
AshuraDX
-
Posts
2,319 -
Joined
-
Last visited
Content Type
News Articles
Tutorials
Forums
Downloads
Everything posted by AshuraDX
-
@Artemis Ah, you're using Pandes Brush export script? If you want a trisoup style export you'll have to create a set of offset vertices N Units in negative vertex normal direction. When it comes to the sides of those brushes you should keep in mind that those need to be split into planes/triangles to maintain a convex shape for the entire brush. If you fail to do this properly you will end up with holes in your brush surfaces which is an issue that can be solved with a bit of math. Message me on Discord if you need some pointers here.
-
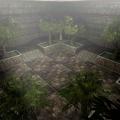
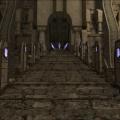
@Artemis A sky shader with multiple suns needs careful balancing in brightness and a fair few suns, just two or three won't really cut it. I used platonic solids as the basis for my lightdomes, first the skybox is converted to a skysphere, then the solid is aligned to the brightes spot on the skysphere with its first vertex. From there the pixel colour of the skyspheres texture is transferred to the solid's vertex colours. Afterwards the brightness values of the vertex colours are normalized and stuck into an exponential expression which yields a factor for the brightness of the sun/light "born" from that specific vertex. This can give very nice results depending on the solid used (which directly correlates to the number of suns/lights) and the skybox textures themselves as well as the exponential expression and chosen max light value. I'd suggest using at least 8 bounces and losing the minlight value as that once again washes out your shadows. It shortens your range of brightness by offsetting your black point towards gray. Which helps if your goal is to make everything a playable brightness, but is guaranteed to kill the believability of your lighting since areas that should be unlit will have some mysterious brightness to them. I can not remember what -dark did exactly, but I've seen those kind of lighting glitches on terrain without using -dark. Interestingly I didn't see that type of glitch on brushes until now, only on models and patches. If you want to try a brush based version of that terrain let me know and I'll run it through Q3ME for you.
-
@ArtemisI'd avoid using ambient light, it adds light on a global level which kills your option of having dedicated dark areas on the map. Try increasing the light bounces in the compiler and try to come up with some neat lightsources for the interior. It will most certainly look even better with believeable light. EDIT: this might be a good use case for a script I made a while ago. The script takes a skybox shader as input, calculates multiple shader suns based on the sky color and spits out a light dome kind of shader that illuminates from all sides with varying lightstrengths and colors. It was inspired by a script a quake 3 Mapper made for one of his maps in Maya: http://lunaran.com/page.php?id=218
-
@Archangel35757 @Stryker I would not use any sort of ffd in max either, I'd create a new keyframe, pose the skeleton to match the model, quickly weight the model to the now posed skeleton, reverse the slider on the timeline back to the original position then freeze the current vertex positions on the mesh and delete the keyframe. This should give you a perfectly posed model for weighting.
-
Couldn't find it anymore - sorry!
-
I made something like that a few years ago. I'll see if I can find it when I'm home from work later.
-
Hey, The height of a model is not changed by altering the glm file. Doing so will in fact break animations for the adapted model. The Proper way of changing a model's height depends on whether you want to commit that change for multi player or for single player. For single player you should look into npc files, which can be edited with any text editor. For multi player it's a bit more complicated, I think it's only possible with JA+/JA++ and some other larger modifications to the game. Regardless of that, if you do want to edit a glm file in Blender you will need to download the glm plugins for Blender, which you can find in the files section right here: https://jkhub.org/search/?q=Blender&type=downloads_file You will need to pick the proper plugin version for your Blender version.
-
@Noodle on mobile there's a button to insert media below the editor. No idea where it is on PC but I'd assume it's in about the same spot Just use that to place your images.
-
[WIP] Q3ME: a 3ds Max Level Design Plugin
AshuraDX replied to AshuraDX's topic in WIPs, Teasers & Releases
Sadly I haven't gotten more than a couple days in a row off since beginning of 2019, not counting holidays I spent with my Family. I'll need a bit of freetime to compile some proper documentation for the core features before I feel content with releaseing it. Just have too much going on in RL atm to do so. -
Make sure that you are using the proper Plugin Version for your Blender version: https://jkhub.org/profile/848-cagelight/content/?type=downloads_file
-
I think there was another tutorial that focuses around playermodels, but I might be wrong. There is also Maui's Tutorial for frankensteining - which covers getting a model ingame after assembling it. That's not quite what the multiple Materials thing means. It means that you can not have more than 1 material per mesh/polygroup. So while you can have a material per mesh, eg. the head, torso and legs could each use their own material, you can not apply two different Materials to a single mesh without splitting that mesh in two or more pieces, depending on the number of intended Materials. Since I'm not a Blender User I'm afraid I can not help with that, I will however ping people that should be able to help, And hopefully not summon their wrath: @Cagelight @SomaZ @swegmaster
-
Most people nowadays use blender to create and get models into the game. From what I have seen >90% of them are only kitbashing/Frankensteining to create mixmatched models out of of parts from existing models with little to no custom modeling work. Some of us oldies use 3ds max (like me) or softimage ModTool. I think there is a rigging tutorial for blender written by mrwonko, bundled with his original release of the blender plugin suite that Cagelight updated. The filetype you need to export your work to is *.glm
-
By editing the text in the quote. It's that simple ?
-
Not a bad idea on paper, and it will look great as long as the player is standing/walking on level ground, but walking on inclines and performing flips are bound to look ridiculous ?
-
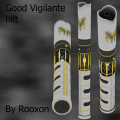
I made one nearly a decade ago: https://jkhub.org/files/file/671-assassins-creed-weaponspack/ It replaces the blaster pistol.
-
Only thing I did with icarus in MP is applying rof animations to stuff. There's this map that does a bit more though: https://mrwonko.de/jk3files/Jedi Academy/Maps/Duel/106205/
-
-
-
-
-
-
-
-
-
Which plugin that is now available?
