Milamber
-
Posts
261 -
Joined
-
Last visited
5 Followers

Recent Profile Visitors
5,832 profile views

.thumb.jpg.3cb63036d5c05cf2ffe3d67818369867.jpg)
Milamber's Achievements
")
Community Regular (4/10)
-
 Rare
Rare
-
 Rare
Rare
Recent Badges
-
So g_smoothClients 1 will make the game code try to extrapolate position of entities after clients have done their prediction. However 2 things seem to be wrong here, 1 it's also hardcoded to a sv_fps of 20, and even on jampded setting g_smoothClients 1 causes laggy updates. So I'm not sure if this code has ever worked as intended. I'll be pushing a fix to the npc think code to OJK that solves the hardcoded reliance on 20 fps, I'll do this for g_smoothClients 1 extrapolation as well but it doesn't seem to fix it fully. However, this fix when combined with disabling g_smoothclients 0, causes smooth movements for npcs and players if the client code has unmodified prediction code. So for JoF's EJK client I'll be pushing a new version that resets some of the legacy code we inherited from EJK where attempts were made at improving prediction, setting it back to if not identical to original prediction code, then very close to it. That being said there's a lot of other things that are hardcoded to be at 20 fps, like how dismembered limbs update, I was not planning on bothering to fix these as of now. If you got any other questions for me feel free to reach out on discord too
-
A skinning guide containing a simple recolor as an example. And pretty much everything explained as I come across it in the tutorial. (Silly banner time! It's kind of ugly...) This tutorial will cover the process of taking a model with an existing texture, applying a new/altered texture to the model, and saving it in a way so that it doesn't overwrite any existing models/skins. (I am using Windows 7 on this tutorial) Needed Programs: - Photoshop (Any image editing program will do, even paint, but I will be using photoshop CS3 for this tutorial). Update: Since I wrote this tutorial I've upgraded to photoshop CS5, everything is still doable though. - Winrar (A lot of other people use packscape, but I've always used winrar and will stick to it in this tutorial). - Notepad/Wordpad(Any text editor). - Modview (Optional). First of all, you need to have an idea of what you want to make. For the simplicity of this tutorial I will only work with a simple recolor skin. A recolor skin is the simplest way of doing a custom skin. This involves taking the existing textures for the model into an image editor, and then change some of the colors without adding or removing any detail. This tutorial can be used by people who want to make new detail as well. Where as I just do recolors, you just have to add the new detail you want to the textures, or completely redo them. Step 1, Extracting the desired model: Now, at this point you know what kind of skin you want, and you have found a model that has the appropriate geometry (shape, body type, cloth type) that you want. For this tutorial, lets say you want to edit the Tusken Raider. To find the model and it's textures we need to go to our Gamedata/Base folder of your Jedi Academy installation. This is usually found under C:/Program Files (x86)/Lucasarts/Jedi Knight Jedi Academy/Gamedata/Base. Inside our base folder you will need to find the assets1.pk3 file. Open this using Winrar (pk3 is an archive format that winrar can open). It will show you something like this: You will need to navigate through the folders: models -> players -> tusken. Here you will have to select the entire folder named tusken, copy it, and paste it somewhere you want to save the work files of your skin. Now you have the model you want to edit extracted with all it's associated texture files. Step 2, Setting up the skin: People do this in different orders, I don't always do it the same order myself, but you can fix all the naming and paths of the skin before you start editing it. We'll do that now for this tutorial. Lets name our skin "tusken_edit", we then create 2 new folders, 1 named "models", and 1 named "players". We then move the tusken_edit folder into the players folder, and then the players folder into the models folder: As a result we will now have the path: "models/players/tusken_edit". We will use this setup to directly create the .pk3 file that will go in your base folder later. We then move inside the folders and into the tusken_edit folder. This is what we'll see: The files that I have marked with a red X are the files we want to remove from the folder, we do not need them. But I will explain why: animevents.cfg is a file used by the game to add a sound to an animation. This is one of the ways the game handles sound events, since the sound is supposed to play when the tusken is howling, they added a script to hook it directly to the animation. And before you start thinking: Hey maybe I can get sounds that play when I press attack or something ingame. I have to say that sadly this does not work, it is not supported by multiplayer and what you'll end up with is either nothing, or a sound that plays whenever ANY character does the animation (I will not say this 100 percent certain because I'm not done exploring it, just haven't had the time to do continue with it, but so far it's a dead end). I have removed all the textures named blue or red, because these are used by the team colors for the skin, and I don't need them to make my own team colors. I will show you how to add team support to your skins as well. The parts we have kept are: body.jpg, face.jpg, hands.jpg, head.jpg, model.glm, model_default.skin, pockets.jpg and sounds.cfg. All the jpg files are the textures we're going to be editing. This is where all the skinning magic happens. The model.glm is the actual model of the skin, without this one here, the textures will have nowhere to place themselves. The sound.cfg chooses which sounds the model uses, and what gender it is. Now, once we have removed all the stuff we don't need, you should have a folder that looks like this: What we want to do now, is open the model_default.skin file, using wordpad/notepad. Inside the model_default.skin we press ctrl+H, this opens the Replace dialogue. In the top one we type /tusken/, and in the bottom one we type /tusken_edit/. This renames all the parts where tusken is mentioned in the skin, with the new skin name, tusken_edit. The reason we add "/***/" is a habit I have learned that is quite handy. Some skins have textures named the same as the model, as an example the body of the tusken could have been named tusken_body. And in the model_default you can see that the textures are listed as well. So to prevent these texture names to be overwritten as well, we make sure to only affect the part we want by adding the "/" before and after the names. After you have replaced all the names correctly it is good to look over to make sure all the names really have changed. Keep in mind that the part talking about stormtroopers should remain the way they are. Because this is referring to the caps of the model, the textures used when an arm is cut off etc, if you want your own cut off limbs to have a special flesh texture inside the cut surface, you can rename these and make your own, but I won't be showing that in this tutorial. It's also nice to notice that on the reborn for example, the mouth and eyes textures are taken from the imperial skin, so even if you rename the /reborn/ parts, there's still a /imperial/ part remaining that you'll have to change as well if you want to use your own eyes and mouth texture. Now let's take a look at the first line to get an understanding of what this is: hips,models/players/tusken/body.tga This line is telling the game that the model part, named "hips", should use the texture located in the models/players/tusken/ folder. And the specific texture is the "body.tga". Now don't be alarmed by it saying .tga there, it's still using the .jpg file you have in the folder. This is just the standard used by Jedi Academy for some reason. If you want, you can turn parts of the model off inside this file. You do so by instead giving it a path to a texture, you type "*off" like so: hips,*off This will turn off the hips piece of the model, so that they won't even be seen when you use seeing force power ingame. (The model needs at least 1 visible piece, so making a completely invisible skin by only turning the pieces off will not work) Once we have changed all the names to tusken_edit, we save the file and close it. If we were to make the models folder containing all these files into a .zip with winrar now, and then rename it to .pk3. This skin would now function ingame under the name tusken_edit, and would not overwrite the existing tusken. It would just be identical cause we haven't done anything to it yet. Step 3, Texturing: Now everything is ready for us to start making our skin unique. We select the body.jpg, right click it, and select "open with photoshop". Or you can open photoshop first and then locate the body.jpg from there. You'll end up with something like this: Now, I will not go through details on how to operate photoshop, you can find tutorials for this elsewhere, but I will show you what tools to use to make a quick recolor. Part 1: Create a new layer, double click the name part of it and rename it so you can keep track of what it is. Part 2: 1. Select a color by double clicking the color squares and picking a color with the mouse and sliders. 2. Select the paint bucket (shortcut G) and then left click the texture. 3. Go to the layer option and scroll down to the Color setting. Part 3: Now we've gotten a new color! But it's all over and covering everything. I didn't want to color the belts etc, so lets do something about that. 1. Select the lasso tool (L), but press down the button so you can select the lasso tool that's showing sharp corners, this is the point to point lasso tool, experiment with it to see what it does. Make sure feather is set to 0 % 2. Select the parts you don't want to have the pink color to it. 3. While having the color1 layer selected press delete. This will remove the color from those parts. Tip: When using the lasso tool you have to close the selection by returning to the starting point you made. After you've done this you can start selecting more again by holding the Shift key as you place a new point, this will make it so your old selection doesn't go away. At the end you should have something that looks like this: Part 4: Now lets try adding another color, to see how this is done. Now I can either do the exact same process again, or if I want to color the stuff I didn't color before, I can use my color1 layer to color the other parts quickly. 1. Create a new layer again, and rename it to color2 2. "Ctrl + Left Click" on the color1 IMAGE to select everything that is on that layer, it will show you a silhouette in the viewport. 3. Press "Shift + Ctrl + I" to INVERT the selection, this will now select everything the color1 layer doesn't affect. Which is the parts we want (Or you can go on Select in the top menu then press Inverse). 4. While having the color2 layer selected, pick a color again, left click on the viewport with the paint bucket selected, and set the layer to color again. I picked black. Now repeat part 1-4 on the other .jpgs in the folder. Step 5, Modview (Extra): Now once you have done that, let's go take a look at it in modview. 1. To setup modview. You take the modview.exe and place it somewhere, personally I placed it in my base folder. (probably not the best place, another path would be creating C:/base and putting it here) 2. Then you need to create the folder setup: models/players inside the base folder. so you can go inside the players folder as far as: "gamedata/base/models/players". Inside this folder you need to place the _humanoid folder, found in the assets1.pk3, follow the steps from step 1 to find it. This folder contains the animations for the player model in Jedi Academy, modview needs it to function properly (You can place modview anywhere, as long as the models/players/_humanoid folder is placed next to it). 3. Once this is done you take the tusken_edit folder, not the "models/players/tusken_edit" folder, just the tusken_edit folder. And place it inside the "gamedata/base/models/players" folder, besides the _humanoid folder.(or "C:/base/models/players" if you chose to use that path) Once you have done this, start modview.exe from your base folder. 4. Press File -> Open, Navigate to the "gamedata/base/models/players/tusken_edit" folder (you can copy the path directly into the text bar to go there fast). select the model.glm inside the folder and press open. When the dialogue shows up just press either yes or no, I have never seen this warning do anything at all, I usually press no though. 5. Now you can view your model in 3d space without making the pk3 file, and without having to go ingame (shaders do not work in modview, so if you want to test a shader you have to go ingame). Modview tips: 1. Navigation: Left click drag to rotate, Right click drag to zoom in and out, Alt + Left Click drag to change focus point. 2. Press the button marked "Tex" to reload textures, if you place updated textures in the "gamedata/base/models/players/tusken_edit" folder you can refresh these without having to restart modview/reload the model. 3. In the navigation bar on the left you can open the "Sequences" to scroll through animations, this is useful for taking screenshots of the model in a particular pose, experiment with the "play, frame by frame, pause" buttons to figure out how to cycle through an animation. (Double click an anim in the sequence list to run it) Step 6, Packing the pk3 file: Now we have all the textures altered, we have the model_default.skin file fixed, the folders are correct, and we're all set to go. 1. go to your models folder. The one containing the players/tusken_edit folders. (Not the one used by modview if you did the extra step, the one you started editing with). 2. Right click the models folder and select "Add to Archive" 3. this dialogue will open: Here it's important that you select the archive format to be ZIP, RAR will not work, and set the Archive name to Tusken_Pinky.pk3, it will say .zip at first, but just set it to .pk3 directly. 4. Take the newely created Tusken_Pinky.pk3 and place it in your base folder, Start the game and select it by typing "/model tusken_edit" in the ingame console. Congratulations! Your skin is now in the game! Step 7, Team support and Icons (Extra): 1. To add team support to our skin, all we have to do is copy the model_default.skin, paste it twice, and rename these to model_red.skin, and model_blue.skin. If you want these to look different from the default skin, you'll have to create new textures. So for example you edit the body in photoshop, make it blue or something, save it with the name body_blue.jpg. Open the model_blue.skin file, find the place where it refers to body.tga, rename it to body_blue.tga, save and the blue team will now use the body_blue texture instead. 2. If you want a special hidden skin, like the reborn/boss. You need to create a model_"name".skin, and they will be selectable ingame by doing "/model tusken_edit/name", example: model_boss.skin ---> "/model tusken_edit/boss". 3. To make icons that work in jka, you need to have a picture with pixel size the power of 2. This means 128x128 pixels, 256x256 pixels etc. Do not overdo it on the sizes here. The default size is 128x128, but I have seen people use 256 as well. 4. The special thing about icons is that they need to be saved in a special way to work for jka, you need to go to file -> save for web. And then just save it with the default jpg/jpeg settings. Name it icon_default.jpg, for the blue and red team name it icon_red.jpg and icon_blue.jpg. if you have a special skin like the reborn/boss, you name it icon_boss.jpg, for it to be associated with the /boss. That concludes this very basic skinning tutorial. It's kind of old now so sorry if I missed some corrections now that I looked over it and posted it here. And in general guys, recolored skins is not something that's usually worth submitting to jk3files or similar. You have to have done quite the impressive recolor for it to be something that'd be considered really awesome xD
-
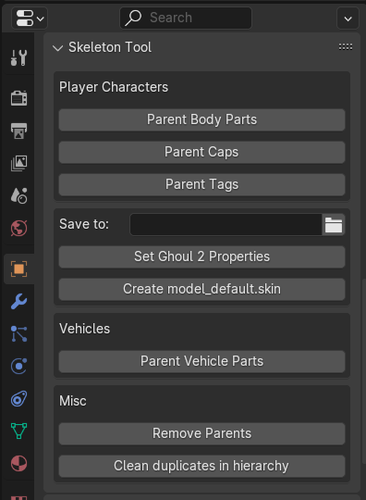
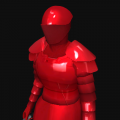
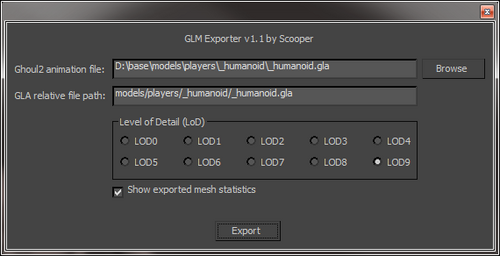
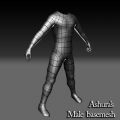
 3ds Max GLM Tutorial Characters, Creatures, Vehicles, Sabers and Weapons This is a tutorial that covers how to use the GLM plugins made by Scooper for creating/editing GLM models for Jedi Academy. As an example I will be showing the process of EDITING existing models. But there's not a big difference in creating them from scratch. Disclaimer: This is not a modeling tutorial, that's something I might make later if people want it, but currently there are tons of tutorials on how to model in 3ds Max out there, so here I'm only focusing on the import and export process. Chapter 1 - Characters explains the process of Importing a Kyle model, editing it, and then exporting it in working condition. Chapter 2 - Creatures and Vehicles explains the differences when importing, editing and exporting creatures and vehicles. Chapter 3 - Sabers and Weapons explains the differences when importing, editing and exporting sabers and weapons. Tools Required: Scooper's GLM importer/exporter. 3ds Max (2010-2016). Winrar/Pakscape (or others) Recommended: Modview Chapter 1 - Characters Importing To import a character model into 3ds Max you first need to extract it from the assets files. For this tutorial we will be using Kyle as an example. I recommend you follow my old skinning tutorial http://jkhub.org/tutorials/article/73-skinning-guide-with-team-supportmodviewicons-explained/ and extract kyle so that you have it ready as a new skin, not one that would overwrite kyle. I'll be assuming you have done that and named it wizard_kyle. Now, once you have the wizard_kyle folder extracted somewhere and done the required edits, you will find the model.glm file located inside. This is the kyle model we want to edit. I suggest renaming it to kyle_model.glm and moving it to a location you want to use for importing .glm files to 3ds max later. This is just so that if you later have a lot of .glm files ready for import you won't be confused as to what is what. I will be assuming you moved it to a different folder and named it kyle_model.glm. Once you have done that, you'll also need to extract the _humanoid.gla file from the _humanoid folder located in the assets1.pk3 models/players/ directory. I recommend moving it to the same folder as the kyle_model.glm Once you have these two you're ready to open 3ds Max (remember to install the GLM Importer and Exporter before opening 3ds Max). In 3ds Max you want to go to file->import then select GLM (*.GLM) type from the 'Files of type' dropdown, and then navigate to the folder where you extracted the kyle_model.glm. Select the glm and click Open. Once you have done this another dialogue will open asking you to locate the .gla file. Again navigate to your folder where you have extracted it, select the _humanoid.gla and click Open. The plugin will ask you if you want to import LODs. The GLM Exporter doesn't currently support LODs, so there's no need to import them, click No here to only import the highest detail level. This will then give you the kyle character fully imported into 3ds Max with the skeleton and the model already skinned(attached) to the bones. Now the model is ready for whatever edits we'd want to make to it. This is also the point in the process we could start making a character model from scratch, all you'd have to do is delete all the model pieces, leaving all the bones and tags. The tags are marked with " * " in the hierarchy if you press H in 3ds Max To create a new model from scratch you'd want to delete everything linked to the stupidtriangle_off that isn't marked with a " * ". (don't delete stupidtraingle_off either. It's a required parent in the hierarchy). IMPORTANT TIP! At this point we can start adding or removing stuff from the model. For this tutorial we'll be giving Kyle a wizard's hat. Here is a quick wizard's hat I made for this tutorial. It has been added as an attachment to this tutorial if you want to use it. To make new pieces work without bugs, there's a few things that has to be in order, and some that are recommended be in order. Required 1. Object Origin For these characters it's required that all the model pieces be located in the center point of the scene, (0,0,0). I suggest using the " Affect Pivot Only " functionality in 3ds Max to do this without moving your model piece. I suggest applying an " xForm modifier " afterwards, to make sure that everything is correct when it comes to position, scale and rotation, and then collapsing the modifier stack. (right click, collapse all on the modifier) 2. Correct Hierarchy All model pieces have to be a part of the hierarchy, or else you'll receive error messages later. With the wizard hat the most sensible place to put it in the hierarchy would be as a child of the head piece. 3. Skinned/Weighted All pieces must be attached to at least 1 bone in the skeleton. This is done by adding a " skin " modifier to the model piece, and then adding the relevant bones to the piece. Since this is a hat, we'll add it to the " cranium " bone. You'll probably be interested in adding something that is supposed to deform with the animations, like a cape or a robe. The process is the same for such pieces, except you add more bones to the bones list. Once you have the bones you want it to attach to, you'll start editing the Envelopes, there are tutorials on how to do that easily available on google as well. Tip: Those are the 3 required actions. Recommended 4. Naming you'll have to add your new model piece to the .skin files of the wizard_kyle, (like the model_default.skin file). So it's recommended you change the name of the model piece beyond the default name given to it by 3ds Max. This makes your .skin files much easier to read. 5. Unwrap UVW and Texturing You should unwrap your model for texturing. This is not required for the export to work, but it's an important step for getting a result that looks remotely decent. Again there are a lot of tutorials on how to do this out there. This is something I recommend is done before attaching it to the skeleton with the skin modifier. Once it is unwrapped you can paint your texture in whatever image editing software you've got available to you, give it a name, for example wizardhat_texture.jpg, and then apply it in the .skin file And then your wizard_kyle will have a textured hat ingame and in modview. 6. Normals The normals decide how the model will be lighted/shaded by the game engine. There are 2 ways of taking control of which the Exporter supports. Is to use the Edit Normals modifier (again this is something you can google for). Is to use the Smoothing Groups (google) while creating the model piece. You only have to do this for the new pieces you add, since the Importer manages to import the glm with proper normals already. You can fix bad edges on the imported model as well though if there are any. Once this is done, your model is ready for export. Export To export, go to file->export and choose GLM (*.GLM) from the dropdown like before. the game requires the .glm files to be named model to work, so name it model. Clicking save will bring up the next dialogue The first line asks you to find the _humanoid.gla file. Click browse and find the one you used for importing the model at the start of the tutorial. The second line tells the model where it will locate it's .gla file. The default models/players/_humanoid/_humanoid.gla that is already written there is correct and you can click export. The only times you want to write something different there is for models that don't use the normal player animations, or you're exporting a weapon, see Chapter 2 and 3 for that. Once you've clicked export you will find the model.GLM saved to the directory you chose. Add the model.GLM you exported to your wizard_kyle, replacing the default one that's left there (unless it's already gone because you named it kyle_model.glm and moved it). Make sure it's the only .glm file in the folder. After having modified the .skin files to include the new wizardhat model piece, and added a texture to the folder. You can go ingame and take a look at your result, or open it in modview and see how it looks. The skinning tutorial mentioned at the start of the tutorial explains how to view the result in modview. Chapter 2 - Creatures and Vehicles For this second chapter I'll be addressing the differences when it comes to using the Importer/Exporter with creatures and vehicles. Disclaimer: This does not cover the process of making fully working npcs or fully working vehicles. I'll make full tutorials on that if I get a lot of requests for it, this just shows how to import and export new glm's ready for being used in completely new creatures/vehicles. Import The difference with creatures/vehicles and character models is mainly which skeleton and animations they use. Unlike with characters, their .gla files are not located in the _humanoid folder. Using the wampa as an example, you'll find that the wampa's files are located in the assets1.pk3 file under the models/players/wampa directory. Inside this folder there's also a wampa.gla file besides the model.glm which we are going to import. These are the files you want to use when importing a creature or a vehicle. So instead of using the _humanoid.gla from the models/players/_humanoid directory, we want to select the wampa.gla when importing the model.glm for the wampa when prompted by the importer plugin. You'll again be asked if you want to import LODs, but like before, we just want to click no here. Once you've reached this far the process is pretty much identical to the character models. From the left: Make sure the added piece is added into the hierarchy logically make sure the center point of the added piece is in (0,0,0) give it a name and add the skin modifier attaching it to the cranium bone. So pretty straight forward, the same as with the character. Export When exporting you want to do the same as with the characters, you export it as model.glm, but when prompted to find the ghoul2 anim file, you select the wampa.gla instead. Also now the " Gla folder path " needs to be changed. This path becomes important because this is how the model.glm for the new wampa finds the .gla file it uses. Since we're not modifying the wampa animations we can point it towards the wampa.gla located in the wampa folder and it should work just fine. Click export and your new wizard hat wampa model.glm is ready. For vehicles the main difference is that they don't have an extensive skeleton. For example with the Tie-fighter there's only one bone called ship which you'd weight the hat to, and the gla is tie_fighter.gla Feel free to PM me if you have any additional questions about creatures and vehicles. Chapter 3 - Sabers and Weapons For sabers and weapons you don't have to worry about any .gla's at all since they don't use any. You can locate sabers and weapons in the assets1.pk3 file under the models/weapons2/ directory. Disclaimer: This does not cover the process of making fully working new sabers or fully working new weapons. I'll make full tutorials on that if I get a lot of requests for it, this just shows how to import and export new glm's ready for being used in completely new sabers/weapons, Also please note that first person view of weapons are md3 files, not glm files and therefore not supported by this tutorial or the plugins made by Scooper. New weapons aren't supported by basejka and the support would have to be modded into your game. I don't know if OpenJK has made this possible or not. But you can modify existing ones with this easily. Import When importing a saber/weapon you select the .glm file, note that with sabers these names are no longer required to be called model.glm, the ext_data/sabers folder in assets1.pk3 contains the .sab files that are used for creating new sabers, and using notepad you can see how you can name your saber .glm pretty much whatever you want. When importing the saber or weapon click cancel when asked for a .gla file, and you'll again be prompted about LODs, as before you want to click no. Here is where some of the major differences from characters, creatures and vehicles come into view. Like before you want to 1. give the model piece a name, and add it to the hierarchy. You don't need to worry about a skin modifier anymore, but you need to have the model piece at (0,0,0) still. If you use the eyedrop tool 2. on the Material Editor (shortcut M) and click the imported model pieces, you'll see that they have materials applied. The texture paths for sabers and weapons in Jedi Academy are stored directly inside the .glm files, and the Importer makes this accessible by applying those paths as materials to the model pieces. on 3. you can see the name of the material, this is the texture path of the model piece this texture is applied to. This means that if you want to give the handle in this image a new path to a new texture, you need to change the path name to your new intended texture location. for me in this tutorial that's here: " models/weapons2/wiz_saber/saber.tga ". Originally the kyle saber would say " models/weapons2/saber/saber.tga " when you import it and use the eyedrop tool. When applying new pieces to a saber, you also need to give it a material with a proper name so that the exporter can apply the texture path. so if you have multiple textures for different model pieces, apply them as separate materials to the model. My top left material is named " models/weapons2/wiz_saber/wizardhat_texture " and is applied to the hat, while the 2nd material is the one previously mentioned and applied to the 2 default kyle saber pieces. Once all the pieces have been given a material, and are correctly placed in the hierarchy etc. We're ready to export. Export When exporting we'll name the .glm whatever we want, and when the exporter dialogue shows up We want to clear the path for the Anim file, since there is no .gla used for sabers and weapons. and in the gla folder path we write *default. Click export and the saber or weapon is ready to be used. Feel free to PM if you have any questions about exporting sabers or weapons. I hope you have enjoyed this tutorial and that it has been helpful, and thank you Scooper for making these plugins.
 -
This tutorial shows you how to create a hologram texture easily in Photoshop for Jedi Academy.
-
 Didn't think you'd release it xD but yeah it's useful so gj ^^
 -
Star Wars Jedi Knight series level editor downloads
Milamber replied to mcmike1489's topic in Jedi Knight General Discussions
@mjt You should make that setup guide for netradiant. -
-
-
-
-
-
-
-

-