

Kualan
-
Posts
1,288 -
Joined
-
Last visited
Content Type
News Articles
Tutorials
Forums
Downloads
Everything posted by Kualan
-
Thank you Peneke, appreciate it. I haven't posted the Patreon here before as I don't think the Hub allows that sort of thing (is that right, @@Circa ?) The donations are collected on a 'per creation' basis so nothing will be taken until I release the big project (the Game Of Thrones mod for Skyrim). Even though I've released individual kitbashes and stuff for JKA in the meantime, it wouldn't feel right to me to claim them as 'creations' and take a round of donations every time one of them is done since they only take a few hours' work each compared to the (literally) hundreds upon hundreds of hours invested in the GoT Skyrim mod.
-
Hey folks, I wonder if one of our 3D modelers would take up the challenge of bringing Grand Moff Tarkin into Jedi Academy? With the recent release of Rogue One, a lot of us are looking back at the original 1977 Star Wars film and one of the few elements from that movie that has yet to be properly realized in JKA is Peter Cushing's villainous Grand Moff. Years ago, Hapslash had a model in progress but, alas, it never emerged and its creator has long since been lost to the void (pun intended). Perhaps someone else might consider taking it up? I'm happy to lend assistance in the form of texture work on the finished product. A few reference pics to help get started: I hope someone considers taking up this request - you may fire when ready!
-
Version 1.0
3,387 downloads
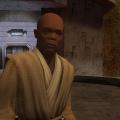
This is a player model (with NPC support) of the Jedi Master Mace Windu. To install the model, simply extract the zzzWinduK PK3 to the gamedata/base folder of your Jedi Academy directory. In-game, an allied NPC can be spawned with the following console commands: 'npc spawn MaceWinduK' - spawns a robed Mace Windu NPC 'npc spawn MaceWinduKBattle' - spawns a combat-ready Mace Windu NPC- 16 comments
- 18 reviews
-
- 1
-

-
- NPC Support
- Jedi
- (and 3 more)
-
Hm, I can't say any of the current HS Imperial heads look particularly like Krennic to be honest.
-
Looking really good, will keep an eye on this as it develops.
-
Had to scratch the itch since that last post, so here we go:
-
If you're genuinely interested, this is the mod in question: http://www.moddb.com/mods/the-game-of-thrones-adaptation-mod-for-skyrim Not going to lie though, seeing Rogue One has kind of re-ignited my Star Wars enthusiasm at the moment so I may be able to fit a kitbash or two in before returning to Skyrim.
-
I just checked - I was thinking of the one by DarthStiv on ModDB, but it doesn't have Lieutenant Grenn in with his TSF uniform, just as a head variant for the 'elder male' Jedi. http://www.moddb.com/games/star-wars-jedi-academy/addons/kotorpack
-
I think he's in the expanded KOTOR pack that's floating around the 'net (not the one that gets shared most often).
-
I don't have much free time these days, as I've started a new job and what little free time I have I tend to spend on my upcoming Skyrim mod.
-

My own two personal projects....
Kualan replied to TheWhitePhoenix's topic in WIPs, Teasers & Releases
I watched the opening scene before I had to rush off - I like the opening camera work (slightly steadier would have made it perfect, but I don't think it's possible to do anything other than free-roam with the mouse in JKA anyway so not a big deal). My one complaint from the opening scene is that the lighting needs to be better. I can barely see the characters! Also - have you considered uploading to YouTube for higher resolution? -
Wow, really REALLY nice work there Jeff. Great stuff.
-
Those aren't links, heh. Try creating an account on https://www.dropbox.com/ and uploading the files there, then you can post the link here.
-
It might be possible to optimise the models. Is there a link to them? I can have a look - not making any promises though.
-
 Very nice. Psyk0 always delivers.
 -
Which error? The Ghoul2 one? Have you tried running the game with OpenJK?
-
Trying to add something to a model with Blender
Kualan replied to ShenLong Kazama's topic in Modding Assistance
I wouldn't recommend merging hands/arms together, but to merge two meshes you select them with SHIFT+click and then press CTRL+J. If memory serves, whatever is the last mesh you selected will be the one whose name/details the merged object adopts. -
Pity, couldn't think of a good enough idea in time. Looking forward to going through folks' submissions though!
-
Aye, slightly delayed, partly due to some rewrites and partly due to RL swallowing up my time. It's on its way though!
-
I really like the map as I said before, but I also think the machinima video is a very faithful recreation of the scene from the TV series produced with the JKA engine. Great work!
-
But...why? That would literally just make it like @@Jeff 's : https://jkhub.org/files/file/1746-bultar-swan/
-
What's the difference between that and @@Jeff 's version?
-
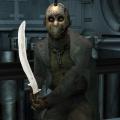
Very nice. I think taking some artistic license with the design is a good move - being able to incorporate more Gamorrean and Kowakian features into the final product makes them more consistent with how they're described over how they actually looked.
-
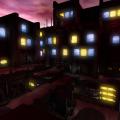 Very cool-looking map, well done!
 -
Cool - are there any models/characters you need that don't currently exist for JKA?