
Ruxith
-
Posts
263 -
Joined
-
Last visited
Content Type
News Articles
Tutorials
Forums
Downloads
Everything posted by Ruxith
-
Talon update: model parts for the limb armour pieces and chestplate, instead of textures only. Next is to re-do the tattoo markings, then tweak some clothing textures and we're nearly there!
-
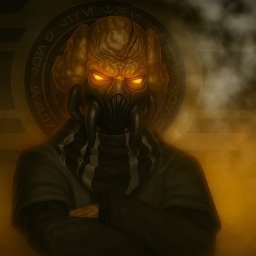
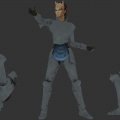
Remember this guy? I know it's bad, it has floating objects, it has gaps, he's standing on his feet weirdly.. but it's exciting for me to think it was a model I couldn't get to export years ago, and this time around it worked first time ? This model acted as practise for me back then with weighing a model, and now that I know I can export it and see how it functions in-game, I'm going to try and go back and re-weigh it again to fix these issues! Darth Talon's still coming too, will show progress once i've finished up the stage i'm currently at so I have something to show!
-
So my next plan was to post the Darth Talon that I uploaded, but then I saw where I left it.. I had a new head planned that never got to finish up. Version 2 incoming!
-
(Yes this has already been released, but I just wanted to put everything I've made into one place. once i've posted the released ones i'll start showing somw work in progress and release some of my old ones!) Now for Athena's reskin of Milamber's Chaosknight. This was a personal skin for a member of |EFF|, an adaptation to Milamber's model with tribal patterns and glowing eyes... All the good stuff! When the JKGalaxies files were made publicly available and Pande made a topic about it, I had a look through them and found some cool looking female heads. We were initially going to go with a hair piece from it too, but it was very fiddly when it came to weighting and the appearance in-game with what's achievable via shaders, so Milamber worked with us and re-vamped the jedi_hf hairstyle to give a better looking ponytail and put it onto the JKG head.The three of us were always a good team! (just not on GTA, Mil sucks ?) Any issues with the ponytail are unavoidable due to the transparency, it's as good as it's going to get with shaders. Besides that there shouldn't be any issues with the skin, apart from it being 20mb for one option with team skins lol.. I might reduce the quality at some point to lower the filesize. Download:
-
Glad you're liking the action figure promo picture! I based it off of the physical star wars action figure packaging when I designed it a few years ago, had the intention to do all of this back then just got burnt out ? I'll probably tweak it slightly so the player model is bigger.. use my "artistic license" to adapt it to suit this purpose more! Gonna post some of my released skins then show you the next one i'll be working on finishing up. Anyone remember this teaser?
-
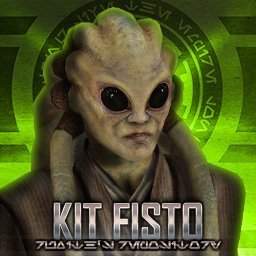
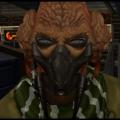
Let's start things off with the Nautolan species skinpack I released the other day. Here we have the infamous Kit Fisto, with some skin variants - a sith version, a reskin by Omicron and an RGB version. Sounds, custom icons and shaders are included. The weights aren't perfect, unfortunately I haven't put any time into fixing them yet, but they work for now. Download: Icons:
-
About time I joined the bandwagon of topics where we post all our fancy mods, now that I've delved back into my Jedi Academy folders; a hole I didn't want to return to as it's a huge mess of files accumulated over the years ? Anything shared to download in this topic will be either what I've created over the years, or any ported models / "unreleased" files I have found from other creators, which I feel might be better shared than kept to myself (of course if I am asked to delete anything by them then I will be happy to do so for respect of them). Anything created by me will be dealt with as if it were an uploaded release on the Hub, with credits, promo pictures etc. If anyone gets missed in the credits please drop me a PM and I will add you to the files, I never want to claim anything is done by me that isn't. All releases posted will be added to this post (the first one), and also provide a link to a folder containing everything released up to date once set up. Some files may be updated once released, and I'd love to collaborate with improving anything which gets posted/projects you may be working on! It's worth noting that I don't expect people to ask permission to use or modify any of my creations, but please include me in your credits, be respectful to the original authors. Released files: Prequesite files: Species MENUS.str file
-
Version 2.0
2,353 downloads
V1.0 I finally got around to releasing what I kept teasing all those years ago I know a similar model has already been submitted within the community, but I'd still like to release my version! The weights aren't perfect, and the tendrils can be a bit funky at times with some animations, but hey it's Kit Fisto, such a cool looking character in the Star Wars universe (in the video games and the clone wars animated series at least!). So this features an RGB version (did you expect any less of me?! ), sith version, reskin by Omicron, custom icons, sounds, shaders. This may be improved in the future, but just glad to finally be able to finish up what I started! Please view the credits and readme file within the folder when you download this. I'm more than happy for anyone to improve on this model so we can upload a 2.0, and any new variants would be cool. V2.0 Versions 2.0 has arrived!.. to finally include a shirtless version using Scerendo's Quinlan Vos model, I've been wanting to make this variation for literally years! I have also made some tweaks to the weights and re-done some of the textures, to give Kit Fisto a more "full of life" skin tone as the original was looking a little dull. New shaders have been applied to give more vibrance to the skin. Full breakdown of changes is in the readme, I hope you enjoy the update! I actually released this last year in a clan I'm in and forgot to post it on here ---------------------------------------------------------------------- Credits: ---------------------------------------------------------------------- - The Force Unleashed for the Kit Fisto model - SW:The Old Republic for the mask model - Sazen/Cloud for the original kitbash of the model he did for me and the weighing. - Scerendo for the Quinlan Vos model, for the shirtless variant - Spanki for the robed models used, and anyone who I have used their retextured images for this project (sorry if you weren't mentioned!) - Noodle for the advice since bringing this project back from the dead, and creating mouth/face animations for the model - Tompa9 for his version of the model, which has provided me with a sounds pack, and a segment to place behind the head to hide any unwanted gaps, it doesn't fit perfect for my version of the head, but very useful nonetheless. - Omicron for the continued advice and for producing a skin variant for the release - Milamber for the continual support with getting my head around frankensteining and 3D modelling over the years, and keeping up with my nagging! - Xishala for the eye textures from the female nautolan model, I have added a shader to this after implementing the texture onto Kit Fisto's eyes- 20 comments
- 5 reviews
-
- 12
-

-
- sith
- star wars related
- (and 3 more)
-
Kit Fisto - Reskin collaboration project maybe?
Ruxith replied to Ruxith's topic in WIPs, Teasers & Releases
? -
-
-
-
-

-
-
What, this old thing? Found it on my external hard drive
-
This will explain how to find those hidden textures in the .pngs of JKA's mysterious skin files the proper way; not using paint to save them or gimp which never worked for me. I've had a lot of issues when I was learning the in's and out's of creating a functional RGB texture. The biggest problem was finding the hidden textures in png's from the base textures, most of the online help suggests simply re-saving the image in paint, or opening it up in GIMP. Neither of these worked for me, and there was literally no help online for it in regards to Photoshop. So I did some researching and this was the solution, I hope that it helps you as much as it has for me. Finding hidden textures Open Assets1.pk3 in pakscape, this can be found from within your game's install directory within the base folder. Once found, open up the following set of folders/sub folders to navigate through to your desired skin folder: Models / Players / (CHOOSE A FOLDER) Drag this folder into a location on your computer. For ease of use with Modview in the future when making skins I create a "base" folder on my computer and mimic the same sub folders shown in the assets file; this is a requirement for viewing models in Modview so will be handy in the future for testing out your skins before you test them in-game! Once you have dragged one of the folders out of pakscape, open it up and drag in the PNG file with RGB/transparency into Adobe Photoshop that you wish to modify. Click layer from the top menu, then layer mask - from transparency. You will notice that now the layer in the layer panel has been assigned a mask. All you need to do now is disable the mask (right click the layer's mask preview in the layer panel > delete layer mask), and you will then be given the big reveal of what the hidden texture looks like! For editing purposes I duplicate the layer first, then do this process on one of the layers so that I have one layer showing the complete texture to work from, and a secondary layer as a backup so I can easily re-save my own edit of the hidden texture for future RGB goodness! Creating your own hidden textures Open the texture that you have created that you would like to be made RGB compatible into Adobe Photoshop. Once you have done this, you will need to create a designated area that you want to have the effect of RGB in-game. For ease of use when learning this I would suggest using an existing base game model as explained in the previous step, so that you have a template to easily re-create RGB textures, but once you get the hang of it this can easily be applied to ANY model's texture! If you have lots of layers, then I would suggest doing what I have done in the screenshot and grouping them all into a folder in the layers panel, then create a new layer and select: "Image" - Apply image from the top menu. This will create a single layer image of all of your active layers. Once this has been done, create one more layer where you create a solid colour fill of the area that you want to apply the RGB to, then hide this layer. This can be in any colour as you will just be using it to quickly select a designated area for a transparency mask while hidden from visibility). I would suggest creating a low saturated/monochrome texture for the RGB area so that you get the best results in-game when playing with the colour sliders. You will notice that the base skins use a low saturated texture, as this creates an interesting default colour, but allows full availability on colour selection; if you chose a bold, highly saturated colour texture to be RGB'd, it wouldn't give you the full spectrum of colours to choose from in-game. Always imagine your RGB texture as a bucket of paint, if you start with a dark/strong colour, there's little you can do to change it, but if you start with a light colour/white, you can easily make any colour of your choice! Now you are ready to create an RGB-ready texture in the next step. With all layers hidden except from the layer we "applied image" on to save all active texture layers into one, hold CTRL on the keyboard and click onto the "RGB filled area" layer from the layer panel in the little square preview box next to the name of the layer, this will create a marquee tool/marching ants effect around the area we want to add RGB to. Then click "Layer" from the top menu, and click "Layer mask - Hide selection". This will then create a layer mask to the image, where the RGB area is hidden from view unless you view in Modview/In-Game or open and repeat the process at the top of this tutorial. All you need to do is save it as a PNG and then it can be used for your own RGB skin. If you haven't done so already, remember to use the same shader data/modify it if you want to add any additional effects such as specular/glow etc from the base game, and alter to match the texture path for your newly created one: I hope this tutorial helps, I know it's something minor but it has helped me greatly as this was never explained or shown in any tutorials. It always bugged me not being able to find where these mystery textures were hiding!
-
Kinda wish sometimes I didn't get bored of the game; I guess after 8ish years I had to take a proper break eventually lol. I didn't like how his arms looked with the ported head model, ingame it made him look very skinny because he had a larger head (when proportional to the jedi_hm heads for eyes/mouth).
-
I had the same issue with Modview, I posted months ago and no one replied/helped. Not sure how it started, I think it was when I installed windows 8/10. I never found the route of the problem, but downloading Xycaleth's modview was the workaround for me and wasn't really an issue for me anymore as I had an alternative.
-
Player Model Request: Fallout New Vegas NCR Veteren Armor
Ruxith replied to a topic in Mod Requests & Suggestions
@@Sentra I have everything I'll send you a pm -
Hey! Going to the login screen and clicking "forgot password" usually does the trick so long as you know which email address you used for it, otherwise PM a member of JKHub staff and see what they can do in regards to using your old account.
-
Cool to see this finally getting finished Mandalorian, looks great.
-
Kit Fisto - Reskin collaboration project maybe?
Ruxith replied to Ruxith's topic in WIPs, Teasers & Releases
Yeah i'm still lurking, just took a break from everything JKA; Rocket league and Overwatch started to take up my time besides working and things. I'll try to get him released within the next few weeks, I kept delaying it to do further reskins, but they can just be included in a later update if I find the time. -
The neck issue is because your weights differ to the edge of the neck, on the head's edges that line up to the neck. Different weights - both parts will deform differently.
-
Look in the PK3 and figure out how RGB works, then try it on the textures of the jetpack and see if it changes the colour when you change the "char_color_red xxx" etc for the player skin