

Psyk0Sith
-
Posts
790 -
Joined
-
Last visited
Content Type
News Articles
Tutorials
Forums
Downloads
Everything posted by Psyk0Sith
-
I'm typing to people who "think they are superior" because they have the most recent / expensive PC, not you . Like i said, they need to get a life. I'm working on a 10 year old PC with upgraded parts and it's still powerful enough so who cares.
-
Funny, this game can be played and modded fine on processing power from 2002-2004! If you think of yourself as some kind of computer elitist because you have more processing power, you should really take a look at your life priorities. Also why aren't you making mods left and right with that expensive hardware? Probably because it has nothing to do with expensive PC parts!
-
 2 weeks to a month.
 -
 I don't remember being asked about the cape but it does add to his character.
- 22 comments
-
- 1
-

-
- Star Wars Related
- Alien
- (and 5 more)
-
Bespin Cloud City Vader SP Mission - WIP
Psyk0Sith replied to Langerd's topic in WIPs, Teasers & Releases
Sure you do! -
Proportions for a Dwarf wouldn't be 100% accurate, the best you can get is something along the lines of Yoda for single player. You can kiss multi player goodbye unless you want to run around as a giant Dwarf.
-
No progress has been done on LODs and whatever else is missing, so no plans to release it for now.
-
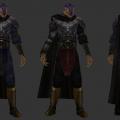
The Elder Scrolls V: Skyrim Daedric Armor
Psyk0Sith replied to Daedra's topic in WIPs, Teasers & Releases
It actually is quite easy to get into JA's pose. I know because i took a stab at it and it took around 5 minutes to setup around the skeleton. -
That wasn't me being angry I was giving you advice...just saying that the request forum requires a minimum of forum activity for you to start a new thread and that reference images will help whoever wants to do the skin.
-
When you have enough posts done, requests go in this section https://jkhub.org/forum/12-mod-requests-suggestions/ Add images of what you want the skin/model to look like, not a vague description.
-
No, you would only have money for ONE hour of work. It takes time just to adjust the proportions and rotate the limbs in the correct place. That's time wasted before you even start to "attach" the mesh to the skeleton. So anywhere between 1 to 8 hours
-
That's for porting. 20$ an hour (~12 pounds). To be fair however the price would be adjusted, as i've mentioned, there are things that will affect the time it takes. A simple model could take 15 minutes while a nightmare of a mesh could take 8 hours.
-
So essentially that would amount to 21$ CAD an hour. Within that hour, who knows how far i could get...because i have take into account: initial model pose, model complexity, segments + capping and finally LODs. In reality, with best conditions it might take a minimum of 8 hours to do. That's for the player model, not counting the weapons.
-
What are your views on paying for mods?
Psyk0Sith replied to Daedra's topic in General Modding Discussions
How about a patreon approach? Game assets with occasional bonus features like early access, basic workflow and in-depth tutorials. -
DO YE KNOW DA WAE? (Ugandan Knuckles Meme)
Psyk0Sith replied to Daedra's topic in Mod Requests & Suggestions
I know da wey: load a previously rigged character, rig knuckles to the pelvis (or maybe skeleton root if that's possible, not sure) so it doesn't deform. Switch the JA character off in the skin files or keep simple limbs geometry (like 1 triangle per object) and hide them within the model. -
The story of the cavern and SCP Chaos Ops WIP Advances
Psyk0Sith replied to scp_chaos1's topic in WIPs, Teasers & Releases
I hope you fix the left arm in 1st person because it's quite distracting. -
Dog legs can look decent, you just have to set the knee at the appropriate location (centered on the tibia's pivot point) and maybe play with the rest of the leg's alignment so it doesn't look too extreme. Not perfect but not bad either.
-
Need some help - Changing hairstyles for Tompa's Luke (Crait)
Psyk0Sith replied to kibasennin's topic in Modding Assistance
Basics of it...you'll need a 3d app to edit the mesh (reshape it to get rid of the mullet if i understand correctly). Blender or Max can do this because of the .glm / skin weights import abilities.- 1 reply
-
- 1
-
-
If you don't know already how to do it, i strongly suggest you learn how to create AO bakes from a low poly model using Xnormal. It will make your life easier and give you a non destructive workflow that is closer to reality since the shadows won't be random. Source preparation: You can use the heal brush to get rid of unwanted details and some highlights, use image>adjustments>shadow highlights with default settings to neutralize the shading, it will look weird but that's exactly what you want, a flat colored source for the color pass. Another way to get rid of highlights is selecting the bright areas and using an adjustment curve to control the spec intensity (sometimes changing the overlay mode to whatever works best), you can also use the content-aware fill. Layering: When you are done with the fixes and put down the color pass on the texture sheet, add the AO on top (multiply or whatever works best) and adjust the hue of the AO based on mat type. For example, skin shadows are dark red in hue, never black so that's one instance where you could change hue to yellow-ish red, until you get the desired look. You now have coherent base to expand on, you can start adding highlights as well as other details where they belong. Paint areas that need to blend together better, always work at low opacity on separate layers, the idea here is to add to the base and not make it too aggressive. Dodge n burn: You have to be careful with the dodge and burn tools, some apps will do a pretty crappy job with the default settings (photoshop is guilty of this) you can change the behavior by switching the tool's mode (near the strength slider at the top). For highlights i prefer to fill a layer with pure black and set it to color dodge...anything you paint in white in that layer will give you colored highlights, this is where having a tablet is useful because you can vary intensity with pressure (but smudge is still useful here to fade away strong highlights). The other benefit over dodge n burn is that it's non destructive, if something looks off, you just paint over the area in black and start over. Last step is usually adding a levels adjustment to make your texture as bright as possible, if you don't take time to do this your textures won't be balanced properly and display poorly in game.
-
In a nutshell, texturing is a layering process. Absolute beginners will usually "paint" pure colors and call it done, which is actually only the first step. Others will use unaltered photos with some level of success but never really tie everything together (tone mismatch between areas, lack of shadows where they should be and highlights that have no business being there). Always get real life references of what you want to texture. Pretty much everything has specularity (with different intensity depending on the material) so try and understand how light would affect the look of the object in a default lighting source (usually from the top down). For JA it makes sense to use photo sourcing but when you do, you have to remove the conflicting highlights / shadows from your sources. i.e.: when you want to texture a face without a proper 3/4 view you'll get a dirty looking skin if you don't alter/paint the source material. The goal is to blend everything together without it being noticeable. Preview your texture on the model in 100% diffuse because you want to make it look as it should without a game engine's lighting and shading. Don't use black color to shade organic materials, always go for a darker tone of an actual color, pure white can be used in some situations but it needs to contrast with the surrounding areas, if you are painting metal edges, a subtle pure white area can be useful but the rest of the highlighted sharp edge has to be contrasting.
-
This old engine requires old school approach to texturing so don't forget to do some final tweaking in 100% diffuse state (and don't just throw a black / dark blue AO on top and call your shading done). If it looks like cement in zbrush, it will also look like cement in retro game engines.
-
Yes it does, skinning or "skin weights" is a term used for the process of attaching the mesh geometry to the skeleton model. It has nothing to do with texturing, uv mapping or the creation of 2d images.
-
Each bone is in reality a pivot point that acts as an anchor to rotate groups of vertices. So when you weight vertices to a particular bone they will "stick" to it and follow any movement the bone does...similar to real life anatomy.
-
General Grievous model - and coding n animation question
Psyk0Sith replied to Langerd's topic in Mod Requests & Suggestions
No 4 arm version on mine tho. -
level Level 9 - Fuel Station Launch
Psyk0Sith replied to Jedi_Mediator's topic in Dark Forces II Mod
Not sure about budget but some could be made as a big element, as if they were all tied together, so you only make the outline round and the "inside" details will be faked with textures.