

Maui
-
Posts
320 -
Joined
-
Last visited
3 Followers


Recent Profile Visitors
12,865 profile views


Maui's Achievements
")
Rising Star (5/10)
4
Community Answers
-
 Is it possible we could gain access to the source code? That might help alot!
 -
It does work now, I've rewritten the addon and made some changes to it.
-
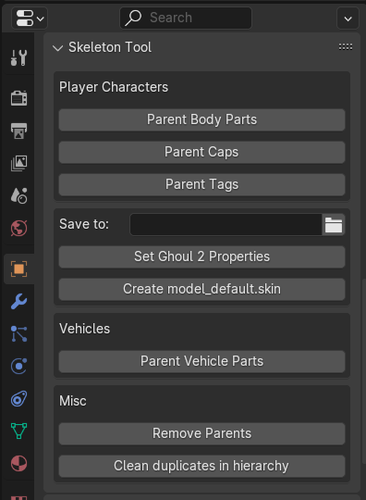 Please visit Github for the latest version of the addon. I will be updating the code almost daily so new features will be added whenever they come to mind. Currently, I added a Delete Empty Vertex Group and Create Tags function. First one is useful when splitting your weighted model into parts, you can use this to iterate through all objects and check which vertex groups has no vertices assigned to it from that particular object. Second one, does exactly as it says. It creates all the tags and stupidtriangle for model_root_0 - you then can use the Parent Tags function to add it to the model_root_0 hierarchy and then Create LODs to duplicate your model_root_0 and reduce level of detail per LOD. Once the addon will get no new functions anymore, I shall create a video on how to use it even though it's self explanatory.
 -

PK3 put inside Base folder isn't being loaded (JKA)
Maui replied to TheFoxTrotte's topic in Modding Assistance
Glad it helped! -
Blender has an fbx plugin so that shouldnt be an issue.
-
A left-handed mouse player ;o Very cool what you're doing!
-
PK3 put inside Base folder isn't being loaded (JKA)
Maui replied to TheFoxTrotte's topic in Modding Assistance
Try the following: Create a .pk3 with Pakscape https://jkhub.org/files/file/89-pakscape/ -
I noticed an issue with stupidtriangle and the _off variant. That will be fixed in the next release. Might upload that later tonight.
-
That would be a fun mod indeed! ;o
-
Katarn model with jacket headsawp request
Maui replied to qball13's topic in Mod Requests & Suggestions
Do you still need help? -
Disable forced saber colors in Team FFA and CTF
Maui replied to Untold Prophecy's topic in Mod Requests & Suggestions
I believe that is hard coded, I havent checked the source code yet. -
Do you still need help?
-
If you're still looking for help, let me know.
-
Why dont you try to learn frankenstein modelling with Blender? Plenty of tutorials (and authors of those tutorials) around.
-
Default Kyle Head on IB Mercenary Outfit.
Maui replied to Starwalker1192's topic in Modding Assistance
If you want to learn how to do these things yourself, hit me up on discord or send me a private message.
