

Linken
-
Posts
839 -
Joined
-
Last visited
Content Type
Profiles
News Articles
Tutorials
Forums
Downloads
Posts posted by Linken
-
-
3 hours ago, mjt said:
@Linken Excellent and indepth tutorial - it would help if we could jump to certain section but I don't know if it can be setup like that in a post - jumping to specific posts yes, but to a specific point within a post?
Anyone got an answer for this? I'd happily implement it to this.
-
So this is going to be a pretty short report, but I hope the following news makes up for it.
OPERATION: KNIGHTFALL
At long last, Knightfall is complete! Yep, you heard that right. It's done!
As of typing this our testers are currently hard at work finding any and all bugs that can be found before we release. In the meantime, my own personal efforts are now shifting toward other things so we can bring forth a complete update.
This mission has truly been a labor of live from many of us on the SWGL team, and after years of waiting, we will finally be able to deliver!
NEXT STEPS
So the next steps going forward before release will include the following, but won't be limited to:
- Upgrade audio in pre-existing missions, currently You Have Become a Rival and The Tragedy of Darth Plagueis will be receiving these upgrades first
- Fix bugs reported in other missions and make other adjustments for continuity. For example, Yaddle will be removed from the final level in Qui-Gon's extended ending for Duel of the Fates.
- Add a whole lotta characters.
There are a few other things I'd like to accomplish but I'm not comfortable sharing right now as I cannot confirm if those things are within my skillset to complete at this time.
This marks the end of the report. If you want to stick around and learn more about what's going to happen with the original mission released back in 2019 and why this remake took so long, you can learn these answers down below.
If you don't want to read anymore, I completely understand and as always I thank you for following the development of Star Wars: Galactic Legacy, and may the Force be with you.
WHAT ABOUT THE ORIGINAL KNIGHTFALL?
Our first ever version of Operation: Knightfall was released on August 12, 2019 and we understand that some people may prefer the original version over the remake, or at the very least may want to still play it.
We completely understand this desire, however for the time being, with the release of this update, Anakin's POV of the original Knightfall level will be made unavailable.
The reason for this is because during production of the remake, many scripts that were used in the original were rewritten and overwrote the original scripts, so for us and our own builds, the mission no longer exists.
However, before releasing and final packaging for the update occurs, I will be taking the current public build of this mod and will extract the original mission and will commence a full refactor of the mission during development of the next update, which should bring about the long-awaited remake of Father vs. Son.
The plan for the original versions of these missions will be for us to create a new category of missions called "Legacy Missions". These will feature archived or outdated missions that we still will allow you to play, but will no longer be supported in any capacity, so all existing bugs and the like will not be addressed.
So to summarize, the remake of Anakin's POV along with the current Clone Trooper and Cin Drallig POVs will be made immediately available in the Knightfall listing, and the original version of Anakin's POV for Knightfall will be re-released with the Father vs. Son remake update as a legacy mission.
WHY DID KNIGHTFALL TAKE SO LONG?
So here comes the opportunity to address the elephant in the room; what took Knightfall so long?
In August 2021, we made the first official announcement that a remake for Operation: Knightfall was in development. Darth Voiid, the man, myth, and legend who created the original wanted to do a remaster for many years, long before we split away from Knights of the Force 2.1.
After the split occurred and several months had passed, Voiid and Lwkill began production on the remake, with the first screenshots being shown in August 2021's progress report.
At that point the mission's foundation was moreorless completed, and as the months went by, more and more developments and progress were made and we were all very excited to have it released.
In the December 2021 progress report, I had mentioned that the mission was undergoing final testing, and then in the February 2022 progress report I mentioned that it and the Deathstar Rescue missions were blocked due to several factors.
As time went on, news about the mission dwindled and eventually became non-existent. 2022 for us was a time of great reflection, as we all realized we had announced so many missions, but had delivered on none of them. A practice which we refuse to repeat going forward.
Though final testing was done on Knightfall as said, what we uncovered was sadly a very buggy mission which was easy to break in multiple instances. Silly things like characters doing idle animations in cutscenes, missing sounds, and some placeholder stuff would've been easily rectified. But on top of this, the mission lacked stability and could not be completed in a single playthrough, which was unacceptable to us and required more work than we thought possible.
Starting in September, things took a turn for the worse as Voiid's own personal life was hit with drama and he lost all desire to work on the mod. As a dear friend of his, I completely understood. In addition to this, my own dedication to the mod was suffering as I was forced to leave the Father vs. Son remake I wanted to make so badly to work months on new menus that the "leader" of KotF 2.1 demanded we change because on the top layer they looked identical despite working in very different (and actually functional) ways.
My own dedication to the mod dwindled and I found myself spending more time playing Red Dead Redemption 2 or really any other game. But eventually those changes were made.
Near the end of 2022, Voiid was still away and I realized at that point how long Knightfall was taking to make. So I made the decision to continue the development on my own and allow Voiid the opportunity to gather himself mentally.
However, my own drama hit when I lost my job in late January 2023 and I was forced to move out of my previous residence. This hit of my own stirred me into a major depression and I lost all want to work on the mod except for very small pockets of time over the past several months.
Though my own personal situation has not improved too much, somehow I was able to find it within me to continue work, eventually working several hours a day to eventually deliver our final product.
This really has been a huge labor of love and a project that all of us on the team are very proud of. Voiid and I are doing a lot better thanks to your support.
Finishing up Knightfall was a very helpful experience for all of us and taught us more and more about the best practices we feel are best moving forward as we create more content.
We hope to move Galactic Legacy along at a better pace than before and we will be making sure to NEVER allow for any mission of ours to take longer than a year (or at least not make you wait longer than a year after we announce).
If you made it this far, then thank you for taking the time to read this stuff. As always, thank you for following the development of Star Wars: Galactic Legacy, and may the Force be with you.
Circa likes this -
5 minutes ago, EvanStreblow said:
Yes, here are my results! I created the cutscene in the tutorial and then created a quick "mission" of sorts. You have to defeat the dark jedi without letting your friend die as well. Then I added a little extra ending cutscene to wrap it all up. I wanted to roll credits (ironically for such a short mission lol) but I couldn't get them to work quite right, haha. Oh well.
That was actually very well done! I'm also very proud you added in an ending. Also with the credits, just treat them as you would any cutscene camera.
I can definitely see you have a willingness to learn and if you'd be interested I'd love to invite you to the Galactic Legacy team. Myself and our other mission makers can train you further to hone your skills.
DM me on here if you're interested.
-
On 5/30/2023 at 6:20 PM, EvanStreblow said:
Thank you so much for the tutorial, I was really having a hard time finding any complete documentation on how to do cutscenes!! It is very well put together and detailed. It was an amazing resource for a beginner like me! I thought cutscenes were going to be almost impossibly difficult, but this tutorial gave me exactly what I needed to get started.
It's my pleasure! I know at first glance this can appear intimidating, but many new things can.
Send me a video of any project you make, I'd love to see it!
EvanStreblow likes this -
Quite an interesting month!
OPERATION: KNIGHTFALL REMAKE
As reported in the previous report, the 3rd gameplay level was said to be done, with only a few minor bugs to take care of. I'm pleased to report that those bugs have been ironed out and I've been able to move on to the next level.
The 4th level is by far the largest level in the entire campaign both in terms of length and location. As of writing this, I'd estimate that about half of the level has been ironed out, with one of the worst bugs present being fixed at last!
There are a few more things to iron out, but I'm hopeful that after this level is completed, Knightfall will be very close to release (for real this time!).

NPC SYSTEM
Literally as I was typing this section of the report I decided to finally program the ability to make any NPC speak any audio file you want. This should be a great tool for machinima makers.
JEDI KNIGHT ENHANCED FIXES
Thanks to the talented people at Jedi Knight: Enhanced, we have been able to implement a number of quality improvements to the mod, primarily for those with Widescreen displays.
Cutscenes from the original game (and Jedi Outcast for that matter) will no longer suffer from the black bars in cutscenes cutting off parts of the cutscene shots and should appear as they did in the original game with minimal difference. Furthermore, text areas will appear more appropriate and the HUD will no longer stretch!
So again a huge thank you to the Jedi Knight: Enhanced team for inventing these fixes.
SOCIAL MEDIA
If anyone has followed us on Facebook or Instagram in the past you might notice that we rarely post on either platform, and we've come to the decision to drop both pages. Facebook was moreorless forced on us as we are flagged for "violating the community guidelines" which was utter BS. Despite efforts to appeal this, they refused to listen.
This, in addition to our utter inactivty on Instagram, has ultimately made us decide to drop Facebook and Instagram completely, and we'll only be available here on JKHub, Discord, Moddb, and YouTube.
CONCLUSION
Knightfall is coming along well and we also implemented a few quality fixes which should've been added a long time ago (but better late than never, right?). I'm hopeful that Knightfall should be completed during June, then we'll focus on adding every character we've announced so far, then we'll have ourselves an update!
This has not been the easiest updateto work on, with these past several months causing me personally multiple cases of burnout, but I am very excited to keep moving forward with this mod and delivering this remake that's been years in the making.
I do want to offer my sincerest apologies to those that have been disappointed with the length of time the Knightfall remake (and Father vs. Son and Deathstar Rescue for that matter) has taken to develop. I hope with the conclusion of this update's development that we will approach announcing new things with more caution instead of forcing you to wait an indeterminate amount of time after we announce something.
Regardless, thank you for following the development of Star Wars: Galactic Legacy, and may the Force be with you.
EvanStreblow and Circa like this -
Finally back to making progress reports again! Yay! Don't ever move my friends, it's very stressful.
OPERATION: KNIGHTFALL
During the course of this month, more work was done on Operation: Knightfall, and the 3rd gameplay level has been completed for the most part, with a few minor bugs to iron out. Despite this, this level should be completed in the near future.
MORE CHARACTERS
And as before I received a pretty sizable number of characters to bring into the mod. The following is a list of new characters I've been suggested recently which will be coming in the next update.
ANCIENT SITH
- Ajunta Pall
- Darth Andeddu
- Lord DramathGALACTIC REPUBLIC
- Sio Bibble
SEPARATIST ALLIANCE
- Sev'rance Tann
REBELLION
- Blue Squadron Pilot
- Luke Skywalker (Pilot) (Updated Model)
- Rodian PilotNEW REPUBLIC
- New Republic Guard
GALACTIC EMPIRE
- Adalric Cessius Brandl
IMPERIAL REMNANT
- Praetorian Guard
OTHER UPDATES
Additional work was done on the code side of the mod as well which should see to the fixing of a few bugs which have plagued the mod (and even the base game for that matter) for a long time.
- The game should no longer crash when loading a save game containing a vehicle which was spawned from the console
- It will be possible to progress through the force power selection menu during the Jedi Academy campaign even if all force powers were maxed out via the "setForceAll" command
- The game will no longer attempt to apply the last skin used when changing characters via the playermodel console command
- Trip mines will now be granted to the player when they're selected in the weapon selection menu during the Jedi Academy campaign.
CONCLUSION
It's been good to return to the mod and we're really looking forward to bringing more stuff to you all. There are of course other things that we're working on but I'm not quite comfortable to show them off just yet.
Thank you for following the development of Star Wars: Galactic Legacy, and may the Force be with you.
PierceDoughty, Lwkill, Circa and 2 others like this -
7 hours ago, NumberWan said:
Even though I didn't know such details, I always felt it would have been nice, if the game could check some global "ifs", so that when Jaden turns to the Dark Side, they have a new skin. Like being corrupted by the Dark Side for example.
The close-up of Jaden's eye while being confronted by Kyle made me think that maybe they considered giving Jaden yellow eyes in that particular instance, would've been cool to see.
Actually some unused code I found did indicate that they planned on having Jaden's saber turn red during those final levels (but obviously that didn't happen).
-
Hey everyone!
So as the title said, there is not going to be a progress report for the month of March. The reason for this is because over the course of this month and February, I have been in the process of moving. There have been other factors which have distracted me from working on this wonderful mod which I'm not comfortable (or permitted) to talk about, but long story short this month has been ridiculous.
With the reality of the move setting in, especially now that as of writing this I will be moving at the end of next week, all gears have been shifted to packing up my home and the mod (and even gaming in general) has been an afterthought.
After the move is completed, I will be back to work in full swing.
To give a quick summary of the progress made this month. The 2nd gameplay level of Operation: Knightfall's remake is completed and both the 1st and 2nd levels are currently undergoing script overhauls which shouldn't take too long.
Lwkill has been hard at work at the long-awaited Escape from Theed mission and Basil Bonehead and I had the opportunity to play the level. We had a lot of fun with this first playthrough and think it's a very well designed representation of the level from the Episode 1 game.
Again, I'm sorry about the lack of a detailed report for this month and I hope the April one will be more exciting.
Also don't forget that our April Fools event will be live for one day on April 1st with a small alteration to Darth Maul's extended ending story with Duel of the Fates!
Again I'm sorry for the lack of report, but life happens.
Thank you for following the development of Star Wars: Galactic Legacy, and may the Force be with you.
TL;DR: Process of moving has made working on the mod difficult and I should be back to normal in April. Knightfall and Escape from Theed are coming along well and both have hit milestones in development.
Circa likes this -
4 hours ago, BobbyDahl said:
I always love updates from you

Thank you! I love writing about them as well!
-
16 hours ago, NumberWan said:
I'm soo glad, you're using new props for the decorations. Many people place Sith statues into Jedi Temples and it looks weird. Well, at least for me. Not just the Korriban color doesn't fit the general design, but such objects unavoidable bring in some aggressive and sinister feel to a place, which is supposed to be peaceful and tranquil.
Even though this is about the Knightfall, one of the darkest hours in Jedi Temple history, it's good to see that the architecture and looks are those of the old Jedi Order.
Thank you! Yeah, Lwkill (our mapper) was very passionate about getting this recreation right. I hope you'll enjoy playing on it!
Basil Bonehead and NumberWan like this -
This month hasn't been the most exciting, but we're still getting closer to our goal!
OPERATION: KNIGHTFALL
Progress continued on the Operation: Knightfall remake. Recently the 2nd gameplay level of the remake has been released to the team for testing. So far initial testing has shown promise, though there are a number of bugs to be ironed out. However, these bus should be fixed very quickly and we can move on to the 3rd gameplay level very soon.
The Operation: Knightfall remake is designed to show off areas of the Jedi Temple never seen before or only hinted at in other novelizations. Though some locations will bring you to familiar areas, other areas of the temple may not be so easily recognizable.
MORE CHARACTERS
We also spent some time this month gathering up more characters for you to play with, here's a small list of them that should be coming to the mod in the next update.
- Narkina V Imperial Officer
- Kino Loy
- Narkina V Prisoner
- Grohto
- Darth Krayt (Updated Model)
- Naboo Guard (Battlefront)
- Hanharr
- 8t88
- Vana Sage
- Skohani Ren
- Eleena Daru
- Kaevee
- Rebel Vanguard
- Rebel Smuggler
As always, we're always looking for new characters, if you have any suggestions, please post the character you'd like to submit along with a link to the character.
COMMUNITY QUESTIONS AND ANSWERS
I'd like to attempt to interact with the community more often, so this month I'll be taking any questions and will answer every single one in the March progress report. If you have any questions for us (or want to ask something silly), please fill out the below Google form.
If we get plenty of questions from the community for next month's report, we'll keep going!
LINK: https://forms.gle/PANTQw8MGBuad8wr5
CONCLUSION
This month hasn't been the most active one as substantial changes have occurred in my personal life which have prevented me or exhausted me to the point where I couldn't work on the mod as much as I'd like to. The month of March will likely be the same with things hopefully settling down by the end of the month.
I will continue my side of development during this time as best as I can, but please understand if the next progress report is lacking in content.
Regardless, thank you for following the development of Star Wars: Galactic Legacy, and may the Force be with you.
DarthValeria, Lazarus, scp_chaos1 and 7 others like this -
-
Hope the first month of 2023 has been good to you all! Let's get started!
OPERATION: KNIGHTFALL REMAKE
Much of the month of January has been focused on ironing out bugs from the initial build of the remade Operation: Knightfall mission. As the original author has been unable to complete this work, I volunteered to finish what he started. As of typing this report, the first of the gameplay levels has been completely ironed out and is at a quality we can deem to be finished.
Production on fixing up the next level has begun, with this level appearing to be the most complex to fix. Primarily we are introducing a small puzzle to the level and one boss fight has to be completely reworked.
SPOILERS FOR TALES OF THE JEDI BELOW
With the recent release of the Tales of the Jedi mini-series, we all learned the ultimate canonical fate for Jedi Master Yaddle (the female of Yoda's species). While Knightfall was in development, Yaddle's fate had not been confirmed, and though she was confirmed to have died between Phantom Menace and Attack of the Clones in Legends, we felt that since Yaddle had no canonical fate that we would use her as a boss fight in Operation: Knightfall's remake. With the release of Tales of the Jedi, we are now having to completely remake the boss battle and use an entirely different character. We mentally prepared ourselves for this, so we will make our adjustments.
After all we don't want people going
END SPOILERS
We suspect that the remaining gameplay levels should be relatively easy to clean up and we're looking forward to bringing this mission to you all after years of promise.
ESCAPE FROM THEED
We've also teased over the past few years another mission which unfortunately has taken us a long time to deliver. Escape from Theed. Inspired by the Episode I video game, players will experience a re-imagining of Qui-Gon Jinn, Obi-Wan Kenobi, and Jar Jar Binks's infiltration in the now-occupied city of Theed. The author, Lwkill, reports that development on this mission is nearing completion. Similar to Operation: Knightfall, Escape From Theed will feature multiple gameplay levels.
NEW CHARACTERS
We have lined up a massive amount of new and updated characters to bring to the mod in the next update.
Below is the current list, please keep in mind that this list is subject to change at any time.
The new characters being added will also bring in two brand new factions to Galactic Legacy; Unaligned Force Users and Zann Consortium. As always, we welcome any additional suggestions for characters.
OLD REPUBLIC
- Havoc Squad Trooper (Updated Model)
- Juhani (Updated Model)
- Kira Carsen (Updated Model)
- Nadia Grell
- Old Republic Pilot
- T7-series Astromech
- Terena Adare
- Vandar Tokare (Updated Model)
- Zez Kai EllRECONSTITUTED SITH EMPIRE
- Darth Chratis
- Dread Master Brontes
- Dread Master Calphayus
- Dread Master Raptus
- Dread Master Styrak
- Dread Master Tyrans
- Khem ValANCIENT SITH EMPIRE
- Tenebrae
GALACTIC REPUBLIC
- 187th Clone Trooper
- 212th Clone Sniper
- 327th Clone Trooper (Phase I)
- Ahsoka Tano (Young) (Updated Model)
- Anakin Skywalker (General) (Updated Model)
- ARC Trooper (Red)
- Blaze Trooper
- Clone Gunner
- Commander Bly (Phase I)
- Glynn-Beti
- Lilit Twoseas
- Naboo Guard (New Model)
- Padme Amidala (Clone Wars) (New Variant)
- Padme Amidala (Pilot) (New Variant)
- Padme Amidala (Snow Gear) (New Variant)
- Siri Tachi (Jedi Tunic) (New Variant)
- Voolvif Monn
- Yoda (Hooded) (New Variant)SEPARATIST ALLIANCE
- Cortosis Assassin Droid
- Count Dooku (Jedi Master) (New Variant)
- Cydon Prax
- E4 Baron Droid
- Geonosian Elite
- Gossam Commando
- Lushros Dofine
- N-K Necrosis (New Variant to General Grievous)
- Nimbus Commando
- Separatist Mercenary
- Umbaran SoldierREBELLION
- Bespin Officer (Jump Trooper)
- Caleb Dume (New variant to Kanan Jarrus)
- Dash Rendar
- Evaan Verlane
- Ithorian Rebel
- Kota's Militia
- Leebo
- Leia Organa (Dark Empire)
- Leia Organa (Jedi Training)
- Leia Organa (Mimban)
- Leia Organa (Ord Mantell)
- Leia Organa (Shadows of the Empire)
- Luke Skywalker (Dagobah Training) (Updated Model)
- Luke Skywalker (Dark Empire) (New Variant)
- Luke Skywalker (Grand Master) (New Variant)
- Luke Skywalker (Heir to the Empire) (New Variant)
- Luke Skywalker (Mimban) (New Variant)
- Luke Skywalker (The Last Command) (New Variant)
- R2-D2 (Jabba's Palace)
- Rebel Marksman
- Shriv Suurgav
- Ten NumbNEW REPUBLIC
- Alema Rar
- Allana Djo Solo
- Anakin Solo (Updated Model)
- Hohass Ekwesh
- Jacen Solo
- Jacen Solo (Yuuzhan Vong Armor) (New Variant)
- Jan Ors (New Variant)
- Kirana Ti
- Lant Davan
- Mara Jade (Emperor's Hand) (Updated Model)
- Mara Jade (Poncho) (New Variant)
- Mara Jade (Yuuzhan Vong Armor) (New Variant)
- New Republic Officer
- Security Droid
- Streen
- Tahiri Veila
- Wee GeeGALACTIC ALLIANCE
- Ben Skywalker (Updated Model)
- Galactic Alliance Guardsman
- Kam Solusar
- LensiGALACTIC EMPIRE
- AT-AT Pilot (Updated Model)
- Ellian Zahra
- Emperor Palpatine (Clone) (Updated Model)
- Gar Saxon
- Imperial Engineer
- Imperial Shuttle Pilot
- Imperial Stormtrooper (Multiple new variants)
- Imperial Supercommando
- Imperial Technician (Scarif)
- Mud Trooper
- Moff Rebus
- Nanda
- Ninth Sister
- Purge Trooper (Uprising)
- Raptor Trooper
- Sergeant Kreel
- Sim Aloo
- Triton Squad
- Warlord ZsinjIMPERIAL REMNANT
- Niles Ferrier
FEL EMPIRE
- Sigel Dare
RESISTANCE
- Chewbacca (Veteran)
- Han Solo (Updated Model)
- Lando Calrissian
- Luke Skywalker (Updated Model)
- Resistance Trooper
- Rose TicoFIRST ORDER
- Agent Terex
- First Order Raider
- First Order Riot Trooper
- First Order Technician
- First Order TIE Pilot
- Kylo Ren (Shirtless)
- VicrulBOUNTY HUNTERS
- 4-LOM (Updated model)
- Aurra Sing (Updated model)
- Boba Fett (Daimyo) (New Variant)
- Boba Fett (Holiday Special) (New Variant)
- Boba Fett (TFU) (New Variant)
- Cad Bane (Updated model)
- Cato Parasitti
- Cradossk
- Greef Karga
- Kleef
- Skahtul
- SkorrCRIMINALS
- Drexl Roosh
- Enfys Nest
- Gadon Thek
- Hondo Ohnaka (Updated Model)
- Hondo Ohnaka (Black Spire Outpost)
- Jariah Syn
- King Terak
- Krix
- Nabrun Leids
- Rebolt
- Syke
- Tonnika Sisters
- Wookiee SmugglerCRIMSON DAWN
- Dryden Vos
- Hylobon EnforcerBLACK SUN
- Guri (Dress) (New Variant)
HUTT CARTEL
- Geezum
- Malakili
- Saelt-Marae
- Skiff GuardZANN CONSORTIUM
- Defiler
- Droideka Mark II
- Silri
- Tyber Zann
- Urai FennCIVILIANS
- Aldar Beedo
- Alderaanian Scientist
- Camie Marstrap
- Chiss Aristocrat
- Devaronian (New Variant)
- Devaronian Pilot (New Variant)
- Gand
- Iridonian
- Ishi Tib
- Kage Warrior
- Kaleesh
- Kaminoan
- Logray
- Muun
- Nikto
- Old Republic Astromech Droid
- Old Republic Protocol Droid
- Paploo
- Polis Massan
- QuarrenCREATURES
- Jungle Wampa
MANDALORIANS
- Bo-Katan Kryze (New Variant)
- Clan Chorn Mandalorian
- Juggernaut Mandalorian
- Khomo Fett
- Rohlan Dyre
- The ArmorerDEATH WATCH
- Death Watch Mandalorian
ETERNAL ALLIANCE
- C2-N2
- Jakarro
- Kaliyo Djannis
- Lana Beniko (Moved + New Variant)
- VetteDARTH KRAYT'S GALACTIC EMPIRE
- Morrigan Corde
- Rav
- Sith OfficerJEDI ORDER
- Cal Kestis (Survivor) )(New Variant)
- Cal Kestis (Inquisitor) (New Variant)
- Kazdan Paratus
- Kento MarekSITH ORDER
- Darth Caedus (Updated Model)
- GithanyNIGHTSISTERS
- Charal
- Gethzerion
- Nightsister Master
- Nightsister ZombieUNALIGNED FORCE USERS
- Abeloth
- Felucian Shaman
- KuellerYUUZHAN VONG
- Vong Priestess
INFINITIES
- Darth Vader (Redeemed)
- Inquisitor Starkiller (New variant to Infinities Starkiller)
- Leia Organa (Sith Apprentice)
- Rebel FriendPOSSIBLE QUESTIONS AND ANSWERS
Q: What are Unaligned Force Users?
A: Unaligned Force Users are a faction consisting of beings who use the Force, but primarily only serve themselves or are part of a faction that isn't currently expanded on.Q: Why is Tenebrae listed under Ancient Sith Empire? Tenebrae, Vitiate, and Valkorion are the same person, so why aren't they variants?
A: I am currently debating on this, but Valkorion will likely remain. Please let me know your thoughts, I'd love to hear them.Q: The Dread Masters left the Empire, why are they listed under them instead of their own?
A: The Dread Master's Empire, the Dread Host, primarily consisted of brainwashed Imperials and Sith of the Reconstituted Sith Empire. It didn't make too much sense to make a separate faction for them.Q: Why is N-K Necrosis a variant of General Grievous rather than his own character?
A: He was made from Grievous's body and had no other affiliations. Wookieepedia claims that N-K Necrosis was affiliated with the Empire because of the scientist that created him, but N-K's existence canonically was too short-lived for him to have any meaningful affiliation.Q: Why is Zsinj listed under Galactic Empire?
A: Because he was loyal to the Empire prior to making his own. Zsinj's empire would only consist of the Raptor Troopers and himself.Q: Will Ninth Sister behave like the other Inquisitors?
A: YesQ: Why is Niles Ferrier listed under Imperial Remnant?
A: He worked with Thrawn in 9 ABY in the Legends continuity and is not listed on Wookieepedia as having any other affiliations (that he was loyal to).Q: WHY TF ARE YOU ADDING ROSE TICO?!!!!! SHE'S THE WORST CHARACTER EVER!
A: Because we canQ: Why are some SWTOR companions assigned to the Eternal Alliance but others aren't?
A: Some companions in SWTOR only join the Eternal Alliance depending on the character you're playing as. Only companion characters that are guaranteed to join would be assigned if we have their correct appearance. If we got Kira Carsen and Lord Scourge's appearances from the Onslaught expansion in SWTOR, they would be moved to Eternal Alliance. Lana Beniko is being moved from Reconstituted Sith Empire to Eternal Alliance for this reason.Q: Why is Silri listed under Zann Consortium instead of Nightsisters?
A: Because she is a hero unit for the Zann Consortium and her only depiction is in Empire at War fighting for them.Q: Rebel Friend is coming? Are we adding LEGO Characters now?
A: The Rebel Friend will not be LEGO. The author designed him to appear true to life.Zelanter, Padawan1138, PierceDoughty and 5 others like this -
23 hours ago, ykas2 said:
The tutorial is a bit too detailed, but absolutely great and absolutely unique. Please, don't abandon it. My result:
Very well done! I know I went a bit overboard on the details but since this was the first tutorial with actually making a cutscene, I felt the need to be as hand-holding as possible. Everyone learns in different ways, so I tried to accomodate as many as I could.
Also I'm very sorry I haven't released a part 3 yet. When I wrote the tutorial, I was in the middle of some major developments for Galactic Legacy, and unfortunately now the workload has increased exponentially. I promise I'll make more tutorials when I can.
-
Happy new year! I hope you've all had a great holiday season. There's a few things to go over so let's get started!
OUR LATEST UPDATE
On December 28th, we released an update seeing to an overall improvement to several menus in the mod. To be perfectly honest, this was not an update that should've taken so long, but this was a very painful update that nobody enjoyed working on. However, it was a necessary step to be taken.
We understand that this update has no new content, and I do sincerely apologize for that, and I want our next one to be overflowing with content!
Currently, we do not have a Mac or Linux build available, due to unforeseen compilation errors. We're currently looking into the cause and hope to have builds available as soon as possible.
UPCOMING MAPS
Our mapper Lwkill has been hard at work these past few months on some passion projects of his own. We're really looking forward to bringing these to you.
The Executor
Venator Bridge
Deathstar II Hangar Bay
THE ROAD AHEAD
Since our last few updates have been rather lackbuster in terms of new content, and we've also gone silent on a few previous announcements. So I'm just going to give you a roadmap for our next update.
- Operation: Knightfall remake (for real this time!)
- Father vs. Son remake
- All-new characters!
- More?????WHAT IS GOING ON WITH OPERATION: KNIGHTFALL???
For a large portion of Galactic Legacy's time, we've constantly been teasing and showing off screenshots of the long-awaited Operation: Knightfall remake. But we have yet to deliver, we've said we're in "Final testing", we're "close to being done" but over a year later there has been no sign of this mission.
What's been going on? The answer is complicated, and to answer it fully would require me to divulge personal information. What I will say however is that our development has been held up due to a number of minor (but important) bugs that we want to iron out. The author has been unable to complete this so I will be taking over for this update, and will not stop until the mission is completed.
This update WILL. NOT. RELEASE. without Operation: Knightfall. You all have waited long enough.
FATHER VS. SON ROADMAP
On the other end of the spectrum, what about Father vs. Son? Progress is being made on the mission, only held up as I focused on fixing up the update we've just released. Now that we can continue work on the mission, everything should be moving forward at some point.
Plans for this remake will be expanded beyond making a whole new mission. But the overall structure of the mission will be changed. We will also be introducing our first ever customizable mission, to allow you to experience the mission the way that you want to play it.
The special editions of the original trilogy have been met with controversy over the years, and Return of the Jedi's finale has been met with a few changes that have sparked MAJOR controversy. The first change was replacing Sebastian Shaw's Force Ghost during the ending celebration with Hayden Christensen. Though this is a change I personally like, I understand that some prefer the original. The second change was making Darth Vader yell "NO!" right before he throws Emperor Palpatine to his (supposed) death. This was a change I personally do not like at all.
So being introduced with this mission will be the opportunity for you all to choose these minor cosmetic things to let you enjoy the mission the way that you want to enjoy it. I'll also be introducing similar customization options in the future provided it's appropriate.
I will provide more details on the mission itself as development continues.
WHAT IS GOING ON WITH DEATHSTAR RESCUE???
Another mission we've neglected to talk about recently is our Deathstar Rescue mission. We released the 1st cutscene a long time ago, then failed to talk about it.
Unfortunately this was a case of me getting distracted by other projects I've promised before.
No progress has been made on this since its last mention in a progress report. This project has been put on hold for the foreseeable future as we work to tackle these other projects. The immediate plan as of right now will be to resume work on this mission once this update is completed.
CONCLUSION
2022 has been a difficult year overall with the realization of many broken promises and lack of any real meaningful content. But we have a plan in store to make 2023 a great year. We hope to make this year the best year for Galactic Legacy, and we hope that you'll be with us every step of the way.
Thank you all for following the development of Star Wars: Galactic Legacy, and may the Force be with you.
-
Patch Notes - 12/28/2022
HIGHLIGHTS
- New console commands have been added to the NPC Free Choice System to allow for a greater variety of control over any NPC of your choice. Make them play an animation of your choice, change their weapons, even give them a lightsaber!
MISSION IMPROVEMENTS
DUEL OF THE FATES (DARTH MAUL)- Qui-Gon and Obi-Wan will now properly attack the player when the player has alignment changing disabled in the character selection menu.
JEDI OUTCAST: NAR SHADDAA STREETS
- The cantina music will now play as intended.
NEW MAPS
- Emperor's Throne Room (Movie Battles II version)
NEW FACTIONS
In order to promote better organization of characters, new character factions have been implemented. All obvious characters have been moved
- Darth Revan's Sith Empire (Separated from The Sith Empire)
- Reconstituted Sith Empire (Separated from The Sith Empire)
- Ancient Sith Empire (Separated from The Sith Empire)
- Brotherhood of the Sith (Separated from The Sith Empire)
- Rule of Two Sith Lords (Separated from The Sith Empire)
- New Republic (Separated from The Rebellion)
- Galactic Alliance (Separated from The Rebellion)
- Imperial Remnant (Separated from The Empire)
- Fel's Empire (Separated from The Empire)
- Darth Krayt's Galactic Empire (Separated from The Sith Empire)
- Sith Eternal (Separated from The First Order)
- Hutt Cartel (Separated from Criminals)
- Black Sun (Separated from Criminals)
- Crimson Dawn/Shadow Collective (Separated from Criminals, called Crimson Dawn in menu)
- Yuuzhan Vong (Separated from Civilians)
- Death Watch (Separated from Mandalorians)
- Mandalorian Neo-Crusaders (Separated from Mandalorians)
- Clan Skirata (Separated from Mandalorians)
- Nightsisters (Separated from Force Users)
- Revanites (Separated from Force Users)
- Eternal Empire (Separated from Force Users)
- Eternal Alliance (Separated from Force Users)
- Jedi Order (Separated from Force Users)
- Sith Order (New Faction)
- Creatures (New Faction)CHARACTER FACTION MOVEMENTS
- Moved Savage Opress from the Separatist Alliance to Crimson Dawn (with Shadow Collective Icon).
- Moved Doctor Aphra from Galactic Empire to Criminals.
- Moved Ren from The First Order to Crimson Dawn.
- Moved the Trandoshan Slaver, Elite, and Mercenary from Criminals to Separatist Alliance.
- Moved Zarien Kheev from Criminals to Galactic Empire
- Moved Gault Rennow from Criminals to Eternal Alliance
- Moved all custom Jedi (excluding KOTOR Jedi) from Old Republic to Jedi Order.
- Moved all custom Sith from Reconstituted Sith Empire to Sith Order.
- Moved IG-86 from Bounty Hunters to Black Sun.
- Moved Nico Okarr from Civilians to Eternal Alliance.
- Moved HK-55 from Civilians to Eternal Alliance.
- Moved Baldarek from Civilians to Hutt Cartel.
- Moved Garindan from Civilians to Hutt Cartel.
- Moved Geonosian from Civilians to Separatist Alliance.
- Moved HK-77 from Civilians to CriminalsMAP FIXES
CLOUD CITY- Replaced a few missing textures that would be absent from the map if the player doesn't have Jedi Outcast configured for their mod.
RPG Dreadnaught
- Adjusted multiple textures in the RPG Dreadnaught map which weren't set to the correct resolution and were causing crashing on it and other maps.
MENU/UI IMPROVEMENTS
NPC SPAWNER- Characters with customization options will now display a valid initial option as intended.
The following NPCs have been added as they were missing from previous builds or fixed due to faulty entries
- Padme Amidala (Blue Nightgown)
- Custom Clone Trooper
- Sergeant Appo
- Clone Trooper (Poncho)
- 442nd Clone Trooper
- Ezra Bridger (Helmet)
- Kyle Katarn (Jedi Robes)
- Nova Trooper
- Armored Kel'Dor
- Ruusaan Skirata (No Helmet)
- Jedi YounglingMAP SELECTION
- Replaced all map levelshots with new images
MISSION SELECTION
- Full remake of the menu
CHARACTER SELECTION
- Added a dual-functionality to the menu to allow it to function as both the NPC spawner and character selector.
- Characters with lightsabers/melee weapons will now be holding their respective weapons upon selection.
- It is now possible to edit your lightsaber while selecting any character.
- You can now edit your Force Lightning color for any character that wields the ability.
- Adjusted Third Sister's biograhy to reflect events that took place in the Obi-Wan Kenobi TV Series
- Fixed a small capitalization typo in Durge's biography
- The Sith Master and Sith Apprentice entries will now be given force abilities as intended.
- (MULTIPLAYER ONLY) Reverted the menu back to the default Jedi Academy multiplayer menu and extended the limit to account for the vast amount of characters.
- Characters with customization options will no longer show as a black/white invalid texture.NPC FREE CHOICE SYSTEM
- NEW CONSOLE COMMAND; NPC ANIM Commands an NPC to play an animation.
- NEW CONSOLE COMMAND; NPC TEAM Sets a new team for an NPC.
- NEW CONSOLE COMMAND; NPC ENEMY Commands an NPC to attack another NPC.
- NEW CONSOLE COMMAND; NPC WEAPON Sets an NPC's weapon.
- NEW CONSOLE COMMAND; NPC SABER Changes and/or assigns an NPC's lightsaber, including colors.CODE CHANGES
- Reduced a number of memory buffers which were causing the game to crash after a small number of save game reloads.
- Characters with the KOTOR or Darth Malak animations will now operate properly in the Jedi Academy campaign as intended.CHARACTER SOUNDSETS
- Created an all new Hondo Ohnaka soundset.
CHARACTER MODEL FIXES
- Refactored Padme's Blue Nightgown model so it appears as intended
- Refactored Halle Burtoni's model so it appears as intended
- Fixed an invalid texture for Gee which was causing him to be lacking eyes
- Fixed a faulty hat texture for Captain Typho's "No Gun" skin
- Fixed an invalid texture path for Commander Keller's RGB skin
- Mister Bones will now appear as intended
- Fixed some missing textures for C-3PO's "Battle Droid Body" variant.
- Removed some unneeded Fives skins
- Removed some unneeded Echo skins and corrected multiple shader errors so he appears as intended.
- Fixed a texture problem with the Revanite Vindicator so he appears as intended.
- Fixed a faulty shader with the Rakghouls
- Fixed a faulty shader with Darth Caedus's hairMISCELLANEOUS FIXES
- Consolidated all arena script files found in other map pk3 files into the main map list files.
- Multiplayer maps will no longer display episode numbers in the list.Lancelot likes this -
Welcome to Part 2 of this tutorial series, my name is Linken and I’ll be your host for today!
This is the tutorial for those wanting to use Radiant. I will make an Entity Modding tutorial later on.
If you haven’t viewed Part 1 yet, or would like a refresher, I encourage you to view it first before continuing on.
Today we’ll be doing a very basic cutscene involving a single NPC. I will write this tutorial in two ways, one way we’ll be using Radiant, and the other way will be done with entity modding. Please feel free to follow along with either or both tutorials.
By the end of this tutorial you should know the basics to do your first script, and you should also begin to understand which method of mission making you like best for your own projects.
Please keep in mind as we go through this I’ll be doing this tutorial in my own personal preference for completing each step. I highly encourage you as you go through today’s tutorial to think about your own favorite practices so you begin to form a technique that best suits you.
PREPARATION WORK
Only a few steps you’ll need to complete before beginning this tutorial, regardless of which tutorial you want to follow.
Please download this file and extract the contents to your Jedi Academy base folder, this contains today’s map file and already compiled BSP. Those wanting to learn entity modding can discard the map file and keep the BSP file.: https://drive.google.com/file/d/1uZfCp9Gs6OM-c6mpDtL2J2-Q0Zety8lJ/view?usp=sharing
Additionally, in your base folder, create a new folder called “scripts”, and inside your “scripts” folder, create another folder called “tutorial_2”
Optionally, feel free to download this file and place it inside your base folder, this will display several missing system textures: https://drive.google.com/file/d/1jMBe8No9KO0E7y0LGqjm7L8FNRahMCRt/view?usp=sharing
GETTING STARTED
Today our map will be nothing more than a simple room. Four walls, ceiling and a floor. Good enough for today’s lesson.
In Radiant, open up the provided map file and bask in my super-basic map making! Or….y’know…..just draw your own room and add an info_player_start entity. I promise you my feelings won’t be hurt
 .
.
Whichever way you want to do it, your radiant camera should be inside this room.
Our cutscene today, we’ll have a Jedi NPC walk forward a few steps, turn on his lightsaber, and perform a flourish, and say a sound. Then a reborn NPC will awaken from his meditation, stand up, turn on his lightsaber, say his own sound, and pull out a second lightsaber (GASP! WHAT A TWIST!)
So overall today we’ll be diving headfirst into NPCs, performing animations, movement, commands, cameras, and map entities used for missions.I know this sounds like a lot, but trust me, it’ll lay out a great foundation for you to get started on your own projects!
TARGET_SCRIPTRUNNER
CREATING THE SCRIPTRUNNER
Regardless of how many scripts you write, your map will be FILLED with target_scriptrunner entities. These are the entities used to execute icarus scripts. The good news is that their location doesn’t matter at all. Right-click on the map editing section of Radiant and look for “Target”, hover over the option then click on “Target_Scriptrunner”
When your scriptrunner entity is created, it should be highlighted by default, if not, select the entity and press your N key to bring up the Entities window. You should see something like this:
You’ll see a few checkboxes labeled “runonactivator” and “inactive”, you can ignore these for the tutorial. You can see in the upper section of the window what these checkboxes mean. People using this version of Radiant can see similar information on most other map entities, very helpful stuff!
The first thing we want to do is tell this scriptrunner to tell what script to…..well….run.
In the “Key” field, type “usescript”, and in the “Value” field, type “tutorial_2/tutorial_start”. After that, press enter. The window should look like this:
One more thing we need is a targetname, this tells the game the name of the entity. Targetname has a few other uses for other map entities, but we’ll get to that in the future. To give the entity a targetname, in the “Key” field type “targetname”, and in the “Value” field we’ll call it “start”. Once you press Enter, your window should look a little something like this.
Alright, so now we have a scriptrunner, but right now, the game won’t trigger it! So let’s do just that!
There are two methods to trigger this script runner entity. I’ll go over both, you just use what you prefer.
METHOD #1: INFO_PLAYER_START (PREFERED)
Select the info_player_start entity (make sure the scriptrunner entity is not selected (ESC key) and press your N key to bring up the entity window.
In the “Key” field, type “target”, and in the “Value” field, type “start”. Once you press enter, the player_start entity will now target the scriptrunner when you spawn in the game. To verify the connection has been made, you should see a line and arrow between the two entities.
Alternatively, if you select the info_player_start entity first and then select the target_scriptrunner entity (yes, the order matters), press CTRL + K on your Keyboard and the player_start entity will target the scriptrunner automatically
METHOD #2: TRIGGER_ONCE
Draw a brush surrounding the info_player_start entity and texture it with the “Trigger” texture (found under System). Should quickly mention that the trigger texture may appear as a red/blue and black checkerbox with “Shader not Found” written inside instead of the green “Trigger” texture. This will not affect your ability to create triggers or do anything else in radiant, however if it annoys you, feel free to download the mapextras pk3 file I’ve included in the “Preparation Work” section of this tutorial.
With the brush selected, right-click in the map editor and look for “trigger”, hover over it and then click on “trigger_once”.
Once completed, press your N key with the trigger selected to bring up the entity menu. In the “Key” field, type “target”, and in the “Value” field, type “start”. Press Enter and you should see something like this:
Then to verify the connection is made, in the map viewing area of Radiant, you should see a green line and arrow connecting the two entities.
Alternatively, if you select the trigger brush and the scriptrunner (in that order) and press CTRL + K, the two entities will connect automatically.
A BASIC CAMERA
Before we make the cutscene, we want to give our script something to do so we know that everything is working properly. We’ll start by creating a basic camera that turns on once you spawn in the game, holds for 2 seconds, and then exits.
Now I’m going to be completely honest with you. I absolutely HATE creating cameras like this and I moved past this a long time ago. However, I feel that it’s necessary to share every method I know of to help you on your journey. That being said, after this brief tutorial on creating cameras in Radiant, I will no longer be using this method throughout the rest of this series. Don’t worry, I’ll explain other methods.
CREATING THE CAMERA
A typical radiant camera consists of two entities, a “Ref_Tag” and an “Info_Null”. The Ref_Tag is where the camera is located on the map, and the Info_Null is where the camera is pointing.
To create a ref_tag, right-click in the map editor and select ref_tag.
Move the ref_tag to wherever you’d like (I’m placing mine directly above my spawnpoint). After you’re pleased with the location, right-click again on the map, hover over “Info_”, then click on “Info_Null”
Move the info_null to wherever you’d like (I’m putting mine directly in front of the ref_tag but moving it a few squares down).
Once you’re pleased with your camera’s position, let’s get these two connected!
Select the ref_tag and info_null (in that order) and press CTRL + K to link the two together. If you did this correctly, a blue arrow and line should be seen between the two entities, verifying the ref_tag is targeting the info_null.
Select the ref_tag entity and press N to bring up the Entity Menu. For the script to be able to use the camera, we need to give the tag a targetname, so let’s do that! In the “Key” field, type “targetname”, and in the “Value” field, type “camera1”. Press Enter to apply your changes. Once you’re done, it should look like this:
Now that you have your camera set up, let’s go ahead and compile our map so we can use it in game!
On the upper toolbar of Radiant, click on the Build menu and then select the option that’ll only give you the BSP (should be the first option that says Q3Map2).
Once your map is done compiling, you should see a confirmation in the console at the bottom of the program. Since this is a very tiny map, compiling should be done by the time very quickly. Much larger/complex maps will take a bit longer.
Now that the map is compiled, let’s head over to BehavED and create our script!
YOUR FIRST SCRIPT
Open up BehavED and look for the Camera Command on the left-side of the window (should have a pink camcorder icon). Double-click the command or drag & drop the command to the main window below the “rem” command already applied (all new scripts will show a comment by default, you can use it or remove it, doesn’t matter). Once you complete this, you should see something that looks like this.
By default, when applying a new camera command, the camera will start off with the “Enable” Command by default. Every cutscene will start with a Camera Enable command, so leave this command as it currently is.
Double-click on the camera command 3 more times (or alternatively, select the first camera command and press your Spacebar 3 more times) to create 3 more camera commands for a total of 4 commands.
Before we start telling what camera to use, let’s go over each camera command (that I know) and what they do.
CAMERA COMMANDS
-
ENABLE: Puts the game in “Cutscene Mode”.
-
DISABLE: Takes the game out of cutscene mode and returns to normal gameplay.
-
MOVE: Moves the camera to a particular location (typically a new camera)
-
PAN: Rotates the camera to the specific angle
-
ROLL/TRACK: I never use these and don’t know what they do as of typing this.
-
FOLLOW: Follows an entity automatically and keeps the camera focused on them.
-
FADE: Applies a Fade effect to the game (such as a bright white flash of light or a fade to black), this is a command that can be used during normal gameplay.
-
SHAKE: Shakes the camera at a certain intensity, this is also a command that can be used during normal gameplay.
-
PATH: Applies a ROFF file for the camera effect. Also never used by typical modders. Is used in Jedi Outcast during the opening cutscene of the first Nar Shaddaa level.
Now let’s do our camera!
Double-click on the 2nd camera command and on the Dropdown menu, click on the “Move” Option. Once the move option is selected, you’ll see a button un-grey itself out called “Re-Evaluate”. It is VERY important that you always click on “Re-evaluate” when the opportunity presents itself, otherwise your script will not work at all.
Once you click on Re-evaluate, the window should change to look like this.
To apply the camera to the script, there are a few steps. Follow along as best you can as this can get a tad complicated for beginners.
Next to the middle dialog box (the one with all the 0s inside) you’ll see a button called “Helper”. Click on that and your window should change to something like this:
On the 2nd dropdown menu, which says “Origin”, click on the button next to it that says “Tag”. The 0s should changed into something like this:
Where the text says “targetname”, replace “targetname” with the name of your camera, which we named “camera1” earlier. MAKE SURE TO KEEP THE QUOTATION MARKS. Once you’re done, it should look a little like this:
Click on OK. Now the game will move the camera to that position. Now let’s get the camera pointing in the right direction.
Double-click on the 3rd camera command to bring up the dropdown menu. Expand the menu and select the “PAN” command. Click on Re-evaluate once selected. Your window should look like this:
You’ll see three sets of dialog boxes, we’re only going to focus on the 1st one for this tutorial. We’ll never use the 2nd one (I still don’t know what it does as of writing this). The 3rd one we’ll use at a later time.
Similar to the MOVE Command, we’ll also be applying a tag to the PAN Command. Follow along as best you can.
Click on the “Helper” button next to the 1st dialog box so your window looks like this:
Click on the Dropdown menu which says “ORIGIN” and select the “ANGLES” option. After that, click on the “Tag” button. Your menu should look like this:
Change the targetname to the name of your camera, which we named “camera1” earlier. Again, make sure to keep the quotation marks, else your script won’t work. It should look like this once you’re done.
Click on OK to apply your changes.
Now to take the game out of “Cutscene Mode”, double-click on the final Camera command we made earlier and in the dropdown menu, click on the DISABLE command. Again, click on the Re-evaluate command, your window should look like this:
Click on OK and let’s review our script! If your script looks like this, you’re on the right track!
Now, if we were to load in our map right now, we wouldn’t see our game in camera mode. The reason for this is because we haven’t told the script to wait. When creating a script, a bunch of commands grouped together will be immediately executed with little to no pause in the order that they were written. So technically our game would go to our camera and then exit, but the action would be so fast we would never see it. This is where our trusty “Wait” command comes in!
Create a new “Wait” command (make sure to select the one with a stopwatch/clock icon and not the red light one) by double-clicking or dragging and dropping the command into your script.
Drag your new wait command in between your Camera Pan command and Camera Disable command. Keep in mind when you drag an existing command through your script, the command will be placed under whatever command is being highlighted. When you’re done, the script should look like this.
Double-click on the existing wait command to bring up its options, you’ll see a dialog box inside with the number 1000 inside. Keep in mind when doing wait commands, they are always done in milliseconds. Also keep in mind that 1000 milliseconds = 1 second. Change the value to 3000 (3 seconds), and click OK. Your script should now look like this:
COMPILING YOUR FIRST SCRIPT
Our script is done, so let’s compile it! Click on the big Compile button near the lower-right corner of the window. If you haven’t saved your script by this point, the program will ask you to pick a location to save your script. Save your script inside the tutorial_2 folder I asked you to create at the beginning of this tutorial, and name your script “tutorial_start” as we referred to it while creating our target_scriptrunner in radiant from earlier.
Your script should now be saved and compiled in your tutorial_2 folder!
Now the moment of truth! Start up Jedi Academy and in the console type “devmap tutorial_2”, wait for the map to load, and see your camera in action! For 3 seconds, then you’ll be in normal gameplay.
Here’s my camera in action:
If you followed everything correctly, you should see similar results! Well done! If not, double-check your work and keep trying until you get it right!
NPCS
Unless you’re planning on having beautiful music involved in your cutscene and having a bunch of cameras tour every nook and cranny of your mission, you’re probably gonna need NPCs.
So let’s go ahead and add some NPCs!
Here’s gonna be our goal for these npcs starting out.
-
There will be 2 npcs, one Jedi, and one reborn.
-
The Jedi will have its Red Team skin applied and will carry a Green lightsaber (as opposed to its default yellow one)
-
The Jedi will be doing all of the major movement for this scene.
-
The Reborn is a Boss NPC
-
The Reborn will spawn in a meditating position, facing away from the Jedi, with its eyes closed.
-
The Reborn will carry a Red lightsaber and another secret Orange lightsaber.
Let’s start with the Jedi!
THE JEDI
Somewhere in the map, right click on the map editor and create an NPC_Jedi map entity
The Jedi NPC will appear as a large red box with an arrow sticking out, the arrow illustrates what direction the Jedi will be facing when he appears ingame.
Press your N key to bring up the entity menu for the spawner entity, and follow along with the next few steps closely.
Starting off, you’ll see a cluster of checkboxes labelled “trainer, master, and random”. Many special NPC spawners like this feature similar commands, while the generalized NPC_spawner entity won’t feature any of these. Feel free to click on any of them at your leisure, I’ll just be keeping mine as its default appearance.
Locate the checkbox labelled “cinematic” and check it. Your window should look like this (notice spawnflags 32 was added automatically). Putting the NPC in cinematic mode will halt its typical behavior indefinitely, and will not actively seek out enemies. Some ingame actions can trigger the NPC to do some actions, but since we’re doing something very basic we don’t need to worry about this.
Later down the line I will show you some techniques you can use to prevent any unwanted actions.
Next we’re going to give this NPC something called an “NPC_targetname”, an NPC_targetname is what the script is looking for to affect a specific NPC. In the “Key” field, type “NPC_targetname”, and in the “Value” field, type “Jedi1”, press Enter. Your window should now display the NPC_targetname.
Now I said earlier that we want our Jedi NPC to have its Red team skin and a green lightsaber. You may be thinking “I can’t see any options! WTF!” That’s perfectly alright, this is where our next part of scripting comes in. We’re going to declare a Spawnscript!
A spawnscript is a type of script that is executed for a specific NPC when it's spawned into the game, very simple. There are other types of scripts, but I will save those for another time.
In the “Key” field, type “spawnscript”, and in the “Value” field, we’ll call for a new script and we’ll call it “tutorial_2/jedi_spawn”. Press Enter and your window should look like this (you may need to scroll down a little to see it):
Finally, we’re going to change the direction our Jedi is facing when he’s spawned, since right now he’s facing the wrong way!
In the “Key” field, type “angle”, and in the “value” field, type a number that forces the NPC to look toward the center of the room. For me it’s 270. You can also use the dialog box labelled “angle” if you’re using the same version of Radiant I’m using. Other versions of radiant have a number of angle buttons in a clock-type pattern. Regardless, make sure your NPC is facing the right direction. Once you apply an angle, the NPC spawner arrow should also change to reflect its new location.
To create the Jedi’s spawnscript, open up BehavED and start a new script.
On the left-side of the program, double-click on the “Set E”Set_Types” command twice to create 2 set commands. Your script should look like this:
We’ll first start off with setting the Jedi’s appearance.
Double-click on the first “Set” command to bring up its options menu. Then expand the Dropdown menu. Unfortunately this part requires a very careful eye for beginners as this menu is not the best organized and there’s no easier way to search for commands. There are some sections to help with navigation, so just keep these in mind. I will try to be as specific as possible during these next few steps to help you out.
Scroll down the dropdown menu using either your arrow keys or (my preferred) your mouse wheel and look for the SET_SKIN command, which is located at the bottom of the “// Scripts and other file paths section” (near the top, just below all of the SET_PARM commands). You can also hold down your left mouse button and move it down for even faster scrolling!
PRO-TIP: There can be instances that the dropdown menu will close immediately when expanding it or any other dropdown menu in BehavED. If this occurs, either restart BehavED or hold down your mouse button and use your mouse wheel or arrow keys to navigate each option.
(You will not see the SET_MODEL - SET_GENDER options in your copy, these are unused commands meant for Galactic Legacy but aren’t used, so don’t panic!)
Once SET_SKIN is selected, click on the Re-evaluate button and your window should look like this:
If you’re familiar with modeling or skinning, this file path should be familiar to you. Change the value in there to “models/players/jedi/model_red.skin”. To delete the previous value faster, double-click on the text inside to select everything then press your Delete or Backspace key (unfortunately Ctrl + A doesn’t work). Your window should look like this:
Click on OK and verify your script looks like this:
Next we’ll set the NPCs lightsaber color.
Double-click the 2nd “Set” command, and navigate the dropdown menu to look for the command SET_SABER1_COLOR1. This command will be located near the bottom of the entire dropdown menu in the “// Special Tables” section.
(SET_FORCE_STASIS_LEVEL through SET_FORCE_FEAR_LEVEL are Galactic Legacy-only script commands so you will not see them.)
Once you have the command selected, click on Re-Evaluate and you’ll see a dropdown menu. This new dropdown will display all saber colors currently featured in Jedi Academy. Expand the dropdown and click on the “Green” color (or really any color, I’m not judging). Once your color is selected, your window should look like this.
Click OK and verify your script looks like this:
Once everything looks good to you, click on the Compile button and save the script in your tutorial_2 folder and call it jedi_spawn.
Verify your script is in the right folder
Now let’s test it! Compile your map and open Jedi Academy. If you did everything right, you should see a Jedi in red clothes holding a green lightsaber. If you want to verify the saber color, use console commands to set your team to enemy (playerteam enemy) and bump into the Jedi. He should ignite his green saber.
Now let’s do the Reborn!
THE REBORN
Back to Radiant, right-click on the map editor and select the NPC_Reborn map entity.
Similar to the Jedi NPC, press N to open the Entity menu. In the checkbox section, tick the boxes labelled “cinematic” and “boss”. Unlike the Jedi, whose NPC we did not change, we are changing the NPC for the Reborn spawner to spawn the boss npc. Again, this is only a function of the special NPC spawners and is not featured in the generalized NPC_spawner entity.
Keep in mind that while the spawnflags value is 40 instead of 32, the game will still recognize that this is a cutscene NPC. How? It’s a code thing.
Now that that mystery is solved, let’s go ahead and set the angle he needs to be facing and his spawnscript.
In the “Keys” field, type “NPC_targetname”, and in the “Value” field, type “reborn1”
Set his angle to face away from the Jedi (so for me it’s 270)
Finally, in the “Keys” field, type “spawnscript”, and in the “Value” field, type “tutorial_2/reborn_spawn”.
The final product should look like this.
Now that our Reborn is set up, let’s go ahead and compile our map once again.
Open up BehavED and start a new script. This one will be a little different from the Jedi as we’ll be adding a few extra commands. Once again, just follow along as best you can.
In BehavED, create four SET <E”set_types”> commands using your preferred method. Your script should look like this:
On the first SET command you created, double-click the command to open up the event editor. On the dropdown menu, you’ll be looking for a command called SET_WEAPON. You can find this command in the // Special Tables section of the dropdown menu, which is near the bottom.
Once you click on SET_WEAPON, click on the Re-evaluate button so a new dropdown menu is displayed which will show off a list of every weapon featured in Jedi Academy.
Expand the dropdown menu and click on WP_NONE, which will remove the NPC’s current weapon. Why are we doing this? Because I don’t want this reborn to be holding his weapon while meditating.
Click OK and verify your script looks like this:
Next we’re going to shut the Reborn’s eyes. On the 2nd SET command, double-click it and on the dropdown menu you’ll be looking for the command SET_FACEEYESCLOSED, which you can find in the // Floats section located close to the middle of the dropdown menu.
Once again, click on Re-evaluate, and the number 0.00000 will appear. This number will tell the game how long to keep the npc’s eyes shut. As we want the Reborn to keep his eyes closed for an unknown length of time, we’ll just put the value at -1, like so.
Click on OK and verify that your script looks like this:
The last two SET commands we’ll be using to control the Reborn’s meditation animation. I personally find it best to declare any animations last just to make sure everything else looks good before we continue.
On the 3rd SET command, double-click the command and on the dropdown menu look for the command SET_ANIM_BOTH, which you can find in the // Special Tables section close to the bottom of the dropdown menu.
Once the command is selected, click on Re-Evaluate, and a new dropdown menu will appear. This dropdown I will be perfectly frank with you, is simply the worst. It’s coarse, rough, irritating, and gets everywhere.
Expand the new dropdown menu and look for the animation BOTH_SIT2, which you can find in the “// BOTH_SITTING/CROUCHING section around the middle of the menu. Once you locate the animation, click on OK and verify your script looks like this.
Now if we don’t do anything else, the Reborn will perform the animation then return to his default standing animation. We don’t want him standing up yet and want him sitting for as long as we need him to. This is where our fourth SET command comes in!
Double-click on the final SET command and in the dropdown menu, look for the command SET_ANIM_HOLDTIME_BOTH, which you can find in the “// ints” section close to the middle of the dropdown menu.
Once you find it, once again click on the Re-evaluate button and you’ll see the number “0” in the value box. As we want this Reborn to meditate for as long as we need him to, set this value to -1. Click on OK and verify your script looks like this:
Now that this script is completed, let’s go ahead and compile it! Save your script to the tutorial_2 folder located inside your scripts folder and name the script “reborn_spawn”, like how we called it in our map from earlier.
Now let’s test! With everything completed, we’ll go ahead and test that both our Jedi and Reborn are where they need to be and doing what they need to be doing. Start up Jedi Academy and load your map, and verify that your Reborn is meditating!
Alright, now our NPCs are in place! Let’s make ourselves a cutscene!
THE CUTSCENE: JEDI MOVEMENT
So the first step we’re going to complete is getting our Jedi to move. We want him to walk a few feet forward and stop at a certain place. So let’s do that!
Back in Radiant right-click on the map editor and select waypoint_navgoal.
A green rectangular prism will appear on the map, a waypoint_navgoal is essentially a location for the NPC to move to when commanded to do so in the script. Now there are a few things to keep in mind when using navgoals.
You want your navgoals to be a decent distance away from an NPC, if the location is too far, one of two things may happen:
-
The NPC will not move to the navgoal at all
-
The NPC (if a Jedi/Sith) will force jump to the navgoal.
Neither are things that we want happening, so we’re going to take a few steps to prevent this.
First though, the location. Move the navgoal to your desired location (I’m going to place it fairly close to the Reborn).
Once you’re pleased with the location, press your N key to bring up the entity menu. In the “Key” field, type “targetname”, and in the “Value” field, type “jedi_move”. Press Enter and verify that your navgoal looks like this:
Exit out of the entity menu and right-click once again on the map editor and select “waypoint”.
A waypoint helps npcs to create a path from Point A to Point B. This entity is essential for any map you’re intending to use for Single Player as it helps allied npcs to follow you accurately. If you ever experienced problems while playing on a map trying to lead your npc friends and they get stuck constantly, a lack of waypoints is the reason why.
Place the waypoint on top of the Jedi’s NPC spawner so the two overlap each other. Once you’re done, create a second waypoint using a method of your choice (Copy and Paste works well) and place it on top of the waypoint_navgoal. Now our Jedi should have no issues going to the navgoal!
Select both waypoints you placed and press Ctrl + K to link the two together. This time, the order will not matter. If done correctly, a yellow line and arrow should be seen between the two, connecting them together.
Now let’s do some cameras!
THE CUTSCENE: CAMERA PLACEMENT
At this point in the tutorial, I strongly encourage you to take some creative liberties with your work. We all have our own opinions for the best camera placements for a cutscene. If you disagree with my choices, I completely understand and you can still follow along with this the same way.
For our cutscene I’m going to utilize a total of 4 cameras with the following purposes:
-
Camera #1 will be a close-up shot of the Reborn while he’s meditating, the Jedi will walk up from behind.
-
Camera #2 will be a close-up shot of the Jedi after he reaches the navgoal
-
Camera #3 will be a straight shot of the Reborn as he stands up and turns around
-
Camera #4 will be a straight shot of the Jedi as he prepares for battle
-
We’ll return to Camera #3 when the Reborn prepares himself for battle
Now this section will take some trial and error, take your time with this and most importantly, have fun!
SETTING UP YOUR TEST
To help you test your cutscene as quickly and efficiently as possible, let’s edit our first script a bit!
In BehavED, open up your “Tutorial_Start” script and select the MOVE, PAN, and wait commands. Copy each command 4 times and edit each camera command to read “camera2”, “camera3”, “camera4”, and “camera3” in that order. Once your edits are made, your script should look like this:
This will ensure that once we position our cameras, we can test them quickly. Since we know what cameras we’re using, and in what order, we can perform this step in advance!
Back in Radiant, copy and paste the first camera we wrote earlier 3 more times for a total of 4 cameras. Place them where you want for now so you can select them when you need them. As you copy and paste each camera, change each ref_tag’s targetname to read camera2, camera3, and camera4. Some versions of radiant will do this step for you (how convenient!).
CAMERA #1
For our close-up shot of the Reborn we’ll use the first camera we created earlier in this tutorial.
Take the first camera and position it fairly close to the reborn and lower it to about halfway down the NPC spawner (to account for the Reborn meditating at the start). If you use the same camera we made at the start of this tutorial, you can compile your map and start up your map immediately to check your work. I’m doing a slight angle shot just to add a bit of dimension.
Verify that your ref_tag has a targetname of camera1 and is linked with its appropriate Info_null (there should be a blue-ish line and arrow connecting the two).
Continue checking and testing your camera placement until you’re satisfied with your camera placement. Ultimately I chose to use this placement:
CAMERA #2
For the second camera, I want it to also be an angled shot of the Jedi, but placed where he should walk to once our cutscene gets going.
Select camera2 and its info_null, and move both entities close to the navgoal entity.
Now what about testing? What can we do to make sure we have the angle and shot we want?
You have two options, you can copy/paste the Jedi’s NPC spawner for a reference; placing it where the Jedi would end up. Or move the original spawner to the navgoal’s location. Regardless of which option you pick, continue to adjust the camera until you get the desired camera; compiling and testing until you are satisfied. Ultimately I decided to use this shot:
CAMERA #3
For Camera 3, this will be used for a full shot of the Reborn as he stands up and prepares for battle, and is the only camera we will call twice in the script.
Grab your Camera3 ref_tag and its info_null entity and position the camera to your desired angle. I will be placing mine to face behind the Reborn, attempting to keep room in the shot to keep the Reborn’s whole body in frame when he stands up.
Like the other few cameras, adjust and choose your angles until you’re satisfied with your camera work. Ultimately I went with this shot:
CAMERA #4
For our last camera, similar to Camera 3 but facing the Jedi instead. Select your Camera4 ref_tag and its info_null and position the camera to face the Jedi. Choose an angle best suited to your liking and continue testing until you’re satisfied.
Ultimately my shot looked like this:
Alright! All of our cameras are placed! Now let’s make a cutscene!
PUTTING IT ALL TOGETHER
The stage is set, everything is set up. Now let’s make a cutscene! Move your Jedi back to his original position or delete the extra NPC spawner, depending on your testing method. Compile your map if you haven’t done so already. You can close Radiant now, you won’t need it anymore, unless you want to add more to your cutscene. But I won’t be referring to Radiant anymore for the rest of this tutorial.
Back in BehavED, open up your Tutorial_Start script and let’s do this!
MOVING THE JEDI
Under the first camera command, we’ll begin our process by creating an affect command for our Jedi. This affect command will tell our Jedi to move to the navgoal we placed earlier, and walk (not run) to it.
Under the camera1 move and pan commands, create an affect command, and double-click on it to bring up its editor window.
In the dialog box that says “DEFAULT”, change the “DEFAULT” value to Jedi1, and click OK. Your script should look like this:
Expand the affect command for the Jedi and create two SET<E”set_type”> commands. To help with placement, keep the affect command selected and expanded to make sure both commands are created inside the affect. Your script should look like this (notice the small indent for the two set commands, verifying they’re both in the affect command):
Double-click on the first SET command to bring up the editor, and navigate the dropdown menu and look for the command SET_WALKING. This command can be located in the “// Booleans” section of the menu, near the bottom of the dropdown menu.
Click on the Re-evaluate button and notice the new dropdown menu which should say “false”, expand this new dropdown menu and select the “true” option. Click OK and verify your script looks like this:
Double-click on the 2nd SET command and expand the dropdown menu. Look for the command SET_NAVGOAL, which can be found in the “// Standard Strings” section near the top of the dropdown.
Once found, click on Re-evaluate, and in the box that says NULL, type the name of our navgoal from earlier, which is jedi_move. Click OK, and verify your script looks like this:
Now our Jedi will move to this location!
JEDI TALKING
Once the Jedi moves we want him to say something, and we want him to talk after reaching his navgoal with Camera 2 focused on him.
Under the camera2 move and pan commands, create a new affect command and have it target Jedi1. Inside the affect command, create a Sound command. Once you’re done, verify the script looks like this:
Double-click on the sound command to bring up its editor. You’ll see a dropdown menu with the default value CHAN_AUTO, and another box which says “FILENAME”. We’ll go over the channels and what they mean in another tutorial, so for now expand the dropdown menu and select the value CHAN_VOICE. Click on the Re-evaluate button and paste the following text into the FILENAME box: “sound/chars/jedi1/misc/anger2.mp3”. The editor window should look like this:
Once you click OK, verify your script looks like this:
Now as it’s currently written, there will be no pause between the camera changing and the Jedi speaking his line of dialogue. So let’s add a little pause! With the affect command selected, double-click the wait command to create one in the Jedi’s affect. I’m going to leave the wait command at a 1 second pause, but feel free to change the pause to your own liking.
REBORN ACTIONS
Now that the Jedi has spoken, it’s time to make the Reborn react! Under the first set of Camera3 move and pan commands, create a new affect command, and have it target Reborn1, like so:
We’re going to have the Reborn perform a few actions:
-
Play an animation to stand up
-
Face the Jedi
-
Pull out his saber
-
Speak an aggressive line of dialogue
Let’s get ourselves set up!
In preparation, create three SET <E”set_type”> commands and 1 sound command inside the Reborn’s affect. Verify your script looks like this before continuing on:
To start, let’s have our reborn stand up! Double-click on the first SET command and on the dropdown menu select the SET_ANIM_BOTH command, located in the “// Special Tables” section near the end of the dropdown menu.
Click on Re-evaluate and click on the new dropdown menu to look for the animation BOTH_SIT2TOSTAND5, located in the “// BOTH_SITTING/CROUCHING section near the middle of the menu.
Once this is selected, click OK, and verify your script looks like this:
Double-click on the 2nd SET command and expand the dropdown menu. Look for the command SET_WEAPON, located in the “// Special Tables” section of the menu close to the bottom.
Once selected, click on Re-evaluate and on the new dropdown menu that appears, select WP_SABER
Click OK and verify your script looks like this:
For our last SET command, double-click it and expand the dropdown menu. Look for the command SET_VIEWTARGET and click on the Re-evaluate button. In the box labelled “NULL”, type the Jedi NPC’s targetname, which earlier we called Jedi1.
Click OK and verify your script looks like this:
Finally for the sound command, double-click on it to bring up the editor. Expand the dropdown menu inside and select CHAN_VOICE. Click on Re-evaluate, and in the box that says “FILENAME”, paste this text inside:
“sound/chars/reborn2/misc/anger1.mp3”
The window when you’re done should look like this:
Click OK and verify your script looks like this:
Now if we were to execute this, the Reborn would perform all 4 actions at the same time. We don’t want that, so let’s add some pauses! Create a few “Wait” commands and place them and edit them as shown in the below screenshot. Make your own personal changes if you would like. Also lengthen the wait prior to the Camera4 move/pan commands to 6000.
One last thing before we move on, we need to open the Reborn’s eyes back up! Create a new SET command under the Animation Command and create a SET_FACEEYESOPENED command, located in the “// Floats” section of the menu, close to the top of the menu.
Once you select the command and click “Re-evaluate”, type “1” as the value for the command. Your window should look like this:
Click OK and verify that your script looks like this:
JEDI RESPONSE
The Jedi isn’t gonna like that very much, so let’s make him turn on his saber, and let’s also have him perform a fancy flourish to show that he means business!
Create an affect command under the camera4 move/pan commands and have it target “Jedi1”. Inside the affect command, create two SET commands. Verify your script looks like this:
Double-click on the 1st affect command and look for the command SET_SABERACTIVE, located in the “// Booleans” section of the menu near the bottom.
Once the command is selected, click on Re-evaluate so the boolean dropdown menu appears. Select “true” for the option and click OK. Verify your script looks like this before continuing:
Double-click on the 2nd SET command and select the SET_ANIM_BOTH command located in the “// Special Tables” section of the dropdown menu near the bottom of the menu.
Click on “Re-evaluate” and in the new dropdown menu, look for the animation BOTH_SHOWOFF_STRONG located in the “// BOTH_ACROBATICS” section of the menu near the bottom of the menu.
Once it’s located, click OK and verify your script looks like this:
The Jedi has now responded and looks confident! What will the Reborn do?!
REBORN RESPONSE
We’re going to have the Reborn pull out a surprise 2nd saber and perform an animation! That’ll certainly make the Jedi fear for his life, because 2 sabers are better than 1….right?
Under the final camera3 command, create an affect command and have it target “Reborn1”, inside the affect, create 4 SET Commands. Verify your script looks like this before continuing:
Double-click on the first SET command and locate the command SET_SABER2, located in the “// Standard Strings” section of the menu near the top.
After clicking on the SET_SABER2 command, click on the Re-evaluate button. The value box will change to say “none”. Change the value of that box to “reborn” and click OK. Verify your script looks like this.
This second saber is unique to this reborn! He wanted an orange saber! So let’s give him one! Double-click on the 2nd SET command and locate the command SET_SABER2_COLOR1 in the “// Special Tables” section of the menu, close to the bottom.
Once selected, click the Re-evaluate button and select the “Orange” color (or whatever color you want). Click OK and verify your script looks like this:
Now we had two other SET commands, but guess what? Delete them! Because we can reuse prior scripts!
Expand the previous “Jedi1” affect and copy the SET_SABERACTIVE and SET_ANIM_BOTH commands to the Reborn’s affect. Verify your script looks like this:
Double-click on the SET_ANIM_BOTH command and expand the dropdown menu with the animations. Select the animation BOTH_VICTORY_DUAL, located just below the previously used animation:
Click OK and verify your script looks like the following.
Create a wait command at the top of the affect for the reborn and leave it at the default 1000 milliseconds to allow for a natural pause. Edit the final wait command prior to the CAMERA DISABLE command to 5000 milliseconds instead of 3000 milliseconds.
And with that! Our cutscene is completed! Load up Jedi Academy and watch your very first cutscene!
I know that this was a very long tutorial and we went over a lot. If you’re still struggling and you’re very confused on where to go from here, that’s perfectly fine! I will include my full solution as a download for you to review and learn from. But I hope between now and when I release my next tutorial I have given you enough information to start building up your own stories!
In Part 3 I’ll go over additional and more efficient methods to set up your cameras, camera movement, and tasks.
Until then, keep scripting my friends! Please DM me if you have any questions!
LINK TO MY SOLUTION: https://drive.google.com/file/d/1ypwO2V0slT34tBjB0sajCf1L7nPk7Fgi/view?usp=sharing
-
-
PART 1: SETUP AND COMMANDS
Hello all and welcome to my tutorial series on how to script and create your very own levels for Jedi Academy!
Jedi Outcast and Jedi Academy have had a long history with mods, and ever since I could remember I always browsed the old Filefront site, looking for new SP maps and mods to try out. Remembering old favorites like the Dark Alliance series, Escape Yavin IV, Deception, and others, those mods and many more inspired me to want to learn how to make my own missions.
But there was a problem. There were no tutorials!
This was a huge turnoff for me, since of course with no tutorials, how could we learn?! This all changed for me back in 2012, when I noticed one day that the author of the Deception mod actually left behind the source files for his mod! Taking an interest, I began studying those files, and through those files I was able to learn how to create my own missions. If the author of that mod ever sees this, thank you so much!
With the knowledge I obtained from that mod, I was able to get started. But it wasn’t until 2017 when I made my recreation of The Phantom Menace’s iconic Duel of the Fates that I now create missions regularly. Now years later, I help to create missions for the Galactic Legacy mod.
I’m writing this series in hopes to inspire more members of this community to create your own stories.
WHAT YOU NEED
-
BehavED: https://jkhub.org/files/file/1137-jedi-academy-sdk/
-
Notepad++ (Highly Recommended): https://notepad-plus-plus.org/downloads/
-
Radiant: The one I personally use is https://github.com/Garux/netradiant-custom/releases but you can use any version of Radiant that you want. Please keep in mind using older versions of Radiant may cause some brushes to disappear for whatever reason.
-
Patience
-
A computer
-
An idea (but you can use mine for now)
THINGS TO KEEP IN MIND
-
I will be writing these tutorials from both an Entity Modding and Radiant perspective (as separate tutorials). This is strictly for my own personal preference and you can use whatever you want.
-
I’m writing these tutorials strictly for Jedi Academy. However, most (if not all) of what you can learn here should also be possible for Jedi Outcast.
-
I will be using Galactic Legacy for my test environment, but you can use whatever you want. I strongly recommend OpenJK.
-
I am using the CD version of Jedi Academy (old much?) but you can use any version of Jedi Academy you want (I hope you’re not pirating though)
-
This is NOT a mapping tutorial, but I will try my best to explain map entities as I use them during this series. You don’t need to be an expert mapper to perform well (my skill set with making maps is very limited), but I’d strongly recommend having some prior knowledge.
-
I will provide download links for every project we work on together to help you get started. I’ll provide downloads for the required starting files and the “solution”.
-
Don’t get discouraged! It’s very easy to get burned out on these projects. Tackle your work at your own pace and take any and all breaks you need.
-
You are more than welcome to Private Message me here and on Discord. I’ll always respond to you and will answer your questions to the best of my ability (just please don’t be rude)
TAKING YOUR FIRST STEPS INTO A LARGER WORLD
Now that you’ve hopefully read my super cheesy introduction and downloaded everything I have suggested, let’s get started! I’ll first walk you through how to install the SDK for Jedi Academy
Go ahead and download the BehavED file I linked for you. In reality this is just the full SDK for Jedi Academy. Once you’ve downloaded the file and opened it, you’ll notice an EXE file and a txt file.
Run the EXE file provided and click on “OK” on the first prompt. On the next window, you’ll see “Unzip to Folder” and a dummy file path. Replace this with the file path to where you want to unzip everything. I personally have it extracted to my Gamedata folder, but you can extract everything to wherever you want.
Once you have your unzipping location set, click “Unzip” and let the program do its thing. If you get an error message, try removing the EXE file from the zip file and run it as an administrator.
Go to the location where you extracted the files and look for a folder called “Tools”. Open the folder and you should see an EXE file called “BehavED”.
Double-click on BehavED (recommend that you run as an administrator) and prepare to be amazed as you look at…….a blank screen….
Don’t worry, this is perfectly expected and perfectly safe. We just have a few things to sort out first.
On the right-side of the window, look for a button called “Prefs” and click on it (or just press the P key on your keyboard).
On the preferences window, you’ll see a few input dialogs expecting some file paths. If you have a W drive or K drive, you’re more than halfway there. For everyone else, just follow along as best you can.
We’re going to be changing 4 of these and the other 2 will be ignored. We’ll start from top to bottom starting with “Script Path”.
Script Path will simply be the default location where BehavED will start from when you click on the “Load” and “Save” Buttons. However, BehavED will often remember where you last browsed your files from. I will set the path to my JKA’s base folder, and I’ll create a folder in my base folder called “Scripts”.
So for me personally, my path will be “C:\Program Files (x86)\LucasArts\Star Wars Jedi Knight Jedi Academy\GameData\base\scripts”
Next we’ll move past SourceSafe script path and SourceSafe INI file location and go to “Location of IBIZE.EXE”.
This file can be found in your Tools folder where the BehavED exe file is, so just set its path to there. My personal path is “C:\Program Files (x86)\LucasArts\Star Wars Jedi Knight Jedi Academy\GameData\Tools\IBIze.exe”
Moving right along we’ll go to “Command Description File”. The software is looking for something called “behavED.bhc” which (like IBIze.exe) is in your Tools folder. If you’d like, you can copy and paste your same file path to IBIze and you’re done! My personal path is C:\Program Files (x86)\LucasArts\Star Wars Jedi Knight Jedi Academy\GameData\Tools\behavED.bhc”
Finally we’ll head over to “Source Files path”, and like the last two, the initial file path will be exactly the same, with the folder it’s looking for being called “SourceForBehavED”. My personal path is “C:\Program Files (x86)\LucasArts\Star Wars Jedi Knight Jedi Academy\GameData\Tools\SourceForBehavED”.
Once you’ve filled in everything, make sure the checkbox labeled “Use SourceSafe?” is NOT checked, and your preferences section should look a little something like this.
Once you’re satisfied with everything, click OK and your BehavED window should change into something like this:
Congratulations! BehavED is now up and running and you can make your first mission!
However, before we go into our first project, let’s go over some of these commands! This will be a simple overview/description and I won’t go into the major details right now until we get to the appropriate tutorial. You can skip this section if you’d like, but this can give you a good start to play around with these commands as I continue writing these tutorials.
Starting from top to bottom:
-
Flush: Clears all script commands on an entity. Useful if you have situations where an NPC may be executing a script and another one is called too soon (as it’ll be ignored)
-
If: A conditional statement where the block of code is executed provided that certain conditions are met.
-
Else: An alternative statement where a different block of code is executed if the previously declared “IF” statement was not met.
-
Loop: Tells the game to perform the same action an “x” amount of times. If set to a negative value, the script will run forever.
-
Affect: Probably the most common command you’ll use, affect a specific entity, NPC, or even the player to have them perform an action. Commands executed in the “Affect” are ignored by the main script outside of the block and can be overwritten unless the script is told to wait.
-
Run: Runs another script.
-
Wait: Halts the execution of the script for an x amount of milliseconds. 1000 milliseconds = 1 second. This is another very common command.
-
WaitSignal: Halts the execution of the script until a “Signal Command” is passed.
-
Signal: Sends out a signal to continue the script if a “WaitSignal” command is present.
-
Sound: Tells the game, character, or entity to play a sound.
-
Move: Tells an entity to move from one location to another, only usable on Map Objects.
-
Rotate: Tells an entity to rotate from one angle to another, only usable on Map Objects.
-
Use: Uses an entity
-
Kill: Kills the NPC or Player
-
Remove: Removes an entity or NPC.
-
Print: Similar to a target_print map entity, prints text on the player’s screen (used during the JKA campaign when the game tells you to kill or spare Rosh)
-
Rem: This is a comment, it does nothing to the script but can be very useful for referring to your scripts in the future if you’re looking to edit them or release your source to the public.
-
Declare: Declares a variable in the map to be used for whatever you need.
-
Free: Removes your declared variable from memory.
-
Set: (E “Set_Types” only), used with the “Affect” Command, sets an attribute for an entity, NPC, or player, or tells an entity, NPC, or player what to do, also a very common command you’ll use.
-
Set: (<str> <str> only) Sets a value of a previously declared variable to whatever you need.
-
Camera: All the camera commands, your number 1 command for cutscenes.
-
Task: An independent block of code used with the “Affect” command to help organize telling what an entity or NPC to do.
-
Do: Used with a “task” command, tells the script to execute the task. However, the script continues to run while the task is being executed.
-
Wait: Tells the script to stop until a previously executed Task is completed.
-
DoWait: A combined use of the previously mentioned “Do” and “Wait” Commands, executes the aforementioned task and halts the rest of the script until the task is completed.
-
Play: Tells the game to play a ROFF file. I know nothing about them, but they’re apparently used during the Outcast and Academy campaigns to simulate certain map objects to use “physics” (like the pipes breaking in the first Artus Mine level or pushing the rock in the T3_Rift mission).
And that concludes the basic overview of each BehavED script command and the end of this tutorial. In the next tutorial, we’ll take a look at creating our first script and a very basic cutscene!
Kessno, Wc3 Tutorial and OCD2 like this -
-
Hope you all had a great Thanksgiving! You know what we're thankful for? All of you! (Ok that was pretty cheesy)
MENU OVERHAULS
This update we've really been focusing on overhauling a number of menus present in the mod. As of typing this report, many of the menus we've been planning to overhaul have been completed, with 1 or 2 more menus remaining.
Primarily, the biggest changes you'll be seeing are in the Character menu. Through the magic of coding, we have the menu made so both the character and NPC spawner menus use the same files. The hope is that this change will help us to save a ton of memory and prevent the game from utilizing more memory to load in more menu items than necessary.
Below are two screenshots illustrating the dual-functionality of the menu. The first screenshot shows the menu in "Character Mode", while the second screenshot shows off the same menu in "NPC Mode". The 5 faction icons you see below will be pertaining to the random Jedi and Sith NPCs we introduced many years ago, placing them in a much more convenient place.
Another really cool cosmetic feature is that lightsabers can now be freely selected and applied to any character you select. Whether it's a character with a set lightsaber or someone not assigned one at all, you will now have the freedom to customize the elegant weapon from a more civilized age for any character.
NPC FREE CHOICE SYSTEM
This update also saw to the addition of some new and improvements to the NPC Free Choice System.
To begin, a lot of optimizations to the existing code have been made. Now what does this mean for you? The player? Aside for some background stuff you'll probably never notice, we have fixed one glaring bug with the Free Choice system, which is that now NPCs with pre-set skins can now have their skins changed.
The next feature (which is really cool!) is the addition of the first set of a new system of NPC Commands!
For a long time, we've been asked by many people to give them the ability to further control NPCs. Now we're giving you that option!
With this next update, 5 new NPC Commands will be making their way to the mod! These are:
- Set Animation
- Set Team
- Set Enemy Target
- Set Weapon
- Set Saber
More will be coming, but I felt personally that these would be the best to start with right now.
CONCLUSION
We're looking forward to putting this update behind us so we can continue to put together new content. We recently posted a new Community Feedback form on our Discord server, please feel free to fill it out if you'd like to have a voice on which direction this mod should go next.
LINK TO FORM: https://docs.google.com/forms/d/1BYTO9dlwRRggII19MxE-pVL5-gBLwLdfrX50xmqJUY0/edit#responses
Thank you for following the development of Star Wars: Galactic Legacy, and may the Force be with you.
Lancelot, PierceDoughty, MagSul and 1 other like this -
Hope you all had a great October! Let's get started!
MENU OVERHAUL
This month, all efforts were focused on the Character and NPC menus, and aside from some bugs needing fixing, the menus are very close to completion! Taking inspiration from the Galaxy of Heroes mobile game, we were able to code the menu to better display the character, and for Jedi and Sith alike, coded them to hold their respective sabers. Another cool thing is that now the Character and NPC menu will now share the same menu! Thus saving space!
Additionally, thanks to the wonderful people at JK:Enhanced, we have also implemented the ability to manually spin around your respective character from any horizontal angle! We also coded a new feeder system so we no longer have to take up precious Menu memory space on manually inserting every single character skin, and they'll now be automatically added. Anyone wishing to modify the menu for themselves will also receive this benefit!
Furthermore, we streamlined the UI and code a bit more to make accessing customization options and using them much more user friendly and engine friendly. Maybe prior CVARs coded for the NPC Free Choice System back at the mod's launch back in 2020 have seen to a major redesign. Though you, the player, may not notice anything, those of you in our community that have peeked at our source code may notice a few changes!
Finally, we're introducing Lightsaber customization to the character menu! A heavily requested feature, taken from the NPC Free Choice System, you will now be able to modify your character's lightsaber to your liking, with a live display of the elegant weapon being held by your favorite character!
Please note that these screenshots are from a current dev build so many things are in the works to be changed.
FACTION OVERHAULS
Another element we're introducing to the Character and NPC menu is better Faction Organization. Many characters were introduced to certain factions and could make it fairly difficult to find your a character you were looking for. To better organize everything (and to allow for the potential for new factions in the future!), the faction selection section of the menu has been expanded to include many other factions in the Star Wars universe!
New Factions being recognized are the following:
- Darth Revan's Sith Empire
- Brotherhood of the Sith
- Ancient Sith Empire
- Rule of Two Sith
- New Republic
- Galactic Alliance
- Imperial Remnant
- Fel's Empire
- Darth Krayt's Empire
- Sith Eternal
- Hutt Cartel
- Black Sun
- Crimson Dawn/Shadow Collective
- Independent Criminals (Renamed from Criminals)
- Yuuzhan Vong
- Death Watch
- Clan Skirata
- Mandalorian Neo-Crusaders
- Nightsisters
- Revanites
- Eternal Alliance
- Eternal Empire
- Jedi Order
- Sith Order
- Creatures
I understand that this may lead to some concern regarding the potential of even more files to download, and that installation will be an even bigger hassle with more files to keep track of. We have thought about this and have taken steps to make this impact as small as possible, deciding to treat the main pk3s as an overall generalization for characters. The following is a list of changes that will be made:
- Two new Faction pk3s will be introduced, JEDI_SITH; for Jedi and Sith Order characters (including the custom Jedi and Sith), and OTHER (for all other factions).
- The FORCE_USERS faction will be removed, and publicly released as an empty pk3 file. All factions previously in
Furthermore, there are other changes that will be made regarding character re-assignments. Though some changes may be obvious, I will also list some characters that will be given new factions in the next update:
- Darth Maul's Sith variation has been moved from Separatist Alliance to Rule of Two Sith
- Maul's criminal/Rebels variations have been moved from Separatist Alliance to Crimson Dawn
- Savage Opress has been moved from Separatist Alliance to Crimson Dawn/Shadow Collective
- Talon Karrde has been moved from Criminals to New Republic (currently not pictured in the below screenshots)
- Ren has been moved from First Order to Crimson Dawn
- Gault Rennow, HK-55, and Nico Okarr have been moved from Criminals/Civilians to Eternal Alliance
- And more! (Full list coming later)
Here are some screenshots! Again, please note that these screenshots are from a current dev build so many things are in the works to be changed (such as "Choose your Side" likely being removed)
CONCLUSION
It's been a busy month, and the work isn't quite finished yet, but we are close! We're still looking at other possible features we would like to include (controller support????), but for now we're making some steady progress.
After this is completed, production on the Father vs. Son remake will continue (FOR REAL THIS TIME!).
THank you for following the development of Star Wars: Galactic Legacy, and may the Force be with you.
-
An interesting month, to say the least.
FATHER VS. SON REMAKE
This month at last saw to the beginning of production for the long-awaited Father vs. Son remake. So far, progress has been relatively smooth, with a number of improvements made to allow for a much more authentic experience.
With the help of our mapper Lwkill, sound editor Commander Langz, and of course the Movie Battles II team, we have successfully begun the process of remaking the mission with a much higher standard of quality never before seen in any of our other missions.
For starters, thanks to the Movie Battles II team, we have been able to remake the mission on their map depicting the Emperor's Throne Room from Return of the Jedi. We are very grateful that they are allowing us to use their map for this mission and we cannot thank them enough.
Furthermore, our sound editor Commander LangZ has taken the time to use a 3rd party site to remove all background audio from the audio clips. This practice will be used in future missions (and re-iterating our previous ones) to get as clear a sound as possible without needing to rely on film rips with (possibly) overlapping music tracks or more in the background. Another user has already provided us with the audio used in all of our current missions, and we will be applying them soon.
You can view our first set of changes here:
https://www.youtube.com/watch?v=H-wOk09T_-c&ab_channel=StarWars:GalacticLegacy
Overall progress has reached the walkway cutscene (where Vader throws his lightsaber), and we suspect the rest of the mission shouldn't take too long to complete.
FATHER VS. SON EXTENDED ENDINGS
Introduced with Duel of the Fates back in our initial release in December 2020, we do have extended endings planned for all possible endings for Father vs. Son. However, this has forced us to make an important decision.
The original mission featured 7 possible endings, with 2 possible for Luke, 2 for Vader, and 3 for Palpatine. However, after much time contemplating, in order to reach the best quality we can, the number of possible endings will be reduced to 4 from the original 7, with an official Palpatine POV being scrapped (and instead being unlocked through one of Vader's endings).
We did this as we felt many of the intended endings would feel too similar to each other, and we wanted the freedom to tell a unique story for each character.
MENU OVERHAULS
Unfortunately this was not a month without some degree of drama. After a lengthy discussion with the Knights of the Force 2.1 leadership, we have been asked to fully redesign a number of our menus, including (but not limited to):
- Character Selection
- NPC spawner
- Mission SelectionAs of writing this article, Knights of the Force 2.1 has been re-uploaded to Moddb and Nexus Mods featuring all content developed by the Galactic Legacy team up until the split (which we didn't consent to). As Fire Phoenix has insisted on believing that our menus are direct copycats of his, we have been forced to take action.
Phoenix (as of writing this) has agreed to remove all of our content from KotF 2.1 provided we remake the aforementioned menus (and probably some others) from scratch, which we always intended to do so, but hoped to postpone. Regardless, we have already begun the process of remaking the Character selection menu, with the menu featuring a specific character already nearing completion.
Below is a current WIP screenshot of the new menu, we will show more as we continue to develop. As these changes are currently conditional of us completing our next update, we will not be able to continue work on anything else until the menus are remade (which is a good thing because we're currently awaiting new content for the Father vs. Son remake which will take its own time).
NEW CHARACTERS
We're currently also going over some new characters for the mod (as we so often like to do). Below is a small list of some of the characters we should be introducing soon:
- Cato Parasitti
- Cydon Prax
- Dash Rendar
- Darth Chratis
- Resistance Trooper
- Githany
- Luke Skywalker (Heir to the Empire)We will of course list more as new characters are added.
CONCLUSION
These menu overhauls are something we've been wanting to do for a very long time and we can't wait to show off more, this along with the Father vs. Son remake, and the next update should hopefully be a very exciting one.
We have a few other things on the backburner right now which I'm not comfortable to reveal at the moment, but as always you can reach us here and our Discord server and we'll be more than happy to answer your questions.
Thank you for following the development of Star Wars: Galactic Legacy, and may the Force be with you.
Circa and PierceDoughty like this -
Hotfix Patch Notes - 09/07/2022
- Corrected Ysanne Isard's NPC menu entry so she appears as intended.
- Added some missing description text for the Third Sister's Inquisitor Mechanic.
- Darth Traya's Lord of Betrayal mechanic will now only allow for her to heal for no more than 2x her maximum health instead of a very large amount.
- Characters in character selection that are intended to have a lightsaber or melee weapon will now receive them as intended.
- Changing your character will now reset your saber styles as intended.
- Fixed Oppo Rancisis's faulty NPC entry where he had an invalid model.
- Corrected multiple overriding shaders causing several maps to lose textures.
- Changed Gerevick's primary weapon from a pair of blaster pistols to a vibroblade, better reflecting his appearance in KOTOR II.
- Corrected the helmetless skin for the custom clone trooper so he appears as intended.
- Added some error checking to correct a rare issue where the lightsaber menu would display options for all lightsabers at the same time.
- Fixed Meetra Surik's faulty appearance in The Trayus Core mission.
- Updated Cal Kestis's lightsaber sounds
- Updated the Electrostaff sounds
- Updated the Protocol Droid footstep sounds. -
Patch Notes - 09/02/2022
HIGHLIGHTS
- NEW MISSION: THE LAST JEDI; With the Resistance cornered, Luke Skywalker confronts his nephew Ben Solo on the salt-covered world of Crait to allow the Resistance time to escape.
- RESTORED MISSION: FATHER VS. SON; Restored after initially being cut, relive the iconic duel in Return of the Jedi, play as Luke Skywalker, Darth Vader, or Emperor Palpatine as you partake in the duel that decides the balance of the Force.
DISCLAIMER: The Father vs. Son mission is a direct port from the original mission released in Knights of the Force 2.1. As such, no changes to the original mission (except for the addition of the end credits and Luke's saber actually moving during a cutscene) have been made. Any and all remaining bugs will not be addressed in lieu of the Father vs. Son remake coming at a later date.
- NEW LANGUAGE SUPPORT: FRENCH; Galactic Legacy propose désormais un support en français!MISSION IMPROVEMENTS
JEDI ACADEMY: EMERGENCY ASSISTANCE - BAKURA
- Jaden will no longer activate his lightsaber and turn in a strange direction during the opening cutscene.
REVAN VS. MALAK
- Replaced the dead Jedi with KOTOR-accurate Jedi because IT'S. MORE. CANON!
- Added NPC barriers to prevent non-player characters from falling off the map or falling into areas of the map they can't get out of easily.
- Fixed clipping geometry in the map to make destroying the Jedi tanks significantly easier, including adding the ability to strike the Jedi with a Lightsaber possible or with Force Lightning much easier.
- Changed NPC teams for the cutscene NPCs for Revan vs. Malak so they look in the direction they're supposed to more often.
- Rewrote the overall scripting logic for Stage 3, which should prevent soft-locks with Darth Malak if the player destroys specific Jedi tanks.
- Fixed an audio issue where Malak's final two lines of dialogue in the first cutscene were clipping suddenly.
- Changed Revan's lightsaber hilt to the correct hilt in all cutscenes.
- Cutscene NPCs of Revan and Malak should no longer make sounds when accidentally hit by force powers during normal gameplay.
- Added Darth Malak's previously cut "Savior, Conqueror, Hero, Villain" line as a taunt to be played at some point during Stage 2 (The ambush stage).OPERATION: KNIGHTFALL (LORD VADER)
- When selecting Lord Vader's POV for the first time, a pop-up will display explaining the exclusive buff to Force Grip during the mission.
DUEL OF THE FATES (QUI-GON JINN)
- Replaced Eeth Koth and Luminara Unduli in the final scene with A'Sharad Hett and Shaak Ti.
- Added Serra Keto, Cin Drallig, and Yaddle to the final scene.NEW/UPDATED CHARACTERS
OLD REPUBLIC
- Meetra Surik (Updated model)
SITH EMPIRE
- Darth Plagueis (New Model)
- Darth Talon (Galaxy of Heroes)
- Darth Tenebrous
- Exar Kun (New Model)
- Freedon Nadd
- Sith Trooper (Darth Krayt's Empire)GALACTIC REPUBLIC
- Anakin Skywalker (Redeemed, Original)
- Obi-Wan Kenobi (Shadow Collective Armor)
- Obi-Wan Kenobi (Exile)
- Obi-Wan Kenobi (Hermit)
- Obi-Wan Kenobi (Jabiim)
- Plo Koon (Jedi Power Battles)
- Tera SinubeREBELLION
- Cara Dune
- Iden Versio (Rebel)
- Juno Eclipse (Updated model + moved)
- Leia Organa (Lothal)
- Luke Skywalker (Crystal Star)
- Rebel Assault Commando
- Rebel Infiltrator
- Rianna Saren
- Rebel Spec Force
- Rebel Spec Force MarineGALACTIC EMPIRE
- Iden Versio
- Imperial Officers (Updated Models)
- Lumiya (Model Update)
- Reva/Third Sister
- TIE Pilot (Updated Models)RESISTANCE
- Finn (Resistance Hero)
FIRST ORDER
- Ben Solo (Pre-fall)
- Ren
- Supreme Leader Snoke (Black Robe)BOUNTY HUNTERS
- Black Krrsantan
- GerevickCRIMINALS
- Bando Gora Slave
- Burg
- Guri
- Pyke Syndicate Members
- Q9-0
- Trandoshan (KOTOR)
- Xi'an
- Zarien KheevCIVILIANS
- Doogo
- Kimmi Chyler
- Pax Bonkik
- Laigrek
- Terentatek
- Willrow HoodMANDALORIANS
- Din Djarin (Pre-Beskar)
FORCE USERS
- Nightsister
NEW/UPDATED LIGHTSABERS
All lightsabers have been assigned appropriately to their respective characters
- Ady Sun'Zee
- Anakin Skywalker (Updated Model)
- Chop'aa Notimo's Staff
- Dan G'vash
- Darth Bane (Renamed original hilt to Darth Bane (Curved))
- Darth Talon's Lightsaber (Updated Model)
- Fourth Sister
- Grand Inquisitor (Added new Rebels entry)
- Halcyon Training Saber
- Jedi Temple Guard (Rebels)
- Luke Skywalker (ESB) (Updated Model)
- Lumiya's lightwhip
- Maris Brood (Updated Model)
- Mother Talzin's spirit blade
- Nari
- Ninth Sister
- Obi-Wan Kenobi (Exile)
Rey (TFA + TROS) (Updated Models)
- Second Sister
- Sharad Hett
- Tajin Crosser
- Tera Sinube
- Third SisterNEW/UPDATED MAPS
- The Mandalorian: Calodan
- Cloud City
- The Last Jedi: Snoke's Throne Room (Updated)
- The Quad
- Mysteries of the Sith: Sith Catacombs
- Mercenary Battle
- Wrecked Alien Spacecraft
- Rebels: World Between Worlds
- Rebels: Jedi Training Room
- Asteroid 77
- Asteroid H5
- Cavrilhu Pirate Base
- Faru
- Padme's Apartment
- Project Rocketlauncher (with NPCs)
- Carida Academy
- RPG Dreadnaught
- RPG Yalara
- Star Destroyer II
- The Great Palace
- Vong Death Duel Arena
- YT-2000eFORCE POWER UPDATES
FORCE DESTRUCTION
- Force Destruction now requires a minimum of 70 force points in order to cast it.
FORCE BLAST
- Increased force power cost from 30 to 40 (given the OP nature of the power).
REMOVED NPCS
All NPCs removed have been removed in lieu of the currently functionality of the NPC Free Choice System
- Finn (Lightsaber)
- Aurra Sing (Sniper)LIGHTSABER FIXES
- Re-designed General Grievous's 4-arm lightsaber to change the hilts to more prequel-accurate hilts.
- General Grievous's 4-armed lightsabers can no longer be thrown and the kata move has been changed to the dual-saber spin attack.MODEL IMPROVEMENTS/FIXES
- Fixed an issue with General Skywalker's Cloaked skin where his boots were showing up as an invalid texture.
- Corrected several instances where customizable models were not showing the correct options.
- Corrected a shader issue which was causing most EG-5 Hunter Droid appearances to appear strange.
- Updated Moff Gideon's hand texture to better reflect his overall skin color
- Removed several redundant multiplayer models of characters with unique animations
- Added a glowing effect to Sith Eternal Emperor Palpatine's eyes, better reflecting his appearance from The Rise of Skywalker.
- Fixed a Shader issue with Supreme Leader Snoke so his specular maps apply as intended.ADDED ANIMATIONS
The following characters have been assigned the KOTOR Stance Animations
- Alek Squinquargesimus
- Atris
- Atton Rand
- Bao-Dur
- Bastila Shan
- Brianna
- Calo Nord
- Canderous Ordo/Mandalore the Preserver
- Carth Onasi
- Cassus Fett
- Czerka Corporation Guard
- Dark Jedi
- Darth Malak (Modified)
- Darth Nihilus
- Darth Revan/Jedi Knight Revan
- Darth Sion
- Darth Sion (TFU)
- Darth Traya/Kreia
- Dorak
- Dustil Onasi
- Jedi Exile
- Jolee Bindo
- Jorak Uln
- Juhani
- KOTOR Jedi Knights
- Mandalore the Ultimate
- Mandalorian Neo-Crusaders
- Meetra Surik
- Mical
- Mira
- Mission Vao
- Queen Talia
- Republic Soldiers/Telos Guards
- Saul Karath
- Sith Assassin
- Sith Commander
- Sith Officer
- Sith Warrior
- Taris Swoop Gang Members
- Trask Ulgo
- Teer'aa & Seer'aa
- Vandar Tokare
- Visas Marr
- Vrook Lamar
- Yuthura Ban
- Zaalbar
- Zhar LestinMAP FIXES
All maps with intended death drops will now kill the player or npcs instead of healing them.
VEHICLE CRASH FIXES
The following maps have been addressed regarding vehicles crashing the game if a respawning vehicle was present
- Battle of Hoth
- Battlefront Yavin
- Battle of Geonosis
- Battle over Coruscant
- Boonta Eve
- Coruscant Speedway
- Coruscant Streets
- Jurancor Park
- Korriban Citadel
- Mos Kreetle
- Naboo Palace
- Tatooine Outskirts
- Trade Federation Ship v1
- UtapauMULTIPLAYER CRASH FIXES
The following maps have been addressed and will no longer boot the player to the main menu when attempting to access them through the Create Game menu.
- Alzoc III Spaceport
- Bloodmine Shaft
- Coruscant Heights
- Crait
- Dark Temple
- Davik's Estate
- Eternal Lair of Ragnos's Disciples
- Emperor's Throne Room
- Eurocorp Citadel
- Gulf of Souls
- Ilum
- Inferno
- Jedi Temple Training Room
- Jedi Trial Arena
- Talon Karrde's Lair
- KOTOR II Pack (Some removed, others fixed)
- Project: Rocketlauncher
- Sultanate of Ruusan
- Shola Sith Temple
- Sith Temple v2
- The Bridge
- The Last command
- Twilight on Tatooine
- Underground Fortress
- Vader's Meditation Chamber
- Vjun Meditation ChamberBATTLE OVER CORUSCANT
- Fixed an issue with vehicles respawning on top of each other, causing the game to crash.
BOONTA EVE
- Changed the swoops intended to spawn to a version that actually exists in the game.
CORUSCANT SPEEDWAY
- Fixed an issue where the swoop bikes would infinitely destroy themselves and respawn every single swoop, causing crashing.
BATTLE OF ENDOR
- Fixed an invalid Millenium Falcon spawner.
- Removed the initial music from the map featuring film audio from Return of the Jedi.STAR FORGE
- Fixed the previously added waypoints, connecting them together better.
- Lengthened the depth of the chasm between the inner section and outer ring, creating a new death drop.
- Added NPC barriers to prevent them from falling where they shouldn't.
- Improved the lighting of the map.
- Removed the dead Jedi in the machines.MENU/UI FIXES AND IMPROVEMENTS
DATAPAD
- Updated Force Fear's level descriptions to accurately represent the power's current behavior.
SETTINGS
- Corrected an issue where the warning screen was not displaying when changing certain graphical options in the menu.
CHARACTER SELECTION
- Fixed some menu syntax to allow for more rapid scrolling through the menus instead of needing to slightly move the mouse in order to progress.
- Removed a pointless "Apply" button located in the main character selection.
- Clicking on a character will no longer immediately change your character, requiring you to click on the "Apply" button to apply your changes. Done in order to encourage browsing characters.
- Fixed an annoying bug where it was impossible to click on the same character twice after selecting them in the menu.
- Characters with a random lightsaber color (such as generic Jedi) will no longer show a raving lightsaber blade.
- It is now possible to exit the character selection menus by pressing the Esc key, as intended.
- Fixed an issue where Bastila Shan's Jedi appearance was not appearing under the Skins section as intended.
- When selecting a new Skin for a character (where applicable), the name title for the character will no longer change unless the appearance is clicked on.
- The last page visited in the menu will be saved and will open when re-accessing the menu.NPC SPAWNER
- Fixed a syntax issue where the Kneel action for the "Gravely Wounded Behavior" was not working as intended.
- Removed a blank option in the Gravely Wounded Behavior options
- Added some additional menu commands allowing you to rapidly use the arrows to scroll instead of needing to "slightly" move your mouse to continue scrolling through the menu.
- In an effort to encourage browsing, NPCs selected in the menu will no longer immediately be assigned to the Quick Spawn button unless spawned.
- The last page visited in the menu will be saved and will open when re-accessing the menu.SABER SELECTION MENU
- Fixed a bug with the lightsaber menu where the secondary lightsaber for the dual saber selection was not changing to the selected hilt as intended.
- Added some additional menu commands allowing you to rapidly use the arrows to scroll instead of needing to "slightly" move your mouse to continue scrolling through the menu.
- Selecting a lightsaber will no longer change your saber unless you directly apply the changes.
- The secondary lightsaber will no longer disappear when choosing to edit your primary lightsaber.MAP SELECTION MENU
- Added some additional menu commands allowing you to rapidly use the arrows to scroll instead of needing to "slightly" move your mouse to continue scrolling through the menu.
- Fixed an issue where 3 Republic Commando-related maps were not loading as intended.MUSIC SELECTION MENU
- Added some additional menu commands allowing you to rapidly use the arrows to scroll instead of needing to "slightly" move your mouse to continue scrolling through the menu.
- Fixed multiple faulty music entries in the music menu, including adding missing tracks from The Last Jedi, removing music no longer in the mod, removing duplicate tracks, adding or replacing missing tracks, and fixing music that wasn't recognized as valid or (in the case of KOTOR: The Old Republic) ear rapey.WEAPON SELECTION MENU
- Removed an unintended option to select the Lightsaber in the weapon selection menu which would cause the weapon menu to glitch out.
SOUNDSET UPDATES
The following characters have had their soundsets updated or have had brand new ones created
- Darth Desolous
- Darth Phobos
- Kira Carsen
- Komari Vosa
- Luke Skywalker (Jedi Master)MODEL FIXES
- Merged R2-D2's Dagobah appearance to the main model, making it an additional skin instead of a separate model and NPC.
The following models have been addressed and should no longer appear without textures when loading a save game with them present.
- Meetra Surik
- Nomi Sunrider
- Revan
- Darth Traya
- Ulic Qel-Droma
- Darth Krayt
- Darth Kruhl
- Captain Argyus
- Neimodian Security
- Magnaguard
- Battle Droids
- EG-5 Jedi Hunter Droid
- Chop'aa Notimo
- Shadow Collective Member
- Yuuzhan Vong
- Emperor Palpatine (Emperor and Senate skins)
- Deathtrooper (Commander)
- Purge Trooper (Commander)
- Luke Skywalker (ROTJ)
- Lando Calrissian
- Rebel Commando
- Ben Skywalker (Robe skin)
- Sith Eternal Emperor Palpatine
- Kylo Ren
- First Order Stormtrooper
- Pre Vizsla
- Mandalorian Neo-Crusader
- Anakin Skywalker (Dark Lord)
- Dark Starkiller Clone (Default appearance)
- Basil Bonehead/Ermaxis Raygon
- Nosaurian Jedi
- Zabrak Jedi
- Chistori Jedi
- Nautolan Jedi
- A'sharad Hett
- 501st Named Clones (Kix, Hardcase, etc)
- 41st Elite Corps
- 501st Assassin (Sharpshooter renamed to sniper)
- 501st ARC Trooper (Bow_dirty renamed to bow_dirt)
- 501st Clone Trooper
- 91st Recon Corps
- SCUBA Trooper
- Lord Vader (Sith eye skins renamed and shortened, burned renamed to burnt)
- Desert Clone Troopers
- Bail Organa
- Captain Typho
- Captain Keeli
- Clone Trooper (Phase I)
- Clone Shadowtrooper
- Custom Clone Trooper
- Coleman Trebor
- Commander Bly
- Commander Doom
- Commander Fil
- Hound
- Commander Stone
- Commander Thire
- Commander Thorn
- Commander Trauma
- General Kenobi
- Obi-Wan Kenobi (ROTS) (Battleworn skin renamed to Worn)
- Ithorian Jedi (Robed skin renamed to Robe)
- Kamino Security Trooper
- Padme Amidala (Geonosis and Nightgown)
- Senate Commando
- Senator Blount (Aide appearance renamed to Aid)
- Senator Tikkes (Aide appearance renamed to Aid)CODE CHANGES
- Registered several models with custom animations in the code which were preventing them from working properly in the Jedi Academy campaign, such as Darth Vader, Emperor Palpatine, and Jabba the Hutt.
- Fixed a crash-to-menu issue where character models with a model_sp.glm file would crash to menu if accessed through the Jedi Academy campaign.
- Improved the overall functionality of the playermodel command, resetting the player's force powers and preventing dual sabers from carrying over to characters who aren't dual wielding sabers.
- Keeping faithful to Grievous, Grievous's 4-armed lightsaber colors will be determined by the player's primary and secondary lightsaber colors OR the player's choice for Grievous's primary and secondary lightsaber colors when spawning his NPC.
- Jedi and Sith NPCs should no longer use Force Stasis, Destruction, Blast, or Fear while firing Force Lightning.
- Updated icarus script commands to allow the use of Force Blast, Fear, Lightning Strike, and Destruction through scripts.MISCELLANEOUS FIXES
- Gave Jedi Knight Leia Organa Solo force powers as intended.
- Gave all NPCs Force Sense and Mind Trick where applicable.
- Updated Eeth Koth's biography to reflect his fate as depicted in the 2017 Darth Vader series issue #19
- Renamed the "Star Wars KOTOR" category in the Mission select menu to "The Old Republic"
- Fixed a texture issue with the datapad which was causing it to appear strange.
- It is no longer possible to access the invisible lightsaber model in Multiplayer.
- To reflect accuracy to the films and TV shows, Emperor Palpatine's lightning color has been reverted from purple back to blue on all variations.
- Added a missing description for The Ren's lightsaber.
- Refactored and renamed a number of models that would appear textureless when saving and loading a game while using them.
- Removed several multiplayer-only models of Galactic Republic characters
- Removed an outdated Jango Fett model that is no longer being used.
- Replaced Ermaxis Raygon's lightsaber with a new model.
- Selecting the Dark Jedi Female in character selection will now give you a lightsaber as intended.
- Corrected Darth Jadus's character entry where his lightsaber color wouldn't changed to red as intended. -
Archangel35757 likes this


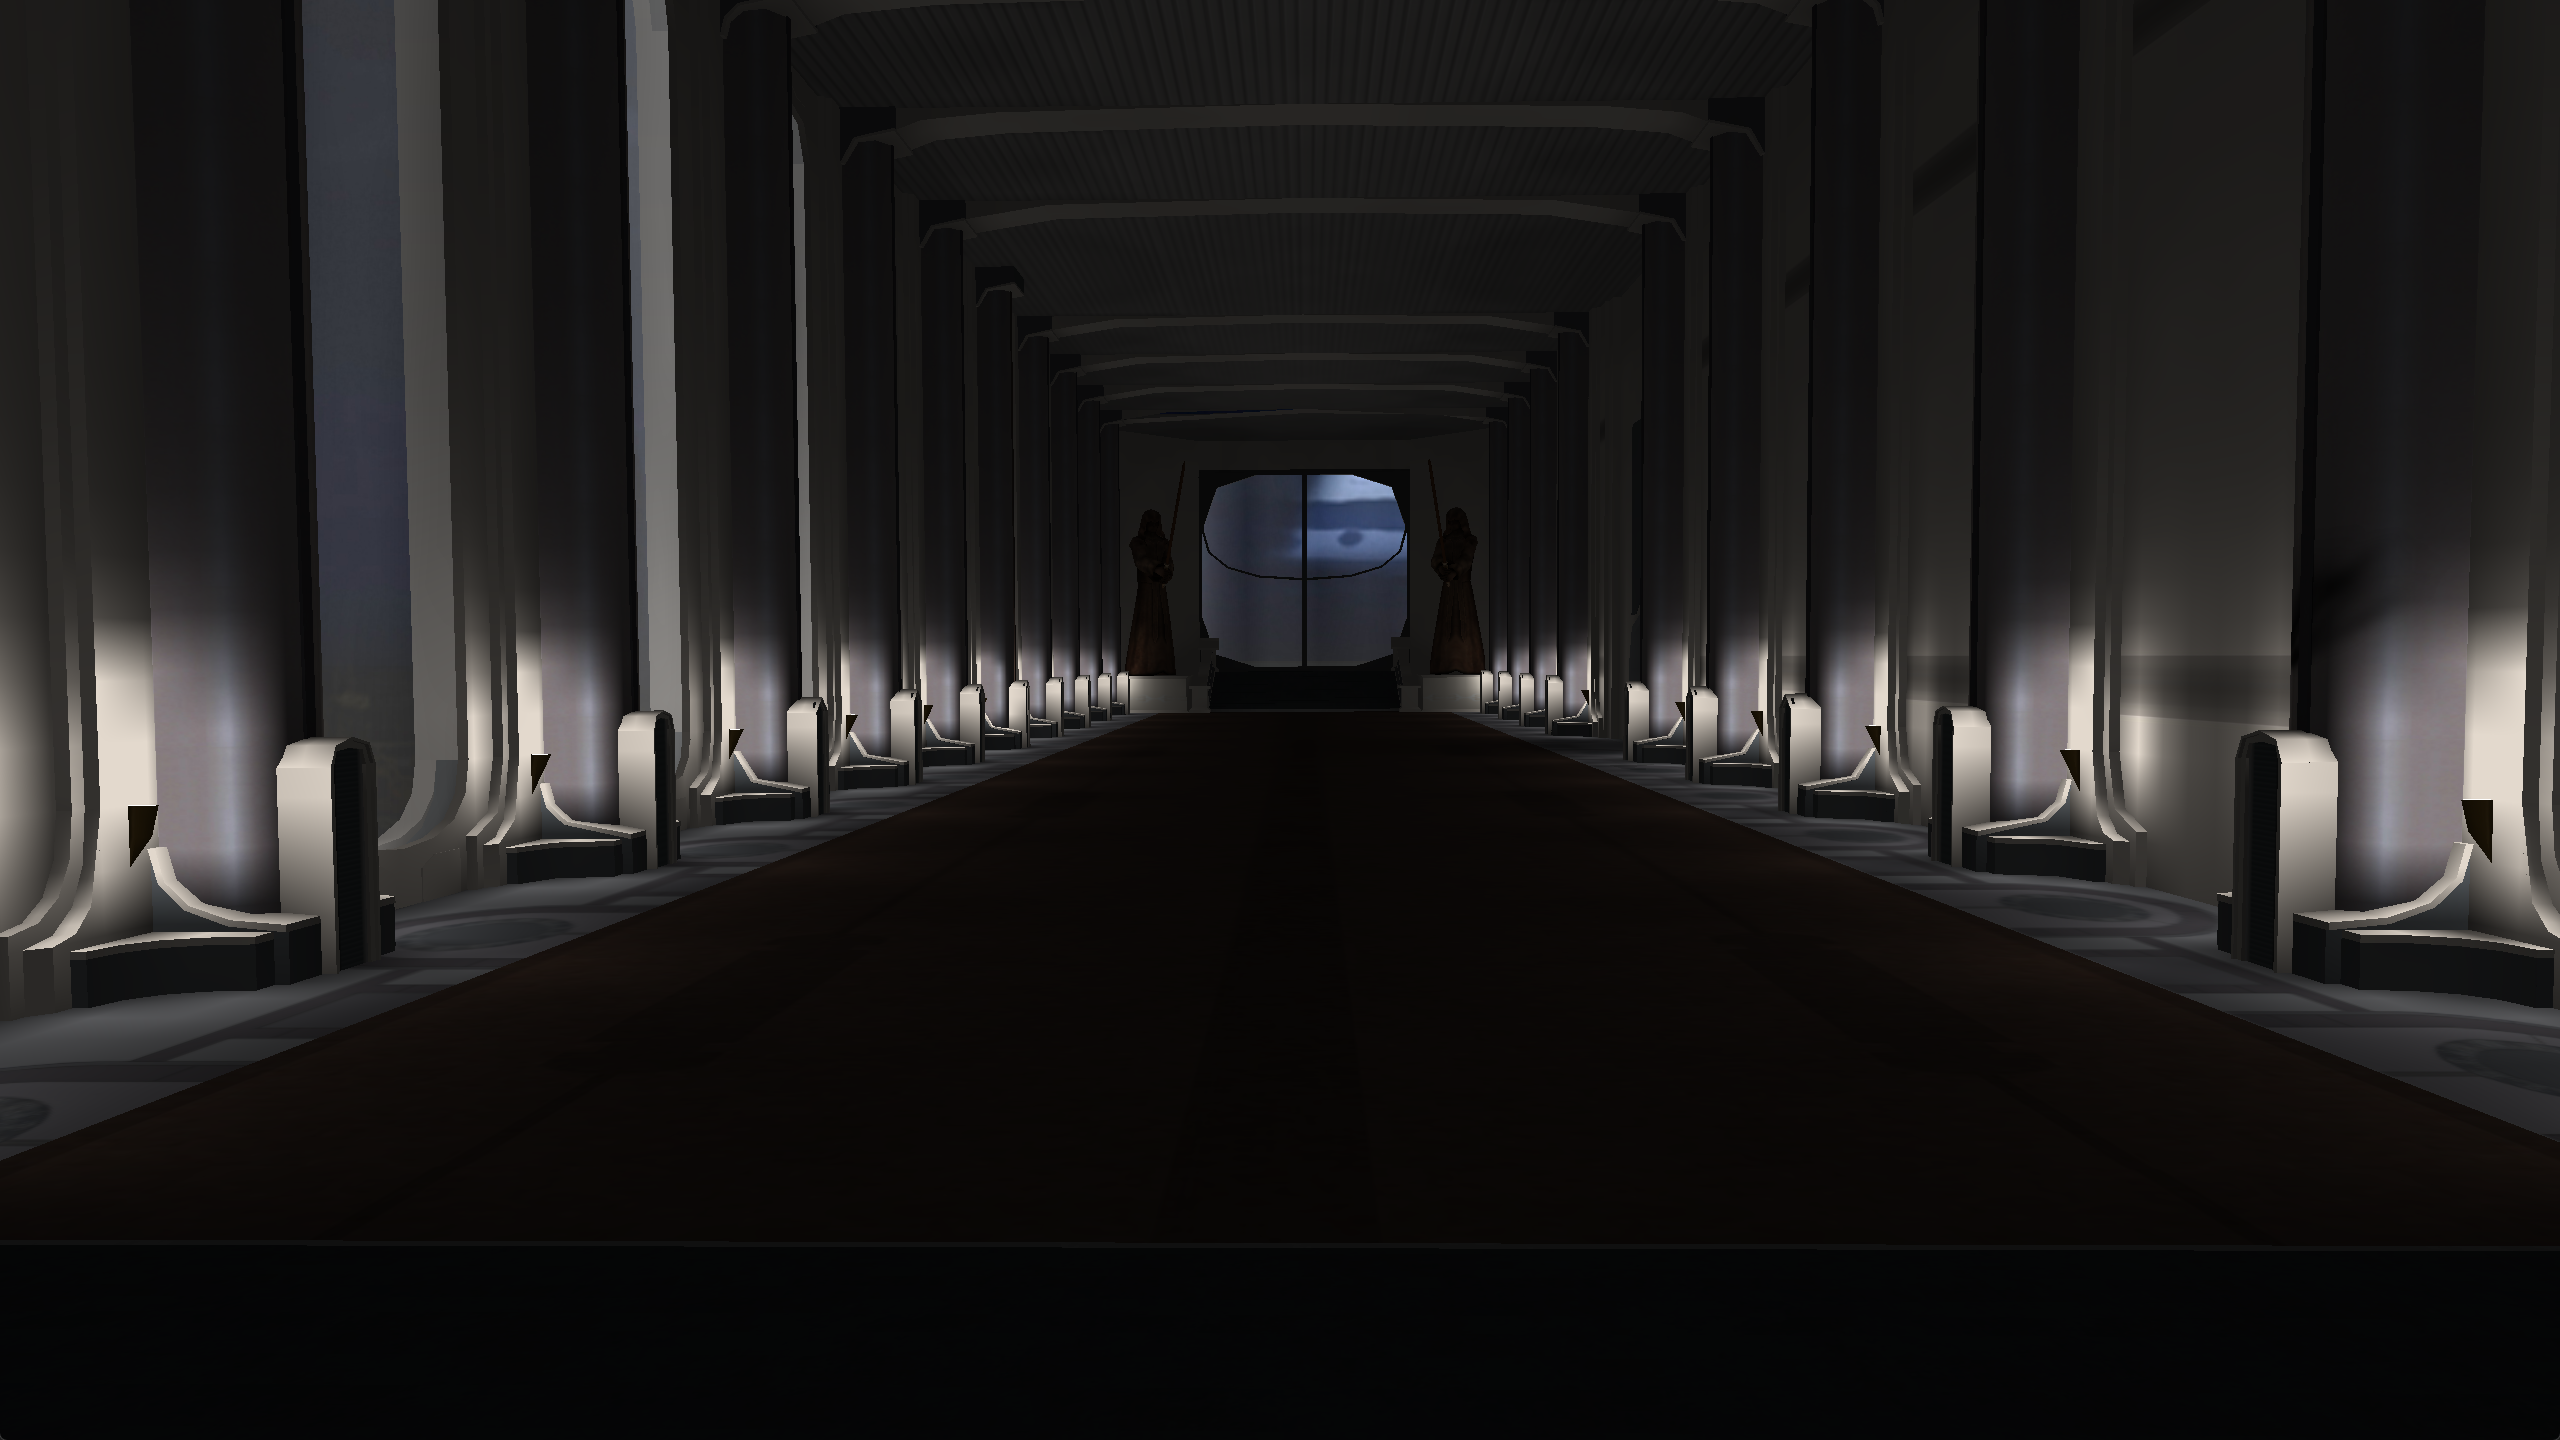
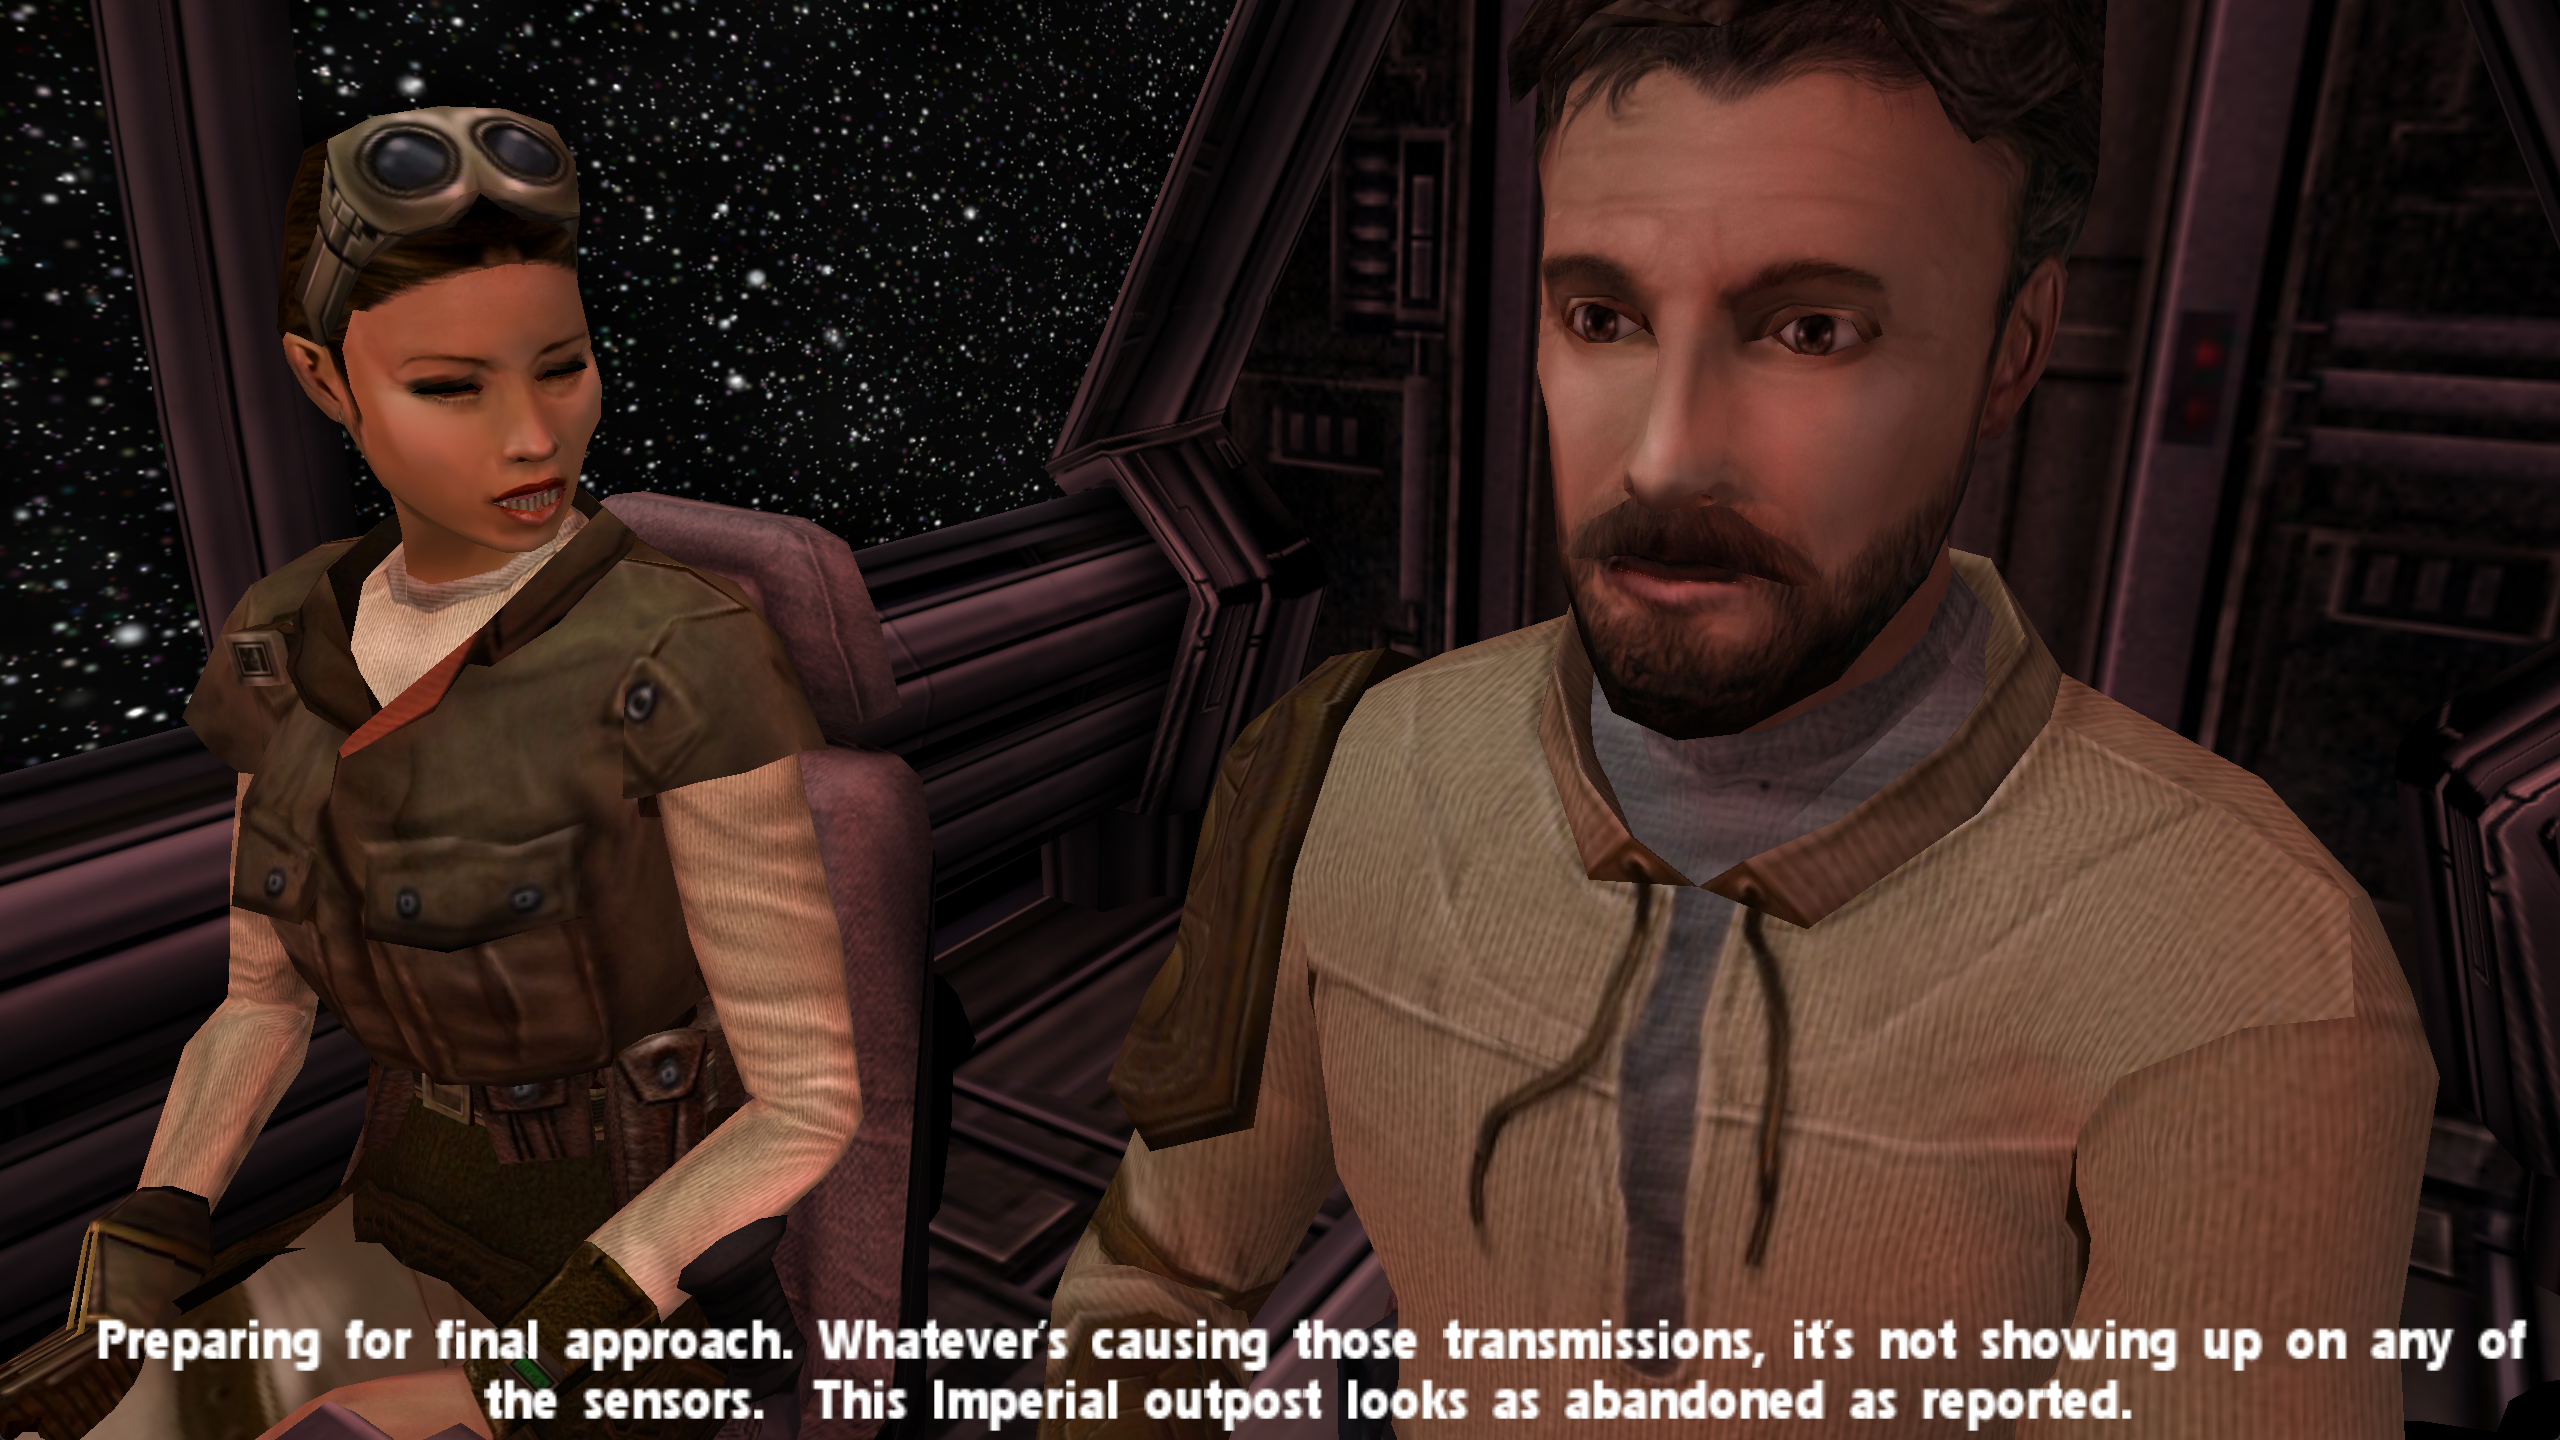
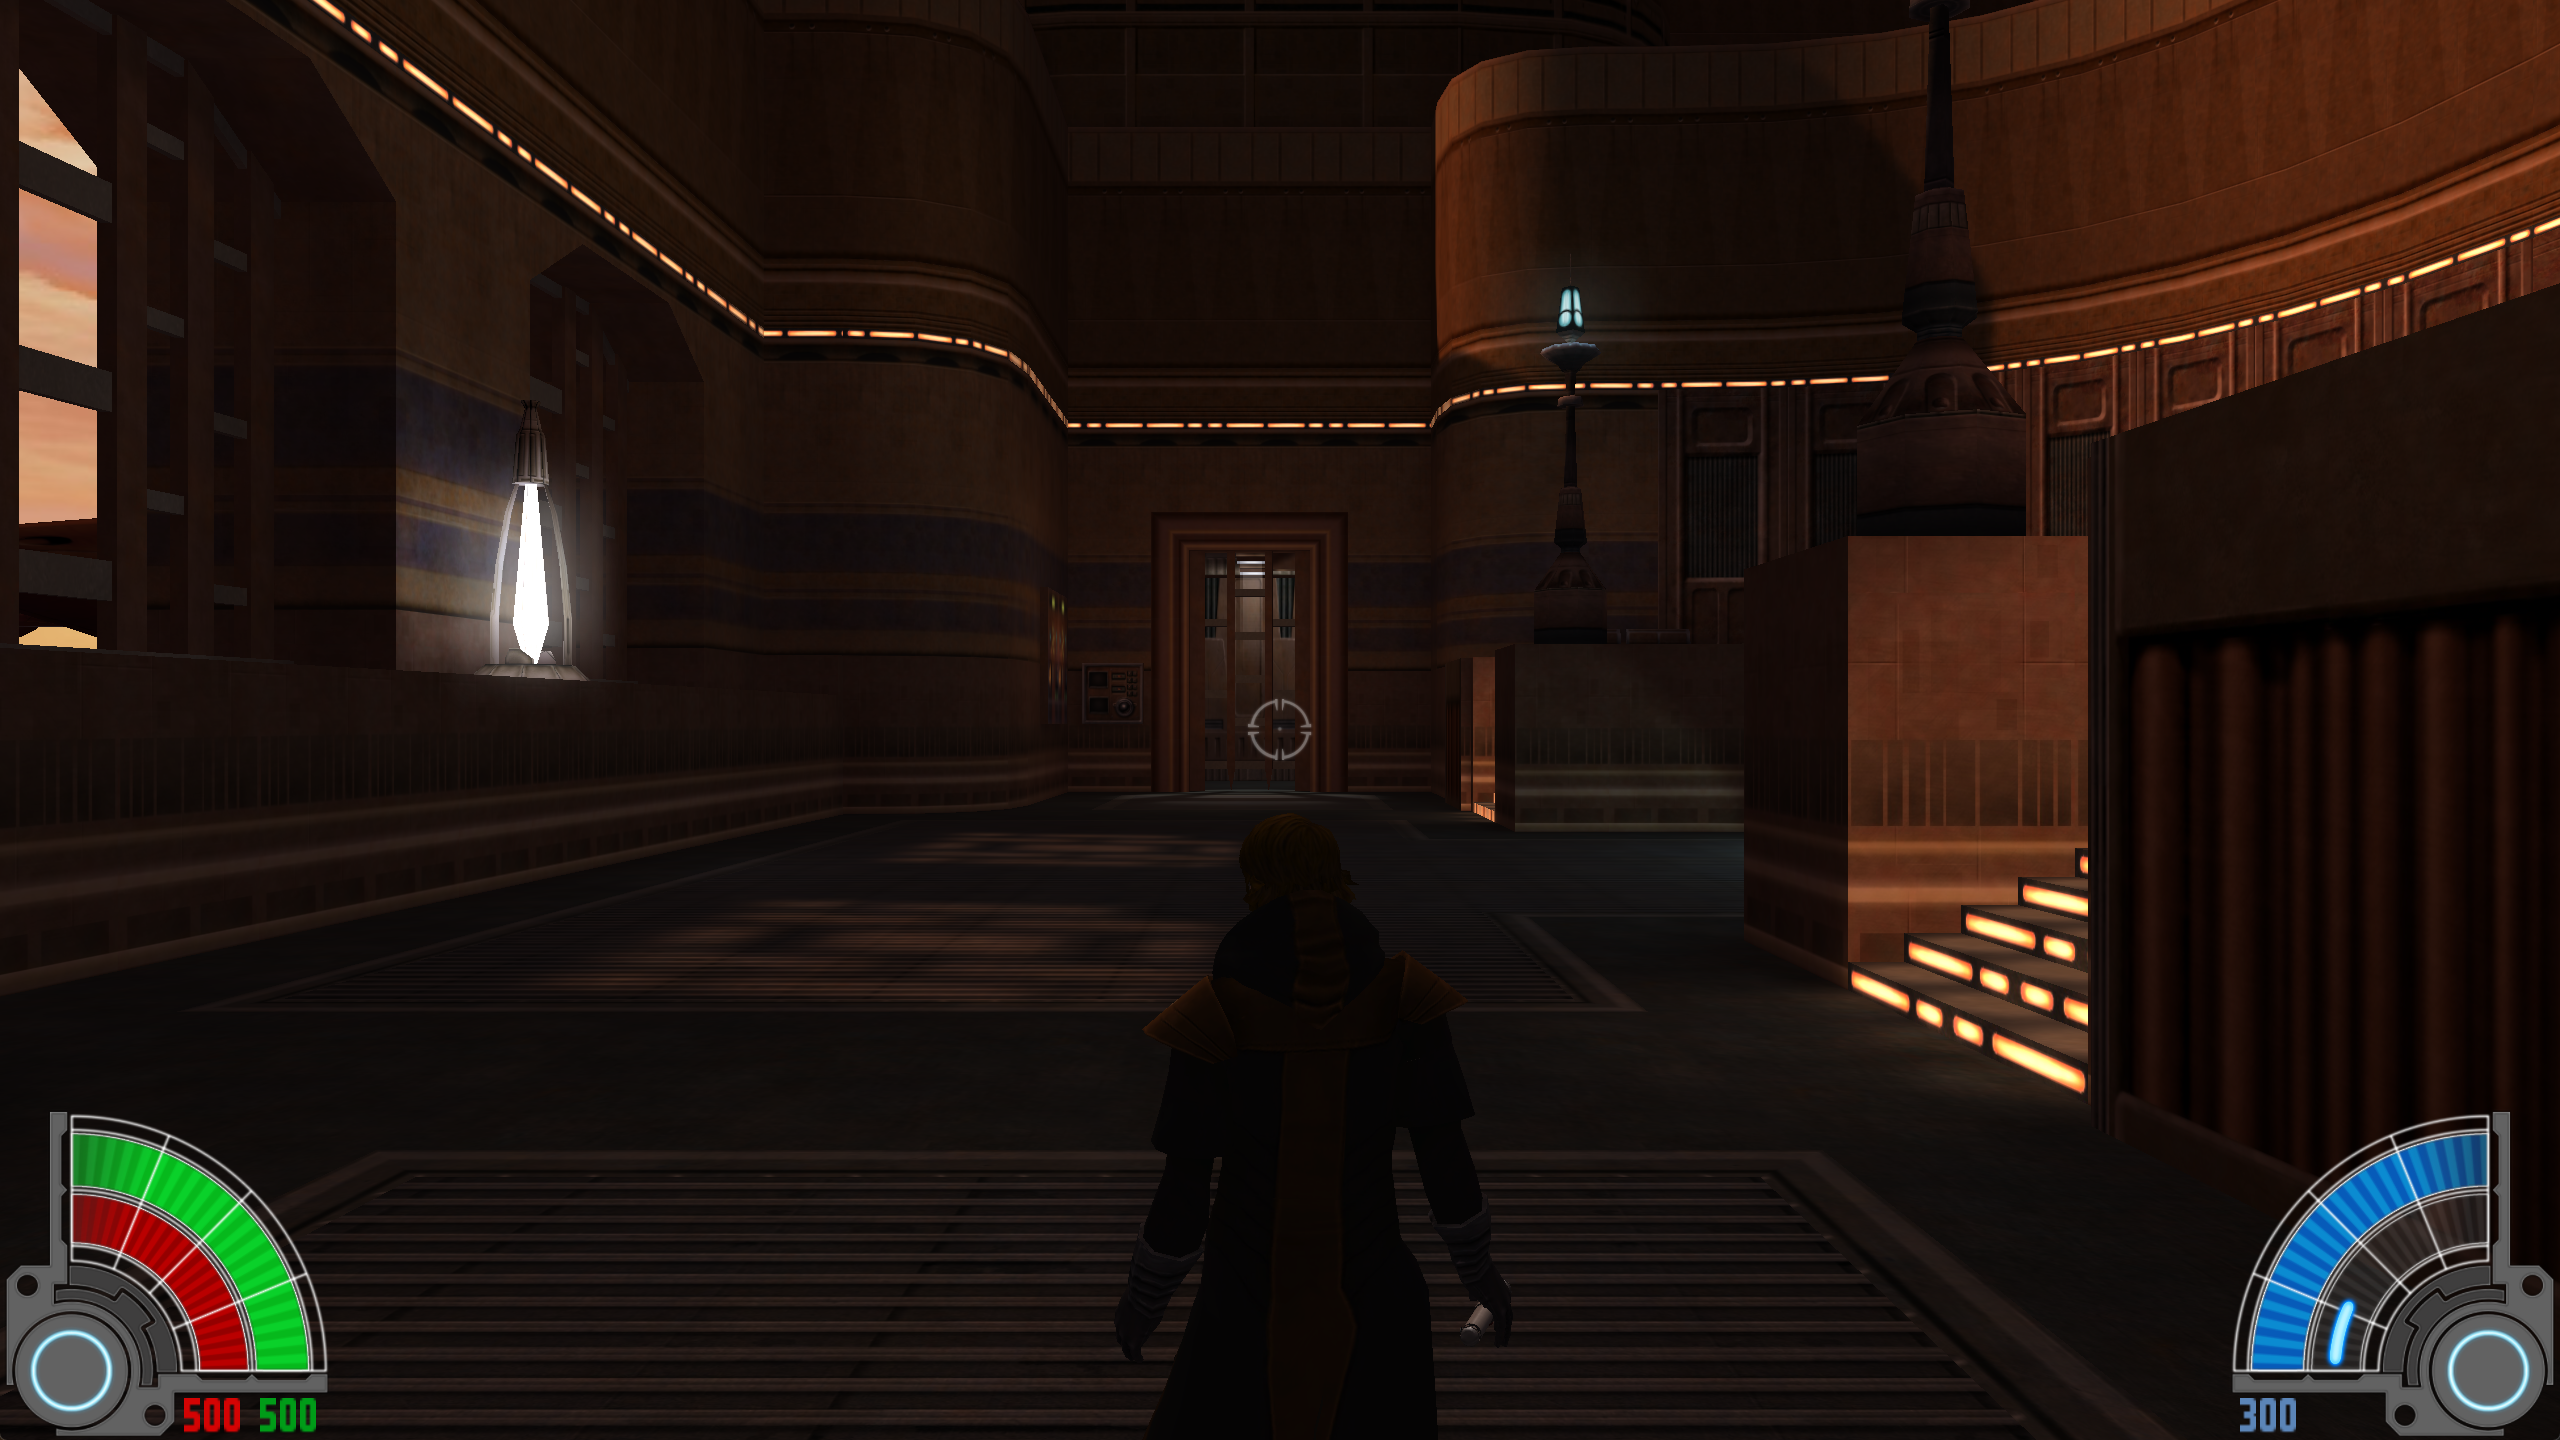


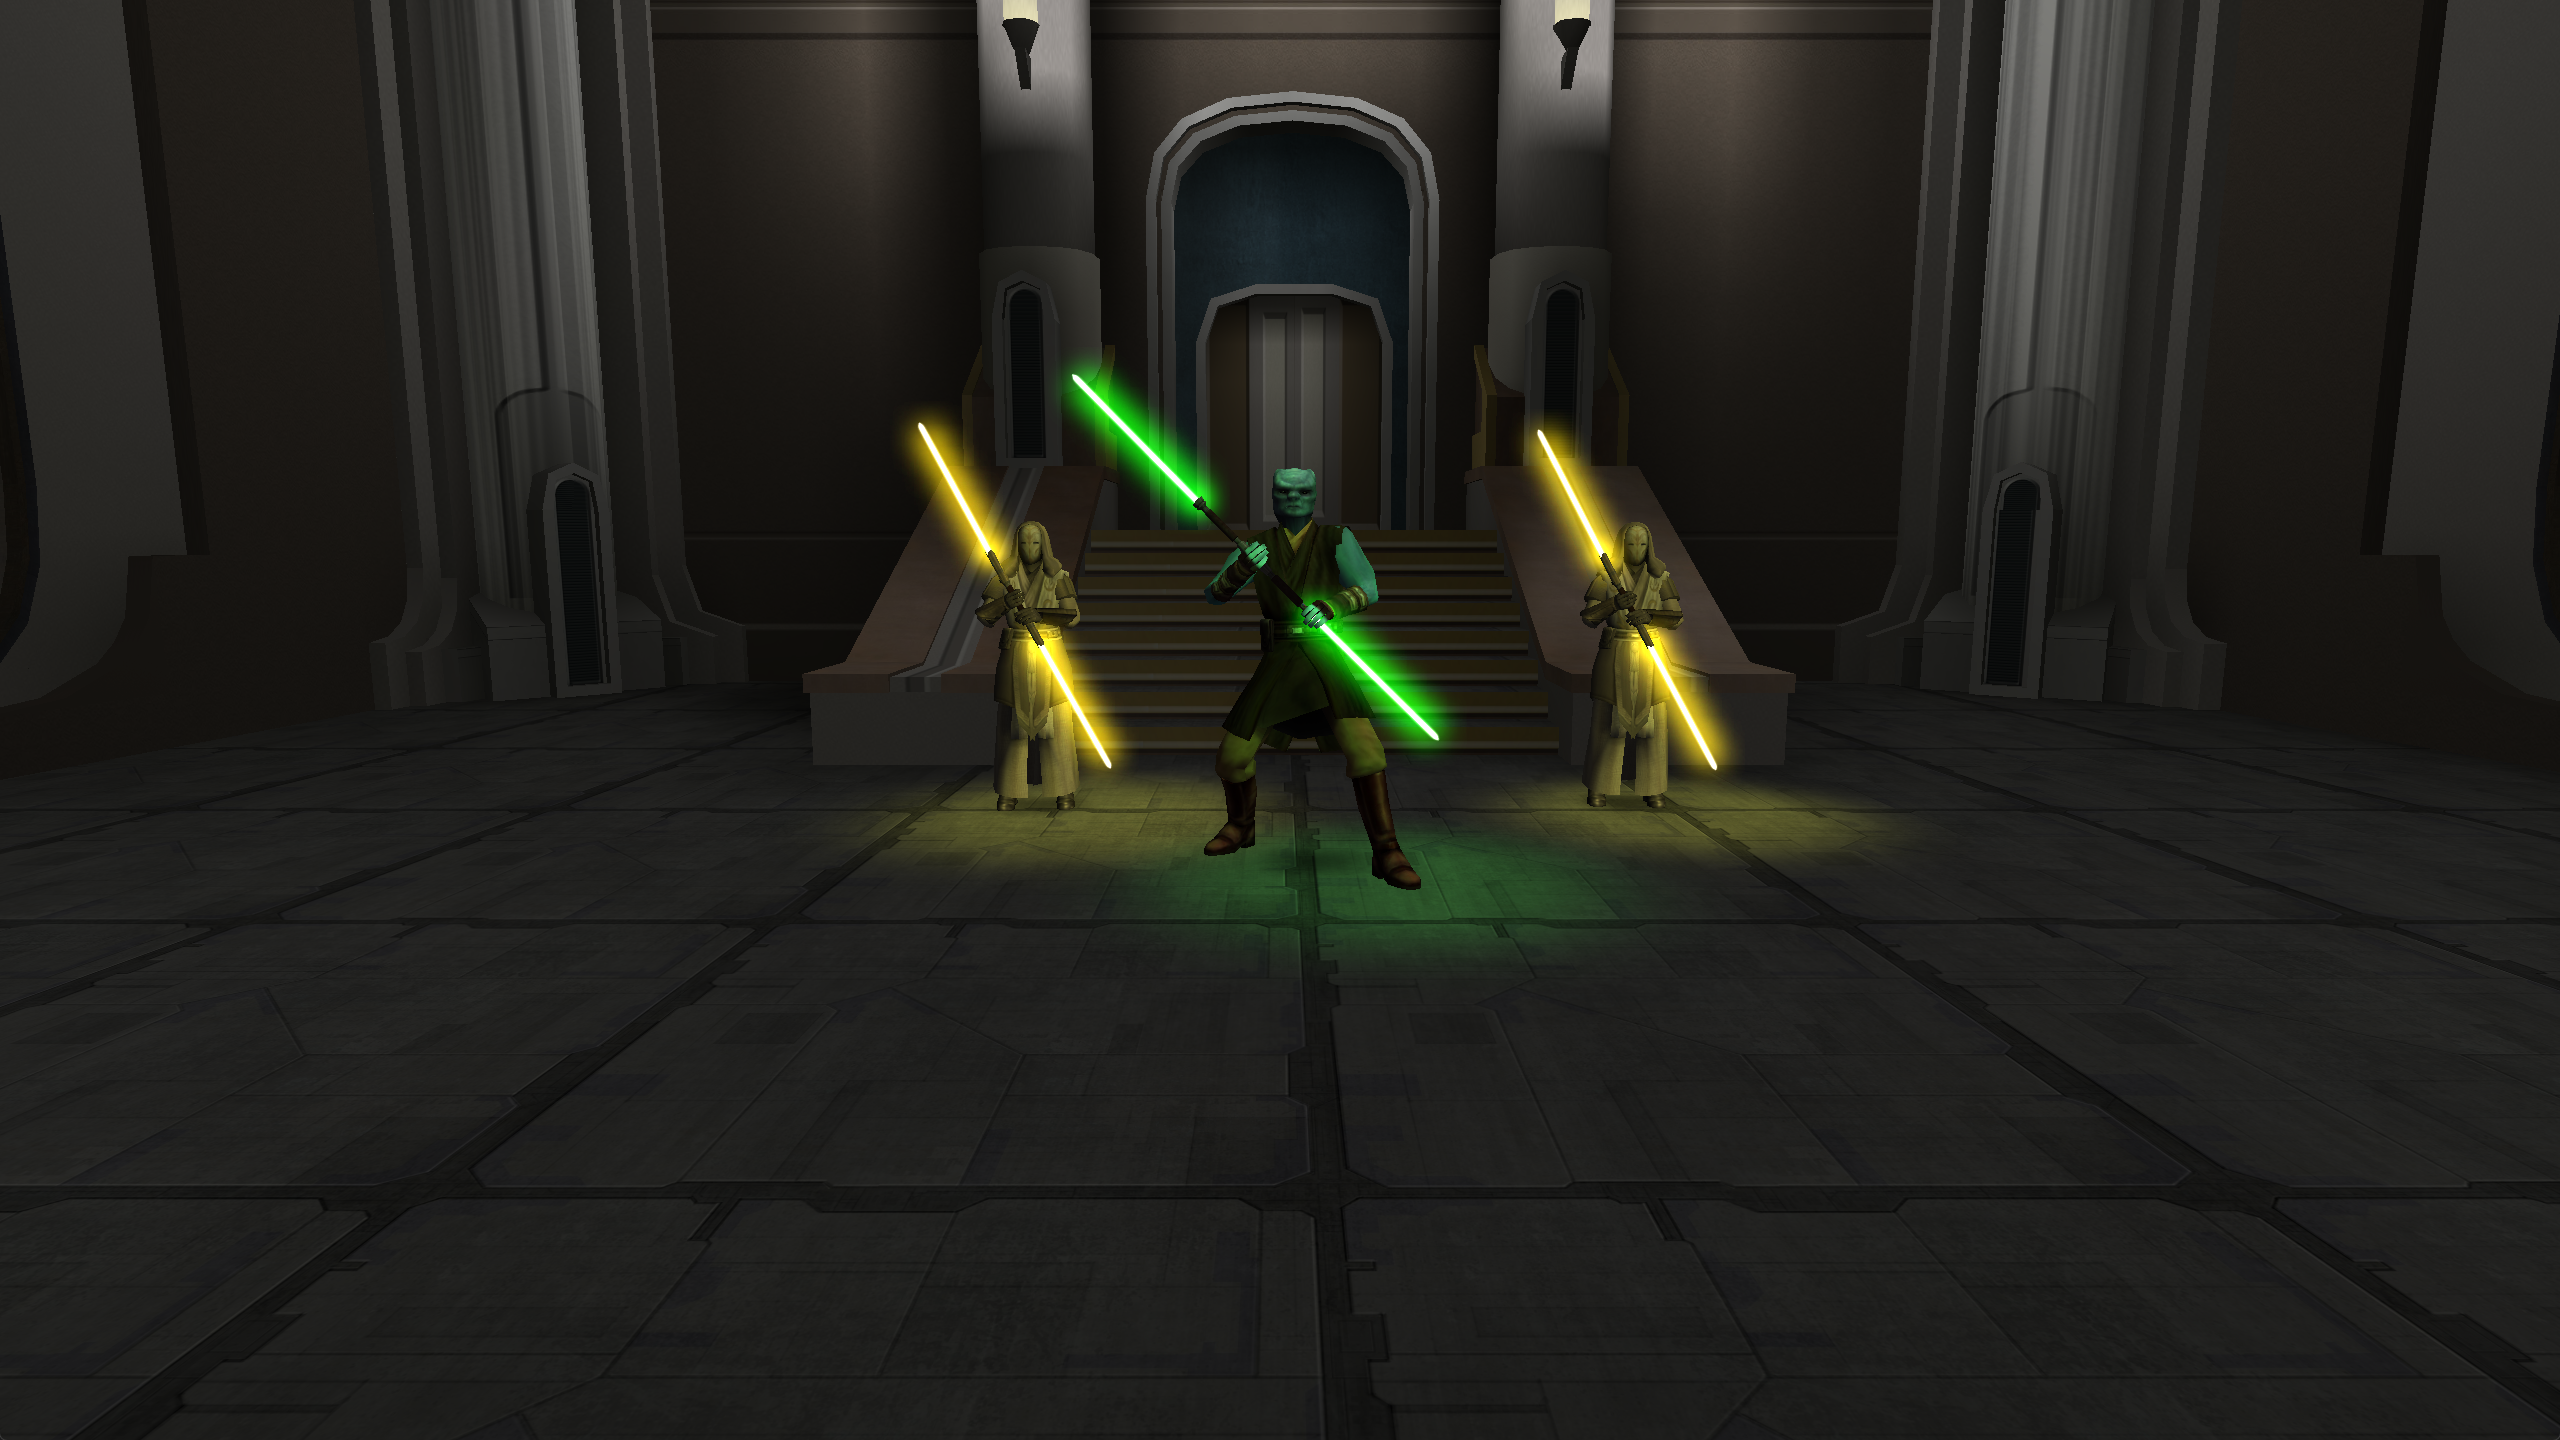

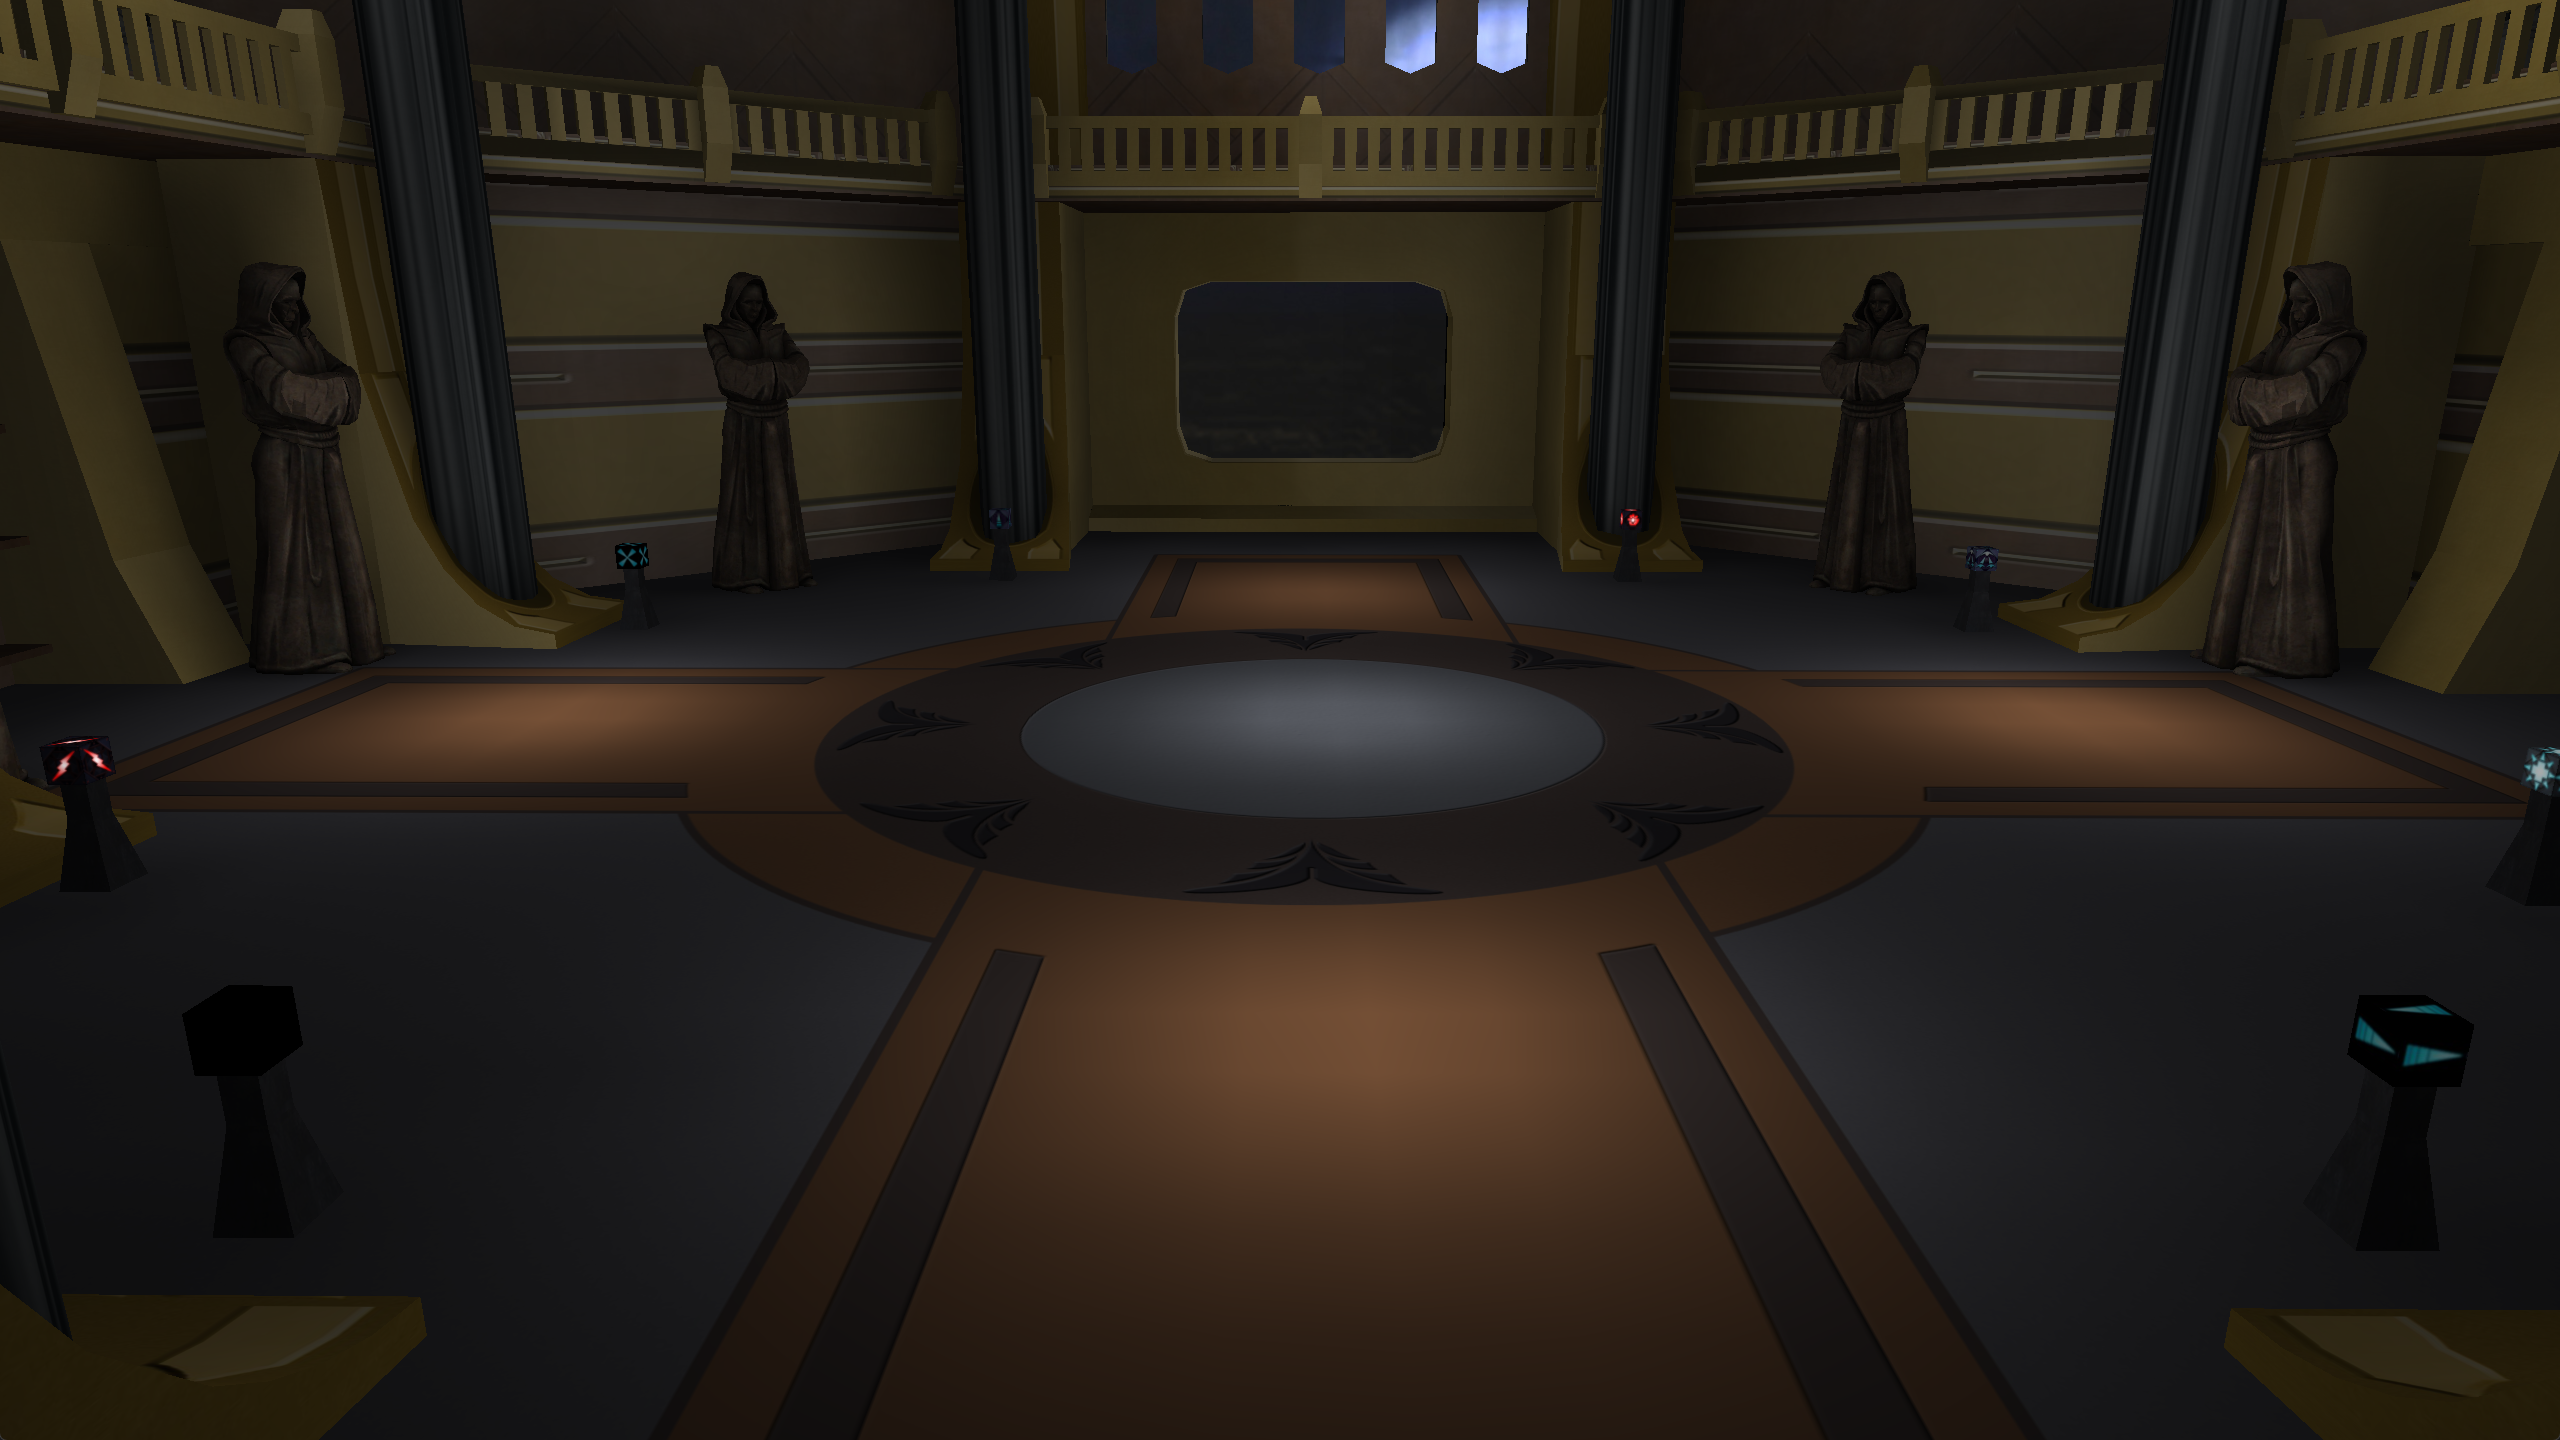


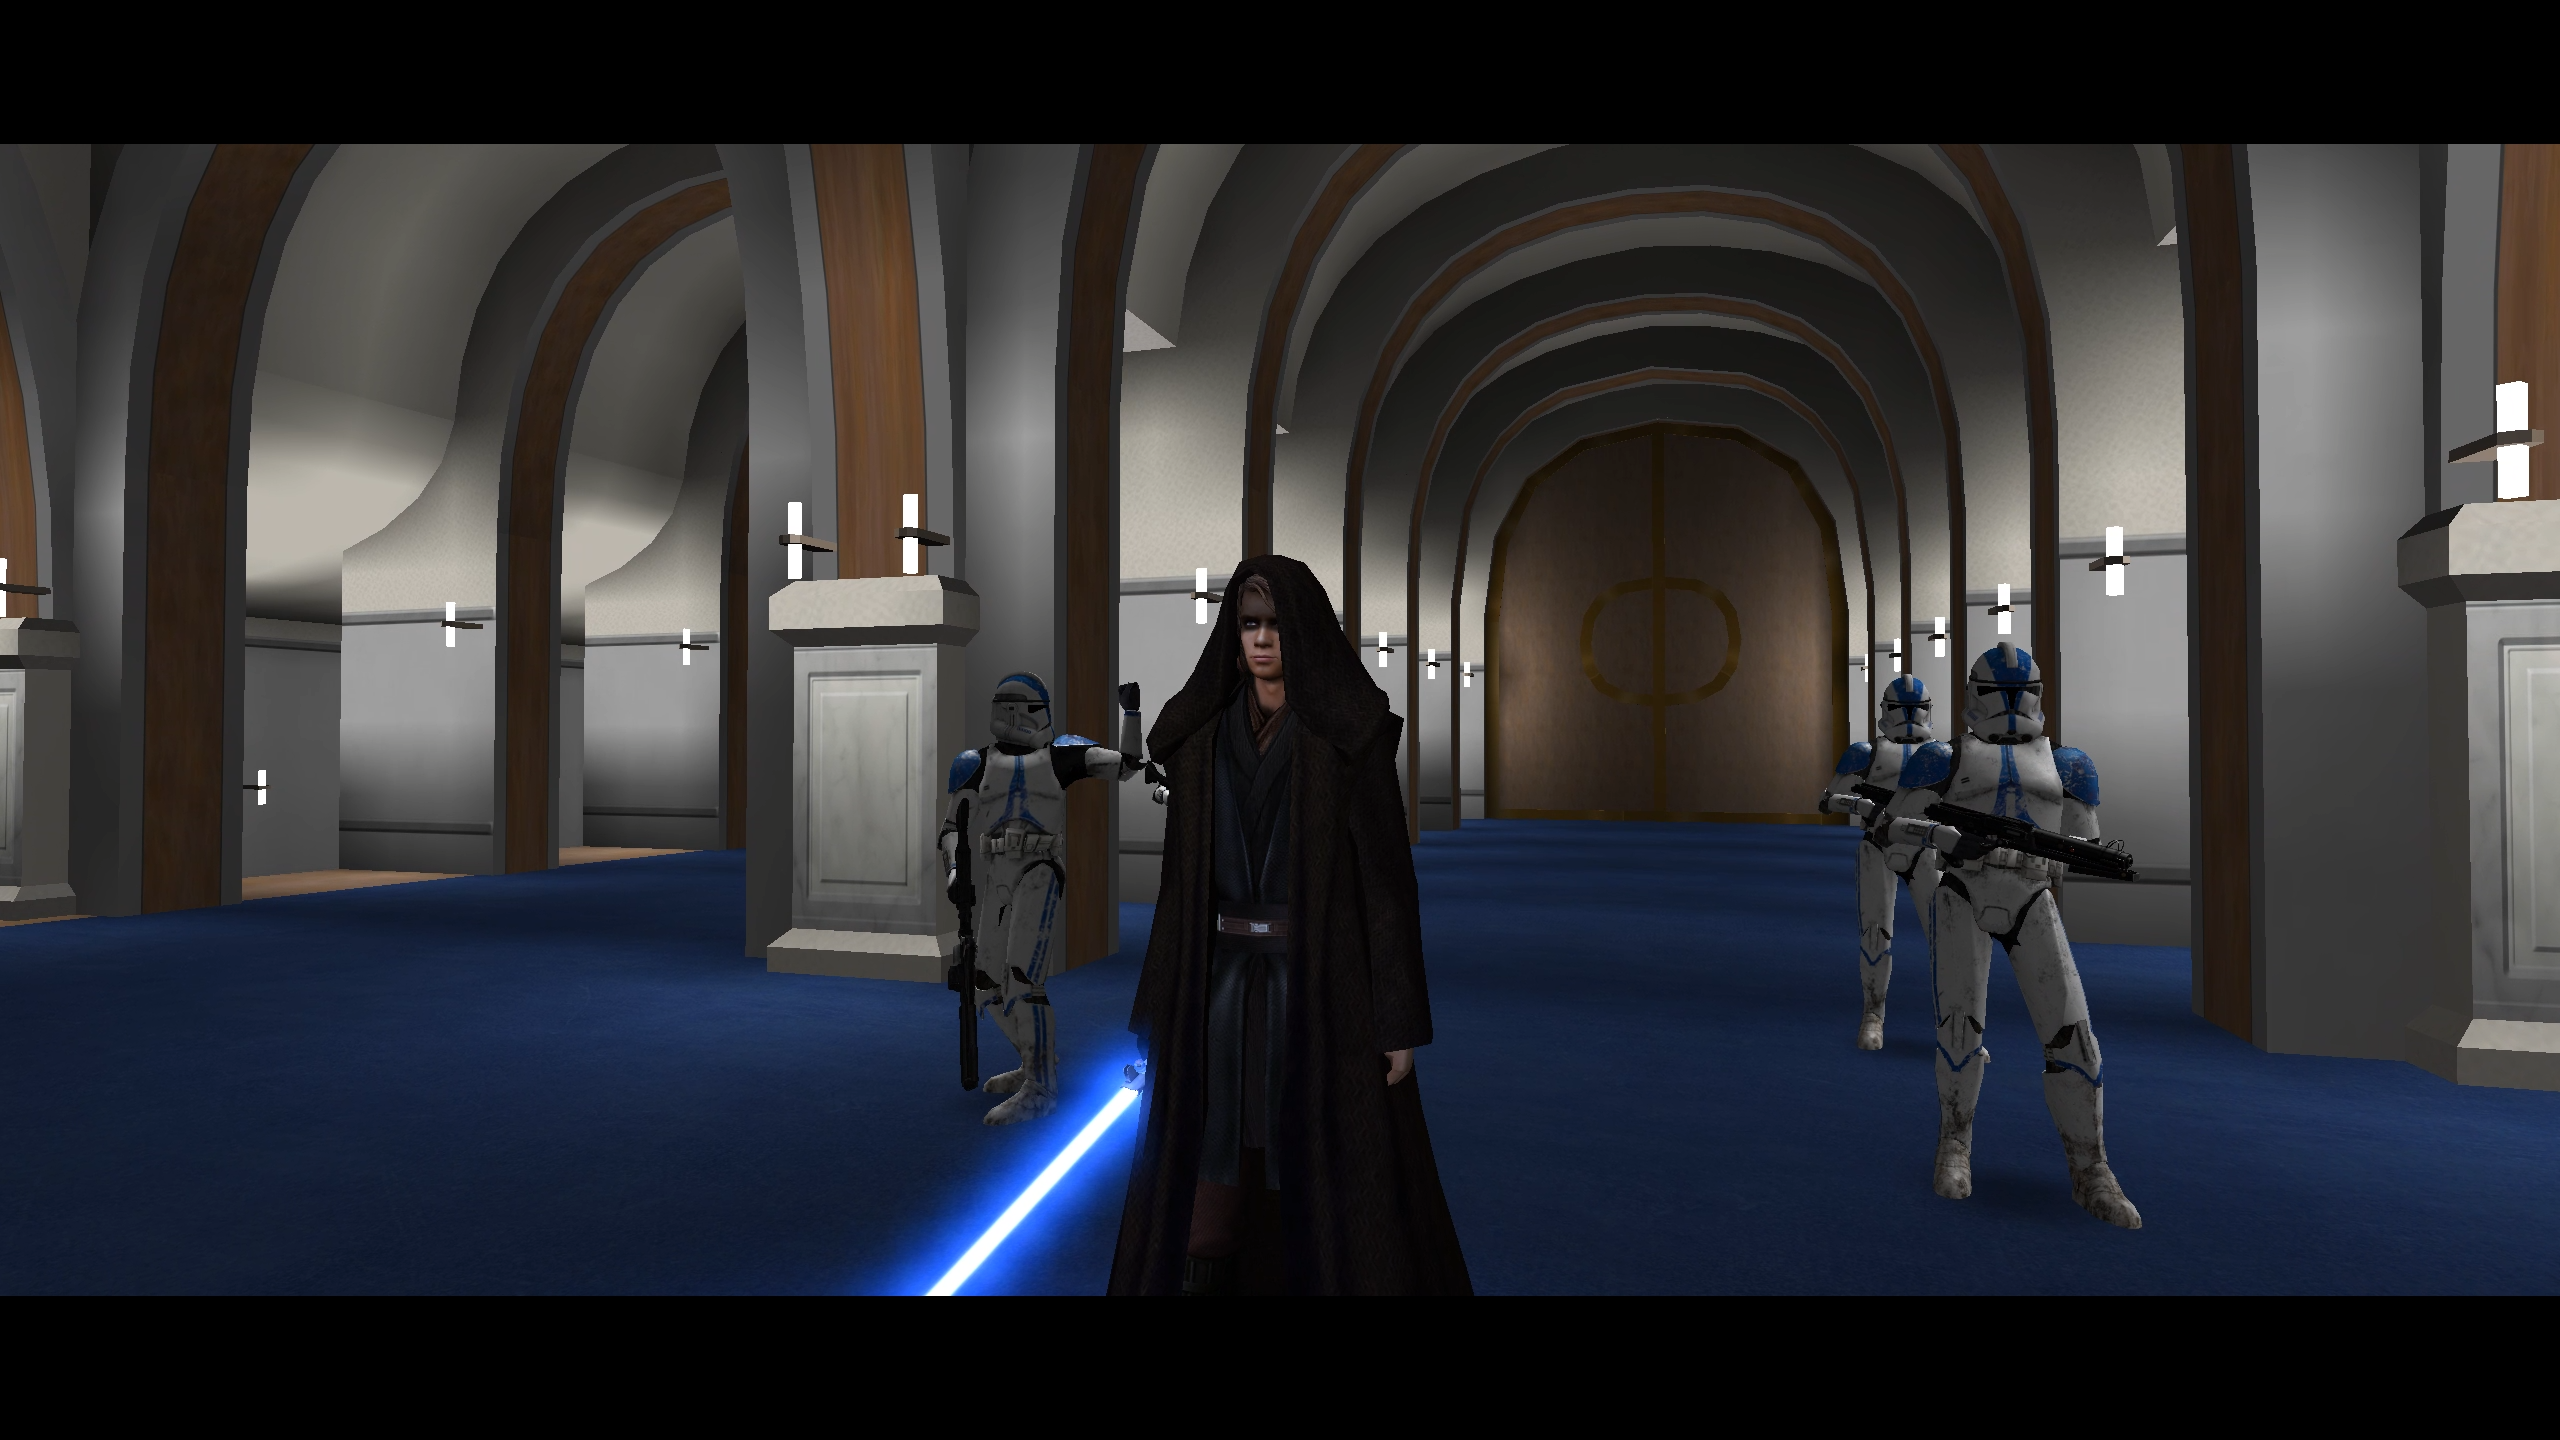
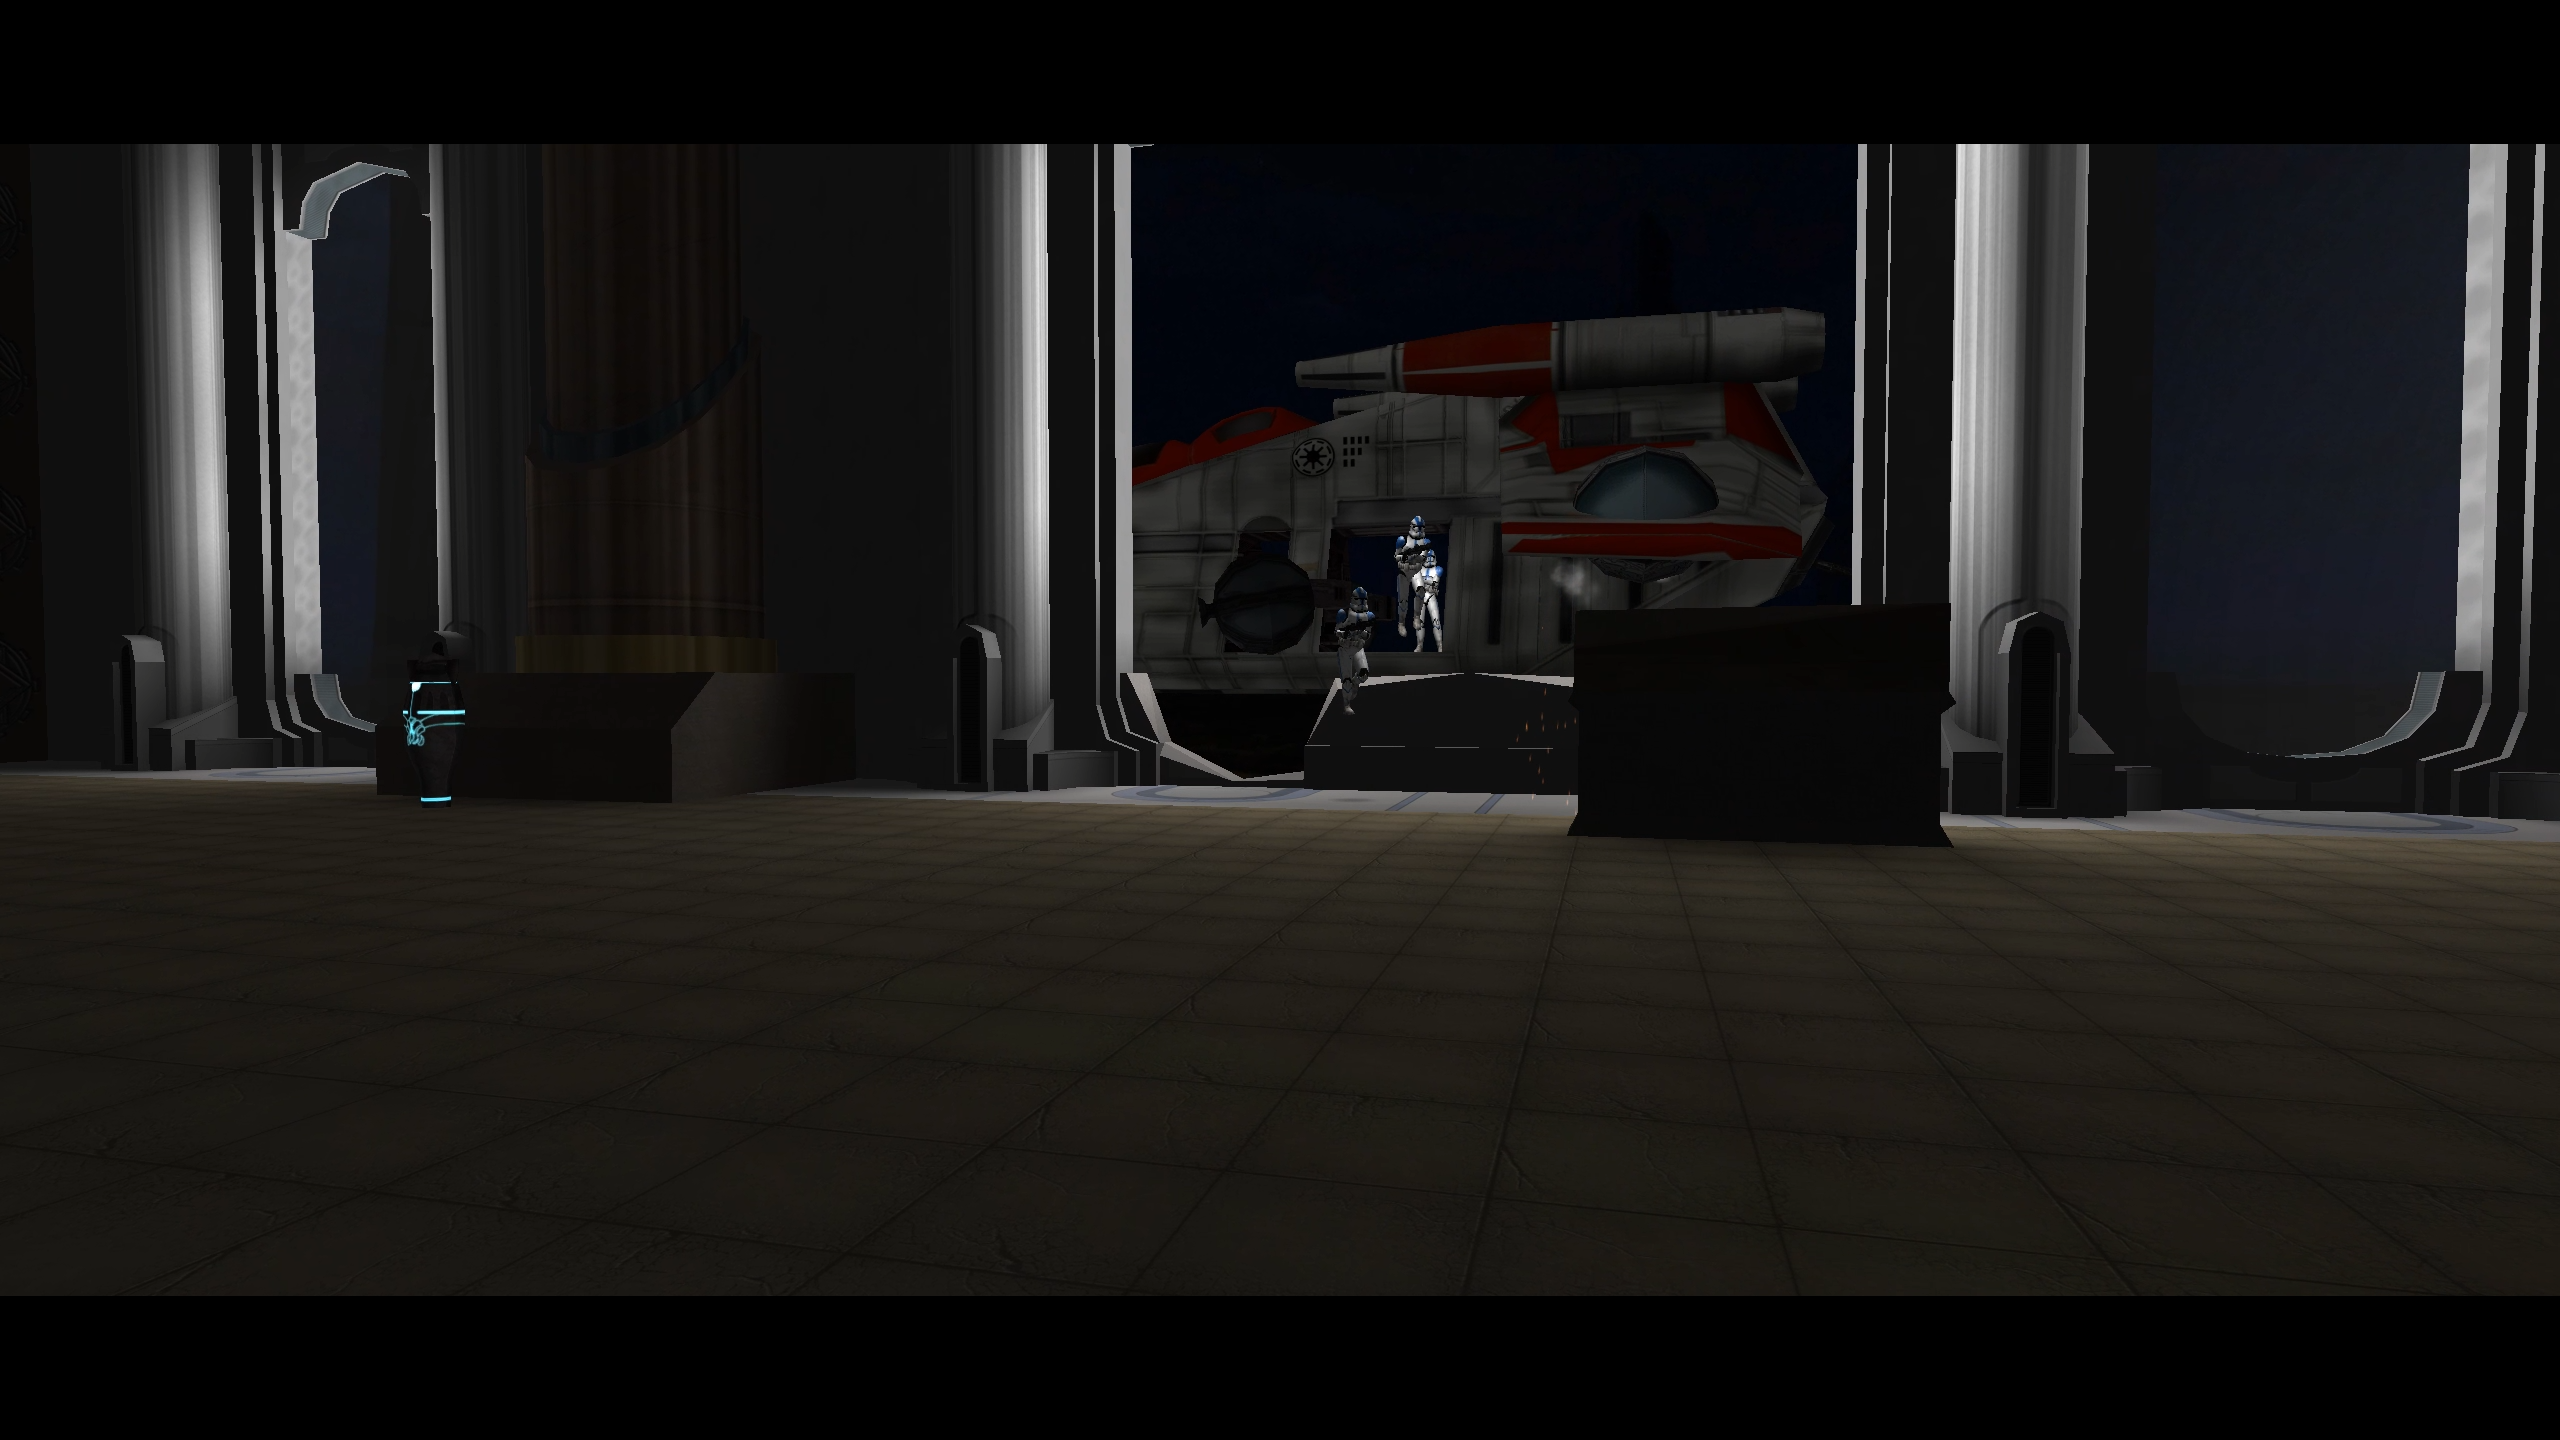


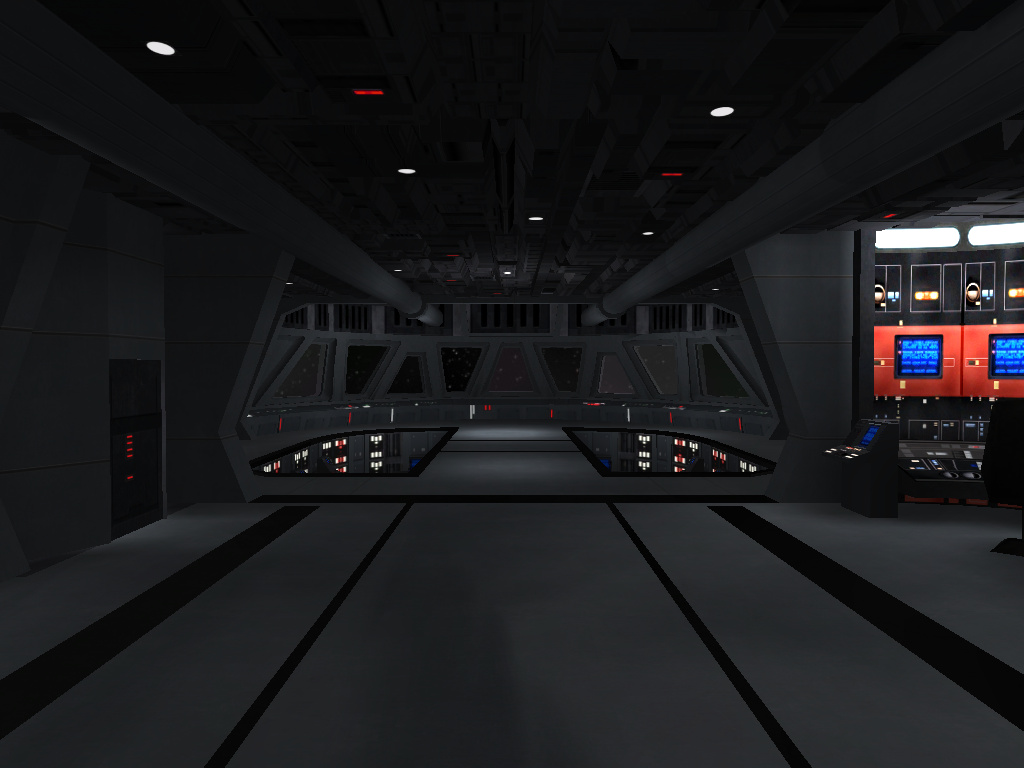


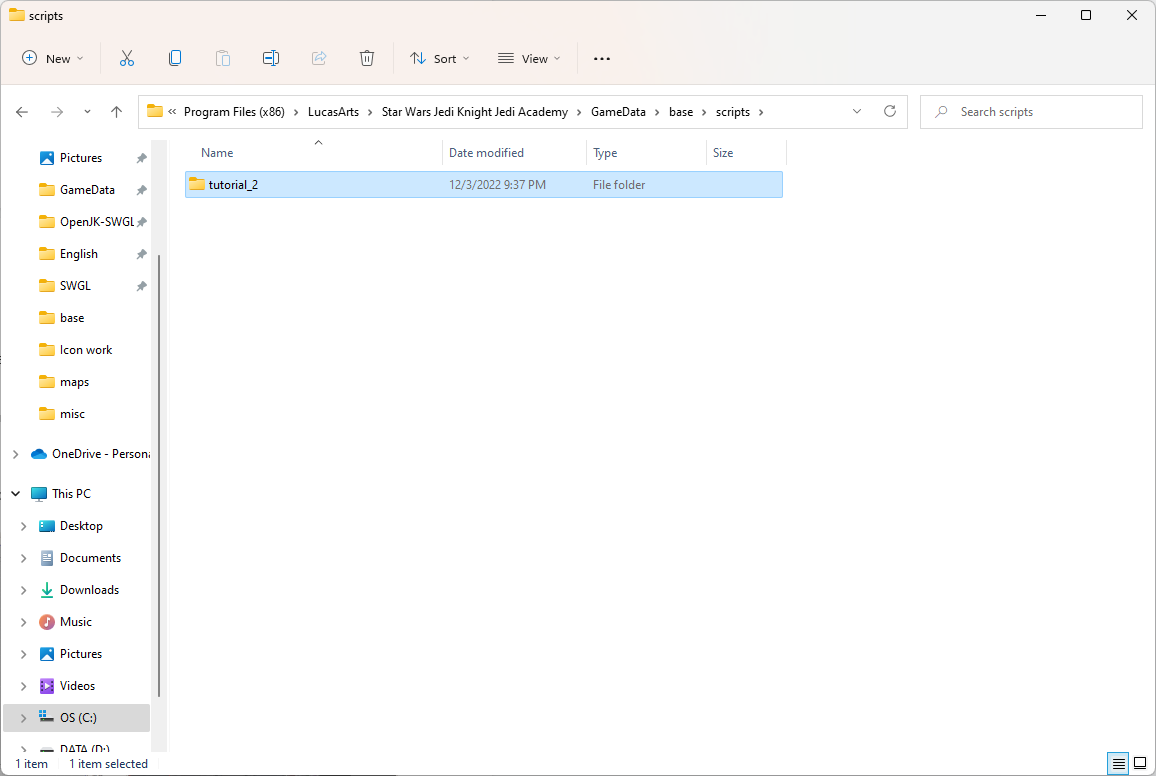
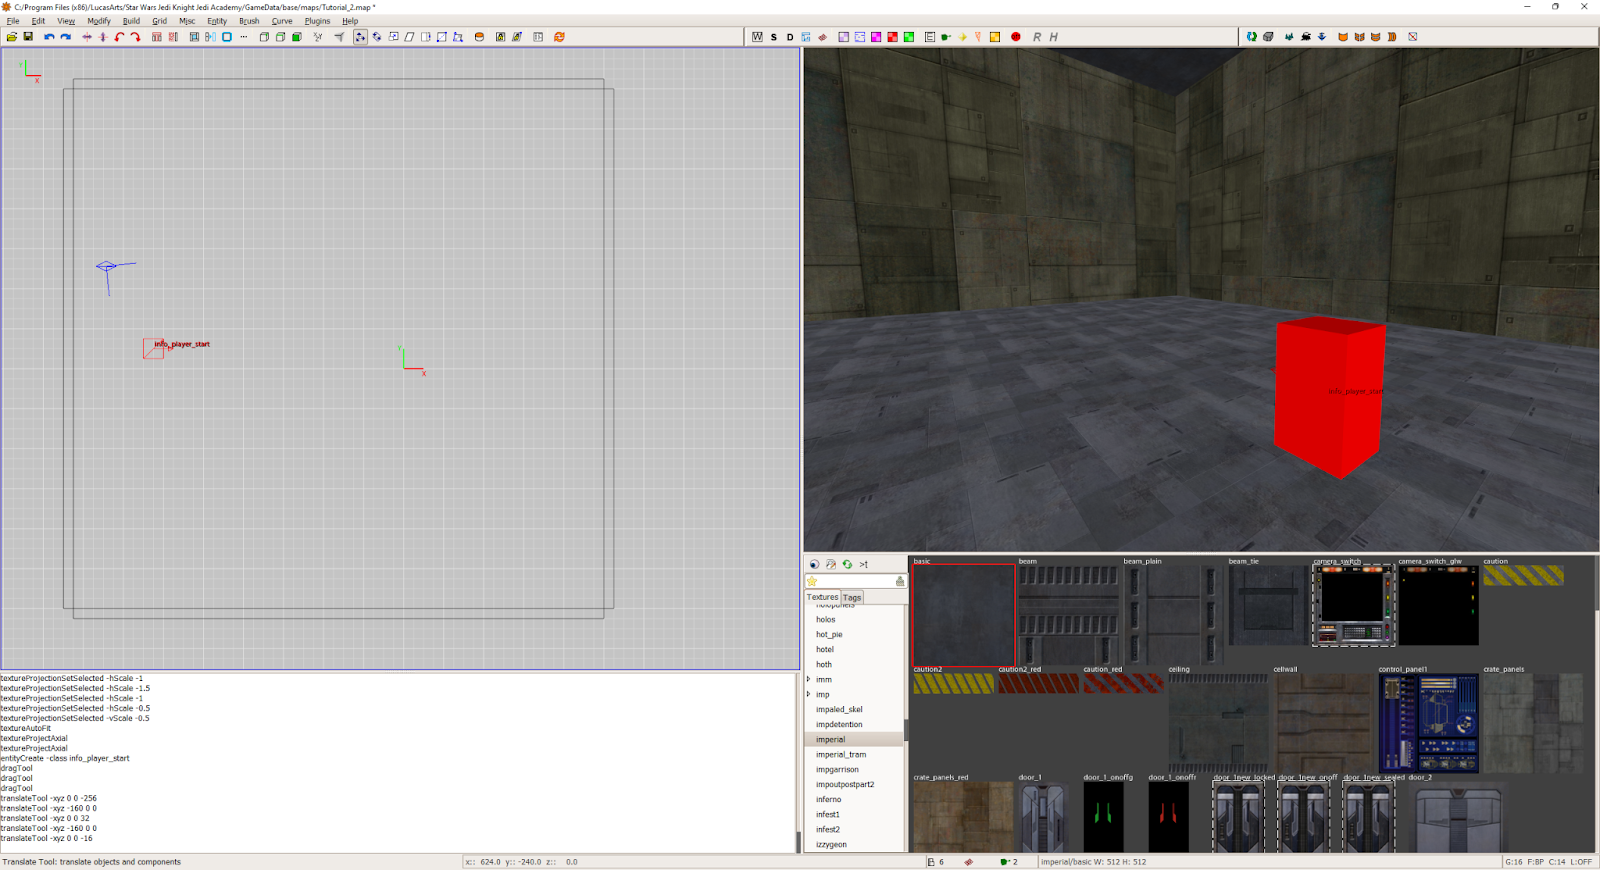
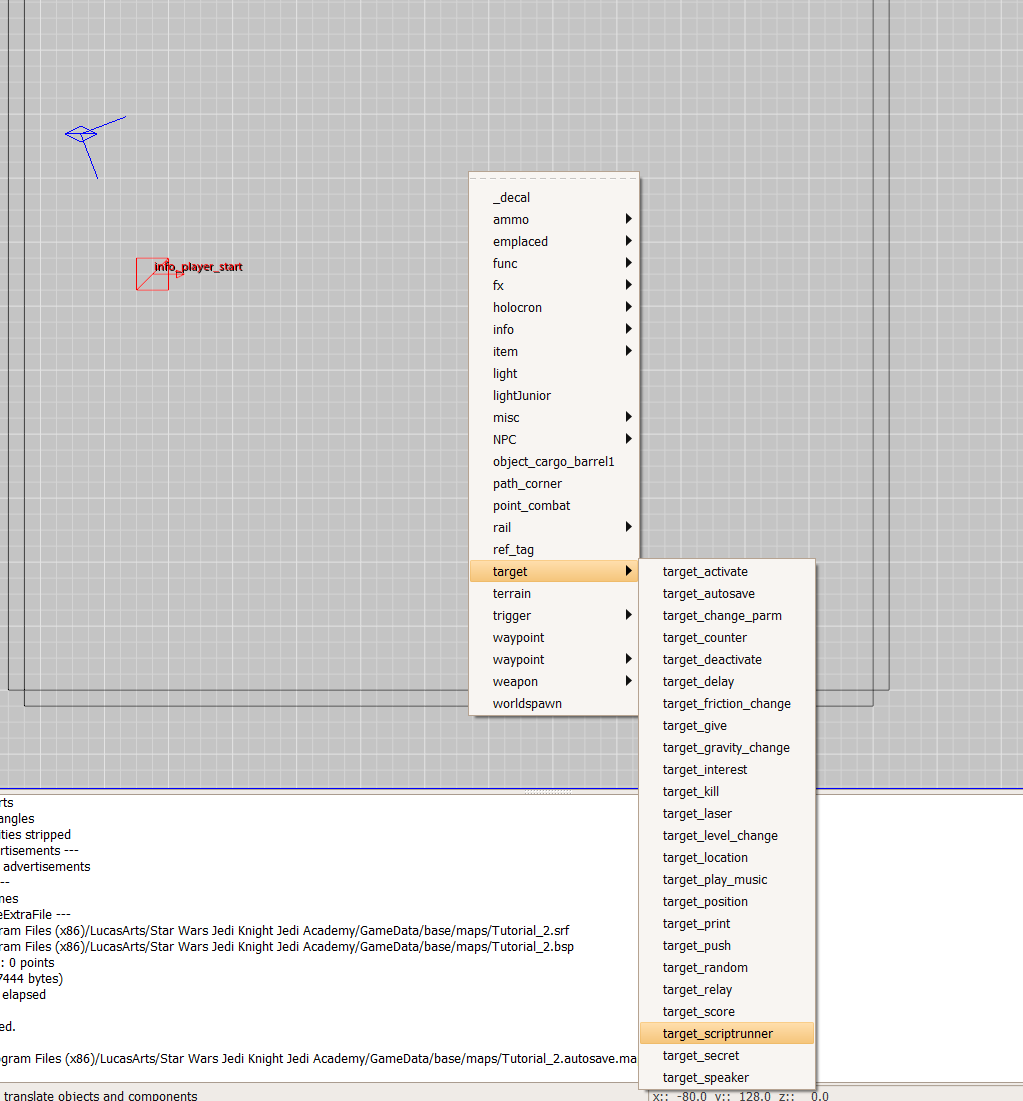

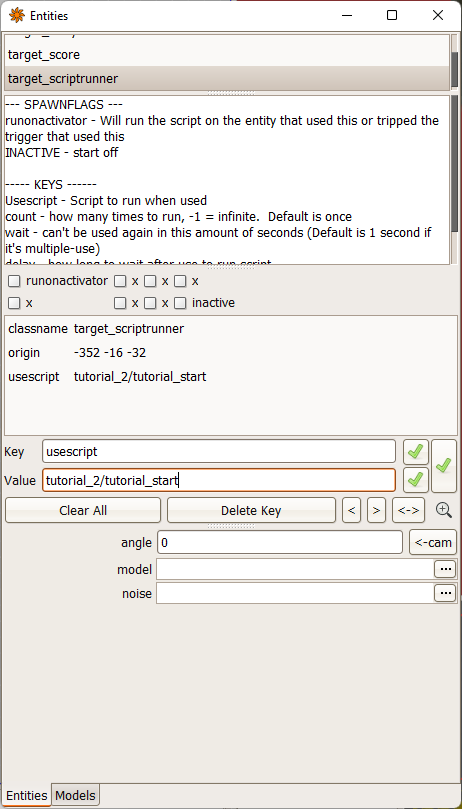
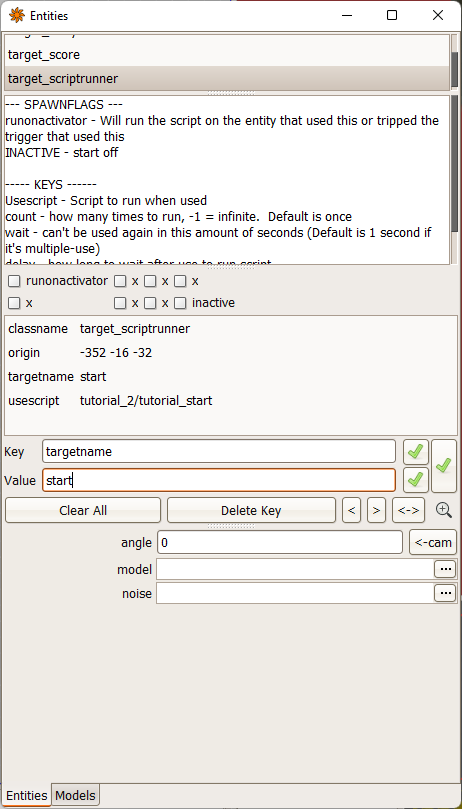
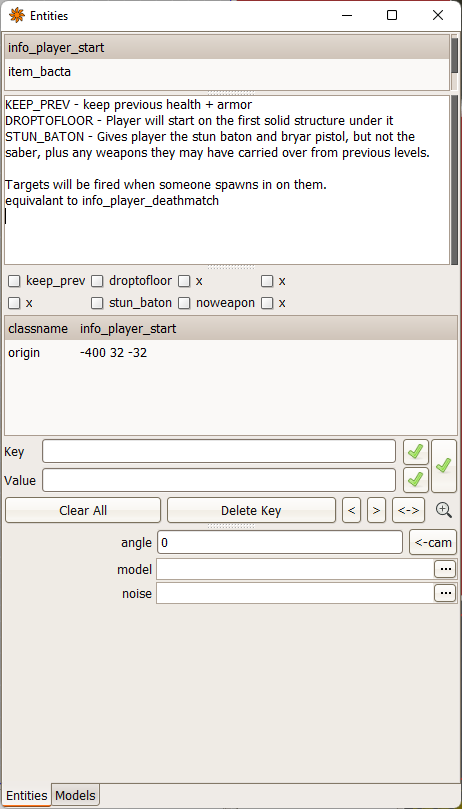

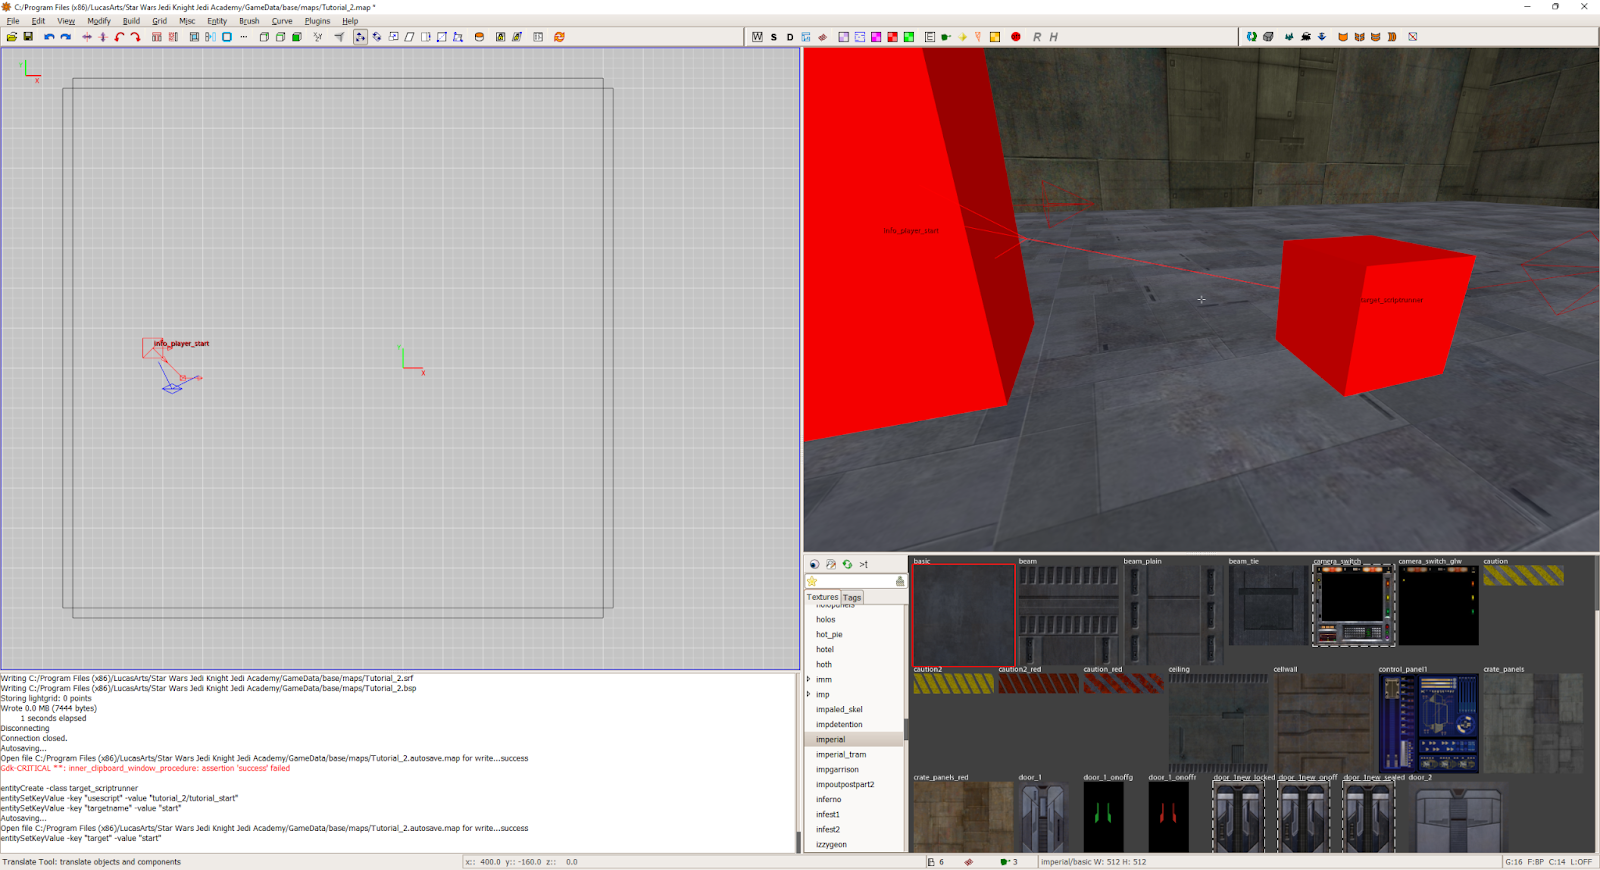

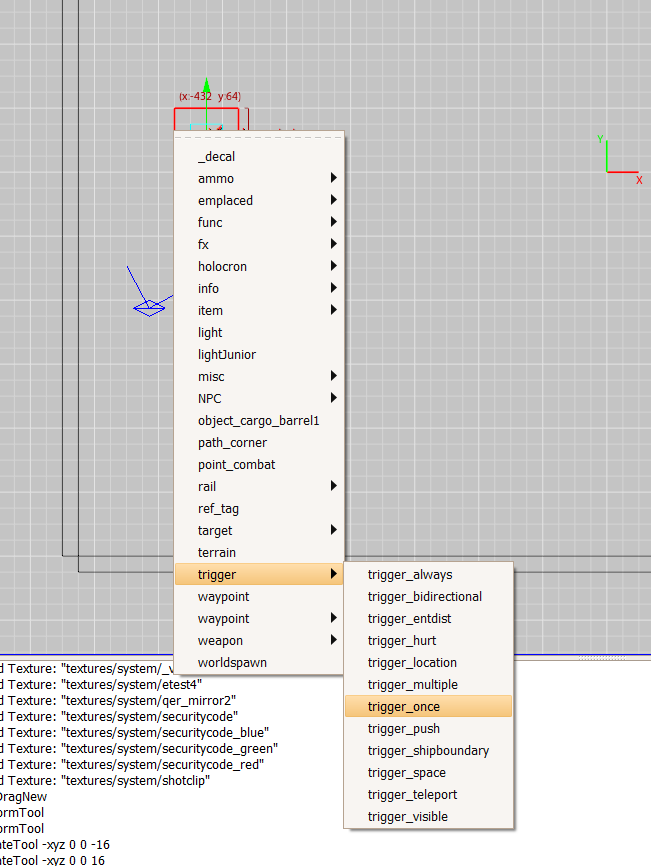

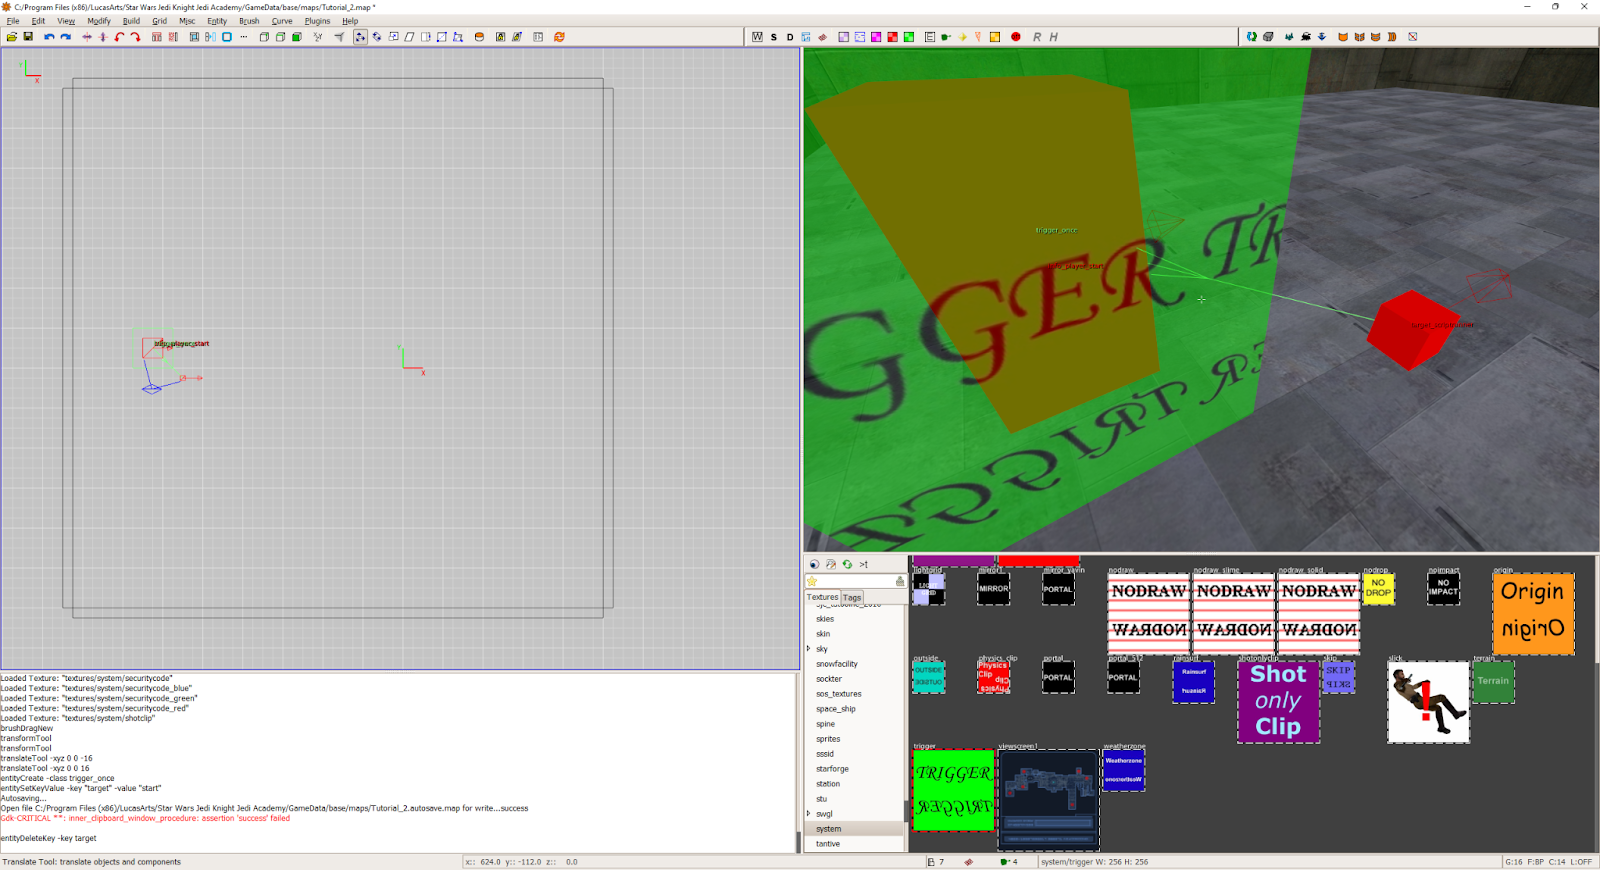

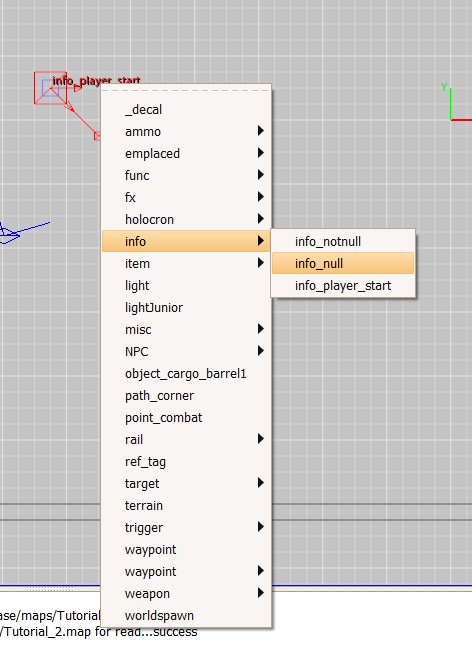
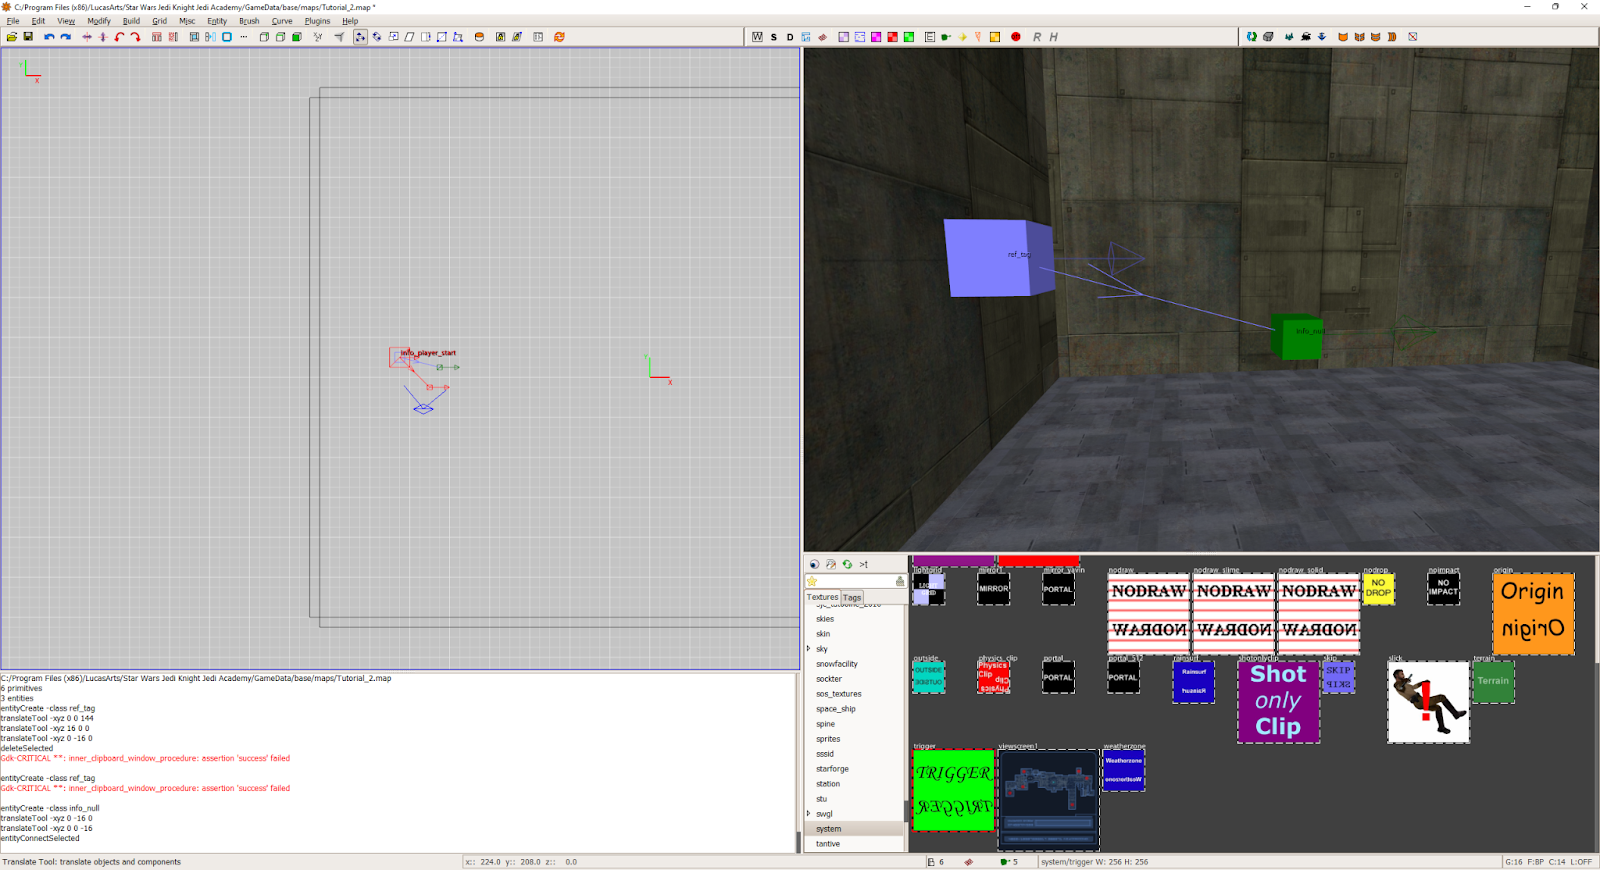


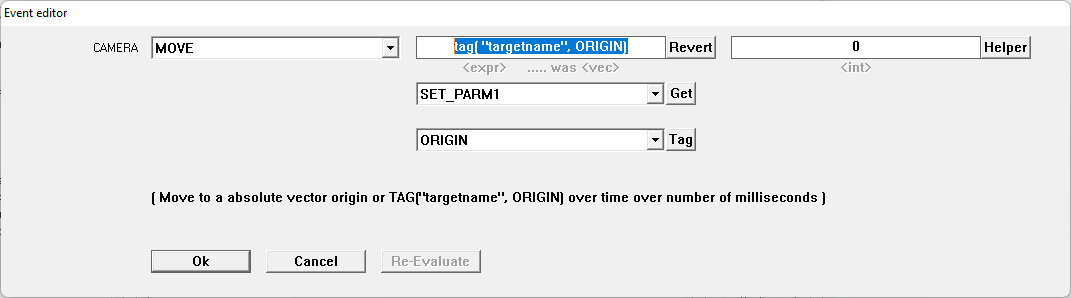


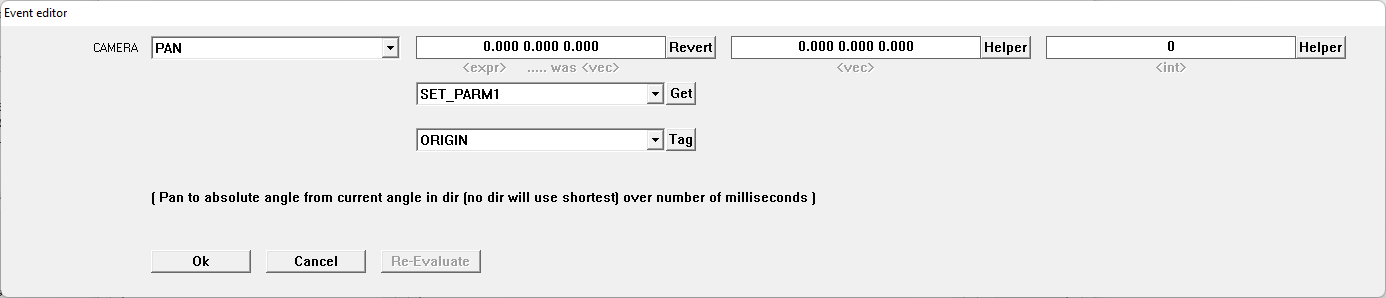
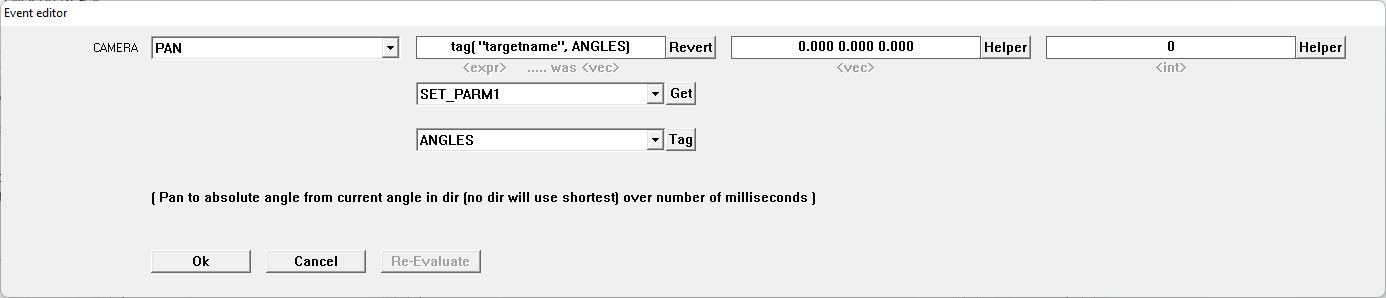
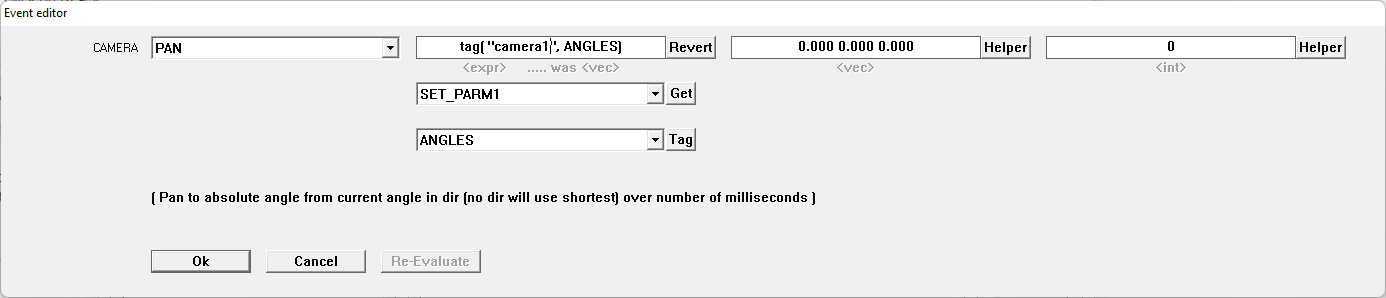
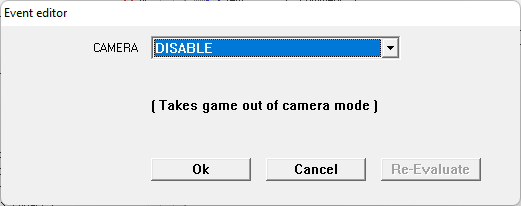
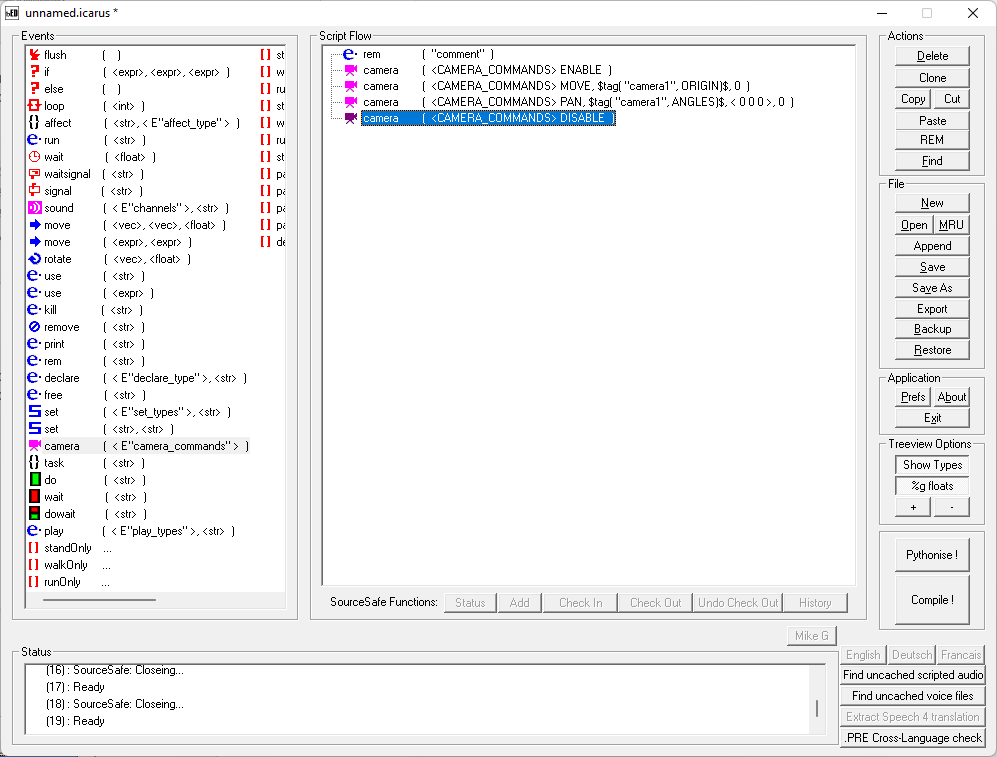
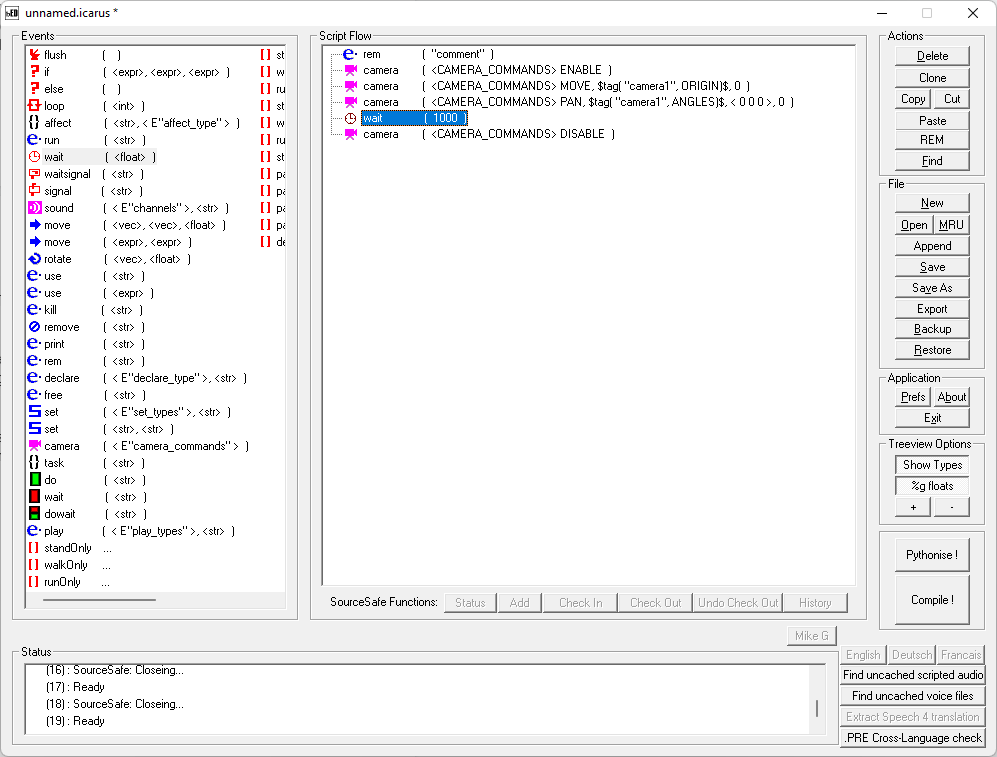

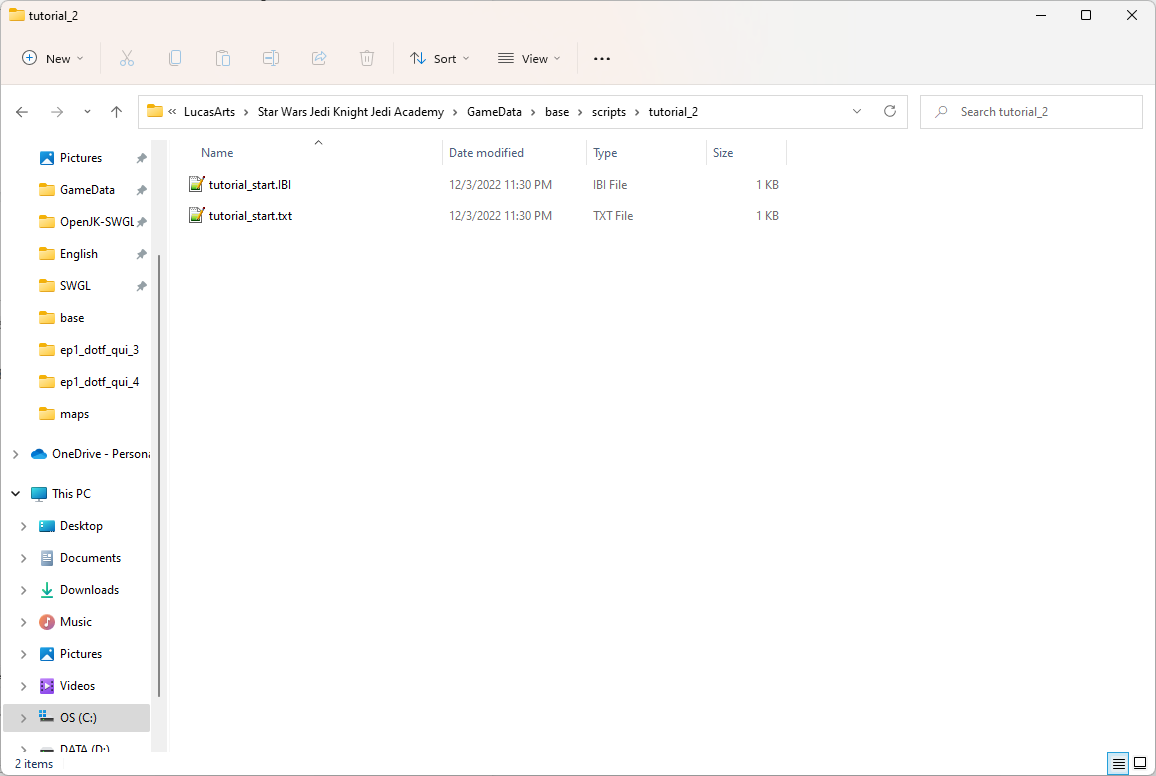


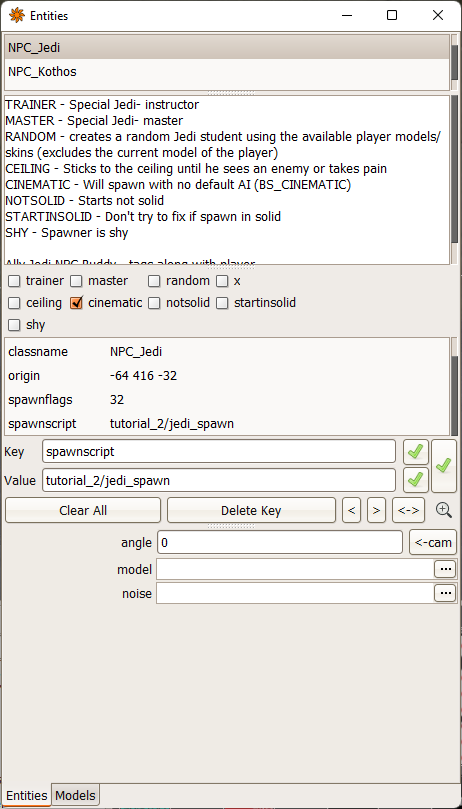

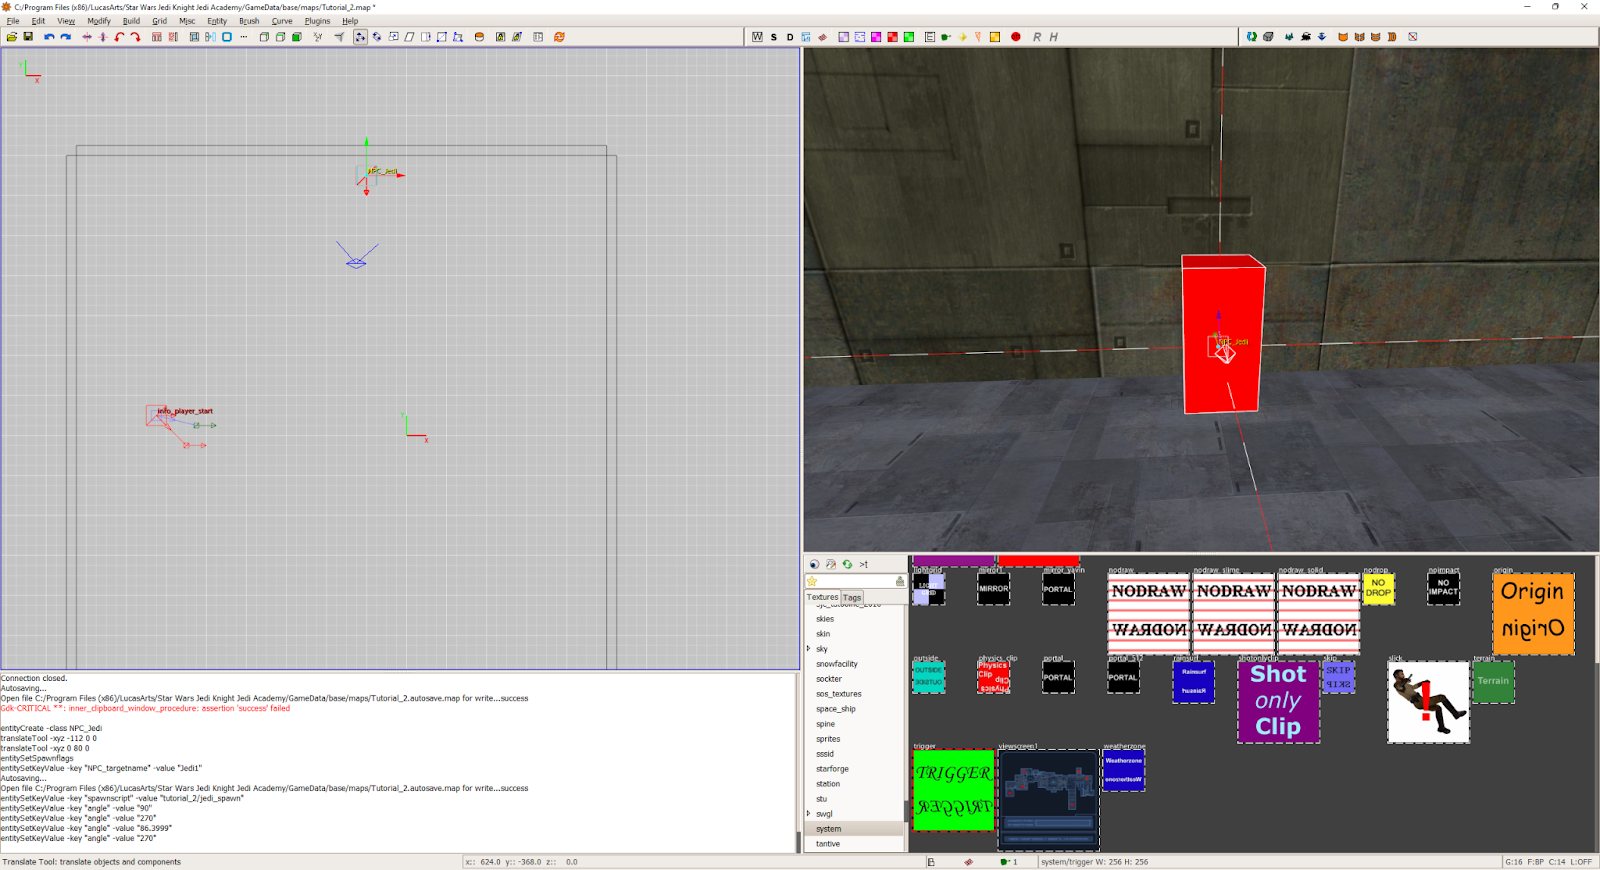
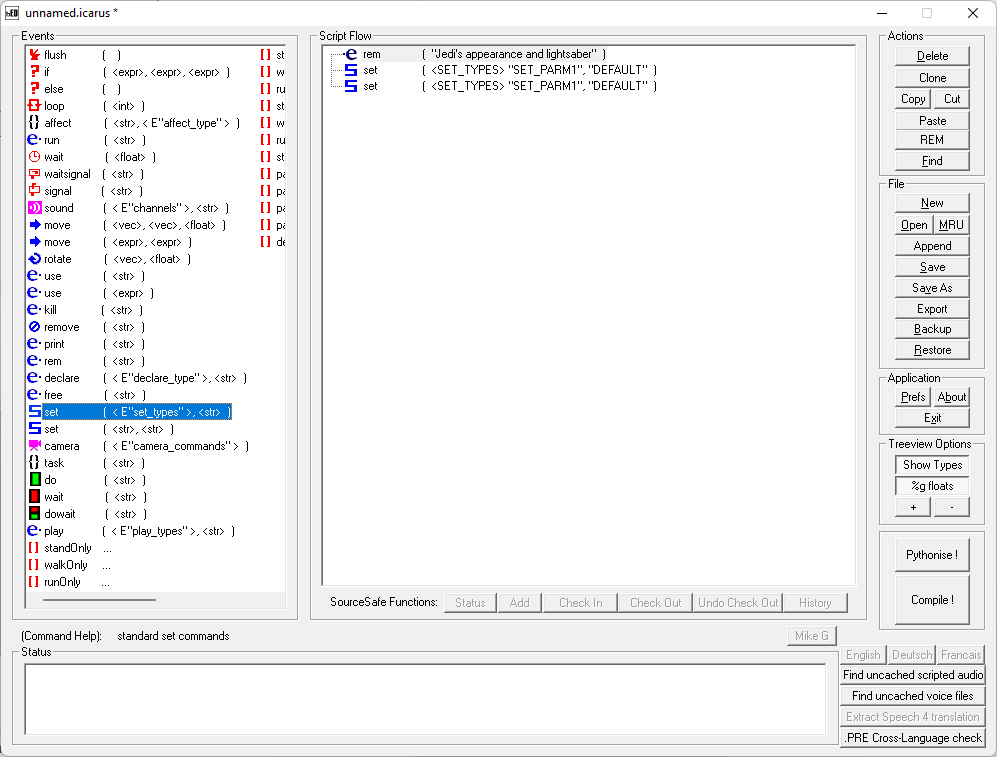

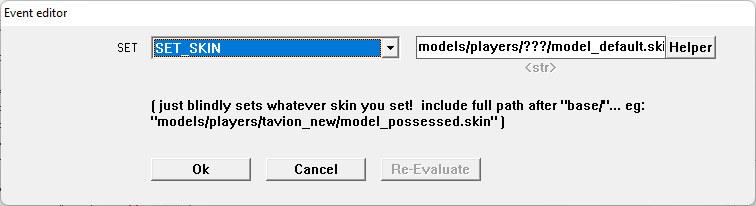
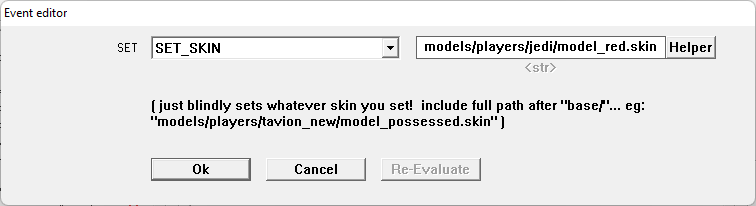
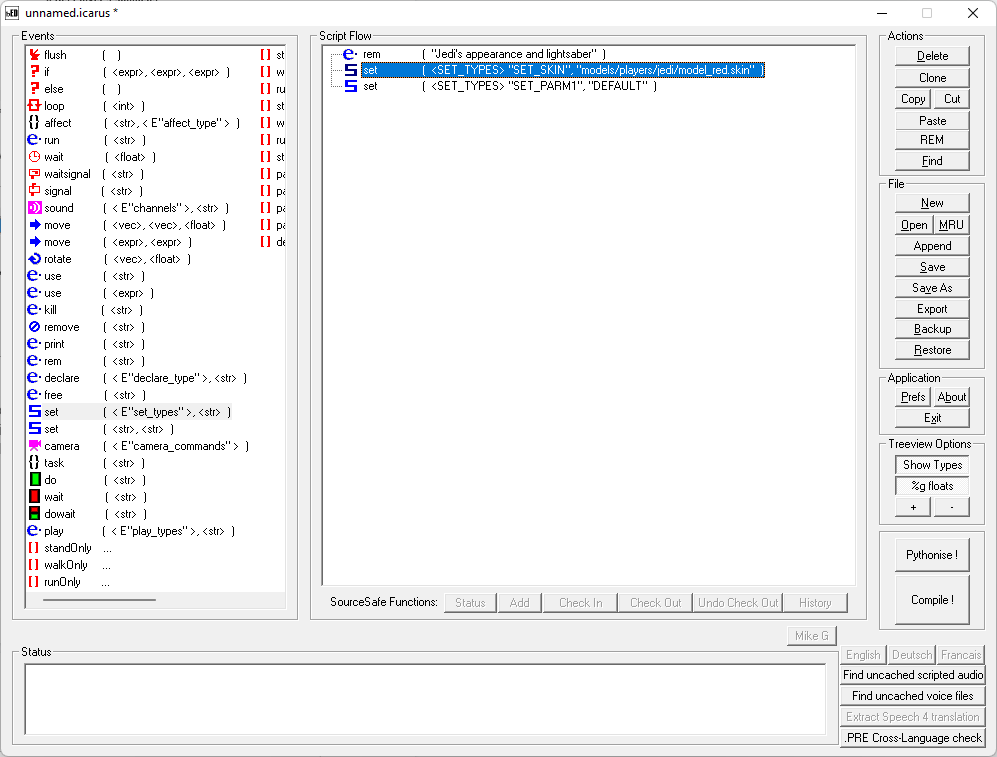
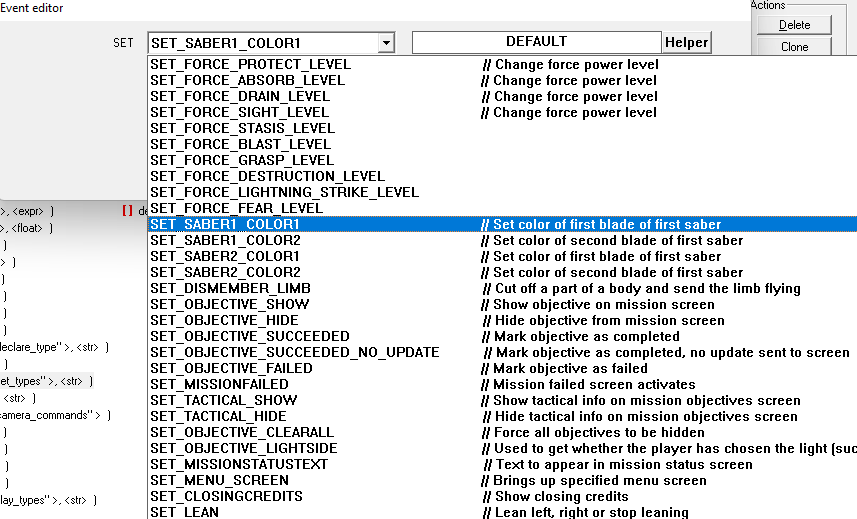


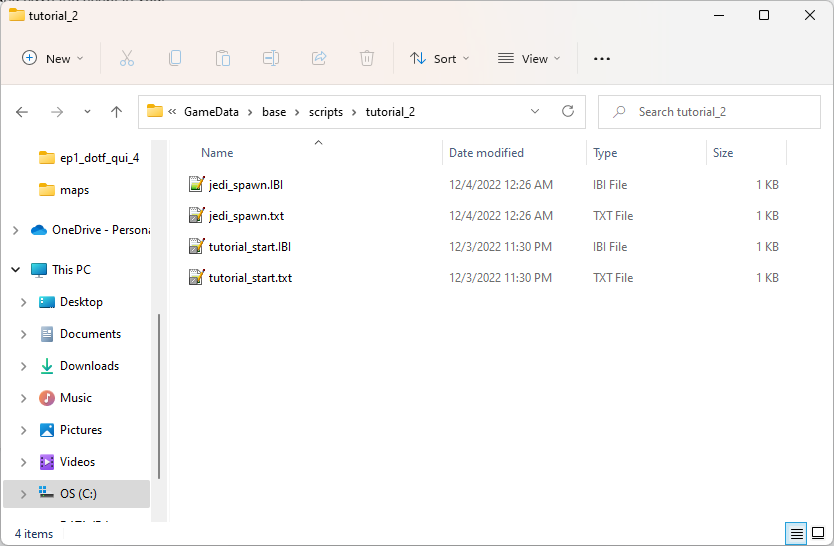

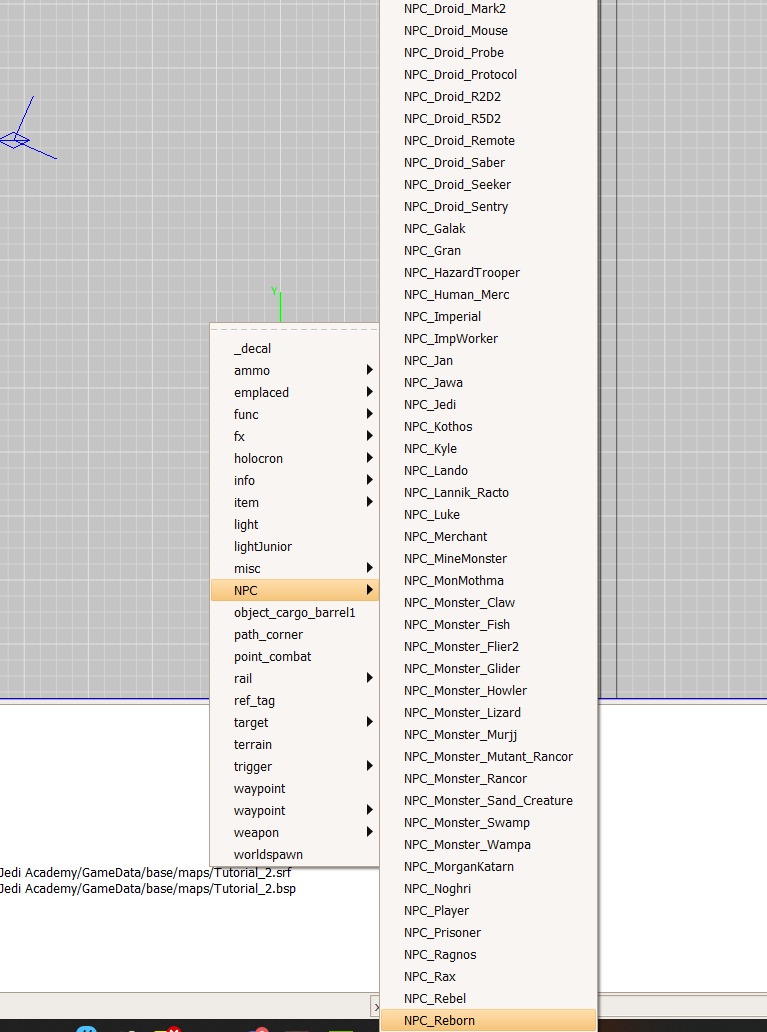

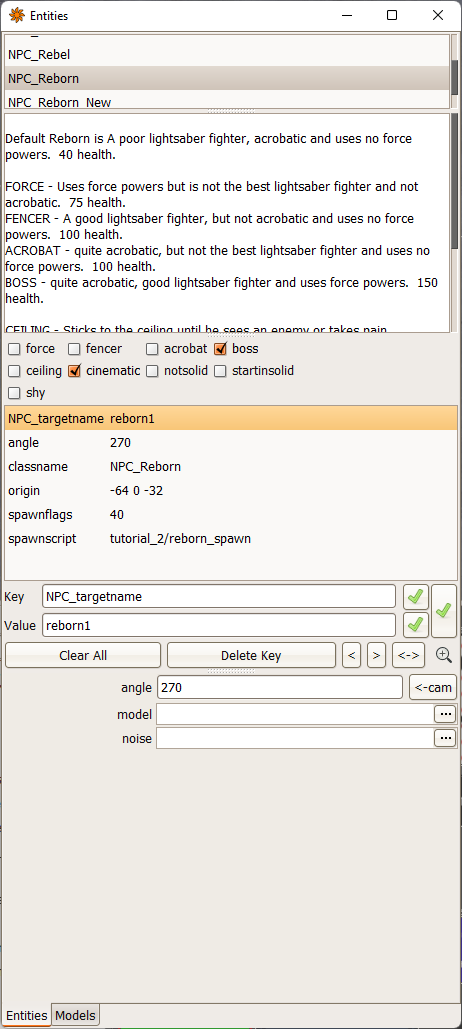
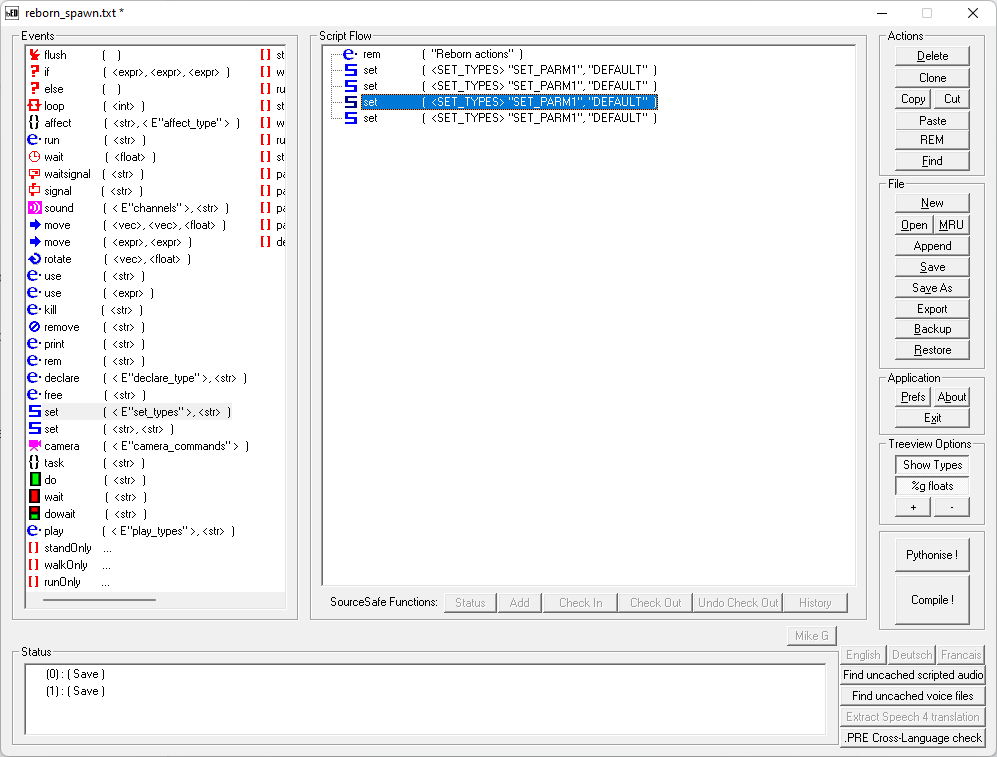


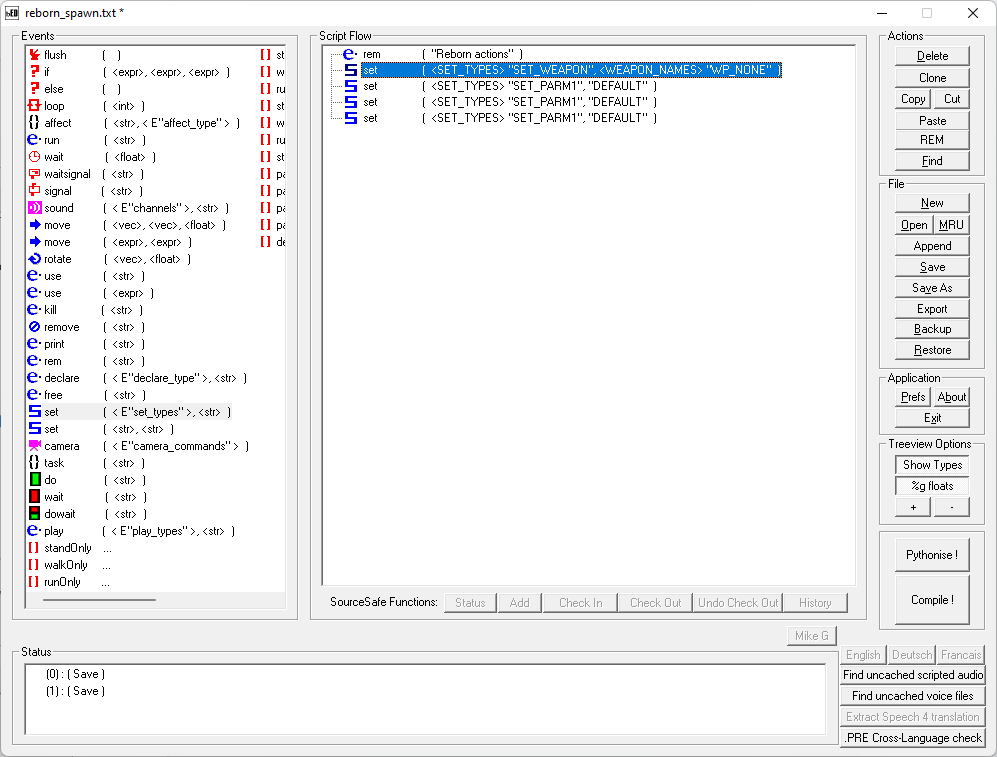

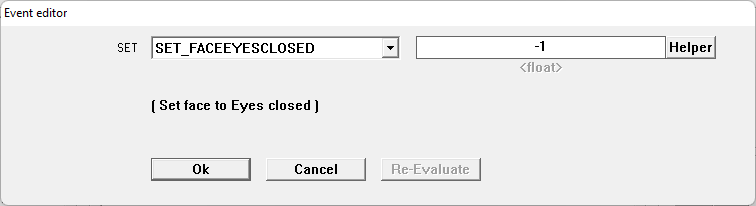
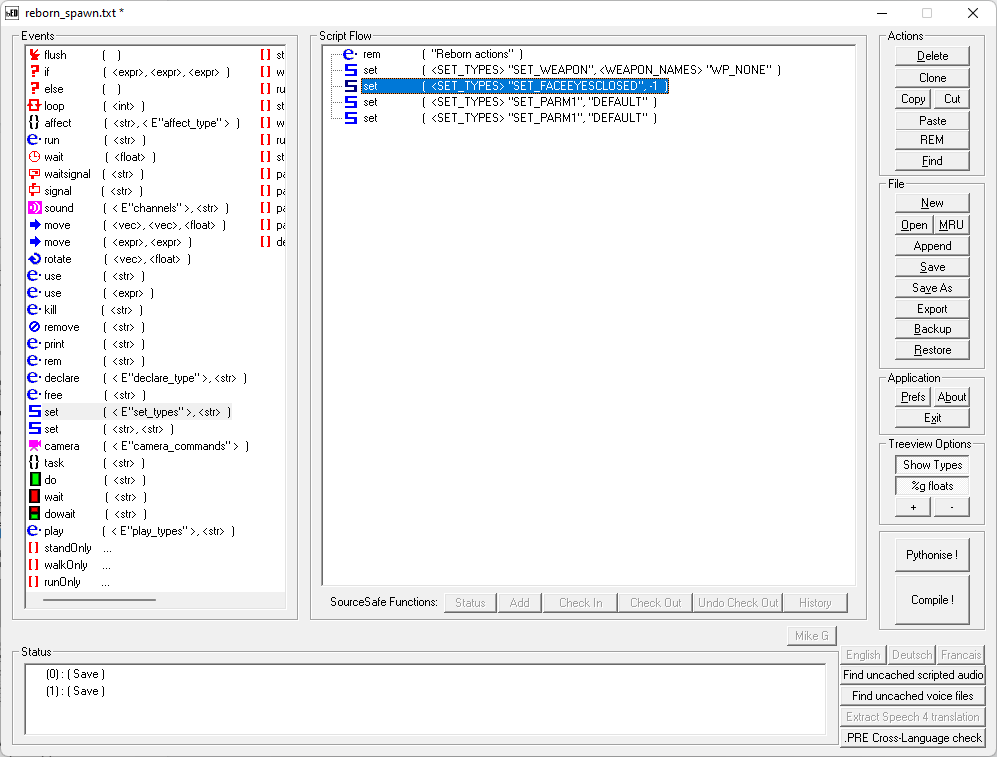


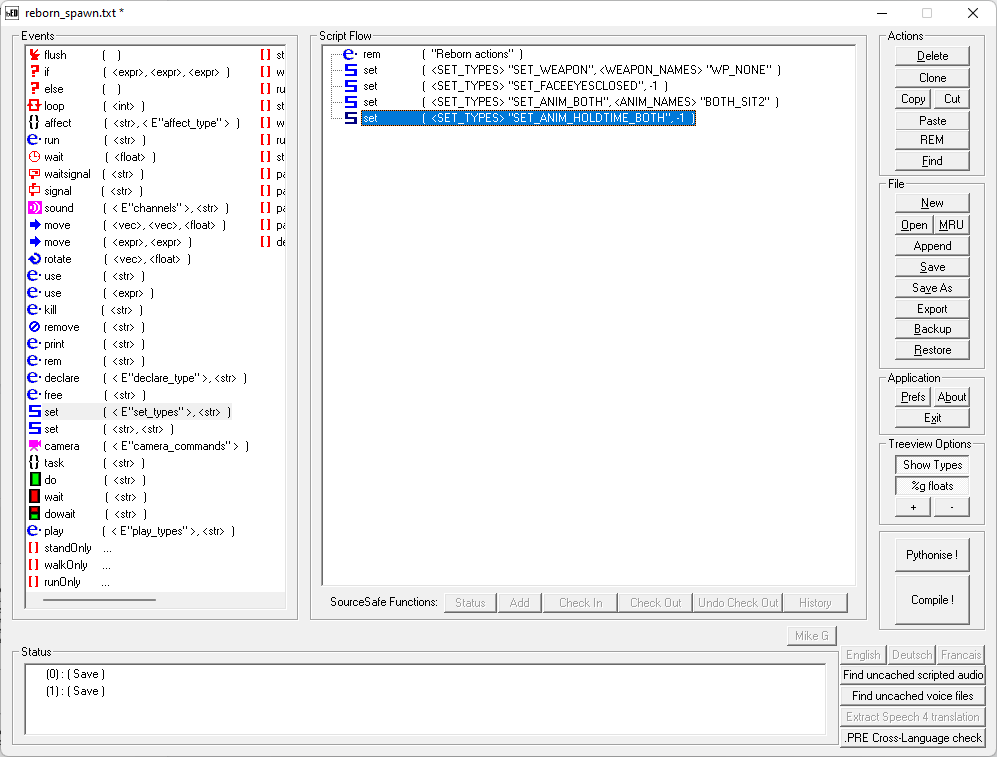
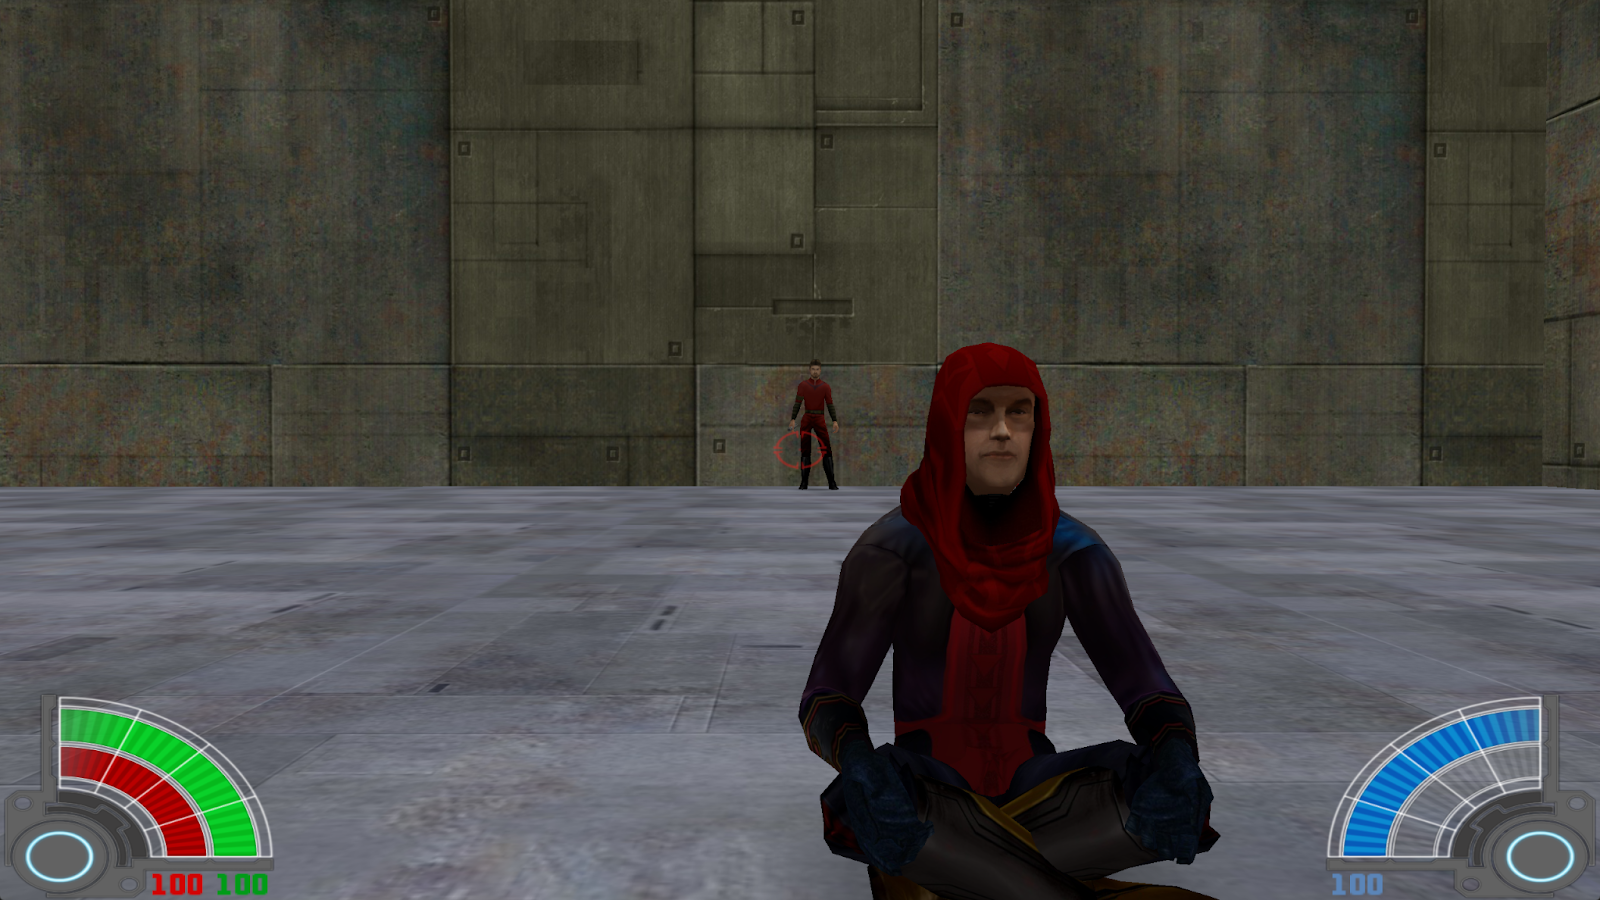


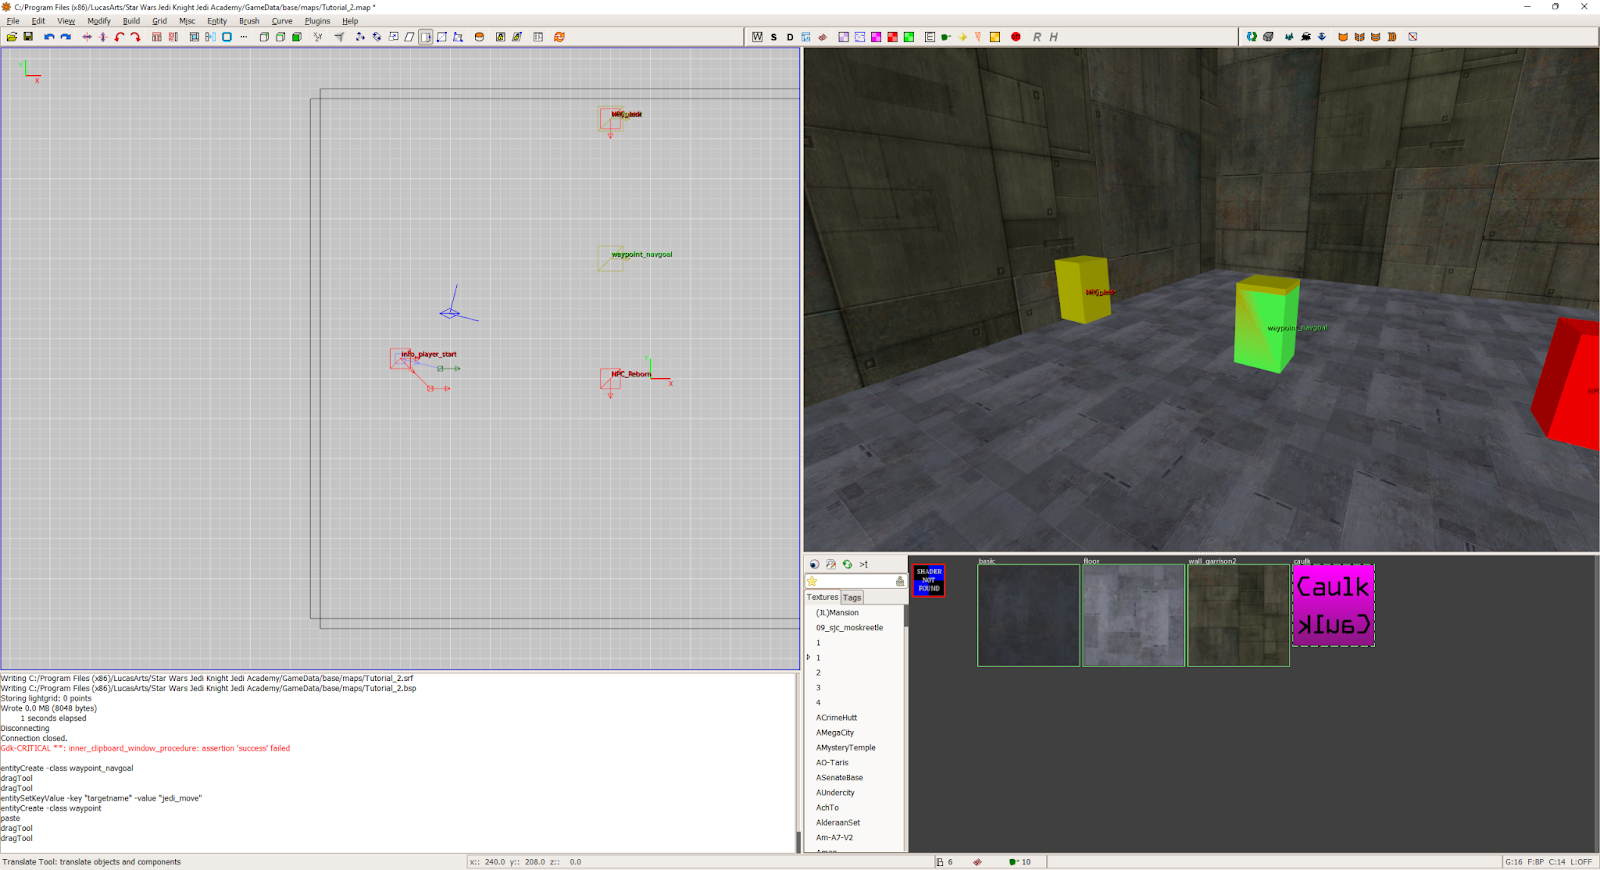


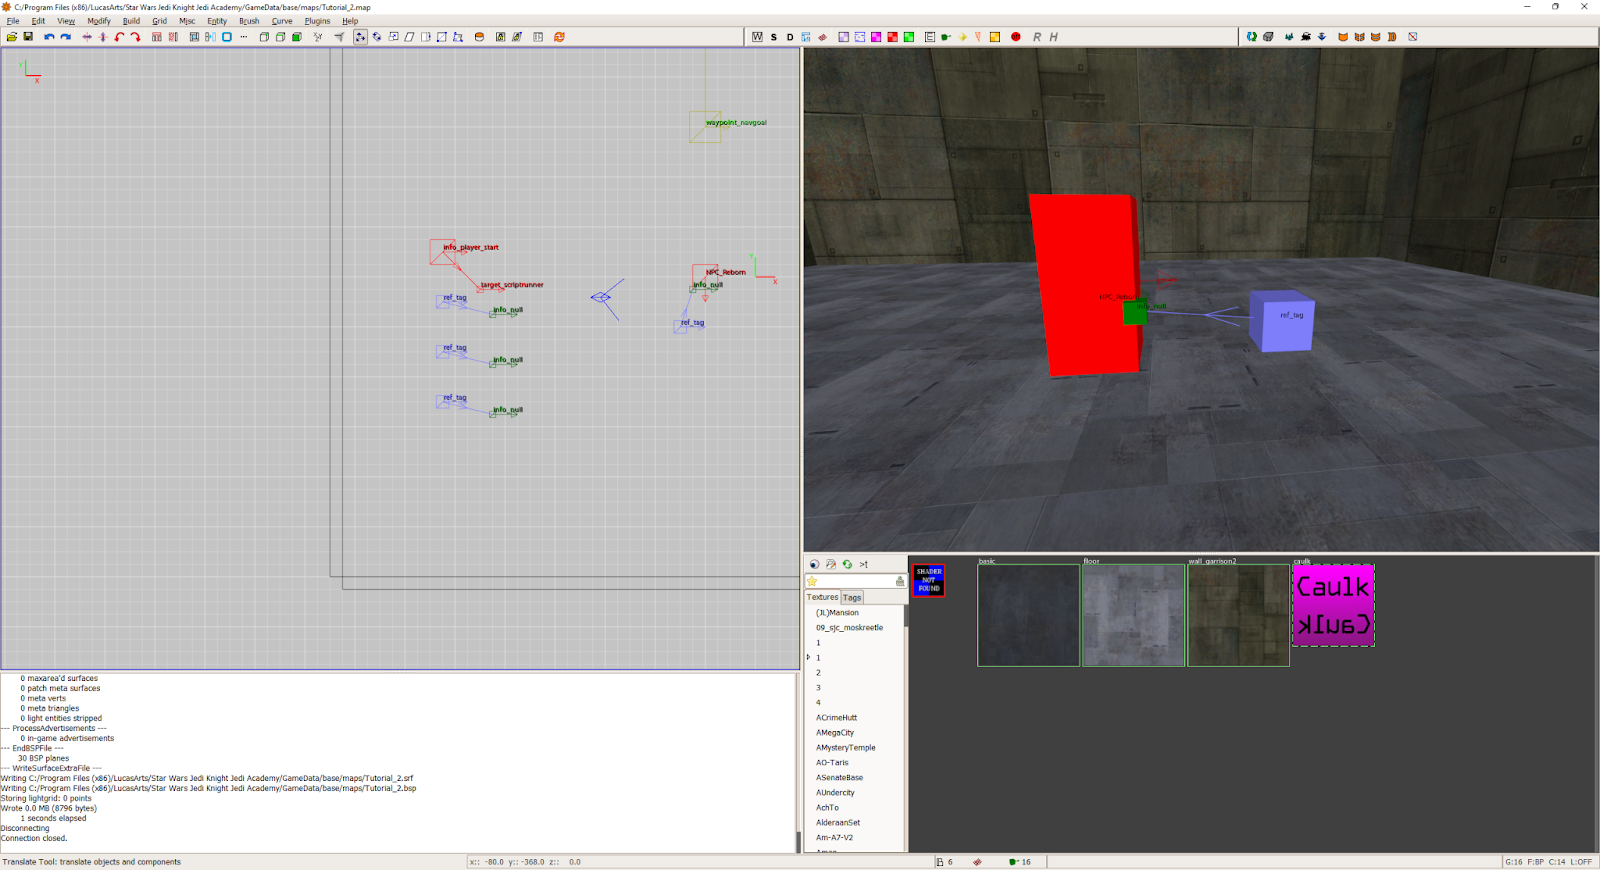


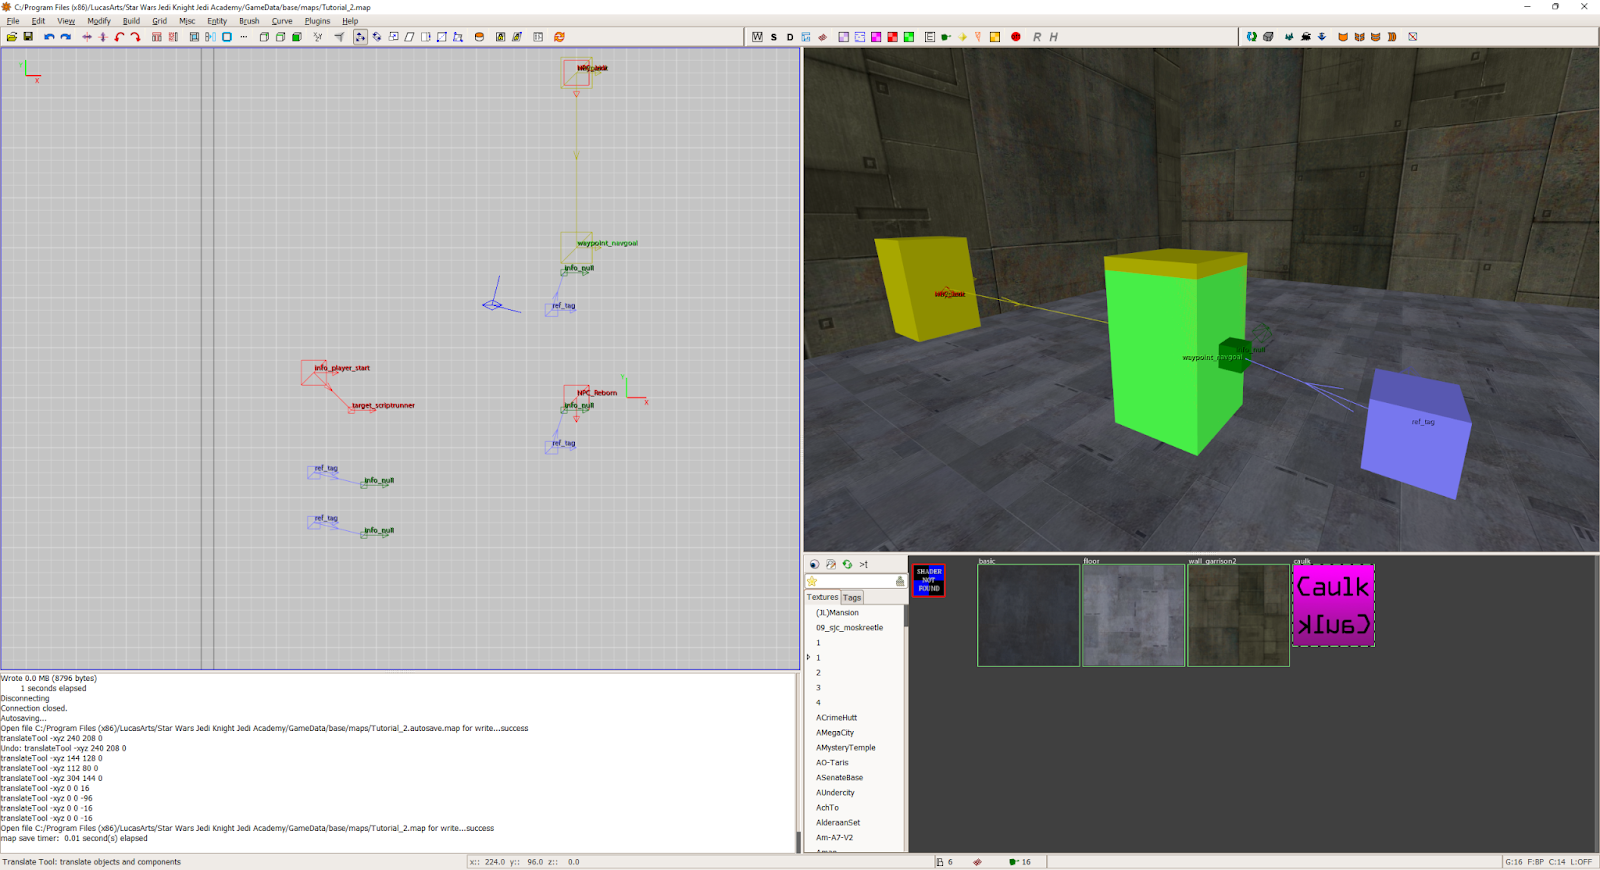

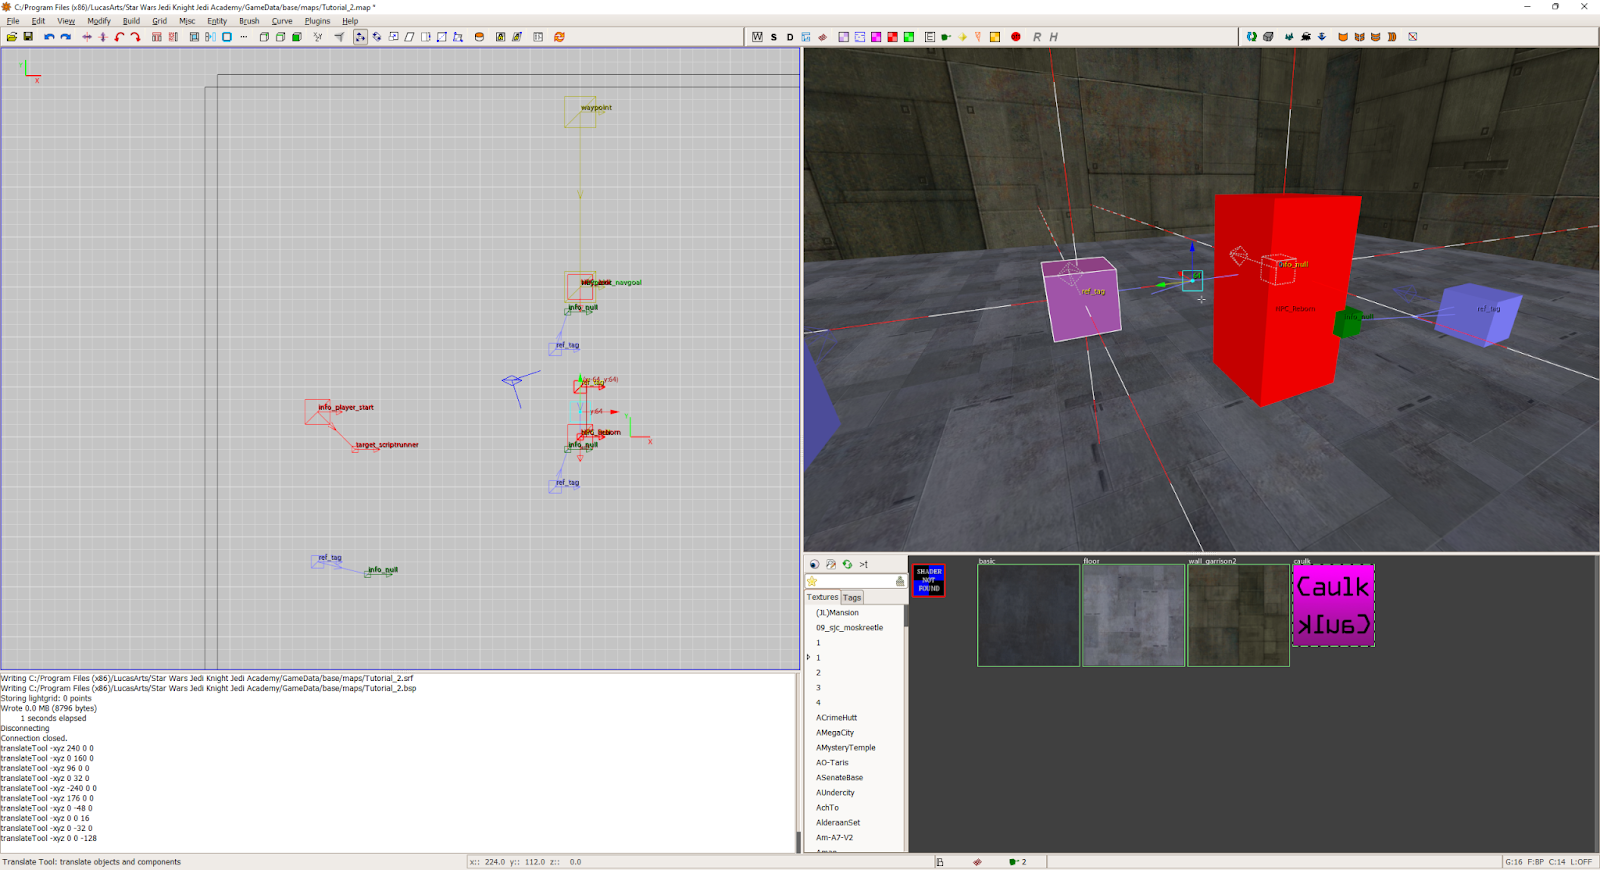
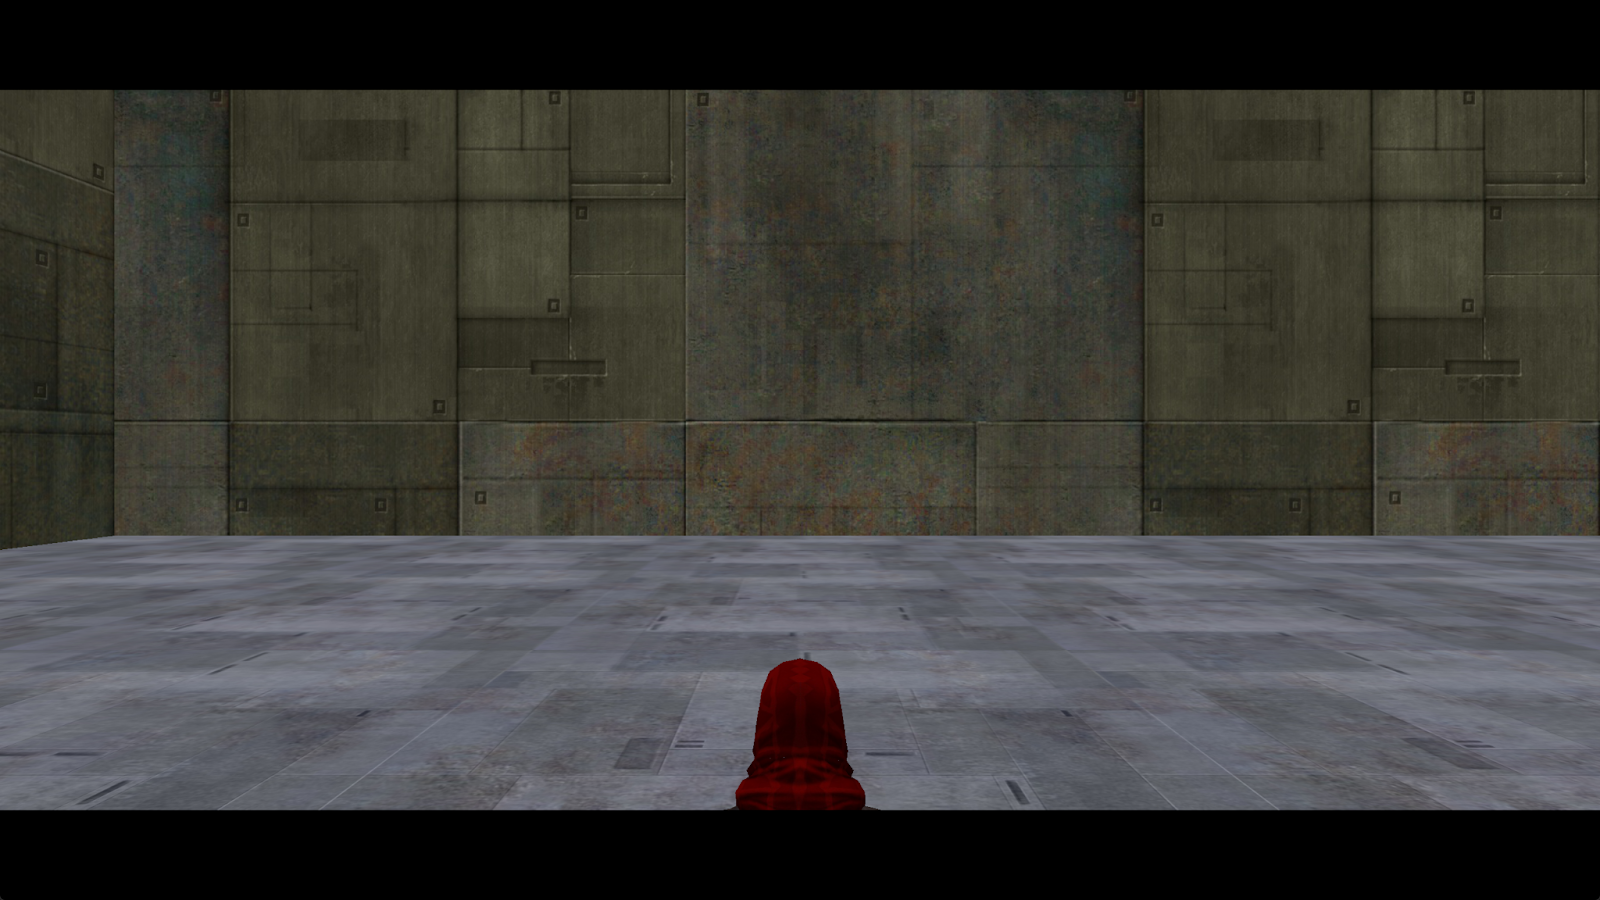
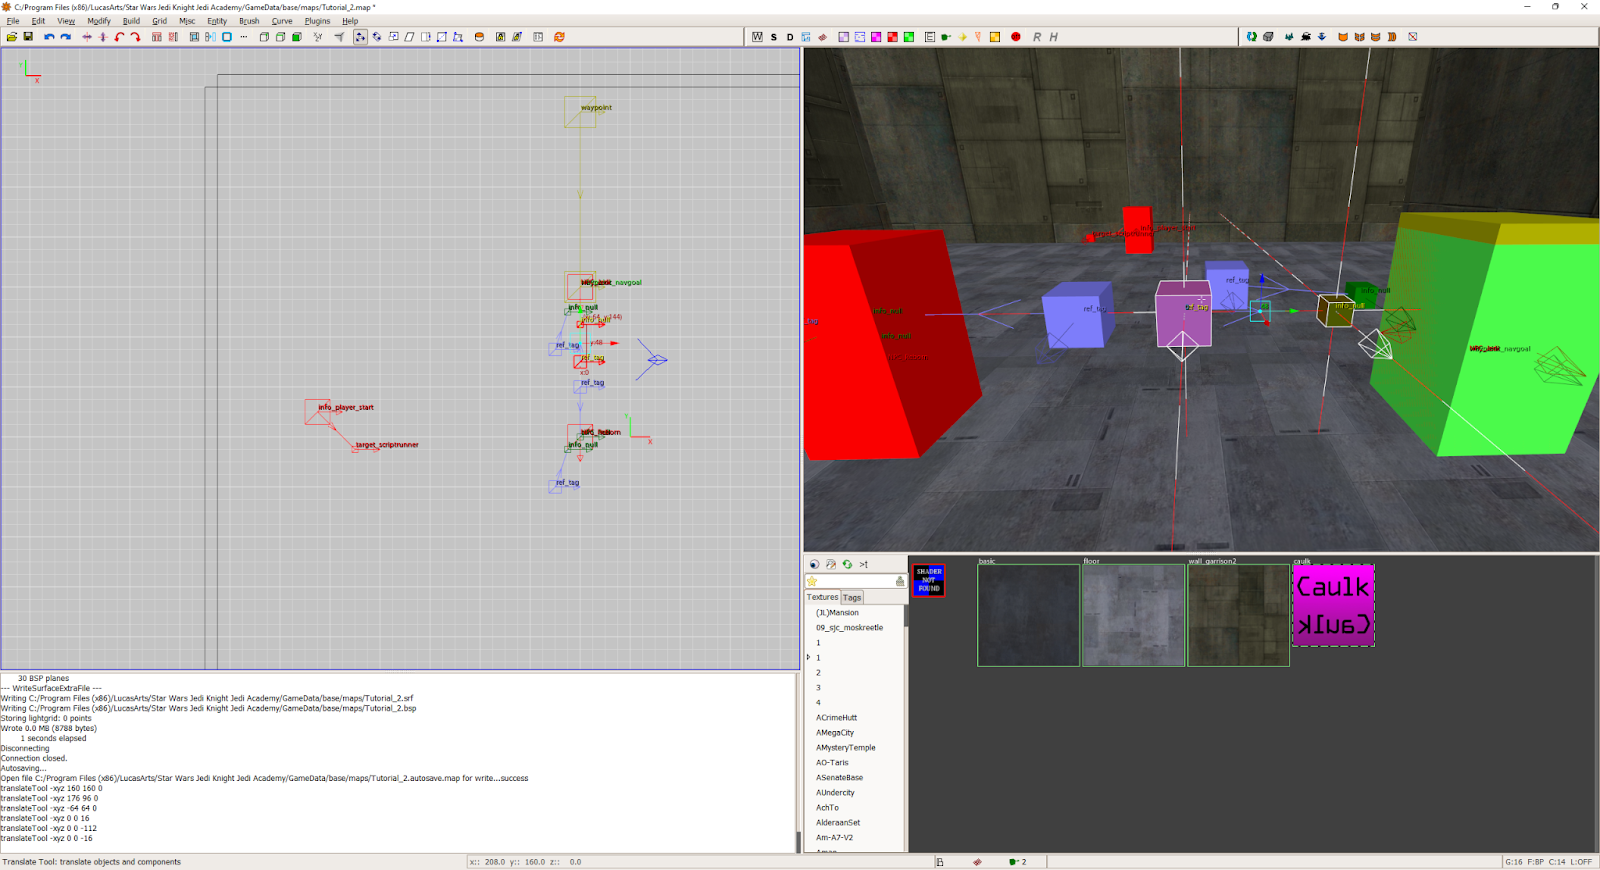
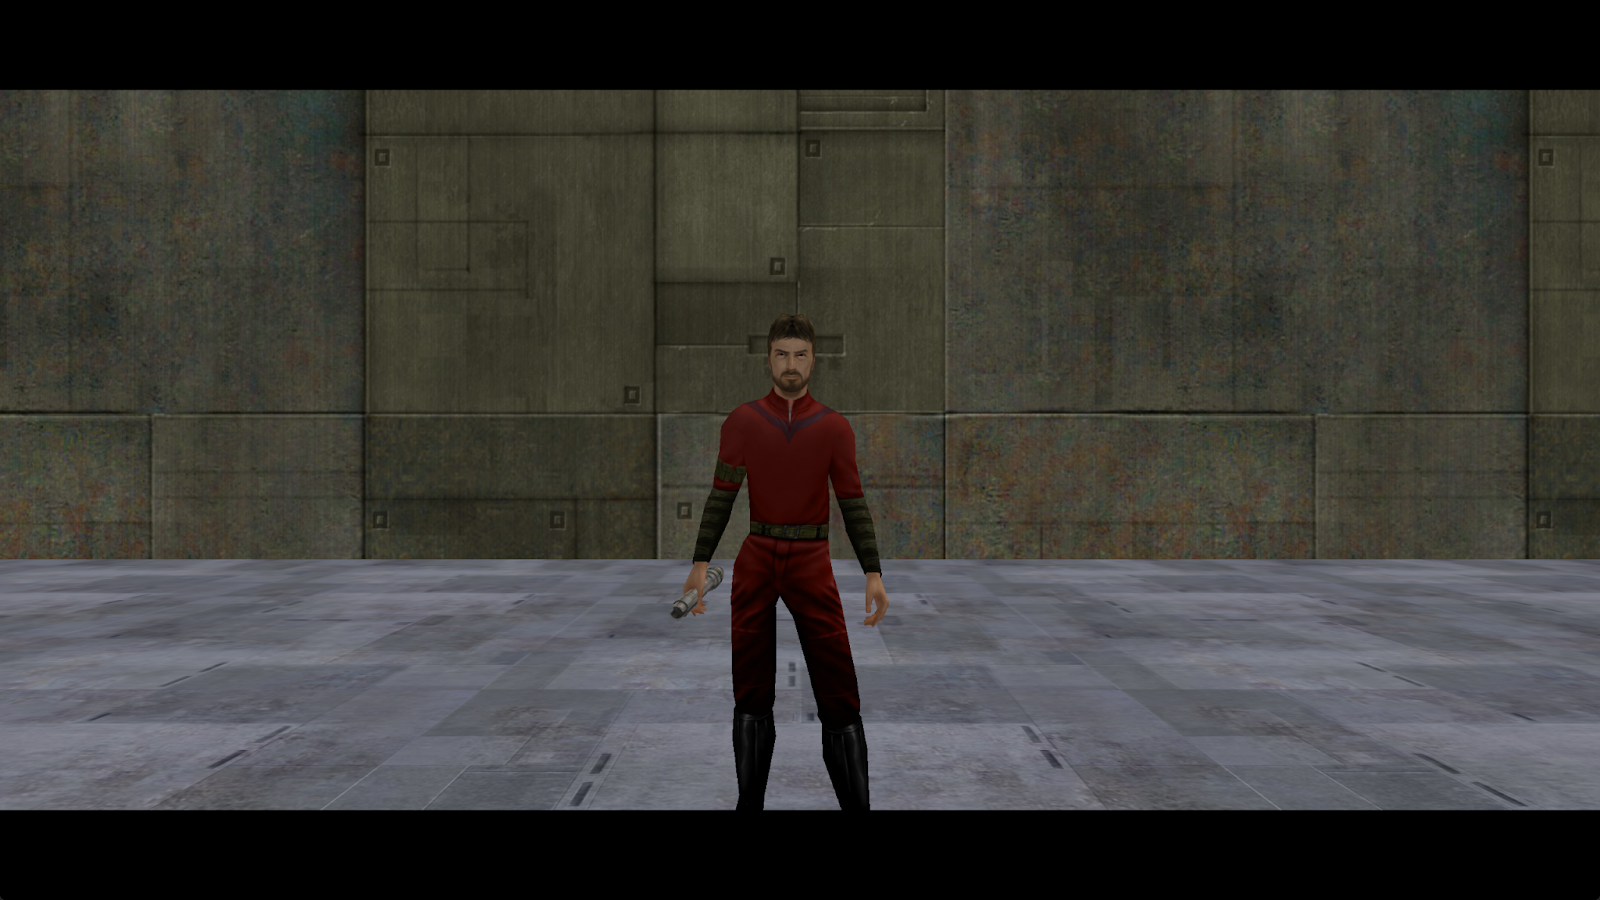
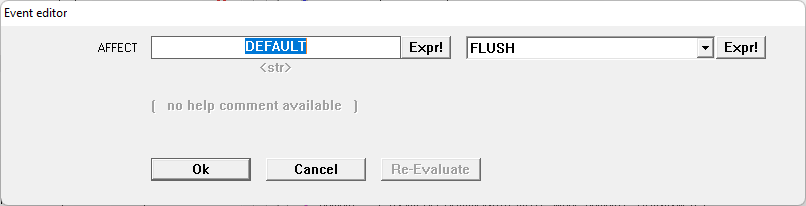
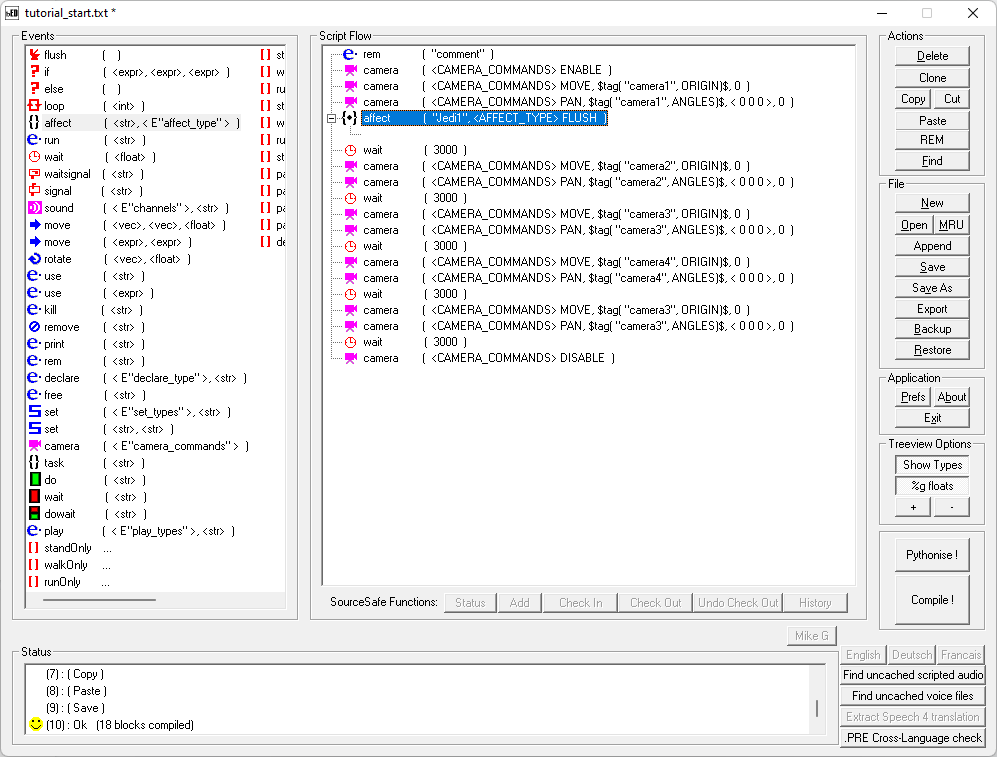


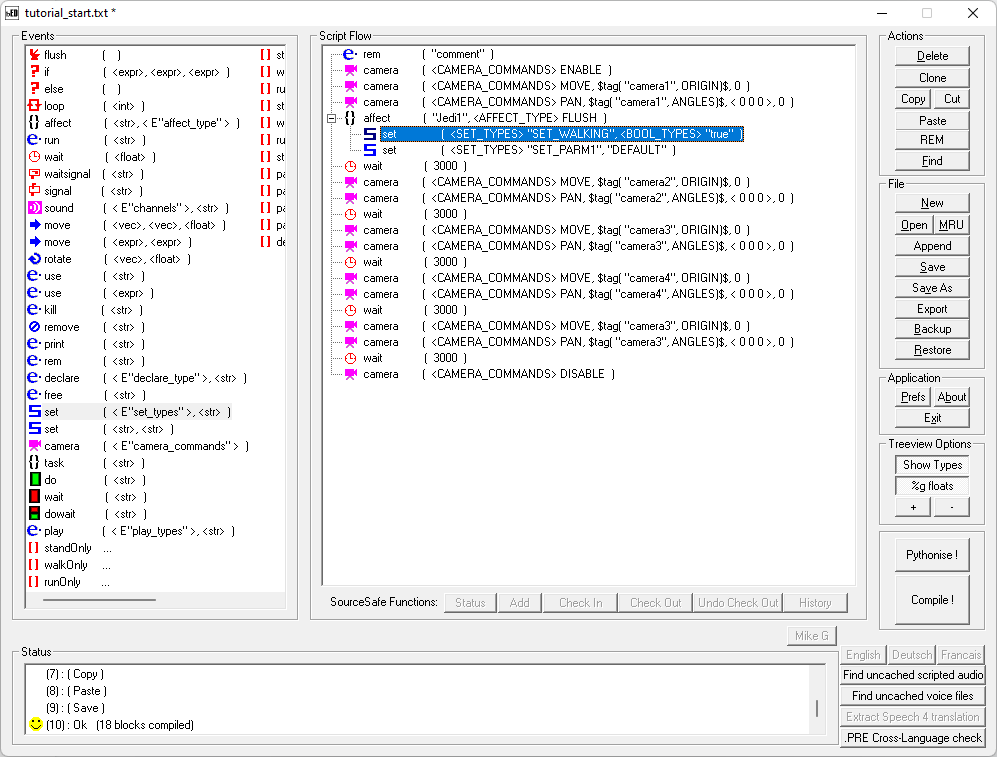
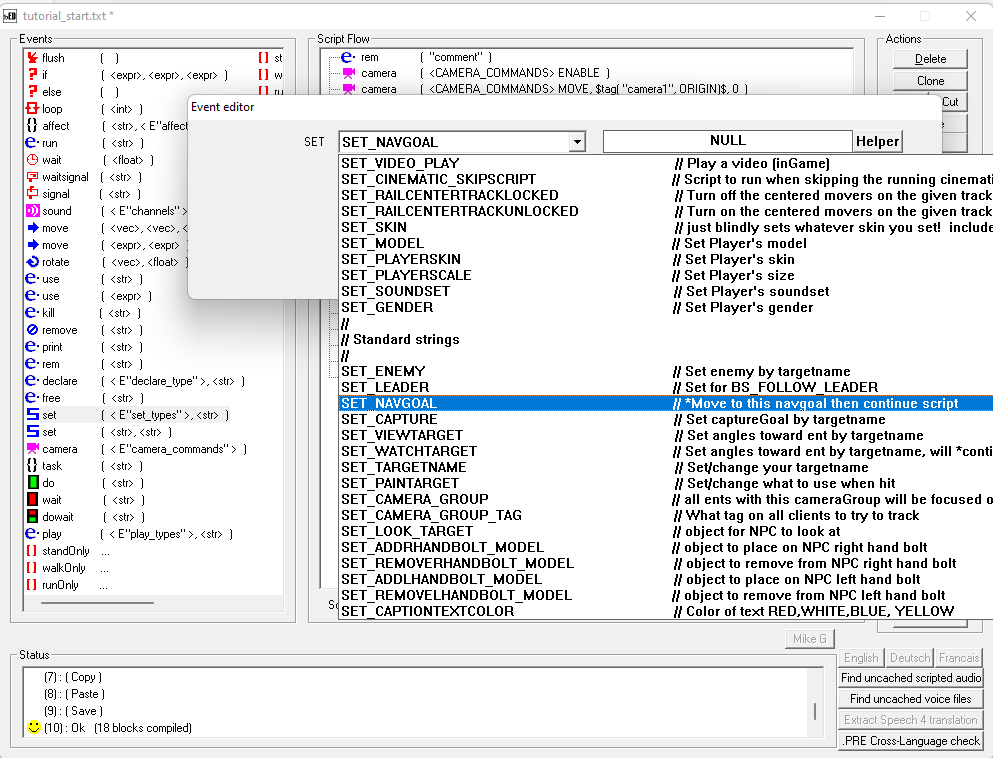
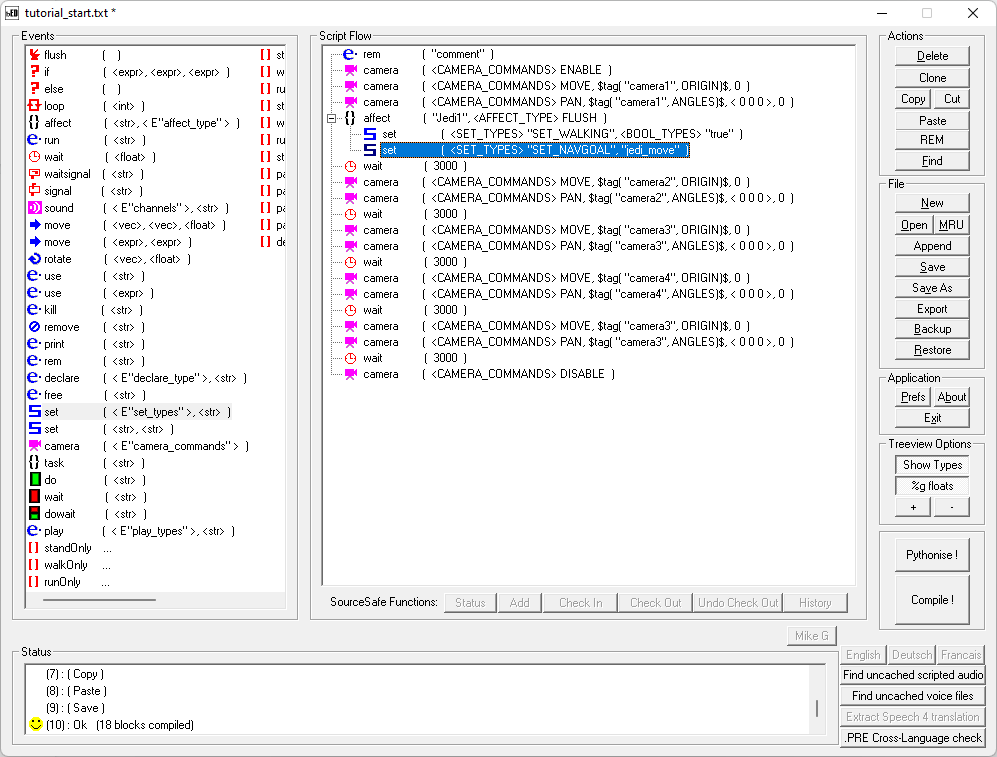


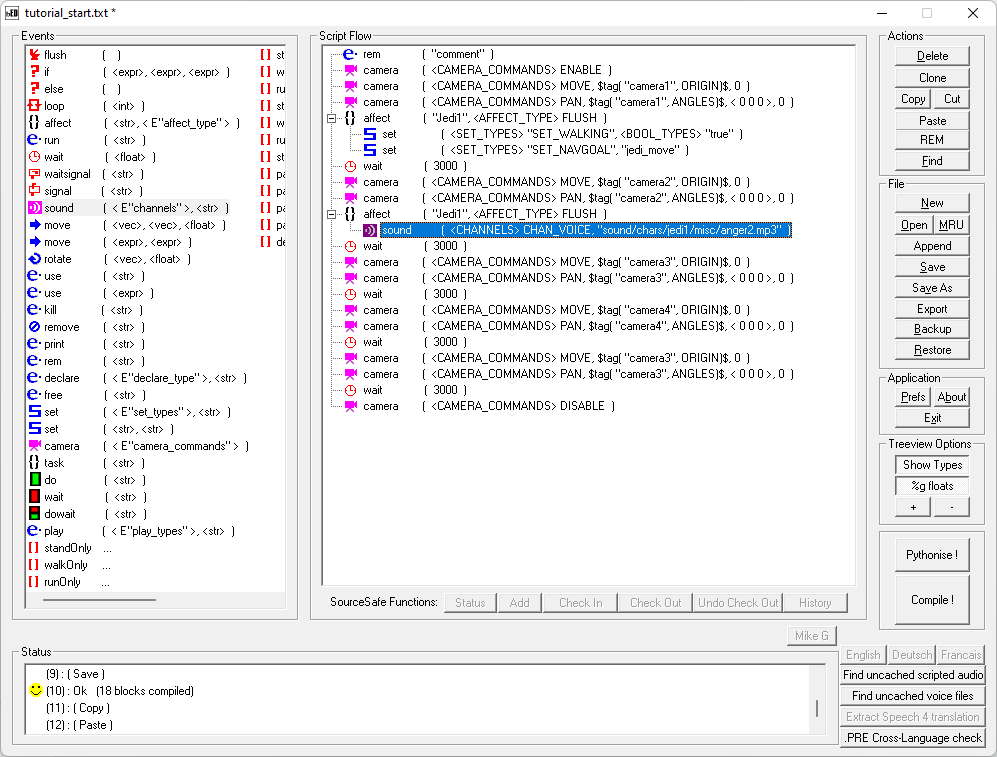


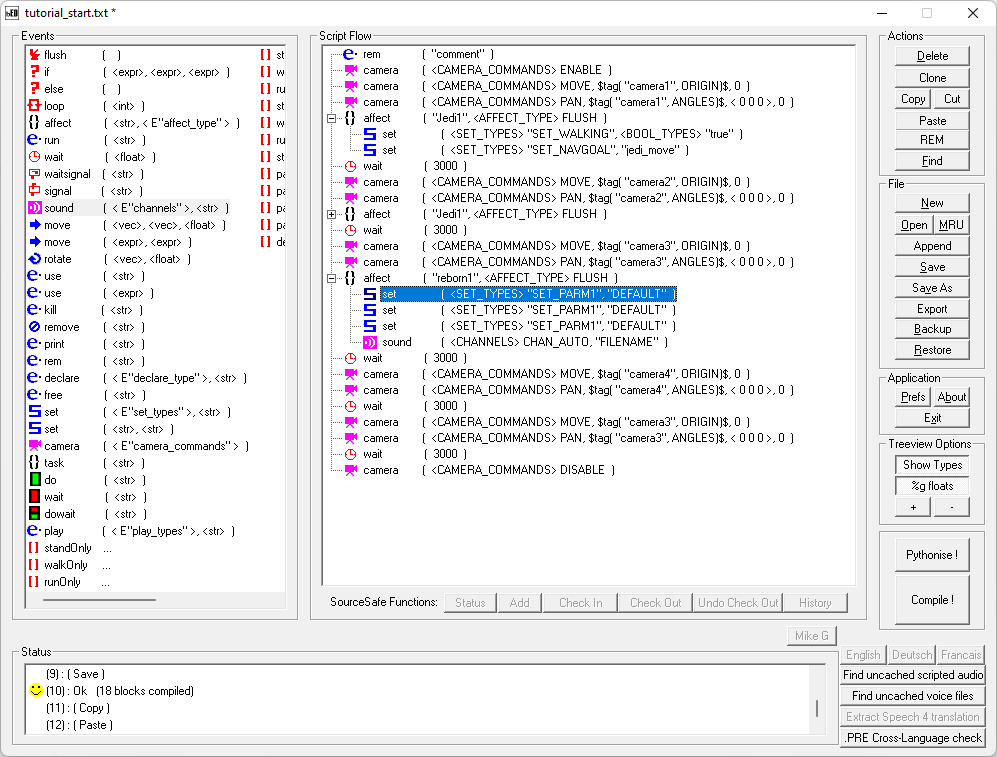


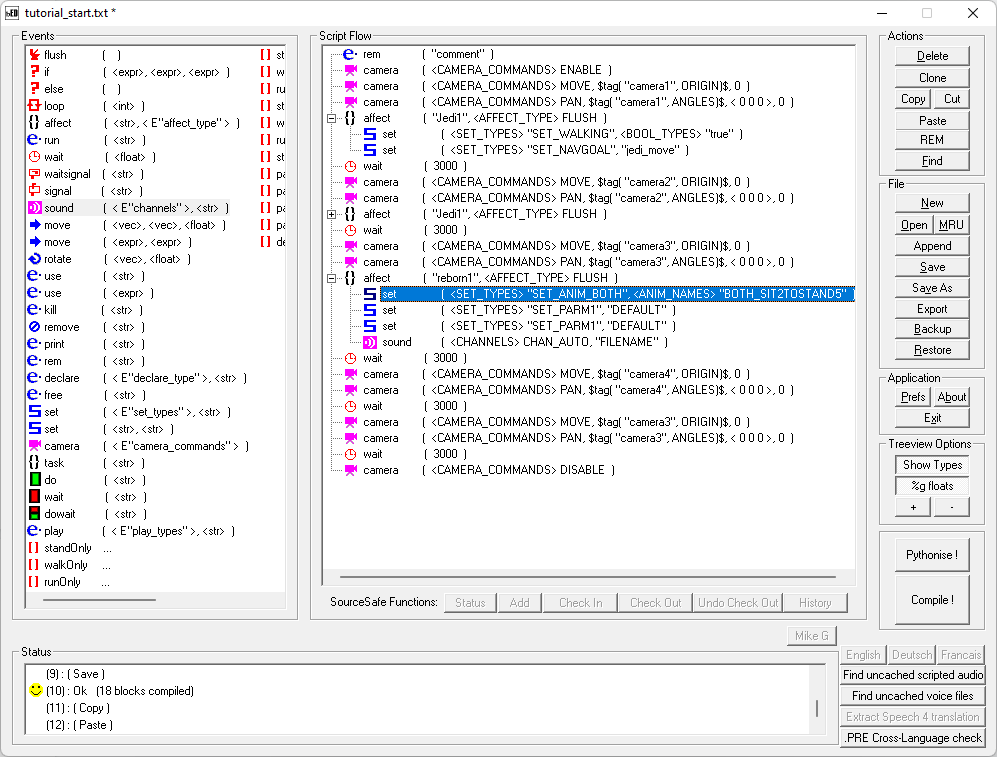
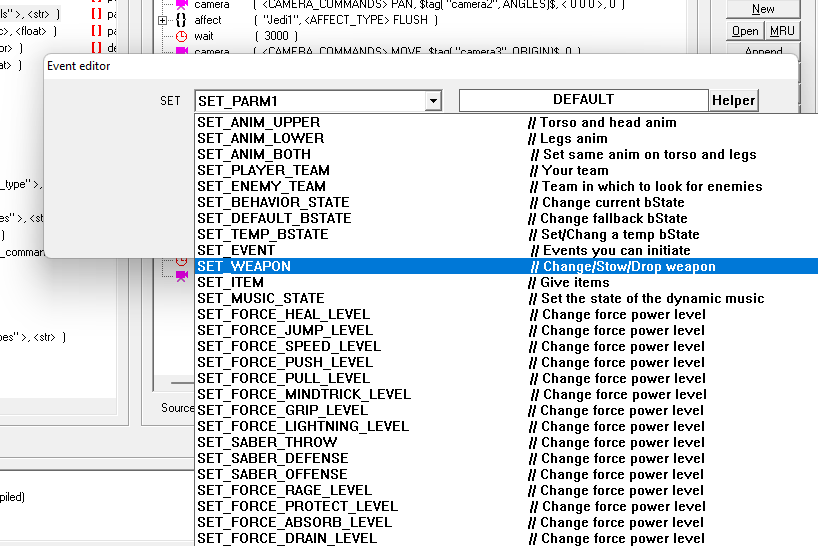


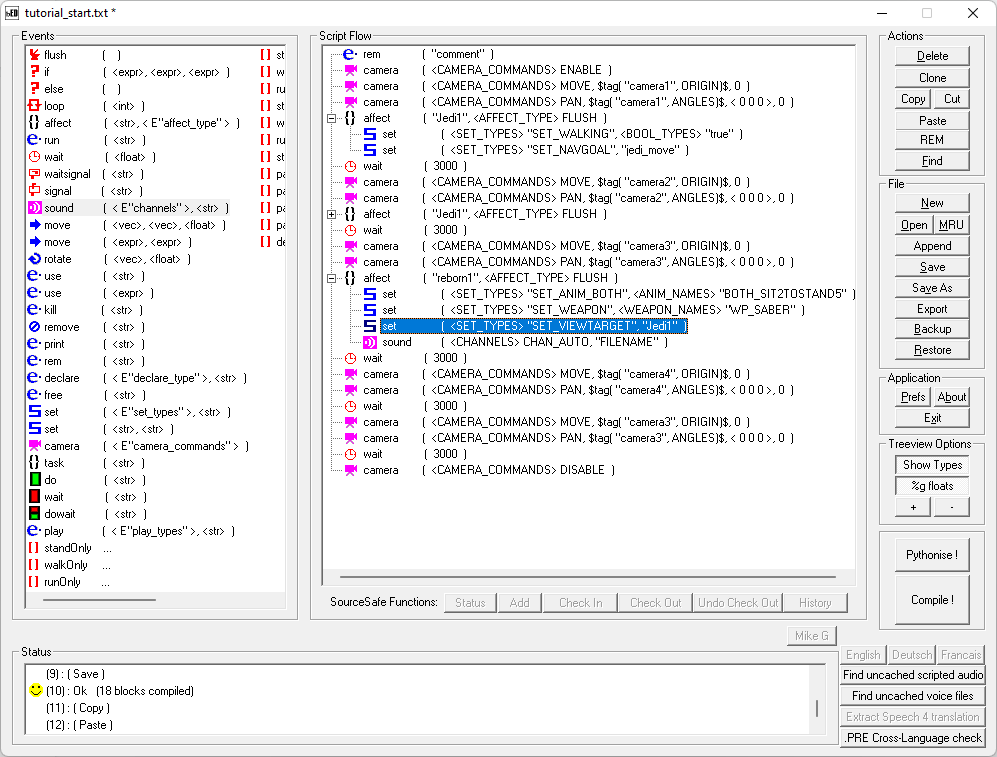

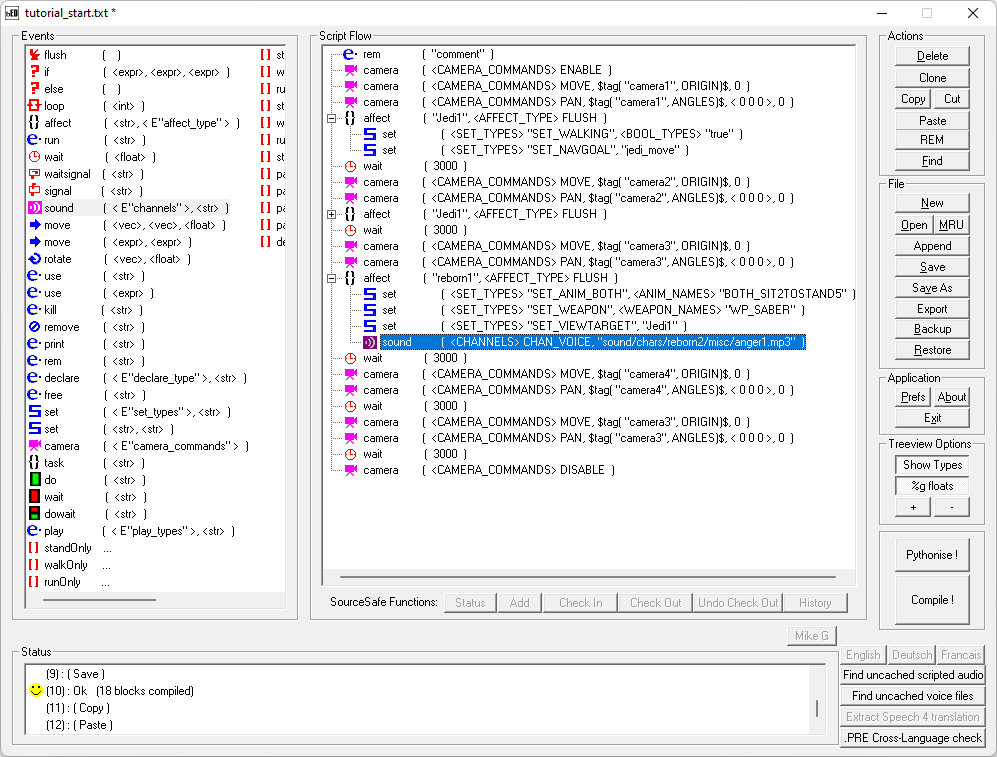

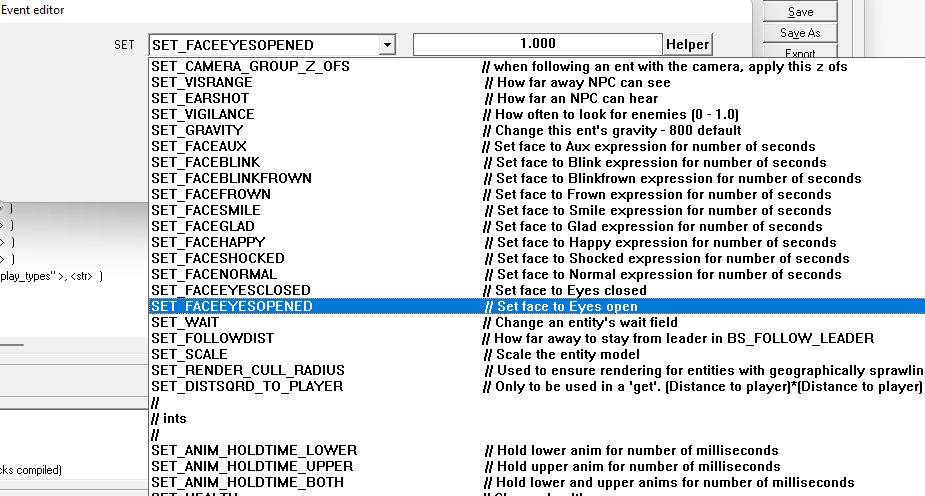

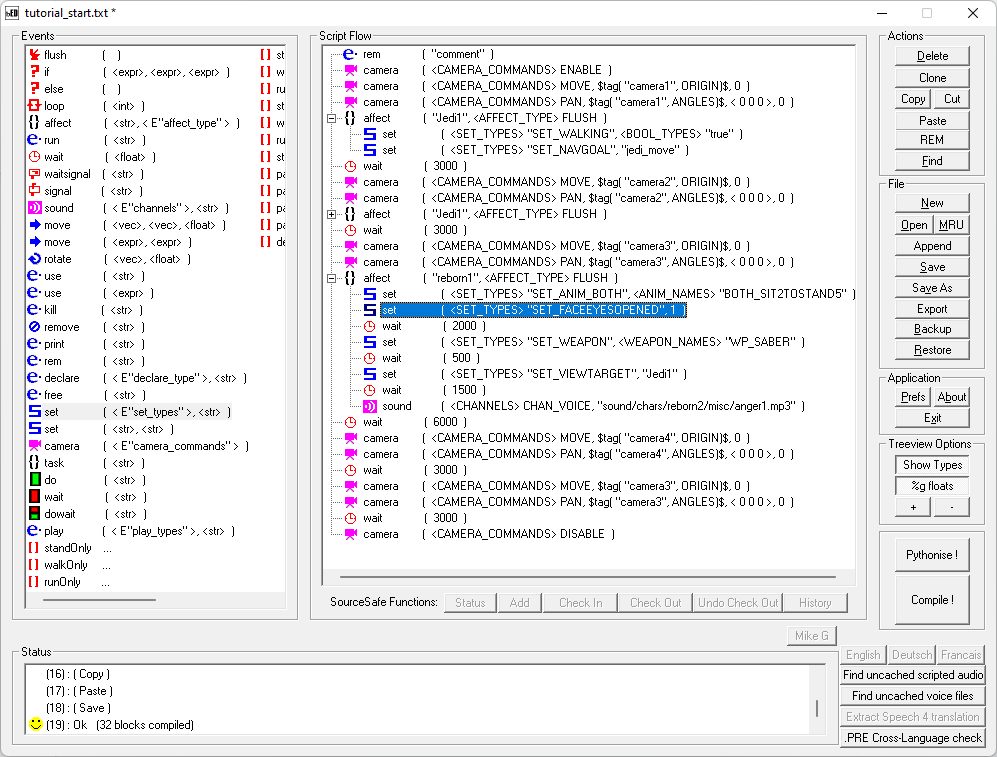
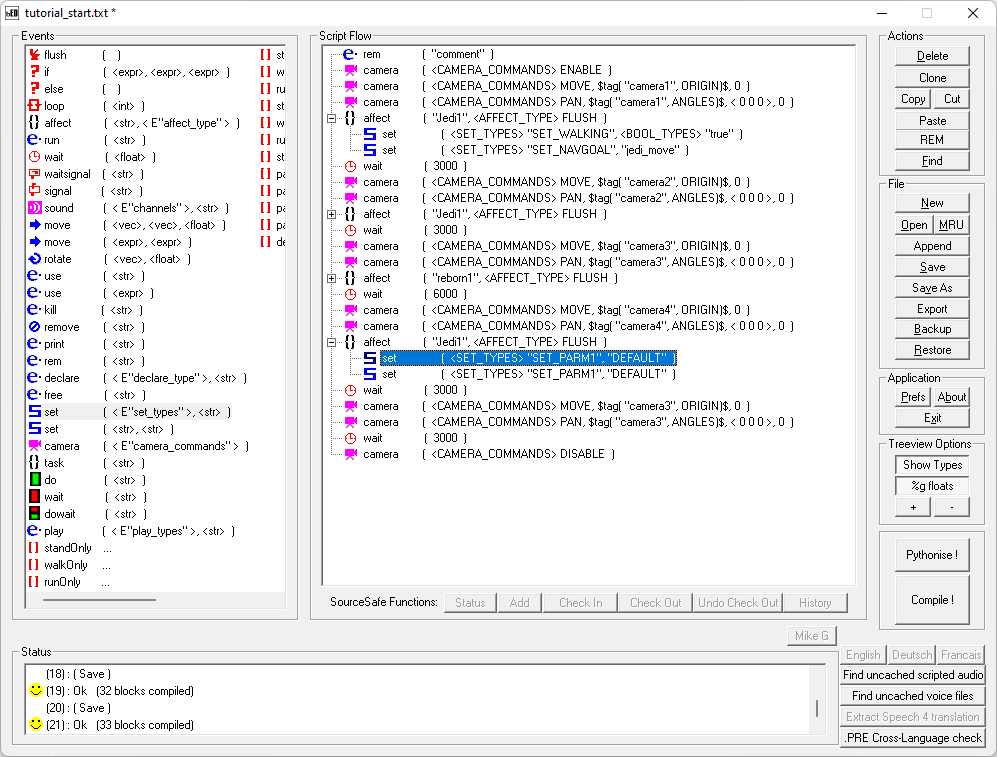
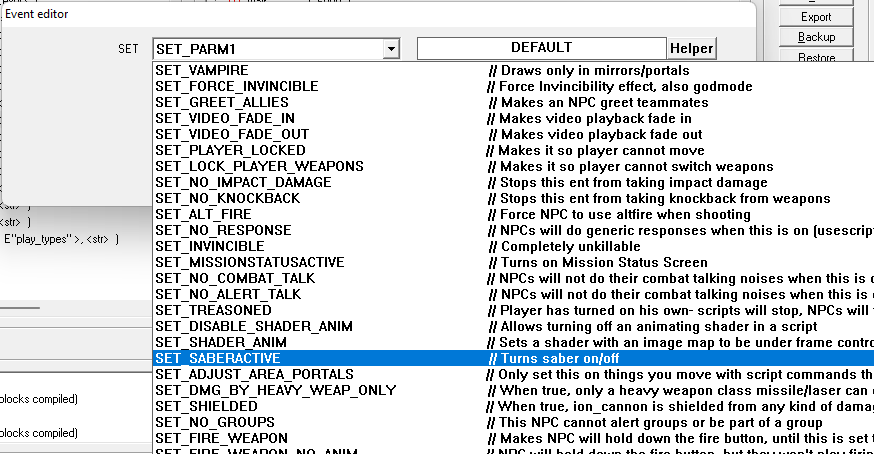
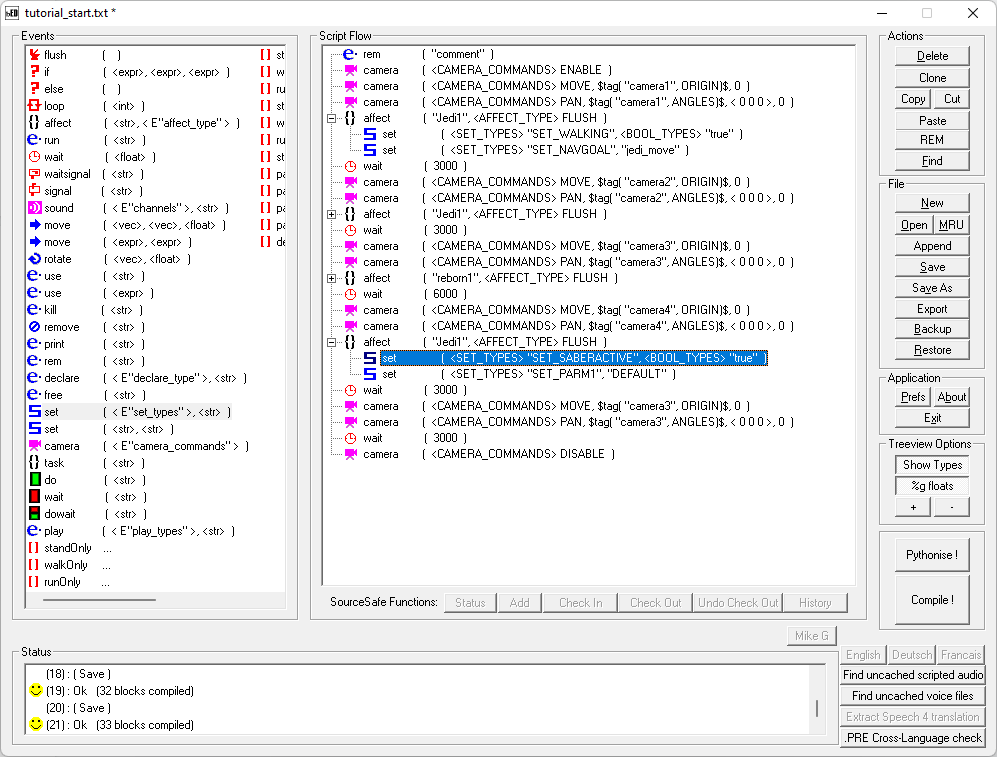

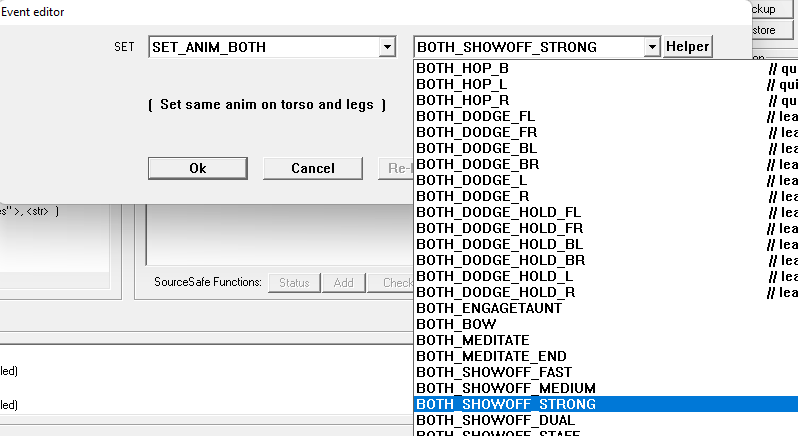
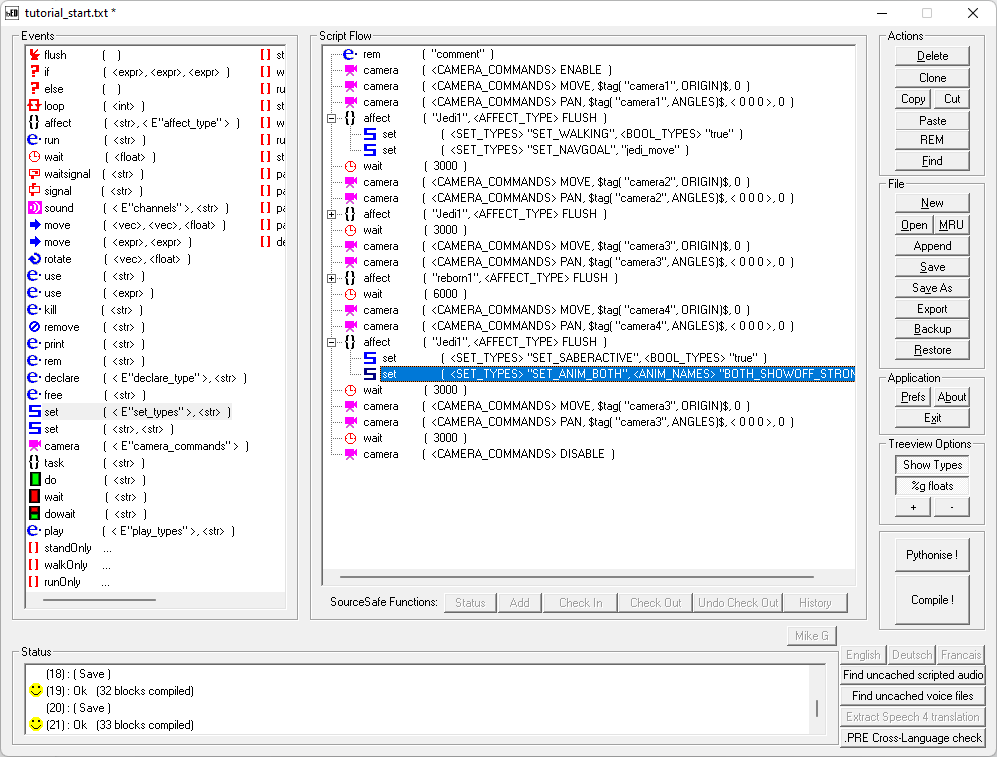


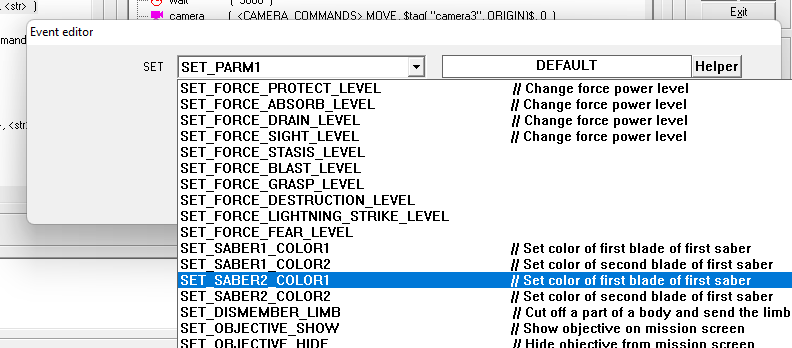
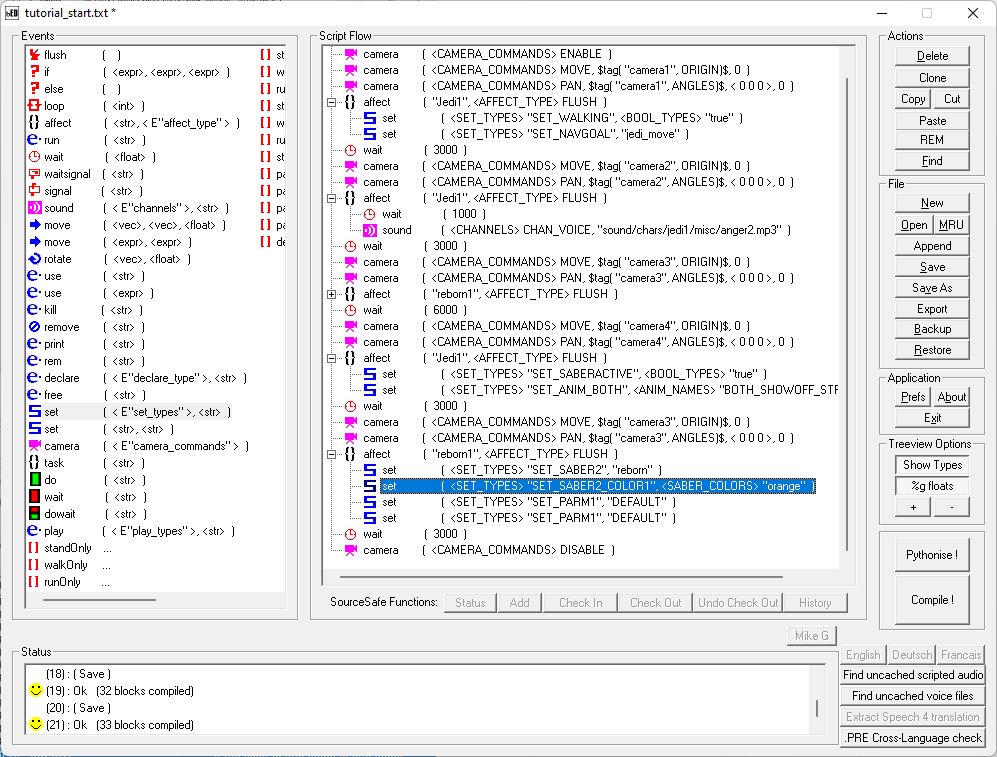
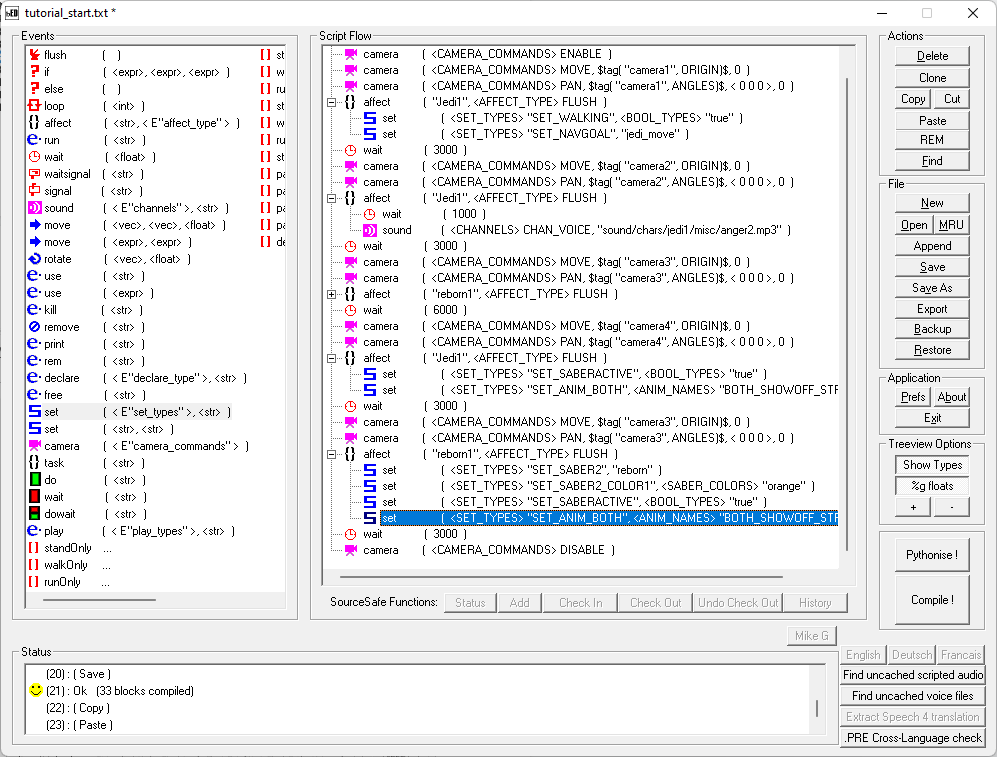
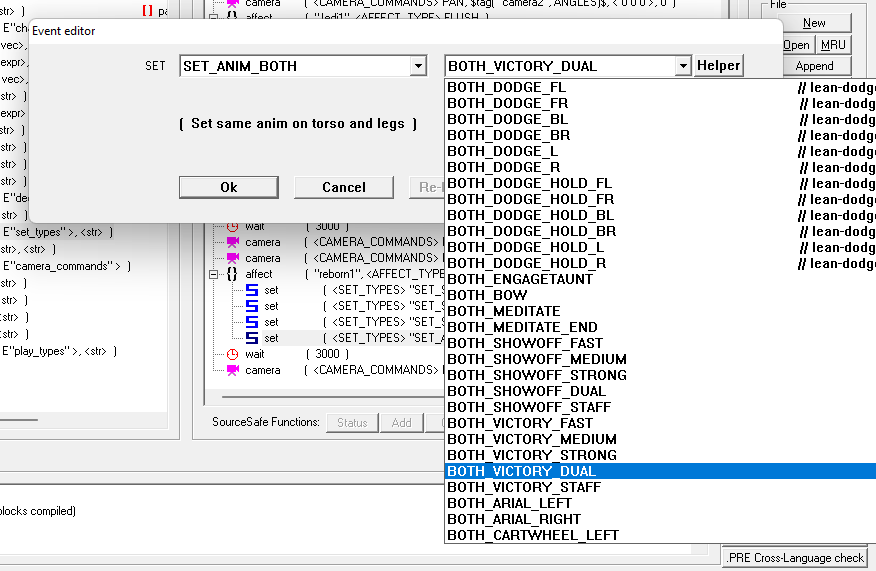


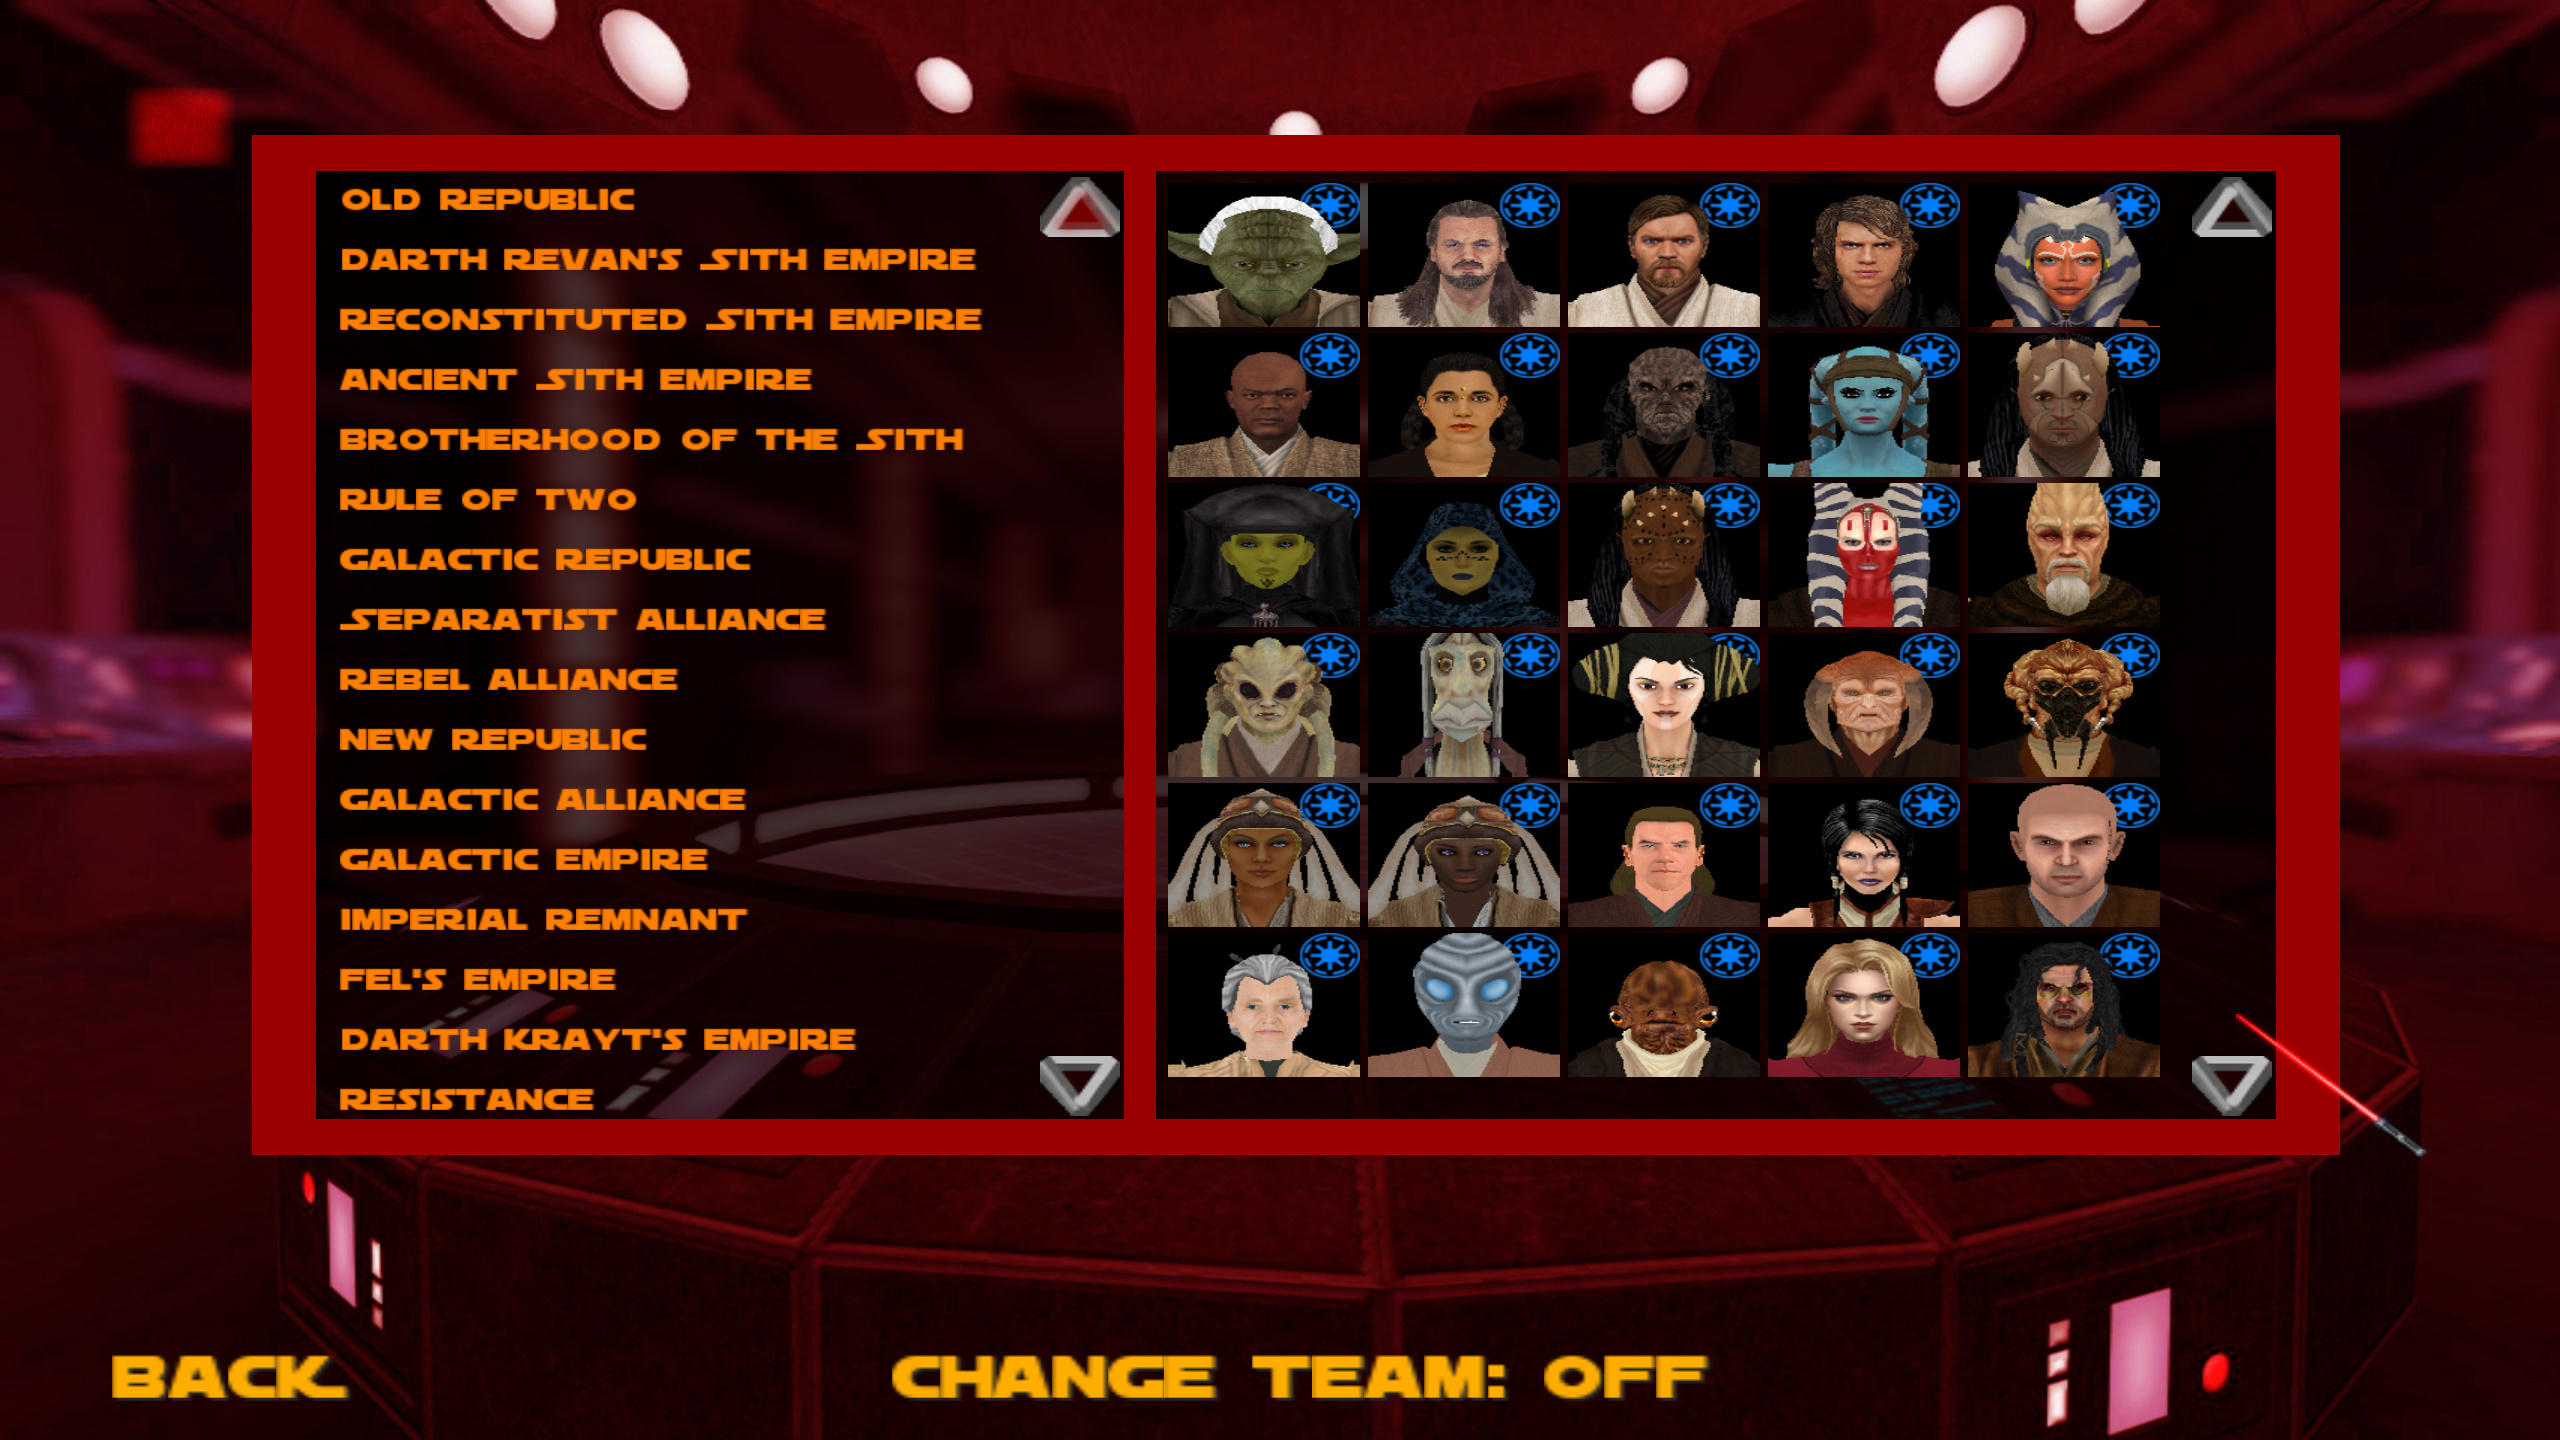
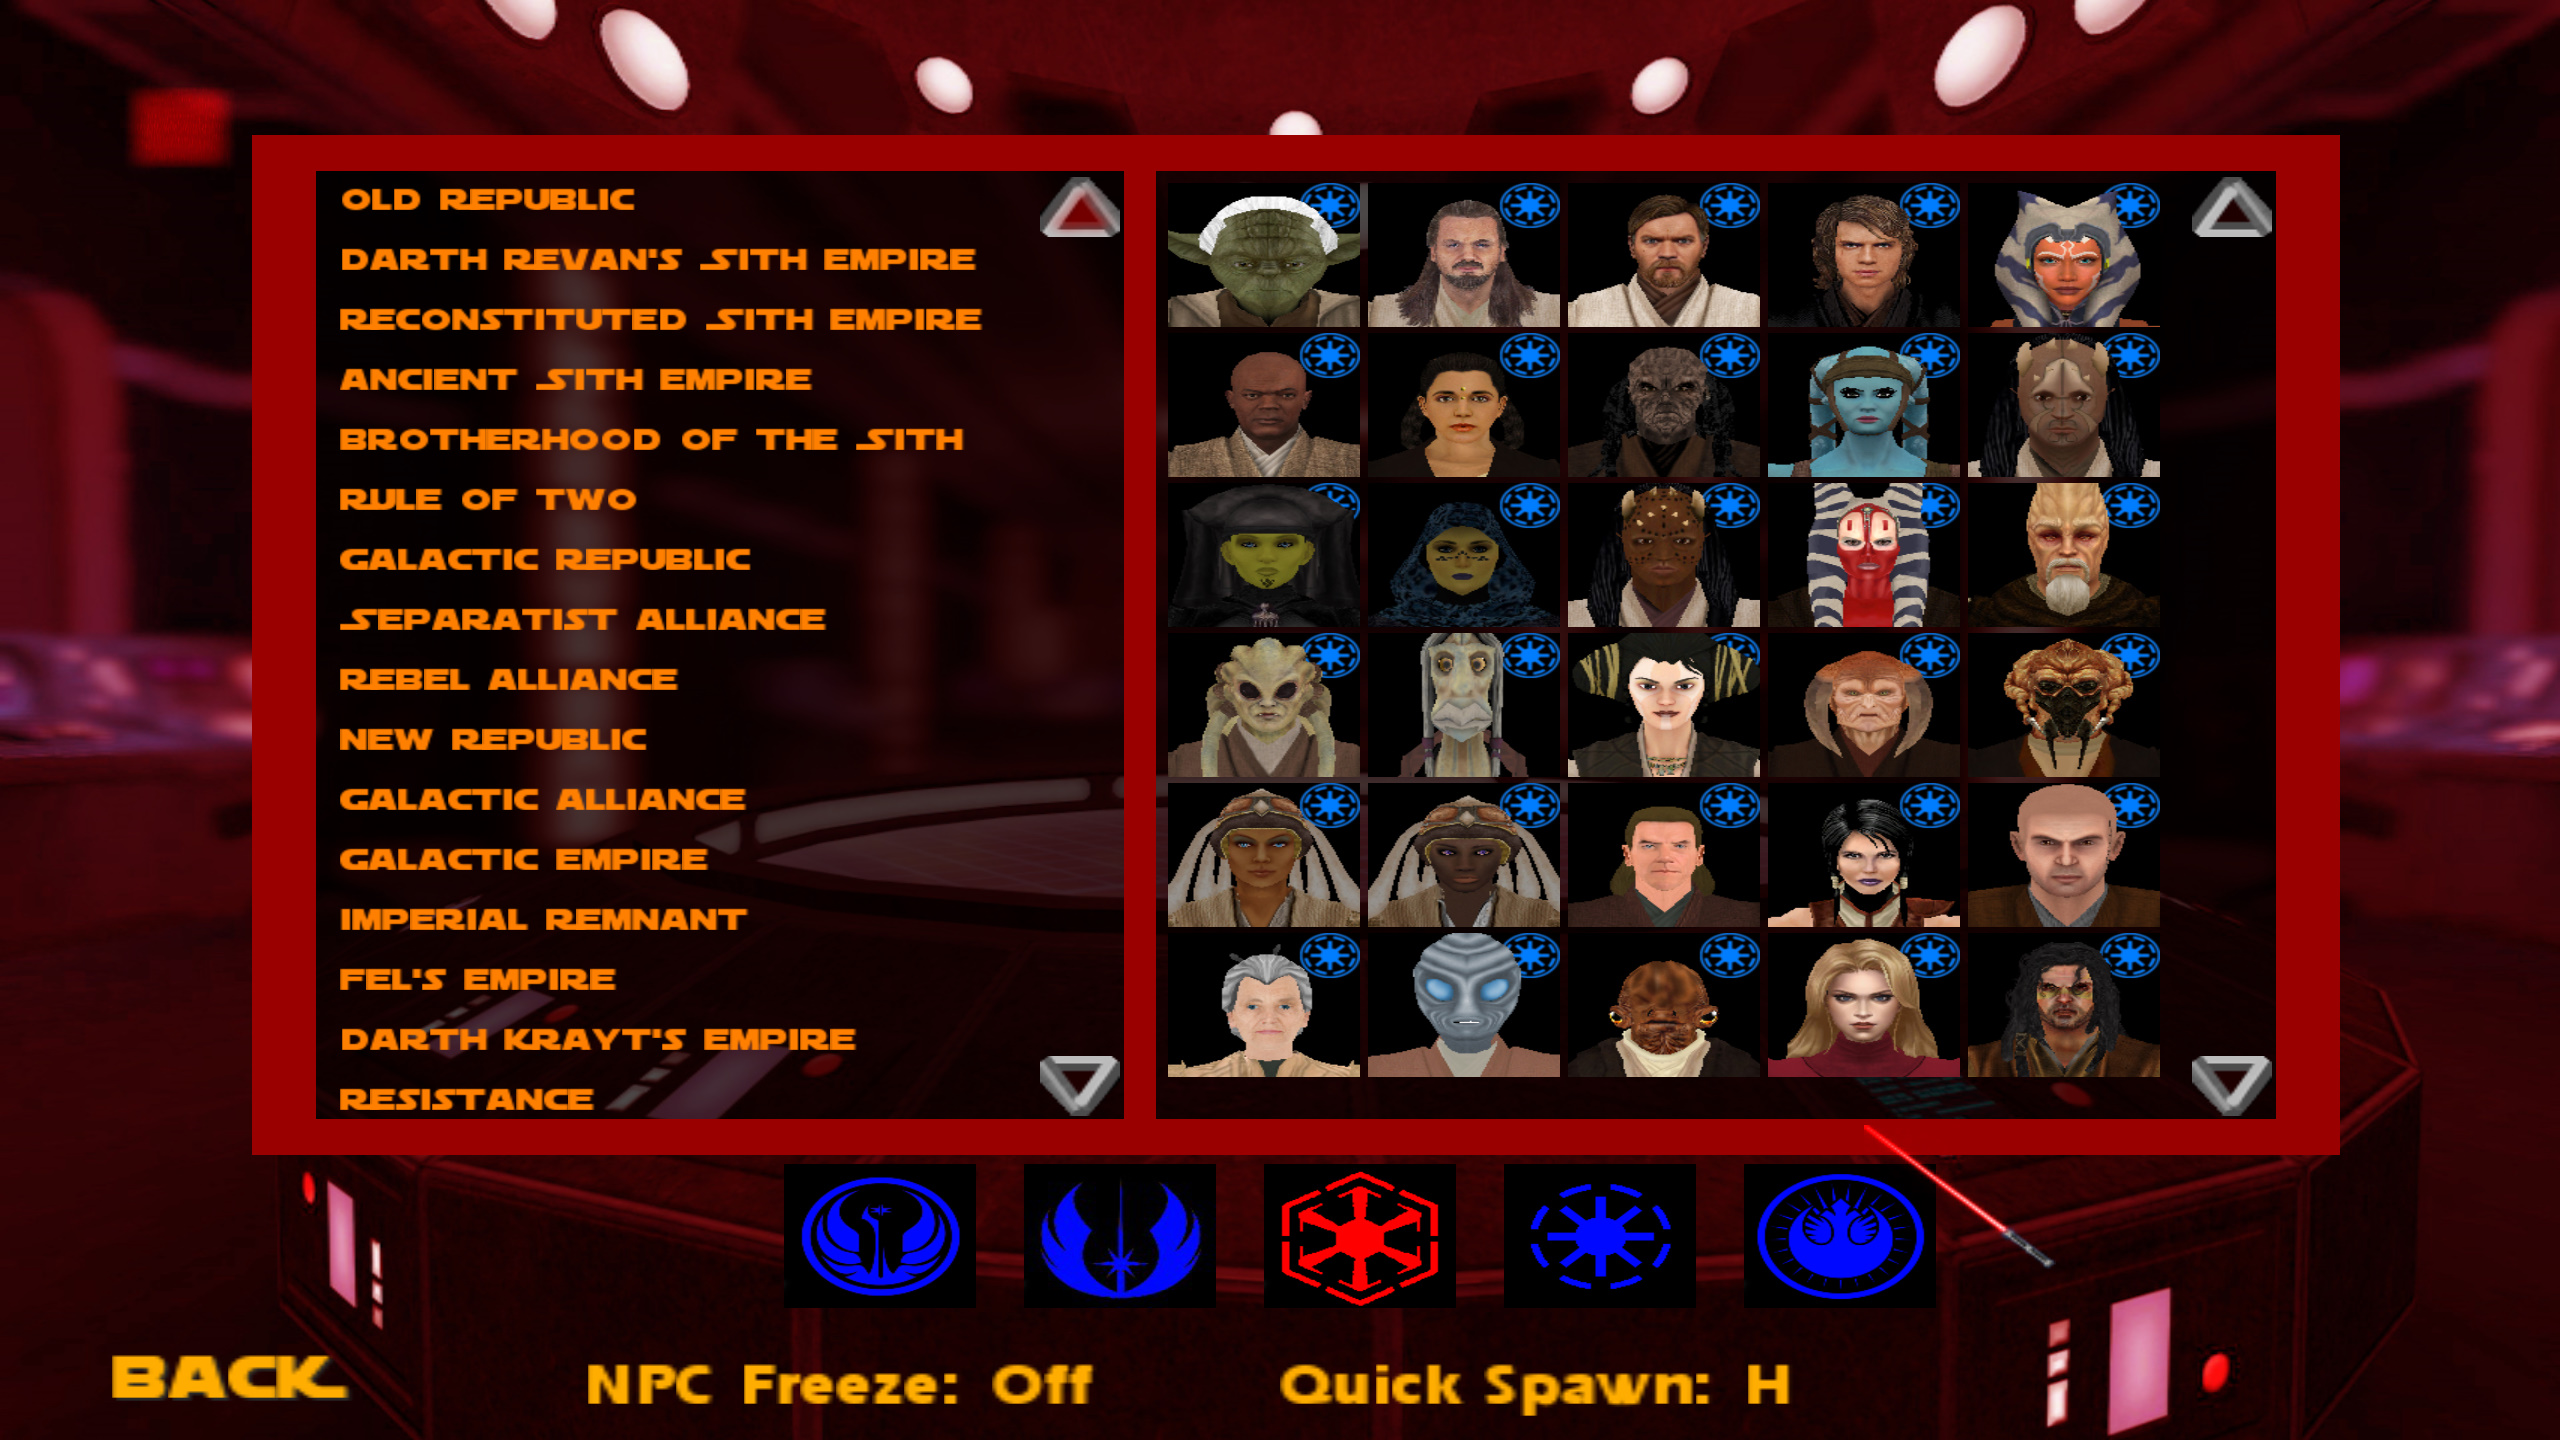
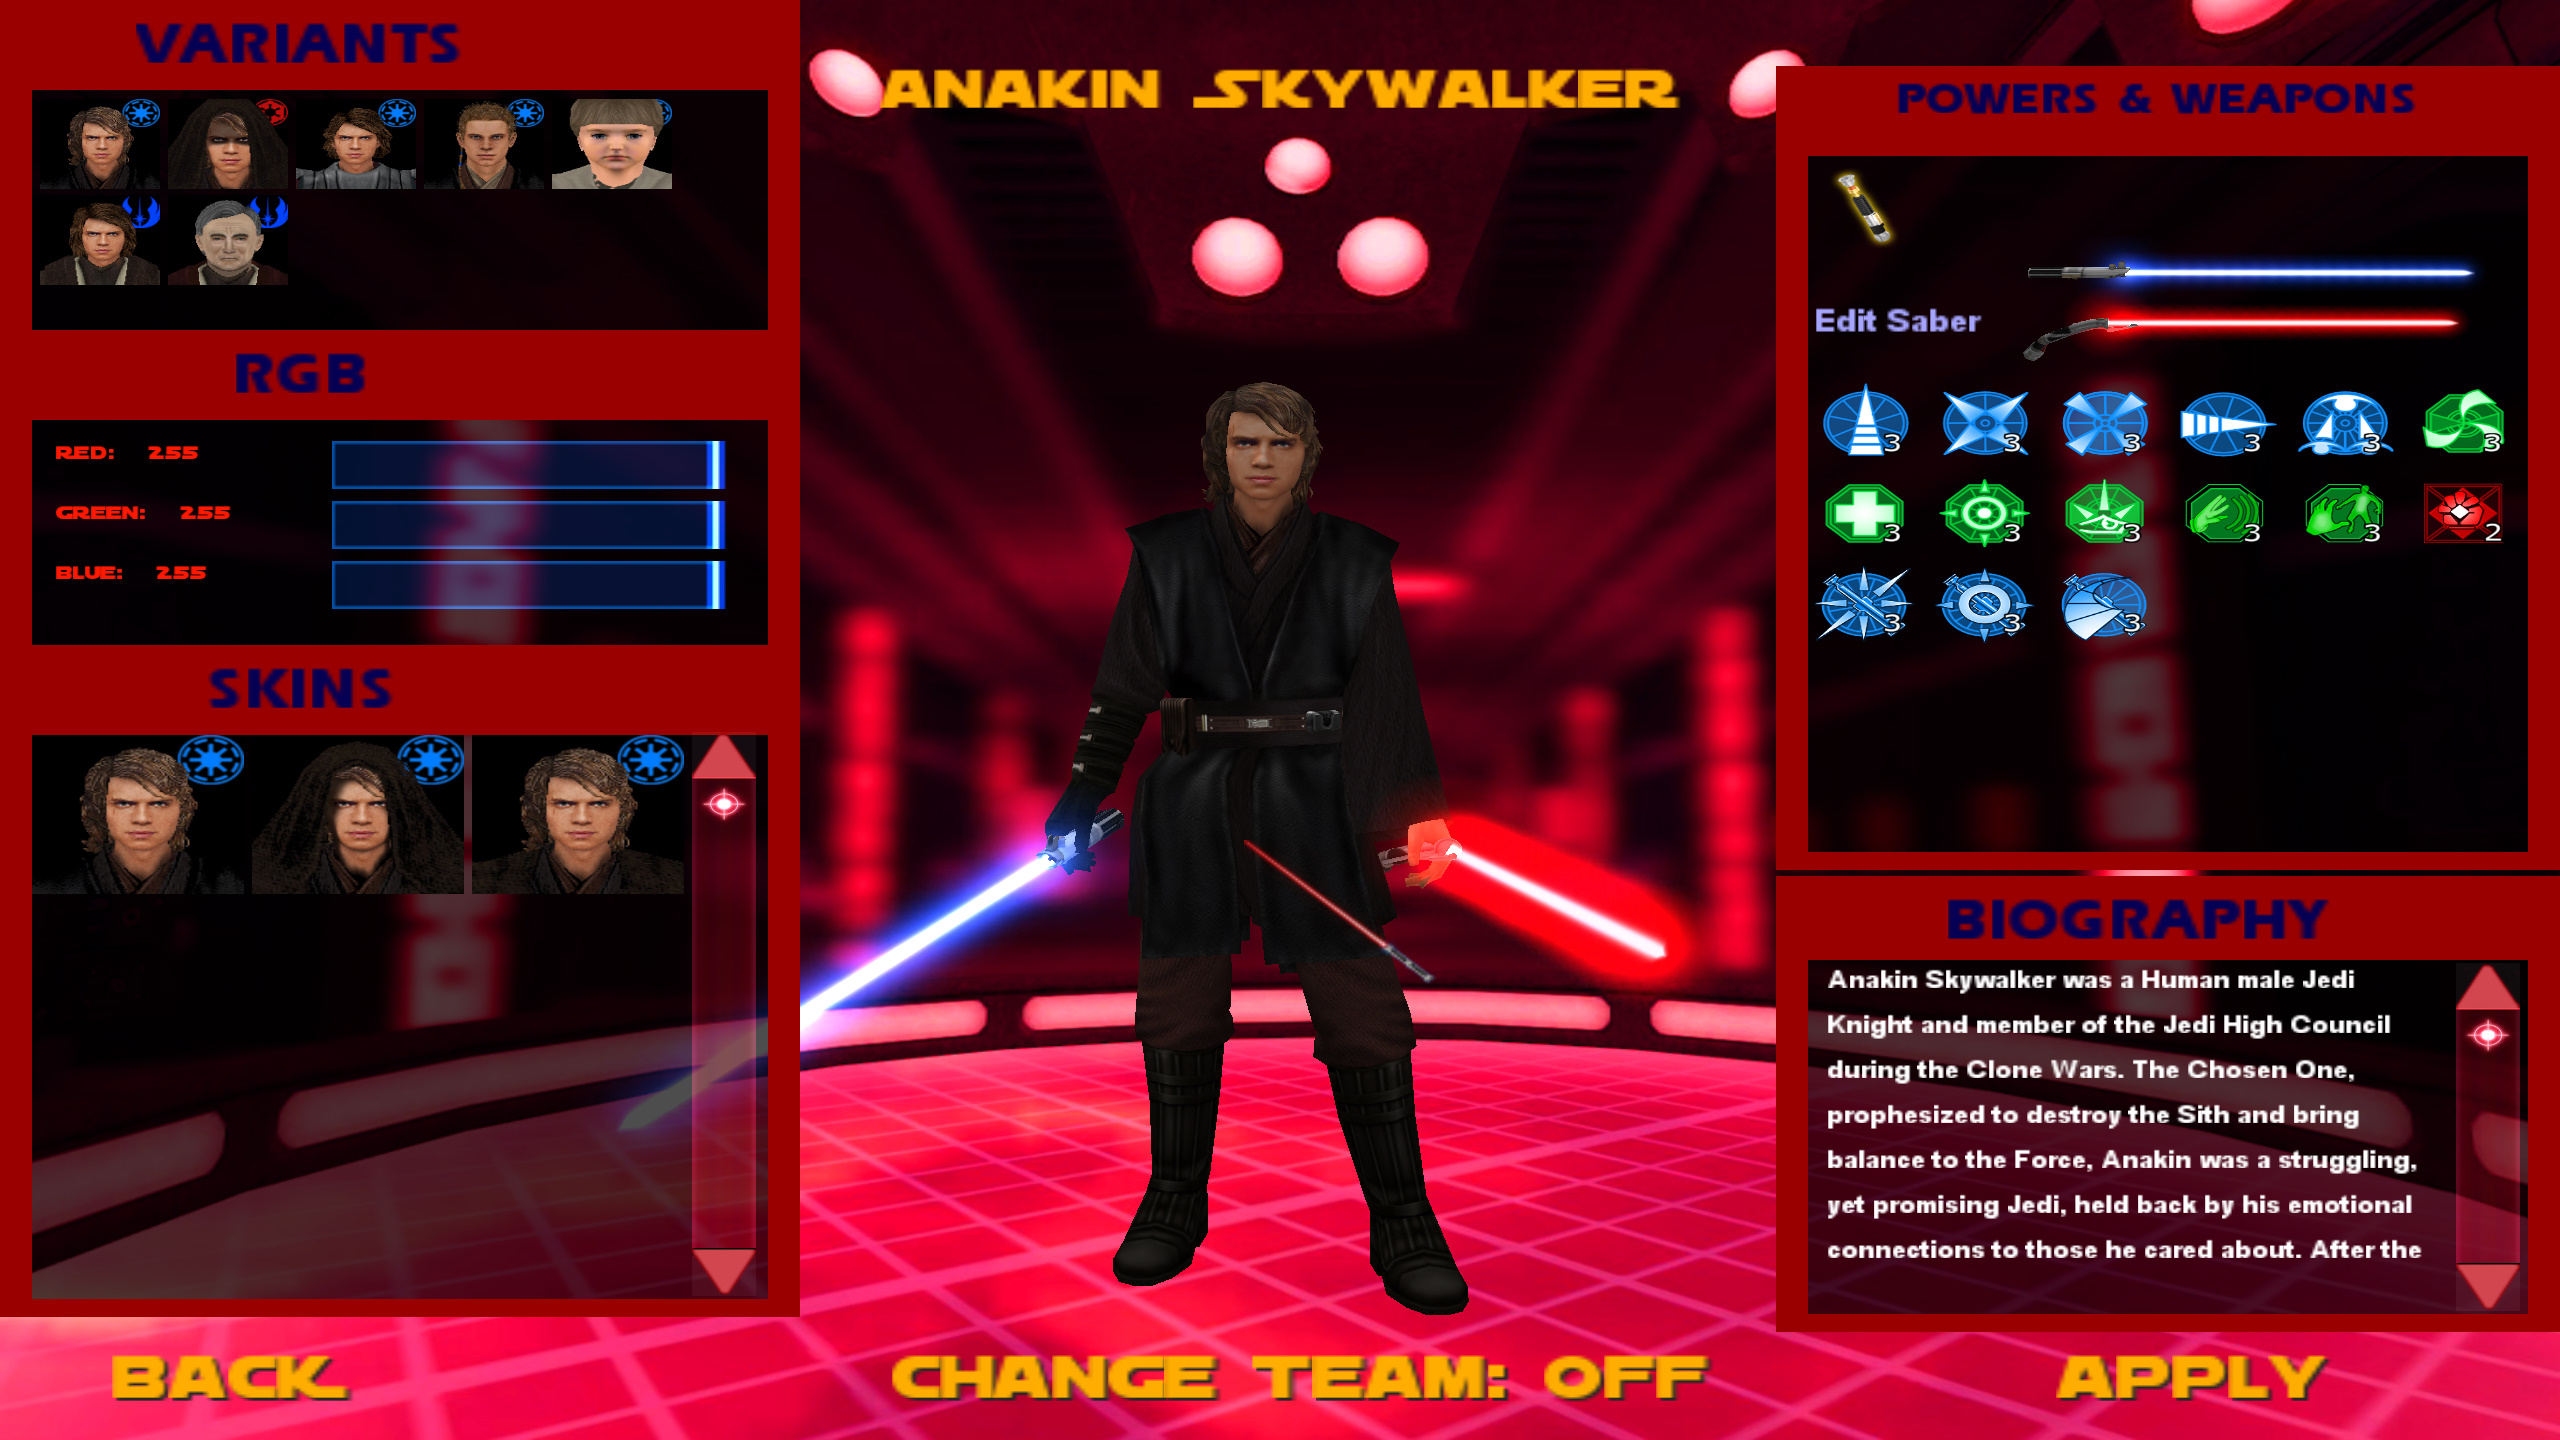
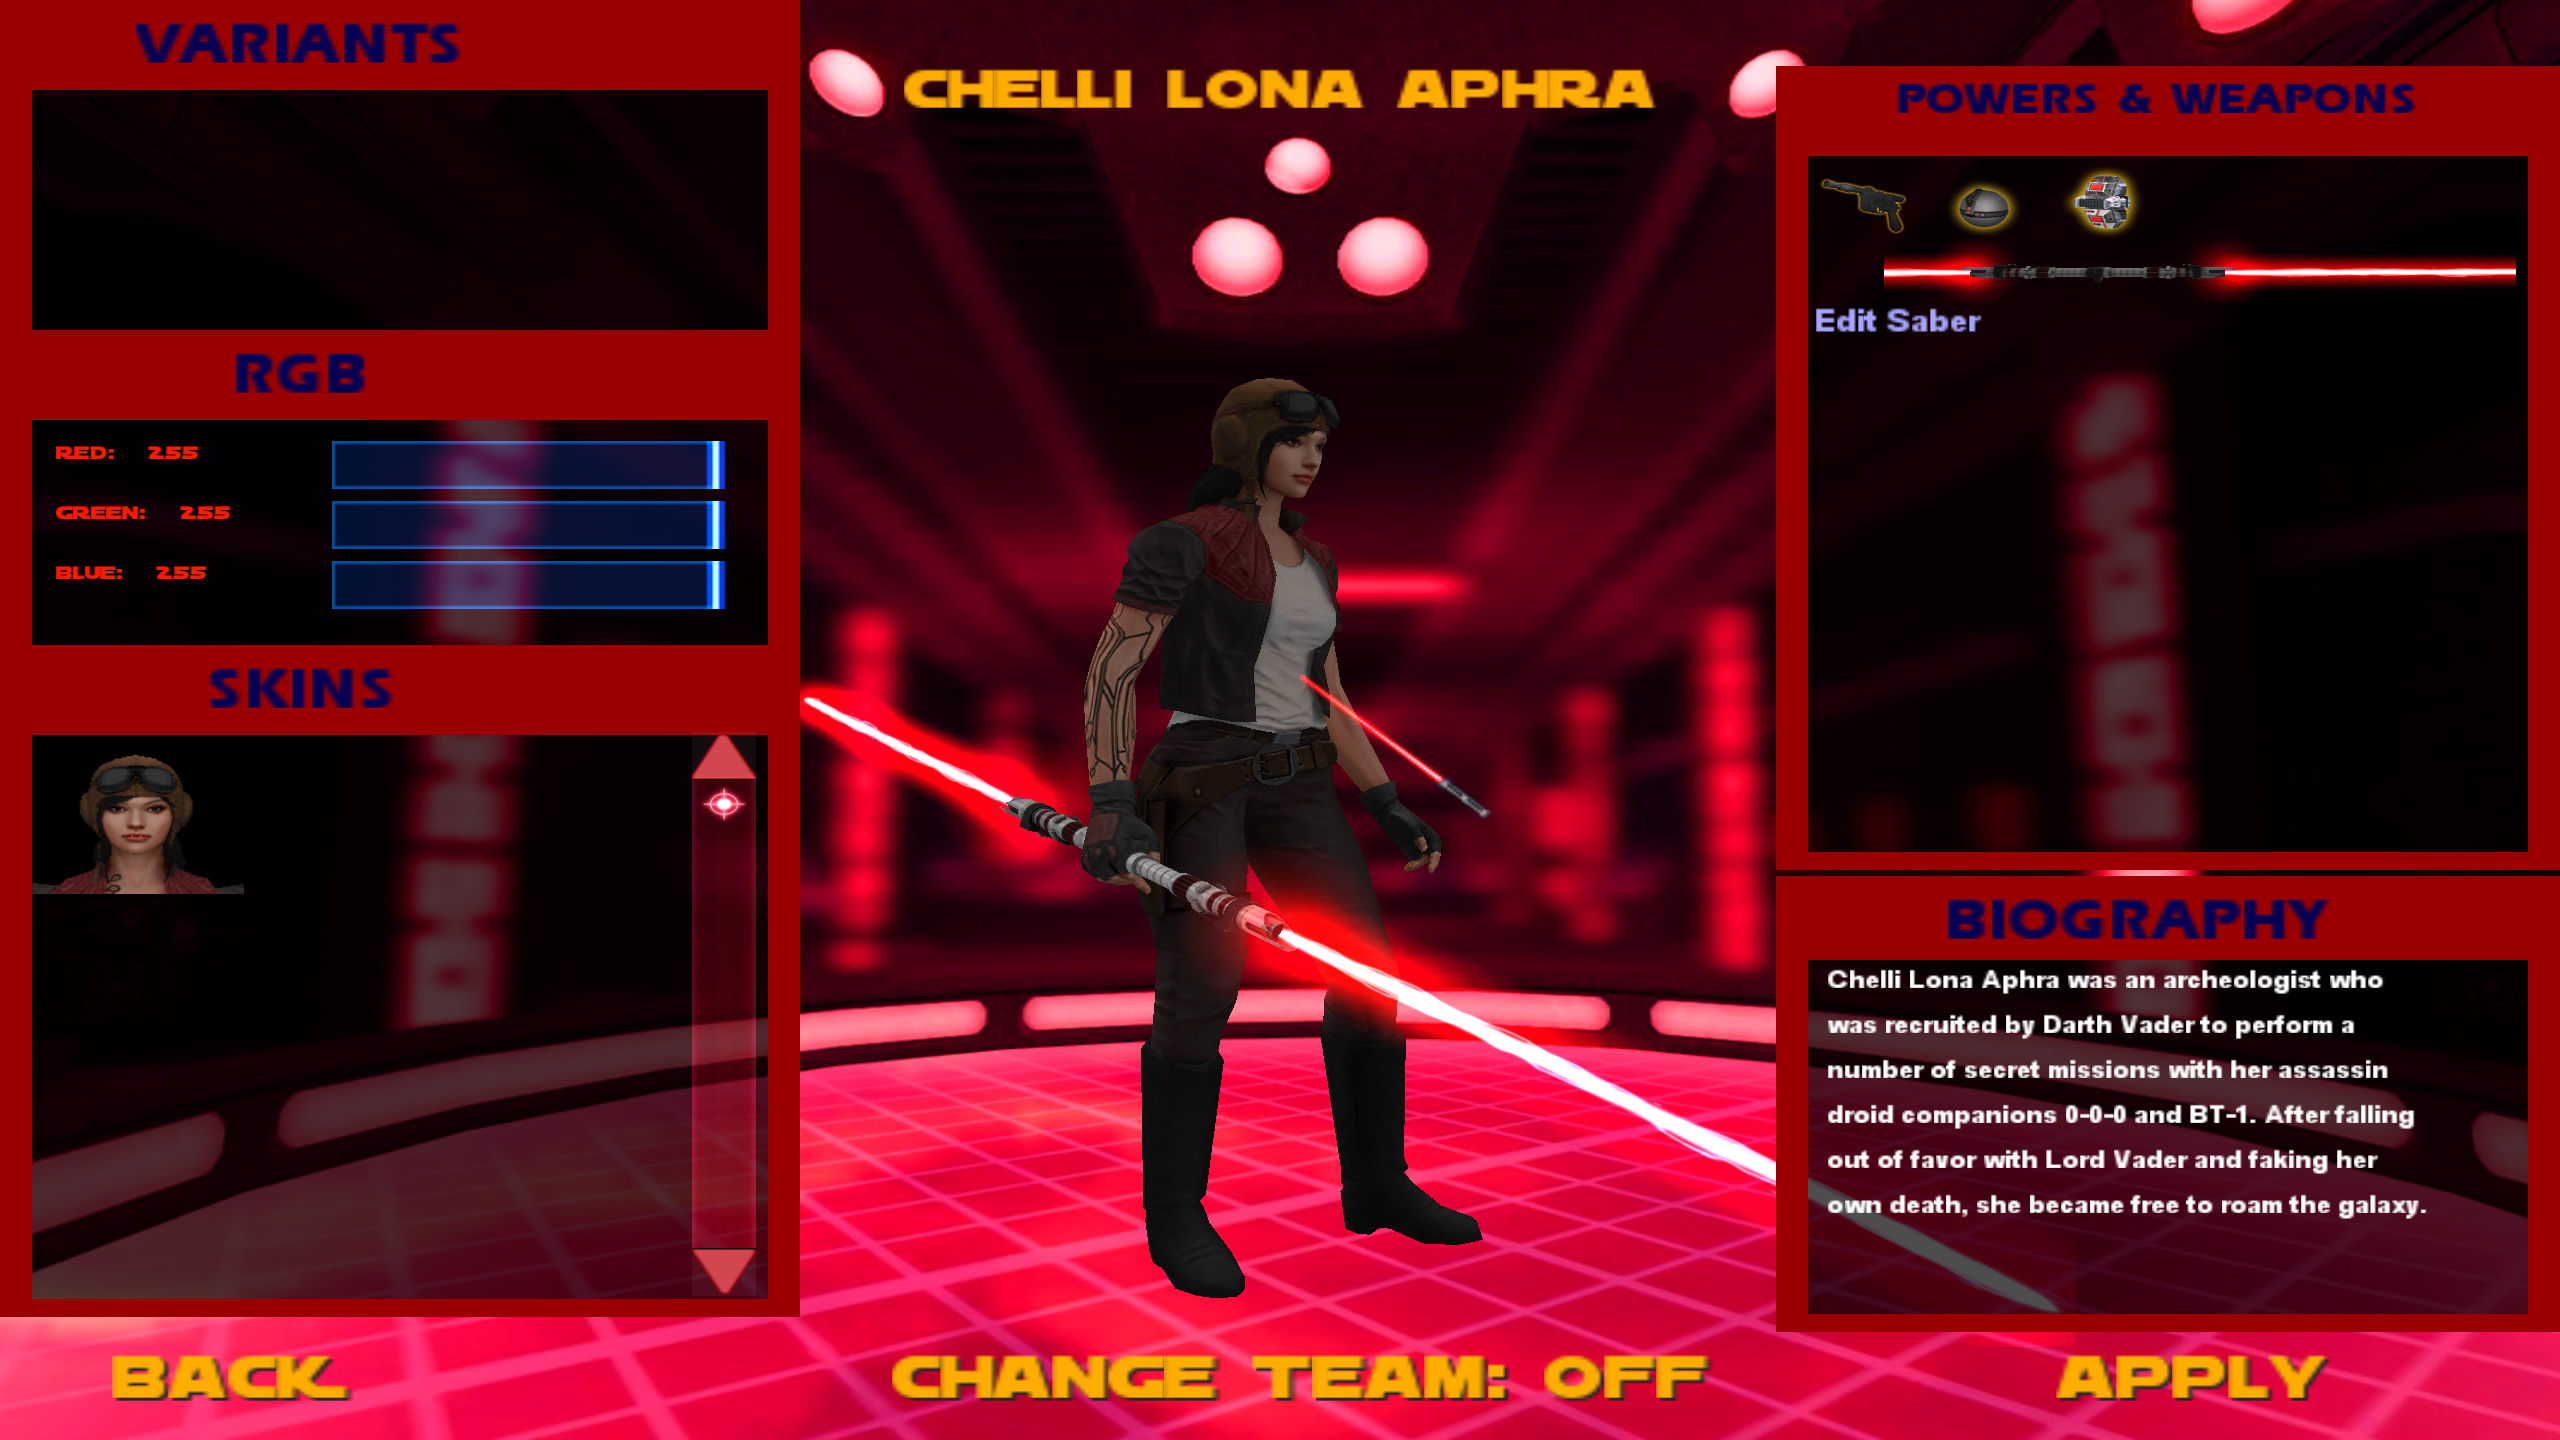
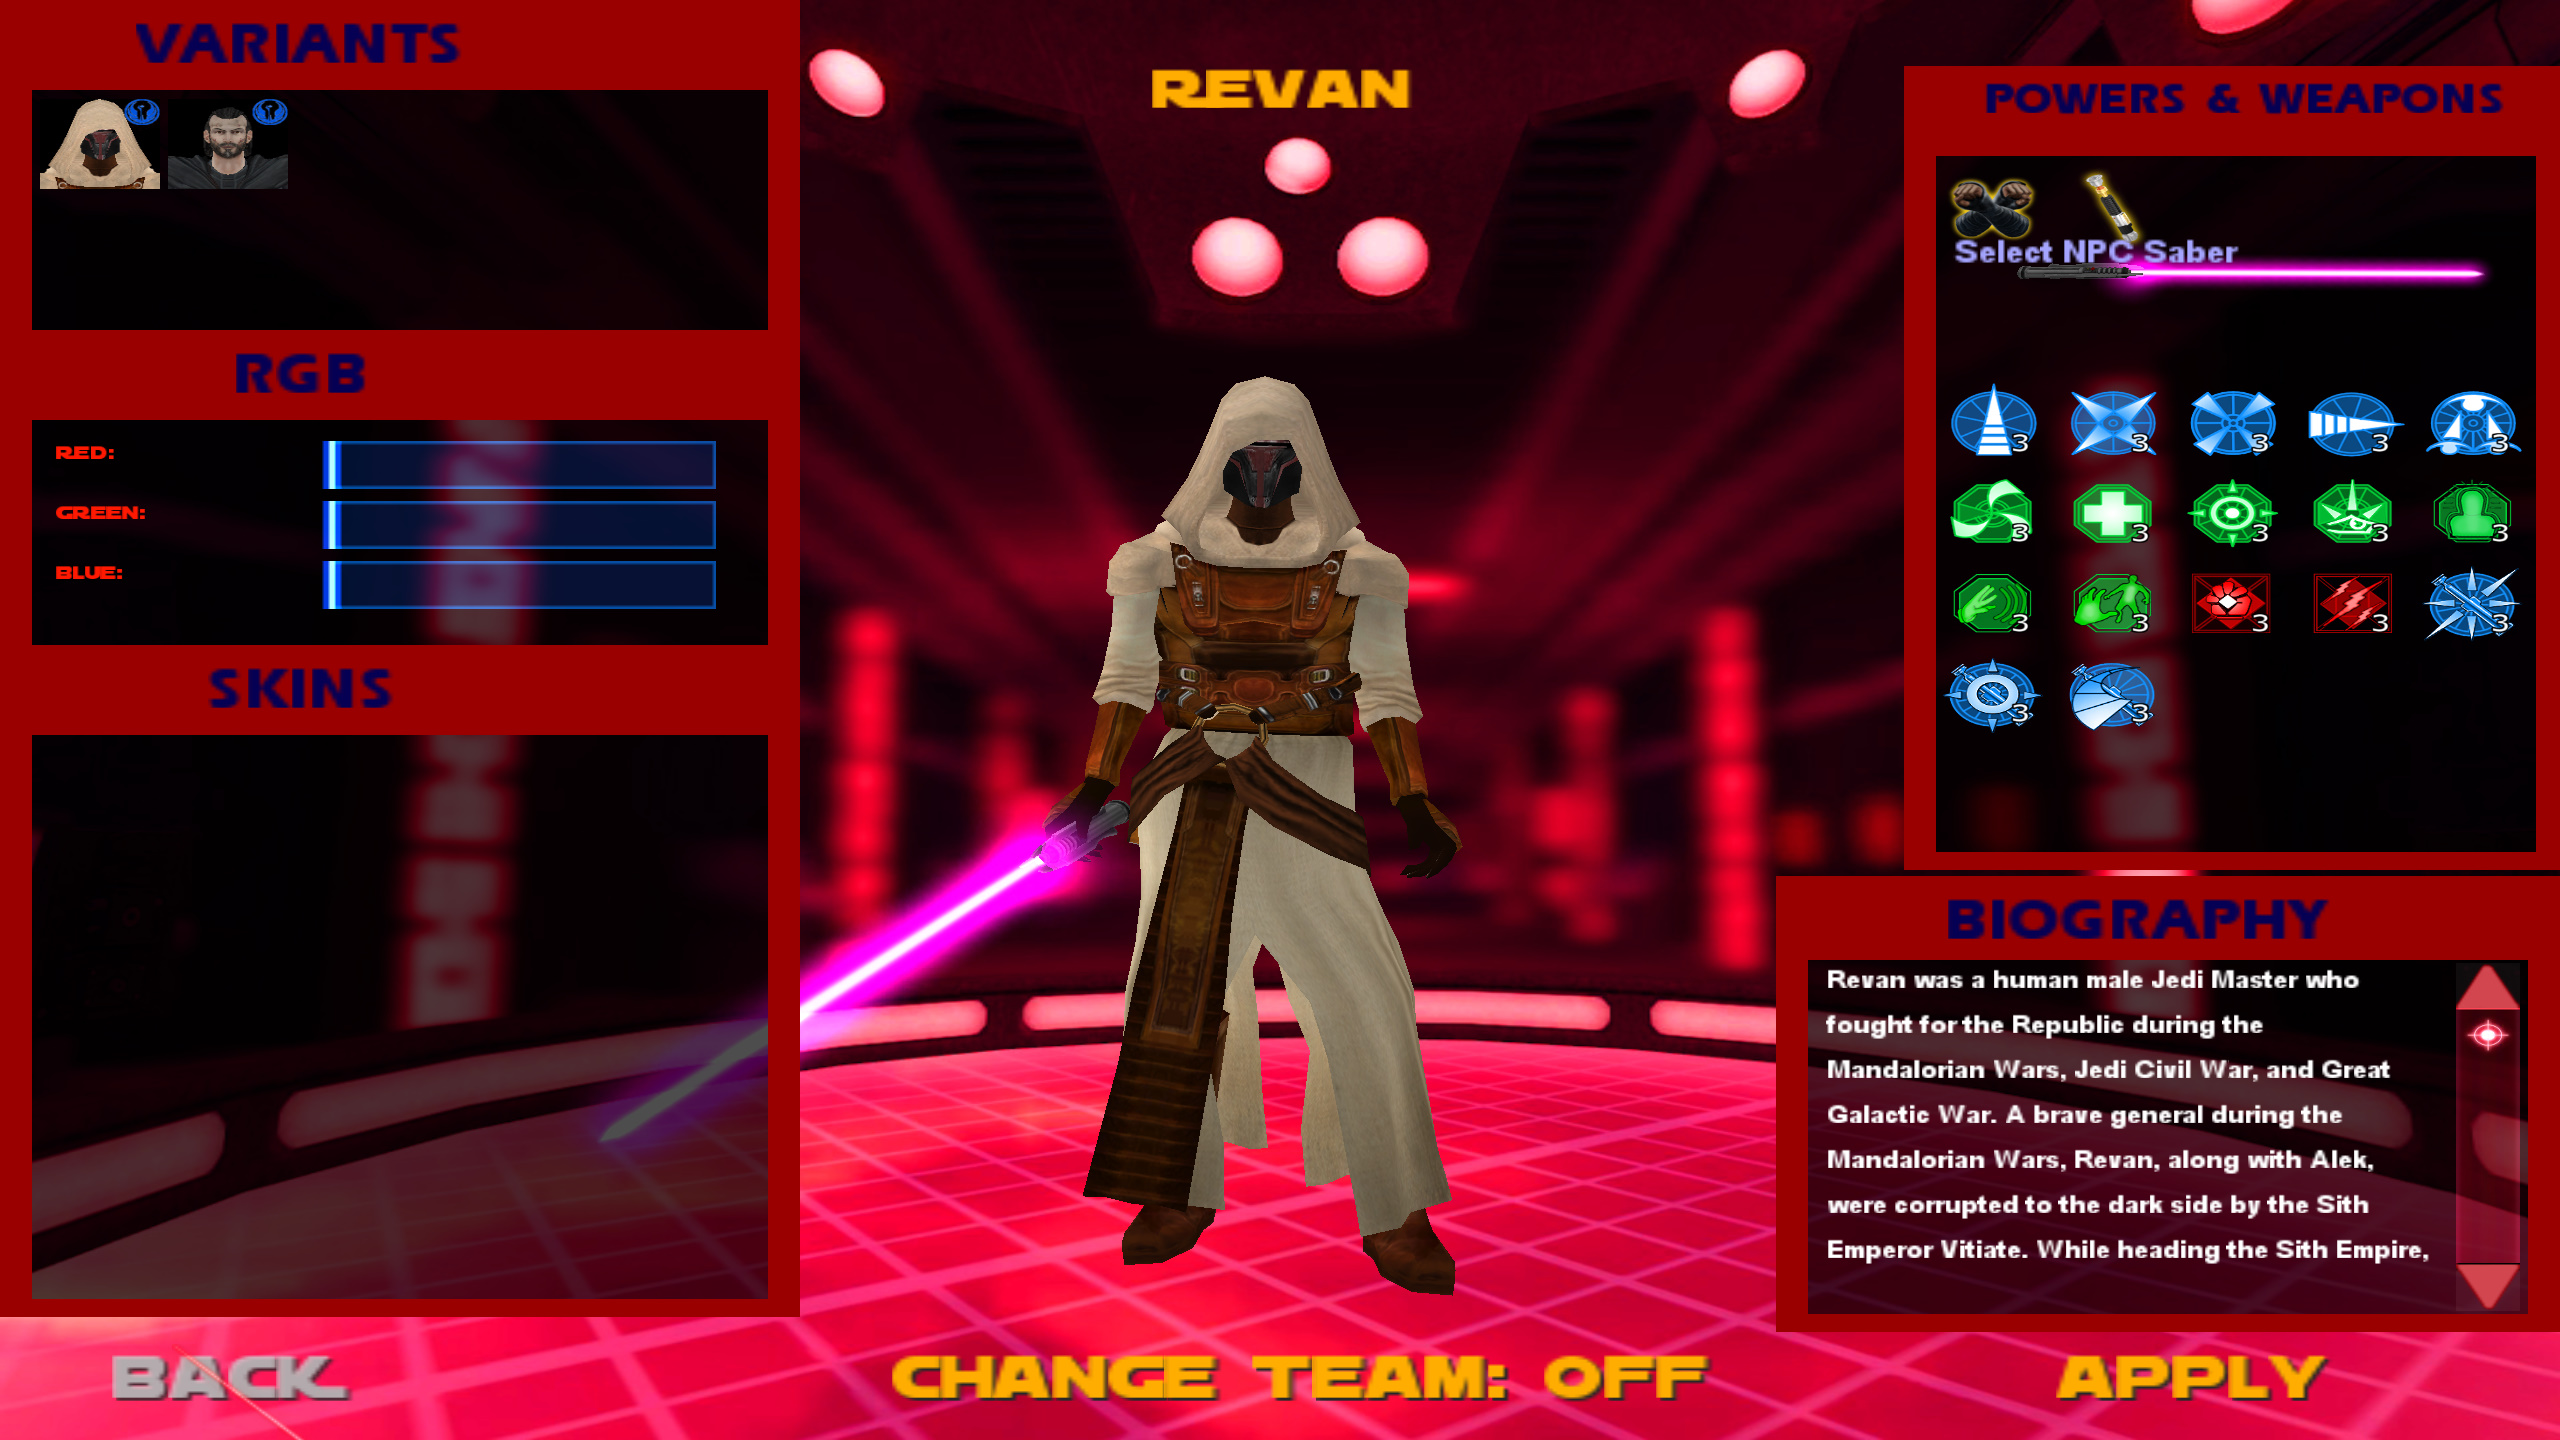
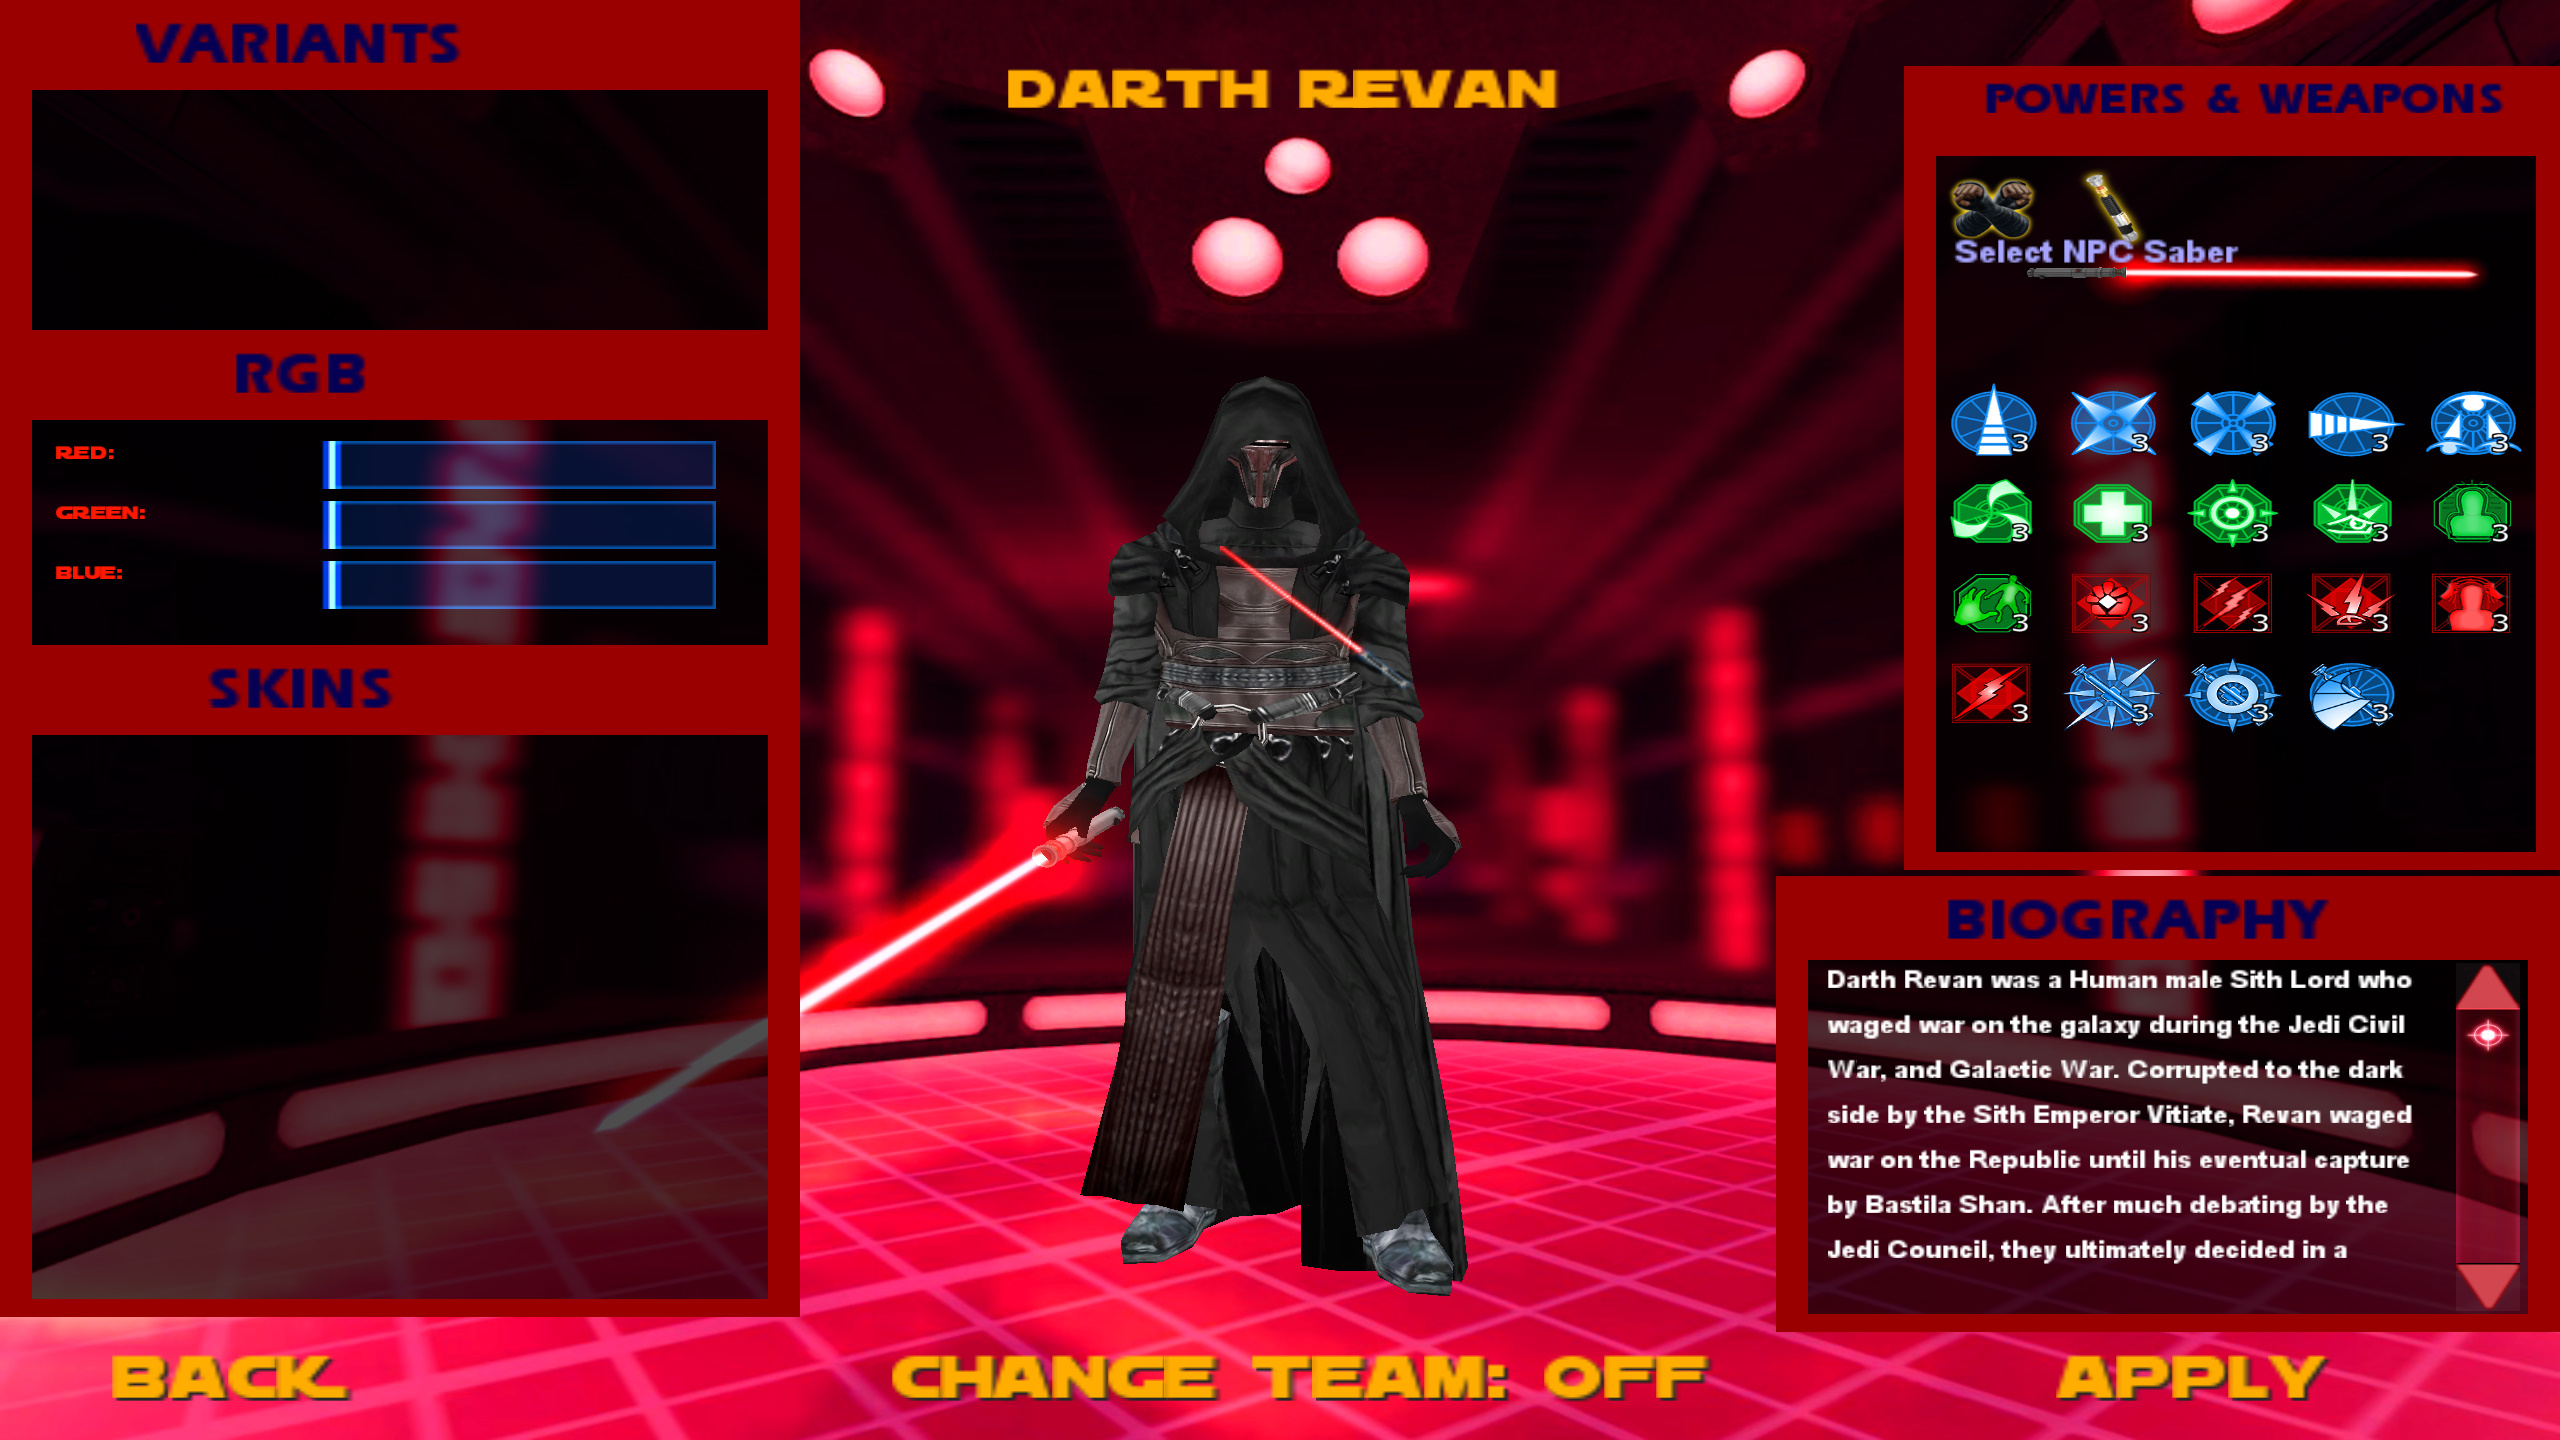
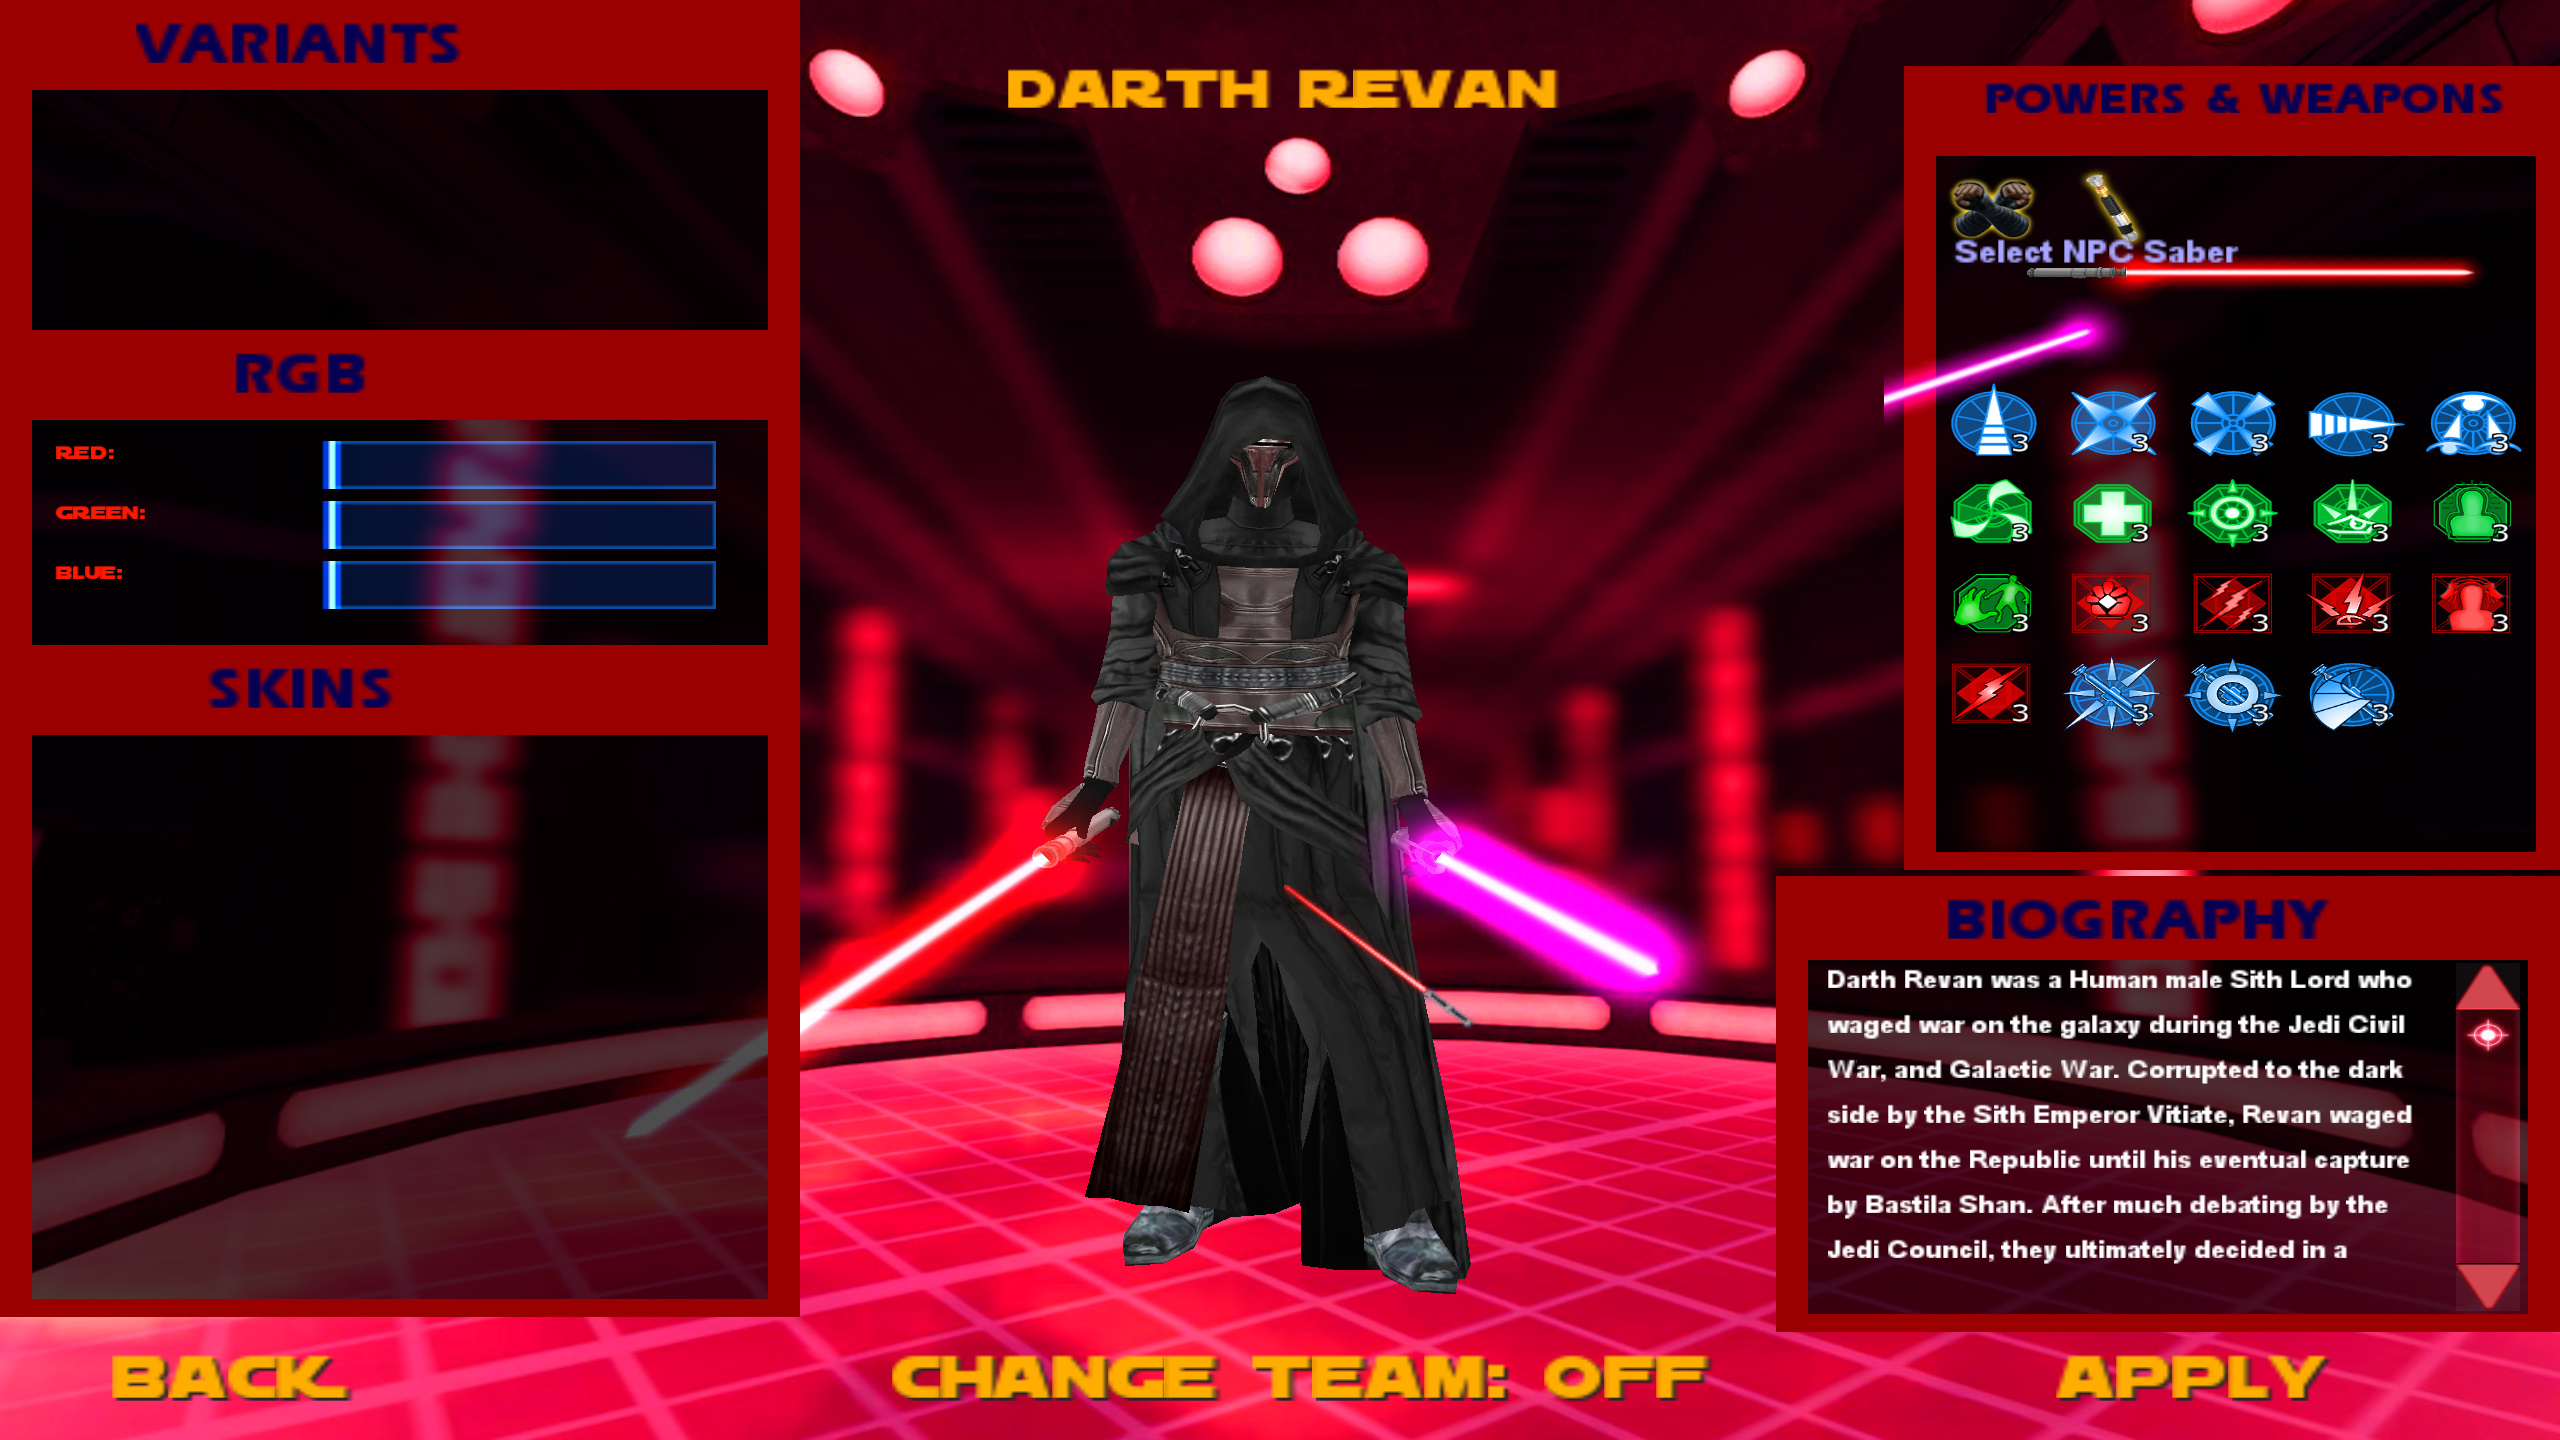
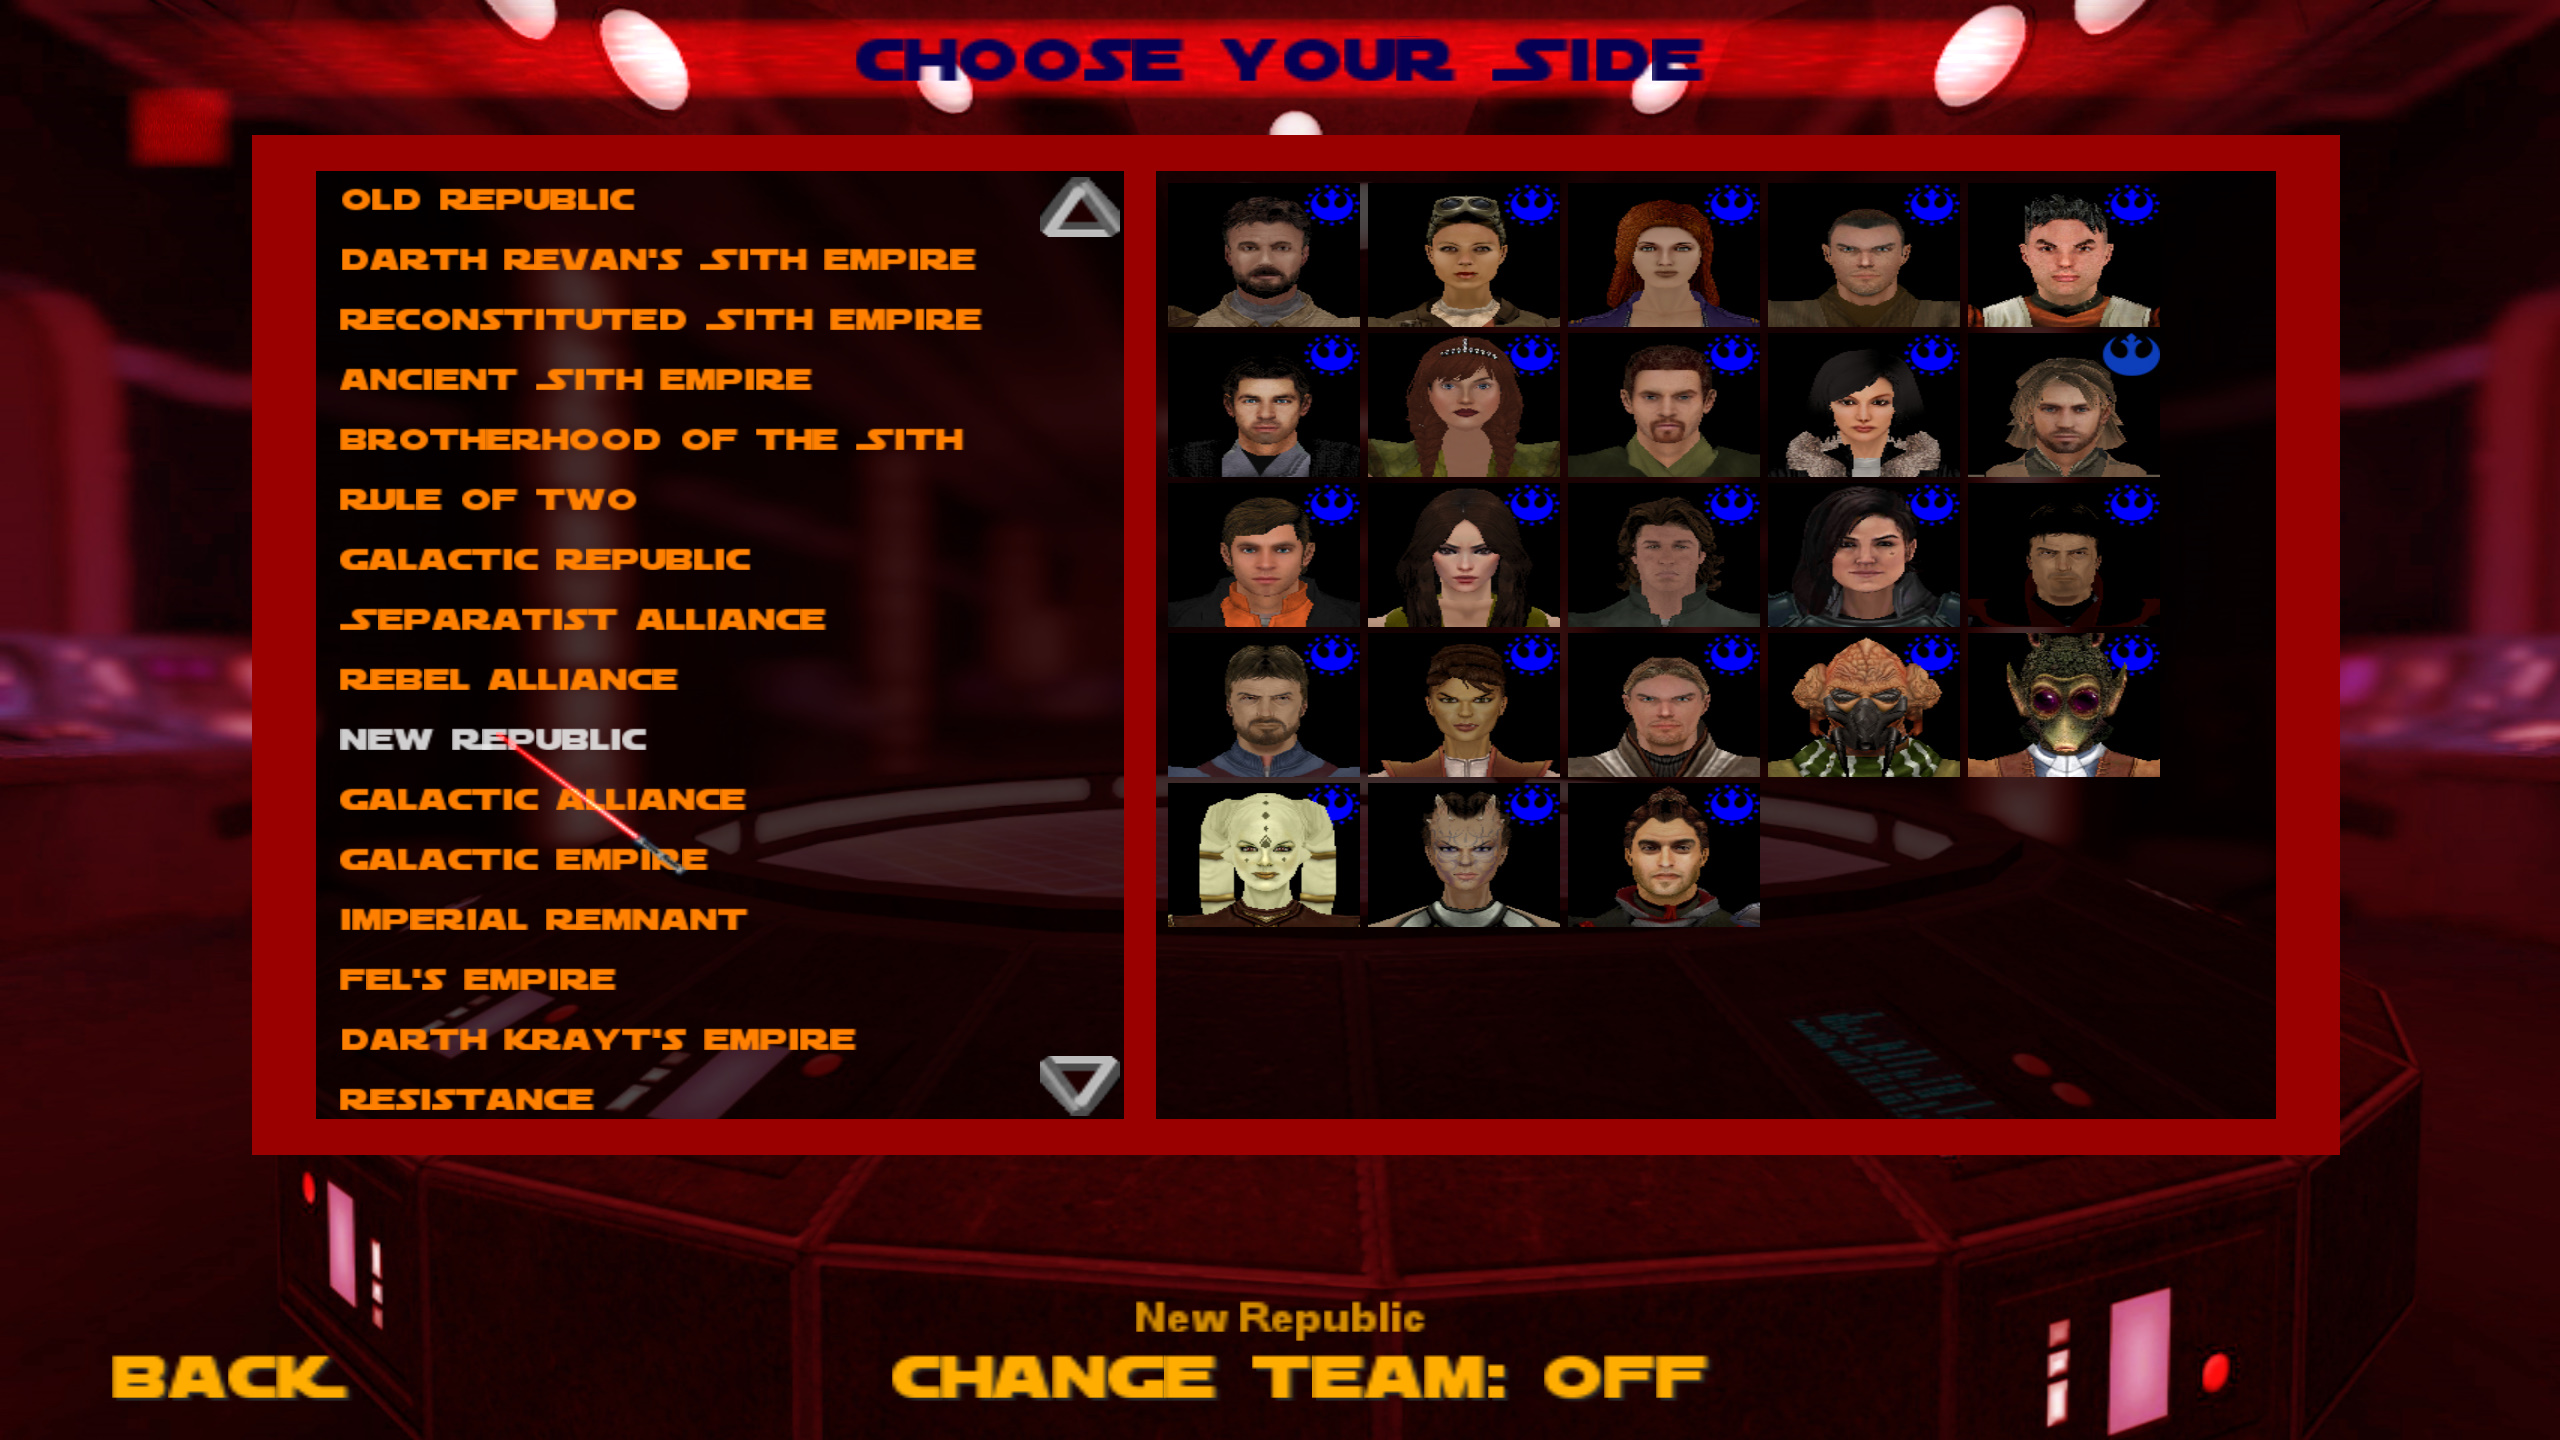
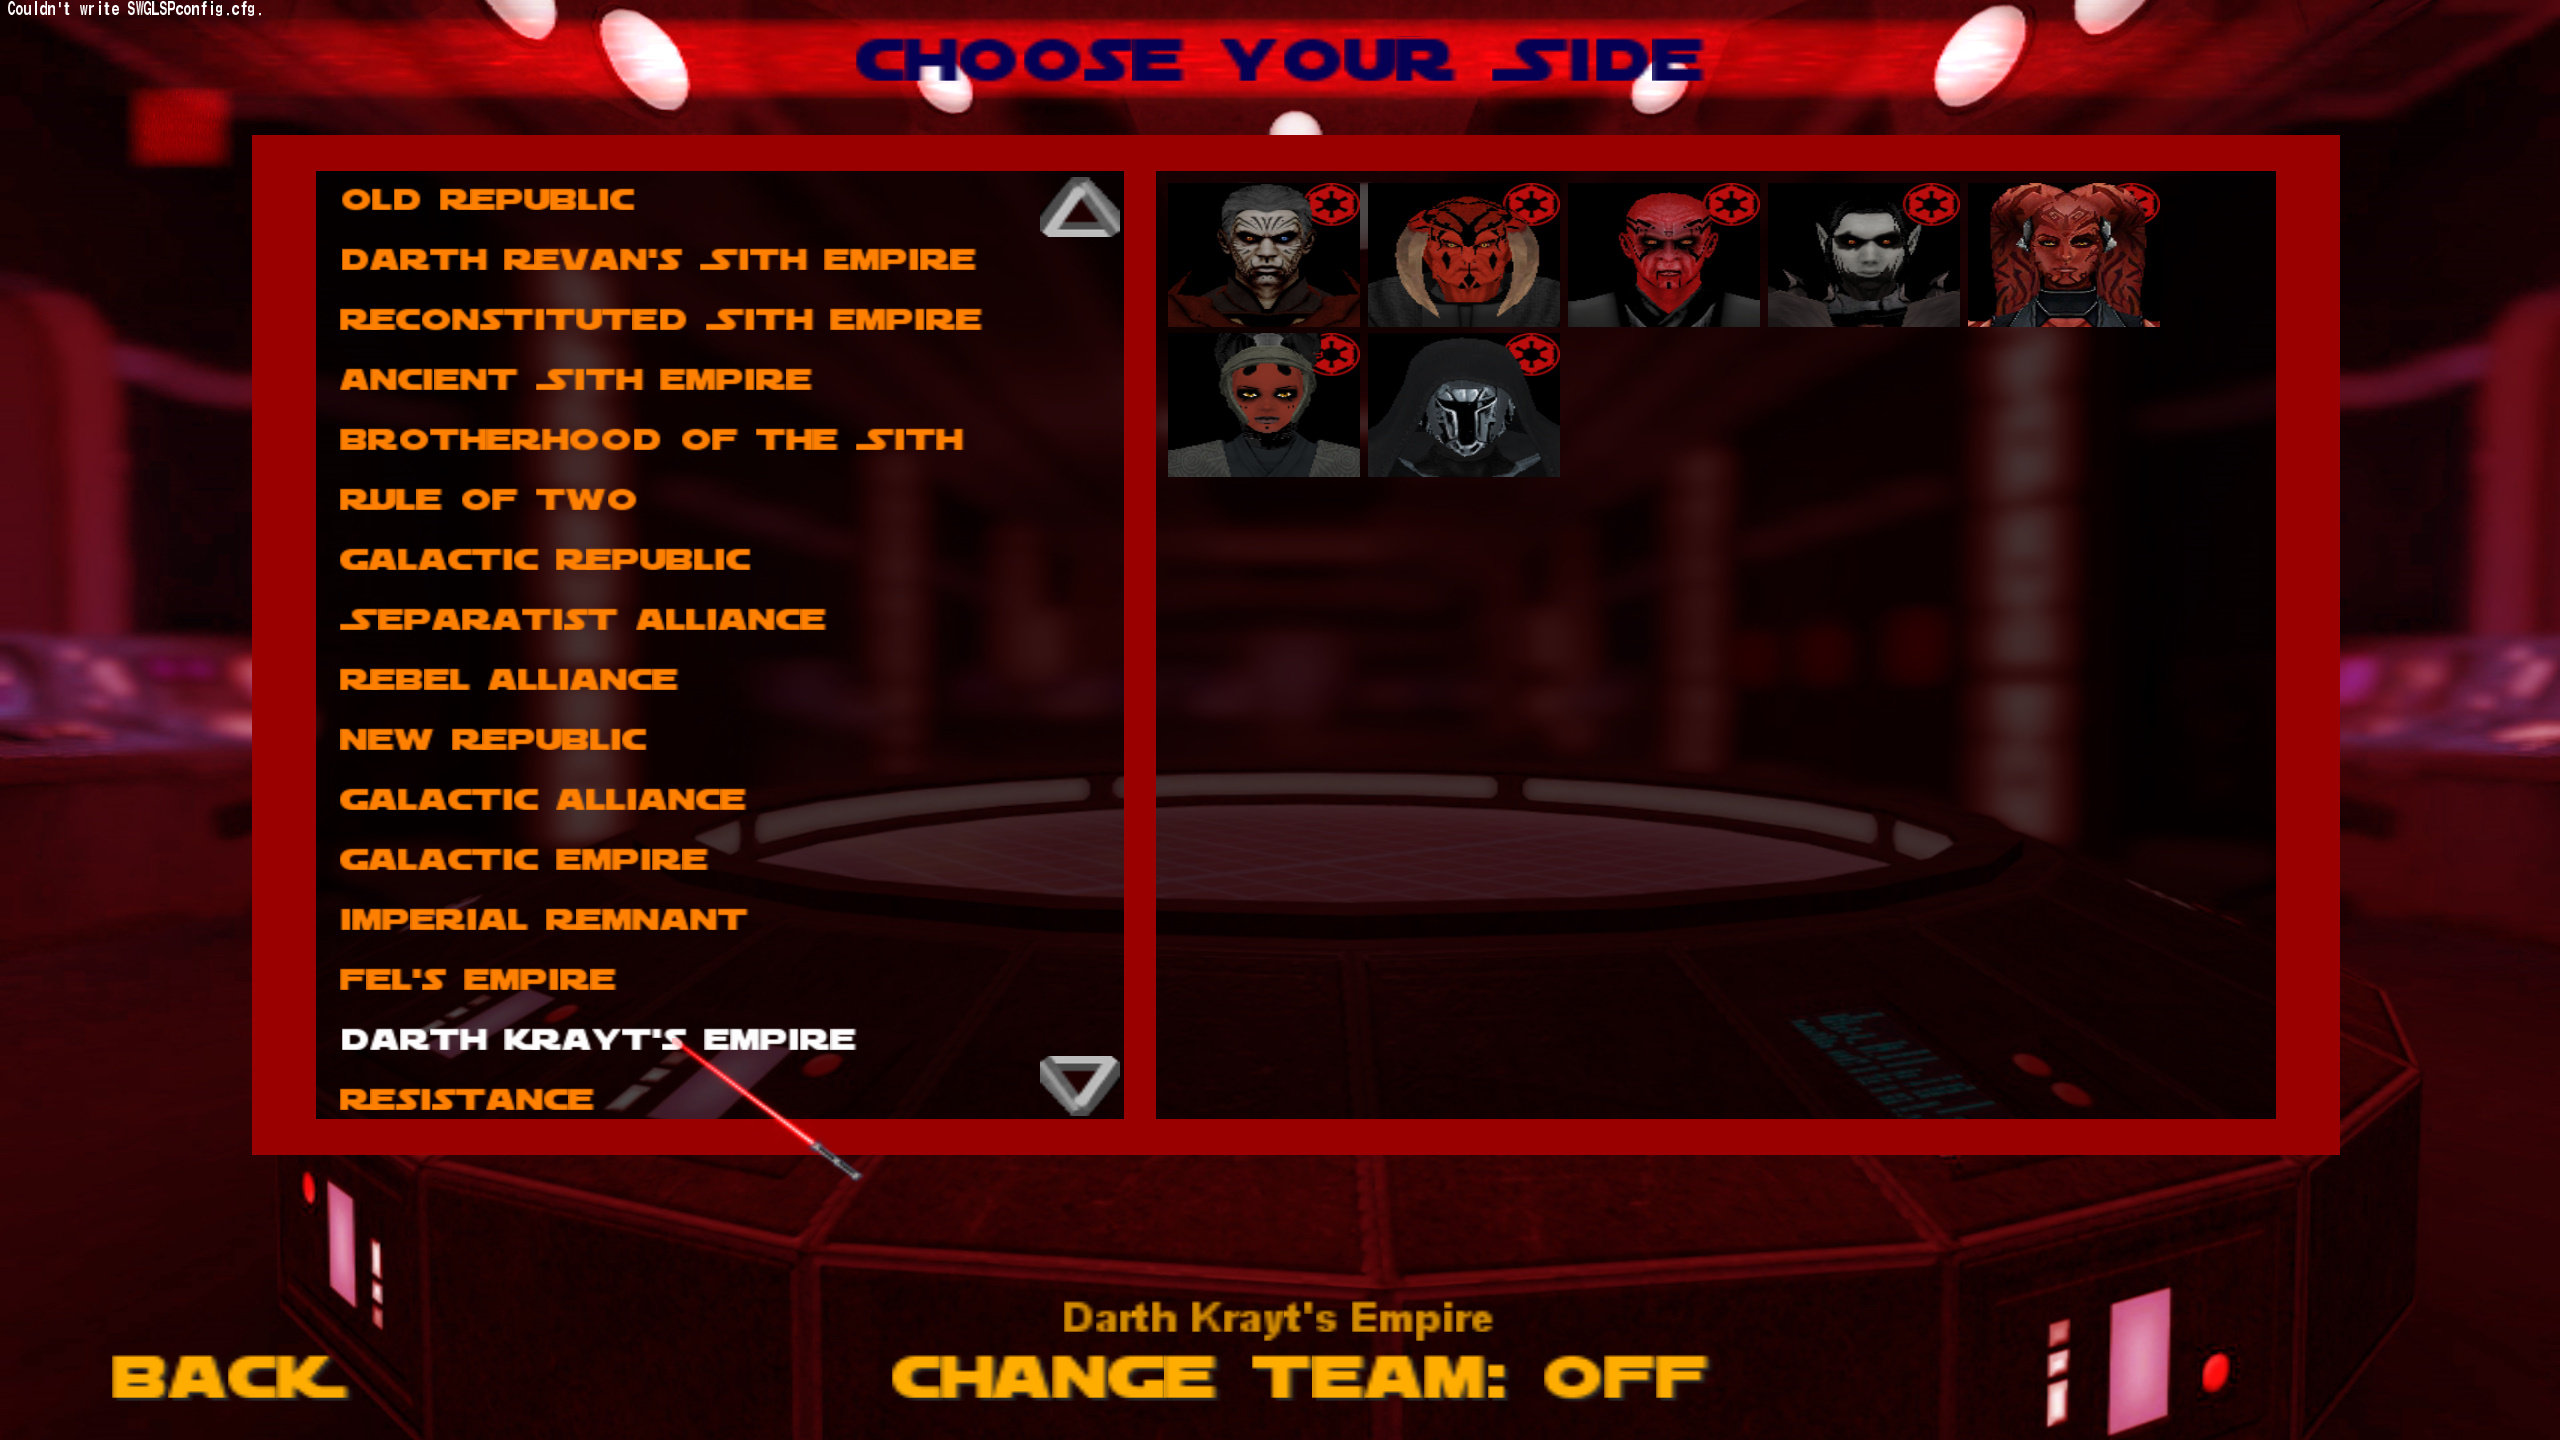
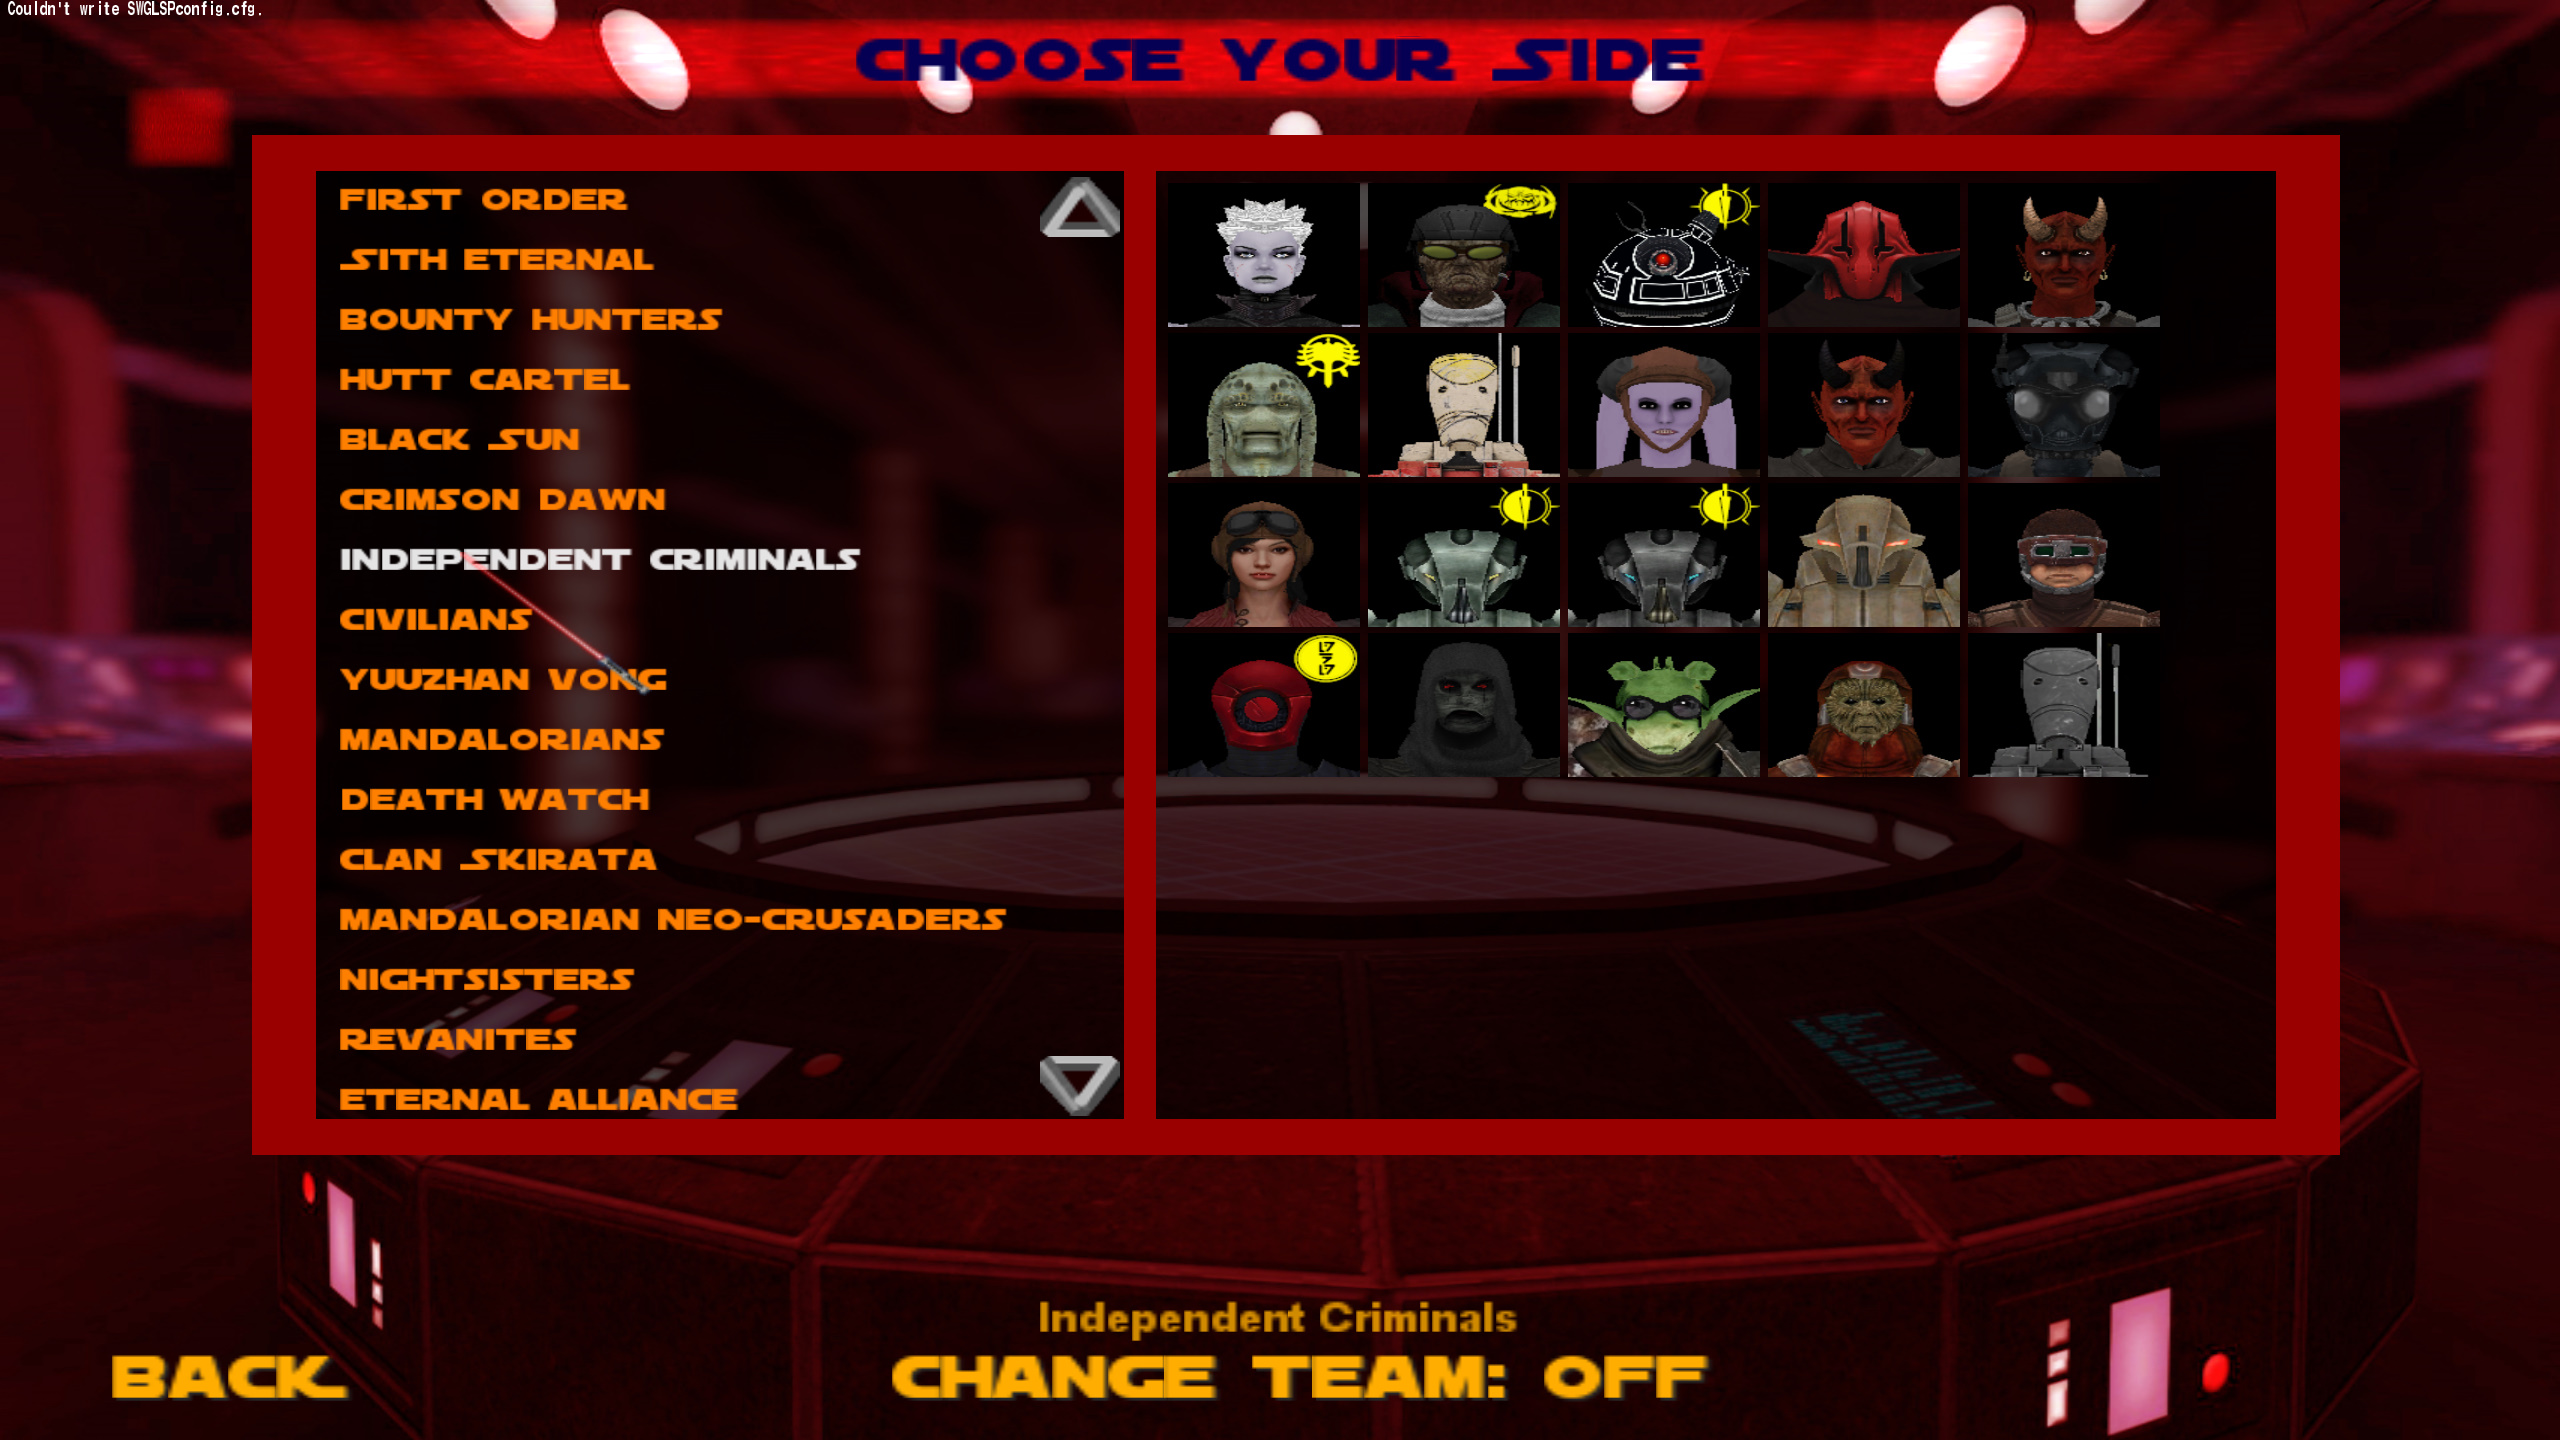
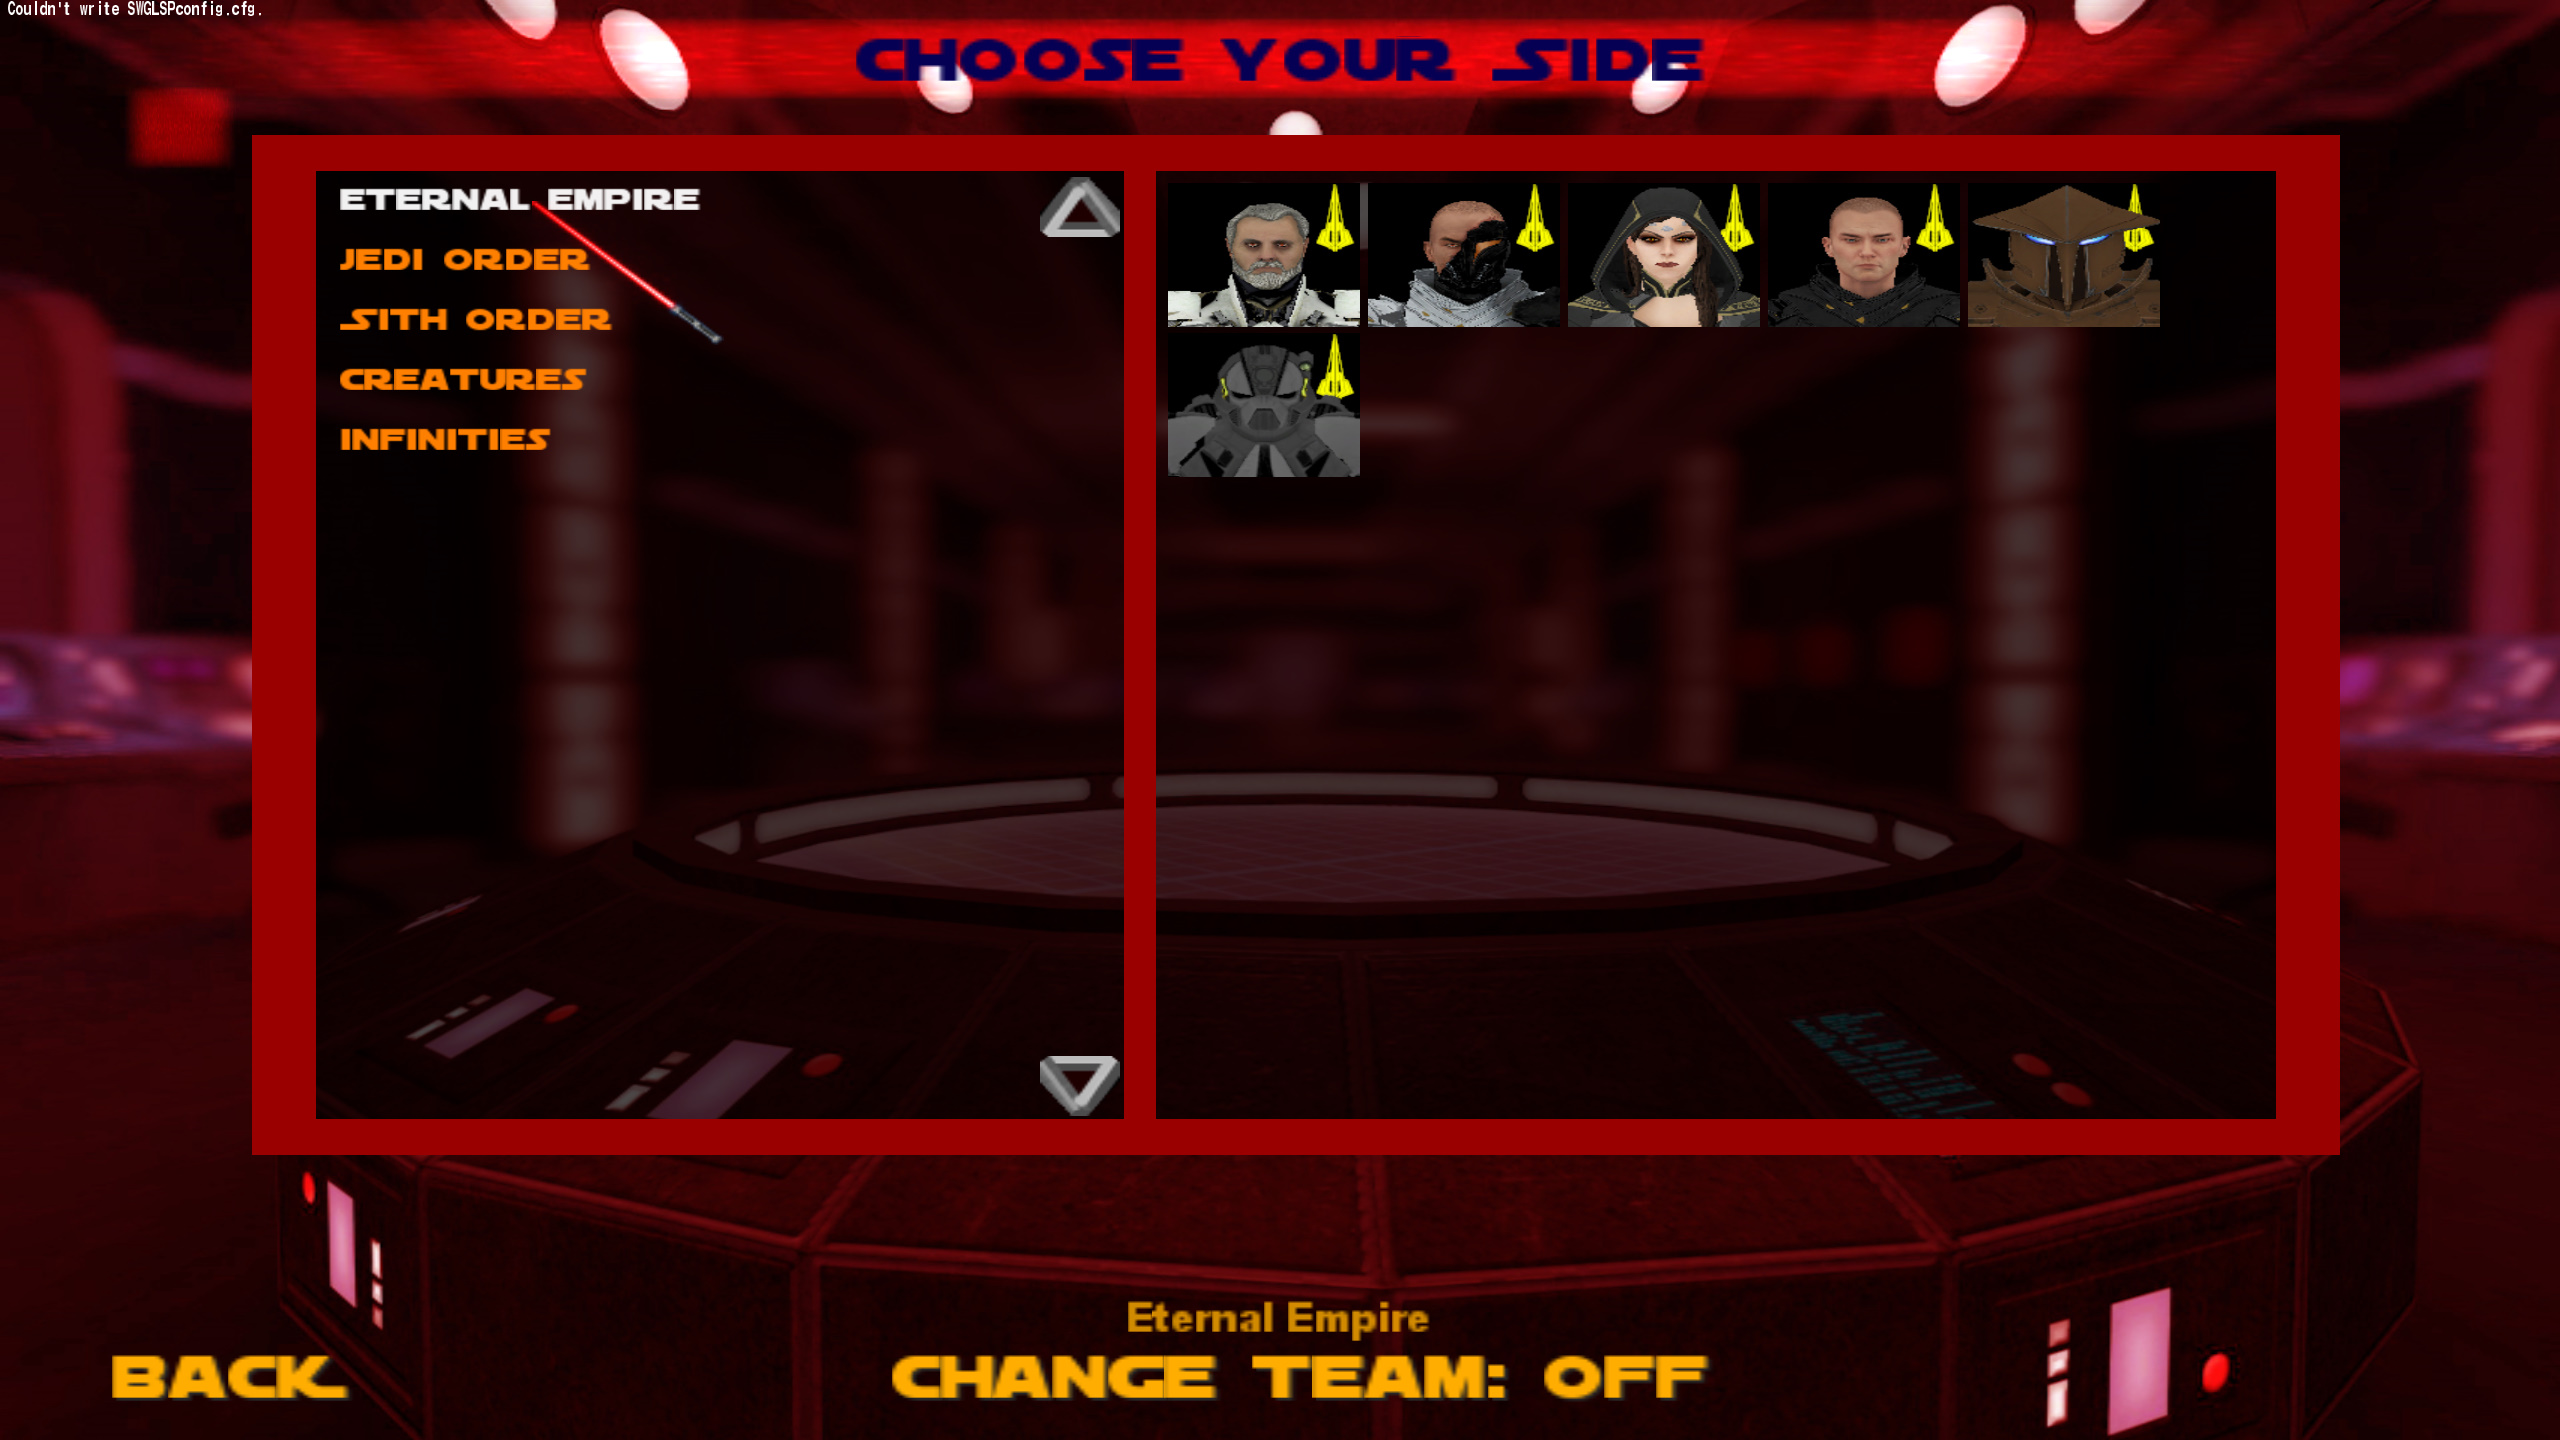


Gamorrean uses jedi taunt with vibro-axe
in Modding Assistance
Posted
@RobiWanKen0bi
I checked the source code and long story short, the animation, BOTH_GESTURE1, is hardcoded for npcs using a single saber. If they're using dual sabers, a staff, or CLASS_ALORA, then the animation is different.
Basically the highlighted code reads:
"If the npc is taunting, then do something. If the NPC is on the NPC class CLASS_ALORA, play her special taunting animation. If using dual lightsabers, play that animation. If using a staff OR using the staff stance, then play that taunt animation. Otherwise, play BOTH_GESTURE1 if that animation exists in my humanoid file."
Looks like there was another instance where the npc would play an idle animation, but that was commented out so it'll never happen. I suppose in cases where an NPC is using a single lightsaber but doesn't have the BOTH_GESTURE1 animation.
For the player, there is some variation allowed as you may know with the "taunt" command.
This one basically reads if not using a saber, do the BOTH_ENGAGETAUNT animation (the animation that plays when you challenge a player to a duel in multiplayer). If using a saber, check if the .sab file has a tauntAnim then play that. Otherwise, depending on what saber style the player is using, play a different animation. So Fast/Tavion both get the twirling the saber with the force. All other single blade stances get BOTH_ENGAGETAUNT. Then dual and staff all get their own too.
So long story short, if you want the Gamorrean to not use the force while taunting, you'll need to set the saber to be a saber staff, change the idle animation to whatever you want and that should work.