
AshuraDX
-
Posts
2,319 -
Joined
-
Last visited
Content Type
News Articles
Tutorials
Forums
Downloads
Everything posted by AshuraDX
-
Shadow/shader problem on butt and shoulders
AshuraDX replied to PreFXDesigns's topic in Modding Assistance
Looks like bad weighting. can you record a video like that with r_showtris 2 ? Depending on the topology of the model this might be fixable with a slight adjustment of the weights. -
And this is the wrong forum section.
-
Yes, you will need to import a version of the alien mesh, that is not weighted to the _humanoid skeleton, pose it to match the howler skeleton and thwn weight it to the howler skeleton.
-
@@DarthJava Scoopers plugin occasionall creates a huge amount of random edge splits. However: You should not underestimate the number of extra vertices created by edgesplits along UV Seams. Which version of 3ds max do you use? Can you save the scene in a .max format for 3ds max 2016 or older? If so I'll take a closer look.
-
or you could just try this: https://jkhub.org/files/file/2400-autodesk-3ds-max-2010-2016-glm-importerexporter-plugins/
-
Just use OpenJk. That does not make use of the steamcloud shit.
-
Supreme Leader Snoke (TFA & TLJ) by PreFXDesigns
AshuraDX commented on PreFXDesigns's file in Player Models
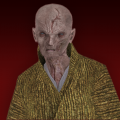 hm, I preferred the old face texture.
 -
This porting craze is starting to get ridiculous... If you are talking about the new SW Battlefront 2 the answer is clearly no.
-
STAR WARS: Movie Duels (Remaster of Movie Duels II)
AshuraDX replied to General Howard's topic in WIPs, Teasers & Releases
One could also try using that neural network based "manga image" upscaler. It once saved me quite some time in preparing a clients artwork for printing. While the sites title and intended use for this tech make me cringe, the results on simple "cartooney" images are stunning. And from what I can tell from those screenshots: it could work on Ahsoka's textures. Just add in some microdetail later and you should be good to go. -
How to make it so that an NPC can't be knocked down by kicks?
AshuraDX replied to Xioth's topic in Modding Assistance
Huh, I thought he'd just flinch. Aren't the hazard troopers immune to knockdown attacks? Been a while since I played through the campaign. -
Dexter Jettster along with his Diner
AshuraDX replied to KyleKatarn1995's topic in Mod Requests & Suggestions
Well, unless you created a new skeleton and a new .gla for the model Alongside all the animation work this would require - that surely wouldn't have worked too good ingame. Unless you posed the arms to have them tight to his body and weighted them to the torso bones. While that would allow the model to work with the base _humanoid skeleton, I don't think that'd be the result the op hopes for. -
Dexter Jettster along with his Diner
AshuraDX replied to KyleKatarn1995's topic in Mod Requests & Suggestions
I'm not surprised at all. His 4 arms are a tricky subject that would need to be animated from scratch. -
How to make it so that an NPC can't be knocked down by kicks?
AshuraDX replied to Xioth's topic in Modding Assistance
Have you tried class Desann? -
DO YE KNOW DA WAE? (Ugandan Knuckles Meme)
AshuraDX replied to Daedra's topic in Mod Requests & Suggestions
Fitting this onto a humanoid jka skeleton remains a problem though @Kylo -
DO YE KNOW DA WAE? (Ugandan Knuckles Meme)
AshuraDX replied to Daedra's topic in Mod Requests & Suggestions
How would you like it to be introduced? As a playermodel? That's pretty much going to be imposdible to do unless someone creates a custom skeleton and custom animations for this. -
He does cover porting a model piece from Skyrim over to JKA. Which should be what you wanted to know. To port a full model repeat the steps he did to port a single piece for all of your pieces. If you need to know what your model should be segmented like or what the hierarchy needs to look like you can take a look at any player model tutorial for any software. As the logic behind that step is not unique to one program.
-
Talking about the industry as a whole actually
-
Unless you are great at painting or have a 3d sculpt to base your work around - yeah, photosourcing is an option. But it's not the main method anymore. Nowadays my method for texturing models relies heavily on my preestablished modeling work. I save time in the texturing process by "baking" a dozen maps from a highpoly mesh.
-
[WIP] Q3ME: a 3ds Max Level Design Plugin
AshuraDX replied to AshuraDX's topic in WIPs, Teasers & Releases
Okay so, just to give you guys an update: I will delay the instruction videos a bit further. As of now I can hardly explain the specifics of worknig with my script without covering to much basic 3ds max usage. And I really want to finish my custom texture browser first. I also have a huge update to entities incoming. -
Supreme Leader Snoke (TFA & TLJ) by PreFXDesigns
AshuraDX commented on PreFXDesigns's file in Player Models
Well done! He is missing the inside of his mouth btw - You guys may want to fix that -
I really have to wonder why you saw the need to make another post to insult someone a allmost a year after he commented on your displayed attitude. It took you just 3 days of waiting to turn from asking for help to insulting everyone who may have been able to help you with your problem. Did this seem like a good Idea to you? I mean - would YOU help someone with his problem if that someone just told you to eat shit? I would not. And I did not in this case. Please keep your communication on here civilised from now on or see yourself out, thank you.
-
[WIP] Q3ME: a 3ds Max Level Design Plugin
AshuraDX replied to AshuraDX's topic in WIPs, Teasers & Releases
I chose to delay the isntructions video for these additions/improvements to my plugin: I added the option to configure and launch Q3map2 to compile your exported .map This allowed me to get Leak Tracing in 3ds max, the way this works as of now is a little hacky - but I'm sure I will find a way to improve this. I also rewrote a large portion of my brush export function to make it faster and allow for more advanced logging later down the road. -
[WIP] Q3ME: a 3ds Max Level Design Plugin
AshuraDX replied to AshuraDX's topic in WIPs, Teasers & Releases
Wellp. Here we go: For the first time everything in this .map file was created within 3ds max and exported. Radiant was only used to run q3map2 and check up if everything exported as expected - which it did. Expect a basic instructions video and a first "alpha" release soon These are the 2 UIs I created for my plugin.- 103 replies
-
- 12
-

-
Well...it works but.... it takes forever
-
@@Jeff I usually weight a merged copy of the mesh, without any outer accesoires (shoulder pads, capes, etc - you name it) so basically as much of a bare body as I can get. This version also has no splits for dismemberment. on that mesh I first make rough vertex selections and assign them to the appropiate bones with a 100% weight. In the second phase I refine/blend the borders between weight regions, during this step I constantly animate random movements across all limbs to see how the model deforms under various circumstances. Next up I transfer weights from the merged body to the individual pieces, including the accessoires. What follows is antoher phase of small tweaks and deformation checks. This may seem complicated but worknig with a merged mesh helps you to keep body parts from gliding apart due to mismatched weights on border vertices (as there are no a splits), if you then transfer this data over to the split model all vertices around the splits share the same weights with their appropiate counterparts.