Jump to content

RAILBACK

Members
  • Posts

    316
  • Joined

  • Last visited

Everything posted by RAILBACK

  1. I don't often post about models or skins because well, theres too many. But this is awesome and original! I would D/L this one for sure!
  2. Rotate railing texture by 30 degrees, then stretch to fit.
  3. Yes well, as much time as that person/s had on their hands, I do not. Work will I do, yeessss.
  4. I was actually thinking that we may be able to do some accommodating when it comes to actually using Yodas home. I think if you crouch that will be good enough. At least then, you can go inside.
  5. Seriously Waffles, please connect all your practice maps together and resubmit_rename. Do, or do not, there is no try.
  6. Well my plan is to make most of the details out of models. Working on tree models now. I might learn Blender or do some ASE if I'm tryin to save time.
  7. Uuhh.. you building this level Chum? Cause that's less work for me then. I'll just hand over some quick textures and you can have at 'er. And NO, make Yodas home, but only as a model you can look into, not go inside.
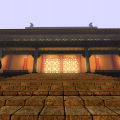
  8. LOL.. great. Now I have to open Radiant. See what you made me do? I just you-tubed that BF 2 level. Yea that is so Yavin. It's not even remotely like the one we are building here. As you can see, ours is way better.
  9. Good gawd man.. NO! I'm not porting anything, and neither are you. If I have to stay up late for the next 60 days, I'll make my own thanks. What happened to creativity?
  10. Kind of a neat level, yea. Has green fog. We need swamp and I don't mean yavin_swamp. PM me @@GPChannel and lets see what you have so far.
  11. Hmm...JKA 2005. No I have not. Doesn't seem as colorful as Shrooms. But the skybox is noteworthy.
  12. There is no Dagobah levels. Just like theres no Otuh Gunga levels either, except the one from @@ShroomDuck which is very simple. Just too much involved I think. Lots of trees and bush and vines like Endor only more so. Maybe ASE the whole map? ?
  13. Don't add sound to effects. I remember that as a rule. If you want sound, add it later with a target_speaker. Wait.. I think I added sound by opening fx files up in notepad. But theres no options in effectsED.
  14. Bring up the console. It should tell you the errors. Try reversing your ALPHA? And yes ShaderED is my favorite to preview shaders.
  15. Do you mean splash screens? You can get more than one to load by using this shader: levelshots/mod{ { map $lightmap } { map textures/mod/your.jpg blendFunc GL_DST_COLOR GL_ZERO } { map textures/mod/your_title.jpg blendFunc GL_ONE GL_ONE animMap 0.5 textures/mod/your1.jpg textures/mod/your2.jpg textures/mod/your3.jpg ... png .. tga etc. }
  16. RAILBACK

    Botroutes

    Jedi Knight2 and Jedi Academy Bot Routes This is not the most user-friendly system ever created by far, but I'll try to explain it in a semi-simple manner. Before you can use any waypoint-related bot commands you will need to enter into bot waypoint edit mode. To do this you'll need to set bot_wp_edit to 1 and restart the map. The bot_wp_edit cvar is cheat protected however, so you'll likely want to add something like this to your command line when starting the game: +devmap mymapname +set bot_wp_edit 1 That should take you into edit mode. Once in edit mode a number of bot waypoint management commands and cvars are available. The first two cvars to note are bot_wp_distconnect and bot_wp_visconnect. If distconnect is non-0 (and it is by default), when a route file is saved there will be an automatic check for how close waypoints are to one another. If a waypoint is more than 400 ingame units from the last or next, a node branching system will be used to connect it (inserting points in between as necessary). The visconnect option works in a similar way, except it checks for visibility rather than distance. Both of these options are very convenient if a level is rather simple and allow you to route a level with very little work. However, if a level is more complex and involves numerous lifts and tricky waypoints placement, it's best to disable them because they may fail where unexpected. If either method fails to branch to a waypoint, it will set that waypoint as being a "one way point" (I'll explain what these are later in more detail), which means that the bot will reverse on the trail when it reaches that point and not go forward on it. When routing a level, you essentially want to just make sure there are waypoints (whether placed manually or by the automated connection routines) everywhere you want bots to go. It's also best to make sure there's always a waypoint close to each spawn point, so a bot has a place to resume the trail on when it respawns. The bots aren't perfect, so if you have an area that's very complex and hard to get through, you may wish to have bots avoid it (unless you don't mind them failing at it now and then). If a bot does manage to get stuck on its trail, it will time out after 2 seconds of no visibility to the next trail point. If it somehow can see the point and cannot get to it, the timeout process will take longer, but will still happen eventually. As far as how the bots actually follow the points you place, they will follow them in numerical order back and forth by default. When the route file is saved, all nearby points and linked to one another as well. So if, for example, waypoint 5 is close to waypoint 98 and the bot wants to get a powerup which is near waypoint 105, he will branch from waypoint 5 to waypoint 98 in order to get to his destination quicker. With that in mind, here are the main commands used for waypoint placement: bot_wp_add - Adds a waypoint at your current ingame location. By default it will add a waypoint after the last in numerical order. However, if you specify an argument with the command it will add the waypoint after a specified waypoint number. So, if you use "bot_wp_add 3", it will insert a waypoint between waypoint 3 and waypoint 4 as waypoint 4 (waypoint 4 will then be bumped up to waypoint 5 an so on). bot_wp_rem - Removes a waypoint. By default this will remove the last waypoint place. If you specify an argument you can remove a specific waypoint by number. So bot_wp_rem 5 would remove waypoint number 5. (and if there is a waypoint number 6, it then becomes number 5, and so on) bot_wp_addflagged - Similar to bot_wp_add, but this requires an argument for the special type of waypoint. Valid arguments are: j - The bot will jump while trying to get to this waypoint. d - The bot will crouch while trying to get to this waypoint. c - A camping/sniping point, the bot will often stand here if it has camping properties. x - Same as 'c', except the bot will crouch while camping. f - Wait for a func brush underneath this point before moving onto it. This is useful for elevators, moving platforms, and other such items so that the bot will wait until the object is under the point before advancing. x - This creates a one-way forward point. The bot will travel past this point, but when reversing on the trail, once he reaches it he will turn back and go forward again. This is a good last resort if you want the bot to jump off a tall ledge he can't get back up. However, use these points sparingly, as they make the bot much less efficient in getting places. y - This creates a one-way backward point. Same principle as the above, except the bot will only pass this point when following a trail in reverse order (5, 4, 3, etc). n - The bot will not perform visibility checks when moving to this point. Should also be used sparingly, as the bot can easily get stuck when moving to these if something prevents it from getting there. m - Sort of reversed from 'f'. The bot will only move here if there is NOT a func brush underneath this point. You can combine these flags however you wish. So if you wanted to add a point that the bot will jump to and only move to when a func brush is under it, you would use "bot_wp_addflagged jf" as the command. This parameter also accepts an additional argument for inserting within trails like bot_wp_add, so if you wanted to insert said point after point 5 in your existing trail, you would use "bot_wp_addflagged jf 5". bot_wp_switchflags - Switches the flags of an existing waypoint. Uses same flags as bot_wp_addflagged. So if you wanted to turn point 5 into a jump point but let it keep all its other existing properties, you would use "bot_wp_switchflags j 5". bot_wp_killoneways - This will remove all one-way (x and y) flags from all waypoints on the level. Can be handy sometimes when the distconnect and visconnect cvars flag waypoints as being one-way automatically. bot_wp_tele - Teleport to a specific waypoint by index. By default it will teleport to the last placed waypoint, but an additional argument will allow you to specify any number (so use "bot_wp_tele 5" to teleport to waypoint number 5, for example). bot_wp_save - Once you are done placing waypoints, this will write the route file out and do all the calculations necessary at save-time. Those are all the commands you should need. If you want to edit an existing route file, just load the level up in waypoint edit mode (as described above) and all the waypoint data will be visible and modifiable. You probably won't end up needing to use many commands other than bot_wp_add, bot_wp_rem, and bot_wp_save. I suggest binding keys to bot_wp_add and bot_wp_rem in order to save time. So then, good luck.This tutorial will get most bot routes in terms of simplicity. I have done a few routes on many maps and the other commands mostly confuse bots, in my experience. That being said, there are some other commands should you wish to try them out. But yea.. NABs shorter version will do just fine
  17. How many files are in there? How did you route? Did you use any 'wait' commands? I've made a ton of routes myself. If your route numbers get too close it can change the direction on you and it wont follow the route you want. Hopefully the map has lots of spawn points.
  18. Thanks anyhow @@Lancelot. It's just way too big of a file and I have too much bloat on here as it is between all the 100's of mods and my own files as well. Think I'll toy with some ext_data files on my own.
  19. From what I can see, I just love what's going on here. Is this a S/P? Looks like you're managing the S. W. atmosphere but with some better lighting. Keep going. Maybe add some interactive content. That 'new' corridor screenshot is so detailed and drooly.
×
×
  • Create New...