

Kualan
-
Posts
1,288 -
Joined
-
Last visited
Content Type
News Articles
Tutorials
Forums
Downloads
Posts posted by Kualan
-
-
Looking really good, will keep an eye on this as it develops.
Noodle likes this -
Had to scratch the itch since that last post, so here we go:
 DTIII, LucyTheAlien, dark_apprentice and 8 others like this
 -
Wish I could hear about your skyrim projects in these forums, since it's such a fun moddable game.
If you're genuinely interested, this is the mod in question: http://www.moddb.com/mods/the-game-of-thrones-adaptation-mod-for-skyrim
Not going to lie though, seeing Rogue One has kind of re-ignited my Star Wars enthusiasm at the moment so I may be able to fit a kitbash or two in before returning to Skyrim.
Noodle, swegmaster, ZanderNao and 3 others like this -
You wouldn't happen to know where THAT is, do you?
I just checked - I was thinking of the one by DarthStiv on ModDB, but it doesn't have Lieutenant Grenn in with his TSF uniform, just as a head variant for the 'elder male' Jedi.
http://www.moddb.com/games/star-wars-jedi-academy/addons/kotorpack
TheWhitePhoenix likes this -
could you possibly make lieutenant grenn from kotor 2?
I think he's in the expanded KOTOR pack that's floating around the 'net (not the one that gets shared most often).
-
Hey, is there any chance of seeing that Oppo Rancisis out anytime? Been dying to round out every jedi from the prequels, and seeing him in the screenshots has been making me excited for weeks.
I don't have much free time these days, as I've started a new job and what little free time I have I tend to spend on my upcoming Skyrim mod.
Jeff likes this -
I watched the opening scene before I had to rush off - I like the opening camera work (slightly steadier would have made it perfect, but I don't think it's possible to do anything other than free-roam with the mouse in JKA anyway so not a big deal). My one complaint from the opening scene is that the lighting needs to be better. I can barely see the characters!
Also - have you considered uploading to YouTube for higher resolution?
yeyo JK and TheWhitePhoenix like this -
Wow, really REALLY nice work there Jeff. Great stuff.
Jeff likes this -
DarthVaderBF3_EpIII.pk3
DarthVaderBF3_EpIV.pk3
DarthVaderBF3_EpVI.pk3
if they do not work help me to solve the problem
thanks in advance
Those aren't links, heh.
Try creating an account on https://www.dropbox.com/ and uploading the files there, then you can post the link here.
NoOne likes this -
It might be possible to optimise the models. Is there a link to them? I can have a look - not making any promises though.
NoOne likes this -
Hello everyone,the models in the game have always the same error
Which error? The Ghoul2 one?
Have you tried running the game with OpenJK?
NoOne likes this -
Another question, probably the last for a while. How can i merge stuff? Like merge hands, fingers and arms so that i can move them to another model without moving every single part.
I wouldn't recommend merging hands/arms together, but to merge two meshes you select them with SHIFT+click and then press CTRL+J. If memory serves, whatever is the last mesh you selected will be the one whose name/details the merged object adopts.
-
Pity, couldn't think of a good enough idea in time. Looking forward to going through folks' submissions though!
-
-
-
Would it also be possible for you or @@Kualan to make the body more...shall we say, feminine? Just a suggestion.
But...why? That would literally just make it like @@Jeff 's : https://jkhub.org/files/file/1746-bultar-swan/
Jeff likes this -
What's the difference between that and @@Jeff 's version?
-
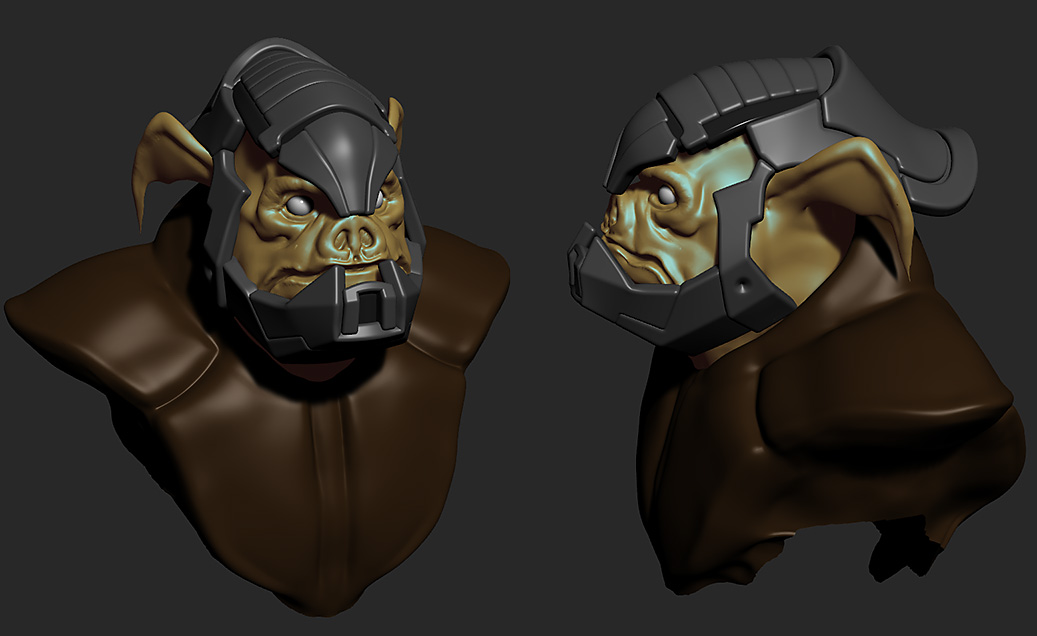
I tinkered with some helmet design...
Very nice. I think taking some artistic license with the design is a good move - being able to incorporate more Gamorrean and Kowakian features into the final product makes them more consistent with how they're described over how they actually looked.
-
Sorry for no updates in a while. I can't say my life is busy but I really don't want to stare at a computer screen at home after 8 hours of configuring laptops all day long.
As of now I just got the Imperial Army Troopers to spawn in game. Hurray! Not a huge improvement I know but its really important because stormtroopers are going to be really limited if they are even in the project at all. I also got the Imperial Gunner and Weapons Tech to spawn so things are going well. This is huge for the story line and stuff so now that that stuff is accomplished, along with other npc's I'll need, things should go swimmingly in that area. Going to try and finish the Death Star detailing tonight and then start working on some outdoorsy stuff.
Cool - are there any models/characters you need that don't currently exist for JKA?
-
Links fixed, I think I had this problem before, Sith Warrior, Senya Tirall, Nico Okarr, Karkodan (he needs work), and LIN-VM8.
Looking good, but a quick tip for SWTOR models I've found useful:
When using the face textures, combine then with the normal map (the same texture ending in _n , usually appears all blue) so produce a more JKA-friendly version of the final result.
What I usually do is:
1. Open the original face texture in Photoshop.
2. Open the normal map version.
3. On the normal map, go to Channels and disable everything except the Green channel.
4. With just the green channel visible, select all then copy and paste over to the main face texture.
5. Change the blend mode (feel free to experiment, I usually go for Soft Light) and set the opacity to somewhere in the 50-60% region.
6. Now go back to the normal map texture and repeat the process with the Blue channel.
7. Again, experiment with different blend modes but I usually go with Multiply and a 25%-35% opacity.
With SWTOR human faces in particular, you can also experiment further by applying additional textures from the Complexions section of player texture and also applying them to the main face texture through the use of blend modes and opacity settings. The results help to combat the cartoonish look of the TOR models considerably, and reduced the washed out appearance of their textures in things like Modview.
Just my two cents.
swegmaster, Jeff, Seven and 1 other like this -
Links are restored I threw a couple of extras in as well.
Link just takes me to my own home file page
I have most of your stuff downloaded already anyway of course but what's the new stuff?
Smoo likes this -
The DL links have been removed I'm tired of going onto Mod DB and seeing my stuff everywhere, with no credit, and half of them claiming they made it.
Sorry to hear that man, but I totally sympathise. ModDB admins seem very lax when it comes to responding to reports as well - having made several myself in the past.
EDIT: Turns out ModDB doesn't even flag a file as reported until several people have done so. Perhaps it's time to name and shame some content thieves so we they can reported and pulled from the site?
Jeff and swegmaster like this -
Don't know how I missed this, but this looks great! Hope you're still working on it.
Darth Sion likes this -
Very nice! Will follow this with great interest.


Kualan's Kitbash Workshop
in WIPs, Teasers & Releases
Posted
Hm, I can't say any of the current HS Imperial heads look particularly like Krennic to be honest.