
JKHub
-
Posts
609 -
Joined
-
Last visited
Content Type
News Articles
Tutorials
Forums
Downloads
Files posted by JKHub
-
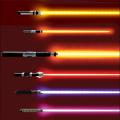
Dark Forces 2 Saber Pack
By JKHub in Lightsabers & Melee
Author
Gaara of the Sand
Nothing special needed for these to work in Jedi Academy...
Just put the JKDF2_Sabers_v1-01.pk3 (or JKDF2_Sabers_v1-00.pk3 if you are running JKA version 1.00)
in your JA base folder, along with the JKDF2_Blades.pk3 for the JKDF2 saber blades, and it's all set...
As a bonus, I have included some of the sabers from the concept artwork shown in the install of JKDF2. Have fun with them!
ALSO, I have heard of people posing as me on JKA 1.01. Note: I DO NOT play jka version 1.01, i play version 1.00.
Remove any older versions from your base folder, to avoid conflicts.
3,380 downloads
-
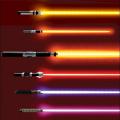
Dark Forces 2 Saber Pack
By JKHub in Lightsabers & Melee
Author: Gaara of the Sand
Submitted by: ShadowPhoneix
Originally by the JK3Files user Gaara of the Sand, this was unfortunately lost due to JK3files shutting down. But I had it on my harddrive, so I thought, since this was so popular, allow me to give it back to you JKhub. You're welcome.
Readme and everything from the original is included. I hope you guys don't mind that Wookiepedia shot of Kyle igniting his lightsaber for the file.
1,339 downloads
- Star Wars
- Lightsaber Based Weapon
- (and 1 more)
-
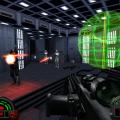
Dark Forces Mod
By JKHub in Single Player
***************************
JEDI ACADEMY MODIFICATION
***************************
Title : Dark Forces Mod for Jedi Academy - Demo Version
Author : The Dark Forces Mod Team
E-Mail : darth_linux@msn.com
Website : http://darkforces.jediknight.net
File Name : dfmod_2008.zip
File Size : 428 MB
Date Released : 1/27/2007
Description : Files required to play the Dark Forces Mod Demo.
The Dark Forces Mod aims to recreate the levels and playing experience of the
LucasArts game "Dark Forces" using the modern 3D engine found in the game
Jedi Knight: Jedi Academy. This demo contains the first 6 levels of the game.
This is the third release by the Dark Forces Mod Team, who, in November 2002,
released a demo of the mod for Jedi Outcast. This release was met with wide
critical acclaim, and it is our pleasure to present you with the third and final release.
For more information, please visit our website. Enjoy the mod!
Installation : Make a new directory calld "dfmod" inside your Jedi Academy/Game Data directory. Unzip the
contents of the the demo ZIP into this directory. Make a new shortcut to jasp.exe on your desktop
and edit the shortcut properties, adding this to the target line: "+set fs_game dfmod" Double click
the icon to begin. Make sure you go into the Setup screen to change your keyboard preferences.
Requirements : Jedi Academy must be patched to version 1.01 to work.
Please set your graphics options to their highest settings for maximum enjoyment.
Comments : Behind a veil of secrecy the evil Empire is creating a doomsday army--one that,
if finished, will become the final cog in the Empire's arsenal of terror and
domination. Your Mission?
Join the Rebel Alliance's covert operations division, infiltrate the Empire, then
battle every man and machine the Imperial Forces can muster. Search a vast galaxy
for clues, attack enemy bases - all in a desperate attempt to stop the activation
of this fearsome new weapon.
It's you and your blaster against an entire Empire. May the Force be with you.
Release Notes : Note that there are a few controls different to Jedi Academy. Please
check out your controls and adjust accordingly.
Known Bugs/Issues *Dianoga makes no distinct "attack" sound when attacking player.[no known solution]
*Concussion Rifle" appears at times in Weapon Inventory when Left Arrow is clicked. [no known solution]
*No lip sync in Sewers cutscene if EAX is enabled. [EAX should be disabled for this mod.]
*Light Saber appears in some levels if melee weapon is chosen. [no known solution]
*There is no animation when throwing the Detonator [JA engine does not have one]
*Size of Concussion Rifle and Repeater Gun ground weapons are very small. [salv could possibly resize them larger]
THIS MODIFICATION IS NOT MADE, DISTRIBUTED, OR SUPPORTED BY ACTIVISION, RAVEN, OR
LUCASARTS ENTERTAINMENT COMPANY LLC. ELEMENTS TM & © LUCASARTS
ENTERTAINMENT COMPANY LLC AND/OR ITS LICENSORS.
12,360 downloads
- Complete Overhaul
- Contains maps
- (and 4 more)
-
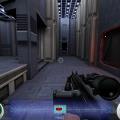
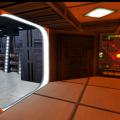
Dark Forces Mod for Jedi Outcast Demo
By JKHub in Single Player
The original Dark Forces Mod demo for Jedi Outcast, made by the same team that made the Dark Forces 6 level demo for Jedi Academy, Enjoy!
***************************
JEDI KNIGHT II MODIFICATION
***************************
Title : Dark Forces MOD for Jedi Knight II Demo - Game Files
Author : Dark Forces MOD Team
E-Mail : darth_linux@planetblood.com
Website : http://darkforces.jediknightii.net
File Name : demo_game.pk3
File Size : 12 MB
Date Released : 11/27/2002
Description : Game files required to play the Dark Forces MOD Demo
Installation : Create a new directory in the "GameData" sub directory of your
Jedi Knight II folder called "dark". Place the demo_game.pk3 inside.
Load up Jedi Knight II, goto the "Setup" menu, then "MODS" and click
on "dark", then "Load Mod". To start a new game click on "New Agent".
Enjoy!
Requirements : Jedi Knight II must be patched to version 1.4 to work. The files
demo_music.zip and demo_video.zip are also needed.
Comments : Assume the role of rebel agent Kyle Katarn and infilitrate
the Imperial Base in which the Death Star plans are kept. Find
the plans, and make your escape.
Release Notes : This is a demo! This does not neccessarily reflect the final
version of the MOD! Also note that this is not attempting in any
way to be an exact replica of the original Dark Forces game. Many
things are different, aswell as many being the same. Enjoy this
demo, but please bare these points in mind.
Note there are a few controls different to Jedi Outcast. Please
check out your controls and adjust accordingly.
Known Bugs/Issues : Briar pistol secondary fire does not work 100%
THIS MODIFICATION IS NOT MADE, DISTRIBUTED, OR SUPPORTED BY ACTIVISION, RAVEN, OR
LUCASARTS ENTERTAINMENT COMPANY LLC. ELEMENTS TM & © LUCASARTS
ENTERTAINMENT COMPANY LLC AND/OR ITS LICENSORS.
613 downloads
- Contains weapons
- Contains maps
- (and 3 more)
-
Dark Forces Mod for Jedi Outcast Demo Update
By JKHub in Single Player
An update to the Dark Forces Mod Demo for Jedi Outcast, fixes some bugs with the mod and improves it a bit.
Author : Dark Forces MOD Team
E-Mail : darth_linux@planetblood.com
Website : http://darkforces.jediknightii.net
File Name : demo_update.pk3
File Size : 6177kB
Date Released : 8/7/03
Description : Additonal files and updates for the Dark Forces MOD Demo
Installation : Add this PK3 to your current Dark Forces MOD demo installation,
where you have the demo_game.pk3.
Requirements : Jedi Knight II must be patched to version 1.4 to work. The files
demo_game.pk3, demo_music.pk3 and demo_video.pk3 are also needed.
Comments : -
Release Notes :
- fixed shot effects for the Bryar pistol (including Imperial Officer shot)
- added completely new Kyle model
- EAX support for the Secret Base demo level
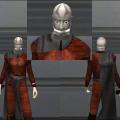
- more sparkly helmet for the Imperial Commando
- new Blaster and Bryar pistol models and skins
- "correct" menu music
- some shader fixes
- one menu fix
379 downloads
- Contains weapons
- Contains maps
- (and 4 more)
-
Dark Forces Mod Source Files
By JKHub in Source FIles
Submitted by Ramikad
These are the complete source files of the original Dark Forces Mod for Jedi Knight: Jedi Academy. Permission to upload the source files here was granted by original team member Dave "Darth Linux" Turner (darth_linux@msn.com):
"Yes, feel free. Thank you"
It includes the maps, map sources, textures, player and weapon models as well as sounds planned to be used in the complete Dark Forces Mod.
Credits go to the original Dark Forces Mod team, I only uploaded the source files, which were released a long time ago, but are seemingly gone now.
587 downloads
-
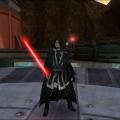
Darth Malak
By JKHub in Player Models
Skin and Model by DarthViper107
Description:
Darth Malak is the former apprentice of Darth Revan. The two were being attacked by the Jedi and Revan was killed and Malak escaped. Malak then assumed the role as Dark Lord of the Sith. This is him as he is in the game: Knights Of The Old Republic on Xbox and PC by Lucasarts and Bioware.
Bot Support: Yes
NPC Support: Yes
Team Support: Yes
1,065 downloads
-

-
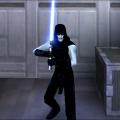
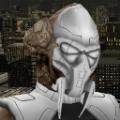
Darth Savet
Original Author: Slaughter
Description:
I completly reskinned the Darth Vos model (by Aaron Smith).
He comes with new Sounds and a new Saberhilt i modeled and skinned.
New Sounds: Yes
Bot Support: Yes
Team Support: Yes
Credits:
My Voice © me
Quinlan Vos Model ©Aaron Smith
Original textures © by RavenSoft
thx to Trauma Sensei for helping me getting the hilt into the game.
1,196 downloads
(3 reviews)0 comments
Submitted
-
 (1 review)
0 comments
Updated
-
Darth Stevenus' Duel Map Pack
By JKHub in Multiple Gamemodes
Author: Darth Stevenus
This is a map pack for JK2 containing three map files. They are:
Yavin: Temple of the Sun (duel) -An ancient temple on Yavin rumored to be the burial ground of a once powerful jedi and his 11 loyal disciples. Features quicksand which will instantly kill you if you touch the bottom. (Hint, there is also a secret area in this map).
Imperial Gravity Chamber (duel) -An Imperial chamber containing a gravity reactor (can be destroyed if you take the shields down). This map features, obviousely, reduced gravity.
Bespin Street Duel (duel and ffa) -Fight your way through the streets of Bespin! Not much else to say about this one.
All 3 maps have full bot support.
208 downloads
(0 reviews)0 comments
Updated
-
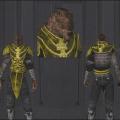
Darth Tiras
Original Author: Slaughter
Description:
I tried to make a Sith Kel´dor with a Uniform kind of look to his clothes.
The hilt was supposed to fit it´s creator so it´s mainly white aswell.
New Sounds: Yes
Bot Support: Yes
Team Support: Yes
NPC Support: Yes
Credits:
Original Model © by RavenSoft
Original Sounds © by RavenSoft
1,580 downloads
-
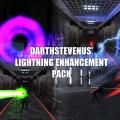
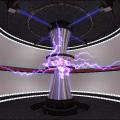
DarthStevenus's Lightning Enhancement Pack
By JKHub in Cosmetic Mods
Author: Darth Stevenus
This pack contains 10 different force lightning effects, a new force push effect, 3 weapon effects replacements, a new saber-type weapon, and a new 2 handed force lightning stance.
Lightning fx -
Datastream
DragonRoar
Lightning type 1
Lightning type 2
Lightning type 3
Lightning type 4
Lightning type 5
Psychburst
Stardust
Twister
Push fx -
Shockwave
Weapon fx -
Arc Caster
Megawatt Rocket Launcher
Plasma Detonator
Sabers -
Force Pike
Animations -
New 2 handed lightning stance
New force push anim (with Shockwave fx)
Most of the fx come in several different colors such as blue, green, orange, pink, purple, red, yellow, white, and black.
1,813 downloads
-

Dash Rendar Resurgence
By JKHub in Single Player
Author: Mercenary
This is an enhanced port of my single player campaign released for Jedi Knight II: Jedi Outcast in 2003.
Dash Rendar has been hired to smuggle weapons to a mining colony planning a hostile takeover from a corrupt organization that has been exploiting them. After the reliable weapons supplier fails to meet at the rendezvous point, Dash goes on a search for him at the coordinates of where he last made communication.
2,138 downloads
-
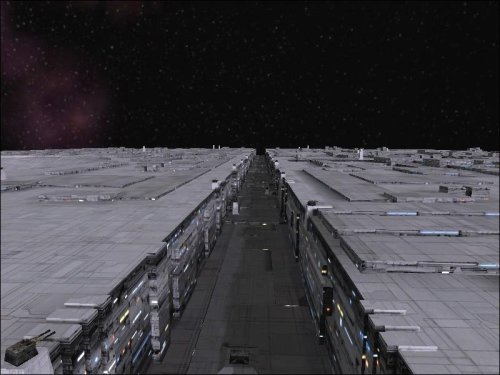
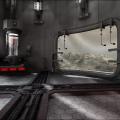
Death Star Trench
By JKHub in Mixed Gametypes
Author: Darth Zappa
Original Release Date: 12-07-2004
The deathstar trench. Pretty self explanatory i guess. This is a team ffa dogfightin' map, with turrets on the surface. There is an exhaust port that goes kaplooie and awards 25 points to the first rebel that shoots it, but the entire map does not explode or anything like that. beware flying over the large deathstar gun dish - the gun is ARMED! if you fly into its shot path, it will fire. you will go kaplooie.
This map will NOT WORK WELL in FFA MODE. I STRONGLY RECOMMEND TFFA GAMES on HERE. to change to TFFA, set your server's g_gametype to 6.
This map is huge. In fact, it's as big as it can possibly be. If you had trouble running star destroyer siege, then don't bother with this. There is no 'inside' to the deathstar, other than the tie-fighter hangars. I have no plans to add the interior to this map.
I may add siege in the future; for now it's TFFA.
There are two versions of the map included:
deathstar_trench_v1 - has just basic x-wing and tie-fighter vehicles.
this version is good for folks who dont want to add any custom vehicles to their servers.
deathstar_trench_v2 - has several custom vehicles added to the map
- tie-advanced - darth vader's tie fighter
- tie-defender - a deluxe tie fighter from the EU novels and games
- tie-interceptor - the improved tie fighter from ROTJ
- y-wing - the rebel heavy fighter
- a-wing - small heavily armed fighter from ROTJ
- b-wing - the large heavy fighter from ROTJ
- millenium falcon (yt-1300) - heavy armed freighter, which is only enabled if the rebels make it to the far end of the trench
** IMPORTANT ** READ THIS ABOUT VEHICLE LIMITS **
This map uses many custom vehicles, and you might hit the limit allowed by JA. I STRONGLY RECOMMEND RUNNING A MOD such as 'ASTEROIDS MOD' or 'JAPLUS v2.2' which enables the server and client to have extra vehicles installed in your base folder. If you do not use a mod like this, you need to clean out your base folder of any other vehicles that you are not using on this map to run it.
If you are running a Mod that allows for extra vehicles, you can also install your vehicles in that mod's folder. For example, if you are running japlus, then you can put extra vehicles in the gamedata/japlus folder and they will only be available when you are on a server running that mod. This is a good method to keeping your base folder tidy and conflict-free.
** INSTALLATION **
put the deathstar_trench.pk3 into your base folder. If you are going to run the v2 version of the map with extra vehicles, put the vehicle .pk3 files into either your base folder, or (recommended) your mod folder, such as gamedata/japlus or gamedata/asteroids (whatever one you are using.) vehicles installed into a mod folder are only available during games that are running that mod.
Credits:
--------
map design and construction by darthzappa
custom vehicle models credits:
b-wing vehicle by Hatrus and Manquesa
tie defender vehicle by Hatrus
a-wing vehicle by Astromash and Manquesa
y-wing vehicle by Manquesa and Andy 867
tie interceptor vehicle by 7IM and Michael 'Chang Khan' Gummelt
tie advanced X1 vehicle by Raven Software, NeoMarz1 and Manquesa
yt-1300 vehicle by Raven Software and Manquesa
all original vehicle read-me files are included in a separate folder. Several of these vehicles are from the Asteroids Mod pack, to ensure compatibility with that mod.
Portions of this map were copy/pasted from Raven's star destroyer siege map, but i changed them around quite a bit.
116 downloads
(0 reviews)0 comments
Submitted
-
Desann Warrior
Author: Darth Dizzy
New textures: Yes
Bot support: Yes
Team support: No
NPC: Yes
New sounds: Yes
Well this is a skin of a 'Desann Warrior', my first skin.
If you wanna use it in SinglePlayer just type in console 'playermodel desann_warrior'
334 downloads
(1 review)0 comments
Submitted
-
Desert Streets
By JKHub in Free For All
Mapped by Roshi
This is a desert city based FFA map. It includes a few dueling arenas,
a council room, many outdoor areas, an small bar room, and a large rancor
arena. A few STAP vehicles are scattered around the map to help you get
around. A spawnscript is included to respawn the STAPs when destroyed.
Credit goes to Aaron Smith for the Jedi Starfighter model, and to Monsoontide
for the STAP vehicle.
Bot-routing is included.
Supported game types - FFA, TeamFFA
218 downloads
(1 review)0 comments
Updated
-
Devolution
Author
Patrick Haslow
Close quarters lightsaber combat between a secret lab in the past and the present. I intended this map to have a narrative sense to it, as if it were a location where a gripping story was taking place. Hopefully players will see it the same way and enjoy being being immersed in the awful events at the laboratory.
This map is a a polygon complicated work that was really meant as a showcase for the 2005 Map-Review JA Geometry Challenge. If you are dissatisfied with the texture choices, pleae remember I did my best to pretty up this map within the 10 texture limit of the challenge. Be warned, slower machines will have a hard time running this map at a decent framerate!
The map is a tight space in which to duel- good luck! For a quick escape, explore the ominous glowing portal contraption. Bot support is provided.
380 downloads
(3 reviews)0 comments
Updated
-

Dim Side Castle
By JKHub in Free For All
Author: Worr Sonn
Submitted by: Barricade24
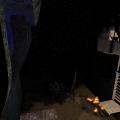
The new and high-tech palace become a nuisance, so master Worr Sonn created an ancient castle for Dim Side
93 downloads
(0 reviews)0 comments
Submitted
-
Dim Side Jedi Academy
By JKHub in Free For All
Author: Worr Sonn
Submitted by: Barricade24
The extra edition of ffa_dimside_se... I took the map and re-did most of it. I kept the classic arenas and got rid of some stuff. The secret area is VERY hard to find, but it is the best area in the map
98 downloads
-
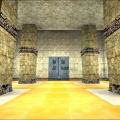
Dim Side Palace 2
By JKHub in Free For All
Author: Worr Sonn
Submitted by: Barricade24
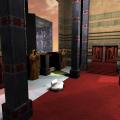
The palace of the Dim side Clan (-{DS}-) headed by Master Worr Sonn. Includes, bar, bedrooms, council room, throne room, ship supply room ,offices, etc.
152 downloads
(0 reviews)0 comments
Updated
-
Dim Side Training Facility
By JKHub in Free For All
Author: Worr Sonn
Submitted by: Barricade24
Small Trial facility to give trials to the many members of -{DS}-.
Start off outside with an outside atmosphere. There's a nice tree house up in the tree which belongs to me (Worr).
You walk in to a large glass duel pad which has ramps leading off to 3 doors and a waiting room.
The rightmost door is a hall with three teleporters that lead to a duel room for Me, Alvinater, and Unnamed.
The leftmost door leads to a strange meditation room.
The middle forcefield is my office, which you must make an appointment to enter
62 downloads
(0 reviews)0 comments
Submitted
-
DoA Flight Arena
By JKHub in Free For All
Mapped by Roshi
The official flight map of Dark Order Alliance. Aircraft are spawned by
using the switches on each landing pad.
The included aircraft are:
X-Wing
TIE-Fighter
A-Wing - Gregory (Manquesa) Birmingham
Anakin's StarFighter - Zymotico, Neo_knight
Snow Speeder - tFighterPilot
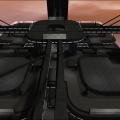
Republic Gunship - AOTC:TC Team, Mars Marshall
TIE-Advanced - RAVEN, Mars Marshall
TIE-Interceptor - RAVEN, Mars Marshall
------------------------------------------
Supported gametypes: FFA, TFFA
Bot routing: yes
829 downloads
-
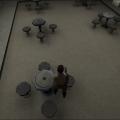
DoA Tournament
By JKHub in Free For All
Mapped by Roshi
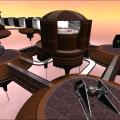
The official tournament map of Dark Order Alliance. Large vjun/bespin themed
area including 4 platforms with duel pads, one circular platform above the
other 4, and the bottom floor which circles around the platforms.
Supported gametypes: FFA, TFFA
Bot routing: yes
133 downloads
(0 reviews)0 comments
Updated
-
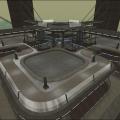
DoA Tournament Complex
By JKHub in Free For All
Mapped by Roshi
The official tournament map of Dark Order Alliance - Version 1.2. Large
vjun/bespin themed area including 4 platforms with duel pads, one circular
platform above the other 4, and the bottom floor which circles around the
platforms.
Supported gametypes: FFA, TFFA
Bot routing: yes
148 downloads