
JKHub
-
Posts
606 -
Joined
-
Last visited
Content Type
Profiles
News Articles
Tutorials
Forums
Downloads
Files posted by JKHub
-
GTK Radiant 1.6.4
This is the most recent pre-release build of GTK Radiant (ZeroRadiant) (v1.6.4)
Noteable improvements:
64-bit q3map2 support
Inbuilt JA support (No need to download a separate gamepack)
Install
Simply extract the contents of the .zip archive to a folder of your choice and run radiant.exe. No install required at present. Select Jedi Academy from the list and point the path to your /GameData folder.
=============================
GtkRadiant is the official level design toolchain for games powered by id Tech engines from id Software, and is maintained by a community of volunteers. GtkRadiant is powered by the GTK+ Project and released under a GPL license.
Repository - https://github.com/TTimo/GtkRadiant
Release notes:
http://icculus.org/pipermail/gtkradiant/2013-August/011885.html
1,620 downloads
-

Imperial Outpost Part 2
By JKHub in Single Player
Part 2 of the Imperial Outpost campaign by Postman86/Eike Legien.
1,380 downloads
-
ASE to MD3 or GLM file converter
This is an executable that can be run to convert ASE format models to MD3 and GLM format. This was a tool originally released by Raven for Soldier of Fortune 2 for the making of static models so when making GLM models it will not write any bone animation or envelope weight data. This tool can be particularly useful to those who are using 3d software that has no MD3 format export support.
Included are instructions on how to use the program in PDF format.
There are two different model formats used in SoF2, MD3 and Ghoul2. MD3 is used
primarily for static models and have an extension of .md3. Ghoul2 models are used for
ConfusEd entities (for SP), bolt-ons and characters andhave the .glm format. Ghoul2
models also have two different methods of being built, one with bones, and the other
without. Ghoul2 with bones are used for models that require animations (characters and
some ConfusEd models). Ghoul2 without bones are used for non-animated models
such as bolt-ons.
This document gives no explanation on actually modelingobjects. If you are new to
putting models into a game, start with MD3s, as they are far less complex than Ghoul2
models. Also, we use 3DS Max 4 for model creation and our supplied plug-ins work with
Max 4. All following instructions assume Max is being used in the creation of models
301 downloads
-
Animation and Model Source Files (Raven Software)
By JKHub in Official Releases
These are the source files to the game released by Raven software, all files are as is and are in dotXSI 3.0 and 3.5 format. No cinematic animation sources are included but everything in the _humnaoid.gla file, all base humanoid models and all non-humanoids plus their animations.
Jedi Academy Player XSI Files
May 3rd, 2004
These files are released "as is" and are unsupported by Raven Software, Activision or LucasArts.
Star Wars® Jedi Knight® : Jedi Academy™:
© 2003 LucasArts Entertainment Company LLC. © 2003 Lucasfilm Ltd. & TM or ® as indicated.
All rights reserved. Used Under Authorization. LucasArts and the LucasArts logo are registered
trademarks of Lucasfilm Ltd. Any use of any of the materials on this site other than for private,
non-commercial viewing purposes is strictly prohibited.
1,587 downloads
-
Q3Map2Toolz
Q3Map2Toolz is an alternative front-end application for Ydnar's Q3Map2 to q3map2build. It is larger than it's build counterpart but for current days still small.
It's main advantage is that it has an included mapacker by Equim which greatly reduces effort in making the .pk3 files.
Additionally, it allows the use of more BSP switches than Q3map2 GUI.
1,435 downloads
(1 review)0 comments
Updated
-
Dark Forces Mod
By JKHub in Single Player
***************************
JEDI ACADEMY MODIFICATION
***************************
Title : Dark Forces Mod for Jedi Academy - Demo Version
Author : The Dark Forces Mod Team
E-Mail : darth_linux@msn.com
Website : http://darkforces.jediknight.net
File Name : dfmod_2008.zip
File Size : 428 MB
Date Released : 1/27/2007
Description : Files required to play the Dark Forces Mod Demo.
The Dark Forces Mod aims to recreate the levels and playing experience of the
LucasArts game "Dark Forces" using the modern 3D engine found in the game
Jedi Knight: Jedi Academy. This demo contains the first 6 levels of the game.
This is the third release by the Dark Forces Mod Team, who, in November 2002,
released a demo of the mod for Jedi Outcast. This release was met with wide
critical acclaim, and it is our pleasure to present you with the third and final release.
For more information, please visit our website. Enjoy the mod!
Installation : Make a new directory calld "dfmod" inside your Jedi Academy/Game Data directory. Unzip the
contents of the the demo ZIP into this directory. Make a new shortcut to jasp.exe on your desktop
and edit the shortcut properties, adding this to the target line: "+set fs_game dfmod" Double click
the icon to begin. Make sure you go into the Setup screen to change your keyboard preferences.
Requirements : Jedi Academy must be patched to version 1.01 to work.
Please set your graphics options to their highest settings for maximum enjoyment.
Comments : Behind a veil of secrecy the evil Empire is creating a doomsday army--one that,
if finished, will become the final cog in the Empire's arsenal of terror and
domination. Your Mission?
Join the Rebel Alliance's covert operations division, infiltrate the Empire, then
battle every man and machine the Imperial Forces can muster. Search a vast galaxy
for clues, attack enemy bases - all in a desperate attempt to stop the activation
of this fearsome new weapon.
It's you and your blaster against an entire Empire. May the Force be with you.
Release Notes : Note that there are a few controls different to Jedi Academy. Please
check out your controls and adjust accordingly.
Known Bugs/Issues *Dianoga makes no distinct "attack" sound when attacking player.[no known solution]
*Concussion Rifle" appears at times in Weapon Inventory when Left Arrow is clicked. [no known solution]
*No lip sync in Sewers cutscene if EAX is enabled. [EAX should be disabled for this mod.]
*Light Saber appears in some levels if melee weapon is chosen. [no known solution]
*There is no animation when throwing the Detonator [JA engine does not have one]
*Size of Concussion Rifle and Repeater Gun ground weapons are very small. [salv could possibly resize them larger]
THIS MODIFICATION IS NOT MADE, DISTRIBUTED, OR SUPPORTED BY ACTIVISION, RAVEN, OR
LUCASARTS ENTERTAINMENT COMPANY LLC. ELEMENTS TM & © LUCASARTS
ENTERTAINMENT COMPANY LLC AND/OR ITS LICENSORS.
12,100 downloads
- Complete Overhaul
- Contains maps
- (and 4 more)
-
JK2 Software Development Kit (Editing Tools 2.0)
By JKHub in Official Releases
From James Monroe's .plan update:
==========================================
Contents of Tools2:
EffectsEd.exe - the editor we used to create EFX files.
BehavEd.exe - the editor we used to create Icarus scripts.
IBIZE.exe - the Icarus script compiler (Note: the ICARUS compiler used
in JK2 is the same as the Elite Force version, but the BehavEd.bhc file
has changed.)
roq.exe - tool to compile images into a RoQ video.
and these Documents:
bot_tutorialot_tutorial.txt - how to make bots for MP
Bot waypoint tutorial.doc
Guide to SOF2JK2 Vertigons.doc
Guide to SOF2JK2 Weather.doc
ICARUS Manual.doc
JK2_Model_Tutorial_by_Tim_Appleby_JK2.doc
Model Constuction Conventions.doc
Using_EffectsEd.doc
and SPscripts.zip - all the scripts from JK2 Single Player as reference.
It will also extract the game source folders:
Code - all the source code for the game VMs. (see CodeMakeAMod_readme.txt for more info)
bin - the folder for code compiling
ui - support folder to compile code
Plus some more example maps and models to Base as well.
==========================================
There are quite a few .maps included, ctf_ns_streets for example. There are also some more player models included.
Note: These tools are unsupported by Raven Software, Activision or LucasArts.
This is an update for the JK2 SDK, includes some useful files, mainly 4 base character models in .xsi format fully enveloped to the skeleton.
1,001 downloads
-
JK2 Software Development Kit (SDK) (Editing Tools)
By JKHub in Official Releases
This official SDK includes the following:
JK2Radiant - the map editor.
MD3View - model viewer for .md3 format models
ModView - model viewer for .glm (Ghoul2) format model
ShaderEd2 - the shader editor/viewer
sof2map - the map compiler, you will not be using this directly, JK2Radiant uses this.
Note: These tools are released "as is" and are unsupported by Raven Software, Activision or LucasArts.
1,034 downloads
-
Flamethrower Blaster
By JKHub in Guns & Explosives
Author: Rhyaan
This is a mod, which changes the blaster rifle to a flamethrower. The damage is the same, but it fires more faster and there is more ammo.
263 downloads
-
Bespin FFA
By JKHub in Free For All
This is a Jedi Academy version of the popular Jedi Outcast Bespin FFA map.
5,525 downloads
-
Moviebattles II
By JKHub in Server-Side
You can find the Moviebattles II server side component in the following download. This page is a redirect for people looking for it.187 downloads
-
Jedi / Sith Chistori
By JKHub in Player Models
Author: Salek
It's a simple Frankenstein, I put the desann's head on the HapSlash's (Thanks) Obi Wan Kenobi. A lot of people want their species on a jedi robe, I made this one
615 downloads
-
CTF Empires II
By JKHub in Capture The Flag
Original Author: Zod
JKA ctf map
Notes: This is the sequal to ctf_empires. This time its Revenge of the Darkside, a map intended for darkside users.
Bot support: No
Put the PK3 in your base folder, run the game!
187 downloads
(1 review)0 comments
Submitted
-
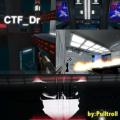
CTF Dr.
By JKHub in Capture The Flag
Original Author: Zod
ctf_dr.
JKA ctf map
Put the PK3 in your base folder, run the game!
85 downloads
(0 reviews)0 comments
Updated
-
CTF Disabled II
By JKHub in Capture The Flag
Orginal Author : Zod
As some of you have already said that PPDisabled was your favorate map, I finally have dont what I always wanted to do on it, the way it looks, plays and so forth. It was worth the wait trust me! I cant stop finding new jumps, routes and awesome scenes from this map, ive enjoyed it so much ive decided to release this beta2 on pcgamemods.com
Thanks to all who enjoyed it, and who begged for it to be put back up on refresh. I've increased framerate, and done loads of work on this. Special thanks to bluestar for his weaponry placement ideas, thanks to nubster for beta testing and all of you guys who make me want to keep at mapping. Vico I left in pugz sign for old school sake, perhaps one day you will get a server back up!
Instructions: put pk3 into base folder
c:/programfiles/jediacademy/base
enjoy!
*****NOTE****
This is BETA2 , not final. The final release will include ffa/tffa spawn points and clipping around areas. Im also working hard on fixing alot of weird brushes, the red base see through brush face, and some other stuff. Again I had so much fun just playing around on it ive sent it to go up on refresh and have put it out here to get more feedback - a number of you want this to help test.
Zod kneels before you!
166 downloads
(0 reviews)0 comments
Submitted
-
CTF Outcast
By JKHub in Capture The Flag
Original Author: Zod
Ctf map. put pk3 in base folder, enjoy.
This is dedicated to the players.
This map is made by Zod.
I hold no legal whatever to whomever.
265 downloads
(1 review)0 comments
Submitted
-
CTF Empires
By JKHub in Capture The Flag
Original Author: Zod
This map was designed for gameplay, by someone who has played real CTF games for
over 3 years. I decided on an Imperial type setting, with bridges and
Imperial hallways, somthing with a real Star Wars feel. I incorporated the
audio from one of the defaults, but spent alot of time choosing the right
one that fits the map best, the stormtrooper type music fits well along with
the theme. New to this map that I've never tried before are sound effect, steam
effects and detailed shaders. I wanted a map that didn't rely on buggy
elevators, narrow choke points or lack of weaponry. The design was taken
from point of view of both the offense and defense, looking at the flag
carriers' position to the idle offense and what would best fit in as far as
weapons placement, ammo and spawns. I am really happy with the excellent
frame rates, the details and texturing, the layout for professional capture
the flag and the speed bonuses of the routes.
Look to encounter extremly fast jedi on this map, a compliment of ammo and
well placed weapons for offense and defense, unique well thought out
wallruns and wallwalks and variations of speed routes that crisscross all
over the place giving it a real fun edge. On top of that your fps will soar
and delight in well thought out texturing and detailing, giving it that
Imperialistic look that only Star Wars can give.
* Special thanks to : *
Amidala, chopshopservers for tremendous contributions to the jka community,
the best capture the flag public server and her encouragement. Full credit
to her for bot routing, and giving me incentives to do ffa/tffa modes, her
server is a haven for jedi who play guns/force ctf hardcore!
Also thanks to Cannoli and especially acdcfanbill, for their endless hours
reviewing every detail of the map.
Thanks also to testers: jax, bluestar, hydra, red5 and many others
THIS LEVEL IS NOT MADE, DISTRIBUTED, OR SUPPORTED BY LUCASARTS ENTERTAINMENT COMPANY LLC. ELEMENTS TM & © LUCASARTS ENTERTAINMENT COMPANY LLC AND/OR ITS LICENSORS.
516 downloads
-
Q3map2 (>2GB Memory Usage)
Ydnar's official q3map2 program updated to use >2GB Ram during compiles to avoid safe_malloc error. No other changes,
Requires a 64-bit OS.
645 downloads
-

Updated MP Entities
This file by DarthG updates the entity definitions used for GTK Radiant 1.4.0 for JAMP.
The central reason was to make it easier to understand what the meaning of keys and values are.
A secondary reason was to add keys and values that people didnt know about because they where not listed but availible.
The final reason was to add entities for a mod that is out there call hydroball.
This file is intended for JKA mappers using GTK Radiant.
File name: mp_entities.def
File size: 381 KB
Install:
For a default installation of GTK 1.4 and JKA you place this file:
C:\Program Files\LucasArts\Star Wars Jedi Knight Jedi Academy\GameData\base\scripts
If you installed it some where else then you figure it out you should know.
Things that I did to improve this file:
1. I cleaned up all the entity definitions and orginized them to one style.
2. I redifined alot of Keys and their possible values.
3. I added alot of keys and values that are availible but not before added here.
4. I hunted down and added models for the in map view of items that there was a whole md3 for. (point is like medpack you actualy see a medpack where you used to see a blue box.
5. There where entities that where either repeats or didnt work so I typed over them because that cant be removed. If you try to remove them and go back into a map that you worked on it will have screwed up entities. The entities must be in the same order as the map was done in before.
For the ones that didnt work I didnt mess with them but I made the box that appears black.
for the repeat ones I wrote these in place. (there was two of them "item_seeker" and "NPC_spawner":
/*QUAKED Darth_G_Notes (1 .6 0) (-19 -36 0) (19 36 70)
===========DESCRIPTION============================
Version: 1.0
From Darth G:
This is where you will find the description of all entities.
The spawnflags definitions (the best I could find or know).
The possible keys and their values (the best I could find or know). I have added either through research of released MP code or original description. I may have also found it helpful to add some things of my experience.
I have done research into the game engine to add things available normally to the Q3 game engine and added them as well.
I added models that have no value in the BSP process and are only for your visual assistance in mapping.
Where there is no model it is because there wasnt one md3 that fit well in JKA assets. (In other words the weapons are multiple parts that make one when used so no one md3 could be named to show to you in the mapping.)
I have removed duplicate or error entities. Because you cant simply remove from this list I either made an entity that you cant use (like this one) or I made the box that appears in the editor black so you can recognize that it is messed up some how or another.
If you find anything incorrect please contact me at either WWW.Map-Center.COM or at my site WWW.DarthG.COM .
Should you need to find the file again its name is MP_entities.def just do a search for it.
If you feel you need to alter the file it is yours to do as you wish just open it in WordPad or notepad. I simply ask that you leave this 'entity' for credit to the hours or work I put in here. If you would like me to add something to a next version just send the info to me and Ill work it in.
The model I used for this entity would be a good reference to scale your maps to normal player size too.
Available entities added:
_Decal
Mod Specific entities added:
trigger_scoreboard (Hydroball)
trigger_playarea (Hydroball)
trigger_goal (Hydroball)
trigger_teamchoice (Hydroball)
trigger_weaponstrip (Hydroball)
info_start_position (Hydroball)
info_ball_spawn (Hydroball)
Hope this helps!
Happy mapping!
==============NOTES===============================
Special note to non experienced moders of this file. If you want to mod the order of entities in this list on the actual file you can not change the order and go back to a map that used a different order and deleting them really messes up the old maps BAD!!
This creates nothing in your map and will be completely disregarded in the BSP process.
=====MODEL FOR MAPPING VISUAL ONLY================
model="models\map_objects\roof_top\office_chair.md3"
======DO NOT SET AS KEY OR VALUE==================
*/
/*QUAKED Darth_G_Tips (1 .6 0) (-8 -8 -16) (8 8 16)
===========DESCRIPTION============================
Version: 1.0
From Darth G:
How to connect entities:
Two ways to connect entities. One is automatic and the other is manual.
Automatic: You first deselect all entities (press ESC twice) then select the triggering entity. Then select the target entity and press ctrl + K. This will cause the connection.
Manual: You first deselect all entities and then select the trigger entity and open the entity window (N) and add key:target and value:(unique name you want). Now deselect the trigger entity and select the target entity. Open the entity window and add key:targetname and value:(the same unique name you used in the target) remember that the names can not have spaces.
How to prevent leaks:
Two things I will share here is; 1 Most entity leaks are caused by using the space bar to reproduce an entity as a short cut. This is what causes the leaks. Just make them from scratch.
How and when to save:
Save as often as you would for anything you wouldn't want to lose but my tip is to save after any major changes with another name. Sometimes the saved file can be saved corrupted.
How to save FPS and texture work:
There is allot that can be done to save FPS but the one tip I will share here is to work your initial brush work in caulk.
Hope this helps!
Happy mapping!
==============NOTES===============================
This creates nothing in your map and will be completely disregarded in the BSP process.
===================================================
All else is explained in the entities I wrote.
Special thanks to those that made this possible:
(Between testing and actual key finding.)
BabySpinach
Lazarus
Kodo
Mercenary
ChernyVolk
harry666t
Szico VII
monsoontide
shadowknight
276 downloads
-
Moldy Crow Vehicle
Primary Author: Dark Forces Mod Team (model & textures)
Secondary Author: @AshuraDX (rigging & animations)
long story short : ages ago , I got the permission to convert the DF mod teams
moldy crow model to a vehicle , now I finally finished it I dont think there's much more to say here
spawn the moldy crow by typing "npc spawn vehicle moldycrow" in the console
cheats have to be activated for this to work
364 downloads
- Flying Vehicles
- Star Wars Related
- (and 1 more)
-

Dragon
Author: Wudan
-1- General Information
To put it simply, Dragon is an animation creation and editing tool for the Ghoul2 animation file format, .gla, used in both Jedi Knight II: Jedi Outcast and Jedi Knight: Jedi Academy (hereafter referred to as JKA). It's primary purpose is to create animations and write them in to the .gla format, which can then be merged with the existing JKA animations (or other .gla files) for use in-game with little knowledge needed.
Dragon has been created on a machine utilizing an AMD Duron 950, 256 MB ram and an ATI Radeon 9200 videocard, which is a fairly low-end system by today's standards. As such, most computers should be able to handle Dragon program smoothly (but, because of Dragon's avatar system, it is possible to put too much strain on any system.)
Dragon features:
A drag-able and transparant UI
An Avatar system
A Console to do nifty things!
A Complete Bone List to animate
A Standard model
A few example animations
Light Saber Rendering (extremely nifty)
Weapon Rendering (blasters rockets etc)
A floor tile, for better animations
Save and load system
A blending option
And probably much more
-2- Installation
The current release (0.1.0) is just a .zip file - you will need a program such as WinZip or WinRAR to extract Dragon. When you extract Dragon, it is important that you keep the folder hierarchy as it is in the .zip file. If you extract Dragon to C:\, the program will be in C:\Dragon\ All you'd need to do is navigate to that folder using Windows Explorer and double-click Dragon.exe. As of 0.1.0, Dragon has a default model that is loaded using the default Avatar, so you should see a shiny little guy, ready to animate.
-3- Getting Started / Basic Usage
Ok, you've gone through the trouble of downloading Dragon, extracting it, and running the core executeable - now what?
You should see a shiny little gray dude, a box that says "BoneList" and a box that says "SliderBox". Below the gray dude is a little stick thing, made of a white, green, and blue sticks. You still with me? Cool.
Let's focus on the BoneList, since it's basic use is pretty easy. You see a list of bones - model_root is in the middle - the active bone is dislplayed in the middle of this box. You can click on any of the bones listed above or below to switch to those bones - as you change bones you will notice that the stick thing (the white, green, and blue sticks mentioned earlier) change position and orientation.
Ok, now you're ready to do some fun stuff. See that slider box that you've been itching to mess with? This is the heart of Dragon - You have several things in here that are noteworthy - a Reset Button (completely obliterates any posing you've done of the current bone), and two sets of 'Sliders'. The sliders on the left are the important ones - the ones on the right we'll get to in a minute.
Go ahead and select the r_femur_YZ bone in the BoneList. Next, click on the green slider on the left - and hold your mouse down - and move your mouse left or right. You should see the gray guy's leg swing back and forth. You can now try moving the blue slider - his leg will sway from side to side.
Getting from here to making a cool stance is actually pretty easy - it's like playing with GI Joes, or some such action figure - you just pose the model how you want it. It might take some getting used to, but you're on your way
-3- Console Commands / Advanced Usage
Dragon uses a console, designed to be somewhat familiar to people who've played a game based on the Quake3 engine. First up to bring down the console press ` (you may need to enter ASCII code 0126).
Console Commands:
screenshot
Takes a screenshot - saved in the 'screenshots' folder.
fnext
Go to next frame (Hotkey: K)
NOTE: Also used to create frames, hotkey does NOT create a frame
fprev
Go to previous frame (Hotkey: L)
fdel
Delete frame - (deletes the current frame.) After deleting, Dragon will go to either the next frame (if there is one), or the previous frame (if there is not one.)
fcpy <number>
Frame Copy - Copies a specific frame number.
fcpyprev
Frame Copy Previous - Copies the frame before this frame. If there isn't one, it does nothing.
fcpynext
Frame Copy Next - Copies the frame after this frame. If there isn't one, it does nothing.
fspeed <number>
Frame speed, if you want your frames play at a higher rate, you need a high fspeed, you want a slower rate, u need a small fspeed. Default fspeed is 20. Usage: fspeed 20
fblend <number>
This is what makes the animation smooth. Its simple to use once u get used to it. Usage: in frame 1 is a stance in frame 2 is a different stance. U want the switch between stances to be fast, so 10 frames should be right. Bring down the console and type: fblend 8. now u should have a smooth switch from stance to stance. NOTE: To prevent odd bugs from happening cycle trough the animation mannually once before clicking the preview button! Always substract the amount of frames u already have for example if u want an animation to last for 20 frames and u have 5 frames animated than its 20-5 = 15 , fblend 15. Hope that makes sense play around with it.
finsa
Inserts a new frame after the current one.
finsb
Inserts a new frame before the current one.
save <name>
Saves a .cfg file to Dragon's directory. This file describes the animation you are currently working on. You do not need to add the .cfg, Dragon does this for you. So, 'save myanim' creates myanim.cfg in the Dragon directory.
load <name>
Loads an animation over the current animation, creates the necessary number of frames (but doesn't nuke any frames - so if you load a 5 frame anim and have 10 frames, you'll have 5 frames on the end of your workspace that you probably don't need. Use fdel to nuke 'em.
savegla <name>
Saves a .gla file in Dragon's directory under your given name. Usage: savegla my_stance
impframe <number> <number>
Import frames from the loaded .gla - so that you can edit previously finished animations. The first <number> is the starting frame number for your import, and the second <number> is how many frames to import.
It is recommended that you use the save and load commands to work on animations, as saving to gla and reimporting several times introduces compression artifacts - in layman's terms, your animation will be broken and you may need to re-do the entire thing. Importing from the original should be fine, as that's what the target executeable (in most cases, Jedi Academy) does anyway.
NOTE: To load up a gla you have to edit an avatar file, or make a new one. More on this in the avatar section.
-4- Avatar System
The Avatar System is one of the more robust components of Dragon. With it, you can animate multiple models at once, bolt models to those model's bones, change the saber's color, and length. So, how to access this advanced functionality? Listen well, young traveller, for a world of infinite possibility awaits those with a steady hand and an open ear.
Dragon, in 0.1.0b, comes with "avatar/default.cfg". (Now might be a good time to set Notepad to be the default editor for .cfg's, if it isn't already.) Opening that file shows:
Wudan{{org 0.0 0.0 0.0gla _JAhumanoid.glaglm models/players/stormtrooper/model.glmskin models/players/stormtrooper/model_default.skinbolt models/weapons2/saber_dual_5/saber_dual_5.glm rhang_tag_bonecolor 0.05 0.15 0.05length 32.0}}
The syntax is fairly similar to .shader file format, so skinners won't be at a total loss here. There are three main, must-have parts of an avatar file, the 'org', the 'gla', and the 'glm' lines. Oh, and the 'skin' line is fairly important. That said, a basic template to follow for creating new avatars would be:
AvatarName{{org 0.0 0.0 0.0gla INSERT_NAME_OF_ANIMATION_FILEglm INSERT_NAME_OF_MODEL_FILEskin INSERT_NAME_OF_SKIN_FILE}}
The org line has three floating point values past it. These tell Dragon where you want to draw the model at. This is useful because adding multiple models would be confusing if they all were at the '0.0 0.0 0.0' location. The gla line has a filename after it. By default it is _JAhumanoid.gla, which is a really small, single frame animation file that contains all of the skeleton file info. The glm line has a filename after it. This can be any .glm file, it is highly recommended that it be a .glm that was made to work with the gla you've selected. The skin line points to a skin file specifically created for the glm that you have selected. As of 0.0.1b, not loading a .skin file results in a crash.
-5- Tutorial: Replacing Animations
So the reason u downloaded dragon was not to read allot of crap but to get urself some animations done! So here we go! This is much easier than u think, Thanks to dragon. Its not hard either. Ive just written allot of text so it would be clear First we create our workspace. Extract /models/players/_humanoid/ (assets1.pk3) to a easy to find place. I've created:
"C:/Base/Models/Players/_humanoid/"
NOTE: /Base/ has to be there. if not ull get errors Check the _humanoid folder, see if u can see the .gla and the animations.cfg files. Now download GLAmerge written by Ask.
Now, create your animation in Dragon. That's easier said than done, right? Well, once you have a completed animation, you can move on to the next step.
However, before you export to the .gla format, there are a few things to consider - for one, have you saved the file (save command), so you can edit the original animation later? If so, excellent. save, then savegla - I think a good idea would be to automatically save when savegla is called - this could be done for the next release - any thoughts?
Ok, now the tricky part is that you'll need the very first frame of animation be empty - it technically doesn't matter, but you need to understand that this buffer needs to be there because other animators, using packages like XSI and 3dsMax, weren't able to keep the skeleton in-tact when exporting to gla and merging, unless they had made the first frame of their animations the base pose, otherwise the animation could not be successfully merged in with glamerge. Dragon does maintain the skeleton's structure, but uses the same merging program as everyone else.
Anyway, the tricky part is that Dragon currently has a blending system that 'wraps' around the animation - if the last frame of animation has blended bones in it, they blend with the first frame. This helps with walk cycles, but makes exporting to gla format pretty tricky. Since 'unblending' bones does not destroy their position, save your animation, then unblend each bone of the first and last frames, then finsb on frame 0 - you should now have a blank frame 0 and the rest of the frames are working fine - but, because Dragon is finicky about frames, cycle through all the frames before you export. You're ready to export - lucky you!
To export, enter the console and put in
savegla YOURFILENAME
(do not append .gla, Dragon does this already.) Ok, you're done with Dragon, go ahead and exit (you did save, right?)
In the folder where Dragon is located, you will find YOURFILENAME.gla - copy the .gla to the humanoid folder mentioned earlier. Than create a new text document. In that document type the following:
@ECHO OFF"glamerge.exe" "_humanoid.gla" "<gla>" -oPAUSEEXIT
This is a basic setting. replace <gla> with whatever your gla is called. i got this: @ECHO OFF "glamerge.exe" "_humanoid.gla" "my_run.gla" -o PAUSE EXIT (if u are an advanced modder, see the readme of glamerge for more options) Save the txt file as gla_merge.txt Now rename the file to gla_merge.bat (the .bat file tells the program what files to merge) now double click on the .bat file (make sure the following files are in the _humanoid directory. Glamerge, _humanoid.gla, your GLA.) It should now ask u for an output name. I suggest humanoid.gla (NOT _humanoid.gla!). Because this way u can rename the humanoid.gla or delete it when it isnt good while keeping the original (of course its just a copy of the original located in assets1.pk3). But for now lets do new.gla Now create the same directory somewhere else (no need for /base/ now) c:/models/players/_humanoid/ copy the other _humanoid files and paste them here. delete everything except Animations.cfg and new.gla Now rename new.gla to _humanoid.gla. Open up the animations.cfg with good old notepad. Now find the running animation. (U can use modview) k now its time for some small time scripting (not 2 hard dont worry) Now uve found the animation u want to replace BOTH_RUN1 12305 26 0 40 (name) (beginframe) (frames) (loop) 40(framespeed) K now. we have to leave the name the same. Now we find out what the last frame is, if u scroll down a bit ull see that ROOT is the last frame on frame: 21374 and it lasts 2 frame wich comes to a total of 21376.Now we know what to fill in the first, now for the second. How many frames is your animation? really simple if u've paid attention when gla merge was busy you shouldve noticed it counted the frames So there. I got 20 frames. Next is wether u want it too loop or not. 0 = yes, -1=no. We have a running anim so i would say 0, yes. And finally the framespeed. This one u can set whatever u like. in dragon the speed was 20 and i liked it so ill use 20 There we're done analyzing. So lets do this ! BOTH_RUN1 21376 20 0 20 Ahh yes were done! Pack /models/players/_humanoid/ in a .pk3 (the same way u would pack a skin) and place it in your base. Launch JKA. play a game and look at your new animation! NOTE: your next animation has to start on a different frame, see the last frame is 21376, plus the 20 frames u used wich would become 21396 I hope u get the point. Delete the .pk3 and yer jka is back to normal, Isnt it simple? Its only simple thanks to Dragon:The Ghoul2 Animation Tool
-6- Contact
If you need help or got questions or want to report a bug (TO SQUASH!) you can contact Wudan on the following ways:
Mt-Wudan
Dragon Forum
Mail: Wudan07 -AT- gmail.com
Aim: Wudan07
Remember! Report Bugs As soon as u find them! And also please fill in the crash/bug form included! You are able to control how good the next version will be if u go on bug-hunting or if u think of things that could be improved
Credits
Jedi Knight Jedi Academy.......................................LucasArts, Raven, Activision
Ask................................................................................GLAmerge
Wudan......................................................Dragon:The Ghoul2 Animation Tool
Shady-D.........................................................Doing some background stuff
You..........................For reading this and for (hopefully) reporting if u find a bug
628 downloads
-
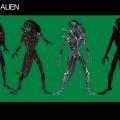
Alien
By JKHub in Player Models
Original Author: Jora Custov
Description:
Alien Quadrilogy - Alien model for Star Wars Jedi Knight 3: Jedi Academy.
1,787 downloads
-
Aeris Gainsborough
By JKHub in Player Models
Original Author: Jora Custov
Description:
Final Fantasy VII, Aeris Gainsborough
900 downloads
(4 reviews)0 comments
Updated
-
Jedi Academy Mod
By JKHub in Server-Side
Original Author: cHoSeN oNe
Description:
This mod is the official mod for the Jedi Academy. A server-side only modification designed to keep the peace and order on the servers. This is the final chapter of this great series for Jedi Knight II: Jedi Outcast® as we get ready for Jedi Knight: Jedi Academy®. With that in mind, I set out and improved this mod with the way I wanted it to in the past. It's loaded with Admin Commands, Client Commands, Emotes, Options, and cVars; Extremely modified to meet any clans expectations. This is truly the only mod you will ever need to get that doesn't alter the normal gameplay of Jedi Knight II: Jedi Outcast® Please visit us at http://www.thejediacademy.net, http://jamod.jk3files.com or on IRC at #jedi-academy, irc.quakenet.org Stay tuned to the new mod Jedi Academy Reloaded for Jedi Knight: Jedi Academy® which will be bigger and better than the JA Mod series for Jk2.
For a full description of the modifications and features, view the readme included with this file!
266 downloads
-
Jedi Academy Mod Scripts
By JKHub in Configuration Files
Original Author: cHoSeN oNe
Description:
Welcome to the Jedi Academy Script! This script is intended for use with the Offical Jedi Academy Mod, version 1.4.
Features:
- Easy interactive menues for JAC, JAT, JAK, and Students.
- Supports admin commands for up to 20 + 1 Clients.
- Shows Trial info for all Ranks.
- Rules for Jedi Academy are listed.
- Demo recording made easy.
- Access to hidden features in JK2.
- Tools for easy CTF communication.
- New RolePlaying Script.
- Full customization.
- And much, much more...
Installation Steps:
1) Decide which script you will use:
**NOTE** Use only 1, for there are contradicting items.
-JAC_script_14.zip = rcon commands and normal functions.
-JAT_script_14.zip = "am level" admin commands and normal functions.
-JAK_script_14.zip = "jk level" admin commands and normal functions.
-JAS_script_14.zip = normal functions.
2) Extract all files out of the the selected script .zip file to the base folder.
3) Open the file ja_defaults.cfg in Notepad. Make sure you set up EVERY KEY to your personal default settings.(ja_defaults.cfg is activated using the DEL key, I suggest you dont edit that. )
4) Next, edit the ja_info.cfg, again in Notepad, with your name.
**NOTE** Readme's are different for each script, be sure to read them!!
Running the Script:
1) When you log into the server, type \exec autoexec.cfg in the console.
2) Hit the DEL(delete) key and that will load the script.
3) Use the default keys for the menues (see specific script for details)
4) Some of the functions of the script are loaded silently. These functions are:
Chat Selector
Saber Color Changer
Emote Selector
Music Changer
//***********************************************
Chat Selector:
Binds the U key to toggle through chat mode, Y key to select and start the chat mode.
//***********************************************
Saber Color Changer:
Binds N to change the color of your saber on the fly.
//************************************************
Emote Selector:
Use the Keypad keys END and PGDN to toggle through emotes, and Keypad DOWNARROW to execute them.
//************************************************
Music Changer:
Use keys LEFTARROW, RIGHTARROW to toggle through music, Use DOWNARROW to play track.
//************************************************
Enjoy!!!
Visit the Jedi Academy Website at:
http://www.thejediacademy.net
254 downloads