
Kessno
-
Posts
118 -
Joined
-
Last visited
Content Type
News Articles
Tutorials
Forums
Downloads
Everything posted by Kessno
-
The Dark Alliance II: Vengeance of the Sith is a Jedi Academy single player mod where you play as Mara Jade. Here's the link to it on JKHub:
- 1 reply
-
- 1
-

-
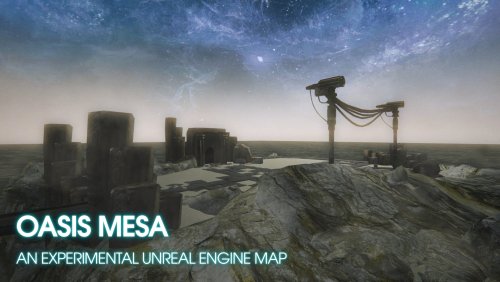 This is a great experimental map! Utilizing Unreal Engine 4 opens up a lot of possibilities for maps in the future. I was also getting a steady 120 fps with OpenJK and Rend2 enabled. I'm using a GTX1070 with an i7 7700k and 16Gb of RAM. After testing the map, I looked at the pk3 file to see why the file size was so large. It looks like several of the textures are 20Mb+. Using the "om_bridge.jpg" as an example, sizing it down in Photoshop to 2048x2048 and saving it reduces the file size to about 1-3Mb. I don't think you would notice much of a loss in image fidelity at 2K and it would significantly reduce the amount of VRAM needed and likely have the map perform better on a greater range of devices. It may even allow the packaged pk3 file to be closer to ~200Mb or less. Looking forward to see where you take this and other experimental maps in the future! I would be interested in seeing your workflow if you ever made any tutorials on the subject.
- 6 comments
-
- 2
-
-
- contest entry
- rend2
- (and 1 more)
-

wip [W.I.P.] (SP) Star Wars - Republic Intelligence
Kessno replied to Lazarus's topic in WIPs, Teasers & Releases
No need to apologize man, family should always come first. Look forwarding to seeing what you have in store. -
Great work on this! The map reminds me a lot of the RPG maps that were popular back in the heyday of Jedi Academy.
-
75 downloads
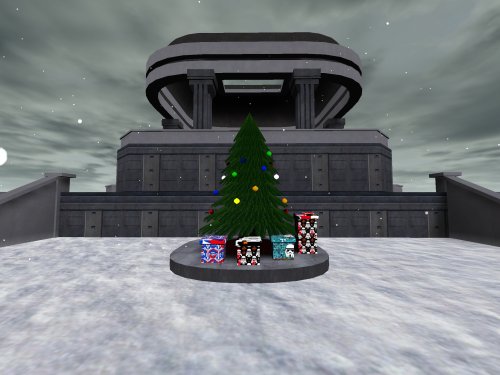
Description: An Imperial Bastion located high in the mountains, inspired by an unnamed location in Fortnite, Chapter 4 Season 1. This was created for the JKHub Holiday Mod Contest 2022 and was built in two days. Installation Instructions: Unzip the file and place the .pk3 file in your GameData/base directory. Notes: I would like to revisit the map after the holiday contest to improve it and add additional details. It was more difficult than I anticipated to find a Christmas tree model and I ended up improvising one. The exterior terrain is a lot shallower than I would have liked, so it doesn't quite feel like a proper mountain base.- 1 review
-
- 5
-
-
- contest entry
- holiday
- (and 1 more)
-
Tutorial originally created by Wedge on Map-Review and posted on 08-15-2003. Bot routing in Jedi Outcast is fairly easy, once you get the basic idea, and it is necessary to include in MP levels when you want to distribute them. This tutorial will provide an overview of basic bot routing, what it is, and how to go about doing it. More specific information can be found in the Word document \GameData\Tools\Bot waypoint tutorial.doc that came with the JKII tool kit. My tutorial contains less raw information, but I tried to make it easy to understand. (This tutorial assumes Windows XP in a few places.) Okay, here we go-- What is a bot route? A multiplayer bot route is the set of instructions that tells bots (computer AI players) where they should move within a map. bot routes are specific to certain maps--the route for ctf_nstreets will be much different from the route for ffa_yavin. A bot route file consists of a list of connected waypoints and their coordinates in the map. Bots will travel from one waypoint to the next in numerical order (or reverse numerical order if the bot reaches the end). Also, bots will branch from a waypoint to another, nearby waypoint (not in order) if there is something they want near the second waypoint. In other words, if a bot is at waypoint 6 and it sees another bot at nearby waypoint 74, then the bot will skip waypoints 7 through 73 and go directly towards waypoint 74. Waypoints can be given flags that specify certain characteristics of that waypoint, for example, that the bot will have to crouch or jump to get to that waypoint, or that one waypoint is a good place to camp. When you finish making the bot route, it will be written to a bot route, or .wnt, file. This is the actual set of instructions that bots follow. How do I set the program up for making a bot route? Bot routing is done manually from the Q3 Arena console ( [~] key, or [shift] + [`] ). First, you must open your map up in bot routing mode. This is easiest done by making a batch file, which you will only have to make once. Do the following: Open Notepad Type jk2mp +set bot_wp_edit 1 +devmap mapname where "mapname" is the name of your map, for example, ffa_SpaceStation Save the file as Jedi Outcast/GameData/jk2mp_botroute.bat (BE SURE THIS IS A .BAT FILE, NOT A .TXT FILE!) Whenever you want to bot-route a map, right-click this file, select Edit, and change "mapname" to whatever map you want to bot-route. Now, double-click on the .bat file! Jedi outcast should now launch and start up your map automatically. As soon as the game starts, make sure there is no time limit, or that there is a long one. Some bot routes take a long time. Open the console. Type set bot_wp_edit 1 How do I make a bot route? Okay, so now you have JKII set up in bot waypoint editing mode. Now, we have to set up the commands we want to use. The most relevant bot-routing commands are these: bot_wp_add: Add a new waypoint. bot_wp_rem: Remove a waypoint. bot_wp_addflagged: Add a waypoint with specific flag instructions for the bot. bot_wp_switchflags: Change the flags on a waypoint. Next up, the most useful waypoint flags, for use on the bot_wp_addflagged and bot_wp_switchflags commands (there are more, these are just the "most useful"): j : Bots will jump on their way TO this waypoint. d : Bots will crouch on their way TO this waypoint. c : Bots that camp will use this waypoint as a camping/sniping spot. x : Bots that camp will use this as a camping spot and crouch in the camping spot. f : Bots will wait for a func_ brush to be under this waypoint before they move onto it (i.e., an elevator or train). So, this seems like it's going to involve a lot of typing. To save time, I like to set hotkeys for the commands I think I'm going to use most often. For example, a common setup for me is to type this in the console: bind 1 bot_wp_add : Add new waypoint bind 2 bot_wp_addflagged j : Add new jumping waypoint bind 3 bot_wp_addflagged d : Add new crouching waypoint bind 4 bot_wp_addflagged c : Add new camping spot Now when I press the 1, 2, 3, and 4 keys, those actions will be performed. you may substitute whatever keys you want there, I just use the numbers because I can remember them more easily. On maps with lots of elevators, add the "f" flag to the hotkeys, and on complicated maps, adding "bot_wp_rem" won't hurt. Just be sure to set your keys back to normal after you finish, or you'll end up doing something like trying to pull out a disruptor and getting the computer screaming about commands bot_wp_addflagged not being allowed on the server. Now you are ready to make the actual bot route! The idea is quite simple: You have the normal JKII controls available, plus these waypoint-adding controls, and you move about the level putting in waypoints. You have to move everywhere you want bots to move, adding waypoints as you go. Find a good corner of your map to start in, and press whatever key you have bound to bot_wp_add. You will see a group of little floating number "0"s appear at your location, along with some information in the upper left of your screen: The waypoint number, the flags this waypoint has, and its coordinates. Now, move a little bit, and press the bot_wp_add key again. You should see some floating "1"s this time (this is the waypoint number). Move through the entire map, placing waypoints as you go. A couple things to keep in mind: Bots will follow the bot route in sequential numerical order. When bots get to the end of the route (the last waypoint), they will turn around and follow the route backwards. Be sure to place waypoints near powerups and info_player_ entities (spawn points). It is a good idea to place your last waypoint near the first one, so the bots can branch from last to first and make a circuit. Around corners, doors, and other tricky places, be sure to place more waypoints than usual so the bot can easily get around obstacles. When you have a long corridor, don't just place one waypoint at the beginning and one at the end: sprinkle some in between, too. Bots are easily confused. What do I do if I make a mistake? If you ever make a mistake placing a waypoint, then you can use the bot_wp_rem command. This command will remove the last waypoint you placed, or can remove a specific waypoint by number, i.e., bot_wp_rem 43. If you want to put another waypoint in between two existing ones, type bot_wp_add 32, if you want the new waypoint to go between 32 and 33. If you accidentally place a waypoint that has the wrong flags, you can use the command bot_wp_switchflags. This command works just like the addflags command, you specify the number of the waypoint, and then whatever flags you want it to have: bot_wp_switchflags 60 j, for instance, will make waypoint 60 a jumping waypoint, regardless of what it was before. If you don't include a number, this command will switch the flags of the last waypoint you placed. You can also include multiple flags on the addflagged and switchflags commands, for example, bot_wp_addflagged j f will add a point that the bot will jump to get to, but only move to if there is a func_brush underneath it. Bot routes vary depending on the map, and on the complicatedness of a map. My Mars map, for instance, has about 150 waypoints (If I remember correctly), City of the Ancients has about 700. The more waypoints you have, the better your bots will be able to navigate complicated or large areas, but if you have too many, the bots may try to branch to too many waypoints or get stuck moving back-and-forth between two close-together points. What do I do with the bot route? When you have put waypoints in every part of the level that you want bots to go in (you can leave complicated parts out--the bots just won't go there) and gone back to the place where you put the first waypoint, type bot_wp_save. This will save the bot route .wnt file, which will appear in the GameData/base/botroutes/ directory. If you want to edit this bot route later, run the same batch file you ran in the beginning, and your map will appear, with all the waypoints visible. When you put your level into a .pk3 file, you must put the yourmap.wnt file in the .pk3, under base/botroutes/ for the map to be properly bot-supported. Now, try it out. There are a couple things I would do: First, play the map with two players, a human and a bot, and join the spectators. Click the left mouse button to set your view to follow the bot. The bot will trace out the route, from start to finish, letting you know of any problem spots. If there are any hang-ups, they may only be minor ones, so try spectating the map with more bots: 6, 8, or 10, even. With more bots present, each bot will branch to different waypoints, and will have to react to attacking bots, so hangups may be less noticeable (the bot will come under attack eventually, and will either run away, counterattack, or be killed, all of which will force it to change its movement pattern). Lastly, play a game with the bots! See if they put up a good fight. Bot-routing is the last step before releasing a level for distribution. Make sure it works, make sure the bots fight well, and have fun!
-
JA/JO Single Player: The Ancient Art of the Single Player Text Crawl
Kessno posted a tutorial in General Modding
Tutorial originally created by Shadriss on Map-Review and posted on 10-22-2003. Ok, so it's not an ANCIENT art, per se. But it is one that looks daunting to those who haven't the foggiest of where to begin. So there you are. You have this great idea for a Single Player campaign. You've even gone so far as to write out what you want the text crawl to be. But, like many others, you have no idea how to get it into the game. Simplicity, friends. It starts rather simply. Using Photoshop 7, open a new image with the image dimensions of 512 by 2048. Make sure you have selected a TRANSPARENT background. Wow... that's a nice big image, eh? Well, believe it or not, THAT image is your text crawl. Or will be. Next, you'll need to make a text box that encompasses ALMOST the entire image. I say almost, because if it IS the whole image, you will get a slight warping of the lettering in game. The is especially true if you place the box hard up against the top edge. Now, in any color you wish (even magenta... I actually had RED lettering in my Text Crawl once by accident...) write out your crawl. The top line or two should be, naturally, the MOD name. Now, there are a couple of conventions to the text crawl. Many authors out there will just write up a bunch of sentences. This works, but isn't true to form... think about it. Every text crawl in the movies had a grand total of MAYBE 6 sentences. At most, two per paragraph. So, for starters, you want to try to be as to-the-point as possible. Don't tell the story with the text crawl - let the campaign do that. That's why it's SINGLE PLAYER! Second, and this one is almost PURELY up to the author, some words should be capitalized. Most notably, these include organization names, such as the REBEL ALLIANCE or the GALACTIC EMPIRE. Important character names and planet names are also in the category, I.E. LUKE SKYWALKER or YAVIN 4. With those two conventions (NOT rules - it's your mod, after all) write out your text. OK, that's the hard part. Really. Save that image as a TARGA file at the highest resolution possible (32-bit I think...). Save it as "tc_engl.tga". Now, in your SPMod PK3 (You DO have one of those, right? If not, refer to Kengo's Tuts on them...) place that file in the "menu/video" folder. That takes care of the GRAPHICAL element of the text crawl... but there is still the TECHNICAL aspect. Which requires a SMALL bit of scripting. In your map, make sure that your player_start is enclosed in a trigger_once, and set the key/value to: usescript/"scripts/"modname"/"scriptname". That all you need to do there. Next, bring up BehavEd. Again, if you are unfamiliar with this program, refer to Kengo's tuts on basic scripting. The script you are going to write is going to look like this: //Generated by BehavEd rem ( "EP1 LV1 Open Cinematic" ); set ( /*@SET_TYPES*/ "SET_CINEMATIC_SKIPSCRIPT", "deception1/mine1open_skip" ); rem ( "THE STAR WARS TEXT CRAWL" ); set ( /*@SET_TYPES*/ "SET_VIDEO_FADE_IN", /*@BOOL_TYPES*/ "true" ); set ( /*@SET_TYPES*/ "SET_VIDEO_PLAY", "jk0101_sw" ); wait ( $150$ ); set ( /*@SET_TYPES*/ "SET_VIDEO_FADE_OUT", /*@BOOL_TYPES*/ "true" ); rem ( "In-Game Cinema" ); Anything after that last line will be for your opening cinematic, should you have one. Now, assuming you did this all correctly, next time you load your mod and start a new game (or at least the level that you want that script in...) the wonder Star Wars text crawl will wind it's way across your screen, emblazoning your bold words into Star Wars history... Or at least into YOUR memory. -
Tomb Raider GOTY, Shadow of the Tomb Raider, and Rise of the Tomb Raider are free on the Epic store now.
-
@darth rexie Great fan art! Look forward to seeing more of your work.
-
A location from Red Dead Redemption?
-
Hey Aeri, welcome to JKHub!
-
I thought you only got access to the beta by pre-ordering?
-
Good on you for remaking it with your own style thrown in. When I was working on Davik's Estate from KotOR I probably rebuilt it at least 4-5 times. Took me over five years total off and on to get it done.
-
Would this be the one that you're looking for? http://www.lonebullet.com/maps/download-the-council-of-light-star-wars-jedi-knight-jedi-academy-map-level-free-53234.htm
-
I wasn't aware that you could get results that looked that good with Jedi Academy. So it *is* possible, just tedious. It looks like you'd need two separate maps, one for the temple and one for the beach area.
-
Apparently I've been summoned. Yeah, I was working on it awhile back but decided against it due to the game engine's limitations. The temple area wouldn't be too bad to create, but the beach terrain would be difficult to recreate in Jedi Academy.
-
Star Wars - Galaxy in Turmoil
Kessno replied to CommanderXeph's topic in Star Wars Franchise Discussions
Very true, technically they can have the game removed just because it's their IP even if it was released for free. Other than the space combat portions, all of the footage I've seen of Galaxy in Turmoil looks very much as if it were still in alpha. I'm surprised they'd even bother putting it on Steam so early (as I doubt they can tag this as an early release title) when its so rough yet. -
Kotor 1 and 2 Jedi Robes. Is it possible via kitbash?
Kessno replied to TheWhitePhoenix's topic in Mod Requests & Suggestions
Roughly 300 years after her appearance in KotOR II according to info in this article. http://swtor.wikia.com/wiki/Meetra_Surik -
Glad you were able to get the site back up after the issues you were having with it. It's good to have you back! Congratulations on becoming a staff member @@DT85!
-
 @DrXann I took lots of reference shots from KotOR and it took quite awhile to get the scale of the map roughly the same. @Syko No, this doesn't use Rend-2, just the vanilla renderer. I could have probably deviated a bit from the blocky geometry that KotOR had, but I ended up running into a lot of problems during development and had already spent so much time on the project that I just wanted to get it released, lol.
 -
1,086 downloads
This is Davik's Estate as seen in the game Knights of the Old Republic. Even though your stay at this location is brief in KotOR I wanted to create this map for Jedi Academy as it is the first location that introduces the Ebon Hawk to the player. I originally started working on this map in 2006 and took a very long break from mapping and eventually ended up moving and starting college. Looking back through my old files I discovered this map again and I wanted to finally take the time to finish it up this year and release it to the community. I hope you all enjoy playing it, I learned a lot during the creation of this map. Unfortunately there are no bot-routes, I wanted to include them but could not get them working properly due to the area portals and doorways. I have included the .map files for both the Estate and Ebon Hawk in the event that someone wants to take a look at them and use them for their own learning. Please note that Sith-J-Cull gave me permission to use his textures for the Ebon Hawk and that you should ask him first if you plan to use them or change them to your own textures first on the prefab I've created before using it within your own project. -
Hey Nozy! Glad to see you've come over to JKHub. Wasn't sure if you kept up with JKA anymore.
-
I could be wrong, but I believe that error occurs when the EXE isn't set to 'Run as Administrator'.
-
On-top of your developing new modding tools and creating another JKFiles mirror?
-
I'm running Windows 10 Home and haven't had any issues with Jedi Academy. Can't say if the vanilla game works without tweaks as I'm currently running OpenJK. I can also confirm that Radiant 1.4.0 and the compiler work without issues.