
JKHub
-
Posts
616 -
Joined
-
Last visited
Content Type
News Articles
Tutorials
Forums
Downloads
Files posted by JKHub
-
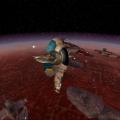
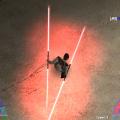
Jango's Slave 1
Author: Maxleof
The original author of this skin and model didnt have the correct weapons and sounds i basicly added them.
Primary fire: Laser as seen and with sounds of Episode 2
Alt Fire: Sysmich charges slowly fly backwars and when hit make explode with sounsd from movies
I have included the original readme for credit purposes.
I only want credit for the sounds and scripts NOT THE MODEL OR SKIN
313 downloads
-
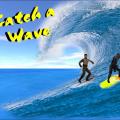
Catch A Wave
By JKHub in Multiple Gamemodes
Author: ook
Have a nice, quiet duel along the beach, or take it to the waves for a deadly surf-off! It's just like that one Batman episode!
277 downloads
-

General Rahm Kota (TFU)
By JKHub in Player Models
submitted by Onlycorndog
Hey!
So, even though there are lots of TFU mods on JKHub, I noticed that there aren't any models or skins for General Kota. So, I took to the interwebs and I found this model. I DID NOT MAKE THIS, NOR DID I MAKE ANY CHANGES TO IT IN ANY WAY.
This is a simple re-upload of an existing model that I thought would fill a niche on JKHub! It includes models for both Kota (as seen in his boss fight in TFU) and blind/drunk Kota (as seen in TFU's Nar Shaddaa level for PS3 and XBox 360). I tried like the dickens to get the blind Kota model to work but I haven't been able to. It's there but I can't get it to work (so I pass it unto greater men in hopes that someone else can). It comes with icons but not menu support (for whatever reason). The bot uses a red lightsaber instead of a green one (for whatever reason).
I'm not sure of GU_tucci is on JKHub but this is just a raw, unedited copy of his mod. All credits to him. I'm not provide support for this mod (I didn't make it and I'm a horrible modder so you're better off without my help, to be quite honest) and I can't be held responsible if this doesn't work anymore with the current state of JA or with your install of JA. I can't, for the life of me, remember where I found this mod originally so I can't give you a link to the site. I have done comprehensive virus scans of the .zip and all its contents (each individually and all together because I'm weird like that) and its 99.9% clean. I say 99.9% because, while I'm very confident that it is virus-free (I was pretty meticulous), I can't give you a 100% guarantee that some sort of malicious program didn't get past my anti-virus software. I recommend doing your own scans if you're in doubt and/or have a big fancy anti-virus suite installed on your machine.
What follows is a copy of the mod's original readme (included in the .zip).
******************************************
JEDI KNIGHT III : JEDI ACADEMY MODIFICATION
******************************************
Title : GT Rahm Kota
Author : Gu_tucci
E-Mail : gustavo_santucci_2005@hotmail.com
File Name : gtrahmkota.pk3
File Size : 2.3MB
Date Released : 04-29-12
Model & Textures - Gu_tucci
Mesh Optimization, Weighting & Conversion,- gu_tucci
----------------------------------------------------------------------
First of all i like to thanks Lucasarts for make this awesome game!
I've been waiting a model of Rahm Kota since TFU was released. So, i've decided to make a model myself. This is not the best model that you are going to see, but for me it is Ok...
Actually this is the first model that I ever made, so I hope that you like. I will release some others model from TFU that i'm working, like Kota's Militia and Proxy... I don't know the release date of them, but i'm sure that it will not take to long.
Hope you like =D
Team Support: Yes
Bot Support: Yes
NPC Support: Yes
New Sounds: no, sry
NPCS:
Kota - Spawn Kota's model
kotab - spawn Blind Kota
kotaevil - spawn kota against you
kotabevil - spawn blind kota against you
Installation:
----------------------------------------------------------------------
Simply extract the pk3(s) to the gamedata/base folder of your Jedi Academy directory.
======================================================================
THIS MODIFICATION IS NOT MADE, DISTRIBUTED, OR SUPPORTED BY ACTIVISION, RAVEN, OR LUCASARTS ENTERTAINMENT COMPANY LLC. ELEMENTS TM & © LUCASARTS ENTERTAINMENT COMPANY LLC AND/OR ITS LICENSORS.
1,506 downloads
- Team Support
- Bot Support
- (and 3 more)
-
Darth Stevenus' Duel Map Pack
By JKHub in Multiple Gamemodes
Author: Darth Stevenus
This is a map pack for JK2 containing three map files. They are:
Yavin: Temple of the Sun (duel) -An ancient temple on Yavin rumored to be the burial ground of a once powerful jedi and his 11 loyal disciples. Features quicksand which will instantly kill you if you touch the bottom. (Hint, there is also a secret area in this map).
Imperial Gravity Chamber (duel) -An Imperial chamber containing a gravity reactor (can be destroyed if you take the shields down). This map features, obviousely, reduced gravity.
Bespin Street Duel (duel and ffa) -Fight your way through the streets of Bespin! Not much else to say about this one.
All 3 maps have full bot support.
208 downloads
(0 reviews)0 comments
Updated
-
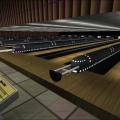
Sirhc's Bowling
By JKHub in Free For All
Author: Christopher--Sirhc
A bowling alley with REAL BOWLING ACTION!!! Also includes a couple of mini-games and some fun areas for all gameplay.
159 downloads
-
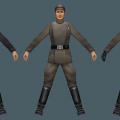
Haps Imperial Officer
By JKHub in Player Models
Author: HapsSlash
The first pk3 will overwrite the Jedi Outcast's default imperial model, and was intended to be your all-purpose standard officer. The model itself features 7 different rank badges, 4 individual code cylinders, 2 seperate pairs of belt boxes, and an additional holster.
The pack also contains 6 different texture sets for the various uniforms; although not all of them are set up to be used in this pk3, and with separate base textures for each of the rank badges included; virtually any rank of officer can be recreated.
The traditional team skins have been replaced with full color uniforms; red, representing the uniform of the Imperial Intelligence agents; and blue, similar to the uniform of the officers of the old republic.
Since this was truly intended to be a simple model replacement, there are no new bots or extra sounds; only what is needed to overwrite the original officers.
Also included within this pack, is the DH-17 model replacement for the original imperial pistol.
1,406 downloads
-
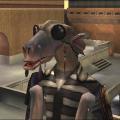
Sebulba
By JKHub in Player Models
Author: Duncan_10158
Submitted by: Barricade24
The strong Dug physique comes from evolution on a high gravity world. On Malastare, the Dugs are arboreal beings, brachiating among the canopies with alarming speed. They have built primitive villages called tree thorps in the Malastare forests of the western continent. An especially dangerous Dug who could once be found roaming the streets of Mos Espa, Sebulba is a shifty Podracing champion who never lets such trite concepts as rules and sportsmanship get in the way of victory.
Sebulba is a perfectionist. He personally organizes and rehearses the bands that play his fanfare whenever he enters a racing arena. (starwars.com/databank)
322 downloads
-

Count Dracula
By JKHub in Player Models
Author: James Tragesser
Submitted by: Barricade24
This version of Dracula has always been my favorite. Other versions of Dracula have been made in the past decade that I have found to be less flattering of this monster. To often do you see movies that have Dracula depicted as feminine and girly. Especially in Japanese animation! Its like Japan has an obsession with feminine men! Anyways I built this model to represent the Dracula I have always loved. The Dracula people dress up as for Halloween.
334 downloads
- Male
- Non Star Wars Related
- (and 3 more)
-
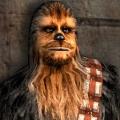
Wookiee
By JKHub in Player Models
Author
Major Clod
A completely new Wookiee player model for JK2. The fur effects were created using alpha channels and shaders.The default skin is Chewbacca, CTF skins are based on the wookiee bounty hunter Snoova. Bot support is included.
ENJOY!
Other Info : LOD support is not included yet. The mesh has been giving me some trouble, and I need time to get it right. I plan to have LOD support in future releases.
692 downloads
(3 reviews)0 comments
Updated
-
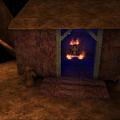
Worr Sonn's Final Map
By JKHub in Free For All
Author: Worr Sonn
Submitted by: Barricade24
After 3 months of hard strenous work my final map is finally complete.
Outside entrance: Mountain Range and a bridge leading to the entrance hall of the building
Main Building: Surrounded with high chrome pillars and 6 doors.
1st Left Door: Unnamed's Nameless Arena: Lava pit with duel arena, and flare lights
2nd Left Door: Grand Duel by: Alvinater : Huge curvey room with giant duel pad, can host about 4 duels
3rd Left door: ShroomDuck's HangOut: Psychadelic grass room with Shroom's that bounce you, tribute to him for his help
Middle door: Teleport to Sloda's room, secret area in here, sit in the meditation chair for a cool effect
1st Right door (wood door): Worr Sonn's (me) dojo, and drop to the testing Do-Jang. The Do-Jang is my TKD school in real life... Testing Do-jang's textures are all original textures by me
2nd Right door: Highly retailed hallway to the council room, council room is unlocked from the outside, it has a teleporter elsewhere
Secret Hangar: The Entrance is at Sloda's Temple, it's from Episode 2 from deleted scenes.
There's a bit more not discussed here, have fun... All music by Linkin Park, mixed by Worr Sonn (me).
116 downloads
-
Dual Saber Staffs
By JKHub in Lightsabers & Melee
Author: [JFE]Cl-Ch-Nojac{L}
Submitted by Swagmaster
This is yet another mod from jk3 files. This is a neat mod that lets you use 2 saber staffs with the dual saber style. Enjoy!
File Description:
This is a handy little mod that I conned this noob §Got Milk?§ into testing this for me about a year ago. When he made it I was thrilled to death - because this mod alters the sabers in almost every way a saber CAN be modded. (length, defense, dmg, color, etc...). The dmgs are pretty much a 1 hit kill - every time. I use it a LOT - its by far the strongest mod I've ever seen and I love it sooo much!! It is a Dual Staff Mod and the best you'll find out there by far.
1,676 downloads
- Star Wars
- Lightsaber Based Weapon
- (and 2 more)
-
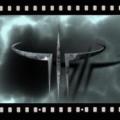
Quake Video Maker
This tool can be used to create RoQ videos inside JK2/JK3
Here is Quake Video Maker. A simple tool to create AVI files with both video and audio.
Import TGA, JPEG, BMP and PNG sequences into scenes
Import AVI movies
Import RoQ (IdSoftware video format)
Import GIF animations
Import RoQ movies
Export to AVI using available video codecs on your PC
Export to RoQ to create ingame videos
Organize your scenes
Make scenes transitions
Special effects (PIP, Overlay, Luma, Monochomatic, ...)
Add your favourite MP3 or WAV file as the movie soundtrack
Include image sequences generated by Flash (or other tools) to create title scenes
850 downloads
-
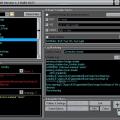
Q3Map2Toolz
Q3Map2Toolz is an alternative front-end application for Ydnar's Q3Map2 to q3map2build. It is larger than it's build counterpart but for current days still small.
It's main advantage is that it has an included mapacker by Equim which greatly reduces effort in making the .pk3 files.
Additionally, it allows the use of more BSP switches than Q3map2 GUI.
1,503 downloads
(1 review)0 comments
Updated
-
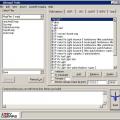
Q3map2 Graphical User Interface
Author: Darth Arth
Why did anybody code a new frontend for old Q3 based engine compiler?
Hmm.., cause i'm still a small active part of german JK-mapping community
Till today i used q3map2build to compile my maps, but i dreamed about a fronted,
which can check the logfile "live", during the compilation.
But the problem was, i couldn't write a working Log-Listener.
I asked DLB for providing me the q3map2build-quellcode, but received no answer
many days after, i did it finally...
... an working log-listener
It was the beginning of q3map2GUI.
Q3map2GUI is simple like q3map2build, but powerfull like q3map2toolz
The most different featuers of q3map2GUI are:
- "live" Log - checking for errors ans warnings (You can see them at one click)
- you can compile and play maps in subfolders! (base/maps/ ...."
- you can specify SP and MP game executables
- this app do not add any registry keys, not one
BSPC is not supported at this time.
907 downloads
(0 reviews)0 comments
Updated
-
Q3map2 (>2GB Memory Usage)
Ydnar's official q3map2 program updated to use >2GB Ram during compiles to avoid safe_malloc error. No other changes,
Requires a 64-bit OS.
667 downloads
-
Pakscape
This is a commonly used tool that can be used to modify at pk3s and zip files. This works on Windows only.
22,039 downloads
-
ModView
Used to view models outside of the game.
Works for both Jedi Academy and Jedi Outcast
6,811 downloads
-
Maya 4.5 dotXSI 3.x Exporter
**************************************************
JEDI KNIGHT III : JEDI ACADEMY UTILITY
**************************************************
Title : Maya 4.5 dotXSI 3.x Exporter
Author : Unknown
File Name : dotXSI4Maya45_121.zip
File Size : 132 KB
Date Released : March 21, 2014
Description:
----------------------------------------------------------------------
Maya 4.5 dotXSI 3.x Exporter. This was a hard find, but hopefully someone has use for it.
This is as-is with no support and is untested because it's so old. If you're able to use
this plugin, I'd like to hear if it actually works.
======================================================================
THIS UTILITY IS NOT MADE, DISTRIBUTED, OR SUPPORTED BY ACTIVISION, RAVEN, OR LUCASARTS ENTERTAINMENT COMPANY LLC. ELEMENTS TM & © LUCASARTS ENTERTAINMENT COMPANY LLC AND/OR ITS LICENSORS.
55 downloads
-
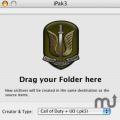
iPak3 (Mac)
This does not work with OS X Lion, Mountain Lion, or Mavericks (10.7, 10.8, or 10.9).
iPak3 allows you to create easy .pk4/.pk3 Files for any Q3-Engine Game like (Quake3, Wolfenstein, Medal of Honor, Call of Duty, Jedi Knight II, Jedy Academy usw.) Features include:
Compress Zip-files.
Compress PK3-files.
Compress PK4-files.
You can use the .pk3-files for any Q3-Engine Game.
Mac Type & Creator Support.
It doesn't compress invisible files (Mac OS X).
Very easy to use only Drag & Drop.
115 downloads
(0 reviews)0 comments
Updated
-

GtkRadiant
GtkRadiant is the official level design toolchain for id Tech 3 by id Software and is maintained by a community of volunteers. GtkRadiant is powered by the Gtk+ Project and released under a GPL license.
Features
Simple, Intuitive Interface
Enhanced texture browser
Entity inspector
Portal viewer
Wavefront .obj export
Game Engine-Independent
Dark Places
Doom 3
Half-Life
Heretic II
Nexiuz
Prey
Quake
Quake II
Quake III Arena
Quake 4
Return to Castle Wolfenstein
Wolfenstein: Enemy Territory
Soldier of Fortune II: Double Helix
Star Trek: Voyager Elite Force
Star Wars Jedi Knight II: Jedi Outcast
Star Wars Jedi Knight: Jedi Academy
Tremulous
UFO: Alien Invasion
Urban Terror
War§ow
and more...
Powered by Q3Map2
45 downloads
(0 reviews)0 comments
Updated
-

GtkRadiant
GtkRadiant is the official level design toolchain for id Tech 3 by id Software and is maintained by a community of volunteers. GtkRadiant is powered by the Gtk+ Project and released under a GPL license.
Features
Simple, Intuitive Interface
Enhanced texture browser
Entity inspector
Portal viewer
Wavefront .obj export
Game Engine-Independent
Dark Places
Doom 3
Half-Life
Heretic II
Nexiuz
Prey
Quake
Quake II
Quake III Arena
Quake 4
Return to Castle Wolfenstein
Wolfenstein: Enemy Territory
Soldier of Fortune II: Double Helix
Star Trek: Voyager Elite Force
Star Wars Jedi Knight II: Jedi Outcast
Star Wars Jedi Knight: Jedi Academy
Tremulous
UFO: Alien Invasion
Urban Terror
War§ow
and more...
Powered by Q3Map2
847 downloads
(1 review)0 comments
Updated
-
GtkRadiant
Gtk Radiant is the official level design toolchain for id Tech 3 by id Software and is maintained by a community of volunteers. Gtk Radiant is powered by the Gtk+ Project and released under a GPL license.
Features
Simple, Intuitive Interface
Enhanced texture browser
Entity inspector
Portal viewer
Wavefront .obj export
Game Engine-Independent
Dark Places
Doom 3
Half-Life
Heretic II
Nexiuz
Prey
Quake
Quake II
Quake III Arena
Quake 4
Return to Castle Wolfenstein
Wolfenstein: Enemy Territory
Soldier of Fortune II: Double Helix
Star Trek: Voyager Elite Force
Star Wars Jedi Knight II: Jedi Outcast
Star Wars Jedi Knight: Jedi Academy
Tremulous
UFO: Alien Invasion
Urban Terror
War§ow
and more...
Powered by Q3Map2
2,321 downloads
-

GtkRadiant
GtkRadiant is the official level design toolchain for id Tech 3 by id Software and is maintained by a community of volunteers. GtkRadiant is powered by the Gtk+ Project and released under a GPL license.
Features
Simple, Intuitive Interface
Enhanced texture browser
Entity inspector
Portal viewer
Wavefront .obj export
Game Engine-Independent
Dark Places
Doom 3
Half-Life
Heretic II
Nexiuz
Prey
Quake
Quake II
Quake III Arena
Quake 4
Return to Castle Wolfenstein
Wolfenstein: Enemy Territory
Soldier of Fortune II: Double Helix
Star Trek: Voyager Elite Force
Star Wars Jedi Knight II: Jedi Outcast
Star Wars Jedi Knight: Jedi Academy
Tremulous
UFO: Alien Invasion
Urban Terror
War§ow
and more...
Powered by Q3Map2
537 downloads
-
GTK Radiant 1.6.4
This is the most recent pre-release build of GTK Radiant (ZeroRadiant) (v1.6.4)
Noteable improvements:
64-bit q3map2 support
Inbuilt JA support (No need to download a separate gamepack)
Install
Simply extract the contents of the .zip archive to a folder of your choice and run radiant.exe. No install required at present. Select Jedi Academy from the list and point the path to your /GameData folder.
=============================
GtkRadiant is the official level design toolchain for games powered by id Tech engines from id Software, and is maintained by a community of volunteers. GtkRadiant is powered by the GTK+ Project and released under a GPL license.
Repository - https://github.com/TTimo/GtkRadiant
Release notes:
http://icculus.org/pipermail/gtkradiant/2013-August/011885.html
1,682 downloads
-

Gmax MD3 Importer
For importing MD3 files into Gmax.
Author
Chris Cookson
Instructions
Just place the q3-md3.ms file in your gmax/scripts folder.
563 downloads
(0 reviews)0 comments
Updated