

SomaZ
-
Posts
440 -
Joined
-
Last visited
Content Type
News Articles
Tutorials
Forums
Downloads
Everything posted by SomaZ
-
So, I started baking the remaining textures for the vanilla mp/duel1 map. Once I've finished the remaining ones, I'll update the download.
-
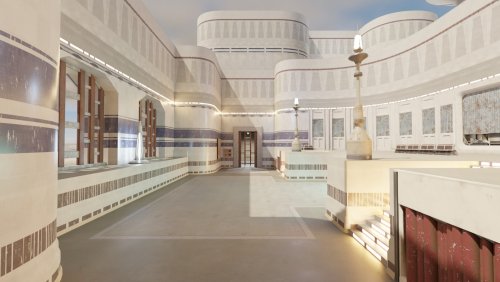
So this is intended to be some "behind-the-scenes" and/or feedback thread for the released Bespin Duel Reborn mod, which you can grab here: The idea behind this mod is simple: I need something to show the modern rend2 features. Duel1 is quite small, so lets just remake this. Easy Like so often in life, things aren't as easy as they seem at first glance. I imported the original duel1 map into blender and realised that this will take quite some time to actually remake the complete map. This is like redoing 40 materials and rend2 requires Albedo/BaseColor textures, normal maps, roughness maps, metalness maps, ambient occulsion maps and in some cases hight maps. Uff. Since most of the walls are based on the same materials, I created one material from scratch. This material I repurposed as a master material in substance designer. All other wall materials are based on this master material. Here are some images when I was testing the first iterations of the textures in-game After finishing all the materials I wanted to replace completely, I started modeling all the missing parts of the map. After that I started building the new map. After I added all the materials and models to the map, I started working on the lighting in blender. The first iteration of a lighted map looked like this I worked on a proper sky for a night time version of the map, but was never really satisfied, so I started working on a day time version instead Last few edits for the materials and some adjustments to the lighting If you are interested in more details of some of the workflows or if you want to know more about a specific model or material, feel free to ask.
-
 Hey Lancelot. Thank you for your kind words. Just wanted to know if you actually tried using rend2 or if you "just" assume your PC can't handle it? Would be interested in your pc config (if thats ok for you) if you have tested it and it doesn't work properly.
- 5 comments
-
- 1
-

-
- anniversary contest
- rend2
- (and 1 more)
-
Version 1.1
669 downloads
WINNER of the Anniversary Mod Contest 2023 This adds a complete rework of the duel1 jedi academy map. This is build to showcase rend2 features. The vanilla game should also be able to run this, but I didn't put too much effort into the vanilla lighting. To take full advantage of the maps features you need to install and run rend2. Everything has been rebuild from scratch. Textures were made with Substance Painter and Designer. Models and Lighting were made in Blender. Credits: Activision, Raven, LucasArts for the original map, Doughnuts for some help with the highpoly model of the lanterns Known Bugs: None that I'm aware of (yet ). There are some materials for the original duel1 map that I haven't baked yet, so vanilla duel1 will look a bit strange with the mix of vanilla materials and rend2 materials. Will fix this when I have some time. Comments: Many thanks for all the feedback to all the awesome testers: mjt, Stoiss, Artemis, Circa, Mat Gaunt, SephFF, Bucky, tayst and Mace * How to install * Install and configure rend2 first. Then just extract the .pk3 into the GameData/base in your game directory. Get latest the rend2 version here: https://github.com/SomaZ/OpenJK/releases If you already have a recent version of OpenJK installed, you can simply grab the "rd-rend2_x86.dll" from the latest release and put it next to your openjk.exe. For easier rend2 configuration I recommend using the following mod- 5 comments
- 2 reviews
-
- 15
-
-
- anniversary contest
- rend2
- (and 1 more)
-
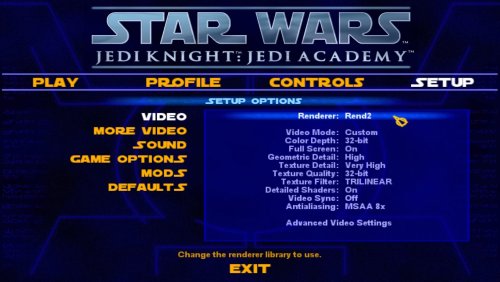
This is a small list of available cvars if you have the rend2 renderer installed. Open the console and use the following commands to configure rend2. cl_renderer = {rd-vanilla, rd-rend2} # Use the vanilla OpenJK MP renderer or rend2 (OpenJK MP only) cl_renderer = {rdsp-vanilla, rdsp-rend2} # Use the vanilla OpenJK SP renderer or SP rend2 (OpenJK SP only) cl_renderer = {rdjosp-vanilla, rdjosp-rend2} # Use the vanilla OpenJO SP renderer or JO SP rend2 (OpenJO SP only) r_hdr = {0, 1} # Disable/enable rendering in HDR colorspace r_floatLightmap = {0, 1} # Disable/enable HDR lightmaps and skies on maps with hdr lighting support r_toneMap = {0, 1} # Disable/enable tonemapping r_autoExposure = {0, 1} # Disable/enable auto exposure r_normalMapping = {0, 1} # Disable/enable normal mapping r_specularMapping = {0, 1} # Disable/enable specular mapping r_deluxeMapping = {0, 1} # Disable/enable reading deluxemaps when compiled with q3map2 r_deluxeSpecular = [0, 1] # Disable/enable/scale the specular response from deluxemaps r_parallaxMapping = {0, 1} # Disable/enable parallax mapping r_cubeMapping = {0, 1} # Disable/enable cubemapping r_cubeMappingBounces = {0, 1, 2} # Renders cubemaps multiple times to get reflections in reflections r_genNormalMaps = {0, 1} # Disable/enable generating normal maps from diffuse maps r_ssao = {0, 1} # Disable/enable screen space ambient occlusion cg_shadows = {0, 1, 2, 4} # Disable Shadows, blob shadows, stencil shadows, shadowmap shadows (4 requires a vid_restart to take effect) r_volumetricFog = {0, 1} # Disable/enable volumetric fog r_volumetricFogSamples = [16, 128] # Set the number of lightgrid samples to take per ray (the more the better, but eats performance, default should look fine) r_smaa = {0, 1} # Disable/enable SMAA antialiasing (MSAA should not be used at the same time, but works too) r_smaa_quality = {0, 1, 2, 3} # 0: LOW | 1: MEDIUM | 2: HIGH | 3: ULTRA r_dynamicGlowBloom = [0, 1] # Scale a bloom effect on top of dynamic glow (good default value is 0.5 for a medium bloom effect) EXPERIMENTAL CVARS r_dlightmode = {0, 1, 2} # Disable/enable dynamic lights, 2 will also enable shadow mapping for dynamic lights NICE TO HAVE CVARS r_ext_multisample = {0, 2, 4, 8} # MSAA multisampling (also works in vanilla renderer) r_marksOnTriangleMeshes = {0, 1} # Disable/enable saber marks on triangle surfaces of the map If you don't want to fiddle around with the cvars manually, you can also use my UI mod which maps most of the cvars to ui elements.
-
Version 1.1
711 downloads
Description: With this simple UI mod you can switch between the OpenJK vanilla renderer and the rend2 renderer (not included). You can also configure some of the advanced features with the UI directly. Known Bugs: This wont work in combination with other UI mods, except for other fonts, that should be fine. Comments: This requires OpenJK and the rend2 renderer dll. You can download the latest rend2 build here: https://github.com/SomaZ/OpenJK/releases * How to install * Just extract the .pk3 into the GameData/base in your game directory. -
In your latest example the line must be surfOn "torso_galaktorso_off torso_collar_off torso_galakface_off torso_eyes_mouth_off torso_galakhead_off" Single arguments dont need quotation marks, multiple arguments must use them like above demonstrated. But this still won't work in JA because you need to use the .skin file instead. Or maybe both is required?
-
Aren't we completely on the wrong track here? The mod is used in JA not in JO right? If I understand it correctly, JA uses the .skin file for visability and not the npc file?
-
Have you tried this? surfOn "torso_eyes_mouth_off torso_galakhead_off" surfOff "helmet torso_galakface_off"
-
 Found a major bug thanks to you. All patch meshes are altered on save, sorry for that. This needs fixing asap. Will work on this the next days
 -
The new update should fix most of your problems, like some shading for unlit maps and a reworked camera control implementation.
-
Yea, the tool doesn't load textures at all. Tried to keep it as simple as possible, for the sake of load and rendering times. I'll add some kind of shading so one can see the different surfaces without a light compile in the next version. I'll also look into the camera controls. Wrote the tool in 5 days, so it's a bit rushed. Thanks for the feedback
-
Yea, unfortunately this is quite common with packed python software. Hence the describtion to build it yourself or run it in a python environment. Windows Defender usually flags all software that hasn't been submitted to them as malicious. I can assure you that the part that I've written doesnt contain any malicious code. I also looked into the pyopengltk code which is also fine. The other librarys I used (numpy and ctypes) are incredibly common in python dev and they are used aross thousands of project. This gives me great confidence in saying that the .exe I build is not a virus. I will look into getting in touch with Microsoft to make Defender like the provided .exe. Sorry for the inconvenience
-
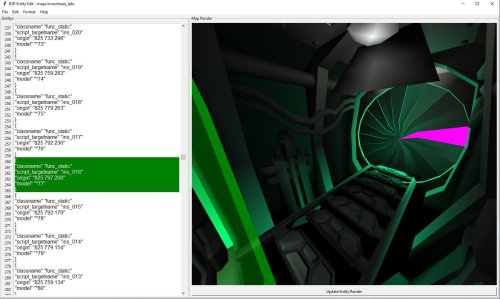
Version 1.0.2
293 downloads
Description: This is an id tech 3 bsp entity editor. It can render opened bsp files with vertex colors, you can pick entities in the render with a simple click, you can edit the entity string, you can save the bsp file afterwards or choose to save as .ent file instead. The preview is updated when you click the button under the viewport. Credits: illwieckz for some lines of code, Jon Wright for pyopengltk, Insidious for his simple text editor tutorial Source: https://github.com/SomaZ/BSP-Entity-Edit Viewport Controlls: W - Move camera forward A - Move camera to the left S - Move camera backwards D - Move camera to the right SPACE - Move camera upwards C - Move camera downwards LMC - Select Object under the cursor RMC Hold and Drag - Rotate view Mouse Scrolling - Move camera forwards or backwards H - Hide currently selected entity Alt-H - Unhide all entities ESC - Deselect entity * How to install * I build an exe for ease of use. It's build via pyinstaller with following command: pyinstaller --noconfirm --onefile --windowed --name "BSP Entity Edit" --add-data "C:/Users/.../Desktop/BspEntityEdit/pyidtech3lib;pyidtech3lib/" --hidden-import "numpy" --hidden-import "ctypes" --hidden-import "pyopengltk" --add-data "C:/Users/.../Desktop/BspEntityEdit/edit_menu.py;." --add-data "C:/Users/.../Desktop/BspEntityEdit/file_menu.py;." --add-data "C:/Users/.../Desktop/BspEntityEdit/format_menu.py;." --add-data "C:/Users/.../Desktop/BspEntityEdit/help_menu.py;." --add-data "C:/Users/.../Desktop/BspEntityEdit/ogl_fbo.py;." --add-data "C:/Users/.../Desktop/BspEntityEdit/ogl_frame.py;." --add-data "C:/Users/.../Desktop/BspEntityEdit/ogl_objects.py;." "C:/Users/.../Desktop/BspEntityEdit/main.py" I included the full source code, so you can build it yourself or run it in your python environment of your choice. You need to install following packages to run the code: numpy, ctypes, pyopengltk Tk must be installed too, but usually it's part of the standard python install You can run the code afterwards with: python main.py Supported games (or at least tested game bsp files): Star Wars Jedi Outcast Star Wars Jedi Academy Star Trek Elite Force Quake 3 Xonotic -

wip School of War: Tron Legacy Edition
SomaZ replied to EvasionStudios's topic in WIPs, Teasers & Releases
Looking very good so far! Be warned that jedi academy lighting can actually just darken your diffuse images though. Just because it is often just mutliplied and lightmaps and diffuse images are in 8bit (per channel) color depth. If you are interested I could show you how to use a blender addon that I've written to properly bake lighting with blender. I could also offer help if you are interested in providing rend2 support with your maps. Blender addon in action: Old version of rend2 in action: -
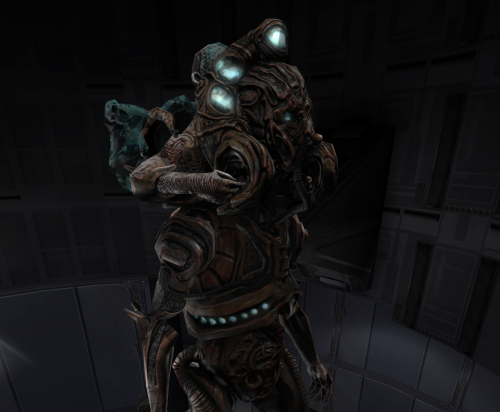
I just released the first verison of rend2 in a very long time. I've been busy with fixing and reworking alot of things. The weather system is fully functional now as also alot of other things. You can grab the latest release here: https://github.com/SomaZ/OpenJK/releases Changelog: - MSAA antialisaing cvar changed to r_ext_multisample which is the same as in the vanilla openjk renderer - Added external hdr lightmap support - Added autoload of images with following suffix "_specGloss", "_rmo" and "_orm" - Realtime sun shadows won't flicker anymore when the player is moving around - Some fixes regarding the HDR rendering pipeline (means rendering in hdr colors, but there's no HDR display support (and never will because OpenGL)) - Thanks to @Almightygirfor contributing a velvet shader (you can use it per shader stage, just add a 'cloth' to it (same as with glow or detail)) and fixes regarding pbr shading - Added a shader stage keyword to "pull out" parallax mapped surfaces ('parallaxBias [0.0 ... 1.0]', you can easily test this with r_forceParallaxBias [0.0 ... 1.0]) - Added mikkTSpace for normal mapping (means baking normal maps in blender or substance will result in the same shading in rend2 now) - Fixed rendering cloud layers - Fixed wrong camera exposure on maps with sky portals - Fixed alot of problems regarding fog - Added flare rendering back - Added most features back to surface sprites (only thing missing afaik is wind handling, swaying is implemented though) - Speed up rendering dynamic lights with parallax occusion mapped surfaces by alot - Added distortion rendering back (invicibility sphere, push/pull sphere) - Added glass shattering back - Added ghoul2 sabermarks back - Added r_showTris 1 back - Fixed a crash regarding md3 model caching - Lots of other small things I think that's all for now. Some WIP pictures of my bespin duel remake with hdr lightmaps
- 332 replies
-
- 19
-
-
Some lighting effects disappear after entity modding; What can I do?
SomaZ replied to KyleFan's topic in Modding Assistance
That is not a thing. Q3map2 assignes lightstyles to surfaces, not entities. The entities are just linked by target and targetName keys in the triggers and target entities. So, as long as theres the keys intact, this shouldn't be a problem at all. Sounds more like q3map2 just clears the lightstyles on the corresponding surfaces. @KyleFanwould you mind sending me your patched bsp file in a dm? This would make the debugging process much easier. -
Some lighting effects disappear after entity modding; What can I do?
SomaZ replied to KyleFan's topic in Modding Assistance
Might be a compiler bug or something like that. I'm not entirely sure how triggering lightstlyes works, but it looks like its using the actual light entities. Those are usually removed on compile in newer versions of q3map2. I guess, you did an ents only compile to add your "level change" entity. You might want to try doing this again, but add a "_keeplights" "1" to your worldspawn before. Else, we could try adding the entity via my blender addon to the bsp and see if the problem still exists. -
I just uploaded a working version of the addon for Blender 3.3. This is a patched up version which still doesnt have pk3 support. https://github.com/SomaZ/Blender_BSP_Importer/releases/tag/v0.9.633 @Tchefuncte Bonaparte If you are used to the old md3 exporter, you can name the materials directly. The md3shader custom property is not used in this addon. You also dont need to split the model anymore, the exporter will take care of it. Triangulation is also taken care of by the exporter. Install guide is found here (but use the version I linked above): https://trello.com/c/aMEbgAXC You all can now also use this tutorial instead
-
Hi. I wrote a blender addon to import bsp files which also features a md3 importer and exporter. It doesn't support blender 3.3 currently but I'll try patching it up, so you and other people can use it. Will let you know when and where you can get the updated version.
-
 Great work of art. I'd love to have rend2 materials for all your models though. Like normal maps and ORM packed ambient occulsion, roughness and metalness maps. Nevertheless, keep up the good work!
 -
202 downloads
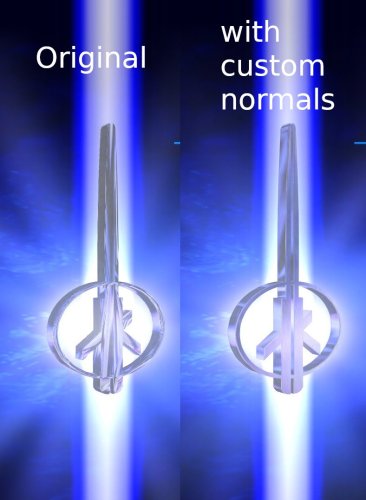
*************************** JEDI OUTCAST MODIFICATION *************************** File Name: JK2 Logo with custom normals Authors : SomaZ File Name : logo_replacement.pk3 File Size: ~20 KB Date Released : 20/08/2022 Description: Replaces the md3 model of the JK2 Logo in the main menus with a new version. The model was imported into Blender 2.83, then the vertex normals were altered, uvs were altered, then exported again. Known Bugs: None Comments: Let me know if there are any issues. * How to install * Just extract the .pk3 into the GameData/base in your game directory. * Copyright / Permissions * THIS MODIFICATION IS NOT MADE, DISTRIBUTED, OR SUPPORTED BY ACTIVISION, RAVEN, OR LUCASARTS ENTERTAINMENT COMPANY LLC. ELEMENTS TM & © LUCASARTS ENTERTAINMENT COMPANY LLC AND/OR ITS LICENSORS. -
That's because the game won't load resources it has already "seen". So things you consider to be "loaded last" are actually loaded first and everything with the same name will be ignored afterwards.
-
In the singleplayer there's a hardcoded cull distance of 8192 units for dynamic models. Here is the corresponding line, if someone wants to have a go at fixing this. https://github.com/JACoders/OpenJK/blob/master/code/cgame/cg_main.cpp#L2040 For others hitting this limit as well: Making this a misc_model prevents the culling, but makes the model stationary. So this can be an alternative. In some cases you also need to remap the shaders of the model with alternaive versions. Models made to be misc_model_statics usually use the lightgrid to get all the lighting information. Misc_models can't access the lightgrid. The easiest way of fixing this is duplicating the shader (if theres one) and swap all "rgbGen lightingDiffuse" with "rgbGen vertex". Remap the original shaders with the new duplicated ones. For every shader add the key “remap0X” “original_shader_name;duplicate_shader_name”. Replace X with 1 or higher for the following shaders like: “remap01” “original_shader_name1;duplicate_shader_name1” “remap02” “original_shader_name2;duplicate_shader_name2”
- 1 reply
-
- 2
-
-
Hello all, here is a list of all the new shader stage keywords and what they are for. // a single value representing the specular level // non metallic surface values range between 0.04 and 0.08 // which translates to 4% to 8% reflectance // metallic surfaces have higher reflectance // this value is in linear space in range [0.0, 1.0] specularReflectance <value> // sets the stages gloss value in range [0.0, 1.0] // 1.0 beeing a perfect mirror and 0.0 beeing a very very dull rock gloss <value> // the same as gloss, but reversed, pick what you like better // roughness = 1.0 - gloss // value is also in range [0.0, 1.0] roughness <value> // controlls the depth of the parallax correction when a // normalHeightMap is supplied to the stage // value is also in range [0.0, 1.0] parallaxDepth <value> // shifts your parallax correction out of the surface // helps with floor materials creating gaps between floor and walls // value is in range [0.0, 1.0] // can be forced on all surfaces for testing purposes // with r_forceParallaxBias when cheats are enabled parallaxBias <value> // scales the values of the supplied normalMap // can flip normalmaps green channel so you can use opengl format normal maps too // eg. normalScale 1.0 -1.0 // height value overwrites parallaxDepth when normalScale is written after parallaxDepth normalScale <xy> or normalScale <x> <y> or normalScale <x> <y> <height> // r, g and b values are specularReflectance of the surface // gloss is gloss obviously // overwrites specularReflectance, gloss or roughness if written after those keywords specularScale <rgb> <gloss> or specularScale <r> <g> <b> or specularScale <r> <g> <b> <gloss> // sets a stages normal map or a normal map with a height map in the alpha channel // for parallax mapping normalMap <name> or normalHeightMap <name> // sets a stages specular gloss map // must have a gloss map in the alpha channel, else the material will always be mirror like specMap <name> or specularMap <name> // RMO packed material map (must have same image dimensions as the map provided) // <red channel> roughness map // <green channel> metalness map // <blue channel> occlusion map // <alpha channel> specular scale map (only when using rmosMap) rmoMap <name> or rmosMap <name> // ORM packed material map (must have same image dimensions as the map provided) // <red channel> occlusion map // <green channel> roughness map // <blue channel> metalness map // <alpha channel> specular scale map (only when using ormsMap) ormMap <name> or ormsMap <name> // MOXR packed material map (must have same image dimensions as the map provided) // <red channel> metalness map // <green channel> occlusion map // <blue channel> specular scale map (only when using mosrMap) // <alpha channel> roughness map moxrMap <name> or mosrMap <name> // change the stages BRDF to look more like fabrics // just need to provide the keyword like glow or detail cloth Here is a simple example of a gold shader that doesn't use any texture: textures/rend2/Gold { { map $lightmap } { map $whiteimage specMap $whiteimage rgbGen const ( 0.0 0.0 0.0 ) specularScale 0.8 0.466807 0.254887 roughness 0.5 blendfunc GL_DST_COLOR GL_ZERO } }