
Pande
-
Posts
337 -
Joined
-
Last visited
Recent Profile Visitors
3,465 profile views


Pande's Achievements
")

-
Model Prep: 1. Create or import your object. Creation of a UVMap is assumed - either in another program or in Blender. However, for testing the capability of this tool, I show you where I've used 'Mark Seam' (Ctrl + E menu) and then hit 'Unwrap' (U menu). 2. Go into edit mode and select all. Open the image you want in the UV/Image editor window. Make sure everything looks ok. Note that the game only supports one UV image per object. In Blender, keep all faces with different textures as different objects (when exported as .md3 with all objects selected, they will form just one .md3). 3. Select all edges that you want to be sharp and select 'Mark Sharp' (Ctrl + E menu). If the object already appears blocky, press T to bring up the tool shelf in the 3D Viewport and hit Smooth. 4. Add an Edge Split modifier (shown bottom left) and disable Edge Angle for ultimate control. This is of course optional if you know what you're doing, but generally speaking and on more complex models, you will need to do the sharp edges manually. 5. Apply the modifier before export. 6. Triangulate the mesh. MD3 Prep: 7. Assign a Custom Property in the Object tab, and give it the name 'md3shader' and assign it's property as 'textures/blah/blah'. Note, no file extension. This should be the name of the shader or texture you want applied to that object. 8. Export the MD3. Note that for map objects, you need to type out the exact file path (including extension) in the MD3 Name box. Make sure to save the .md3 into the correct folder. 9. At the time of writing, the exporter often fails the first time. If it does this (see error in image) just go into edit mode, select all, triangulate again, and try exporting it. It should work...
-
-
Blender trisoup exporter (WIP, functioning)
Pande replied to Pande's topic in WIPs, Teasers & Releases
No, you lose the ability to texture in Radiant and would have to define the textures in Blender first. You also lose the weapon marks on models, I don't understand why but I think Razor fixed that in one of his mods. Lastly, the game's collision detection can really screw up on terrain models, leaving problems like being able to climb a wall because of strange invisible surfaces jutting out from the model, possible in the SP jawa droid level for example. -
My first python script, took a while to bugfix it and get it working. It's WIP as I'd like to convert it to a blender Addon, in which I can let the user define things like scale, a few parameters to control the 4th vertex production, etc. Atm, it generates trisoup so its great for making terrain. You could import a height map into blender and displace a subdivided plane for a quick 'easygen' like terrain. Or you can sculpt out something. Set blender's grid to metric centimeters. 1 meter in blender will now be 64 units in radiant. This is a good size for a terrain triangle, I wouldn't go much smaller than that overall, just in areas of intense detail (yes, we can have intense detail now! ) The brush generated is a 4 sided prism. I chose this because you can edit the vertices of surrounding terrain tris very easily within Radiant without worrying about breaking the brush. The 4th vertex is positioned at the apex of the triangle and shifted back along the normal. It is controlled by the 'depth' variable in the script. import bpy import bmesh bpy.ops.object.mode_set(mode='OBJECT') bpy.ops.object.mode_set(mode='EDIT') bpy.ops.mesh.select_mode(type='FACE') obj = bpy.context.active_object mesh = obj.data bm = bmesh.new() bm.from_mesh(mesh) bm.normal_update() rounding = '.0f' depth = 8 f = open("export_to_trisoup.map", "w") f.write('// entity 0\n{\n"classname" "worldspawn"\n') brush = 0 e = [] for face in mesh.polygons: f.write("// brush %s \n{\n" % brush) brush += 1 normal_x = face.normal.x; normal_y = face.normal.y; normal_z = face.normal.z center_x = face.center.x; center_y = face.center.y; center_z = face.center.z vertices = face.vertices[:] v = [] for vert in vertices: v.append(format(mesh.vertices[vert].co.x, rounding) ) v.append(format(mesh.vertices[vert].co.y, rounding) ) v.append(format(mesh.vertices[vert].co.z, rounding) ) e = format(center_x - normal_x * depth, rounding), format(center_y - normal_y * depth, rounding), format(center_z - normal_z * depth, rounding) f.write('( {0} {1} {2} ) ( {3} {4} {5} ) ( {6} {7} {8} ) system/clip 0 0 0 0.1 0.1 0 0 0\n'.format (v[3],v[4],v[5],v[0],v[1],v[2],v[6],v[7],v[8])) f.write('( {0} {1} {2} ) ( {3} {4} {5} ) ( {6} {7} {8} ) system/nodraw 0 0 0 0.1 0.1 0 0 0\n'.format(v[6],v[7],v[8],e[0],e[1],e[2],v[3],v[4],v[5])) f.write('( {0} {1} {2} ) ( {3} {4} {5} ) ( {6} {7} {8} ) system/nodraw 0 0 0 0.1 0.1 0 0 0\n'.format(v[0],v[1],v[2],e[0],e[1],e[2],v[6],v[7],v[8])) f.write('( {0} {1} {2} ) ( {3} {4} {5} ) ( {6} {7} {8} ) system/nodraw 0 0 0 0.1 0.1 0 0 0\n'.format(v[3],v[4],v[5],e[0],e[1],e[2],v[0],v[1],v[2])) f.write('}\n') bpy.ops.object.mode_set(mode='OBJECT') f.write('}\n') f.close() To use, copy the above text and paste into the python console in Blender. It works only on the currently selected object. Note: Ridiculously small brushes may crash Radiant. Do not use 'Import .map' in Radiant with an unsaved map file to avoid the small possibility that an incorrectly scaled model might crash radiant on import. If you stick to the grid size mentioned above, the tris should could out pretty good. Showing the back side:
-
I'm pretty sure Call of Duty does something like distance from grenade explosion point * percentage derived from angle of player view. No matter your angle it would affect you somewhat, I assume a clamp or ramp on that percentage from angle of view, and I assume in order to simulate the bouncing of the flash across nearby surfaces.
-
No one has yet mentioned.. BLOTH FISIX?
-
To fix the neck blend you need to paint over it in 3D, with a tool such as Blender's 'Quick Edit' in Texture Paint mode
-
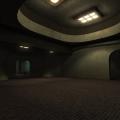
Forums are for discussing, whatever idc! As to the map, yeah it's brighter I set it in day. The original is night. I didn't like it either, but I loved its layout. I just prefer day, it changes how people behave I found. Seriously... @@ensiform, I thought so too but it's actually brighter than the original map, even. That said I've increased brightness since those screenshots even so. One big sorta optical illusion if I can go that far is that my map has far less contrast and this adds to how difficult it is to distinguish shapes. Any time I added color in the texture it just looked plain wrong so I avoided it in the end.
-
Yeah uhh... can't disagree more. The SP of JKA was cringey and easy. Outcast had a way better, linear story. The 'missions' thing of JKA and the fact that you never got to attach to any character (Kyle was almost non-existant, no sidekick like Jan) made it really emotionally stale. Anyway, for both games, Once you've played SP once or twice, it's done (to me). I don't play any games unless they're multiplayer... that's where the personality lies.
-
Once a base player model is in use, definitely. The textures actually exist. The clothing could be easily turned into a useable clothing/armor item.
-
The lights will stay you get used to them and forget about it after a while. By the way.. I can't ignore it any more... It's light -ing not lightning! ;p
-
The engine has nothing to do with it, normal maps are baked in. The issue is using too much small lightmapscale and causing the engine to be unable to load the large BSP lightmap. When the lightmap is too large the game doesn't properly display errors... since the map is still playable, I guess, with vertex lighting. Instead it seems to corrupt the memory or something because other parts of the game get ROYALLY ***ed. As for white lights. Couldn't do anything about it, the map is just built that way modern lights built into old stone... makes no sense. But impossible to replace with anything else imo. Agree on sky, I'm just using a default atm. Will also be replacing the sunExt with something custom.
-
In my experience so far efx lights have looked terrible. I also don't know how to add one in to that stock .efx, if anyone would like to do that so I can test it out be my guest. Agree on lightmapscale. Yeah but it's how it gets used. Rich Diesal has a tut on it but it's not specific. I tried what he suggested (texture only the top and bottom of the brush) but in that case it didn't render at all - and I used caulk_nonsolid for the rest. Also, trying to fix these damn patches showing darker than others. I think it may just be the -dirty switch and I won't find a work around... shame because this map really works well for -dirty. Nope, got it. The patches were inverted and transposed... still not really sure what exactly transpose does after all these years But it does invert the patch, which is 'corrected' by inverting it regularly. But apparently this is the result! Or perhaps, rather, this is a fix for this exact issue. Who knows. Anyway, the fix is to go around finding all these dark patches and transposing and inverting them all. Sucks because I copy pasted a lot of them, and ofc they show up fine in radiant, so I have to do this side by side with the map open ingame. Bleh.
-
Somewhere I made an original thread showing early work on this project, but it's been removed in some forum cull it would seem. This map loads completely normally (providing server is sv_pure 0, as most non-competitive servers are) in place of the original, so you can use it just like a model replacement.. but its a map replacement. I'm nearly finished, just need to fix a few things with the map edges where the sky occludes a few things badly. Lighting is a WIP, need to improve a few dark areas. Oh also, anyone know how to get fog to work so it renders like in mp/ffa1 (Vjun) pit? Can't seem to get it working. Always has a flat top to it. Need it for the pits!
- 28 replies
-
- 14
-

-
Getting the same issue, Hierarchy looks good as far as I can tell. No head hands or feet.. do I need to have empty, tagged nulls there?