
JKHub
-
Posts
609 -
Joined
-
Last visited
Content Type
News Articles
Tutorials
Forums
Downloads
Files posted by JKHub
-
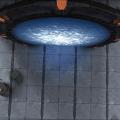
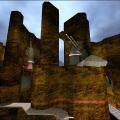
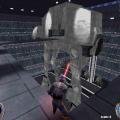
Nivalis
By JKHub in Free For All
Original Author: Watcher
Description:
A small indoor 'outpost' with a large outside snowy area.
Uploader's Comments:
A Stargate map for jedi academy. this one is quite interesting, I am quite aware the gate is on but it doesn't take you anywhere. That is the beauty of it. Its a roleplaying map. The stargate is located basically in a little hangar away from the outside. The outside reminds me of a Christmas map or a hoth map good for sneaking and hiding from your enemies. The stargate may not work but its got bot support, that is a plus. Well don't take my word for it, download it and enjoy
Note: There was absolutely no way I could've contacted the author. He didn't specify a email or way to contact him. So it was impossible for me to contact him for permission.
Author: Watcher (ERP_Watcher)
Credits: More in readme
Email: N/A
Website: N/A
Bot Support: Yep
New Textures: Yep
New Objects: Yep
New Models: Yep
New Sounds: Nope
New Skins: Nope
Brush Count: 2116
Entities: 24
Bugs: None
Radiant Version: 1.4
Gametype: FFA
RP Map: Yes
Filesize: 8.71 MB (Map: 7.78 MB)
Filename: Nivalis.pk3
Date Released: November 8, 2006
Uploaded by
Original author may contact the staff
here if they wish this file to be removed.
252 downloads
(2 reviews)0 comments
Updated
-
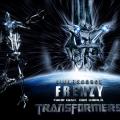
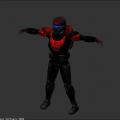
Transformers Frenzy
By JKHub in Player Models
Author: Lightsource
Uploaded by Barricade24 (Fitting isn't it?)
DESCRIPTION: It's a Frenzy model from the new Transformers movie, he has team, bot and npc support, and also a few cool taunts and sounds from the movie.
BUGS: well If I got things right there's none. Only a little bit of clipping because of the strange shape of the model.
COMMENTS: well it's not the exact copy of the movie version, on the movie he has a lot of more details than this, but well this is the best that I can do for now.
If you want to spawn the Npc Frenzy:
-npc spawn Frenzy ( normal Frenzy )
-npc spawn Frenzy_dual ( you get the point )
276 downloads
- Custom Sounds
- Alien
- (and 4 more)
-
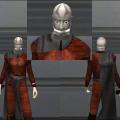
ReX-vs-TermiReX
Author: Light Ninja
Submitted by Barricade24
This pk3 file has 2 desann skins that are differents to all the desanns and i worked too much in the texture of the face so it looks really cool.
Information : Extract it in your X:/.../GameData/base Directory.
IMPORTANT : This skin DON'T REMPLACES the desann/default, it just is like a desann extension that has the same size of desann at the mods. To play with it just
go to the player selection window and choose it or type in console:
/model desann/default_rex
/model desann/default_termirex
224 downloads
- JK2
- Star Wars Related
- (and 2 more)
-
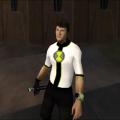
Ben 10
Original Author: Phonock
Description:
Actually i made this skin just a tryout for my brother.The skin is based on Cartoon Network shows Ben 10.I think its turn up pretty well .So i decided to share with you,and i hope you'll like it.
95 downloads
- JK2
- Team Support
- (and 2 more)
(1 review)0 comments
Updated
-
Halloween 2003
By JKHub in Multiple Gamemodes
Author: Darth Arth
ffa map for saber-only fighting.
This map will be released like "is as is", there will be no patches or future-versions.
If you like it, have fun, if not just kick it to hell
233 downloads
(2 reviews)0 comments
Updated
-
New Force Lightning Animation
By JKHub in Cosmetic Mods
Author
HOUOU
It changes the effect of force lightning.
There are three kinds of new effects.
[raging flame]
The hellish flame burns up an enemy.
[ice storm]
It emits strong chill.
[destruction ray]
It destroys an enemy around in the strong destruction beam.
295 downloads
(3 reviews)0 comments
Updated
-
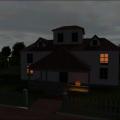
House of Madness
By JKHub in Single Player
Author: Zeus
Submitted by: Barricade24
This is my first map. I might bring out a multiplayer version of it
191 downloads
(2 reviews)0 comments
Submitted
-
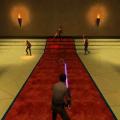
Dim Side Jedi Academy
By JKHub in Free For All
Author: Worr Sonn
Submitted by: Barricade24
The extra edition of ffa_dimside_se... I took the map and re-did most of it. I kept the classic arenas and got rid of some stuff. The secret area is VERY hard to find, but it is the best area in the map
98 downloads
-
CTF Canyon
By JKHub in Capture the Flag
Author: The Truthful Liar
Submitted by: Barricade24
A war-torn canyon with narrow paths.
200 downloads
-
Alphas Shoop da Whoop on a Stick
By JKHub in Lightsabers & Melee
Author: AFL_Alpha
Submitted by: Barricade24
This file contains a saber hilt wich represents shoop da whoop on a stick. I have of course also added new sounds to match with the hilt.
92 downloads
- Lightsaber Based Weapon
- Humorous
- (and 1 more)
-

Dragon
Author: Wudan
-1- General Information
To put it simply, Dragon is an animation creation and editing tool for the Ghoul2 animation file format, .gla, used in both Jedi Knight II: Jedi Outcast and Jedi Knight: Jedi Academy (hereafter referred to as JKA). It's primary purpose is to create animations and write them in to the .gla format, which can then be merged with the existing JKA animations (or other .gla files) for use in-game with little knowledge needed.
Dragon has been created on a machine utilizing an AMD Duron 950, 256 MB ram and an ATI Radeon 9200 videocard, which is a fairly low-end system by today's standards. As such, most computers should be able to handle Dragon program smoothly (but, because of Dragon's avatar system, it is possible to put too much strain on any system.)
Dragon features:
A drag-able and transparant UI
An Avatar system
A Console to do nifty things!
A Complete Bone List to animate
A Standard model
A few example animations
Light Saber Rendering (extremely nifty)
Weapon Rendering (blasters rockets etc)
A floor tile, for better animations
Save and load system
A blending option
And probably much more
-2- Installation
The current release (0.1.0) is just a .zip file - you will need a program such as WinZip or WinRAR to extract Dragon. When you extract Dragon, it is important that you keep the folder hierarchy as it is in the .zip file. If you extract Dragon to C:\, the program will be in C:\Dragon\ All you'd need to do is navigate to that folder using Windows Explorer and double-click Dragon.exe. As of 0.1.0, Dragon has a default model that is loaded using the default Avatar, so you should see a shiny little guy, ready to animate.
-3- Getting Started / Basic Usage
Ok, you've gone through the trouble of downloading Dragon, extracting it, and running the core executeable - now what?
You should see a shiny little gray dude, a box that says "BoneList" and a box that says "SliderBox". Below the gray dude is a little stick thing, made of a white, green, and blue sticks. You still with me? Cool.
Let's focus on the BoneList, since it's basic use is pretty easy. You see a list of bones - model_root is in the middle - the active bone is dislplayed in the middle of this box. You can click on any of the bones listed above or below to switch to those bones - as you change bones you will notice that the stick thing (the white, green, and blue sticks mentioned earlier) change position and orientation.
Ok, now you're ready to do some fun stuff. See that slider box that you've been itching to mess with? This is the heart of Dragon - You have several things in here that are noteworthy - a Reset Button (completely obliterates any posing you've done of the current bone), and two sets of 'Sliders'. The sliders on the left are the important ones - the ones on the right we'll get to in a minute.
Go ahead and select the r_femur_YZ bone in the BoneList. Next, click on the green slider on the left - and hold your mouse down - and move your mouse left or right. You should see the gray guy's leg swing back and forth. You can now try moving the blue slider - his leg will sway from side to side.
Getting from here to making a cool stance is actually pretty easy - it's like playing with GI Joes, or some such action figure - you just pose the model how you want it. It might take some getting used to, but you're on your way
-3- Console Commands / Advanced Usage
Dragon uses a console, designed to be somewhat familiar to people who've played a game based on the Quake3 engine. First up to bring down the console press ` (you may need to enter ASCII code 0126).
Console Commands:
screenshot
Takes a screenshot - saved in the 'screenshots' folder.
fnext
Go to next frame (Hotkey: K)
NOTE: Also used to create frames, hotkey does NOT create a frame
fprev
Go to previous frame (Hotkey: L)
fdel
Delete frame - (deletes the current frame.) After deleting, Dragon will go to either the next frame (if there is one), or the previous frame (if there is not one.)
fcpy <number>
Frame Copy - Copies a specific frame number.
fcpyprev
Frame Copy Previous - Copies the frame before this frame. If there isn't one, it does nothing.
fcpynext
Frame Copy Next - Copies the frame after this frame. If there isn't one, it does nothing.
fspeed <number>
Frame speed, if you want your frames play at a higher rate, you need a high fspeed, you want a slower rate, u need a small fspeed. Default fspeed is 20. Usage: fspeed 20
fblend <number>
This is what makes the animation smooth. Its simple to use once u get used to it. Usage: in frame 1 is a stance in frame 2 is a different stance. U want the switch between stances to be fast, so 10 frames should be right. Bring down the console and type: fblend 8. now u should have a smooth switch from stance to stance. NOTE: To prevent odd bugs from happening cycle trough the animation mannually once before clicking the preview button! Always substract the amount of frames u already have for example if u want an animation to last for 20 frames and u have 5 frames animated than its 20-5 = 15 , fblend 15. Hope that makes sense play around with it.
finsa
Inserts a new frame after the current one.
finsb
Inserts a new frame before the current one.
save <name>
Saves a .cfg file to Dragon's directory. This file describes the animation you are currently working on. You do not need to add the .cfg, Dragon does this for you. So, 'save myanim' creates myanim.cfg in the Dragon directory.
load <name>
Loads an animation over the current animation, creates the necessary number of frames (but doesn't nuke any frames - so if you load a 5 frame anim and have 10 frames, you'll have 5 frames on the end of your workspace that you probably don't need. Use fdel to nuke 'em.
savegla <name>
Saves a .gla file in Dragon's directory under your given name. Usage: savegla my_stance
impframe <number> <number>
Import frames from the loaded .gla - so that you can edit previously finished animations. The first <number> is the starting frame number for your import, and the second <number> is how many frames to import.
It is recommended that you use the save and load commands to work on animations, as saving to gla and reimporting several times introduces compression artifacts - in layman's terms, your animation will be broken and you may need to re-do the entire thing. Importing from the original should be fine, as that's what the target executeable (in most cases, Jedi Academy) does anyway.
NOTE: To load up a gla you have to edit an avatar file, or make a new one. More on this in the avatar section.
-4- Avatar System
The Avatar System is one of the more robust components of Dragon. With it, you can animate multiple models at once, bolt models to those model's bones, change the saber's color, and length. So, how to access this advanced functionality? Listen well, young traveller, for a world of infinite possibility awaits those with a steady hand and an open ear.
Dragon, in 0.1.0b, comes with "avatar/default.cfg". (Now might be a good time to set Notepad to be the default editor for .cfg's, if it isn't already.) Opening that file shows:
Wudan{{org 0.0 0.0 0.0gla _JAhumanoid.glaglm models/players/stormtrooper/model.glmskin models/players/stormtrooper/model_default.skinbolt models/weapons2/saber_dual_5/saber_dual_5.glm rhang_tag_bonecolor 0.05 0.15 0.05length 32.0}}
The syntax is fairly similar to .shader file format, so skinners won't be at a total loss here. There are three main, must-have parts of an avatar file, the 'org', the 'gla', and the 'glm' lines. Oh, and the 'skin' line is fairly important. That said, a basic template to follow for creating new avatars would be:
AvatarName{{org 0.0 0.0 0.0gla INSERT_NAME_OF_ANIMATION_FILEglm INSERT_NAME_OF_MODEL_FILEskin INSERT_NAME_OF_SKIN_FILE}}
The org line has three floating point values past it. These tell Dragon where you want to draw the model at. This is useful because adding multiple models would be confusing if they all were at the '0.0 0.0 0.0' location. The gla line has a filename after it. By default it is _JAhumanoid.gla, which is a really small, single frame animation file that contains all of the skeleton file info. The glm line has a filename after it. This can be any .glm file, it is highly recommended that it be a .glm that was made to work with the gla you've selected. The skin line points to a skin file specifically created for the glm that you have selected. As of 0.0.1b, not loading a .skin file results in a crash.
-5- Tutorial: Replacing Animations
So the reason u downloaded dragon was not to read allot of crap but to get urself some animations done! So here we go! This is much easier than u think, Thanks to dragon. Its not hard either. Ive just written allot of text so it would be clear First we create our workspace. Extract /models/players/_humanoid/ (assets1.pk3) to a easy to find place. I've created:
"C:/Base/Models/Players/_humanoid/"
NOTE: /Base/ has to be there. if not ull get errors Check the _humanoid folder, see if u can see the .gla and the animations.cfg files. Now download GLAmerge written by Ask.
Now, create your animation in Dragon. That's easier said than done, right? Well, once you have a completed animation, you can move on to the next step.
However, before you export to the .gla format, there are a few things to consider - for one, have you saved the file (save command), so you can edit the original animation later? If so, excellent. save, then savegla - I think a good idea would be to automatically save when savegla is called - this could be done for the next release - any thoughts?
Ok, now the tricky part is that you'll need the very first frame of animation be empty - it technically doesn't matter, but you need to understand that this buffer needs to be there because other animators, using packages like XSI and 3dsMax, weren't able to keep the skeleton in-tact when exporting to gla and merging, unless they had made the first frame of their animations the base pose, otherwise the animation could not be successfully merged in with glamerge. Dragon does maintain the skeleton's structure, but uses the same merging program as everyone else.
Anyway, the tricky part is that Dragon currently has a blending system that 'wraps' around the animation - if the last frame of animation has blended bones in it, they blend with the first frame. This helps with walk cycles, but makes exporting to gla format pretty tricky. Since 'unblending' bones does not destroy their position, save your animation, then unblend each bone of the first and last frames, then finsb on frame 0 - you should now have a blank frame 0 and the rest of the frames are working fine - but, because Dragon is finicky about frames, cycle through all the frames before you export. You're ready to export - lucky you!
To export, enter the console and put in
savegla YOURFILENAME
(do not append .gla, Dragon does this already.) Ok, you're done with Dragon, go ahead and exit (you did save, right?)
In the folder where Dragon is located, you will find YOURFILENAME.gla - copy the .gla to the humanoid folder mentioned earlier. Than create a new text document. In that document type the following:
@ECHO OFF"glamerge.exe" "_humanoid.gla" "<gla>" -oPAUSEEXIT
This is a basic setting. replace <gla> with whatever your gla is called. i got this: @ECHO OFF "glamerge.exe" "_humanoid.gla" "my_run.gla" -o PAUSE EXIT (if u are an advanced modder, see the readme of glamerge for more options) Save the txt file as gla_merge.txt Now rename the file to gla_merge.bat (the .bat file tells the program what files to merge) now double click on the .bat file (make sure the following files are in the _humanoid directory. Glamerge, _humanoid.gla, your GLA.) It should now ask u for an output name. I suggest humanoid.gla (NOT _humanoid.gla!). Because this way u can rename the humanoid.gla or delete it when it isnt good while keeping the original (of course its just a copy of the original located in assets1.pk3). But for now lets do new.gla Now create the same directory somewhere else (no need for /base/ now) c:/models/players/_humanoid/ copy the other _humanoid files and paste them here. delete everything except Animations.cfg and new.gla Now rename new.gla to _humanoid.gla. Open up the animations.cfg with good old notepad. Now find the running animation. (U can use modview) k now its time for some small time scripting (not 2 hard dont worry) Now uve found the animation u want to replace BOTH_RUN1 12305 26 0 40 (name) (beginframe) (frames) (loop) 40(framespeed) K now. we have to leave the name the same. Now we find out what the last frame is, if u scroll down a bit ull see that ROOT is the last frame on frame: 21374 and it lasts 2 frame wich comes to a total of 21376.Now we know what to fill in the first, now for the second. How many frames is your animation? really simple if u've paid attention when gla merge was busy you shouldve noticed it counted the frames So there. I got 20 frames. Next is wether u want it too loop or not. 0 = yes, -1=no. We have a running anim so i would say 0, yes. And finally the framespeed. This one u can set whatever u like. in dragon the speed was 20 and i liked it so ill use 20 There we're done analyzing. So lets do this ! BOTH_RUN1 21376 20 0 20 Ahh yes were done! Pack /models/players/_humanoid/ in a .pk3 (the same way u would pack a skin) and place it in your base. Launch JKA. play a game and look at your new animation! NOTE: your next animation has to start on a different frame, see the last frame is 21376, plus the 20 frames u used wich would become 21396 I hope u get the point. Delete the .pk3 and yer jka is back to normal, Isnt it simple? Its only simple thanks to Dragon:The Ghoul2 Animation Tool
-6- Contact
If you need help or got questions or want to report a bug (TO SQUASH!) you can contact Wudan on the following ways:
Mt-Wudan
Dragon Forum
Mail: Wudan07 -AT- gmail.com
Aim: Wudan07
Remember! Report Bugs As soon as u find them! And also please fill in the crash/bug form included! You are able to control how good the next version will be if u go on bug-hunting or if u think of things that could be improved
Credits
Jedi Knight Jedi Academy.......................................LucasArts, Raven, Activision
Ask................................................................................GLAmerge
Wudan......................................................Dragon:The Ghoul2 Animation Tool
Shady-D.........................................................Doing some background stuff
You..........................For reading this and for (hopefully) reporting if u find a bug
660 downloads
-
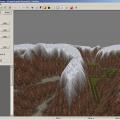
EasyGen
With EasyGen you build up terrains and export them as Radiant source map (including alphamap and metahsaders).
Bitmap import/export is also supported.
Supported games
Quake3
Return To Castle Wolfenstein
Generally all games based on Quake3 engine (Including Jedi Outcast/Jedi Academy), who need a source map(.map), an alphamap(.pcx) and a metashader script(.shader) to compile a terrain entity. (if you want to to learn more about this process read the Official Terrain Manual written by Paul Jaquays contained in the latest GTK installations)
Installation
Make sure to extract all files contained in the zip in the same folder.
After you've extracted the zip, EasyGen folder should looks something like this:
EasyGen\modifiers\*.* - modifiers
EasyGen\templates\*.* - various files (*.shader, *.cfg)
EasyGen\save\ - saved terrains (*.egn)
EasyGen\tutorial\*.* - tutorial stuff (old but sufficient)
EasyGen\EasyGen.exe - executable
EasyGen\btnexgenipl32.dll - a dll
EasyGen\readme.txt - this readme.txt
EasyGen will not run if 'btnexgenipl32.dll' is not in the same folder.
Also EasyGen needs to know your work mod folder under <your_game> root folder (ie baseq3\, missionpack\, main\ etc etc), you will be prompted to browse for that asa you start EasyGen. I repeat for the last time, you need to browse for a MOD folder, not for the <your_game> root folder.
Features
Terrain shape manipulation through several modifiers (Hill,Cone etc etc).
Program your own modifiers with an easy asm like language. Read 'custom_modifier.txt' to learn more.
Direct export source map plus alphamap and metashader script.
Alphamap import/export.
Bitmap import/export.
Models (md3) are loaded automatically from <your_game>/<your_mod>/models/ directory.
Import brushes from a map file. Brushes are only used as space references to aid positiong the terrain entity. Bruhses manipulation is not supported by EasyGen and BRUSHES are NOT exported toghether with the terrain. Only the TERRAIN ENTITY itself is exported and the models you have inserted.
Terrain import from a map file (and related alphamap and metashader). This should work in the most of the cases.
To exclude triangles from export: - select MODIFIER TAB. - click the pink triangle button on the toolbar (the one with the red cross) - SHIFT+LEFTCLK on a triangle
Upgrading shader templates (templates/*.*) is useful if the author of the compiler (ydnar) makes come modifications to the compiler itself (q3map2.exe). Replacing old templates with the new ones will ensure that EasyGen will export shaders hat will work with the new version of the compiler.
878 downloads
(1 review)0 comments
Updated
-
Quake Video Maker
This tool can be used to create RoQ videos inside JK2/JK3
Here is Quake Video Maker. A simple tool to create AVI files with both video and audio.
Import TGA, JPEG, BMP and PNG sequences into scenes
Import AVI movies
Import RoQ (IdSoftware video format)
Import GIF animations
Import RoQ movies
Export to AVI using available video codecs on your PC
Export to RoQ to create ingame videos
Organize your scenes
Make scenes transitions
Special effects (PIP, Overlay, Luma, Monochomatic, ...)
Add your favourite MP3 or WAV file as the movie soundtrack
Include image sequences generated by Flash (or other tools) to create title scenes
843 downloads
-
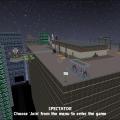
Duel ATAT Bay
Author: Belial
This is a duel or ffa map. It has a large platform area whereby you can duel safely, but if you venture out you can pick up the better powerups...but it can be risky.
217 downloads
-
Tavion Extreme Makeover
This is a modification for the Lucasarts/Raven Software PC game Star Wars® Jedi Knight®: Jedi Academy.
This file was created by Amidala (operator of the Chop Shop Jedi Academy and Jedi Outcast servers).
--------------------------------------------------------
Concept
The television program "Extreme Makeover" takes average people and gives them thousands of dollars worth
of aesthetic (plastic) and surgery, professional hair and makeup styling, and a new wardrobe, to make them
as attractive as possible.
I decided to give my favorite bad-girl Tavion an "Extreme Makeover" with laser tattoo removal,
hair and makeup changes, and some wardrobe "improvements" to make HER as attractive as possible.
Each Tavion skin has color-coordinated feathers, eyeshadow, and nail polish.
Default Tavion has hazel eyes, Red Tavion has green eyes, and Blue Tavion has blue eyes.
--------------------------------------------------------
1,192 downloads
- NPC Support
- Team Support
- (and 1 more)
-
Jedi-Mart
By JKHub in Free For All
Author: Fir`en Darkhaven
A simple spoof off of Wal-Mart. It's got many of the same features as a Wal-Mart,
and perhaps a bit more. As of this point, I decided to ditch several ideas that I had had to move on
to a different map project. I know FPS is a little shaky in some parts (possibly more so outside, since it's a lot larger)
but it's the best I could do in a massive area. It's my first map that I've made (so I know it's probably lacking)
but I hope you guys enjoy!
New Music: YES
New Models: YES
New Textures: YES
Bot Support: NO
434 downloads
-
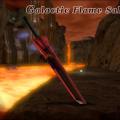
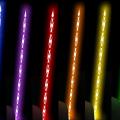
Galactic Flame Saber
By JKHub in Lightsabers & Melee
Author
HOUOU
This model design is the sword of my comics character, it is a mechanical flame sword.
When it fights, a flame is made to occur from the sword.
But, there is no change of the performance.
New sound, attack effect are attached additionally.
Use cheat code to use this weapon with Single Player.
-Saber Cheat Code-
gf_saber
307 downloads
(1 review)0 comments
Submitted
-
Sev
Author
UnsungHero/Schrodinger
This is a remodel of the Boss skin in cloneultima, it is Sev with black armor (Sev is the red republic commando that used the sniper).
69 downloads
-
Darth Malak
By JKHub in Player Models
Skin and Model by DarthViper107
Description:
Darth Malak is the former apprentice of Darth Revan. The two were being attacked by the Jedi and Revan was killed and Malak escaped. Malak then assumed the role as Dark Lord of the Sith. This is him as he is in the game: Knights Of The Old Republic on Xbox and PC by Lucasarts and Bioware.
Bot Support: Yes
NPC Support: Yes
Team Support: Yes
1,064 downloads
-
A-Wing Prefab
Created by Gregory A. Birmingham (Manquesa)
Main Awing textures created by Jose Gonzalez of the SWMA.
This prefab is available to be used freely by anyone who wants to use it.
Please credit the author in your readme file if you do use it.
Feel free to edit it to your preference and make any necessary changes to it.
Awing prefab created using JK2Radiant.
Make sure you have texture lock on and set for both moves and rotations when placing the prefab in your map.
The 2 custom textures AWT1.jpg and AWT4.jpg need to be saved in a new directory names textures/awing in you base directory of JK2.
Please notify me of your use of this prefab in your map if convenient.
Thanks.
68 downloads
(2 reviews)0 comments
Updated
-
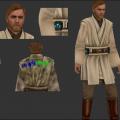
ObiWanKenody's Custom Skin
Author: ObiWanKenody
My Personal reskin of HapSlash's Ep.3 ObiWan for Jedi Academy. (Bonus hilt included)
482 downloads
-
Chopper Saber
By JKHub in Cosmetic Mods
Author : Egor
Description : Saber skin that puts iron cross "chopper logo" in sabers.
75 downloads
(1 review)0 comments
Submitted
-
Fire Blades
By JKHub in Cosmetic Mods
Author : {THC}ShovelHead
Description : This mod will give a mystical fire look to your saber blade.
131 downloads
(1 review)0 comments
Submitted
-
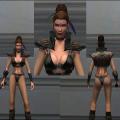
Black Widow Gang
Author: Dowza
This was made for Forcemod 3 RPG Server as a Gangster/assassin skin. It is basically a reskinned saboteur with red patches and gold lining, with the Gang insignia on the arms and legs. I will re-release this with team support AND BETTER SOUNDS (ones that are in mp3 format and sound good) when I find time.
62 downloads
(1 review)0 comments
Submitted
-
 (1 review)
0 comments
Submitted