
AshuraDX
-
Posts
2,319 -
Joined
-
Last visited
Content Type
News Articles
Tutorials
Forums
Downloads
Everything posted by AshuraDX
-
I see, I wanted to try Marvelous for a while - I think I may have to find a way to get my hands on it
-
Damn that scarf is looking sexy, did you use Marvelous Designer to create that? It looks so flawless
-
so many stitches. Still have a few more to go - hooray for my stitch brush EDIT:
-
Texture WIP: I need to get some variation in for the cloth textures, dirt and wear have barely been tackled yet - mostly basic colors and my smart material to give some lighting information
-
Updated EULA Regarding Porting Content
AshuraDX replied to eezstreet's topic in JKHub Feedback & Help
So are we gonna do a Pornstar Chainsaw fighting game based at JKA now? -
Or you use fancy software, setup a procedural wear effect and have it wear your paint while you're painting, then finetune in a second painting pass Can be doen in gimp and photoshop aswell, just takes a bit more work to setup EDIT: this was produced by applieing various different filters and adjustments to the curvature map of my clone models torso.
-
while it's not likely to happen they COULD potentially decide to do it
-
@@Seven slight differences http://vignette2.wikia.nocookie.net/starwars/images/7/7c/Clonearmor_negwt.jpg/revision/latest?cb=20060808183103 the hand plate is different, shoulder pads, upper arm armor, slighty different torso armor but nothing that'd be too much work
-
putting a link here won't save you from trouble if a any company sues you for violating their EULA/Copyright by spreading their content for free. But JKHub.org remains mostly uneffected in this case since we're not hosting the file.
-
@@Circa this model will become my "fall back/filler project" for boredom. I have plans to make additional helmets and including a phase 1 style helmet is not that big of a deal
-
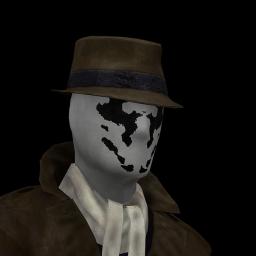
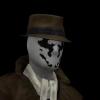
@@Lancelot nailed it, incase you were wondering YES the mask will change here's a shader test: Patterns are stock images, the game version will be updated with more movie accurate patterns EDIT:
-
Let's see if someone, excluding those I've allready told, can guess who this will become seeing that this sculpt is allmost finished it shouldn't be too hard to guess
-
@@Seven there may be a way to do the covnersion in Blender - but you'd have to look that up
-
Looking for one particular saber
AshuraDX replied to Unbekannter's topic in Mod Requests & Suggestions
that's the physical Reaver, the file OP is looknig for is the ghost form -
@@Seven do you have normal maps for the TFU heads? if you do you can use them to improve the currently very flat look of the textures. To do that get Xnormal first, once you have that export the head you ported as a .obj (hair and what else mgiht use the same textures included). Open Xnormal and go to Tools and look for the Object/Tangent space converter, run that and load the exported head as the lowpoly mesh, load your normal map as the input normal map and set the converter to "convert tangent space to object space". if done correctly it will produce an image that looks similiar to this. if you have that, open the head texture and your new object space normal map in Gimp or whatever else you use for skinning, first take a look at the Object space map. Disable the Red and blue Color channels (leaving you with the green channel), you should see that the upwards facing areas are lightly colored while the down facing areas are dark. Select everything and copy this over to the head texture (on a new layer) set that Layers blendmode to "soft light" and decrease the opacity to about 60% Now you'll do the same with the blue channel of the object space normal map, copy it over to a new layer and set that layer to "multiplay" and about 30% opacity, this should darken the backside of the models textures. sounds doable?
-
Looking for one particular saber
AshuraDX replied to Unbekannter's topic in Mod Requests & Suggestions
@@minilogoguy18 any chance you have the spectral reaver saber? -
going by other pictures from that album @@Jeff might be your man
-
Neat, I wonder how/if it handles custom normals
-
If my theory about what causes this is right, a shader with the line "cull disable" or "cull twosided" should be able to fix it. Just identify the texture that's used for the crest and if it allready has a shader add the line to the entry for the used texture or if it does not have shaders: create a new folder "shaders", in that create a plain text file (.txt) and write the following in that: models/players/"modelname"/"texture" { cull twosided q3map_nolightmap { map models/players/"modelname"/"texture" blendFunc GL_ONE GL_ZERO rgbGen lightingDiffuse } } Just replace the "modelname" with the nme of the folder that holds the samurai vader skin, and "texture" with the name of the imagefile used for the crest.
-
Not exactly, I'm processing a channel from the wsp normals through 2 different Gradient maps, mask the second gradient using another channel and finally set flat areas facing along the base axis to 50% grey. My smart material eats PBR(Albedo, Metal, Roughness, Height/bump) maps and a bunch of baked maps (AO, Curvature, WSP Normals) and spits out a Diffuse and a spec map for JKA. Being a Smart material it offers a ton of Input Parameters for you to adjust stuff as you see fit. To handle Skin it can be fed a Thickness and an ID map, if the skin option is active it'll add some fake SSS and tint the baked lighting for the skin areas slightly using to 2 variable Blood and Shadow colors. The biggest problem atm is handling non metallic areas in the spec map, but I think I can fix that by adding an additional input that takes a base spec map that contains specular base values. About the models issues: I did not mention them here before, I wanted to get a first Release out for the community, as I figured that since I plan to add new stuff anyway I can allways go back and do a few fixes
-
@@Psyk0Sith the feature is in place, I'l have to load a custom reflection gradient to make it look good though
-
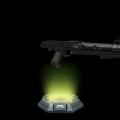
1. yup, I have a bent normal map overlay in there, but it's not enough. The textures are converted PBR materials I sent through my substance material, which in essence does this, while offering a few more features. It actually has a feature to produce a sort of metallic specular reflection, but that is currently locked to the y-axis as it was mainly intended to be used for sabers, here' an early WIP shot of that feature - tested with one of @@Rooxon's sabers. Adding an option to ick the base axis for the reflection is on my to-do list for this smart material. 2. it was skinwrapped, I'll fix it in a next update. I allready amde the bottom halves of the boxes rigid by weighting them exclusively to the pelvis, but didn't want the boxes to clip through the torso too much so I kept the top vertices slightly weighted to the lower lumbar Edit: If you happen to use substance painter and/or Designer shoot me a pm and I'll pass you the material for testing.
-
https://jkhub.org/files/file/2893-ashura39s-dc-15s-blaster-carbine/ it's out!
-
Version 1.1
2,365 downloads
I just had to make a matching blaster for my clone model, so here it is! comes complete with new effects, sounds, UI graphics and a new descrition text. If you're not using OpenJK it will most likely crash when used with my clone model in Singleplayer, this was not tested though -
outfitted with new blaster sounds by @ I finished the effects for the DC15:
