
Maui
-
Posts
320 -
Joined
-
Last visited
Content Type
News Articles
Tutorials
Forums
Downloads
Everything posted by Maui
-
 Is it possible we could gain access to the source code? That might help alot!
 -
It does work now, I've rewritten the addon and made some changes to it.
-
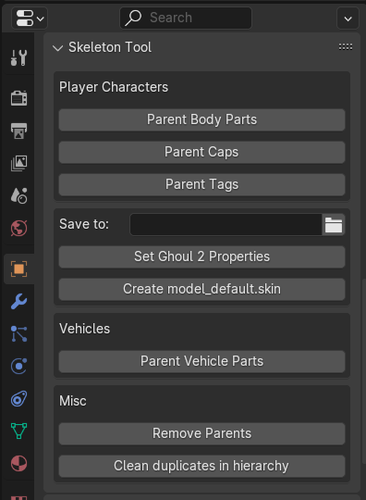 Please visit Github for the latest version of the addon. I will be updating the code almost daily so new features will be added whenever they come to mind. Currently, I added a Delete Empty Vertex Group and Create Tags function. First one is useful when splitting your weighted model into parts, you can use this to iterate through all objects and check which vertex groups has no vertices assigned to it from that particular object. Second one, does exactly as it says. It creates all the tags and stupidtriangle for model_root_0 - you then can use the Parent Tags function to add it to the model_root_0 hierarchy and then Create LODs to duplicate your model_root_0 and reduce level of detail per LOD. Once the addon will get no new functions anymore, I shall create a video on how to use it even though it's self explanatory.
 -
PK3 put inside Base folder isn't being loaded (JKA)
Maui replied to TheFoxTrotte's topic in Modding Assistance
Glad it helped! -
Blender has an fbx plugin so that shouldnt be an issue.
-
A left-handed mouse player ;o Very cool what you're doing!
-
PK3 put inside Base folder isn't being loaded (JKA)
Maui replied to TheFoxTrotte's topic in Modding Assistance
Try the following: Create a .pk3 with Pakscape https://jkhub.org/files/file/89-pakscape/ -
I noticed an issue with stupidtriangle and the _off variant. That will be fixed in the next release. Might upload that later tonight.
-
That would be a fun mod indeed! ;o
-
Katarn model with jacket headsawp request
Maui replied to qball13's topic in Mod Requests & Suggestions
Do you still need help? -
Disable forced saber colors in Team FFA and CTF
Maui replied to Untold Prophecy's topic in Mod Requests & Suggestions
I believe that is hard coded, I havent checked the source code yet. -
Do you still need help?
-
If you're still looking for help, let me know.
-
Why dont you try to learn frankenstein modelling with Blender? Plenty of tutorials (and authors of those tutorials) around.
-
Default Kyle Head on IB Mercenary Outfit.
Maui replied to Starwalker1192's topic in Modding Assistance
If you want to learn how to do these things yourself, hit me up on discord or send me a private message. -
Need help with importing humanoid playermodels in Blender [JKA]
Maui replied to LennyGuy20's topic in Modding Assistance
Did you get the problem fixed? -
To play those, you have to change some settings when importing the .gla file. Play around with the frame begin and frame end in the import screen.
-
How do i select the root pose as the first frame in Blender?
Maui replied to Piaujeymer's topic in Modding Assistance
Have you tried following a tutorial? If that problem still persists, I'll try to figure it out "by using google" since blender might be the cause of the issue anyways. Also if a character is invisible you might have an issue with exporting the model itself. Mesh issues, no G2 properties set, no .skin file, etc -
PK3 put inside Base folder isn't being loaded (JKA)
Maui replied to TheFoxTrotte's topic in Modding Assistance
Do you still have the issue? -
New functions added and older code optimised. It now has functionality for vehicles too. Parent all caps, tags and object in 1 click. Also gives you the possibility to unparent everything if you so please. I haven't made any video's about it yet, but it's self explanatory. Would you like to see a video?
-
The addon has now been finished. If you follow the correct naming convention, it will work beautifully. Previous problems stated above are also been taken care of.
-
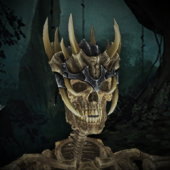
Introduction: Hey there, I'm Maui and I love to learn new skills. That's why I learned how to do frankenstein modelling with Blender using the Jedi Academy Plugin Suite. I started learning Python and created an addon called Skeleton Tool, this would be a must-have but it became outdated and full of errors. After 3 years I came back to the community and decided to pickup where I left everything. Requirements: Modview -> http://jkhub.org/files/file/90-modview/ Pakscape -> https://jkhub.org/files/file/89-pakscape/ Blender -> https://blender.org Jedi Academy Plugin Suite https://github.com/mrwonko/Blender-Jedi-Academy-Tools (make sure to download and install this plugin by using this link and follow the instructions if need be) Skeleton Tool -> https://github.com/Mauii/skeleton_tool What you'll learn: Frankenstein modelling How to use "Skeleton Tool" Proper naming convention Download Everything Download everything mentioned above in the Requirements section. Place everything on desktop (relocate wherever you can easily find it when needed). Prepare Directory Add models/players/ Go to your JKA installation and navigate to gamedata/base. Add new directory -> name it models and open it. Add new directory -> name it players and open it. Add _humanoid Go to your base folder and open assets1.pk3 -> do not close this. Navigate through the following path -> models/players. Click and drag _humanoid into base/models/players. Add models Go back to assets1.pk3. Click and drag Desann and Rodian into models/players. Prepare Blender Install required addons Open your file explorer (windows 10 shortcut: windows button + e). In the navigation bar -> %appdata%. Navigate to Blender Foundation\Blender\2.91\scripts\addons. On my end it looks like C:\Users\Kenny\AppData\Roaming\Blender Foundation\Blender\4.2\scripts\addons. Click and drag (or copy/paste whatever method you prefer) jediacademy and skeleton_root into script\addons. Enable required addons Open Blender. Go to Edit -> Preferences -> Addons. Search for skeleton Make sure the addon enabled by ticking the checkbox. Search for jedi and do the same for this addon as mentioned in step 4 On the left bottom corner, press on the triple-striped icon and select Save Preferences. Tutorial Series Thank you I hope you've learned something out of this tutorial, if you do please let me know in the comments below. If there's something unclear to you or isn't working as you hoped it would, don't hesitate to contact me by either using the comments section or send me a PM. I prefer the comment section so other people can use your question (+ solution) aswell. Thank you for reading and following along with this tutorial. I hope it went flawless for you, and again.. if it wasn't the case don't hesitate to call for help!
-
I used seta disable_item_ysalimari 0 to enable the ysalamari
-
I found the issue. The item disable also has a ysalamari setting. Added that into the .cfg and put a 0 behind it. Now it works
-
Nobody?
