

Szico VII
-
Posts
1,054 -
Joined
-
Last visited
Content Type
Profiles
News Articles
Tutorials
Forums
Downloads
Posts posted by Szico VII
-
-
@mjtThat would be very much appreciated

Could you share your batch file? Perhaps just one where the map can be dragged onto it to run the compiler (all 3 stages?)
Many thanks again
Oh, and I might take you up on the tour at some point but Im off to a mates stag this weekend so will rain check for now, if thats ok?
mjt likes this -
@mjtthanks for nice words
when ita done all source files will be included as usual.
What is POM stand for?
alpha blend functions will blend both the diffuse and the normal/parallaxmaps , I am not sure how it would work with a decal shader + parallaxmap though
Ball would be nice as an NPC but I don't know how to do this myself as never used any character modelling stuff and not really keen to worry about that side of things unless it's very straightforward and has a clear easy tutorial.
I'm not sure what you are asking about the terrain. It's a brush trisoup in its entirety. The surface shader is a standard diffuse with an alphablended secondary texture for each blend, phong shaded and then the parallax and specular rend2 texture maps added.
-
Hi @mjtI was referring to q3map2 not netradiant, I did see the link about the netradiant features from another post above
in order to decide if its worth using, and how to make best use of it, I wpuld rrallynlike anlist of changes and any new compile parameters and what they do, so far I can find absolutely zero
I also have no idea how to actually get this new q3map2 working in the first place. Simply replacing the old exe does not work and the various dll files are in a new structure compared with the 2.5.17 version in gtk 6.6
-
I'm finding this a big problem coming back after a few years, nothing is documented and there's no references

-
Small updates - decided I preferred it with some more skybox elements.
 NumberWan, ZelZel, PreFXDesigns and 4 others like this
 -
3 hours ago, AshuraDX said:
You could simply download netradiant, grab its q3map2.exe and replace your current one with it. Doesn't require you to use netradiant at all, I mean I'm piping maps from 3ds max into netradiants q3map2

But what does it do differently?
-
What features does this new q3map2 have over the one with GTK1.6.6?
Is it possible to get the new q3map2 from somewhere by itself?
-
There is cubemapping on the water surface from rend2 , that's what's giving the little highlights on the crests of the waves and the slight green tinge reflecting the palm trees
I am not planning players to be much underwater as you cant really fight in the water anyway, most of the ocean accessible (not clipped off) is not so deep
I have never used fog underwater, JKA just projects that 2d blue tinge overlay effect I think
More details referred to things on the actual island, maybe a hammock , sorting out the grass e.t.c, some fishes underwater and so on
-
Thanks to @SomaZ the ocean deformvertexes are now working with rend2. Looks even better with true deformity - see video below:
Very soon this ocean work will be done and I can start adding some more to the map itself
And this last one is vanilla, which still looks ok!
-
-
9 hours ago, SomaZ said:
I guess you have exactly 1 deformVertexes in the shader. Theres another stupid in rend2 which originates from the ioq3 renderer where shaders with 1 deformVertexes aren't able to use the shader system to its full extend. Maybe add a deformVertexes normal next to the other one for now.
@SomaZ - yes with one deformvertexes (either wave or normal) there is no material properties applied. Problem is, with 2 the game crashes on map load - see shader below. Works fine in vanilla. And you only get the spec/cubemaps if i remove the deformvertexes completely...but then it doesnt look like water
textures/szico_halcyon/ocean_water2
{
qer_trans 0.5
qer_editorimage textures/szico_halcyon/ocean_water2
q3map_tessSize 256
qer_trans 0.65
q3map_material Water
surfaceparm nonsolid
surfaceparm trans
surfaceparm water
deformVertexes normal 0.4 0.25
deformvertexes wave 0.75 sin 0 1 1.0 0.75
{
map $whiteimage
alphaGen const 0.0
alphaFunc GE128
}
{
map textures/szico_halcyon/ocean_water2
normalMap textures/szico_halcyon/ocean_water2_nm
specularreflectance 0.5
roughness 0.1
alphaGen const 0.8
blendFunc GL_ONE_MINUS_SRC_ALPHA GL_SRC_ALPHA
tcMod scroll 0.01 0.025
}
{
map $lightmap
blendFunc GL_DST_COLOR GL_ZERO
}
} -
-
1 hour ago, SomaZ said:
m, no idea what would cause parallax to break. Did you add a rmo map with different image dimensions than the main image of a stage? The console might tell you more. Theres nothing else I can think of right now. If thats not the case, could you send me your current project so I can test it myself? Might take some time to figure out via text exchange only
Nothing has changed. Ive even made a new map just a square box with a single shader and the parallaxmap isnt applying now. Textures are both identically sized, the main texture and the nm.jpg. The specular layer still works fine if added. Nothing actually has changed with the shader or images from when it was working earlier.
Am I on a borked or old rend2? The most recent one on the github that was built was like from 2018 I think
And for some reason the github page is now gone/down ??
http://gandalf.acslo.com/rend2/
NVM I am so dumb, I redid the bumpmap to alter slightly and forgot I need a heightmap added to the alpha channel, which got erased by mistake
/facepalm
SomaZ likes this -
1 hour ago, SomaZ said:
The dummy stage actually forces the renderer to think its a solid material. Currently only solid materials can use the new lighting system (even if they actually arent solid). I will remove this restriction when I have some time because its stupid.
As I said, pbr materials try to decouple lighting from the material itself. Reflections are a component of lighting. So the roughness of the material defines how much reflection you will get. Not the most physical correct explaination. Reflection is always there. The roughness actually tells how much the reflection will scatter. The stronger the scattering, the less noticiable is the reflection itself. There is no dedicated reflection stage for cubemaps. Else you could not use the material in other places without defining a new shader with a different cubemap assigned.
EDIT: For a water shader you probably dont need a rmo. Theres no real occlusion happening, and you dont have metallic components. You can just skip that map completely. You can just define the roughness per stage with the keyword "roughness 0.5" for something that is more rough, "roughness 0.1" should be fine for water like surfaces. Since you scale down the reflection with your blend, you can counter it with "specularreflectance 0.0-1.0".
If you have a uniform transparency of 0.08, your specularreflectance should be around 1.0, the less transparent, the less the reflectance. Like uniform transparency of 0.16: specularreflectance should be 0.5 and so on. At least thats how I handled glass. Water might be more reflective overall.Assuming you use a texture without alpha channel, your shader could look similar to this
textures/rend2/water
{
	qer_trans	0.5
	{
		map $whiteimage
		alphaGen const 0.0
		alphaFunc GE128
	}
	{
		map textures/rend2/water
		normalMap textures/rend2/water_n
		specularreflectance 1.0
		roughness 0.1
		alphaGen 0.08
		blendFunc GL_ONE_MINUS_SRC_ALPHA GL_SRC_ALPHA
	}
	{
		map $lightmap
		blendFunc GL_DST_COLOR GL_ZERO
	}
}
See, i didnt even know these commands existed: (and incidentally, the line "
alphaGen 0.08is not recognised by the renderer (ingame error)
specularreflectance 1.0 roughness 0.1@SomaZDo you have a list of all the current working shader commands and descriptions by any chance?
Also, random issue - i enable r_parallaxmapping1 and as you can see from last video, was working with proper parallax effect on sand. But now its just stopped working. I even removed every other texture and shader from the mtr, just leaving the sand and the parallax effect is completely disappeared? Is this a bug or am I missing something
-
2 hours ago, SomaZ said:
Cubemapping needs to be enabled via cvar: r_cubemapping 1;vid_restart
It will use deathmatch spawn points to create them on level load, or you place new entities with "classname" "misc_cubemap", "radius" "#your_parallax_correction_radius", "origin" "#origin_obviously". Parallax radius is not very intuitive tbh, I'd start with something big like 1000 and reduce or increase when reflections behave strangely. Surfaces use the closest available cubemap around them. Theres another way of defining cubemaps via a json file, but this feature is like 100% undocumented. I added an export to my blender addon for the file, but also not public yet and undocumented.
EDIT: Havent tested any transparent surface with cubemaps for a long time. You might need to add a "solid" dummy stage first that actually draws nothing.
textures/rend2/transparent_cubemapped
{
	{
		map $whiteimage
		alphaGen const 0.0
		alphaFunc GE128
	}
	// your transparent layers after that
}
@SomaZIm confused which part of the shader tells it to use cubemaps for reflection?? Same for the one in the other topic:
Base has the tcGen enviro command, which bits in these shaders even tell it to be reflective? Just looks like a transparency + NM?
Or does it derive reflective areas from the rmo?textures/DF2_glass/glass1 { qer_trans 0.5 { map textures/DF2_glass/glass1 blendFunc GL_ONE_MINUS_SRC_ALPHA GL_SRC_ALPHA normalMap textures/DF2_glass/glass1_N normalScale 1 -1 rmoMap textures/DF2_glass/glass1_RMO } { map $lightmap blendFunc GL_DST_COLOR GL_ZERO } }
-
Thanks for the breakdown, is there a good tool that will generate appropriate PBR for free you can recommend?
The rend2 feature I was really hoping for was cubemapping for water but that's a no go?
Also, how would you darken the texture near the water line using rend2? Theres no good way to do this in baseJA other than a separate texture blend which is definitely possible
-
12 hours ago, Circa said:
I think @SomaZ is usually a good resource for rend2 questions.
If rend2 tutorials are spread around the forum we should probably get them in the tutorials section to find easier. I could always make a new category for it if people think that would be used.
I haven't found any good resources really. Just that one post that mjt already highlighted.
And there's no explanation of what each type of texture is, or does. Some example files for each type of shader pass/material pass would be extremely useful.
e.g the terms, albedo map, RMO mean nothing to me, and even google doesnt tell me what RMO stands for
It also mentions liquid shaders but that doesnt seem to work at all in my mtr so in need of refreshing
-
12 minutes ago, mjt said:
If you tell me the water level in worldunits, I'll drop you an .eal eagle mesh for EAX soundmuffling below water.
Im going to be honest, I have no idea what that means - can you explain?
14 minutes ago, SephFF said:your tutorials and .map files ya shared are half the reason I was able to make it. for example alpha shaders and decals are some things I learned from ya. The other half was due to @mjtbeing a mapping senpai lol. regardless can't thank ya enough.
Very glad you found the assets useful, Ill have a look at it shortly:
Do people think its better more isolated or I can pop more islands in the skybox to make it seem more of an archipelago chain
NB: rend2 is on left and vanilla on right:
15 minutes ago, mjt said:Do you intend to setup cloudshadows on the sea and island as well?
Also no idea how to do this, is this a rend2 feature? Ive found current ren2 documentation lacking, took me a few hours browsing posts to realise the shader commands I used a few years ago had all been changed e.g "stage normalparallaxmap"
-
Some progress:
And tried some rend2 features, parallax/specular on the sand and boat
As well as the dynamic sky light and shadows
@SephFF no its 1024x1024 the sky was a premade one I found on google, had to add the horizon and water below so it properly worked with the ocean blending
Skybox source: Pin page (pinterest.co.uk)
-
scp_chaos1, SomaZ, mjt and 13 others like this
-
- Title: Horizon Blending
- Subject: How to create a seamless horizon blend between your 3D terrain and a 2D Skybox.
- Written by: Szico VII
- Tutorial written for: JK3
- Similar concept work like in: N/A
- Difficulty level: 10/10
- Expected time to complete for first attempt: 2-4 hours
- Prerequisites: Understanding of trisoup and quadsoup terrain creation, Understanding of Alpha-Fading, Proficiency in Radiant 1.4.0 and in shader creation and useage, an image editing program that can blend 2 textures together, understanding of func_groups and how to use them.
Introduction:Creating the Skybox
This tutorial will instruct you on how to create a seamless blend between your 3D terrain and playable map and the horizon of your skybox, which I call "Horizon Blending". It will involve editing of the skybox image files, so you will need an image editing program capable of blending two textures together. I this tutorial I use Photoshop CS3, however you are free to use any program which performs a similar function.
There is a fair amount of assumed knowledge you will need to follow this tutorial, most importantly the basics behind quadsouped and trisouped terrain, and you must be able to create your own .SHADER files and be able to get them working in Radiant. This tutorial also assumes strong knowledge of the editor and its various shortcut keys, although these will sometimes be listed for your convenience.
Additionally, this method makes use of the alpha-fade system, so background knowledge on this system will help when customising different terrain blends. However, shaders and information will be provided in this tutorial which you can simply copy and paste, so it is not necessary to grasp the full concept provided you follow the instructions carefully.
Below is a list of tutorials you may find useful to read prior to attempting a terrain/skybox blend.
Hand-Shaped Terrain
Updating your Compiler
Terrain Blending
IMPORTANT! You must have Q3map2 version 2.5.16 installed for the alpha-fade system to work. Download it here (should be installed with GTKRadiant too) and use the above tutorial to install it if necessary.
Opaque Horizon Blending (no Water)
EXAMPLE FILES! - You should download the example files and extract them all to your base folder whilst reading through this tutorial, as they will help you to understand how things work! The large file size is due to the high-res textures.
Download example/source files
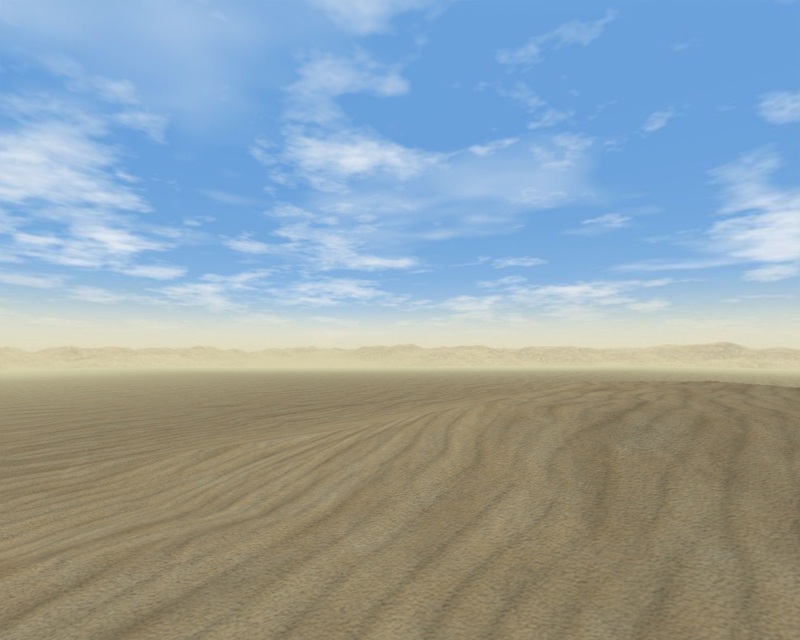
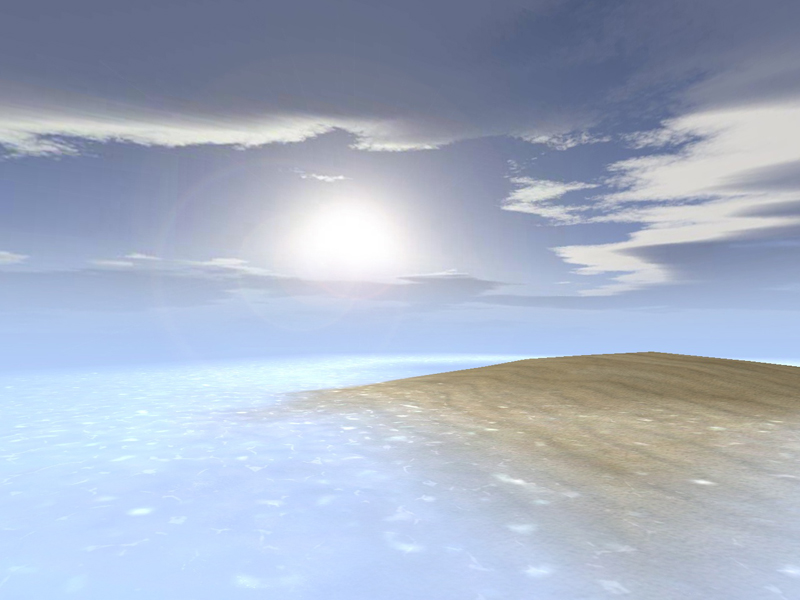
The first thing You will need to create is the terrain in which your players can move around in. This is basically your normal level, so build whatever you want. However, it is important that you decide on a texture which you want to use to blend into your horizon. In this tutorial, I shall be making a desert themed map, so the edges of my playable area will be using a sand texture. Ideally this texture should be large and scalable, as it will be stretching a long way into the distance and the less repetitive it looks, the better. There are a few design tips I have however, that will make your skybox blend look better.
If possible, have your playable area raised (i.e on a small hill) this is because it means the player is ABOVE the horizon line in relation to the skybox, and this allows you to keep more of your skybox visible (more on this later) If you are trying to create an ocean effect that a player can swim in, don't raise it too much as this will cause problems.
Try and make your map in a mainly circular shape - i.e, If you stuck a giant circular brush underneath it, it would fit onto it with no sections jutting out.
Make sure that when you have finished creating your level, the edges of the terrain of it are squared off and the same texture is all around the border. You should also place clip brushes to prevent players running out into the horizon!
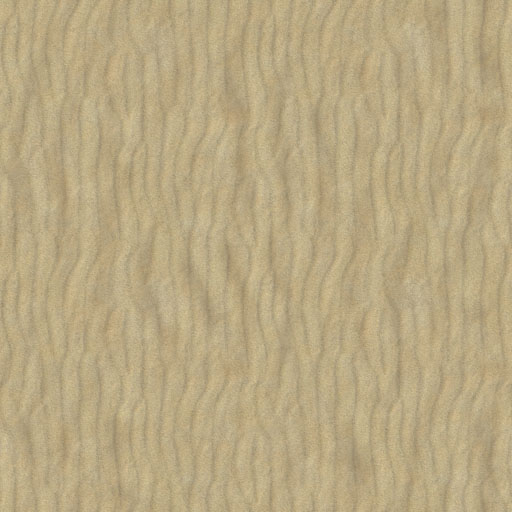
Here is the sand texture I have chosen to use for my terrain blend:
NB: You do not need to download this texture as it is included in the example files!
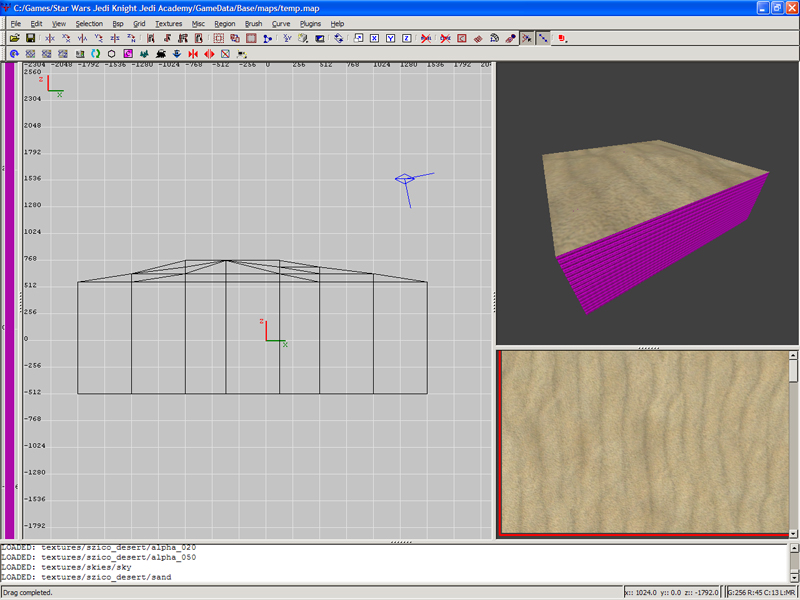
And here, is my basic terrain. (squared off at the edges) It doesn't have any detail in it, as this is only for demonstration purposes, but you can build whatever you want in this area as you would in a normal map. Feel free to make the terrain undulate (but keep the outside edges all the same height and using the same chosen texture) or do other alpha blends within this section
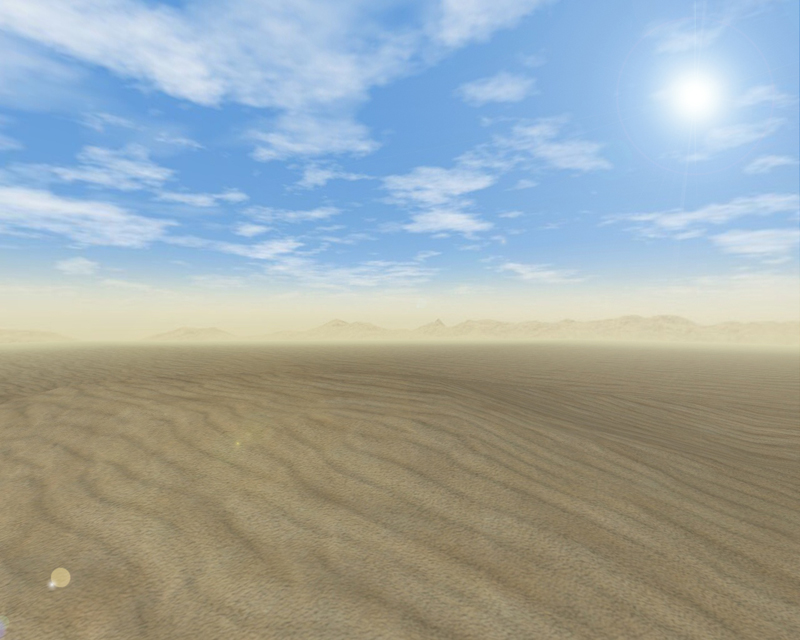
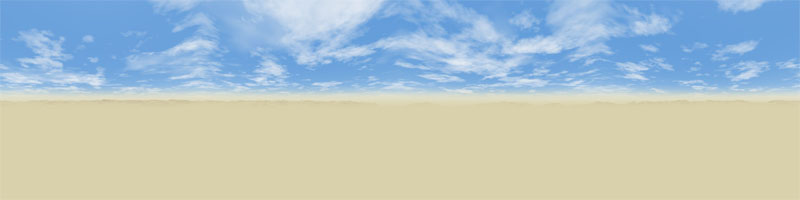
Now we can begin working on our skybox horizon blending itself. The first thing You will need to do is find an appropriate skybox, but bear in mind you will be losing any detail below the halfway line in them, so choose appropriately. Sometimes skyboxes that might not seem to be good choices for a seamless blend turn out to be quite good. I've chosen to use a base JA skybox, DESERT. You will need to place all your skybox images in a custom texture folder. For the purposes of this tutorial, I have chosen the folder textures/szico_desert. One of my skybox images can be seen below.
"textures/szico_desert/desert_ft.jpg"
You will also need to setup a sky shader for your new skybox. I have pasted one you can use below.
textures/szico_desert/sky
{
qer_editorimage textures/skies/sky.jpg
q3map_sun 1 1 1 350 180 45
surfaceparm sky
surfaceparm noimpact
surfaceparm nomarks
notc
q3map_nolightmap
skyParms textures/szico_desert/desert 512 -
}
NB: This sky shader has "Sky Lighting" which means a global sun will illuminate the level. You can choose to remove this if you wish, by deleting the line: "q3map_sun 1 1 1 350 180 45"
Open up your image editing program of choice!
Before we continue, I should explain the main principle behind this skybox blending.
Theory
The main idea behind blending 3D terrain into a skybox is quite simple. In order for both the skybox and your terrain to both appear to have blended together, they must both be the same colour and shade where they "meet." (In reality, they never meet as the skybox is drawn at an infinite distance from the player, but to the player"s eyes ingame, this is how it will appear.) This blend occurs at the horizon line on your skybox, that is, exactly halfway up your side-facing skybox textures, provided the player is on a flat plane. So here is what happens:
You blend your side-facing skybox images (skybox_rt, skybox_bk, skybox_lf, skybox_ft) to a solid colour of your choice halfway down. The colour you choose should be close to the shade of the skybox pixels directly above where the blend occurs, and a similar shade to your texture that you picked earlier on (in this case, a yellowy sand texture) Your bottom skybox image should be converted into a single colour that matches the one you picked for the sideways images. Do not edit your UP skybox image.
You then create a flat section terrain which stretches out into the distance in your map, and gradually blend this texture to the same shade of colour that you used in your skybox, using alpha-fade brushes. This gives the impression of a seamless blend, as shown below.
An important thing to note is that the lower down a player can move within the playable area of the map, the "horizon" line moves further up the side of your skybox texture. You will have to experiment to find the best place to blend your skybox images.
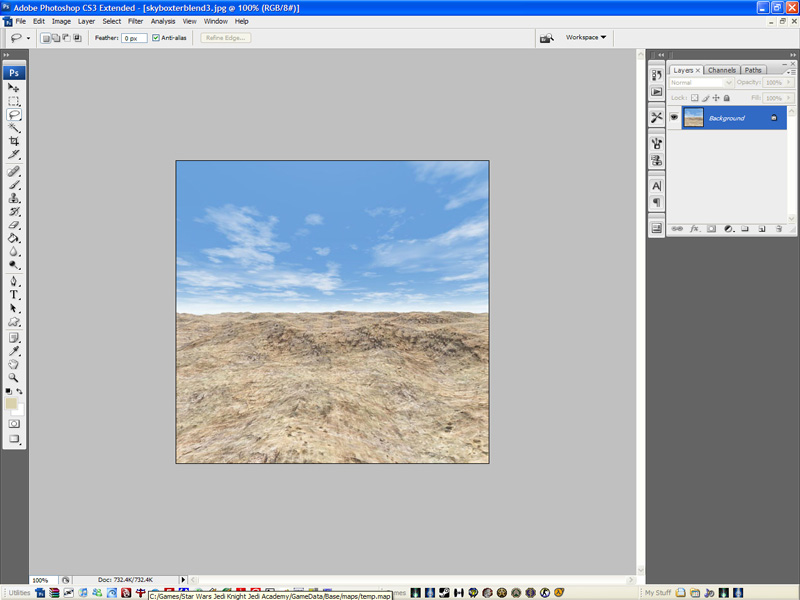
So, the next section of the tutorial will quickly explain how to create your skybox images using Photoshop.
NB: - The next few steps show how to blend your side images using Photoshop - If you use a different program you will need to find an equivalent tutorial for this section.
PHOTOSHOP ONLY
Step #1 - Open up your skybox_dn.jpg image. Recolour it to a completely flat shade (Remember, the shade should be approximately equal to the colour of your terrain texture) Some of JKA"s default skyboxes already have the bottom skybox image as a flat shade, so you do not need to edit these. An example is shown below, using the Korriban skybox.
SAVE THIS IMAGE!
Step #2 - Create a smaller 64x64pixel texture and colour it completely the same shade again. (This is the image we will later use to blend our terrain texture with.) SAVE IT as textures/szico_desert/yellowblend.jpg (Feel free to change the name when creating your own skybox blend that doesn"t use yellow as its colour)
Step #3 - Open your 4 side-facing skybox images (skybox_rt, skybox_bk, skybox_lf, skybox_ft.) You can start with any one of these 4.
Step #4 - Create a new layer (Layer --> New --> Layer...)
Step #5 - Use the fill tool to make this layer the same colour as the DN skybox image.
Step #6 - Create a new Layer Mask (Layer --> Layer Mask --> Reveal All...) A white box should appear next to your layer thumbnail in your layers window.
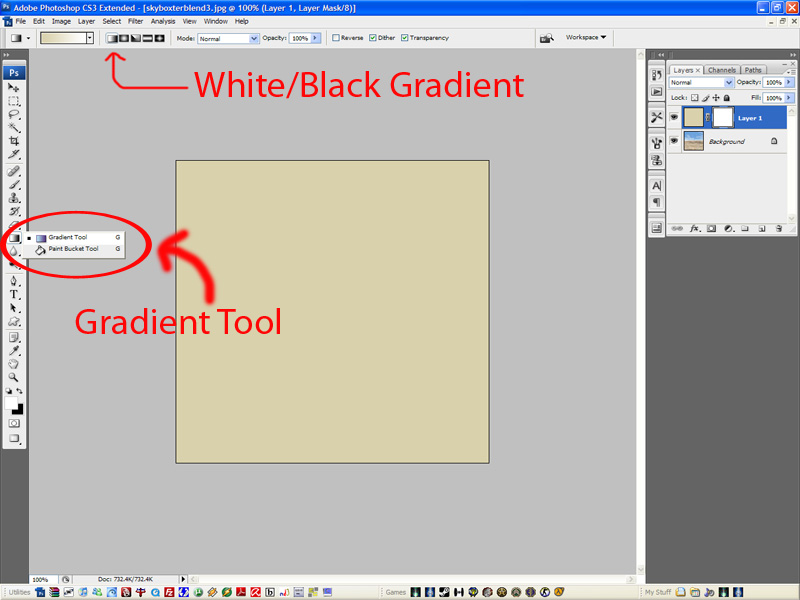
Step #7 - Select the Gradient Tool, and make sure that you are using the white/black flat gradient, as shown below:
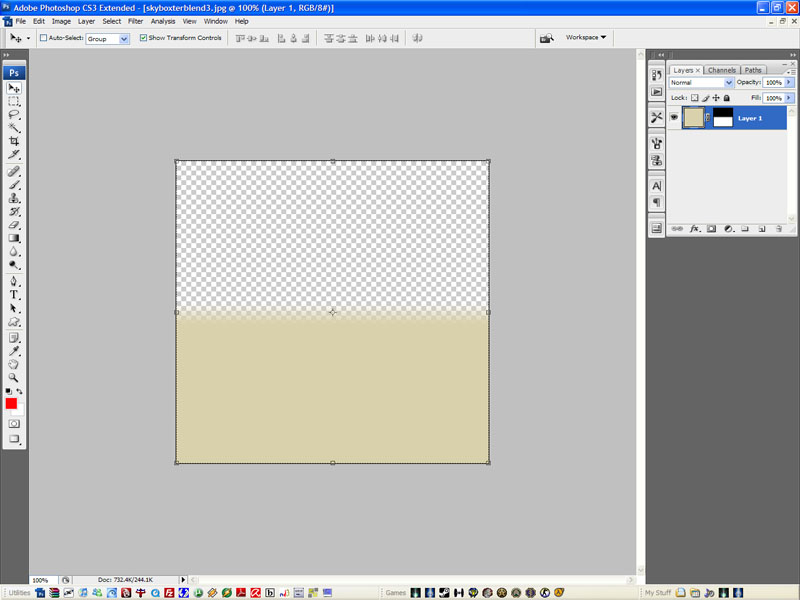
Step #8 - Press and Hold SHIFT, whilst clicking and dragging your mouse upward. The further you drag your mouse upwards, the more gradual the blend. You can try again by repeating this action if you make your blend in the wrong place. Ideally your blend should start just about the halfway point, and extend slightly above it, although this might change depending on your specific map horizon level. This will create an effect as shown below:
SAVE THIS IMAGE over your original image.
Step #8 - Now we need to paste this new layer mask into the other 3 side-facing skybox images. In your layers window, RIGHT-CLICK on the layer that is named "Background," and press DELETE. This should leave you with your yellow blending only.
Step #9 - Copy everything left over. First hit Ctrl+A to select everything in your image, and then go Edit --> Copy Merged. This will add your yellow/transparent blend to your clipboard.
Step #10 - Paste this layer over your remaining 3 side-facing skybox images, so all of them blend to a solid yellow colour at the same level, as shown below. SAVE ALL OF THEM OVER THE ORIGINAL IMAGES!
You have now finished all the editing of your skybox textures! The next section will deal with blending your terrain into this skybox.
Blending your terrain: Opaque Horizon Blend
First up, here is a basic explanation of what an alpha fade is, and how it works.
An Alpha-fade brush is simply a brush you make in Radiant which is covered with an alpha-fade shader. Alpha fade shaders are used by a mapper to blend textures together in varying degrees. In this tutorial, we will only be blending 2 textures together, similar to the way easygen blends textures together, but using a different method.
For this tutorial, our PRIMARY texture is my sand texture (textures/szico_desert/sand.jpg), and my SECONDARY texture is my yellow texture (textures/szico_desert/yellowblend.jpg) Wherever an alpha 100% brush covers a brush vertex with a special blending shader applied, it will tell the shader to show the Primary texture at 100% opacity. Wherever an alpha 0% brush is applied, it will tell the shader to show the primary texture at 0% opacity, and thus the secondary texture will be fully visible.
Values of 50% and other inbetween show the primary texture at various opacities, thus creating a blended effect.
Shaders:
You will need to edit all these shaders into your own shader file for your own maps - however, all the tutorial images/shaders can be found in the included example files.
PHONG SHADER: - This is the shader that should be applied to all the edge brushes of your playable area. It is a phong shader, which means it smooths shadowing over trisouped and quadsouped terrain, preventing hard edges or splodge shadowing/lighting from occuring. This shader is NOT affected by alpha fade brushes.
textures/szico_desert/sand
{
qer_editorimage textures/szico_desert/sand
q3map_material Sand
q3map_shadeangle 90
q3map_nonplanar
{
map $lightmap
rgbGen identity
}
{
map textures/szico_desert/sand
detail
blendFunc filter
}
}
SAND/YELLOW BLENDING SHADER: - This is the shader which is applied to all the flat brushes outside your playing area, and these are the brushes where the blending takes place. This shader is affected by any alpha fade brushes which touch the vertices of the brush it is applied to. It also has an editorimage so you can tell the difference between the normal phong sand shader and the blending shader in radiant.
textures/szico_desert/sandyellow_blend
{
qer_editorimage textures/szico_desert/sandyellow_blend
q3map_material Sand
q3map_shadeangle 90
{
map $lightmap
rgbGen identity
}
{
map textures/szico_desert/sand
blendFunc GL_DST_COLOR GL_ZERO
}
{
map textures/szico_desert/yellowblend
blendFunc blend
alphaGen oneMinusVertex
}
}
ALPHA FADE SHADERS: - These are the shaders that give the alphamod brushes their paramaters and cause them to affect your blending shaders. They are editor only and are used only during the compile process, and do not appear ingame.
textures/szico_desert/alpha_000
{
q3map_alphaMod volume
q3map_alphaMod set 0
q3map_nolightmap
surfaceparm nodraw
surfaceparm nonsolid
surfaceparm trans
qer_trans 0.75
}
textures/szico_desert/alpha_010
{
q3map_alphaMod volume
q3map_alphaMod set 0.1
q3map_nolightmap
surfaceparm nodraw
surfaceparm nonsolid
surfaceparm trans
qer_trans 0.75
}
textures/szico_desert/alpha_020
{
q3map_alphaMod volume
q3map_alphaMod set 0.2
q3map_nolightmap
surfaceparm nodraw
surfaceparm nonsolid
surfaceparm trans
qer_trans 0.75
}
textures/szico_desert/alpha_030
{
q3map_alphaMod volume
q3map_alphaMod set 0.3
q3map_nolightmap
surfaceparm nodraw
surfaceparm nonsolid
surfaceparm trans
qer_trans 0.75
}
textures/szico_desert/alpha_050
{
q3map_alphaMod volume
q3map_alphaMod set 0.5
q3map_nolightmap
surfaceparm nodraw
surfaceparm nonsolid
surfaceparm trans
qer_trans 0.75
}
textures/szico_desert/alpha_075
{
q3map_alphaMod volume
q3map_alphaMod set 0.75
q3map_nolightmap
surfaceparm nodraw
surfaceparm nonsolid
surfaceparm trans
qer_trans 0.75
}
textures/szico_desert/alpha_100
{
q3map_alphaMod volume
q3map_alphaMod set 1.0
q3map_nolightmap
surfaceparm nodraw
surfaceparm nonsolid
surfaceparm trans
qer_trans 0.75
}
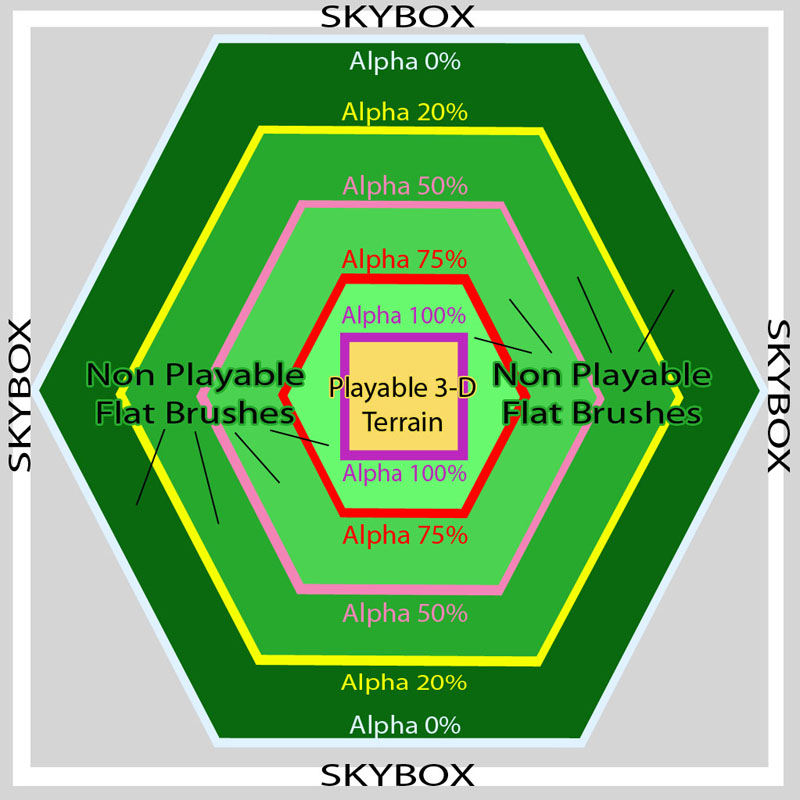
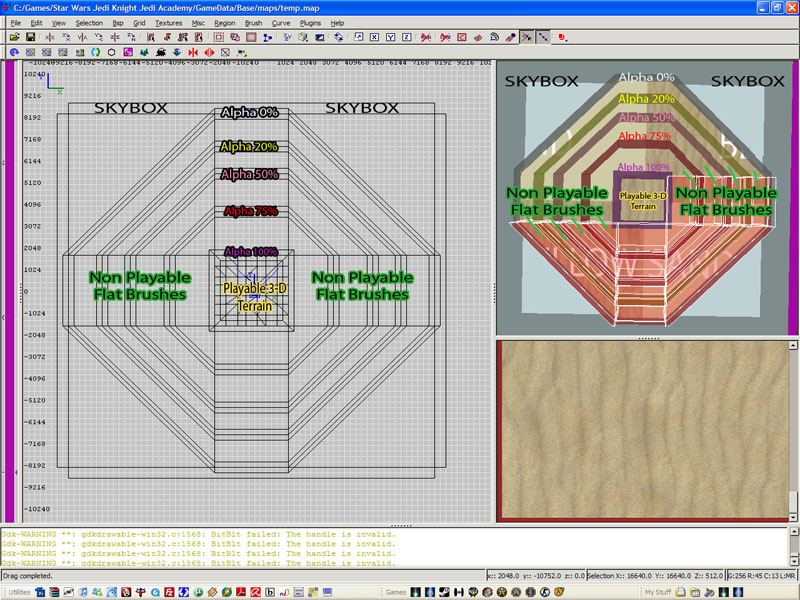
The basic layout for our overall terrain will be as shown below. It is important to note that all your skybox terrain blending brushes (Green in the image below) should be FLAT.
Key:
GREEN - Flat brushes covered with the SAND/YELLOW BLENDING shader. Each different shade of green is a different set of brushes.
ALPHA XX% - Brushes which overlap the edges of the flat GREEN brushes either side and use the alpha fade shaders.
SKYBOX - Your skybox shader applied to a large box which extends around your terrain.
PLAYABLE 3D - The area where your map itself is located, bordered by the PHONG SHADER.
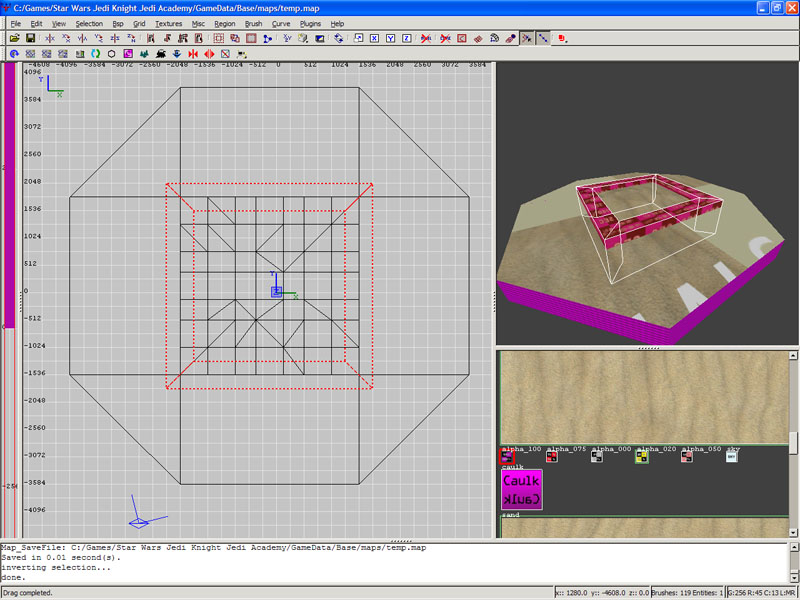
Here is the same setup shown in Radiant. The playable area of your map which you made earlier is in the center.
Here's how you go about creating this shape, starting from your basic playable area (remember it should be a square shape and the edges should use the phong shader described above)
Remember the basic terrain we made earlier?
Well, it's time to add to this. We will start with our first "layer" of terrain blending brushes and form them into a hexagonal shape around our central box.
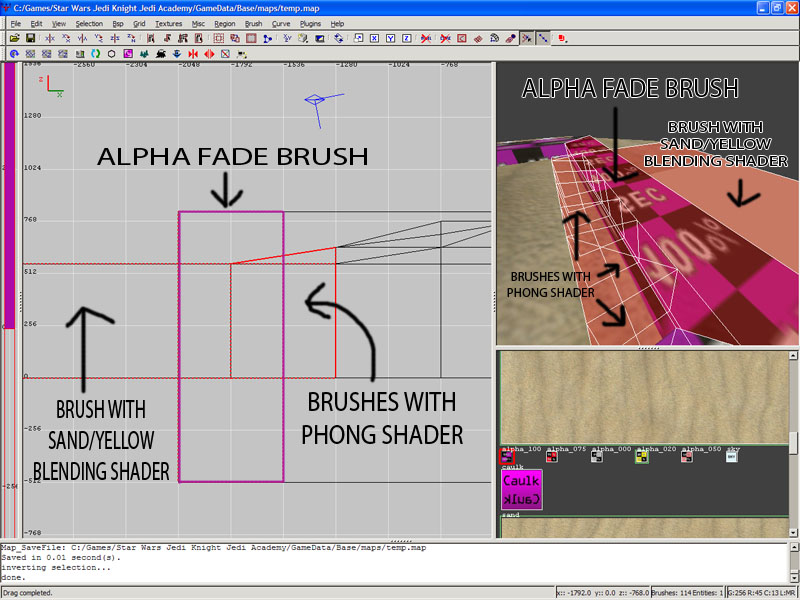
Create a hexagonal shape around your central area using 6 brushes as shown below. Texture them all with the SAND/YELLOW BLENDING shader. You will notice the brushes in my central area all use the PHONG shader, but in your map this is not necessary - only the brushes nearest the outside of this area need the phong shader. If you wanted grass in the middle, you could then blend the phong shader to grass, but that's something for you to try in your own time. If you're fine with sand all the way, then leave it as I have.
Now it's time to add the alpha-fade brushes. Place 4 alpha fade brushes (mitred) along the seams between your 6 new terrain blending brushes, and any brushes making up the edges of your playable area, as shown below. The Alpha Fade 100% brushes used will tell the game to show 100% of the primary texture (The sand) where the terrain blending brushes meet the normal phong shader. As the primary texture and the phong shader are the same, they should match up. The alpha fade brushes should extend above and below the terrain brushes, AND they should extend a short way into the brush on either side, to make sure they are over the brush vertexes.
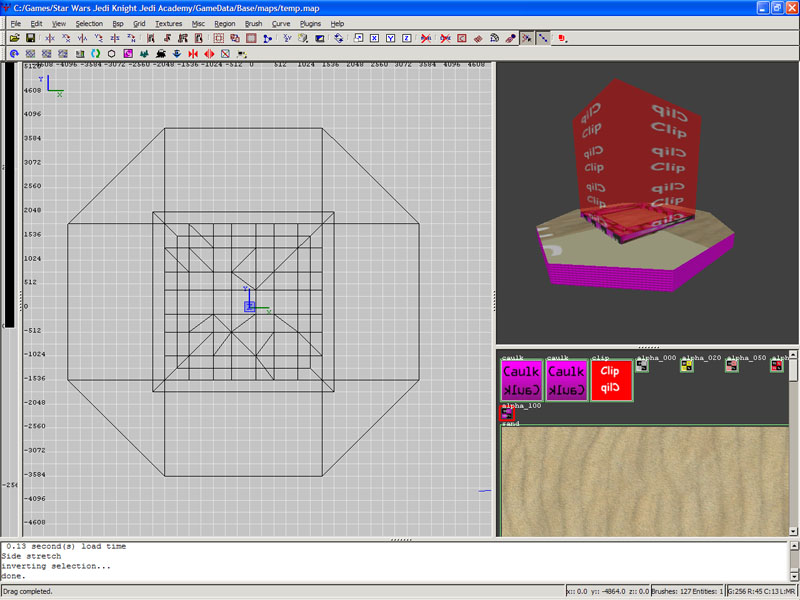
I have also added CLIP brushes to prevent players from leaving the main map and venturing into our skybox/terrain blending section.
Now we need to make the next layer of brushes. In case you don't understand why we are making it in layers, it is because alpha fade brushes only work when they are placed over brush vertices, and so if we just made one big brush, it wouldn't have any effect, except for at the edges. However, this time we will be using an alpha fade 70% brush on the seams - this means our secondary texture (the yellow texture) will start to show up. It wont show up in radiant but after you have compiled you will see it.
NB: I have hidden the clip brushes for ease of viewing
You now just need to add the remaining layers until you get to the final layer and can use the 0% Alpha Fade brush. You can use the above images as reference if you wish.
NOTES:
You are free to make these layers wider or shorter, or use more of them with more specific alpha fade brushes. I have only used 100,75,50,20 and 0%, but you can use any value between 1-100% by editing the alpha fade shaders to suit your needs.
Increasing the width of the layer results in a more smooth transition, for long terrains stretching out into the distance. Smaller widths tend to fall off faster, but do save space in your map, so aim to make them as thin as possible whilst still maintaining a good looking blend.
For maps where you can move to very high points, say towers and the like, you will probably need wider brushes to made the blend look good.
When you are finished, your map should resemble my sample map. Don't forget to add your skybox box if you haven't already!
Compile and check it out ingame!!
A water skyline: Non-Opaque Horizon Blends
This next section builds on the last by showing you how to create non-opaque terrain blends - that is, using water as well as fading terrain to create your horizon. It will also show you how to add a surf to circular islands using alpha fading, and how to add caustics to shallow water, again using alpha fading.
The first thing to note about blending water is that the terrain setup is slightly but significantly different from when you make an opaque terrain blend. With the opqaue blend shown in the above section, you only need two sections of terrain: The central playable area, and a flat plane for your blending terrain which stretches into the distance.
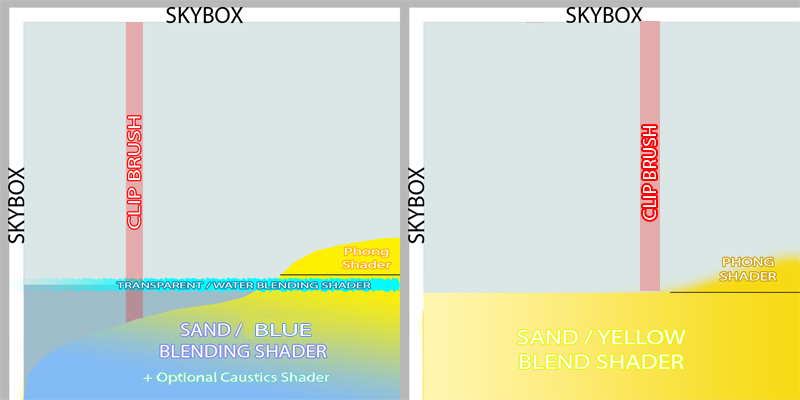
However, with a non-opaque water blend, you have to remember that you will be able to see through the water, so there needs to be another layer of terrain beneath it. Additionally, your underwater sand layer is not going to be completely flat, as shores generally tend to slope off into the water, and would look silly if they just went down and then was straight. The second point is that your water layer will need to blend to transparency, rather than a solid colour texture, which will require a different shader! The image below shows the differences between the two types of horizon blending. And finally, your water will start (on the shore) as transparent, then quickly fade to 100% water shader, and then gradually back to transparent. This it to prevent a hard line occuring where the water meets the shore.
At the end of this section will be an optional paragraph or two about adding underwater caustics and a surf should you wish.
On the left: Non-Opaque blending, and On the Right, Opaque blending.
Shaders:
You will need to edit all these shaders into your own shader file for your own maps - however, all the tutorial images/shaders can be found in the included example files.
PHONG SHADER: - This is the shader that should be applied to any brushes exclusively above your water level, i.e, only brushes that have no section of them underneath the water line! It is a phong shader, which means it smooths shadowing over trisouped and quadsouped terrain, preventing hard edges or splodge shadowing/lighting from occuring. This shader is NOT affected by alpha fade brushes.
textures/szico_beach/sand
{
qer_editorimage textures/szico_beach/sand
q3map_material Sand
q3map_shadeangle 90
q3map_nonplanar
{
map $lightmap
rgbGen identity
}
{
map textures/szico_beach/sand
detail
blendFunc filter
}
]
SAND/BLUE BLENDING SHADER: - This is the shader which is applied to all the underwater terrain brushes (including those that are partly underwater and partly above water), and these are one set of brushes where blending takes place. This shader is affected by any alpha fade brushes which touch the vertices of the brush it is applied to. It also has an editorimage so you can tell the difference between the normal phong sand shader and the blending shader in radiant. It will be applied to a trisoup/quadsoup.
textures/szico_beach/sandblue_blend
{
qer_editorimage textures/szico_beach/sandblue_blend
q3map_material Sand
q3map_shadeangle 90
q3map_nonplanar
{
map $lightmap
rgbGen identity
}
{
map textures/szico_beach/sand
blendFunc filter
detail
rgbGen identity
}
{
map textures/szico_beach/blueblend
blendFunc blend
rgbGen identityLighting
alphaGen oneMinusVertex
}
}
OCEAN BLENDING SHADER: - This is the shader which is applied to flat ocean brushes (i.e, your water level.) and these are one set of brushes where blending takes place. This shader is affected by any alpha fade brushes which touch the vertices of the brush it is applied to. It does not have a lightmap so you will need to adjust the brightness/contrast/colours of the textures manually if you want to use it for a night-time water. It contains multiple layers, all of which will fade to transparency when the right alpha fade brushes are applied to it, and the extra layers will simulate various refractions off the water, as envmaps don't work with this kind of blending (or, I haven't got them to work properly yet.
textures/szico_beach/oceanwater
{
qer_editorimage textures/szico_beach/water
q3map_nolightmap
qer_trans 0.65
q3map_material Water
surfaceparm nonsolid
surfaceparm trans
surfaceparm water
cull none
sort additive
{
map textures/szico_beach/water
blendFunc GL_SRC_ALPHA GL_ONE
rgbGen identity
alphaGen vertex
tcMod scroll 0.01 0.025
}
{
map textures/szico_beach/oceanwater
blendFunc GL_SRC_ALPHA GL_ONE
rgbGen identity
alphaGen vertex
tcMod scale 0.25 0.25
tcMod scroll -0.0075 -0.03
rgbGen identity
}
{
map textures/szico_beach/oceanglow
blendFunc GL_SRC_ALPHA GL_ONE
rgbGen identity
alphaGen vertex
tcMod scroll -0.0075 -0.03
rgbGen wave sin 1 0.05 0 0.5
tcMod scale 0.5 0.5
rgbGen identity
glow
}
{
map textures/szico_beach/oceanglow2
blendFunc GL_SRC_ALPHA GL_ONE
rgbGen identity
alphaGen vertex
tcMod scale 0.35 0.35
rgbGen wave sin 1 0.05 0 0.5
tcMod scroll -0.05 0.008
tcMod rotate 4
rgbGen identity
glow
}
{
map textures/szico_beach/oceanglow3
blendFunc GL_SRC_ALPHA GL_ONE
rgbGen identity
alphaGen vertex
tcMod scale 0.15 0.15
tcMod scroll -0.005 0.01
rgbGen wave sin 1 0.05 0 0.5
rgbGen identity
glow
}
}
Setting up your Terrain
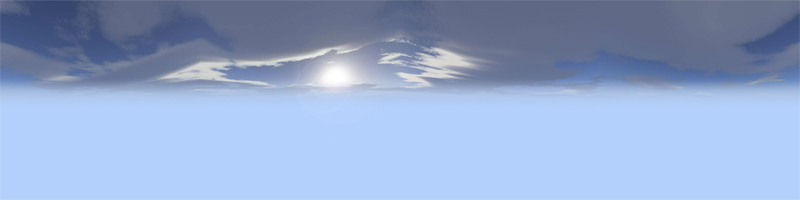
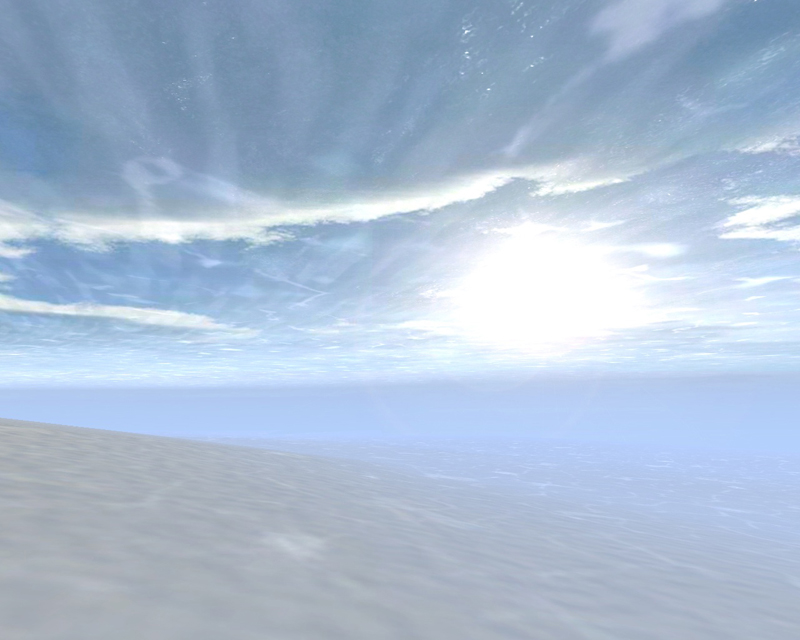
Firstly you will need to repeat the steps shown previously to create your skybox. As this is now a water-themed skybox, blue is a more appropriate colour to blend to, instead of yellow, so blend to a blue colour instead (and save a 64x64 pixel texture using the same block colour).
My skybox is shown below.
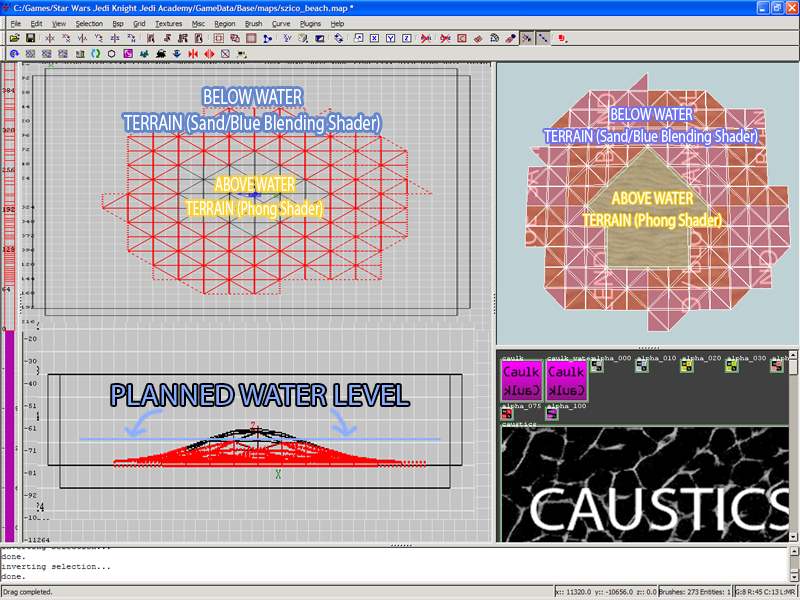
Next up, you'll need to create your playable terrain. For my example map, the player is on a beach, and so can actually enter the water. For this reason, my underwater terrain is entirely trisouped. Remember, any brushes exclusively above water should be your phong shader, at least around the edges, but within that you can build your normal map and anything you want. Any brushes which touch beneath your planned water line in any way should be covered with your sand/blue terrain blending shader, as shown below. Remember your central area must (obviously) be higher in the middle and gradually slope outwards, although the exact incline and shape is entirely up to you.
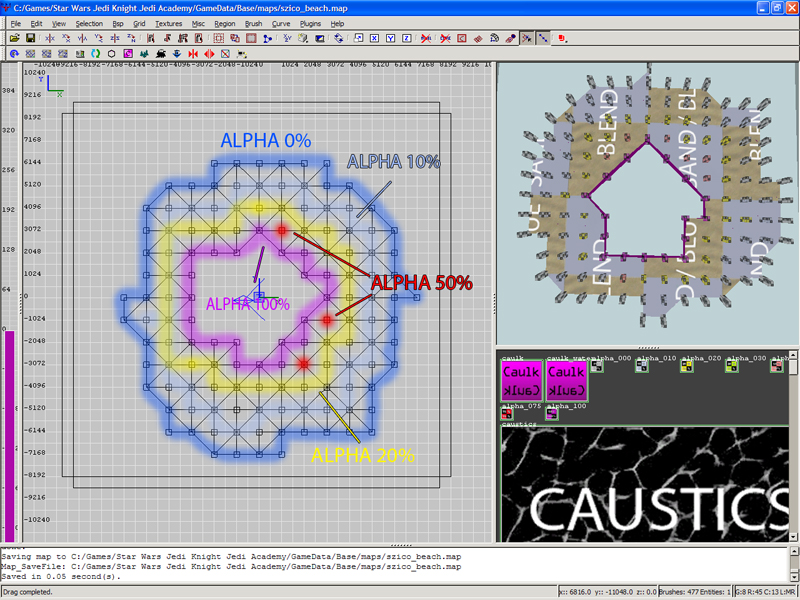
The next part is adding your alpha fade brushes to this terrain to cause it to gradually blend to the same blue colour that you have used for your skybox.
Because we are using our terrain blending shader on a trisoup this time, we will need a LOT more alpha fade brushes, as you will need an alpha fade brush for each vertex of your trisoup. It is is a little difficult to explain, so you should look at the source files as you read through, but you need to move in a circular motion around the far outside of your trisoup, placing Alpha 0% 'poles' on every set of brush vertexes. Once you have finished the outside layer of vertexes, you should do the next layer using Alpha 20/30% brushes. Depensing on the size of your terrain, you can control how gradually the blend occurs by using a greater variety of alpha fade brushes. For my map, I used 0,10,20,50 and 100%. The basic layout is shown below.
Select all your brushes with your Sand / Blue Terrain Blending shader AND the alpha fade brushes you have added (but not your phong shader brushes) and FUNC GROUP THEM!
You can hold Alt+Ctrl and click one of these brushes to quickly select the entire group if you wish in the future.
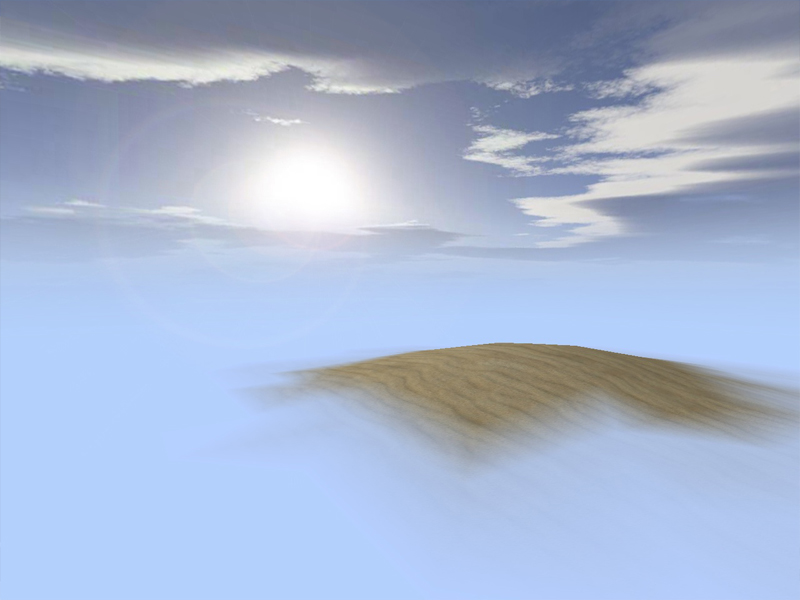
This is what you have done so far looks ingame. The blend might seem very sharp and not very smooth at the moments, but when we add the water brush above it it won't be noticeable. Obviously, bigger islands will need a large area of underwater terrain and a more gradual blend.
FUNC_GROUPS
The type of blending used within this section of the tutorial relies on the use of func_groups within radiant. Func_groups are used to group brushes together within the editor, both for convenience, and in this case, to determine which alpha fade brushes affect which sections of terrain Alpha fade brushes will only affect terrain blend shaders on other brushes within the same func_group. This is particularly necessary in this section because there will be overlapping areas of terrain, but which need to be affected by different alpha fade transparencies. Each different set of brushes with a blending shader will be part of a different func group.
To make a set of brushes into a func group, simply select all the brushes you want to include in the group, go Right Click --> func --> func_group
To select all the brushes within a func group, hold Alt+Ctrl and click any brush that is part of the group you wish to select.
Adding the water:
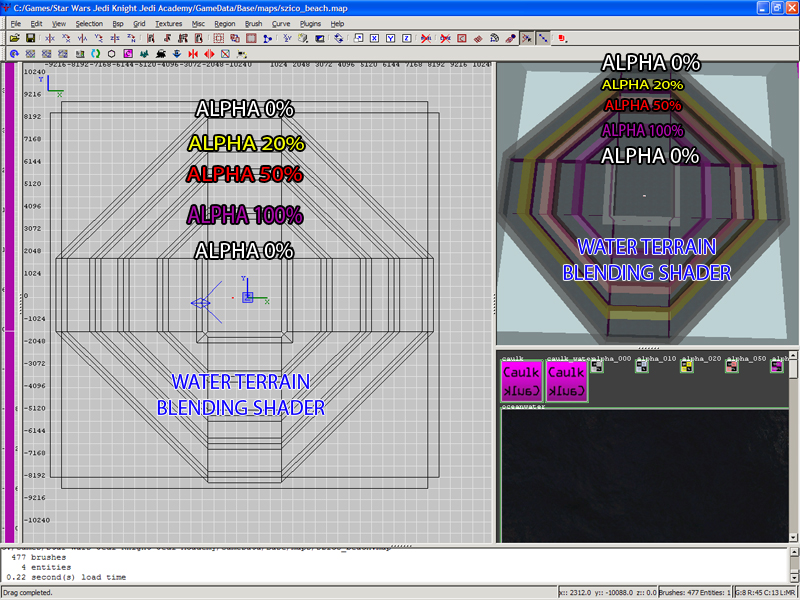
The setup for your water brushes are remarkable similar to the setup used in the first section of this tutorial for an opaque terrain blend. The water brushes must be flat as before, and will still be in a hexagonal shape with alpha fade brushes applied to the vertex seams. There are however, 3 crucial differences here.
NOTE #1 - Aside from the top facing face of your brushes, all the other sides should be caulk_water.
NOTE #2 - You must FUNC GROUP all your alpha brushes and water brushes together to make sure the alpha fade brushes used here don't affect the underwater terrain you just made and mess the blending up.
NOTE #3 - You should use alpha 0% shaders for moth the outermost brushes and the innermost brushes, to both blend the water to transparency at the edges of the map, and right on the shoreline to prevent a hard edge from occuring where it means the sand terrain. The 2nd innermost layer should go straight to a 100% alpha brush, and then gradually fade out towards the outermost layer. An example is shown below.
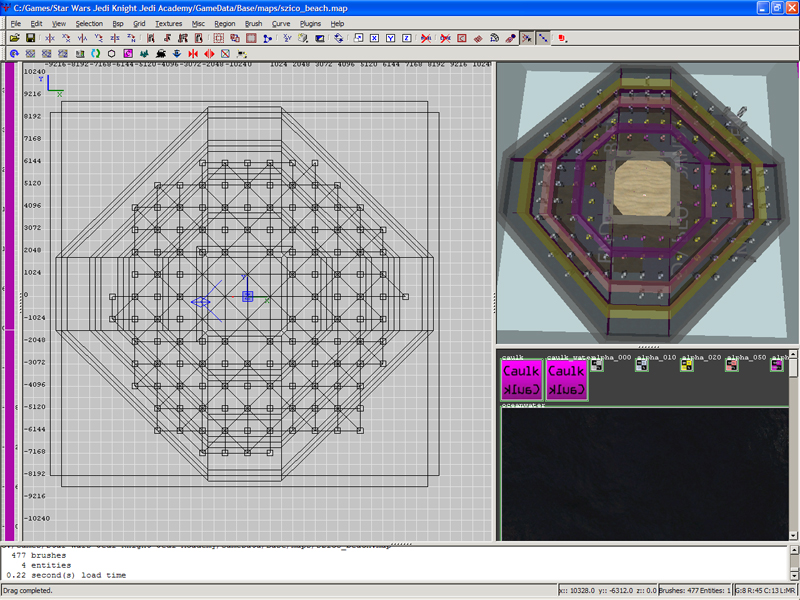
The water brushes, with the rest of the terrain hidden:
The map with both the water terrain func_group AND the sand terrain func_group visible.
And the map ingame:
And that's it for creating your water! If you want to learn how to add underwater caustics and a surf, carry on reading!
Light Refractions Underwater: Underwater Caustics
Adding underwater caustics is quite simple. You will need a shader similar to the one shown here:
CAUSTICS SHADER: - This is a DECAL shader. This means that it if placed on a brush that occupies the same plane as another brush, this shader will always be shown on top. We can use this to good effect by duplicating the orginal sand/blue terrain blending brushes and simply applying this shader to them. Although identical shaped brushes will now be in place, the brushes with the caustics shader will be prioritised ingame.
textures/szico_beach/caustics
{
qer_editorimage textures/szico_beach/caustics_editor
q3map_material Sand
q3map_shadeangle 90
q3map_nonplanar
q3map_nolightmap
surfaceparm trans
surfaceparm nonsolid
surfaceparm nonopaque
qer_trans 0.5
polygonOffset
{
map textures/szico_beach/caustics
tcmod Scale 4 4
blendFunc GL_SRC_ALPHA GL_ONE
alphaGen oneMinusVertex
rgbGen wave sin 1 0.05 0 0.5
tcMod scroll -0.0075 0.005
}
{
map textures/szico_beach/caustics2
tcmod Scale 4 4
blendFunc GL_SRC_ALPHA GL_ONE
alphaGen oneMinusVertex
rgbGen wave sin 1 0.15 0 0.8
tcMod scroll -0.0175 0.025
}
{
map textures/szico_beach/caustics3
tcmod Scale 4 4
alphaGen oneMinusVertex
blendFunc GL_SRC_ALPHA GL_ONE
tcMod scroll 0.15 0.15
rgbGen wave sin 1 0.15 0 0.8
glow
}
}
Hide your water terrain brushes with the alpha fade brushes, and select your brushes covered with the Sand / Blue Terrain Blending Shader. Copy and Paste the entire set of brushes, and change the shader to your caustics shader. Re-func group these brushes to make them a seperate func group from the original set of brushes!You will now need to change the centre-most layer of alpha-fade brushes from 100% alpha to 0% alpha, as we need the caustics to blend to transparency as they touch the shoreline, then become more opaque as you go beneath the water, then fade to transparency again as you move away from the centre of the map. You may need to change some of the other alpha fade brushes to get a clear set of caustics visible ingame
MAKE SURE YOUR CAUSTICS BRUSHES AND THEIR ALPHA-FADE BRUSHES ARE ALL FUNC_GROUPED AND IN A DIFFERENT FUNC_GROUP FROM YOUR ORIGINAL TERRAIN!
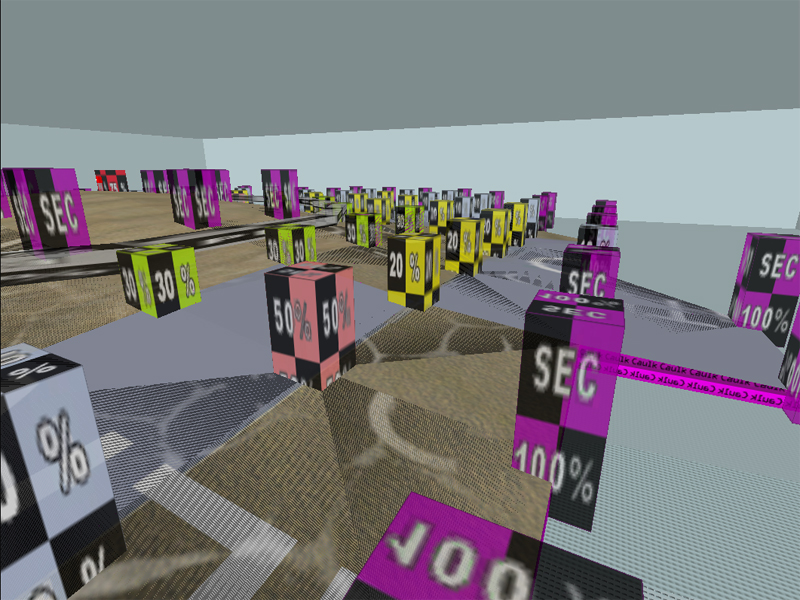
In Radiant, you will see Z-fighting, as shown below,
But ingame, it should look like this! - Alpha fading used to create underwater caustics! -
- Title: Admin Password Creation (Atlantica)
- Subject: Creating a custom admin room password for Atlantica or other maps.
- Written by: Szico VII
- Tutorial written for: BehavED/JK3/Atlantica
- Similar concept work like in: N/A
- Difficulty level: 5/10
- Expected time to complete for first attempt: 25 mins
- Prerequisites: Atlantica Source, BehavED and Pakscape programs downloaded.
Before we get started with this tutorial, you will NEED two programs in order to get this to work, as well as the Atlantica Source Files
NB: This was written specifically to edit the passworded system found in my map Atlantica, but it can be transposed and used in other maps.
Firstly, you will need a program called BehavED, and secondly you will need a program called Pakscape. BehavED is a scripting tool used to create the password script and is part of the Jedi Academy SDK (Developer’s Kit), and Pakscape is used to make PK3 files. The download links are below:
To install the developer’s kit (SDK) you may use the following tutorial
Look for the section named "Installing the developers kit."
Once you have installed the SDK and Pakscape, and downloaded and extracted the Atlantica Source Files, we are ready to continue:
Open BehavED – you should see a window that looks like this if you have installed it correctly
You should now open the default password script file. On the right hand side of the program, find the File>Open button, and press it.
Browse to the following folder:Jedi Academy/GameData/base/scripts/atlantica/keycode/
And open the file named universal.txt
Your BehavED screen should now look like below:
Click the small + sign next to the first ‘IF’ line, and then click the + sign under the ‘IF’ that appears under that. Repeat until you have pressed all the + signs that stem from the first IF line, as shown below.
You will see that the current information (indicated by the green arrows here) reflects the default code used in the map. Changing this information is relatively easy.
To change the code, simply replace the values shown above with your own values by double clicking each line and editing the value in the right-hand most field, as pictured below.
Once you have replaced all 6 values, press SAVE. However, we still have another section to edit which relates to how the code resets itself to 999999 (ingame) after a successful use.
Click the + Sign before the second ‘IF’ line to open another block of code, a longer one this time. We are only interested however, in the sections between the lines shown below.
Basically, in order to reset the counter back to 9 after a successful password input, the script tells the counter to move down one number, as many times as it takes to return it to 9 from its ‘success’ position. For example, the first digit of your new code might be 4. This means, when a code is successfully inputted, the digit of button1_code_useable will be 4. (The next step down after 0 is back to 9) In order to return to 9, the script should tell the counter to move down by 1, five times, with the value decreasing from 4, to 3, to 2, to 1, to 0 and then back to 9. Each block of code between the ‘wait 100’ lines tells the digits to decrease by one for each console mentioned.
FOR EXAMPLE, THE USING THE ORIGINAL INPUT - 557752- The first block of code decreases each digit of all 6 consoles by 1, thus making the digits show 446641.
- The second block of code is the same as the first, and also decreases each digit of all 6 consoles by 1, thus making the digits show 335530.
- The third block of code is identical to the first and second blocks, which tell the digit values of consoles 1-6 to decrease by 1, resulting in the digits 224429. (After a console digit reaches zero, the next digit down is back to 9)
- CONSOLE #6 HAS NOW RETURNED TO ITS 9 POSITION, AND SO IS NOT INCLUDED IN THE FOURTH BLOCK OF CODE, AS THAT WOULD THEN SET THE DIGIT VALUE OF THIS CONSOLE TO 8.
- As such, the fourth block of code only contains 5 lines, which tells the digit values of consoles 1-5 to decrease by 1, resulting in the digits 113319.
- The fifth block of code is identical to the fourth block, which tells the digit values of consoles 1-5 to decrease by 1, resulting in the digits 002209.
- The sixth block of code is identical to the fifth and fourth block, which tells the digit values of consoles 1-5 to decrease by 1, resulting in the digits 991199.
- CONSOLE #1,2,5 AND 6 HAVE NOW RETURNED TO THEIR ORIGINAL POSITIONS, AND SO ARE NOT INCLUDED IN THE SEVENTH BLOCK OF CODE, AS THAT WOULD SET THE DIGIT VALUES OF THESE CONSOLES BACK TO 9.
- As such, the seventh block of code only contains 2 lines, which tells the digit values of consoles 3 and 4 to decrease by 1, resulting in the digits 990099.
- The eighth block of code is identical to the seventh block, which tells the digit values of consoles 3 and 4 to decrease by 1, resulting in the digits 999999.
- CONSOLE #1,2,3,4,5 AND 6 HAVE NOW RETURNED TO THEIR ORIGINAL POSITIONS, AND SO WE HAVE REACHED THE END OF THIS PORTION OF THE SCRIPT.
The tricky part about this section is figuring out how many times you need to ‘use’ each console within the script. You can copy/paste lines if you need to add more, or hit the delete key to remove lines. If you need to create new blocks, simply copy and paste an entire block( with the wait 100 line also.)
Once you have finished your changes to the script and are happy they are correct, SAVE the script and press the button that says ‘COMPILE.’
This will generate a file called UNIVERSAL.IBI in your :Jedi Academy/GameData/base/scripts/atlantica/keycode directory
THIS IS THE IMPORTANT FILE WE NEED FOR CREATING OUR PK3, SO DON’T DELETE IT.
NEXT STEP – MAKING OUR PK3 FILE.
OPEN UP PAKSCAPE.EXE
Go to the File menu > New to create a new pk3 file, and then add folders (Object >New Directory) so that you have the setup shown below:
scripts/atlantica/keycode/UNIVERSAL.IBI
scripts/atlantica_rpg/keycode/UNIVERSAL.IBI
Once you have created this directory setup, click and drag your UNIVERSAL.IBI file into both ‘keycode’ folders, the one in atlantica AND the one in atlantica_rpg.
Click the ‘save’ icon, and make sure you SAVE YOUR FILE AS A PK3 (.PK3) and NOT a .zip
It is important that the file name of this pk3 is alphabetically further down than the ‘Atlantica.pk3’ file or else the original script will still take priority over your new one. As such, you should name this file:
z_AtlanticaCustomKeycode.pk3
You can now upload this file to your server (it is completely server-side, none of your clients will need it) -
Originally written by lassev - Source[/size]
- Title: Rotating Doors with Areaportalling
- Subject: How to create realistic rotating doors which use areaportals.
- Written by: Lassev
- Tutorial written for: Jedi Academy/BehavED
- Similar concept work like in: N/A
- Difficulty level: 4/10
- Expected time to complete for first attempt: 30 mins
- Prerequisites: Entity linking, Scripting, Basic Brush Manipulation, BehavED installed
Introduction
Rotating doors, like the ordinary swinging doors that we use all the time in the real world, are not directly supported by the Jedi Academy game engine in the form of func_doors. However, they are easy to build using another entity called func_static and some simple scripting. Now that scripting is also supported in MP, the demand for swinging doors is higher than ever before.
The title calls this tutorial "Rotating Doors With Areaportaling." Areaportaling is an easy and good way to keep the FPS up in your map, so you should do that every time you use a door between two rooms otherwise sealed from each other (no windows or other holes between them).
However, if your rooms are leaking into each other or you don't want to use areaportaling for some other reason, you can skip the parts required for areaportaling (I will mention those parts separately).
Technical Note: This tutorial requires very basic Radiant mapping skills. It also requires that you know what an ICARUS script is and how to use BehavEd to make some simple scripts. If you don't know how to use ICARUS, or you haven't yet configured BehavEd, you need to do and learn that first.
Check Kengo's cutscene scripting tutorials for some ideas. They are, however, meant for JK2 Jedi Outcast, but despite the fact that the paths need some adjustment to Jedi Academy folders, they should be pretty correct...
Building the Door in Radiant
Let's launch Radiant and start the tutorial. First you need some basic architecture to be able to test the swinging door. For this specific purpose you obviously need two rooms to be connected with each other. Either use some preexisting map of yours or build one from scratch according to the specifications that I will give below.
All right! If you start from scratch, build one room big enough to run around in game. Texture it, then select the walls, floor and ceiling, and clone it all. Place the new room next to the original, leaving something like 48-64 units between the rooms (or as much as you want). Next we will make a small corridor between the rooms. Notice that I used thicker brushes for the walls facing the other room. This has a special meaning in avoiding nasty errors later when we will make the actual func_static door entities.
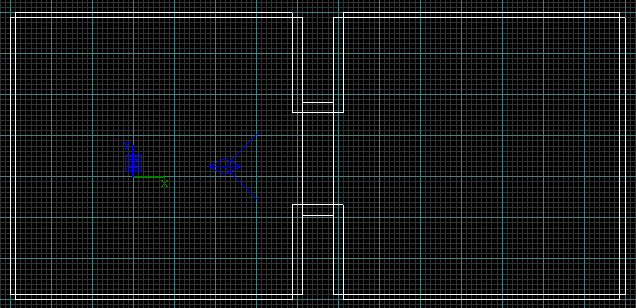
2D from above:
Fig 1. The room layout.
The doorway between the rooms. I have thrown in some random brush blocks to make the rooms just a little bit more interesting:
Fig 2. The doorway.
OK. Let's now draw the door itself. In this tutorial, I will make double doors, instead of a single swinging door. This is just to illustrate that double doors are just as simple to make as the single type. However, if you prefer a single swinger, it's easy enough just to skip making the counterpart, and stretch your door to cover the whole doorway. Also, you will see easily enough how to adapt the script for just one door.
Since I''m a fan of door frames, I will start my doorway by making them. I'll start it by drawing a big brush, 16 units thick, to span the whole mouth of the corridor, like in Fig 3.1 below (16 is also the thickness of the thicker than normal wall here). Then I clipped the frames and textured them, like in Fig 3.2. The portion that will form the actual doors is also reduced to thickness of 8 units, and placed in the middle of the frames, as you can see. Even if we are making double doors, don''t yet clip the door portion, if you are going to use one of the existing Raven double door textures (or one of your own equivalents). Texture it first, by fitting the texture 1x1. After that, you can easily just clip it in two in the middle, and you will have perfectly textured double doors! Just check Fig 3.3. Don''t forget to texture also the surface of the doors facing each other, and the surface facing the door frames. You don''t want to leave caulk there, because then they would be transparent, when the doors are open in game!Fig 3.1 Fig 3.2 Fig 3.3
Next you will need to place Origin brushes for both doors. The Origin brushes will be integral parts of the func_statics, but they won't show in game. However, they will define the actual point around which the doors will rotate. So they are indeed very essential for the swinging doors to work. In practice the Origin brushes are nothing but brushes covered with the Origin shader (texture).
You will find the Origin shader in System. It has (in addition to the text "ORIGIN") an ugly orange color, so you should have no trouble finding it...
Having the Origin shader selected, make a 16x16 piece, and place it exactly like you see in Fig 4. This means at about the half the height of the door, so that the middle of the Origin brush is 4 units (one grid button 3 square) over the hinge end of the door. This means the door will turn nicely in game, and won't invade the door frame. So, on the Y axis, the origin is three quarters inside the door, one quarter inside the frame. After you are done with the first Origin, do the exact same thing with the other half of the double doors.
Fig 4.
The Origin brush is selected to make it easier for you to spot it. Notice that it's not entirely inside the door, but also partially inside the frame. Actually, the size of the Origin brush does not matter at all, just its exact center coordinates.
Finally we are ready to actually turn the doors into entities! Now, you need to select the origin brush, then the door half. You need to make two func_statics for double doors; the halves are totally separate entities; they will just be controlled at once. So, after you have selected the left origin and left door, right click, select func/func_static. Do the same trick for the right door.
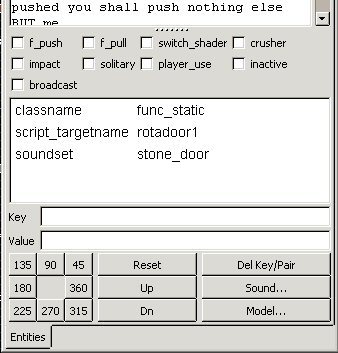
Now, select the left portion (the upper one in XY 2D) and press "N" to bring up entity properties. You will need to enter two keys over there (see Fig 5):
key: script_targetname
value: rotadoor1
key: soundset
value: stone_door
Fig 5. Entity properties for the left (upper in XY 2D) door.
Script_targetname will define the name you will use in the affect command in the script controlling the doors. If you want to use some other name for your doors, feel free to do it! Soundset of course just gives some audible character to the doors. Name the other door likewise, only use "rotadoor2" as the script_targetname. You can also check the crusher flag of the door if you want it to cause damage to the player, if blocked. This is something you must decide based on your specific needs. The swinging doors should work properly, whether you make them crusher or not.
Now we have only a couple of compulsory things to do, before we will leave Radiant for a while to write the script. We will also do some extra work to make the areaportal work, but if you don't want to do that, I will point out what you can skip. However, you will need to do the next things no matter what for the doors to work.
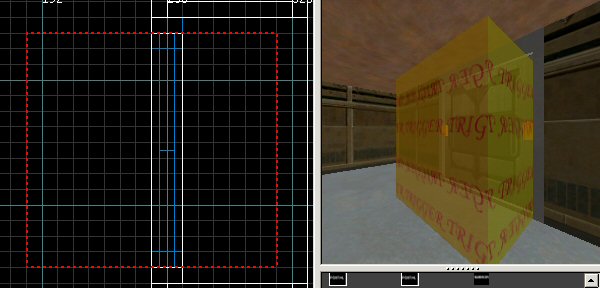
Go to System textures again and fetch the Trigger texture. Draw a big brush that spans from one side of the door all the way through it to the other side, just like you can see in Fig 6. Turn it into trigger_multiple. Give it the following key:
key: wait
value: 10
Fig 6. The trigger_multiple to control the opening of the doors.
This makes sure that the double doors won't be triggered to open a second time before they have had time to open, wait a little, and then close again. The actual script will determine how fast the doors open, how long they stay open, and how fast they again close. The combined time of those events will be made to be little less than 10 seconds.
If you haven't saved your map before this, it's time to do it. Select some sensible name, but if you want to follow the tutorial without changing a single bit, you will have to name it "rotamap". However, it's easy enough to use what name you ever want. You will just need to create a folder named after you map under scripts.
Next place a target_scriptrunner next to the trigger_multiple. Target the trigger to the scriptrunner. Then select just the scriptrunner, and bring up the entity properties. You will need to add the following keys and values:
key: count
value: -1
key: usescript
value: rotamap/dooropener
"Count -1" means that the script can be run as many times as needed (indefinitely). "Usescript rotamap/dooropener" is the key and value pointing to the script file we haven't yet made. If you named your map something other than rotamap, then just replace the map name with your own.
Now we are finished with the compulsory things to be done in Radiant. If you are not interested in Areaportaling, just skip the things I will explain next, and jump to the scripting part. However, if you want to build a clean map, you can follow through the next steps.
Areaportaling The Swinging Door
Areaportaling a normal func_door couldn't be easier: You just place an areaportal brush there. Unfortunately it's not so simple with a rotating door. To work, an areaportal needs the origin of the entity to move. This is the triggering event that will adjust the areaportal. That is, the movement of the entity tells the game engine that it needs to remove the areaportal so that the player can see through the doorway. However, a rotating door won't move its origin at all; it will just rotate around it. How can we then use an areaportal at all with a swinging door? We will do it by tricking the game into thinking there is actually a door opening and closing just normally. And so there will be - but it will be an invisible, silent and a very fast bogus door. However, it's enough to make the game adjust areaportaling.
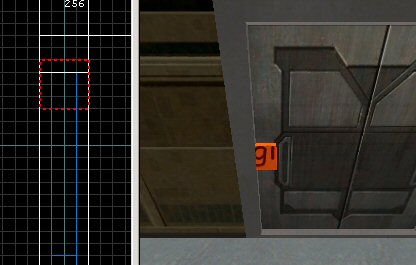
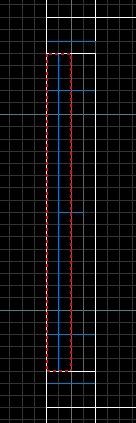
All right, without further ado we will proceed to place an areaportal inside the double doors. You need only one areaportal, even if you have two doors, like in double doors. So, go to System textures and look for a "Skip" texture (it''s tiny and blue, just before the texture where Kyle is slipping, if you don''t seem to find it). Hit now "shift+ctrl+T" to filter away the big trigger so that you will be able to better work with the door. Select and then deselect once either of the doors - that will give you the right height for the areaportal. Then draw with the skip texture such a brush as you can see in Fig 7 below. Notice that the other side of the brush is in line with the walls and door frames of the room. This is necessary. The other side, however, is exactly in the center of the double doors. Otherwise the areaportal spans the whole doorway (excluding the frames made of structural brushes).
After you are finished with drawing the brush, you will need to move it temporarily away from the right place. Drag it away from inside the door so that you can see the side that will be inside the door. Now, select just that surface, and texture it with the yellow Areaportal shader (also in System). See Fig 8 how it should look like, before you place it back to its proper place halfway inside the door (Fig 7).
Fig 7. The placement of the Areaportal brush so that it will be in line with the walls of the room, and halfway inside the door entity. The areaportal texture (see Fig 8) is located to the right side, in the middle of the door.
Fig 8. The Skip/Areaportal textured Areaportal brush in a temporary location.
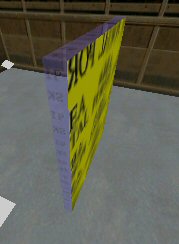
Alright, we are about halfway through areaportaling now. Let's move forward. We must create the secondary, invisible door that will control the areaportaling. The secondary door will be made toggleable, and it''s controlled in the script controlling the door rotation. Without this secondary door the opening swinging doors will produce a very ugly HOM (House Of Mirrors).
Drawing the bogus door is easy: Just clone your existing areaportal brush, click caulk to make it all caulked, and then resize as shown in Fig 9.
Fig 9. The thickness of the bogus door is half that of the actual swinging doors.
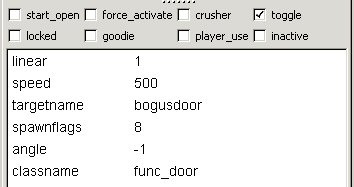
Turn the new brush into a func_door and give it the following entity properties:
Fig 10. Entity properties for the toggle mode bogus door.
Finally! Now the map is ready even with the troublesome Areaportal adjusting! If you are making an SP map, place the info_playerstart in some sensible place, but put it far away from the door so that it won''t be inside the trigger! Otherwise if you are making an MP map, place there the appropriate starting positions.
Writing The Door Control Script
You need to launch BehavEd to create the script controlling the doors. I'm not going to tell here how to script but what to script. As noted in the Technical Notes, you need to know something about scripting to survive the next part. All right, that being said, let's move forward.
It's usually good to keep the Radiant and the map still at hand, because you might forget some targetnames. Type some notes in the rem(comment) if you want, then proceed to add your first command.
Affect ("rotadoor1", /*AFFECT_TYPE*/ FLUSH )
{
This will direct the following commands to the upper door. The doors will function basically mirror like when compared to each other. They will also be affected separately, but in effect everything will happen at once in game. That is, the doors will open simultaneously.
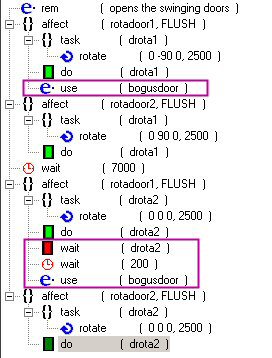
OK, let's go forward. I will give you in Fig 11 all the opening script commands needed for "rotadoor1" and "rotadoor2", and explain what everything does in the script.
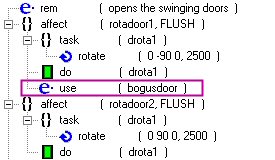
Fig 11. The opening portion of the script.
I have encircled with purple the command you need ONLY if you are going forward with the areaportaling. If you chose not to areaportal, don't insert the line encircled with purple, just insert the other rows. OK, use("bogusdoor") tells the game that it needs to open the fast, silent and invisible bogus door inside the actual swinging doors. This will make the game open the areaportal, allowing the player to see through the doorway.
As you can see, the use command lies only once in the opening portion of the script. This is necessary, because the bogus door is a totally separate entity from the swinging doors, and using it twice would make it close immediately again, and we cannot do that yet. The command could as well reside inside the rotadoor2 affect group.
The rotate (0 -90 0 , 2500) command means that the brush entity (the door) is going to be rotated ninety degrees toward the room on the left. Here you need to only think about the angle buttons in Radiant entity properties. -90 degrees is essentially the same as 270 degrees. Check my little picture below for some insight into rotating objects with the rotate command:
Fig 12. Rotating entities with the rotate command. Imagine the squares as flags swinging around the axes.
The most important thing to keep in mind while rotating is that the rotation is not relative to the current position (facing) of the brush. The rotate command will rather give every time a new absolute angle value for the object, much like the angle buttons in Radiant entity properties. For our doors we use the middle value that controls the rotating around the Z-axis, the axis rising from the XY plane, and thus the most natural axis for any door hinges. The starting position for an entity, as long as you haven''t hit the angle buttons, is 0 degrees, that is, straight to the right on the XY plane! So, even if our upper door points down, it's still facing zero degrees, when we start the game. Thus we need to turn it -90 degrees to open it toward the left room.
Adjust the opening script to the lower door as well. You need to change the rotate command to 90 degrees instead of -90 degrees (take the minus away), and also take away the bogus door control command, which you must not have twice in the opening part of the script.
After you are finished with the other door, minimize the trees, and insert a wait(7000) after the two affects. The wait means that the door will stay fully open for 4.5 seconds, after it has spent 2.5 seconds opening. Let's think for a moment the times. As you remember, you entered 10 seconds for the trigger Wait key. Now, if you consider the script, it takes 2.5 seconds for the doors to open and close. However, the time for them to stay open is reduced to 4.5 seconds. This mean the doors will stay closed for half a second, before they can be opened again (because the trigger won't launch again until the 10 seconds wait has passed). The half a second idle time is implemented to ensure proper areaportaling behavior.
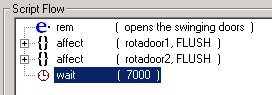
Your script (when the affects are minimized) should look like this:
Fig 13. Both door affects and the wait.
After this, you need to make the doors close after the staying open time is finished. For this purpose, copy the existing two affects, and paste them after the wait. Then proceed to edit them. I'll now post the whole script in Fig 14. You should by now know exactly what''s going on, so I will only explain it afterwards very shortly.
Fig 14. The whole script for opening and closing the double doors and adjusting Areaportals!
As you can see, the parts needed only for Areaportal adjustment are once again encircled with purple. Other parts are needed always. The latter affects will rotate the doors to the starting positions, thus all the rotate values have only zeroes; they are the absolute values for starting positions, of course. In the script we wait for the rotadoor1 to close, then we wait for an additional period of 200 ms just to be sure, and only then close the bogus door. The areaportal is returned.
Of the trigger's 10 seconds wait time, 300 ms is left for the areaportaling to update, before reopening of the doors is possible.
Now you only need to save your script. You must give it the name you used with the "usescript" key in the target_scriptrunner. After saving, just hit the Compile button. Now you are finished! Just ship the script with your level, in "scripts/mymapname" directory (in our case "scripts/rotamap").
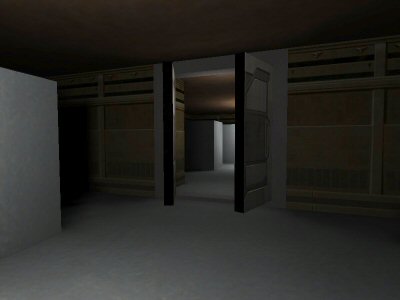
Close BehavEd, compile your map and launch it in JA. You will see that once you go near the door, inside the trigger, the script will launch and the door will open! After a while, it will close. If you implemented the Areaportal, you can check whether it works by using the console command:
r_showtris 1
Closing Remarks
It wasn't hard at all, was it? Have nice time implementing this methods in your own maps. And remember that you can rotate objects which ever way you want. So, you can have trapdoors in the roof, or floor, wherever you want. You can even divide the door into four parts and open it like a flower.
These images show you the door while it is closing. Areaportaling has worked properly, as you can see while looking at the picture on the right. You cannot see anything from the other room while having r_showtris 1 turned on. -
Originally written by Seto
- Title: Shader Remapping
- Subject: How to Remap shaders (Swap one for another on the fly)
- Written by: Seto
- Tutorial written for: Jedi Academy
- Similar concept work like in: N/A
- Difficulty level: 5/10
- Expected time to complete for first attempt: 15 mins
- Prerequisites: Intermediate familiarity with mapping, entities, shaders, and GTK Radiant
Overview
Shader remapping is a technique that is not obvious in GTK Radiant, but knowledge of its uses can lead to many interesting and unique features in your map. There are two entity keys called "targetshadername" and "targetshadernewname" that can be applied to certain target and trigger entities to have the game instantly remap all instances of a particular shader (or plain texture) to another.
Any entity that triggers targets should work, but the best options are trigger_always for permanent changes, target_relay for controlled changes, and target_delay for timed changes (the remap will occur after these entities trigger their targets, so you can create delayed remaps with target_delay). Do note that it will remap every single instance of one shader to another; there is no way to pick just one particular case.
Also, remapping shaders that contain a lightmap might cause odd results, and certain properties of shaders are not inherited and cannot be transmitted, such as portals.
Application
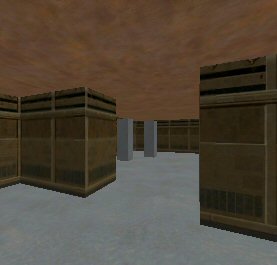
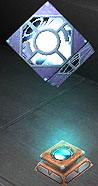
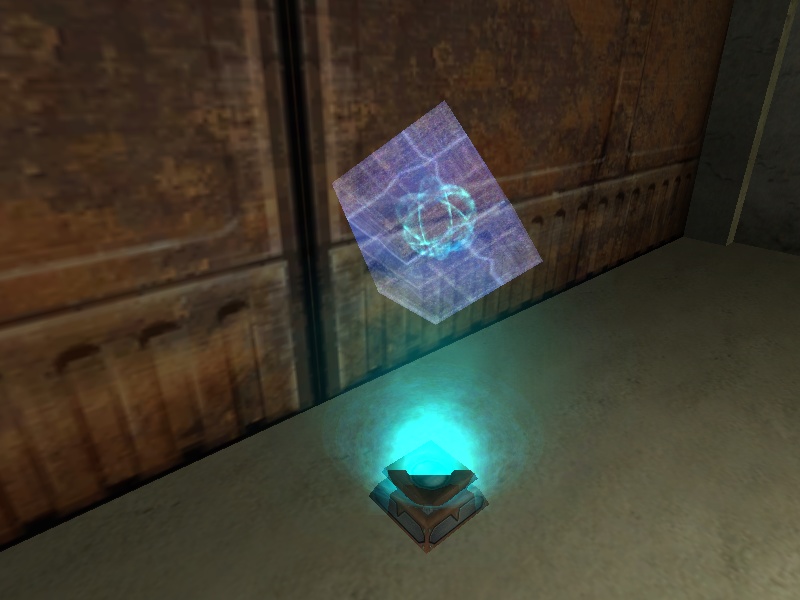
Shader remapping can be used with any shader or texture, including those used by default on items and other entities. Let's say we decide to change the appearance of an item_force_boon entity. As we know, Force Boons look like this:
This item uses a number of shaders, so for our example we will focus only on the two shaders of the "box" part: the outer hollow cube and the inner glow within. If the name of a shader is not known, we can find it by looking in the appropriate .shader file. In this case, we can look in assets1.pk3 to find the right .shader file (models.shader), and then use a text editor to scan this file until we find the names of the two shaders used by the Force Boon:- models/map_objects/mp/force_boon -> the outer cube shader
- models/map_objects/mp/boon -> the inner glow shader
Now that we know our two target shaders to be changed, we need to pick two new shaders to change them into. There are many, many possibilities here, but for this example I am going to choose these two:- textures/common/glass_security_hex -> glass with a hexagonal design
- gfx/misc/mine -> the shiny yellow mine that Imperial Shuttle vehicles can drop
Of course, you could use your own shaders too, just remember to use the full shader name. Now that we know both our shaders to remap and what to remap them to, we can add a remap entity to perform this for us. As mentioned earlier, the three most useful shader remap entities are trigger_always, target_relay, and target_delay (note that trigger_always is not compatible with the latest versions of Lugormod, but works fine anywhere else). If we want the remap to appear instantly when the map loads, we use trigger_always, while if we want the remap to appear only after being triggered by a specific action, we use either target_relay or target_delay.
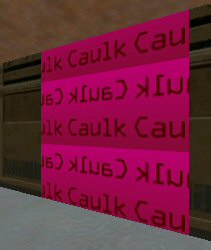
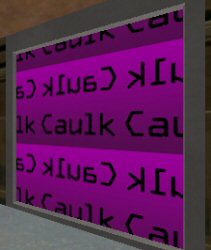
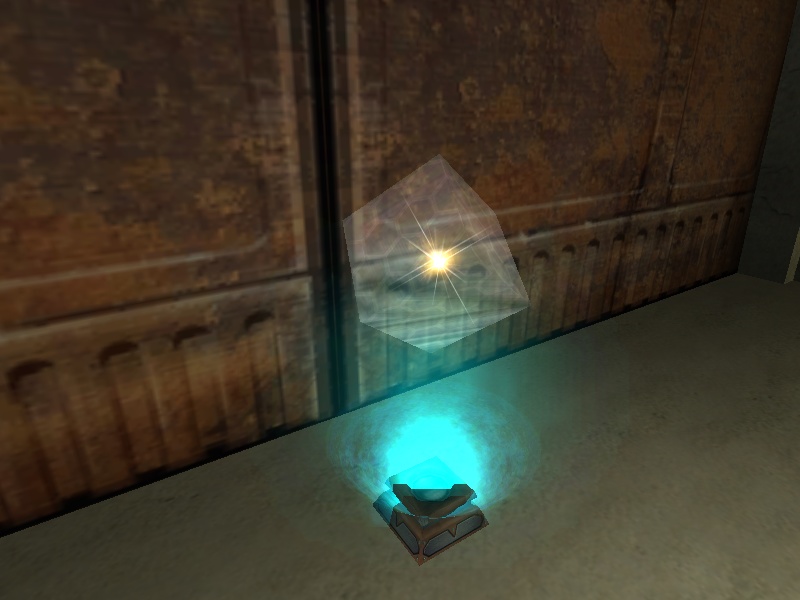
For this example, we will use target_relay. You will need to create two target_relay entities total, because we have two different shaders to remap. After linking them to an activator (like trigger_multiple), you will need to manually add the shader remap keys (targetshadername and targetshadernewname). Your final entities should look like this:
{
"classname" "target_relay"
"targetname" "remap_boon"
"targetshadername" "models/map_objects/mp/force_boon"
"targetshadernewname" "textures/common/glass_security_hex"
}
{
"classname" "target_relay"
"targetname" "remap_boon"
"targetshadername" "models/map_objects/mp/boon"
"targetshadernewname" "gfx/misc/mine"
}
Assuming "remap_boon" is the target of your activator, upon use it will cause your default Force Boon items to change appearance from there normal form into something like this:
Now if we want to change it back to its original appearance, we can follow a similar process of creating two target_relay entities, only this time they should look like this:
{
"classname" "target_relay"
"targetname" "remap_boon"
"targetshadername" "models/map_objects/mp/force_boon"
"targetshadernewname" "models/map_objects/mp/force_boon"
}
{
"classname" "target_relay"
"targetname" "remap_boon"
"targetshadername" "models/map_objects/mp/boon"
"targetshadernewname" "models/map_objects/mp/boon"
}
Notice that we refer to the target shader by its original name, despite the fact that it has already been remapped to take a different appearance. When remapping shaders, always use the original shader name as the targetshadername, not any new shader you use in the remap.
Further Uses and Restrictions- To cause any shader to appear totally invisible, simply use "clear" as the value of targetshadernewname. This can be useful to create effects such as vanishing lava or forcefields.
- Shader remapping works with sky shaders, but when a skybox shader is remapped, any clients who are experiencing the remap for the first time will be hit by a brief moment of lag due to shader precaching. This only applies to skybox shaders, and does not affect any client who has already rendered the remap previously. Furthermore, if a skybox shader is remapped to a non-skybox shader, there is a high probability that clients will crash upon coming into view with it, so ALWAYS remap skies to skies.
- Remapping certain special shaders such as caulk and clips will be refused; remember, the primary purpose of shader remapping is simply to change the visual appearance of things, not their actual properties.
- Shader remapping may cause certain shaders to lose lightmap info.
- Shader remapping can be used on non-map shaders as well, such as UI components (console, chat icon, HUD images, etc) and even NPC/player textures.
Screenshots
Here are some screenshots of various shader remapping techniques in action.
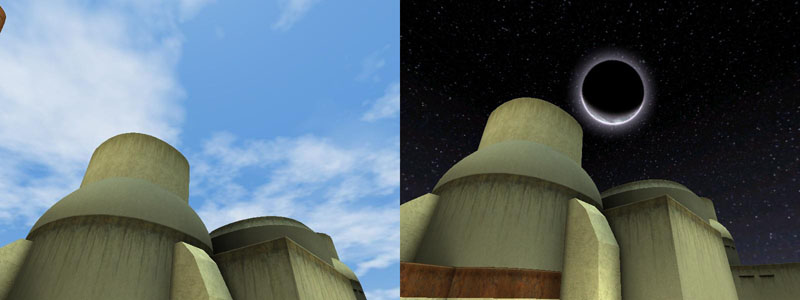
Tatooine sky shown in day and remapped to night.
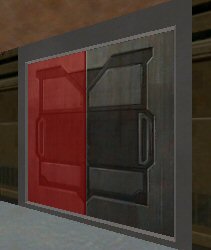
A different Force Boon remap, this one for a more evening feel.
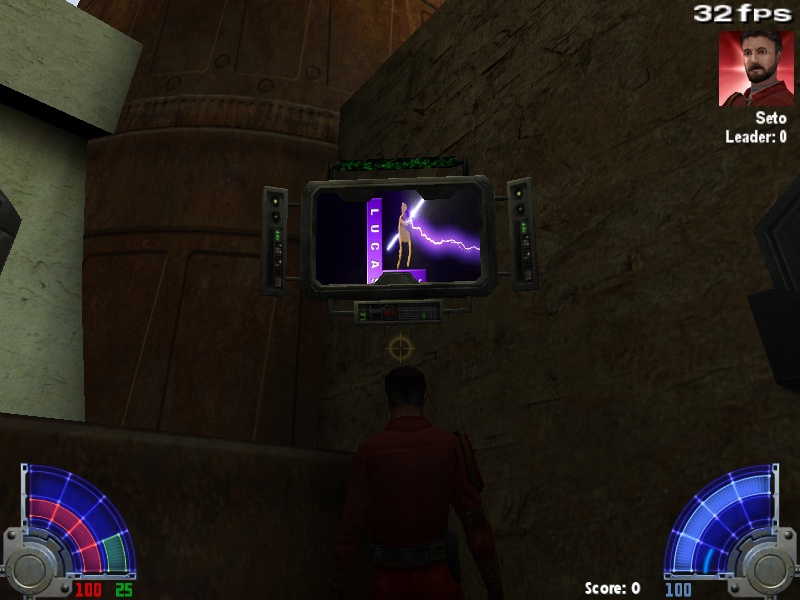
A view panel model with remapped screen to show the opening game logos.
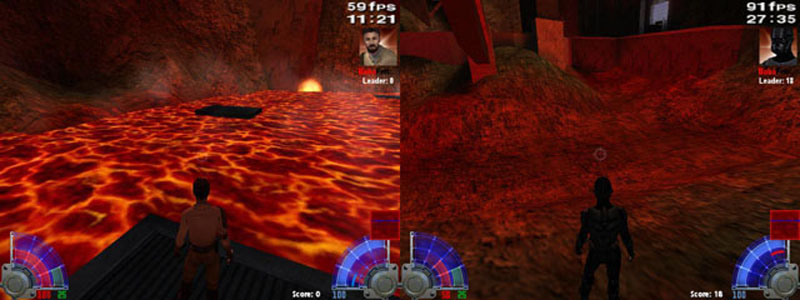
A lava pool shown normally and with the lava shader cleared (courtesy of BobaFett).
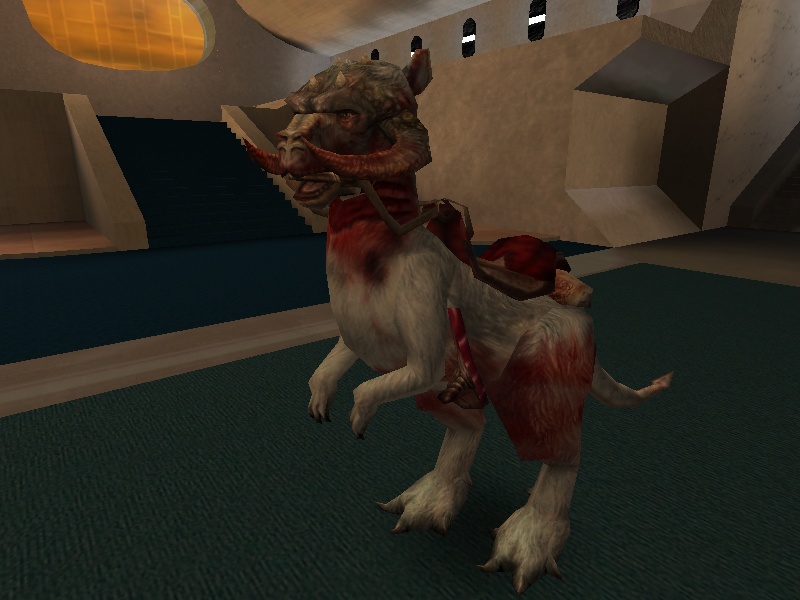
The tauntaun vehicle NPC with remapped textures to match the dead tauntaun model.
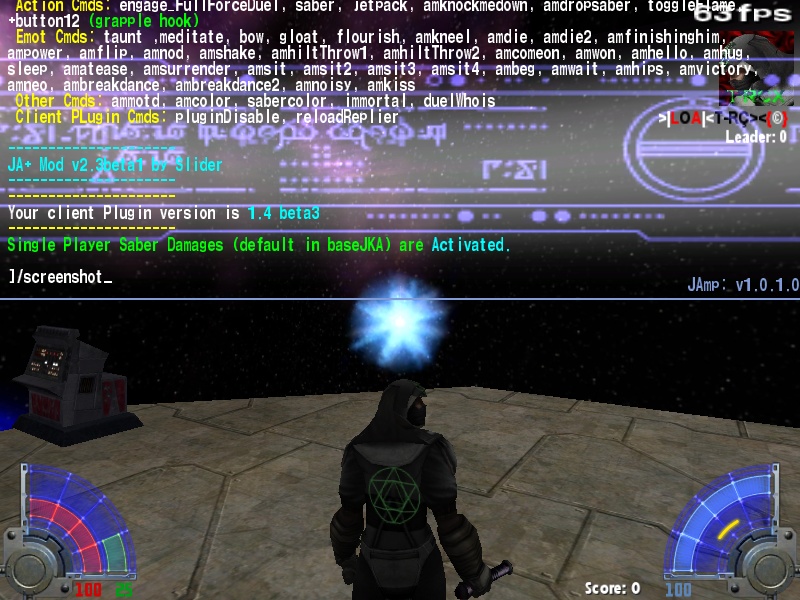
A remap of the chat icon and console. Both new shaders are animated.
This concludes our lesson in shader remapping. Experiment on your own to create your own unique shader combinations.


Relaxing day at the beach
in WIPs, Teasers & Releases
Posted
Long time no see
I will definitely try this out shortly as you have put the effort to make it work as you did with moonbase!