

ooeJack
-
Posts
83 -
Joined
-
Last visited
Content Type
News Articles
Tutorials
Forums
Downloads
Everything posted by ooeJack
-
Welcome Arth mate!! :D ooeJack
-
Heya IFailedEnglish. Good to hear you've figured it out! I'm not sure if there are any other threads in there which ask and fix any particle issues, so it would be great if you give us a quick reply on what your problem was, and how you fixed it out. Good luck with your modding! ooeJack
-
373 downloads
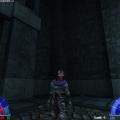
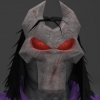
Death based off Darksiders II. Contains: - Team Support - Menu Support - Custom Sounds - Custom Shader - New Model - Custom Textures Known bugs: - A small amount of unavoidable clipping on a few poses. ooeJack -
Heya GPChannel. Yea mate, I'm not sure about this. I've had a couple other mates have similar issues with this. I do not know how it works. The texture file seems to be transparent like that OR missing entirely, but it works in-game. Sorry I can't be of much help. Hopefully somebody else knows the answer. Good luck! ooeJack
-
I still don't get what you mean, man. Are you talking about transparency? Show us some screenshots/images. It will help us understand. ooeJack
-
Heya GPChannel. I'm sorry dude, I don't quite understand the question. Do you mean that while in-game you can change the colour to be anything in the RGB spectrum in the profile settings? ooeJack
-
Jedi's Home 3! Nice man. I'm sorry to say I don't know anything about map making. But hopefully you can get some help from other talented mappers here. Good luck! ooeJack
-
Hiya Teancum. When you rename the object, also check under the 'Object' option to the right, scroll all the way down and make sure the G2 Properties have different names for each object. That might be the issue. Good luck. ooeJack
-
Never heard of it mate. Sorry.
-
How do I change the music for specific SP levels from dms.dat?
ooeJack replied to Sonarwave's topic in Modding Assistance
I dunno man, but that's quite a project you got there. May the force be with you! ooeJack -
Heya Newmodder. You could try the Star Wars Clone Wars approach and make the hair/beards solid looking objects then texturing them as their hair. Search up Star Wars Clone Wars Obiwan in Google images and you'll see. Perhaps that'll be the way to go for you, hair is pretty tough to make. ooeJack
-
I was going to reply with that too, but I went through the original assets as was released with the game and noticed that some of their texture files were in unorthodox resolutions as well. So I guess it's not 100% integral to have texture resolutions to a power of 2 with JKA, but it should be done none-the-less just for good practice at least. ooeJack
-
Blender .GLM exported character not working
ooeJack replied to T.Zealot's topic in Modding Assistance
I've got my skeleton_root and scene_root separate. Under "hips_0" is of course the rest of the segments. Also note that this hierarchy worked for me. I remember when I first did the hierarchy and weight painting. I first did the hierarchy to what it was meant to be, then I set up the weight painting (selecting segments and parenting to the armature). When I set up that armature parenting, it reset my hierarchy, so I had to redo it. Ever since then, I've been parenting the segments to the armature/skeleton, then completing the hierarchy. It's been working, too. I guess both ways of parenting the scene root and skeleton root is ok to do when working on a JKA character? ooeJack -
Hey dude. So I knew I had this issue before and I may have found it. For me, at least, I got that error message the same way you did. I remember specifically I entered a server, went to Profile to select my skin, and as soon as my icon popped up, the game crashed and gave me that compile error. It turns out it was the type of texture file that was the issue. Something about .jpg compressions. I couldn't figure out how to change them (never came up with any options when I saved my textures out as jpg's), so I saved my texture files out as .png's instead with Compression set to 'Smallest / Slow' and Interlace set to 'None'. After I did that, no crashes, everything worked. So make sure everything including your icons are png's with those settings. Try that mate. I reckon that's what's going on with yours right now. Let us know how it goes!! ooeJack
-
Hiya. I recall having an issue like that before, but unfortunately I cannot remember what I did to fix it. Your files look fine except that it looks like you've got duplicates of texture files which would just take up space unless you're using them. I mean that you've got 2 hand textures, 2 boots textures etc. when you'd only be using 1 of them for each segment of your character. To save space in your final character .pk3, only have the textures that are referenced in the "model_default.skin" in your folder. Hopefully you get an answer for the compile issue. I am really curious why that occurs. Good luck! ooeJack
-
Heya NAB622. You should just be able to put 2 planes there. 1 which is facing the inside of the ship which will have the mirror see-through texture, and the other plane parallel with it which will be facing the outside of the ship which will have the wall texture. From my understanding that should work. ooeJack
-
Oh. Have you been extruding inwards? I believe if you select multiple faces which have edges in between those faces, and extrude inwards, then it'll leave those edges in between the faces you just extruded. If you extrude outwards, then it should be fine. Please let us know if that's it. ooeJack
-
Try updating Blender. It's currently version 2.78. Updating to that version may fix some issues you're having and any other potential problems. I noticed you're using 'Draw'. Change that to 'Add' and see if that changes anything. Usually I use Add, and Subtract to weight paint. Also, try setting the object to wireframe mode and trying to weight paint again. Perhaps it's not getting all of the vertices because Blender can't 'see' all the verts. I've had that issue before. Not with weight painting, but with selecting verts. But update Blender for sure. Good luck! Edit: I just did exactly what you did; opened Blender with a box, and started weight painting using "draw", and it's all working fine. I'm on Blender version 2.77. ooeJack
-
Firstly I believe you need to make sure you're using either the "Add" and "Subtract" to paint your vertices. Dunno what the other options do, but that's what I use and it works fine. Make sure that the armature is all good. You wanna select all of your objects, then select the skeleton as the active selection, meaning to select it last so that the objects are dark orange, and the skeleton is light orange. Once selected properly, press CTRL + P, and click, first of all, "With Automatic Weights". What this means, is that blender will try its best to weight the character properly. I won't be good, but it'll allow you to test if the weights are even working in the first place by posing your skeleton. Once that works, you can undo or open the file again, and reselect everything, hit CTRL + P, then click "With Empty Groups". You can stick with the Automatic Weights if you wish and fix it up, but I prefer doing it from scratch. Either way, you probably should test with "empty groups" and see if you can paint the weights now. Let us know if that fixes it. I dunno if it will, but this is just to make sure you have everything set up properly to start weight painting. ooeJack
-
Hey dude, that's looking pretty good! Well done! I notice that your characters left and right arm are this grey and white colour. This problem usually occurs because those segments of the character are missing their textures. Either missing them entirely (no texture for the arms exist at all), or that they are incorrectly or not at all mentioned in the .skin file. Check the spelling etc. within your .skin file. Pro-tip with imgur: Once the upload is finished, you can right click on the image, and click "Open link in new tab" or "Open link in new window". What that'll do, is instead of having the image presented as an album, it'll be presented as just that individual image. I probably should have mentioned that in my previous post. Again. Good job. ooeJack
-
If you mean paste a screenshot here on your thread. All you need to do is upload the screenshot to imgur or something similar, then grab the link and paste it here once it's finished uploading. ooeJack
-
You might have multiple edge loops in the exact same location. So that when you extrude, you're only extruding 1 set of edges, while the rest of them stay? I'm not quite sure what the issue is. Also, I believe you should be modelling as an "Editable Poly" not Mesh. Not sure if it makes much of a difference, but give that a go also. If nothing works, you could try doing this first part that you're having trouble with in another 3D program, such as Blender. Make the extrusions you need, then export and import it back into 3ds Max what whatever that program you're using there. Good luck! ooeJack
-
Oh that's what you meant. I didn't get what you meant with your first point, yasuakiNk. Ramikad's got some good pointers there. You can also use the command /cg_ThirdPersonCameraDamp 0. Default is 0.3. What that does is keep the camera where you left it when you entered that command. It'll still point at your character where ever you go, but it won't move from its position. ooeJack
-
Icon stuff you have written there is good. You may experience issues such as the game crashing when you try to play your character if you use jpgs for your icons or texture files. There's a specific reason to this which is written in another thread here which I can't remember, but it can be solved if you use png's with the default settings on Photoshop when you save it out. (Compression: Smallest / Slow - Interlace: None ooeJack
-
Converting FBX to GLM and rigging a model
ooeJack replied to ShenLong Kazama's topic in Modding Assistance
Heya ShenLong Kazama. Do you mean 'convert a specific fbx file into glm' that you have a "modelname.fbx" and want to simply export it as a .glm? Or doing the steps required to get it to that state? You'll need to do a whole bunch of extra steps than just converting to glm and changing skeleton to get this to work. Have you seen these tutorials? These should help you out. - http://psyko3d.50webs.com/tutorials/jk2_guide.htm - http://psyko3d.50webs.com/tutorials/spacemonkey/jk2.htm Also, what 3D program are you using? ooeJack
