

MUG
-
Posts
901 -
Joined
-
Last visited
Content Type
News Articles
Tutorials
Forums
Downloads
Everything posted by MUG
-

Displaying FPS, radar, team health, timer and lagometer.
MUG posted a tutorial in Console Commands & Cvars
There is a great deal of information that can be displayed in jka by setting a few cvars to 1: Open notepad or some other text editor like notepad++ Copy the following into it: //Display the lagometer (graph which shows how good your connection to the server is) cg_lagometer 1 //Display your Frames per second Counter cg_drawfps 1 //display the round timer cg_drawtimer 1 //display the radar in team games and vehicles cg_drawradar 1 //display your team mates' HP and locations in team games. cg_drawteamoverlay 1 Click save as select "save as type:" "all files(*.*)" type a name and add .cfg to the end. (eg display.cfg) Start jka and open the console type /exec [your file name] (eg /exec display) To disable any of the displays we have added, simply change the 1 to a 0 and re-save and exec the file. You can also manually type each line into the console rather than using a cfg file (eg /cg_drawfps 1 in the console to turn on the fps meter) -
VSTRs (Variable Strings) are a neat little way of assigning a command (or group of commands) a name which you can enter to use. For example: /set haddock say I like haddock sets a vstr called haddock that makes the user say "I like haddock" on use. The format is: /set [vstrname] [command(s)] To use a vstr: /vstr [vstr name] eg /vstr haddock It is important to note that JKA tends not to remember vstrs between sessions, so if you want to save them, create a cfg. A few things you can do with vstrs You can bind a vstr to a key: /bind x vstr haddock You can even make a vstr with multiple commands just like in a bind: /set spam "say I hate white people;wait 200;say lololololololollololoollollol" would make you say "I hate white people" and then say "lolololololololololo" after a short delay whenever you type /vstr spam Make a vstr that changes what it does (useful for a number of advanced things): /set haddock "say hi;set haddock say no you" the first time you /vstr haddock it will make you say "hi" the second time you will say "no you" Vstr uses with servers You can set up vstrs in your server cfg or in other configs. These can be used via rcon to quickly do things with one command. Additionally there is an admin command in japlus (and I think in some other mods) "amvstr" which can be used by admins to make the server run vstrs. This means that server admins can effectively give their admins access to some specific commands that they have set with server side vstrs, without needing to give them rcon access. Making A Command Selection Cycle: You know the force selection on Q E and F? Imagine if you could do that, but instead of selecting force powers you could select from a list of commands you pre-set in a config. Here's how to do it. Go to base and create a new text file. Rename it to cycle.cfg (or anything else you want.cfg) Open it in notepad or any other text editor First lets set up the keys: Choose a random name for your cycle. I will go with "cycle" for simplicity. Type: bind [ vstr cycleprev bind ] vstr cyclenext bind enter vstr cycle You can replace "[", "]" and "enter" with you choice of previous, next and use keys (like Q, E and F) Now get a list of all the commands you want to be selectable. Here is my example list: cg_draw2d 0 cg_draw2d 1 saber single_4 saber single_4 single_6 (you can have way more than 4 commands (any number in fact) i just used 4 for simplicity) Now here is the hard part you need to make a load of vstrs, one for each command in this format: seta cycle2 "set cycle [command 2];set cycleprev cycle1;set cyclenext cycle3;echo Message" For cycle1 you need the "set cycleprev" to name the last cycle and for the last cycle entry you need "set cyclenext cycle1" Example: seta cycle1 "set cycle cg_draw2d 0;set cycleprev cycle4;set cyclenext cycle2;echo Hide Hud" seta cycle2 "set cycle cg_draw2d 1;set cycleprev cycle1;set cyclenext cycle3;echo Show Hud" seta cycle3 "set cycle saber single_4;set cycleprev cycle2;set cyclenext cycle4;echo Single Saber" seta cycle4 "set cycle saber single_4 single_6;set cycleprev cycle3;set cyclenext cycle1;echo Dual Sabers" Finally you need to set the default setting: "set cycle [command 1];set cycleprev cycle4;set cyclenext cycle2" here is the full example file: bind [ vstr cycleprev bind ] vstr cyclenext bind enter vstr cycle seta cycle1 "set cycle cg_draw2d 0;set cycleprev cycle4;set cyclenext cycle2;echo Hide Hud" seta cycle2 "set cycle cg_draw2d 1;set cycleprev cycle1;set cyclenext cycle3;echo Show Hud" seta cycle3 "set cycle saber single_4;set cycleprev cycle2;set cyclenext cycle4;echo Single Saber" seta cycle4 "set cycle saber single_4 single_6;set cycleprev cycle3;set cyclenext cycle1;echo Dual Sabers" "set cycle cg_draw2d 0;set cycleprev cycle4;set cyclenext cycle2" To activate it, go in game and type /exec cycle into the console. The game should now remember the cycle for good. If it stops working simply type /exec cycle again.
-
To set a key to a command: Type: /bind [key] [command name] into the console and press enter eg: /bind k kill would make your character die whenever you press your K button. To bind multiple commands to a key: /bind [key] "[command 1];[command 2]" (you must put double quotes around multiple commands when binding) eg: /bind x "kill;say I JUST CANT TAKE IT ANYMORE" to kill yourself and then scream about the horror of life. To see all your current key bindings: /bindlist Keys Most keys are just the name of the button (eg "a" or "." or "[" or "shift") with these exceptions: semicolon backspace The NumPad: kp_slash kp_star kp_minus kp_plus kp_enter kp_del kp_ins kp_end kp_downarrow kp_pgdn kp_leftarrow kp_5 kp_rightarrow kp_home kp_uparrow kp_pgup To unbind keys: /unbind [key] For binary commands (ones that are a simple switch of 0 or 1 to toggle a command) you can use a ! as the toggle. For example: /bind x cg_draw2D ! That will allow you to press the X key to toggle the HUD and 2D elements on your screen on or off. That way you don't need to have 2 keys for both. Click here for a list of all commands which can be bound
-
No-one made any agreements giving up rights to their work, so whilst it maybe be a dick move, I have every right to make it, and frankly, if there had been an agreement that anyone can veto any design decision I make, then I would never have got involved. Either way this has turned into a hostile mess now (which may well be to a great extent my fault), and I see that it would be best if I just depart from this project and take my portion of it with me.
-
So I just wrote a lengthy post arguing further but I see no point in wasting time with that, as we can argue about this all year, and I don't think either of us are going to budge, so instead I'll just cut to the chase: I have already made it extremely clear that I do not give you permission to use my work if you are going to re-scale it, yet you apparently think you can ignore even that request. So remove my content, or I will go to extreme lengths to create as much fuss as possible.
-
Okay I'm just going to go ahead and go full tantrum, like the mature guy I am. I am not arguing against what you are saying because I am offended, I am arguing because I completely disagree and think you are about to ruin what I suspect is my best mapping work to date. I'm afraid if you are going to re-scale my section of the map, I am going to have to insist you remove it from the project and I will release it separately in the scale I intended. I'm sorry, but I will not permit you to take my work and screw it up because you think you have a better idea of how big things of my own design are supposed to be. I think it is a shame that people here are being so elitist that they believe their opinion to be so much more valuable that they can justify changing things other people have made, after they have made it clear they disagree with the proposed changes, based on their preferences rather than any actual need for change. If this was a case of the map actually not working because of my area being physically too small to work, then I would concede, but it is simply a case of you thinking it would be better the way you want it. And no, I am not suggesting that I have a better idea of what the perfect size for an area is than the rest of you, but I think I am capable of knowing how big I intended it to be, and you could have the decency to respect that I built it the way I built it because that was how I wanted it to be, rather than waving your egos around and forcing your opinions on the rest of us. So please either leave my section in it's current scale, or remove it completely. Thank you.
-
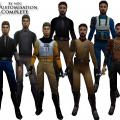
From @@MagSuls screenshots of the street, featuring his player-model, it already looks slightly over-scaled if anything. I dread to think what it is like now that you have seemingly made the buildings 5 times as large. The windows must be the size of cars.
-
MUG's List of Mods EVERYONE should have.
MUG replied to MUG's topic in Jedi Knight General Discussions
I don't even see any files under your username. -
Gotcha. Ty.
-
in assets1.pk3 lives the file ext_data\sabers\sabers.sab which contains a whole bunch of sabers which NPCs use and the player cannot. You can never use these. I see there is a key for "notInMP" but I see nothing defining if a saber is selectable in SP. Anyone know how that works?
-
 Glad you like it. Use it however you wish.
 -
MUG's List of Mods EVERYONE should have.
MUG replied to MUG's topic in Jedi Knight General Discussions
Added my new improved base chat bubble to the list http://jkhub.org/files/file/1503-improved-animated-base-icon/ (Idea viciously stolen from @@SiLink 's animated bubble mod and his mention of not liking the base one =P) -

Version (V1)
202 downloads
This gives you a couple of options to improve the base chat icon. I got the idea after seeing some recent chat icon mods. Place whichever pk3 you want into gamedata/base: AnimatedImprovedBaseIcon - Recommended: My modified version of the base chat Icon, where the speech bubble actually points at the character, with animated dots. AnimatedBaseIcon - The default JKA chat Icon, but with animated dots. ImprovedBaseIcon - My modified version of the base chat Icon, where the speech bubble actually points at the character. Credits: Animated shaders are based on a shader by Ruxith in SiLink's custom icon: http://jkhub.org/files/file/1493-silinks-chat-icon/ Get other base improvements here: http://jkhub.org/topic/696-mugs-list-of-mods-everyone-should-have/ Published Exlusively on JKHub - 20th March 2013 Feel free to modify/use as you please. -
@@Delta_135 that should work. Feel free to improve upon that building, its just a thing I started on and never completed, so it's nice that its getting some kind of use =) @@Pande To return to the scaling discussions; Obviously, I cannot comment on the stuff added since I was working on the map, and I don't know if the different areas are off scale relative to each other, but as for your complaints about my train; I modeled it on a mixture of the different underground trains we have in London, don't know if you have been on something similar but they are cramped as hell, and the doors and seats are indeed very small. Basically everything is as small as they can possibly be whilst still being able to squeeze people into them. I very intentionally made the objects the size they are, relative to the player character. Obviously, if areas are off scale relative to each other, that could be a problem, as the map will look like the areas don't match up, and I can agree that fixing that may be necessary, however your comments about objects on the train are just your opinion on how big these objects should be, and I would find it somewhat upsetting if people change my design choices based on their differing design opinions, rather than a necessity to make the map work/make sense. Also, with the windows thing, if we look again at BlueIce Nightfall, there are plenty of interior windows with a shader on them which gives the appearance of there being something outside, but actually not being transparent. And I'm not suggesting just throw a skybox behind them either, I meant that a low-fi fake exterior could be mocked up like a few blocky buildings that resemble the actual map or such. I wont be making anymore posts about this, as I have made all the points I can make and further bickering wont really achieve anything, but I'd just like the future mappers to consider what I have said before they fuck my train up =P.
-
Frankly, I think people are being completely unreasonable. The idea with this project was for each person to create an area and for the next people to work out how they wanted to attach their own to it. The idea of having open ended streets being a serious problem which means the map is beyond rescue is frankly ridiculous, as the entire point of the project was to leave space for the other mappers to expand. Equally, the idea that having a currently disconnected area with windows is a terrible problem which will result in the death of the map is completely delusional, as not only can window shaders be changed to a non-transparent one, or just have a small personal skybox/exterior area to prevent them having to overlook the map, we don't even know what the rest of the map will be like and whether that will even be a problem. I hope the next guy in the line won't be so pessimistic and will actually do some mapping rather than just throwing in the towel and explaining how they are going to go write a tutorial about how not to map like the people before them. That's just needlessly insulting, we knew from the start that there were going to be mixed skill levels in this project, and that it will take some work towards the end of the project to round off the edges and make it all work as a complete map. [/rant]
-
But no, seriously, I meticulously made sure every little detail of that thing was the perfect size. I think what pande may not be realising is that most maps that people make are for some reason on a crazy giant scale relative to the player models, and that JKA has a giant collision hit box for players.
-
I don't get what the scale issues are. If anyone dares rescale my station or anything in it I will rape them to death, just saying.
-
Looks neat. I'm actually glad i didn't get round to making any of the streets outside, because that looks far more awesome than what I had in mind.
-
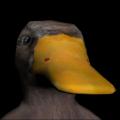
Well its not the right duck, but close enough xD
-
 This is one of the best things to happen to JKA. Ever.
 -
Just going to go ahead and point out that you can download files without logging in. You just cant view user profile pages. Anyhoo, I don't really see how its a big problem that you can't view user profiles without logging in. If it's more secure this way, I say keep it as is. If someone who doesn't have an account REALLY needs to view someone's profile, it really isn't hard to create one.
-
its good, aye. But day in the life has a certain sense of epicness.
-
Possibly the best song
-
kak was owned by someone else, they just had a spare server which they loaned to Caelum/myself, but it mysteriously vanished a while back, but i guess you get what you pay for. But yes, I would definitely be up for this if someone can find a venue. edit: ah yes, fighter ended up hosting this particular event, as the actual kak server had mysteriously vanished at that point.
-
Not unless someone happens to have a server and a bunch of people who want to play it =P
