Linken
-
Posts
883 -
Joined
-
Last visited
Content Type
News Articles
Tutorials
Forums
Downloads
Everything posted by Linken
-
First video my first thought immediately went to: But seriously, it's amazing work you're doing,
-
 Alright, I'll leave it up to you on how to implement or how to call it. So I'll write some simple tutorials. I'm going light on the details since I know you have a coding background, but let me know if you need screenshots. 1. In Q3_Interface.h, declare your new script command. 2. In Q3_Interface.cpp, add your command to the Enum2String and the Set method in the appropriate spot (would recommend making it a Boolean) 3. IF Making Global: have it change the value of the "g_broadsword" cvar to 0 (turned off) or 1 (turned on) depending if set to true or false. You can stop here. 4. IF Making NPC Specific, declare a new NPC scriptFlag (in b_public.h). In this example I'll just call it SCF_NO_RAGDOLL, make sure its Hexadecimal value is correct. An unmodified OpenJK source code should probably be 0x100000000. 5. To apply to an NPC, create a new function somewhere called by your script command and write something like this: static void Q3_SetRagdoll(int entID, qboolean ragDoll) { gentity_t *ent = &g_entities[entID]; if ( !ent ) { Quake3Game()->DebugPrint( IGameInterface::WL_WARNING, "Q3_SetRagdoll: invalid entID %d\n", entID); return; } if(ragDoll) ent->NPC->scriptFlags |= SCF_NO_RAGDOLL; else ent->NPC->scriptFlags &= ~SCF_NO_RAGDOLL; } 6. Lastly go to the function G_RagDoll (in g_main.cpp) and add a check near the beginning of the function to verify if the NPC has this scriptFlag applied, and if they do, return qfalse. DISCLAIMER: I wrote this code on the fly and didn't personally test.
 -
Are you looking for it to be global or only impact specific npcs?
-
Type "broadsword 0"
-
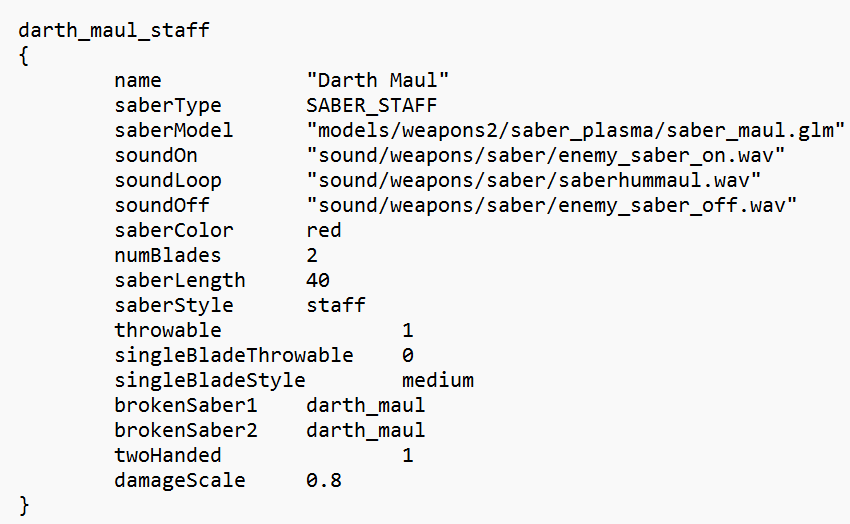
Is there any way to make staff style saber throwable?
Linken replied to Chen_tu's topic in Modding Assistance
This is what I did
-
There are 2 ways I can think of, one of them is easier than the other, but it's up to you. You'll need some basic modding knowledge. METHOD 1: REFACTORING This is likely what the author of that model did. You take the model you want to use and rename the model folder to match the name of the original. I don't have KotF 2.0 installed so I don't know the name. After you rename the model, you'll need to go into each .skin file and change the file paths inside to match. So for example, if the original model name was "hs_kenobi" and the new one is "new_kenobi", then you'll change all mentions of "new_kenobi" in the file to the original name. After that, zip the pk3 together, add a few zzzzs to make sure it overwrites and you should be OK. METHOD #2: MENU & NPC CHANGE This method is a bit more complicated if you're not used to opening these files. If you know where it is, then great. Once you open the menu file, look for any mention of the model name and change it to your new one. It should be prefaced by the code "ui_char_model". For the skins, very similar, except you'll be looking for 3 codes: "ui_char_skin_head", "ui_char_skin_torso", "ui_char_skin_legs", replace those with the skin codes that are applied for your character. After that's done, locate the NPC file and change the appropriate lines in there or create your own with the same code used in the mod.
-
I want to start this report off by thanking you all for your patience and understanding as I navigated the start of this enormous change in my life. This was not an easy change to deal with, but I'm feeling much better than before and I've gotten quite a bit done. I went ahead and released this progress report early due to upcoming Thanksgiving plans. MISSION FIXES As I slowly got back into development, I started off with some basic fixes and (hopefully) overall improvements to our missions. To begin, I did a great deal of work on the Jedi Outcast campaign. Here's what I did: All Jedi Outcast levels have been addressed where loading a save game would result in a loss of force powers and weapons. The turrets in doom_detention and ns_starpad will now work as intended and will now display a laser effect. I also spent a little time on fixing up the mission "The Trayus Core". Here's what I did with that: Reduced Darth Traya's health from 2000 to 1000 in Stage 1 Improved the hitbox for the floating lightsabers to make defeating them a bit easier. Removed the Lightsaber's force immunity MAP WAYPOINTS Our amazing team member Aimde has been hard at work adding waypoints to many maps and his dedication has not waivered at all. Adding waypoints will allow for npcs to behave as you would expect them to. The following is a list of maps confirmed to be receiving waypoints in the next update: Carida Academy Episode IV: Tantive IV Rogue One: Scarif Episode V: Echo Base RC: Geonosis Canyons KOTOR II: The Ravager Episode VIII: Snoke's Throne Room Episode VII: Jakku Episode II: Kamino Episode III: The Invisible Hand NEW CHARACTERS Alright, last point to make, this month has been heavily focused on beginning the process to package up the new characters for the mod. As of writing this: 10 of the 16 Skin pk3s have been packaged with all new characters. I hope to finish this process by the end of the month. As of today, I will no longer be accepting any additional character requests for this update (unless the character is one I'm very excited about). Here is a list of all confirmed characters arriving to Galactic Legacy in the next update. Please note this list is subject to change at any time: THE OLD REPUBLIC Atris (Darth Traya) (New Variant) Bao-Dur (Armored) (New Variant) Kavar Lonna Vash Nomen Karr Revan (General) (New Variant) DARTH REVAN'S SITH EMPIRE Kreia (Updated Model) RECONSTITUTED SITH EMPIRE 2V-R8 Darth Acharon Darth Baras (Model Update) Darth Decimus Darth Hadra Darth Malgus (Renegade) (New Variant) Darth Mortis Darth Nyriss Darth Ravage Darth Vowrawn Jaesa Willsaam Sith Empire Trooper (Updated Model) Sith Eradicator (Updated Model) Sith War Droid (Updated Model + Animations) Vitiate (Illusion) (New Variant) ANCIENT SITH EMPIRE Ajunta Pall Kissai Ludo Kressh (Crowned) (New Variant) Marka Ragnos (Updated Model) Marka Ragnos (Spirit) (New Variant) RULE OF TWO Darth Bane (Updated Model) Darth Cognus Darth Tenebrous (Updated Model) GALACTIC REPUBLIC Anakin Skywalker (Commander) (New Variant) Anakin Skywalker (Nelvaan) (New Variant) Kelleran Beq (Updated Model) Kit Fisto (Mon Calamari) (New Variant) Sister HIGH REPUBLIC (New Faction) Geode Jecki Lon Yord Fandar SEPARATIST ALLIANCE Asajj Ventress (Yavin) (New Variant) BX Commando Droid (Updated Model) Droideka (New NPC Class) Geonosian Elite Qymaen Jai Sheelal (New Variant to General Grievous) REBELLION Garazeb Orrelios (Updated Model) Grizz Frix Han Solo (Updated Model) Jan Dodonna Jyn Erso (Disguise) Keyan Farlander Lak Sivrak Lando Calrissian (Smuggler) (New Variant) Leia Organa (Mimban) (Additional Appearance) Luke Skywalker (Bespin, Farmboy, Sith Apprentice) (Updated Models) Luke Skywalker (Grand Master) (New Variant) Luke Skywalker (Mimban) (Additional Appearance) Raymus Antilles Sabine Wren (Updated Model + New Variant) Saw Gerrera Starkiller (Dreaming Robes) (New Variant) Starkiller (Experimental Jedi Robes) (New Variant) Toryn Farr Twi'lek Rebel NEW REPUBLIC Garsk 81 New Republic Officer GALACTIC ALLIANCE T'ra Saa GALACTIC EMPIRE Brakiss Captain Pellaeon (New Variant) Crosshair's Elite Squad Member Emperor Palpatine (Senate) (New Variant) Janus Greejatus Royce Hemlock Stormtrooper (Updated Model + Variants) SITH ETERNAL Sovereign Protector DARTH KRAYT'S EMPIRE Darth Krayt (Robe) (New Variant) Darth Maladi (Updated Model) Darth Maleval Darth Wyyrlok BOUNTY HUNTERS 4-LOM (Updated Model) IG-88 (New Variant) Zuckuss (Updated Model) HUTT CARTEL Dr. Cornelius Evazan CRIMSON DAWN Maul (Model Update) INDEPENDENT CRIMINALS Bera Kazan Bom Vimdin Davik Kang 0-0-0 CIVILIANS Asogian Babu Frik Camie Marstrap Dantooine Militiamen Duros (New Variant) Lak Shivrak Leesub Sirln Nautolan New Republic Citizens Quarren Tusken King MANDALORIANS Mandalore the Indomitable MANDALORIAN NEO-CRUSADERS Mandalore the Ultimate (Updated Model) ETERNAL ALLIANCE Nico Okkar (Updated Model) Vette (New Variant) JEDI ORDER Cal Kestis (Scrapper) (Updated Model) Jedi Knight (Hermit & Journeyman) SITH ORDER Sith Lord (Armored) Sith Statue UNALIGNED FORCE USERS Baylan Skoll Shin Hati INFINITIES Darth Jar Jar Darth Valeria (New Variant) Max POSSIBLE QUESTIONS & ANSWERS Q: Why are Baylan Skoll and Shin Hati in Unaligned Force Users instead of Imperial Remnant? A: Baylan and Shin did help Morgan Elsbeth reach Peridea and help in Thrawn's return. However, they were Mercenaries and weren't truly loyal to the Empire. Q: Is Darth Jar Jar going to be OP? A: We had to sacrifice many in his name to not be OP. He is however very strong. Q: Will there be a version of The Trayus Core mission with Atris instead of Kreia? A: There aren't any plans at this time, this would be up to you all to push us to make. CONCLUSION Once the characters are packaged up, there are a few more things to take care of regarding the new Dynamic Weapon System which I'm foreseeing to be pretty difficult to fix, so I'm saving it for last. I'm also currently looking into ideas to add some automation to the Character/NPC menu to make adding them a bit easier. It's a bit hard to say at the moment what else may need doing. However, the inclusion of new characters will be a huge milestone once completed, so I'm looking to have that done as soon as possible. I'm currently on the look out for potential new menu music, if you have any ideas, please send me a DM over Discord with your ideas (please no more than 3 suggestions). Thank you all for following the development of Star Wars: Galactic Legacy, and may the Force be with you.
-
- 1
-

-
Working in the modding scene for many years now and getting a chance to work in the Jedi Academy source code has unveiled a lot of really interesting things about the game that I never would've guessed to be a thing. I wanted to share a few of these discoveries with you all. 1. Jedi Master difficulty is not real It turns out according to the code that the difference between Jedi Knight Difficulty and Jedi Master is the health reduction. 2. The Difficulty nerfs your lightsaber Depending on what difficulty you're playing on, the lightsaber loses its ability to reflect the projectiles of certain weapons. On Padawan, it'll reflect all appropriate weapons. On Jedi, it'll no longer reflect the Flechette or Demp 2. On Jedi Knight/Master, it'll no longer reflect the Flechette, Demp 2, Bowcaster, or Repeater. 3. You can't die from fall damage if your playerteam is "free" Honestly this one surprised me a bit. I'm not entirely sure why this is the case or why it was coded in the first place, but it's a fact. 4. You can take away an NPC's force push So we all know the mechanic where if you grip or drain anyone with a lightsaber (even if they don't have push) they'll push you back anyway. There's a special function coded to perform this, how it's coded is that it'll assign the push power to the npc, play the power, then take it away. There's no check in the code if the npc owns the power beforehand, so this method will take away the npc's ability to use Force Push in normal combat. 5. Blocking Force Lightning with a lightsaber is in the game, it just doesn't keep you safe. You might have noticed if an npc is shooting Lightning at you that your character is moving the saber as if attempting to block it but you're still taking damage. This isn't a glitch but is an intentional mechanic. Lightning damage is calculated with a number of factors in mind (distance from the victim, one or two hands, etc), however, the simple act of holding a lightsaber offers the victim a significant damage reduction (not immunity). The blocking animation played is hard-coded in the game. If you want to experiment with this, spawn 2 npcs, one with a lightsaber, and one with another weapon. The non-saber user will die much faster than the saber user.
-
- 4
-
-
I saw this, wanted Sushi, then went to the store for Sushi, they didn't have any. I am now upset. 10/10 would torture myself with looking at this art again.
-
Jedi Academy Outcast Enhanced: Unofficial Patch
Linken commented on RebornKyle's file in Single Player
 The doom_shields fix was discovered by Jace Solaris, who codes for the Serenity Jedi Engine/Movie Duels. I just "borrowed" the code from him.
 -
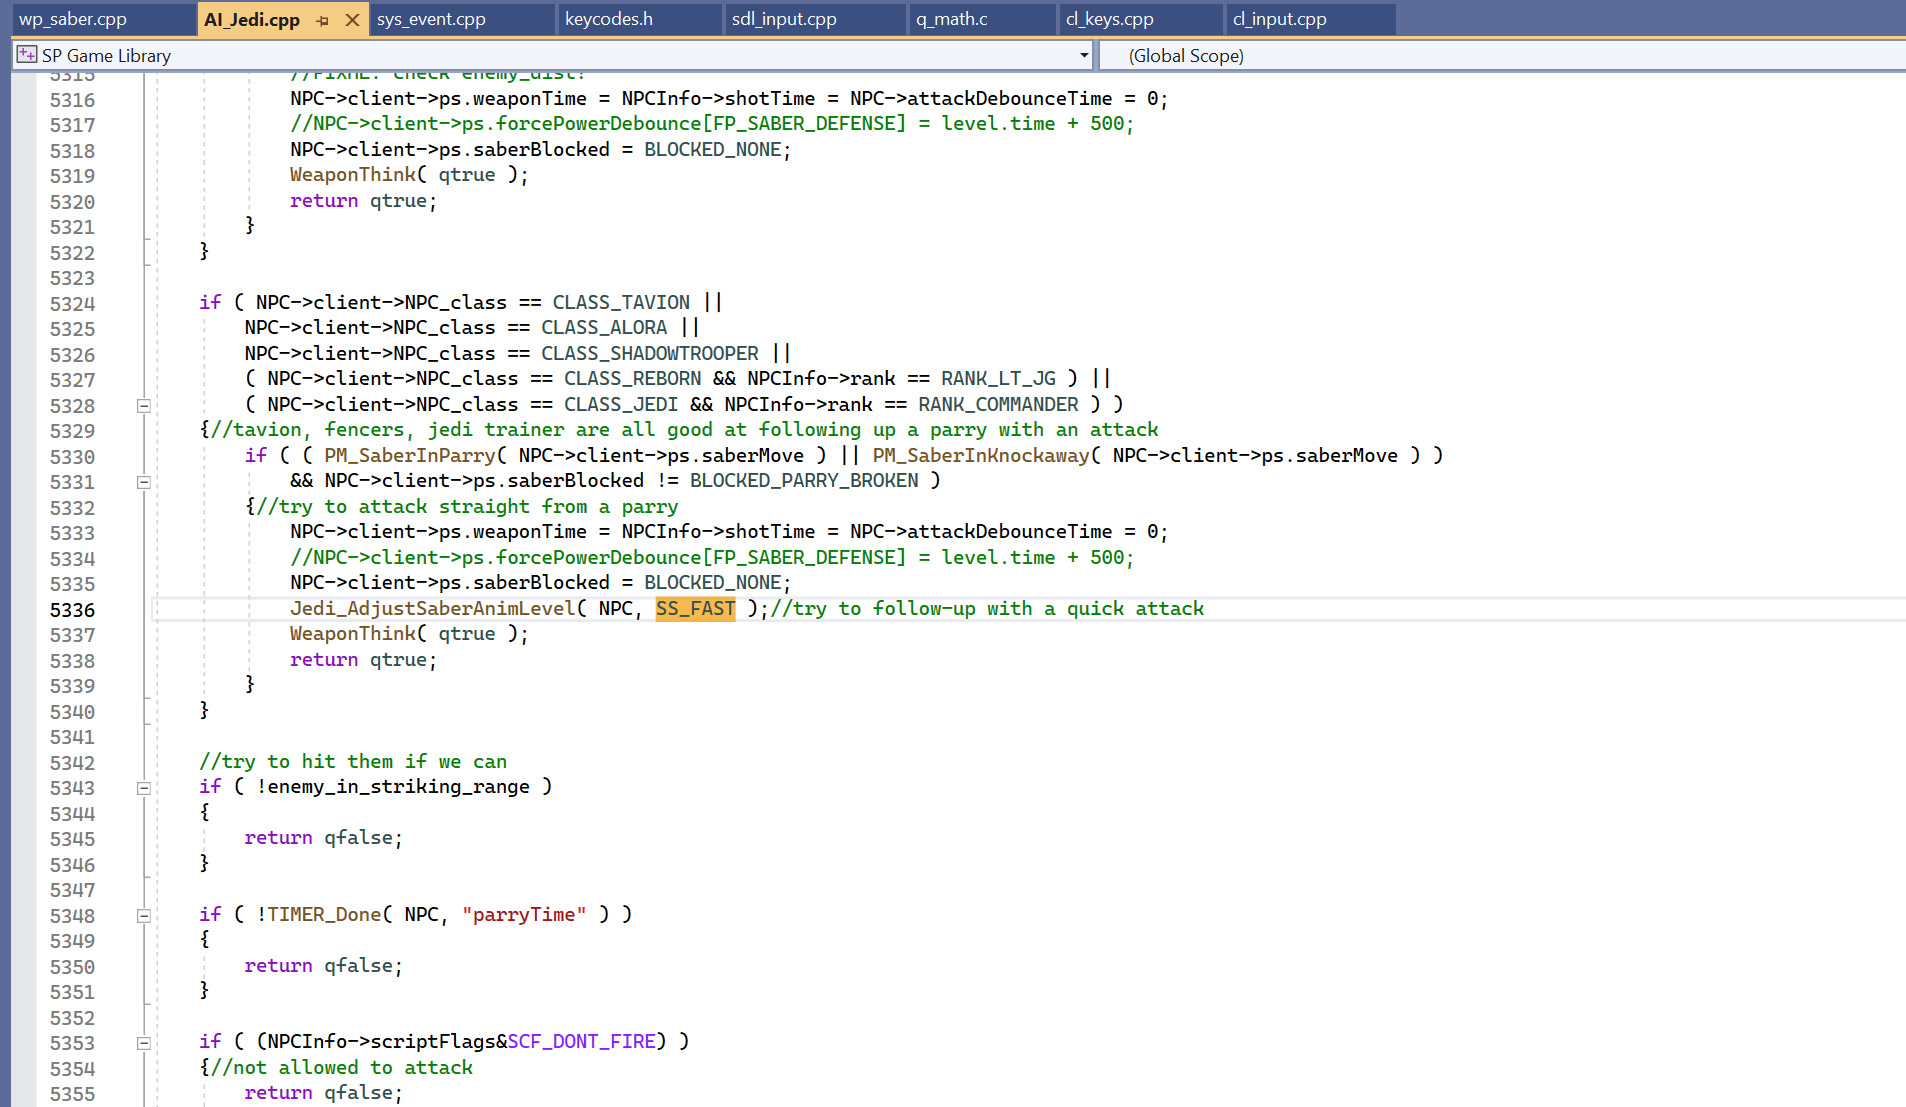
How to prevent saber staff NPCs from using fast style?
Linken replied to RebornKyle's topic in Modding Assistance
I think it's here on line 5336, of course it's been FOREVER since I did this. I can't for the life of me remember if doing Q_irand(SS_FAST, SS_TAVION) fixed it, even for dual/staff wielders, but it's a good place to start, probably even in the function itself.
-
Been a tough month, but an interesting one at that! FATHER VS. SON REMAKE Luke's 1st level for his dark side ending is very close to completion with one final cutscene to be made before testing can begin. I'm very sorry that this has taken so long to make, but moving and finding the time to do this is quite difficult. MAP WAYPOINTS We brought a new member on our team, Aimde, who immediately got to work on creating the long-awaited waypoints and NPC pathing we've been wanting for SO long! With his hard work, we have a handful of maps that are ready for you to fully experience with npcs as we've always intended for you to. The maps that are confirmed to be coming to the mod with full waypoints added are: Episode V: Echo Base Episode III: The Invisible Hand (v2) Rogue One: Scarif Episode IV: Tantive IV As Aimde works on this on his own time, I have given him free reign to work on whatever maps he chooses next and will not prioritize any maps. As he completes them, I will of course be sure to list them off for you. NEW CHARACTERS Don't worry, we have new characters coming! I'll provide a complete list of characters organized by faction once we actually start adding them to the mod! Bao-Dur (Model Update), ported from KOTOR II by Darth Valeria Kavar, ported from KOTOR II by Darth Valeria Lonna Vash, ported from KOTOR II by Darth Valeria G0-T0 (Model Update), ported from KOTOR II by Darth Valeria T3-M4 (Model Update) & (Weathered), ported from KOTOR II by Darth Valeria T3-H8 (Model Update), ported from KOTOR by Darth Valeria Kissai Ludo Kressh (Crowned) Raymus Antillies New Republic Officer T'ra Saa Sovereign Protector, by Omega Dr. Cornelius Evazan Wookiee Jedi Knight Human Male New Republic Civilian Human Female New Republic Civilian Max POSSIBLE QUESTIONS & ANSWERS Q: Who is Max? A: Max from Sam & Max from the hit video games by LucasArts. Max made a secret appearance in Jedi Knight: Dark Forces II in Level 5: Baron's Hed. Might be canon??? Q: Is SWGL turning into a meme factory now? A: We have to have fun sometimes After all...ITMAYORMAYNOTBECANON! Q: Who is the New Republic officer? A: The officers as depicted in Mysteries of the Sith Q: What faction is Dr. Evazan going in? A: Hutt Cartel. He is affiliated with them with Ponda Baba (and they'll be put next to each other too!)
-
- 1
-
-
How to prevent saber staff NPCs from using fast style?
Linken replied to RebornKyle's topic in Modding Assistance
There's a hardcode in the game code that sets the NPC's style to fast whenever they take damage. It's primarily seen with modded assets since the function that handles saber style logic has a few hard code cases with the base npcs. I don't have the code in front of me right now since I'm currently at work, but this was a problem with Galactic Legacy before it was corrected. -
That is a very common programming practice and is used constantly. You're just following the crowd.
-
If I recall correctly, I believe that the game does actually account for Jedi Outcast models being present and has code to make them behave like normal so you'd never notice. The problem is that the game hardcoded the expected humanoid filenames. This presents other problems, like being unable to play through the JKA campaign with a character with their own humanoid file because cutscene animations don't work.
-
So this is sadly an issue that can only be resolved via coding. When I worked on getting this mod into Galactic Legacy, I struggled a fair bit to figure out the cause. Though I can't confirm/deny any other solutions, what I ended up needing to do was add the jk2anims.gla file to 2 functions in the source code to a couple of if statements, which basically told the game "Hi there hello, this is a real humanoid file, treat it like that please or I'll be very sad". I am at work as of writing this, so I can't provide screenshots, but if you're able to compile OpenJK yourself, search for the function G_StandardHumanoid and add the path to the jk2anims gla in a new if statement (have it return the same value as all the others) , and then there's one other function to do the same thing in which I cannot for the life of me remember what it's called. This will fix the objects not being held but will also fix character heads moving in the wrong direction too.
-
Interesting month, let's get started! FATHER VS. SON REMAKE The 1st level of Luke's extended ending is nearing completion with a few things left to add in addition to the usual bug fixes, I'm hopeful that this next month will see to its completion, and thus we can begin the next level! NEW CHARACTERS These past several months we've received a number of new characters, though maybe not as much as before. I'll go ahead and list them below. Starkiller (Jedi Armor), ported by Darth Valeria Starkiller (Dagobah Illusion), ported by Darth Valeria Vitiate (Oblivion), ported by Darth Valeria Jecki Lon, by SlavicPickle Sister, by JollyGreenJack 0-0-0, by Linken NPC FREE CHOICE SYSTEM Some additional work was done on the menus to account for the NPC Free Choice System upgrades that were completed some time ago. This month was focused on heavy refactoring and general clean-up of NPCs that will no longer be needed. Now why am I telling you this? Just to forewarn you all. I understand that many of you have save games you want to keep, and because many npcs are getting removed, I felt it appropriate to post the list here so that way you all can mentally prepare yourselves for this change just in case you all use the console over the menu Regarding the impact it'll have on the menu, you should not notice any difference. However, the listed NPC codes will no longer work in the console after we release this update. This list is not final and can change at any point. Also want to quickly emphasize that this is not deleting any character entries. BOUNTY HUNTERS - boba_fett_panna - boba_fett_daimyo - boba_fett_resurfaced - Montross_Helm SEPARATIST ALLIANCE - asajj_ventress_disciple - asajj_ventress_staff - asajj_ventress_nightsister - asajj_ventress_bh - count_dooku_ritual - Neimoidian_Security - Ep3_Nute_Gunray - battle_droid_firefighter - battle_droid_flamethrower - battle_droid_marine - battle_droid_mk3 - battle_droid_rc - battle_droid_rocket INDEPENDENT CRIMINALS - trandoshan_kotor CRIMSON DAWN - Shadow_Collective2 - pyke2 - pyke_bh ZANN CONSORTIUM - mkii_droideka BLACK SUN - Guri_Dress CIVILIANS - ithorian_kotor - jawa2 - S_mustafarian - N_mustafarian (renamed to Mustafarian) - tusken2 GALACTIC EMPIRE - IMP_OFF_ISB - IMP_OFF_OL_PNC - IMP_OFF_BL_PNC - IMP_OFF_ISB_PNC - IMP_OFF_OL_TCH - IMP_OFF_BL_TCH - IMP_OFF_ISB_TCH - IMP_OFF_OL_F (renamed to impofficer_f) - IMP_OFF_BL_F - IMP_OFF_ISB_F - Galen_Marek_Heavy - Galen_Marek_Light - Galen_Marek_Training IMPERIAL REMNANT - alora_dual2 - alora_dual3 - impworker4 - mark3_dark INFINITIES - Galen_Marek_Ceremonial - Galen_Marek_HCG - Galen_Marek_Utility - Galen_Marek_General - Galen_Marek_Assassin - Sith_Stalker - Cybernetic_Reconstruction - Lord_Starkiller_Tatooine - Starkiller_Hunter - Battle_Droid_Concept JEDI & SITH - KOTOR_Jedi7-30 MANDALORIANS - Bo-Katan_Mando - Ruusaan_Skirata_NoHelm - The_Mandalorian_NoBeskar DARTH KRAYT'S EMPIRE - Darth_Talon (replaced by Darth_Talon_GOH) - Twilek_Sith ETERNAL ALLIANCE - Lana_Beniko_Advisor CREATURES - Rakghoul_TOR - Undead_Stormtrooper_Blaster ETERNAL EMPIRE - Zakuul_Knight_Dual REBELLION - Ahsoka_Tano_Mandalorian - Ezra_Bridger_Helmet - Galen_Marek_BH - Galen_Marek_Corellian - Galen_Marek_Industrial - Galen_Marek_Jungle - Galen_Marek_Medical - Galen_Marek_Temple - Starkiller_TIE - Starkiller_Jedi - Han_Solo_Hoth - Kanan_Jarrus_Mask - Rahm_Kota_Drunk - Rahm_Kota_TFU2 - Leia_OM - Leia_Honoghr - Leia_Lothal - Leia_Black_Sun - Leia_Jedi_Training - Ep6_Leia_Slave - Ep4_Luke_Yavin - Ep5_Luke_Pilot - Ep5_Luke_Dagobah - BOBF_Luke - Luke_CS - Luke_Heir - Luke_Heir_Pilot - Luke_Rebel - Luke_Mimban - r2d2_jabba - Mothma_TFU - Sabine_Wren_Darksaber NEW REPUBLIC - Jaina_Solo_Jedi - Jaina_Solo_Pilot - Jaina_Solo_Rogue - Jaina_Solo_Top - Kyle_DF2_LS - Kyle_DF2_Cutscene (replacing Kyle_DF2) - Kyle_DF2_LS_Cutscene - Kyle_Robes - Kyle_Stealth - Mara_Jade_Winter - Mara_Jade_Smuggler - Mara_Jade_Poncho - Mara_Jade_Vong GALACTIC ALLIANCE - Ben_Skywalker_Tunic - Corran_Horn_Pilot RESISTANCE - Finn_EP9 - Rey_Skywalker OLD REPUBLIC - vrook_lamar_kotor - Republic_Trooper2 - Havoc_Trooper2 - Satele_Shan_Exile - Republic_Pilot RULE OF TWO - Darth_Bane_Lord - Darth_Bane_Spirit - Darth_Maul_Shirtless - Darth_Sion_TFU BROTHERHOOD OF THE SITH - Exar_Kun_Lord ANCIENT SITH - Naga_Sadow_Alt RESURGENT SITH EMPIRE - Sith_Inquisitor_Single DARTH REVAN'S SITH EMPIRE - Sith_Commander - Sith_Trooper_Swordsman - Sith_Trooper_Heavy - Sith_Trooper_Grenadier GALACTIC REPUBLIC - Gran_Jedi2 - Ahsoka_Tano_Padawan - TCW_Anakin - TCW_Anakin_Midwar - Barriss_Offee_Dark - Barriss_Offee_Disguise - Depa_Billaba_TPM - Even_Piell_TCW - Darth_Sidious_Dual - Darth_Sidious_Apprentice - Plo_Koon_JPB - Plo_Koon_TCW - Quinlan_Vos_TCW - Siri_Tachi_Suit - Yoda_Hood - NSF_Guard2 - NSF_PalaceGuard - NSF_PalaceGuard2 - Nahdar_Vebb_Robed - TCW_Obiwan - TCW_Obiwan_Midwar - Obiwan_DW - Obiwan_Hermit - Obiwan_Jabiim - Ep2_Padme_Pilot - TCW_Padme_Snow - Ep3_Padme_Senator - Ep3_Padme_Nightgown - Ep3_Padme_Nightgownblue - Ep3_Padme_Mustafar - Ep1_Padme_Queen_Black CONCLUSION A lot of development work was done on Luke's dark side ending which I sadly can't share any screenshots of yet, but this doesn't mean we don't care, it just means we want you all to experience the story as freshly as possible. There is a possibility that a progress report for July may not happen as I'm currently in the process of purchasing a house, and moving is.....uhhhh.....well it's moving. Regardless, we will still continue developing the mod, just maybe a little less on my part than expected, depending on how everything goes. And as always, thank you all for following the development of Star Wars: Galactic Legacy, and may the Force be with you.
-
- 1
-
-
 For a skinning job, I think it was well done, and to boot, learning JKA modding JUST to do this makes this immediately a 5-star for me. Can't wait to add her to Galactic Legacy! Thank you so much!
- 2 comments
-
- 3
-
-
- bot support
- npc support
- (and 3 more)
-
So to get the obvious stuff out of the way, moving didn't happen. Yeah, it sucks, but that means more work on the mod was done! Yay! FATHER VS. SON REMAKE Some light work was done during this month on Luke's dark side ending, the main portion of the 1st level is completed, with bug fixes and the boss encounter needing to be done. While I can't provide screenshots as it would provide spoilers, I wanted to quickly assure everyone that the level is still being worked on with the utmost care, however I would say that more time this month was spent on other necessary things for the mod. NPC FREE CHOICE EXPANSION As other parts of the mod needed some attention, work was done this month on improving the menus and the NPC Free Choice System. To start things off, we're adding a randomizer option for any customizable character so you'll have the ability to spawn a wide assortment of characters with a simple click. This will also work for any customizable character that you add to the mod yourself, our goal is to give you, the player, additional ways to further integrate characters that we may not yet feature, so this same functionality will be added to the npc spawn console command. NEW CHARACTERS Alright, we have secured some new characters! Let's list them off! All of the following (except one) were ported by DarthValeria! A huge thank you to him for his work! Sith War Droid (Updated model) Jaesa Willsaam Nomen Karr 2V-R8 Kreia (updated model) Darth Malgus (Renegade) Darth Acharon Darth Vowrawn Darth Ravage Darth Mortis Darth Hadra Darth Decimus Darth Baras (Updated model) Darth Acharon Darth Traya (Atris) https://www.youtube.com/watch?v=v7eiY0ikRwI&ab_channel=StarWars%3AGalacticLegacy Yep, we're doing it. In celebration of the 25th anniversary of The Phantom Menace, or a glitch in the Matrix, or because we're utterly insane, Darth Jar Jar is officially coming to Galactic Legacy! Darth Jar Jar was created from the Jedi Gungan model already featured, with additional skin work done by myself and utilizing textures from the Spanki Sith Customization pack. CONCLUSION It's been a very interesting month but we knew we wanted to report this for you all. We hope that next month will see to more awesome news! Until then, thank you all for following the development of Star Wars: Galactic Legacy, and may the Force be with you.
-
- 3
-
-
Plenty to talk about, so let's get started! FATHER VS. SON REMAKE The 2nd level in Luke's Dark Side ending is coming along very well. The most complicated portion has been completed, so all that's left is to fill in the blanks! More than likely this level is about 50% completed, as the part that mattered the most took a very long time to complete. I'm very proud of the work and I can't wait to show you all more. However, I can't show off anything right now, but I hope in the next report I'll have something cool to show you all. NEW CHARACTERS We were able to gather up more characters to bring to Galactic Legacy in the next update! YAY! Here's a list of who they are and where they'll be going. I'll provide a more complete and organized list once Luke's ending is completed. General Mohc (Officer Uniform) (Galactic Empire) by Jeff Vette (Knights of the Fallen Empire) (Eternal Alliance) ported by Jeff Toryn Farr (Rebel Alliance) by Jeff Leesub Sirln (Civilians) by Jeff Lak Sivrak (Civilians) by Jeff Royce Hemlock (Galactic Empire) by SebTheAlchemist Tusken King (Civilians) by Jeff Sabine Wren (Model Update) (Rebel Alliance) ported by SebTheAlchemist from Galaxy of Heroes Garazeb Orrelios (Model Update) (Rebel Alliance) ported by SebTheAlchemist from Galaxy of Heroes NPC FREE CHOICE SYSTEM A long requested feature that we've been asked for is the ability to customize an NPC's skin RGB. So....yeah....we did that. CONCLUSION, LIFE CHANGES & IMPORTANT ANNOUNCEMENT So there's a bit of an announcement to make with my personal life. I'm moving. As some of you might know, moving is a hassle, and settling down in a new home can be a fairly lengthy task. As things stand right now, myself and my fiancee will be moving to a new home on May 31st. Because of this, I have decided to take some time away from the mod and focusing on creating this new home and starting a new chapter. While I'm not saying that I am stopping all development on the mod on my end until this time is over, this will sadly mean that there will be no Progress Reports for the month of May or the month of June. During this time, I will continue developing what little I can, but primarily focusing this May on getting everything packed up, and then spending June to unpack and create a new home. Our next Progress Report will be in July, hopefully will more exciting news to share! We'll of course continue to post new previews for new things as they come along, so please don't consider this page or this mod as dead, we're still very much alive! As always, thank you all for following the development of Star Wars: Galactic Legacy, and may the Force be with you.
-
- 2
-
-
Good month for the mod! Let's get started! FATHER VS. SON REMAKE As with the previous months, this month was also heavily involved with developing Luke's Dark Side ending's 1st level. Shortly after the release of the last progress report, I received the needed assets in order to continue with production. We're hoping that this level starts off the ending strongly. NEW LIGHTSABERS Plasma recently updated his saber pack! We've added them to the mod and they are good to go! YAY! Huge thanks to Plasma for his awesomely awesome work! Baylan Skoll Dagan Gera Ezra Bridger (Peridea) Jedi Temple Guard (Folded) Joruus C'Baoth (Default color may be inaccurate, if you know what color it's supposed to be, please let me know) Sabine Wren Shin Hati Yoda (High Republic) FORCE POWER CHANGES Some light work was also done on fixing up Force Stasis and Destruction, which boiled down to a single bug fix and a cosmetic tweak. Fixed an issue where Force Stasis's sound would continue playing on the player after the power's effects wore off. Force Destruction will no longer disintegrate non-animal vehicles. APRIL FOOLS DAY We don't have any new "content" planned for April Fools day, but as always our April Fools changes will be available all day April 1st! Fight against Wilbur Wonka and his gigantic lolly of death in a silly reimagining of Darth Maul's extended ending! CONCLUSION This month has been very interesting and hopefully additional progress of Luke's dark side ending can continue without any further interruptions. We have a few other things secretly happening behind the scenes that we hope to report on soon! As always, thank you all for following the development of Star Wars: Galactic Legacy, and may the Force be with you!
-
- 4
-
-
PK3 put inside Base folder isn't being loaded (JKA)
Linken replied to TheFoxTrotte's topic in Modding Assistance
Did you attempt my suggestion before commenting this? -
PK3 put inside Base folder isn't being loaded (JKA)
Linken replied to TheFoxTrotte's topic in Modding Assistance
So my immediate guess might be because this was a RAR file before you changed the file extension. Since you said before when you had it in your base folder not as a pk3 it worked. What I propose as a solution is to repackage your mod as a ZIP file instead of a RAR, then change the file extension to pk3. Hopefully that works. -
PK3 put inside Base folder isn't being loaded (JKA)
Linken replied to TheFoxTrotte's topic in Modding Assistance
Can you show us a screenshot of the inside of your pk3 file? -
I believe the breathing sounds are called in the AI files for the rancor and sand creature.