Linken
-
Posts
883 -
Joined
-
Last visited
Content Type
News Articles
Tutorials
Forums
Downloads
Everything posted by Linken
-
Busy month! Let's get started! FATHER VS. SON REMAKE Development on Luke's Dark side ending for the Father vs. Son remake has been progressing slowly. The level occurring immediately after the duel within the Emperor's throne room has gone through quiet a few revisions, which unfortunately has halted progress for the immediate future. However, with the help of Lwkill, we are currently adding hopefully the last piece of the puzzle which should allow me to complete the level and begin this journey. I sadly cannot share screenshots of this level as this would involve some spoilers. The next one however whenever we get to it should allow us to provide some development screenshots of Luke's journey towards the Dark Side of the Force. We're really looking forward to showing off more as development continues. INQUISITOR SABERS We have successfully coded the AI to use the Inquisitor lightsabers and they are fully functional for players and NPCs alike! https://youtu.be/Kebsn4mg6h0 All Inquisitorious characters will be given the ability to use these new specialized sabers against the enemies of the Empire (or allies of the Empire if you want). POSSIBLE QUESTIONS & ANSWERS Q: Can any NPC spin the Inquisitor sabers? A: Only members of the Empire's Inquisitorious can spin the sabers, if another NPC is equipped with it, it will function as a normal saber staff. However, with the new Attribute system we're introducing, you will have the option to modify any NPC or add your own and give them this ability. Q: Will Inquisitor Starkiller be able to use the saber? A: Yes, Inquisitor Starkiller will be given this ability Q: Will this mean that I can get killed very easily by an Inquisitor character? A: The spinning saber can provide an advantage for the Inquisitors, however the damage the saber gives is nerfed while the saber is spinning. Once the update releases, we may or may not change this depending on feedback. Q: Can they fly now? A: No, they cannot fly now. Q: How would I spin the saber if I'm using it? A: Press the key you use to change saber styles, it will cycle between 3 set speeds. BUG FIXES In addition to these new features, we also spent some time to look over some bugs plaguing the mod. Here's a list of things fixed so far. Fixed an issue where throwing your lightsaber would occassionally cause the hilt to revert to a previous saber you were using. RGB Sabers will work in the NPC spawner menu as intended. If the game cannot load a level after extended play sessions, the loading screen will no longer stick Fixed a spawn point in the Raxus Prime map that would cause players to almost immediately fall to their death upon spawning. Changed the default values for NPC spawnscripts, fleescripts, and deathscripts from their set behaviors, which was causing some major player confusion. COMMUNITY Q&A In the previous Progress Report, I included a new Community Feedback form to hopefully answer any burning questions from you wonderful people! Can the community help with voice lines for NPCs? We occassionally put out casting calls on our Discord server depending on what we need. Please consider joining our server so you never miss them! Will you add any characters from the High Republic series? We would love to, but people would need to make them first! What will the next missions added be? A remake for Episode VI's Father vs. Son mission with 3 unique campaigns. Currently in active development is Episode I's Escape from Theed. Can't comment on any others right now. When is manual block coming lol When the monkey I hired to write the code stops eating all of my bananas Would it be possible for sandbox maps to automatically have NPCs? Just like in Lego Skywalker Saga when you arrive on a planet? This was something I've considered many times. The problem is that too many NPCs can cause some serious lag, which you, the player, don't need to deal with. This would be tentative on figuring out how to make the game multi-threaded or allow for an increase in CPU resources so the game can run better on modern hardware. Will there be a option to make our own character in sandbox I'm currently considering possible ways for you to add your own characters to SWGL without needing to wait for updates. 2025 will be Episode III's 20th anniversary. Could you do a mission to celebrate the occasion? Given the unpredictability of developing this mod, I cannot in good conscience make this promise. I personally would like to though. Would it ever be possible to make the sandbox mode of Galactic Legacy Co-op? It would be fun to spawn NPCs in with friends I absolutely agree and I have been thinking about this recently, so maybe the update after this we may focus on multiplayer. i wish i had a more interesting question to ask than "where duel x pls", but is ESB vader vs luke being worked on? Iid love to see that duel fleshed out with more endings similar to duel of the fates. This mission is not being actively developed at this time. Would it be cool if we can add a new npc command which we can add waypoints and make them walk? We definitely want to do this. 2- Is it possible to add a command like "npc effect" to spawn effect on the player without attacks (like lightning or drain) It's theoretically possible, I can't guarantee it'll be in this update, but this is a possibility. Do you plan on updating some of the worse looking player models? (i.e. young Ahsoka, Cal Kestis' poncho). Yes. Except Ahsoka, we don't have anything for her right now. Are you planning on adding singleplayer levels without any enemies or objectives into the maps list? There is already a few such as Kril'dor, but it would be interesting to see all of the singleplayer maps implemented. I can definitely understand the appeal, we'll see what we can do. Could you guys update the JK2anims to allow them to function better with JA features or add jk2 lightning as a new "Lightningcolor" or bring back the JK2 feature of npcs steapping aside for other npcs and stopping at ledges? I ask because of how much JK2 means to me since it is the only game I had as a kid and introduced me to start wars. Thank you. NPC behaviors like that are entirely dependent on map waypoints and other entities so the AI can react "kind of" better. Regarding the JK2 animations, I'm not 100% sure what you mean. If you leave us a comment detailing what you're asking about, I'd be able to answer you a bit better hopefully. Would it be possible to create a database of user-created missions for others to play? We offer a channel on our Discord server where players can submit their save games for others to enjoy. Backhand stance lightsaber looks "copied and pasted", this looks cool but it's not really functional (roll attacks do not work for example). Can this be improved? The biggest issue is that the saber models are flipped upside down, this heavily restricts the possible moves the player can do. We would need to edit the animations to adjust the saber positioning. I don't know if it's already in the mod, but would you guys consider making a hotkey for freezing npcs so you won't have to go back to the menu everytime to freeze them. Maybe Can you make a Darth Jar Jar model ? He's the Sith'ari after all ! We've tried, but sadly this entity was too powerful for even the most seasoned player to defeat. Is there a way you could create basic mission objective templates we could drop into a map alongside spawned NPC etc? Objectives are tricky because the game needs objectives coded, else they won't work. So at the moment, this sadly isn't possible. CONCLUSION It has been an interesting month but a good one for the mod's development. Hopefully in the next report we'll have more news on some possible new features I've been brainstorming as of recently! Thank you all for following the development of Star Wars: Galactic Legacy, and may the Force be with you.
-
- 2
-

-
Hope you all have had a great January and that your year has started off well! This January, more progress is made! YAY! FATHER VS. SON Luke's dark side ending is coming along very well, with a number of new assets being created. This story is starting to come together, starting with a mission aboard the 2nd Deathstar! Lwkill, our super awesome mapper, has been hard at work putting together a wonderful environment for you all to explore, and I'm really looking forward to showing more as the level is put together! I would like to apologize for the lack of specific updates with this mission over the past few reports, so I would like to offer you all the first cutscene of Luke's Dark Side ending for your viewing pleasure. Please keep in mind that anything with this scene is subject to change. However, this scene does not contain any real spoilers, so there's no warning behind this one. I hope you all enjoy the scene along with an amazing performance by Sonam Burke! https://youtu.be/la9qA6CwasI OPERATION: KNIGHTFALL COMMENTARY Myself, the original author Darth Voiid, and Basil Bonehead have at last recorded a commentary for the Operation: Knightfall remake! We hope you'll consider watching and enjoying the many stories behind the creation of our largest mission to date! https://youtu.be/WmD4hdPM2yk?si=CjqVph_MHTxT6TI3 INQUISITOR SABERS Regarding the Inquisitor sabers. We got them working! Yay! We've implemented a very basic functionality to let you spin them and stop them from spinning at will. A huge thank you to Darth Valeria for making this possible, as well as Plasma for making them in the first place! More details should be coming in a later report as to how these sabers will impact gameplay. https://youtu.be/WyiSVc4KoHE NEW/UPDATED CHARACTERS Alright, a list we haven't gotten a chance to make this list for a while! New characters! Given the small amount we currently have in the queue, the list will not be organized by faction. Instead, I'll be adding their intended faction. Additionally, I will be including a list of characters that will be receiving faction changes in order for them to be more accurate. Darth Malgus (Rogue) (New Variant), Malgus will also be moved from Reconstituted Sith Empire to Unaligned Force Users. Created by Bioware, ported by Darth Valeria Anakin Skywalker (Nelvaan) Pack provided by The Unguided (https://jkhub.org/files/file/4183-the-six-swole-pack/). Cal Kestis (JFO). Ported/Created by Zeal (Updated Model) Mandalore the Ultimate (Updated Model) Created by Engys Epangelmatikes, ported from Garry's Mod by Zeal Kelleran Beq (Updated Model). Ported from Galaxy of Heroes by SebTheAlchemist, upscaled textures by YesImSev. Princess Leia (New Infinities Variant) Luke Skywalker (New Infinities Variant) Baylan Skoll, added to Unaligned Force Users, created by ZelZel Shin Hati, added to Unaligned Force Users, created by ZelZel Taron Malicos, moved from Nightsisters to Unaligned Force Users CONCLUSION & COMMUNITY FEEDBACK This month has been a busy one and I'm eagerly looking forward to bringing you all the remake for Father vs. Son. We hope to make 2024 a great year for the mod and one to remember in general! We could not have done all of this without your support as well as the countless authors that have allowed us to feature their work/ports. We have a lot of things on the backburner we hope to announce soon, but for now I do hope that you all enjoyed this report. I do apologize for the lackluster reports from a few months ago, but hopefully this one at the very least led us in the right direction for your forgiveness! I've set up a new Community Feedback form that I hope each of you will participate in! Please be as brutally honest as you would like, these responses are completely anonymous. https://forms.gle/YCUrTrtoCVhr9Hfj6 As always, thank you all for following the development of Star Wars: Galactic Legacy, and may the Force be with you.
-
- 2
-
-
I am so sorry for the long response time! From what I could gather, animations are strictly assigned per model, so if you wanted one appearance of your character to have one set, and another appearance to have another set, you'll need two different models. Back when I wrote this, the notepad method did work, but that's definitely not the case these days. I'll probably edit this tutorial at some point to only include the Hex Editor.
-
I hope everybody had a great Halloween! But unlike the holiday, this mod's development was anything but spooky! (Or maybe it was, who knows) FATHER VS. SON REMAKE This month was heavily focused on the long-awaited remake of Father vs. Son. As of typing this, all major duel cutscenes have been completed, with the choice and subsequent endings still requiring development for Luke's side (and then Vader needs to be worked on of course). I wanted to take this time to address a few changes, and also put to rest a few potential concerns regarding some possible controversy that may arise as a result of this news. Less Endings: The original Father vs. Son had 8 endings. This will be scaled back to 4. The reason for this decision was because we felt that many of the endings would've taken a very similar (or simply identical) route to others that we felt had more of an impact. Other endings were omitted because we simply couldn't think of a believable story. No Palpatine POV: Since the Palpatine POV in the original was only a choice duel, this POV will be removed and (SPOILER ALERT) you will only play as him if you betray Palpatine as Darth Vader in Vader's own POV. All endings will be given a short what-if story: Similar to Duel of the Fates, all 4 new endings of the Father vs. Son remake will be greatly expanded on, with the non-canonical endings being given an original story to detail what could've been. NEW MAPS Our amazingly awesome mapper Lwkill has been hard at work this month creating and updating maps that we hope you'll get to experience soon! THE EXECUTOR IMPERIAL STAR DESTROYER CHARACTER ATTRIBUTES A big issue that plagues most (if not all) Jedi Academy mods is that basically all characters act or behave exactly the same. Of course there are some minor AI changes depending on NPC classes, but overall, all NPCs behave roughly the same way. Other issues of course include some characters not having certain biological (or mechanical) improvements that you'd expect. To help combat this, the first three brand new attributes have been coded to the game. More should be on the way at some point, but we feel this is a good foundation. HERO: Allowing the heroes and villains of Star Wars to shine, Heroes take less damage from all sources, cannot be disarmed, are immune to mind trick and Force Fear, and deal significantly increased damage from whichever non-explosive weapon they're using. AQUATIC: Aquatic characters cannot drown, simple as that. HELD BY HATRED: Inspired by Darth Sion's mechanic, Held By Hatred allows a character on the brink of death to sacrifice a chunk of their maximum health to return to life and continue fighting. The more health the character has, the longer they can potentially last. NPC FREE CHOICE SYSTEM Ok! This is the big one, the most heavily requested features for the NPC Free Choice System are coming! You've asked, and we've delivered. Next update: Model, Soundset, and Force Power customization! CONCLUSION It honestly surprised me how much we got done with the mod during this month, I'm very excited to bring this one out to you all. Next report we hope to have more updates on the Father vs. Son remake (including some development screenshots!) and hopefully more! Thank you all for following the development of Star Wars: Galactic Legacy, and may the Force be with you.
-
- 2
-
-
You have some options with this, the most basic solution is create a script in BehavED to call the NPC, have them play a sound, and loop it. Sadly as you said earlier, the rancor and sand creature breathing is hard-coded. I don't have the code in front of me right now to say where, but I do remember when implementing breathing sounds for Darth Vader and Lord Starkiller in Galactic Legacy it was only a couple of lines of code. But if neither option is available for you, then the lightsaber sound would probably work best for you.
-
We made the emperor's throne room for our rendition of the False Emperor final fight against Malgus in the Galactic Legacy mod. Same with the dreadnought.
-
INITIAL DEVELOPMENTS So despite me saying I was taking a break from developing.... Quite a fair bit of progress has been completed on the mod, and I'm very excited to talk about it! DYNAMIC WEAPON SYSTEM Initially coded by our amazing coder The New Order, the Dynamic Weapon System has been fully integrated into the mod and will be ready with the next update (sans bug fixes of course). The Dynamic Weapon System will allow for us to group together multiple weapons of the same functionality to allow us to use up less weapon slots for the mod, and thus in turn will let us offer up a larger variety of weapons now and in the future. To begin this process, most weapons which you know have been merged, and 2 new weapons have been coded! The E-5s Sniper Rifle, and the Super Battle Droid's arm cannon! More weapons are slated to come at a later time. We're really looking forward to bringing this to you. NEW CHARACTERS We've also received a lot of new character suggestions for the mod. Below are some that are slated to come, please remember that this list is subject to change at any time. Bera Kazan Jyn Erso (Imperial Disguise) By Jeff Sith Eradicator (Updated Model) By The Unguided Sith Empire Trooper (Updated model) By The Unguided Mandalore the Ultimate (Updated Model) By Zeal Baylan Skoll, By ZelZel Shin Hati, By ZelZel Nico Okarr (Updated model), Ported by Punisher Saw Gerrera, Ported by Punisher And more THE DROIDEKA Wait, why is the Droideka getting a section? Good question! Over the past few weeks (in fact pretty much the whole month) the Droideka has been received some very much needed attention. Since the mod's debut, the Droideka and Super Battle Droid have often been regarded as bad eyesores for the mod, lacking their signature weapons and overall just weren't threatening. This month I've been hard at work getting the Droideka to a place where I feel we can consider it as much more authentic and more accurate to its overall threataning nature as depicted across all of star wars. Please watch this video and see for yourself how the droideka operates as both an NPC and also for the player! CONCLUSION There's still a lot to work on the Droideka, primarily cosmetic things, but overall things are coming along well with it. There are other things we are working on which we want to keep quiet for now, but hopefully this offers a taste of things to come for the mod. If you haven't seen yet, we did release one final hotfix for our August update and performed a full merger, so the full mod is fully up to date with everything. Thank you all for following the development of Star Wars: Galactic Legacy, and may the Force be with you.
- 1 reply
-
- 3
-
-
All characters have this ability, and can play any sound (provided JKA can play it). So if you want Vader to play Youngling lines or Palpatine to sound like Dooku, you can do that, there's no limitation at all. Also it looks like I'm getting delayed responses, I'll get a notification saying you quoted me but not receive it until long after the fact. So I apologize if some stuff seems out of order in this post.
-
See my previous post, also don't add a \ before the sound. If you're still having problems, reach out to me directly on discord and we'll sort this out together.
-
Finally got around to being able to get ingame. Here's a screenshot of my own attempts, which worked. If it's still not working for you, please make sure you downloaded our recent update we released this past august.

-
Double check the filepath I gave you is correct. I only wrote that as an example since I wasn't near my computer when I wrote the last post (still am not so I can't check it). Open the Republic skins pk3 file, open the sound folder and find the filepath of the sound you want to play.
-
So I'll give you an example command using your qui-gon npc as an example. We'll have him play a taunt sound of his and have it play globally. Also since I'm nowhere near my computer right now, I can't verify the name of his sound folder. npc sound qui-gon_jinn63 sound/chars/quigon/misc/taunt2 global
-
If you're wanting to use galactic legacy (I saw you mention it earlier), we actually implemented a system to let you play audio off an NPC. Our syntax is "NPC Sound [NPC targetname] [sound file path] [channel]". The channel can be left blank, but valid channels are voice (default), global, weapon, and body.
-
Since we just released an update, this will be a short one. THE ROAD AHEAD First off I want to quickly thank you all for your support during the development of the previous update. Though we unfortunately had to release a few hotfixes (which often seems inevitable with this stuff), I think we can officially close the book on this update and look to the future and begin planning for our next content update! Myself and my fellow leads are currently discussing what we want to bring to Galactic Legacy in our next update, and though we're not comfortable revealing everything, we still want to prioritize bringing in new missions and features we've promised for some time. Currently our list of new additions is this: Father vs. Son remake Episode I Escape from Theed campaign Dynamic Weapon System And perhaps more! THE IMMEDIATE FUTURE Though we're excited to bring you this next update, mental health is more important. So during the month of September I will be taking a break from developing for the mod. This previous update was unfortunately surrounded by a ton of personal drama and I need some time to heal and prevent burnout. Though I'll be putting my side of development to rest, don't think that I'll be going anywhere. I'll still be available on our Discord server and will still be around moddb, jkhub, and YouTube to answer comments and the like, I just won't be developing. Lwkill, our amazing mapper, has been hard at work with his own projects, including the Escape from Theed campaign, and we're very excited to show off what he's done in the next report. There are other projects being worked on by other members of the team; so we should still have a progress report for September. On my end however, I will resume development at the end of September with the debut of that month's progress report. COMMUNITY FEEDBACK We would like to hear from you on which direction we take this mod in the next update, so we've created a new community feedback form. We'd also like to hear from you regarding your experiences with the remake of Operation: Knightfall, so please fill out the form and let us know your thoughts. All responses are completely anonymous, so be as brutally honest as you would like. https://forms.gle/U4AHa7LWdViQLzUs8 Thank you all for following the development of Star Wars: Galactic Legacy, and may the Force be with you.
-
- 3
-
-
If you want the player to have the melee attacks by default, then do the cvar g_debugmelee 1.
-
Patch Notes - 08/23/2023 HIGHLIGHTS -NEW MISSION: OPERATION: KNIGHTFALL REMAKE; Re-experience the night of Order 66 as the newly christened Darth Vader leads the 501st Legion into the Jedi Temple to destroy the Jedi Order. Re-made from our original mission back in 2019 featuring all new moments inspired by the Revenge of the Sith video game, The Clone Wars, and more. Featuring the voice talents of Plumb as Lord Vader, JollyGreenJack as a secret role, RedSun as the 501st Clone Troopers, Darth Voiid as Gate Master Jurokk, and Linken as a Jedi Temple Guard. - Controller support comes to Galactic Legacy! (In-game only) MISSION IMPROVEMENTS DUEL OF THE FATES (ALL) - Changed Count Dooku's appearance to his new variation as seen in Tales of the Jedi. DUEL OF THE FATES (QUI-GON JINN) - Removed Yaddle from the final cutscene. DUEL OF THE FATES (DARTH MAUL) - Reworked a number of spawn points of the dead Naboo guards so they no longer create a loud splat sound when loading up the level. - Replaced the music playing during the Mustafar duel with a new original composition created by Peter Danielsen. - Added a missing subtitle for Count Dooku for his dialogue that plays shortly after the duel begins. THE TRAGEDY OF DARTH PLAGUEIS - Implemented new and improved dialogue audio. - Improved head movements to be more accurate to the film. FATE OF THE REPUBLIC (MACE WINDU) - The Coruscant Guard will now appear as intended. OPERATION: KNIGHTFALL - Disabled friendly fire so it is no longer possible to accidentally kill allied Clone Troopers. - Clone Troopers deal 2x damage to Jedi (only applied in this mission) FORCE POWER UPDATES FORCE GRIP - WHILE PLAYING OPERATION: KNIGHTFALL (REMAKE) Force Grip deals 3x damage to all Jedi enemies and cannot be resisted or broken out of (except by bosses or Jedi with force absorb activated beforehand), this buff is only applied in Operation: Knightfall and cannot be accessed in any other game mode. FORCE BLAST Force Blast can no longer kill the player. However, the power is still lethal to non-player characters. FORCE ABSORB Lightning Strike will no longer bypass Force Absorb and will now offer protection to the player based on the following levels: LEVEL 1: 10% Damage Reduction LEVEL 2: 50% Damage Reduction LEVEL 3: 100% Damage Reduction NEW FACTIONS - Ewoks - Unaligned Force Users - Zann Consortium CHARACTER IMPROVEMENTS Made improvements to the generation tool which required a full recreation of all configuration files for all characters. This may result in characters using weapons they may or may not have used in previous builds. - Playing as either Darth Vader or Lord Starkiller will now play a breathing sound for the player. - Applied canonical animations to Starkiller and Ahsoka Tano created by Katanamaru. - Increased Cin Drallig's existing force abilities from 2 to 3 where applicable. Changed his NPC class from CLASS_JEDI to CLASS_KYLE. - Changed Sora Bulq's lightsaber color from green to blue and gave him a blue shoto lightsaber - Gave Tarfful a DC-15s Carbine Rifle to account for his appearances in Jedi: Fallen Order and Galaxy of Heroes. - Removed all dark side abilities from the Imperial Knights to keep accuracy with their philosophy. - Made the black shadow guard the default skin for the Emperor's Shadow Guard. - Removed unneeded blue and red skins from Admiral Screed - Queen Talia will now be able to hit enemies when using a sword or other melee weapon. - Bossk will now be able to hit enemies when using a sword or other melee weapon. NEW/UPDATED CHARACTERS OLD REPUBLIC - C2-N2 - Fideltin Rusk - Havoc Squad Trooper (Updated Model) - Jonas Balkar - Juhani (Updated Model) - Kaevee - Kira Carsen (Updated Model) - Nadia Grell - Protocol Droid - R-8009 Utility Droid - Republic Crewman - Republic Pilot - Republic Trooper (New Variant) - Skohani Ren - T7-series Astromech Droid - Terena Adare - Vandar Tokare (Updated Model) - Zez-Kai Ell DARTH REVAN'S SITH EMPIRE - Iridonian Mercenary - Mark VII Experimental Assassin Droid ANCIENT SITH - Ajunta Pall - Darth Andeddu - Freedon Nadd (Updated Model) - Lord Dramath - Naga Sadow (New Variant) - Tenebrae RESURGENT SITH EMPIRE - Darth Chratis - Eleena Daru - Imperial Trooper (Updated Model) - Khem Val - Malavai Quinn - Sith Pureblood Warrior - Sith War Droid GALACTIC REPUBLIC - 187th Clone Trooper - 212th Clone Sniper - 327th Clone Trooper (Phase I) - Agen Kolar (Updated Model) - Ahsoka Tano (Padawan) (New Variant) - Anakin Skywalker (Force Ghost, Original) (Updated Model) - Anakin Skywalker (General) (Updated Model) - Anakin Skywalker (Mid-War) (New Variant) - ARC Trooper (New Variant) - Bultar Swan (Updated Model) - Captain Fordo (Updated Model) - Clone Blaze Trooper - Clone Gunner - Clone Pilot - Eeth Koth (Updated Model) - Even Piell (Updated Model) - Glynn-Beti - Grohto - Jurokk (New Variant) - Kelleran Beq - Lilit Twoseas - Naboo Guardsman (New Variant) - Obi-Wan Kenobi (General) (New Variant) - Padme Amidala (Clone Wars) (New Variant) - Padme Amidala (Pilot) - Padme Amidala (Snow Gear) - Sio Bibble - Siri Tachi (New Variant) - Temple Security Force - Voolvif Monn - Yoda (New Skins) SEPARATIST ALLIANCE - A-series Assassin Droid - Cortosis Assassin Droid - Count Dooku (Jedi Master) (New Variant) - Cydon Prax - E4 Baron Droid - Gossam Commando - Lushros Dofine - N-K Necrosis (New Variant to General Grievous) - Nimbus Commando - Separatist Mercenary - Sev'rance Tann REBELLION - 2-1B - Bespin Jump Trooper - Blue Squadron Pilot - Caleb Dume (New Variant to Kanan Jarrus) - Captain Rex (Endor) - Chewbacca (Injured) (New Skin) - Dash Rendar - Evaan Verlaine - Han Solo (Hoth) (New Variant) - Kota's Militia - Lando Calrissian (Jabba's Palace) (Updated Model) - Leebo - Leia Organa (Bespin Dress) (New Variant) - Leia Organa (Black Sun Captive) (New Variant) - Leia Organa Solo (Dark Empire) (New Variant) - Leia Organa (Jedi Training) (New Variant) - Leia Organa (Mimban) (New Variant) - Leia Organa (Ord Mantell) (New Variant) - Luke Skywalker (Dagobah Training) (Updated Model) - Luke Skywalker (Heir to the Empire) (Updated Model + New Variant) - Luke Skywalker (Mimban) - Luke Skywalker (Pilot) (Updated Model) - Luke Skywalker (Rebellion) (New Variant) - Luke Skywalker (Sith Apprentice) (Updated Model) - R2-D2 (Sail Barge) - Rebel Marksman - Rebel Pilot (Devaronian) (New Variant) - Rebel Pilot (Rodian) (New Variant) - Rebel Soldier (Ithorian) (New Variant) - Rebel Soldier (Quarren) (New Variant) - Rebel Smuggler - Rebel Vanguard - Shriv Suurga - Ten Numb - Wedge Antilles - Wookiee Warrior NEW REPUBLIC - Allana Djo Solo - Jacen Solo (Updated Model) - Jan Ors (New Variant) - Kirana Ti - Lant Davan - Mara Jade (Emperor's Hand) (Updated Model) - Mara Jade (Poncho) (New Variant) - Mara Jade (Vong Armor) (New Variant) - New Republic Guard - New Republic Security Droid - WeeGee GALACTIC ALLIANCE - Alema Rar - Ben Skywalker (New Variant) - Galactic Alliance Guard - Hohass Ekwesh - Kam Solusar - Lensi - Streen - Tahiri Veila GALACTIC EMPIRE - Arden Lyn - AT-AT Pilot (Updated Model) - Darth Vader (Dark Dimension) (New Variant) - Ellian Zahra - Ensign Nanda - Gar Saxon - Grand Admiral Thrawn (With Ysalimari) (New skin) - Ground Crewman - ID9 Seeker Droid - Imperial Engineer - Imperial Officer (Armored) (New Variant) - Imperial Shuttle Pilot - Imperial Seatrooper - Imperial Supercommando - Kashyyyk Trooper - Mud Trooper - Ninth Sister - Purge Trooper (New Variant) - Phase Zero Dark Trooper - Rebus - Sergeant Kreel - Sim Aloo - Triton Squad Stormtrooper IMPERIAL REMNANT - Juggernaut Pilot - Niles Ferrier - Praetorian Guard - Raptor Trooper - Zsinj FEL'S EMPIRE - Sigel Dare RESISTANCE - Lando Calrissian (Veteran) - Luke Skywalker (Updated Models) - Resistance Trooper - Rose Tico FIRST ORDER - Agent Terex - First Order Raider - First Order Technician - First Order TIE Pilot - Vicrul DARTH KRAYT'S GALACTIC EMPIRE - Darth Krayt (Vong Armor) (Updated Model) - Imperial Officer - Morrigan Corde - Rav BOUNTY HUNTERS - Boba Fett (New Variant) - Boba Fett (Daimyo) (Updated model) - Cato Parasitti - Cradossk - Greef Karga - Hanharr - Jariah Syn - Jodo Kast - Skahtul - Skorr MANDALORIANS - Bo-Katan Kryze (New Variant) - Clan Chorn Mandalorian - Heavy Mandalorian - Khomo Fett - Tarre Vizsla - The Armorer - Torian Cadera MANDALORIAN NEO-CRUSADERS - Rohlan Dyre INDEPENDENT CRIMINALS - 8t88 - Brea & Senni Tonnika - Drexl Roosh - Enfys Nest - Gadon Thek - Hondo Ohnaka (Galaxy's Edge)(New Default Variant) - Krix - Rebolt - Syke - Terak - Vana Sage HUTT CARTEL - Geezum - Malakili - Max Rebo - Salacious Crumb - Saelt-Marae BLACK SUN - Guri (Dress) (New Variant) CRIMSON DAWN - Dryden Vos - Hylobon Enforcer - Shadow Collective Mandalorian ZANN CONSORTIUM - Defiler - MK II Droideka - Silri - Tyber Zann - Urai Fenn ETERNAL ALLIANCE - Jakarro - Kaliyo Djannis - Koth Vortena - Lana Beniko (Alliance Advisor) (New Variant) - Vette JEDI ORDER - Cal Kestis (Inquisitor) (New Variant) - Cal Kestis (Survivor) (New Variant) - Gungan Jedi Knight - Kazdan Paratus - Kento Marek SITH ORDER - Darth Caedus (Updated Model) - Githany NIGHTSISTERS - Charal - Gethzerion - Nightsister Master UNALIGNED FORCE USERS - Abeloth - Dagan Gera - Felucian Shaman - Kueller - Maris Brood - Maulkiller CIVILIANS - Alderaan Scientist - Chiss Aristocrat - Devaronian (New Variant) - Gand (New Variant) - Ishi Tib - Kage - Kaleesh - Kaminoan - Muun - Nabrun Leids - Narkina V Prisoner - Nikto - Polis Massan EWOKS - Logray - Paploo Yuuzhan Vong - Vong Priestess CREATURES - Swamp Wampa INFINITIES - 3 new Operation: Knightfall-exclusive characters - 2 new team member characters - Anakin Skywalker (Redeemed) - Rebel Friend - Starkiller (Inquisitor) CODE UPDATES - Re-wrote some logic to prevent the RE_RegisterSkin error message which would cause a number of player models to display the black and white invalid texture when loading a save game. - Corrected an issue where the playermodel command would keep the same skin used by the previous model which could cause a missing texture OR missing skin issue. - Implemented a number of improvements for widescreen displays. (Huge thank you to the Jedi Knight Enhanced team). - Controller Support! - Characters with saber-switching AI will now reflect the same saber color they started off with if their assigned color wasn't their default. - New command: NPC Speech. Allows for any NPC or the Player to speak any audio file. "NPC Sound [NPC Targetname] [Sound file path] [Voice channel]" Valid channels are Global (Can be heard anywhere), Body (comes from the character's body but causes no mouth movement), Weapon (comes from the character's weapon), or leave blank for normal voice behavior. - New command: NPC Remove. Remove any NPC from the game without needing to kill them. "NPC Remove [NPC Targetname]" OPENJK UPDATES The following changes were implemented with recent commits to the JACoders/OpenJK GitHub repository. - Game will no longer hang when attempting to load a map with more than 128 spawn points - Re-worked logic to allow players to progress past the Force Power selection menu even after using the "Setforceall 3" command. - The game should no longer crash if attempting to load a save game featuring a vehicle that was spawned from the console. MAP UPDATES MUSTAFAR (V3) - Fixed all invalid NPC spawners that were attempting to spawn bad npcs. NEW GAME PLUS UPDATES - Added new logic to prevent melee-using npcs from spawning in certain conditions to prevent them from floating. - Replaced the Purge Trooper melee variations with the Imperial Supercommando and Uprising Purge Trooper for the Stormtrooper Commander and Officer. - Changed the snowtrooper's alternate enemy from a Cultist to an Imperial Supercommando. MENU/UI FIXES WEAPON SELECTION - Selecting the trip mine will now provide it as intended MISCELLANEOUS FIXES - Beginning the Jedi Outcast campaign will now display the "A long time ago in galaxy far far away" message instead of the typical loading screen. - Removed a number of pointless menu items from the JKJO pk3 file that was causing issues with starting a new game in the base game. - The default targetname message will no longer display if the NPC attempting to be spawned is not valid.
-
Credit to Colonel Cornelius CornJulio, Zaron Gaming, and Basil Bonehead. The long-awaited remake of Operation: Knightfall arrives to Galactic Legacy on August 23rd, 2023. in addition to this, new NPC controlling commands, dozens of new characters, Controller Support, Widescreen enhancements (originally from the JK: Enhanced mod), and more! https://youtu.be/hv9v82Xvuus
-
- 3
-
-
So the "code-less" workaround would actually be to utilize the cvar g_debugmelee 1, you can have it set in your menu on startup so it's impossible to miss. Also if you want another npc to use Kyle's melee attacks, make sure their npc class is CLASS_KYLE and they have the "1" spawnflag activated in their npc spawner.
-
Busy busy month! Let's get started! THE FINAL COUNTDOWN On our discord server I've begun posting final countdown postings on an occasional basis. Almost every day more progress has been made on packaging up the new characters coming to the mod. As of typing this, the only remaining factions are The Old Republic and Sith Empire (with sub-factions). CONFIRMED CHARACTERS The following is the full list of characters that are 100% coming to Galactic Legacy in the next update. This list will not include Old Republic or Sith Empire characters. GALACTIC REPUBLIC - 187th Clone Trooper - 212th Clone Sniper - 327th Clone Trooper (Phase I) - Agen Kolar (Updated Model) - Ahsoka Tano (Padawan) (New Variant) - Anakin Skywalker (Force Ghost, Original) (Updated Model) - Anakin Skywalker (General) (Updated Model) - Anakin Skywalker (Mid-War) (New Variant) - ARC Trooper (New Variant) - Bultar Swan (Updated Model) - Captain Fordo (Updated Models) - Clone Blaze Trooper - Clone Gunner - Clone Pilot - Eeth Koth (Updated Model) - Even Piell (Updated Model) - Glynn-Beti - Grohto - Jurokk (New Variant) - Kelleran Beq - Lilit Twoseas - Naboo Guardsman (New Variant) - Obi-Wan Kenobi (General) (New Variant) - Padme Amidala (Clone Wars) (New Variant) - Padme Amidala (Pilot) - Padme Amidala (Snow Gear) - Sio Bibble - Siri Tachi (New Variant) - Temple Security Force - Voolvif Monn - Yoda (Hood) (New Variant) SEPARATIST ALLIANCE - A-series Assassin Droid - Cortosis Assassin Droid - Count Dooku (Jedi Master) (New Variant) - Cydon Prax - E4 Baron Droid - Gossam Commando - Lushros Dofine - N-K Necrosis (New Variant to General Grievous) - Nimbus Commando - Separatist Mercenary - Sev'rance Tann REBELLION - 2-1B - Bespin Jump Trooper - Blue Squadron Pilot - Caleb Dume (New Variant to Kanan Jarrus) - Captain Rex - Chewbacca (Injured) (New Skin) - Dash Rendar - Evaan Verlaine - Han Solo (Hoth) (New Variant) - Kota's Militia - Lando Calrissian (Jabba's Palace) (Updated Model) - Leebo - Leia Organa (Bespin Dress) (New Variant) - Leia Organa (Black Sun Captive) (New Variant) - Leia Organa Solo (Dark Empire) (New Variant) - Leia Organa (Jedi Training) (New Variant) - Leia Organa (Mimban) (New Variant) - Leia Organa (Ord Mantell) (New Variant) - Luke Skywalker (Dagobah Training) (Updated Model) - Luke Skywalker (Heir to the Empire) (New Variant) - Luke Skywalker (Mimban) - Luke Skywalker (Pilot) (Updated Model) - Luke Skywalker (Rebellion) (New Variant) - Luke Skywalker (Sith Apprentice) (Updated Model) - R2-D2 (Sail Barge) - Rebel Marksman - Rebel Pilot (Devaronian) (New Variant) - Rebel Pilot (Rodian) (New Variant) - Rebel Soldier (Ithorian) (New Variant) - Rebel Soldier (Quarren) (New Variant) - Rebel Smuggler - Rebel Vanguard - Shriv Suurga - Ten Numb - Wedge Antilles - Wookiee Warrior NEW REPUBLIC - Allana Djo Solo - Jacen Solo (Updated Model) - Jan Ors (New Variant) - Kirana Ti - Lant Davan - Mara Jade (Emperor's Hand) (Updated Model) - Mara Jade (Poncho) (New Variant) - Mara Jade (Vong Armor) (New Variant) - New Republic Guard - New Republic Security Droid - WeeGee GALACTIC ALLIANCE - Alema Rar - Ben Skywalker (New Variant) - Galactic Alliance Guard - Hohass Ekwesh - Kam Solusar - Lensi - Streen - Tahiri Veila GALACTIC EMPIRE - Arden Lyn - AT-AT Pilot (Updated Model) - Darth Vader (Dark Dimension) (New Variant) - Ellian Zahra - Ensign Nanda - Gar Saxon - Grand Admiral Thrawn (With Ysalimari) (New skin) - Ground Crewman - ID9 Seeker Droid - Imperial Engineer - Imperial Officer (Armored) (New Variant) - Imperial Shuttle Pilot - Imperial Seatrooper - Imperial Supercommando - Kashyyyk Trooper - Mud Trooper - Ninth Sister - Purge Trooper (New Variant) - Phase Zero Dark Trooper - Rebus - Sergeant Kreel - Sim Aloo - Triton Squad Stormtrooper IMPERIAL REMNANT - Juggernaut Pilot - Niles Ferrier - Praetorian Guard - Raptor Trooper - Zsinj FEL'S EMPIRE - Sigel Dare RESISTANCE - Lando Calrissian (Veteran) - Luke Skywalker (Updated Models) - Resistance Trooper - Rose Tico FIRST ORDER - Agent Terex - First Order Raider - First Order Technician - First Order TIE Pilot - Vicrul DARTH KRAYT'S GALACTIC EMPIRE - Darth Krayt (Vong Armor) (Updated Model) - Imperial Officer - Morrigan Corde - Rav BOUNTY HUNTERS - Boba Fett (New Variant) - Boba Fett (Daimyo) (Updated model) - Cato Parasitti - Cradossk - Greef Karga - Hanharr - Jariah Syn - Jodo Kast - Skahtul - Skorr MANDALORIANS - Bo-Katan Kryze (New Variant) - Clan Chorn Mandalorian - Heavy Mandalorian - Khomo Fett - Tarre Vizsla - The Armorer - Torian Cadera MANDALORIAN NEO-CRUSADERS - Rohlan Dyre INDEPENDENT CRIMINALS - 8t88 - Brea & Senni Tonnika - Drexl Roosh - Enfys Nest - Gadon Thek - Hondo Ohnaka (Galaxy's Edge)(New Default Variant) - Krix - Rebolt - Syke - Terak - Vana Sage HUTT CARTEL - Geezum - Malakili - Max Rebo - Salacious Crumb - Saelt-Marae BLACK SUN - Guri (Dress) (New Variant) CRIMSON DAWN - Dryden Vos - Hylobon Enforcer - Shadow Collective Mandalorian ZANN CONSORTIUM - Defiler - MK II Droideka - Silri - Tyber Zann - Urai Fenn ETERNAL ALLIANCE - Jakarro - Kaliyo Djannis - Koth Vortena - Lana Beniko (Alliance Advisor) (New Variant) - Vette JEDI ORDER - Cal Kestis (Inquisitor) (New Variant) - Cal Kestis (Survivor) (New Variant) - Gungan Jedi Knight - Kazdan Paratus - Kento Marek SITH ORDER - Darth Caedus (Updated Model) - Githany NIGHTSISTERS - Charal - Gethzerion - Nightsister Master UNALIGNED FORCE USERS - Abeloth - Dagan Gera - Felucian Shaman - Kueller - Maris Brood CIVILIANS - Alderaan Scientist - Chiss Aristocrat - Devaronian (New Variant) - Gand (New Variant) - Ishi Tib - Kage - Kaleesh - Kaminoan - Muun - Nabrun Leids - Narkina V Prisoner - Nikto - Polis Massan EWOKS - Logray - Paploo Yuuzhan Vong - Vong Priestess INFINITIES - 3 new Operation: Knightfall characters - 2 new Team member characters - Anakin Skywalker (Redeemed) - Rebel Friend - Starkiller (Inquisitor) - Zeldrin OTHER ADDITIONS In addition to packaging up characters, we also have new things coming to Galactic Legacy! Below are a few of those things: - All versions of Starkiller and Ahsoka Tano will be given some very long-awaited backhand animations created by Katanamaru. - Characters with a saber-switching AI (Inquisitors and Cal Kestis) will now reflect the same saber color they were assigned if their assigned color wasn't their default And finally.... - CONTROLLER SUPPORT! Yes, we have finally added in Controller support! Please keep in mind that this will only be applied for ingame so all controls will need to be manually mapped. CONCLUSIONS We're getting very close to our release and we can't wait to bring it out. So sorry this has taken so long! Thank you for following the development of Star Wars: Galactic Legacy, and may the Force be with you.
-
- 3
-
-

Gamorrean uses jedi taunt with vibro-axe
Linken replied to RobiWanKen0bi's topic in Modding Assistance
Simply for the fact he's using the staff style is what's fixing it for you. But I'm happy I was able to help! Now I must implement a fix for Galactic Legacy! -
Gamorrean uses jedi taunt with vibro-axe
Linken replied to RobiWanKen0bi's topic in Modding Assistance
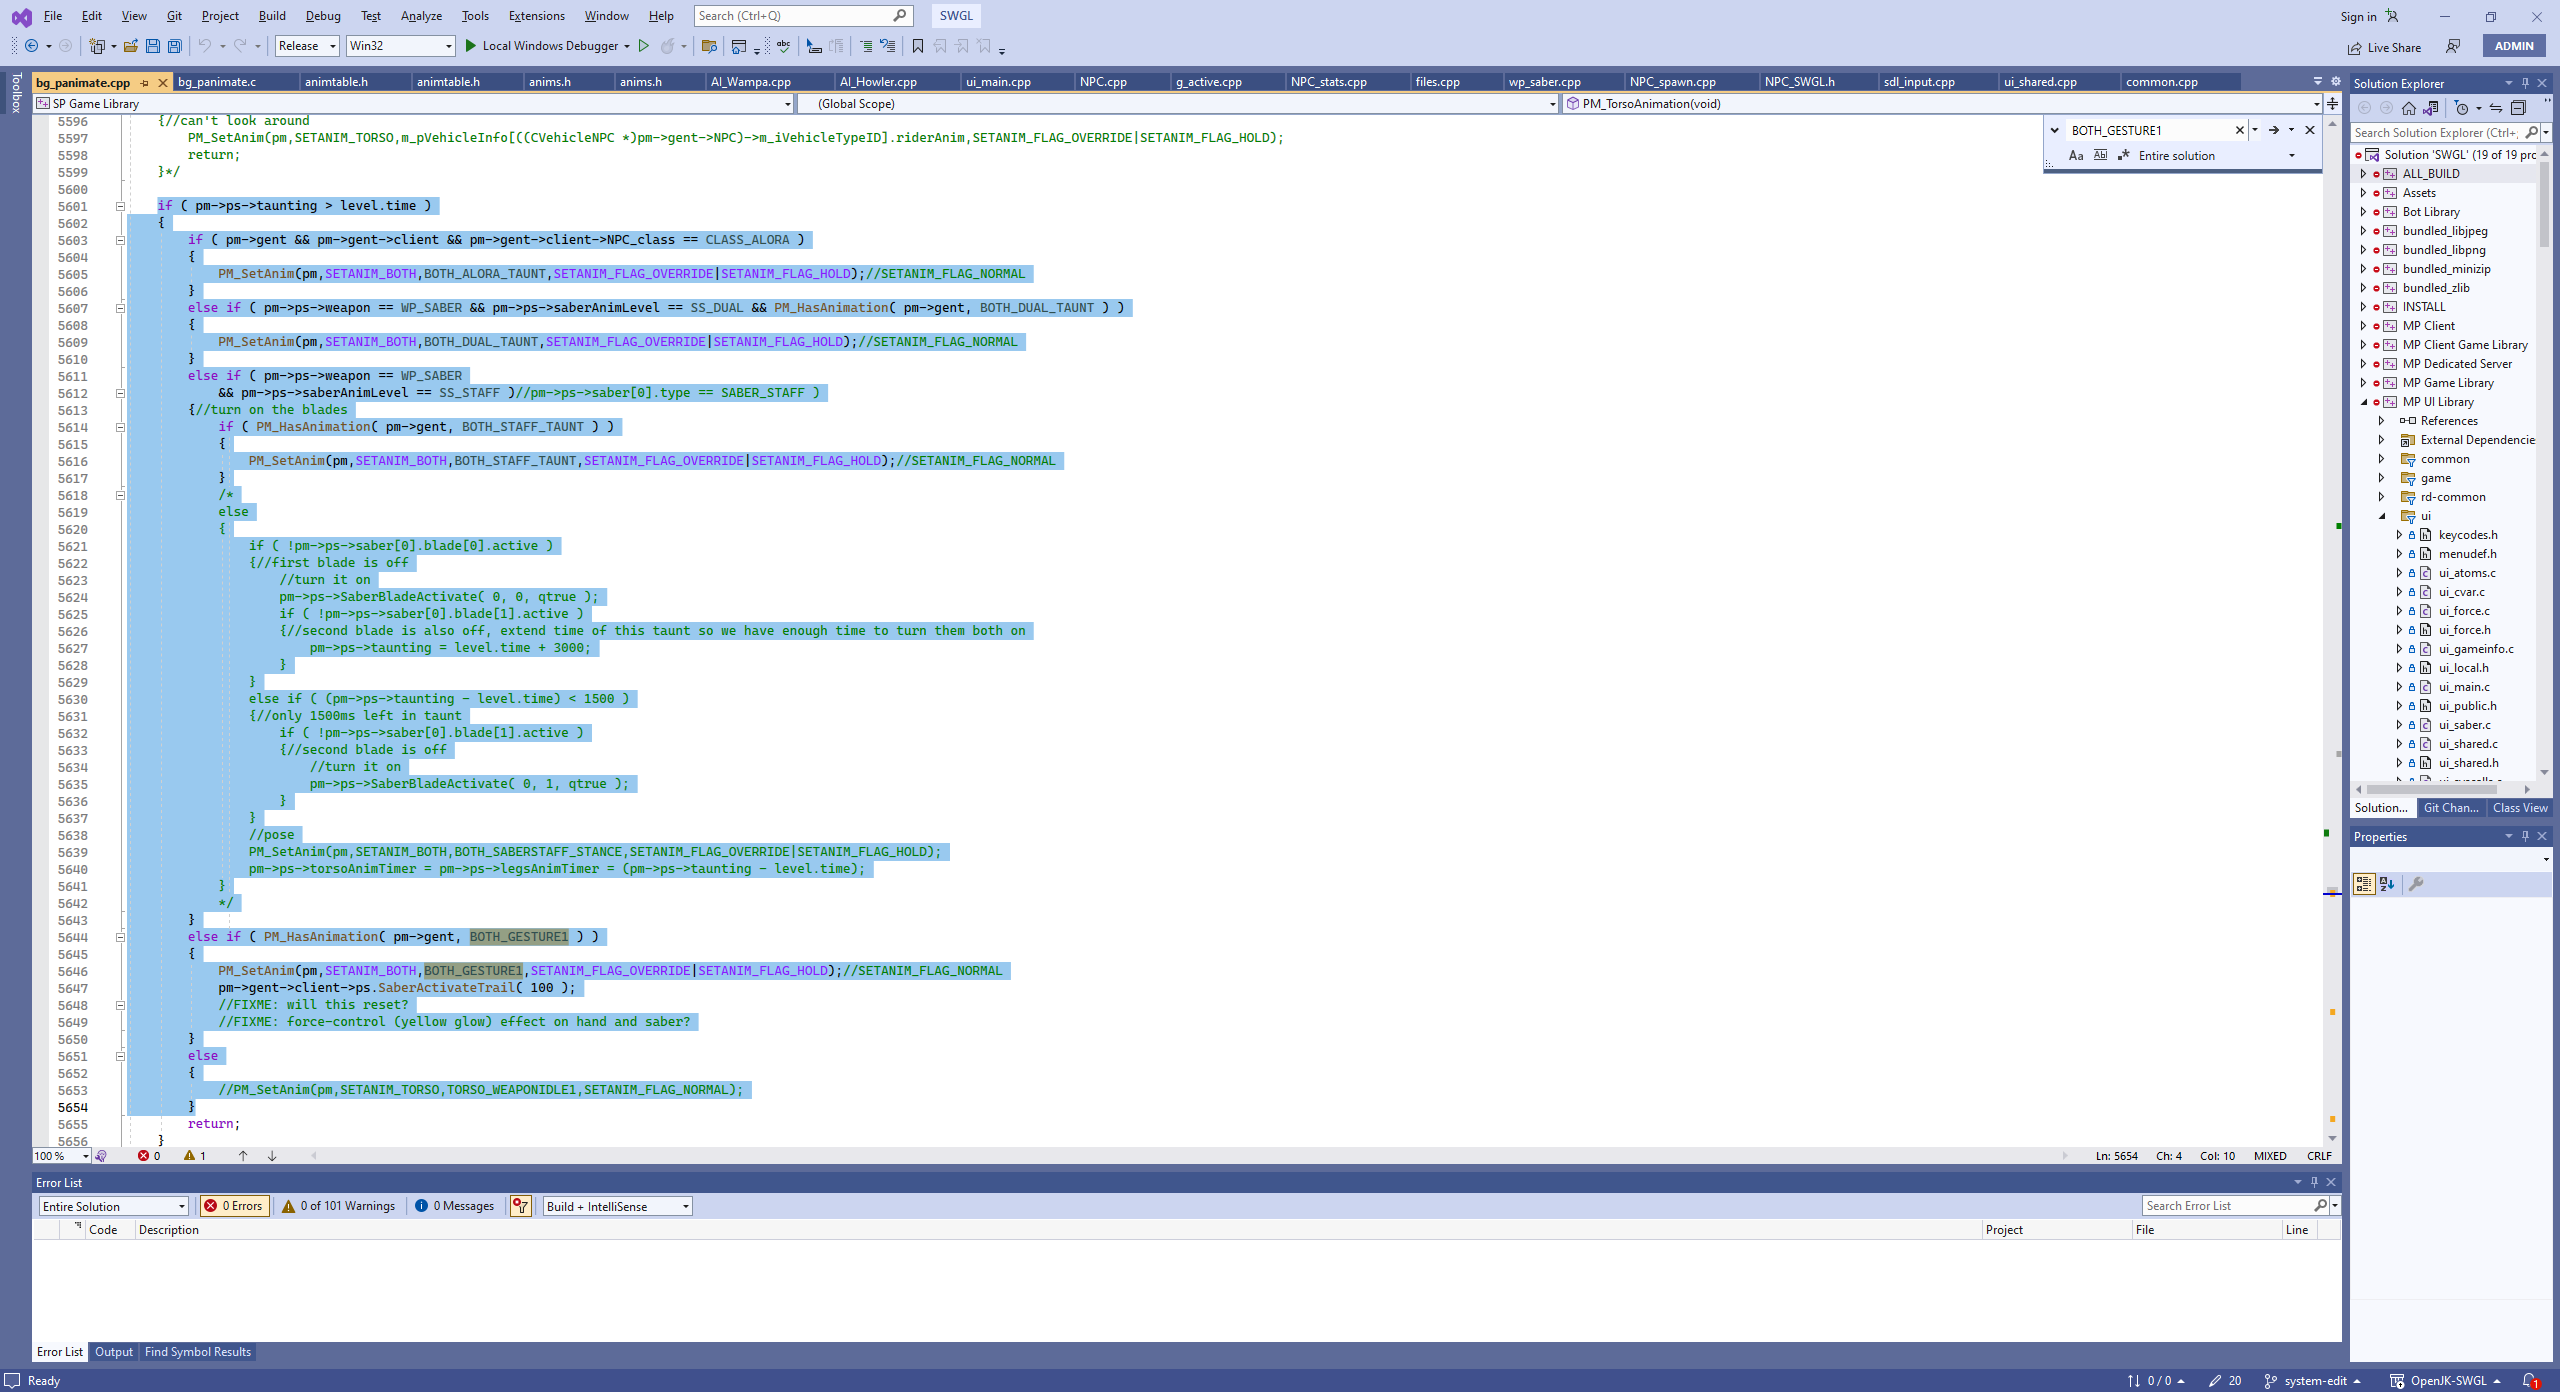
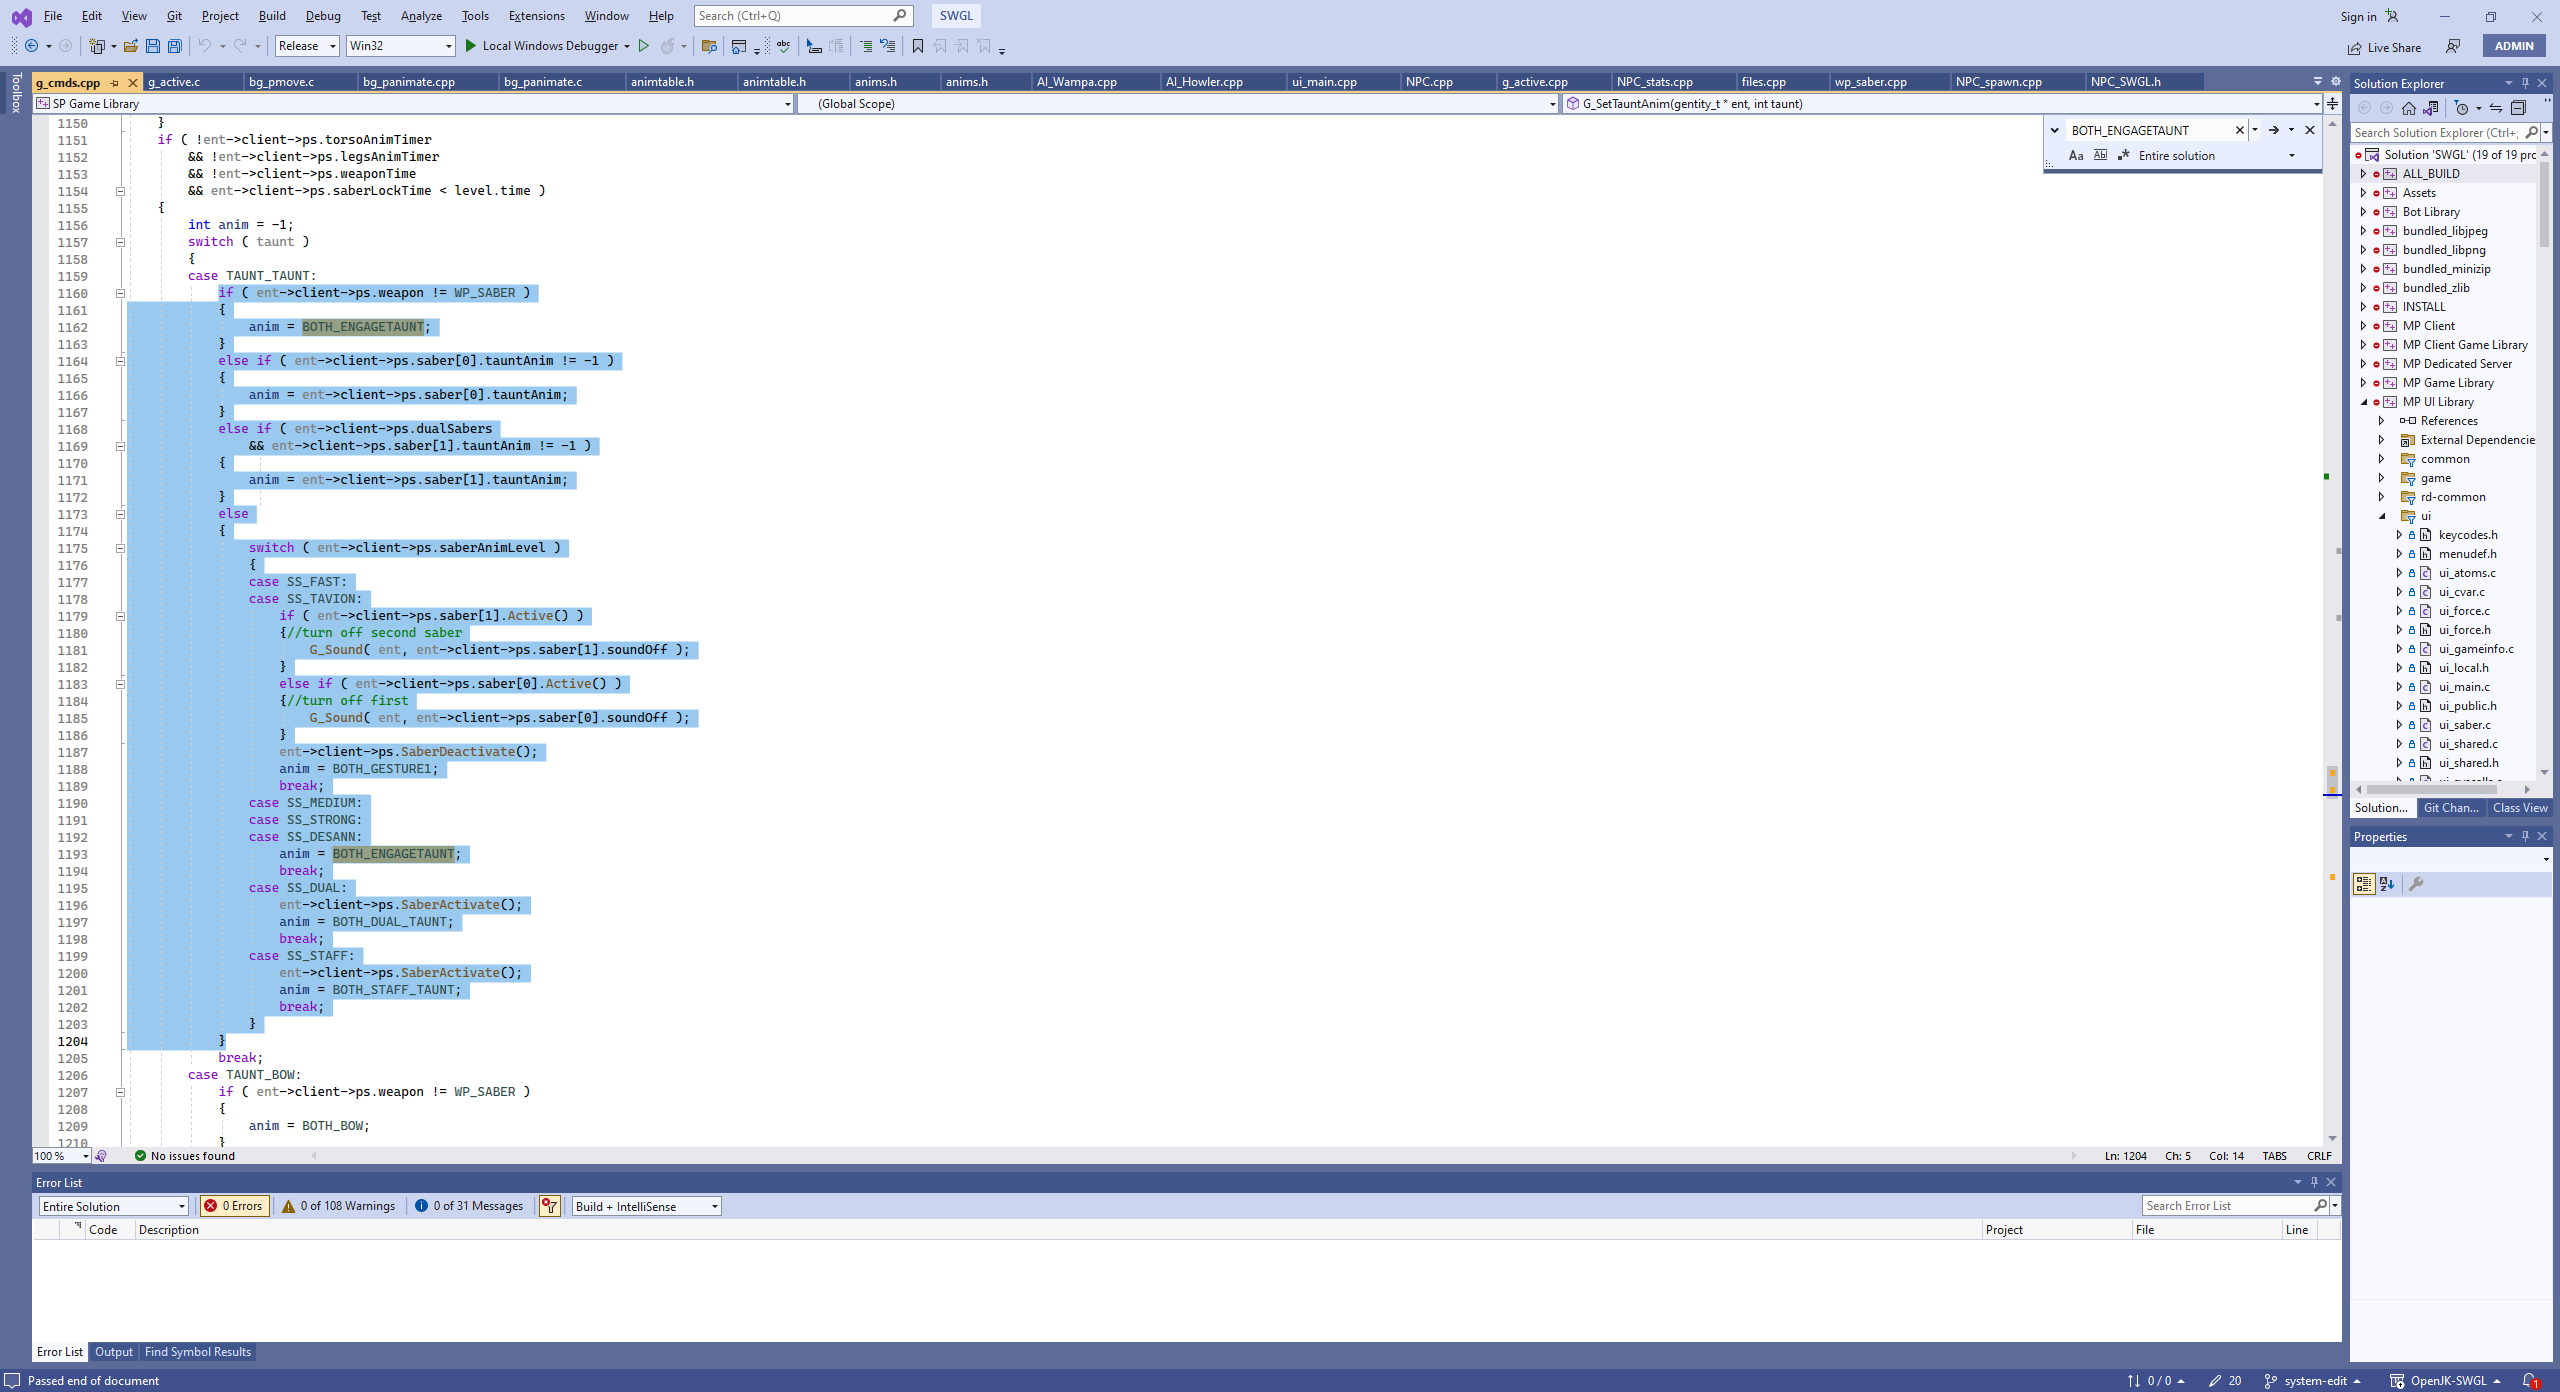
@RobiWanKen0bi I checked the source code and long story short, the animation, BOTH_GESTURE1, is hardcoded for npcs using a single saber. If they're using dual sabers, a staff, or CLASS_ALORA, then the animation is different. Basically the highlighted code reads: "If the npc is taunting, then do something. If the NPC is on the NPC class CLASS_ALORA, play her special taunting animation. If using dual lightsabers, play that animation. If using a staff OR using the staff stance, then play that taunt animation. Otherwise, play BOTH_GESTURE1 if that animation exists in my humanoid file." Looks like there was another instance where the npc would play an idle animation, but that was commented out so it'll never happen. I suppose in cases where an NPC is using a single lightsaber but doesn't have the BOTH_GESTURE1 animation. For the player, there is some variation allowed as you may know with the "taunt" command. This one basically reads if not using a saber, do the BOTH_ENGAGETAUNT animation (the animation that plays when you challenge a player to a duel in multiplayer). If using a saber, check if the .sab file has a tauntAnim then play that. Otherwise, depending on what saber style the player is using, play a different animation. So Fast/Tavion both get the twirling the saber with the force. All other single blade stances get BOTH_ENGAGETAUNT. Then dual and staff all get their own too. So long story short, if you want the Gamorrean to not use the force while taunting, you'll need to set the saber to be a saber staff, change the idle animation to whatever you want and that should work.
-
You want animations that only your character/s can use? Read this. Requires an existing custom animation/s that already work in-game. As the title implies I will be showing you how to make your models own _humanoid file. As this is the stage AFTER making your animation, I will assume you already made yourself an animation and have compiled it into the base _humanoid file. WARNING: Unique _humanoid files can ONLY work in Single Player, attempting to do it in mutiplayer will keep your model from appearing properly, make sure you back up your existing skin/model so you can keep using it for Multiplayer. What you need Notepad/Hex Editor(OPTIONAL) Your model/skin (including the .glm) that has Single Player support. Pakscape The mock base folder usually found on your desktop (meant for skinning) _Humanoid.gla (modified), animations.cfg (modified), animevents.cfg With your new animation/s in hand, and already overided existing animations, you're ready to begin. First make a new _humanoid folder in the same folder where all your skins are. Name it _humanoid_<name> (change <name> to whatever you want, but keep it simple). Paste _Humanoid.gla (the one with the new animations you made), animations.cfg, and animevents.cfg into that folder. Now the easy part is done. Using notepad, open the _Humanoid.gla using NOTEPAD or your hex editor, while you will see a bunch of random gibberish on there, at the very top is the part which you must pay attention to. As you can see at the top, there is a file line, you must change it so it matches what you labelled your _humanoid file as. For example, if I named the folder _humanoid_derpy. I change the file path to models/players/_humanoid_derpy/_humanoid. Now that you are done with your _humanoid.gla file, you can move onto the final piece, your model.glm. As with the _humanoid.gla, open up the model.glm file with notepad and look for the file path like the _humanoid.gla file had, change that to match with your new humanoid folder, save, and exit. Repeat this process as many times as you would like for each skin you would like to give those animations. After you are finished, place your skin + the new humanoid folder into a .pk3 file. In case you forgot, it's models/players/<skin> and <humanoid folder>. Save as a pk3, put into your base, start up, choose your skin, and play.
-
It's my pleasure! I know at first glance this can appear intimidating, but many new things can. Send me a video of any project you make, I'd love to see it!
-
That was actually very well done! I'm also very proud you added in an ending. Also with the credits, just treat them as you would any cutscene camera. I can definitely see you have a willingness to learn and if you'd be interested I'd love to invite you to the Galactic Legacy team. Myself and our other mission makers can train you further to hone your skills. DM me on here if you're interested.