

Jedi_Mediator
-
Posts
154 -
Joined
-
Last visited
Content Type
News Articles
Tutorials
Forums
Downloads
Everything posted by Jedi_Mediator
-
I would be glad to try making the shader, but my hardware doesn't handle Rend2 very well, so I'll probably still do most of my testing in the base game, unless that's a problem. The new sun shader uses new syntax. Will I need a different version of q3map2 so I don't get errors during compile?
-
Sadly, it seems my first WIP shots were lost to the commercial interests of Photobucket. Oh well--new WIP shots are finally here! -Enhanced most of the map's terrain to look more organic than the original -Added detail inside the ship Part of the detail I added in the ship is a pile of crates that toppled when the ship crashed in the canyon. I think this makes sense, given that it was a cargo ship, but on the other hand, the crates are obstacles that weren't present in the original game. Let me know if you think they should stay. Also, I obviously haven't worried much about fixing the phong shading, since the textures/shaders will be changed anyway. https://jkhub.org/albums/nkCVD7Q By the way, is there a reason I can't use img tags? When I try, it says "you are not allowed to use that image extension on this community."
-
Is it weird to lose interest in the series?
Jedi_Mediator replied to Mert-K's topic in Star Wars Franchise Discussions
Interesting, I didn't know that about the cultural context of the first film. Also interesting to think of the very act of subverting clichès as a clichè of its own. From this perspective, returning to classic storytelling would, in some cases, be more original than coming up with another quirky twist. But I do think there's a difference between being quirky and writing archetypes with depth and complexity. You don't have to subvert a character type to make the character interesting. It seems to me that Obi-Wan in the sequels is an example of failing to add complexity to an archetypal character. Every human alive has at least one flaw in their personality, abilities, etc. Giving characters flaws in stories, then, is an important part of making them relatable and believable. But I can't see any flaws in Obi-Wan's character. Instead, he seems to be little more than the archetypal Wise Old Man, as described by Carl Jung. Lucas wouldn't have needed to mess with the archetype to make him interesting (making him the Wise Old Burglar, or Wise Handicapped Man, for instance). It would have been interesting enough to add flaws within the constraints of the archetype instead--maybe he's distracted by regrets, or pacifistic to the point of being passive, etc. These things would add detail without subverting any archetypes. But Obi-Wan in the sequels seems to be just a cardboard cutout of his archetypal role--no more and no less. To me, that makes him less than interesting. Do you see more depth in the SW characters than I do? Just to reiterate, I can accept that there's value in the franchise sticking close to the archetypes it's chosen. It only bothers me if a character isn't given additional detail, beyond their surface-level archetypal role. -
Is it weird to lose interest in the series?
Jedi_Mediator replied to Mert-K's topic in Star Wars Franchise Discussions
I skimmed over a summary of Cambell's book, so correct me if I misunderstood anything. I've heard ideas before that are similar to his, in other sources about archetypes that were probably influenced by his work. I found it particularly interesting that Lucas apparently acknowledged Campbell's influence on the SW franchise. The story certainly follows the "monomyth" pattern that Campbell describes. In my opinion, as an admittedly young and inexperienced writer, is that 1) it is impossible to write a story without archetypes, and 2) there are creative and un-creative ways to use them. I recognize that SW uses archetypes to connect with its audience (Luke as the Reluctant Hero, Obi-Wan as the Wizard in the sequels, etc.), and I don't fault it for that. I just think it wasn't terribly creative in the way it used those archetypes. It played them pretty "straight," so to speak, throughout most of the movies, and I didn't see a whole lot of individuality in the characters, beyond their archetypal roles. It's fine for a character to be an archetype, but if they don't have many unique traits beyond that, they end up kind of boring. Luke, for example, doesn't have much of a personality beyond his "Reluctant Hero" tendencies. As an example, imagine if Disney spent tens of millions of dollars to create a movie called "The Knight and the Princess," featuring an all-star cast and spectacular special effects, and also featuring--you guessed it--a knight and a princess. For the sake of connecting with its audience, it uses archetypes we're very familiar with, especially in Western culture: a courageous knight who sets out on a journey to defeat a vicious monster and rescue the captive princess. Audiences will understand the story very quickly (which is a good thing), because they're so well-accustomed to those archetypes. But this strength is also the story's weakness: we've heard this story so many times that it will be boring, unless something creative is done with the plot or characters to set it apart. Without a creative twist, any discerning viewer will see it as "just another fairy tale." Maybe there is some value in the simplicity of such a story, but is it really worth millions of dollars to keep telling the same story, without variation, over and over again? It's that variation that's necessary to add interest to a story, to make it compelling, and to give it an identity of its own. Do you see this kind of variation in the characters and story of the SW franchise? Or do you see it as valuable specifically because it seems to stick so close to its archetypes, without adding much variation? -
Is it weird to lose interest in the series?
Jedi_Mediator replied to Mert-K's topic in Star Wars Franchise Discussions
I'm fond of Star Wars mainly for nostalgia reasons. When I was a kid, I loved it because of the cool, flashy firefights and laser swords. As a result, I became convinced that Star Wars was cool, at an age when it's very easy to become convinced of such things. So I still like it today. But as I've gotten older, seen good movies and read good books, and started my own journey as a writer, there is also a part of me that has come to see past the cool battle scenes--and realize that, beyond the "cool" factor, the franchise doesn't have much substance. Sure, the story is okay, and the amount of world-building is certainly impressive, but a lot of the characters and concepts presented are pretty simplistic, and therefore not as satisfying or compelling as they could be. It's true that I've found a lot more substance in certain branches of the franchise, such as the novels--Matthew Stover's novelization of RotS makes Anakin's switch to the dark side MUCH more believable than the movies do--but since the franchise started with the movies, I think the movies should be the reference point for judging the franchise as a whole. And from a writing standpoint, the movies are just okay. Definitely cool, and kind of entertaining if you don't think too much, but not very compelling or satisfying in terms of storytelling. Even so, I think I will always be fond of SW. It's associated with my childhood, so it will always feel like a safe, familiar haven to return to. I can compare it to learning languages. I'm decent at speaking/understanding Spanish, but I'll never understand it the way I understand English. Just as I will always feel most comfortable with English, since it was my first language, I will always feel most "at home" with SW (and Pokèmon, and Harry Potter), no matter how many incredible movies or books I experience later in life. -
You could also turn the patches into a func_group and give the group a key/value pair of "_cs 0" to prevent them from casting shadows on themselves (or anything else). I'm not sure if q3map2 is very good at rendering self-shadowed patches, unfortunately. Alternately, you could always use the "-filter" command in the light compile to add a blurring effect to the lightmap. I've heard that this makes splotchy shadows less visible. Then, if the terrain texture you use has a decent amount of visual noise, the splotches might not be noticeable at all.
-
What's the biggest, most open map you can think of?
Jedi_Mediator replied to Gorc's topic in Jedi Knight General Discussions
I looked those up...both said they had 0 players, and both were running the standard ffa3 map. Are there certain times when these servers are likely to be populated and playing an interesting map? -
What's the biggest, most open map you can think of?
Jedi_Mediator replied to Gorc's topic in Jedi Knight General Discussions
But does anyone play any of these on actual servers these days? I remember years ago when I could discover new and awesome maps while playing with others...seems like those days are gone now. I would love to be proven wrong though. -
324 downloads
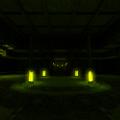
This map was released for the 2017 Halloween Contest on JKHub. It was the first map I completed and released since Inferno, which I released back in 2009. It was nice to actually finish something for a change. Players start out in a large central chamber, which is perfect for hanging out and casual dueling. Branching off from this chamber are six different rooms, each with a unique challenge for players to face. The halls leading to these rooms are haunted, though; they change frequently, and enjoy leading you to places you didn't want to go. Two rooms are special duel rooms: one with a platform that dips itself into lava, and the other with some mischievous torches that like to turn off when you least expect it. Not scared of the dark? Watch your step anyway--you might fall on the spikes. The other four rooms are games. There's a maze room (with walls that are constantly changing), a guessing game room (which punishes you for wrong guesses), a bottomless pit room (with bridges and stairs that like to disappear), and a room with working slot machines (where you place bets with your health). All of the games present their own unique challenges. Winning a game will reward you with "gems." You can collect up to 10 gems and use them for special rewards within the map. There are 4 rewards you can get: -1 gem will let you teleport to any game room, without using the hallways. -2 gems will let you choose from two types of music. -4 gems will restore your health. -7 gems will give you continuous healing--until you die, you will return to full health every time you are hurt. All rewards can be accessed using the floating icons in the central chamber. This is the most interactive map I have ever made. My previous map, Inferno, was focused solely on visuals--and I think I made it look pretty cool. But then I realized that players want stuff to do, not just stuff to look at. This is my attempt to give them both. This is also the first time I have made a map focused on a specific theme. My approach to the "Halloween" concept was to use lots of green and yellow light, tons of shadow, and plenty of weird, random, assymetrical scenery. I wanted to break out of the usual pattern of bloody, gory, death-centric Halloween ideas, and make the map "spooky" in my own way. Hope you enjoy it! NOTE: Yes, this map is dark. On my monitor, it's not too dark to see, but since every monitor is different, I can't make it perfect for everyone. If it's too dark for you, please just turn up your brightness in-game. -
Wow, that's great! I imported the .map file and everything is clipped quite nicely. A few observations: the first time I did a -meta compile with your clip brushes in the map, I got loads of "duplicate plane" warnings in the error window. But the map still played fine, and in later compiles, these errors were mysteriously gone. I'm sure they were just caused by generating clip brushes from my very weirdly-angled models. Also, I had to manually rotate one set of clip brushes into place. It was the top-leftmost model in the map, when viewed from XY perspective. It was just the wrong orientation compared to the model. It took less than a minute to fix, but it might be something to look at as you develop your plugin. Anyway, thanks for all the help! You will definitely be recognized in the map credits.
-
@@AshuraDX As far as I could tell during troubleshooting, all of them refused to be autoclipped, and all of them seemed to generate extra lights during compile. I was in a hurry because of the deadline, so I can't be 100% sure, but I'm pretty certain that they were all causing the problem. It would make sense, since all of them were exported with Noesis. Like I said, if you don't want to deal with the two extra models, that's fine. I can send you a .map file that only includes references to the first model you examined. But maybe having three different models would be helpful in testing/developing your plugin.
-
I used Noesis to export the .md3 files, either from .ase or straight from .bsp...can't remember which. Noesis is a tool I heard about on another thread here on JKHub. I thought it would be incredibly useful, allowing me (who is clueless about modeling programs) to make simple models using Radiant. But if this is the problem it creates every time, then it must not work as well as I assumed it would. Here's the link to a .map file containing every problem misc_model in my map. There are two other .md3 files not included in the first .zip I gave you. I included them in this one. Just unzip the whole contents of the .zip to your maps folder, and everything should work right. If you feel like it, you can clip the new models as well. Do what you want though, and no need to hurry, because I found a way to (kind of) work around the broken misc_models, even though they're not solid. So I will still be able to submit my entry even if you want to take your time with making the clip brushes. https://drive.google.com/file/d/0B5h3mw7Vh5k4eVZKVzZiU1g4SjA/view?usp=sharing Thanks again!
-
Haven't tried that yet, mainly because I want the models to be solid, and clipping them manually would be a big waste of time right now, with the contest deadline so close. Maybe I'll try it another time, after the contest. We'll see.
-
@@AshuraDX Hope this Google Drive link works. You'll find one folder in the .zip archive. Put that folder in your maps directory. The .map and .md3 files are inside. If you need the shader I'm using for the model, it's in the original post. Thanks! P.S. As you'll see, the spawnflags are 2, not 6. https://drive.google.com/file/d/0B5h3mw7Vh5k4VFZBUC1uczhaZUE/view?usp=sharing
-
Alternately, if you don't want to use an alpha channel, you could make that background gray instead of white (perfect gray, with exactly 50 value), and use the blendfunc used in the original example you posted. This blendfunc blends the colors with those behind it in a specific way, and all perfect gray values become essentially transparent. The advantage is that you can create a kind of transparency using a .jpg, which are smaller than .tga or .png. The disadvantage is that the colors of the decal itself will also blend with the colors behind it, making details visible from the texture it's placed on. If you don't want details visible from the texture underneath, you'll have to use an alpha channel.
-
Can you explain more about this "background layer that isn't drawn?" If it isn't drawn, what function will it perform? As that base decal shader demonstrates, you can have a transparent decal with only one shader pass. You don't need another "background" pass unless it will serve some other purpose. Also, for the blendFunc, I would recommend GL_SRC_ALPHA GL_ONE_MINUS_SRC_ALPHA, instead of the one in that example. It's the one I use for pretty much all my transparency.
-
My misc_models are failing at life. Problem #1: They aren't solid in-game. I'm trying to use the autoclipping feature that is accessible by entering "spawnflags 2" into the model's properties. This has always worked for me with other models in other maps. But for some reason, I can still walk through the models in-game. Problem #2: They seem to be, all on their own, dramatically increasing the number of lights in my map. The shader applied to them has no light-emitting properties. Nevertheless, when I compile with the models in my map, the light stage reports processing 900 total lights. When I delete the models and try the compile again, changing NOTHING else, the light count plummets down to around 100. This means that something about these models is increasing my compile times, yielding no visual improvements whatsoever, and wasting precious minutes that I need to meet the deadline for this project. Honestly, I didn't think misc_models were capable of emitting light in the first place, so I don't see how they could be having this effect. Here is the shader I am using for each model: And yes, this is the map I'm making for the Halloween contest. I didn't see a rule anywhere saying that I couldn't ask for assistance with my entry. Feel free to correct me if I'm wrong on this.
-
Just to be clear, does the oct. 23 deadline mean that we can still submit entries on the 23rd, until the end of the day? Or do we have to have our entries in before 12 a.m. on the 23rd (as in, the 22nd is the last day anythIng can be submitted)?
-
Script that change saber when you turn off the saber
Jedi_Mediator replied to Langerd's topic in Modding Assistance
I think this is a simple issue of a runaway loop. You have a loop value of -1, but there are no wait commands outside the conditional statements. I think this means that the game is performing a near-infinite number of conditional checks every second, thus causing it to crash. I'd be very interested to hear what happens if you stick in a small wait command, like 50 milliseconds or something, before or after the if/else statement. Everything else about the script seems promising. -
They will be available indefinitely after the contest, just like any other file. For instance: https://jkhub.org/files/file/3100-last-night/
-
GTK Radiant Clicking Problems
Jedi_Mediator replied to Droidy365's topic in Jedi Knight Tech Support
When I was running Windows 7 and using radiant 1.5, I had to use the "disable desktop composition" compatibility option to prevent a buggy UI. This option is no longer obviously available in win10, but some seem to think it is still possible using a registry edit: https://social.technet.microsoft.com/Forums/windows/en-US/b49de36e-d36f-4f7c-a63e-b70c49c86efd/compatibility-administrator-and-the-old-setting-disable-visual-themes?forum=w8itproappcompat Otherwise, are you running as administrator? Have you updated your video drivers recently? Have you tried the compatibility troubleshooter that comes with win10? Not sure how good it is, but maybe it's worth a shot. -
In JKA multiplayer, is there a limit to how many script commands can be executed per second, or how many scripts can be running at the same time? If too many script commands are happening at once, will this lead to client-side or server-side instability? I have a very "fast" script that affects 4 entities simultaneously, executing 10 script commands per second on each one. That comes to 40 script commands per second, just for this one script. I don't notice any lag or anything when I'm testing it out by myself, but I'm wondering if it could cause issues when the map is run on a real server, with real players connected. Of course, I'm aware that runaway loops will always cause problems. That seems to be an example of too many commands happening at once. That's mainly why I'm wondering about this. If runaway loops bog down systems, is there a concrete limit to keep in mind when making scripts "fast" in other ways?
-
Jedi Academy Of Weird New Things
Jedi_Mediator replied to NAB622's topic in WIPs, Teasers & Releases
I never got shaderED to work right, and now I find it pretty easy to write shaders manually. But I have always used EffectsEd to make new effects, and I've always found it very useful. Have you had issues with it? -
Hey thanks for the PM @@Ramikad! Well, it looks like I should have cleared up something very obvious right from the start: I'm trying to get this to work in MP. When I loaded your map in MP and it still didn't work, I wondered if you had been using SP instead...sure enough, in SP, it worked just as you described. So it appears that toggling a func_rotating in MP does not work the same as it does in SP--if it works at all. Does anyone know of a way to make it work in an MP map? So far my best solution is to not use a func_rotating at all, but to make a func_static and use a script with an infinite loop to repeatedly rotate it in 90-degree increments. "If" statements are then used to check variables at each increment and see if rotation should continue. The script is continuously running in the background during gameplay, so that it's ready whenever a variable changes. Very clunky, and very tedious to script, but it does basically work. I'm hoping for a more elegant solution...thus, this thread.
-
I tried the exact setup you described and got the same result as before. Except this time, I had a suspicion--after the func_rotating disappeared, I noclipped back to the map's origin (coordinates 0, 0, 0), and sure enough, there was the func_rotating, still rotating just as before. Using it had caused it to fly back to the map origin for some reason, without affecting the rotation. Interestingly, when I tried moving the entity with a script, that made the rotation stop. But I couldn't figure out how to get the rotation going again. If you get a chance, could you attach or send me the .map file where you got it to work? If I can't replicate your results using the setup you described, I should at least be able to get the same results by using the same .map file. If I compile your map and it still doesn't work for me, there's something a lot weirder going on.
