

Jedi_Mediator
-
Posts
154 -
Joined
-
Last visited
Content Type
News Articles
Tutorials
Forums
Downloads
Everything posted by Jedi_Mediator
-
The Making of the Bumpmapping Mod Section One: Introduction So here I am, writing a tutorial in Microsoft Word about how to write shaders and make textures for specularly enhanced models. There were a few of you that expressed interest in getting this tutorial in their hands, so here it is, at long last. This tutorial may be short, but for all of you that are fond of the “bumpmapping” effect my solution puts on the gun models, you will be delighted to know that the effect can actually work on ANY model in the game. Unfortunately, though, it doesn’t work well on all map textures, just…because. It probably has something to do with the tris…or…something. That’s the problem I ran into with putting this effect on the default map textures, in case you were wondering why I hadn’t lived up to that. Anyway! On to what I came here to do! Section Two: Making the Texture And now we come to the main purpose of this document. If you follow these simple steps correctly, you will soon have your very own “bumpmapped” model. DEFINITION OF SPECULAR LIGHTING: Lighting on a surface that is calculated by the game engine and can move—or be moved—across that surface like a shiny highlight. As you may have guessed, this is the method by which I have made this mod. I manufactured the textures in GIMP (a FREE alternative to the $400-$900 Photoshop program) using Lighting Effects and then used them as a Specular Map on a given model, using specialized shaders. A Specular Map is the texture that is overlaid onto the existing texture of a surface when the light hits that area. This is what allows the shiny appearance. Its shader keyword is “lightingSpecular.” However, we’ll discuss that later, in Section Three. For now, let’s just get through those steps of manufacturing such a texture. Follow me to the next page, where we’ll see the texture we’ll be modifying. NOTE: If you do not have GIMP or Photoshop, YOU WILL NEED THEM. This tutorial is written under the assumption that the user is utilizing GIMP. Download GIMP here: http://www.gimp.org/downloads/ . Click the link, press “Gimp 2.4” at the topmost download section, and you should have the program in a little while. Patience! THIS IS THE TEXTURE! IT IS THE SKIN FOR THE BLASTER RIFLE. Start up GIMP or Photoshop and open up this included image (blaster_r.jpg) that is contained in the “Bumpmapping” folder included in the .zip folder you downloaded for this tutorial. Once you have the file open, you can immediately begin lighting the texture with bumpmapping for the finished Specular Map. Go to Filters > Light Effects > Lighting Effects to get to the menu where you can apply the effect. Follow these steps… Step 1: The Menu Step 2: Turn on Bumpmapping under the Bump Map Tab Step 3: Decrease “Maximum Height” to 0.03 and then move on to the Materials tab and enter the following values, moving the blue dot in the Preview Pane to the shown position Step 4: Press Okay This was only a quick mock-up of what this kind of Specular Map should look like. If you want the finished effect to look more like my Bumpmapping mod does, you’re going to have to increase the “Shiny” value to something like 1.50 or above. After applying this filter with the settings shown in Step 3, you should end up with something that looks basically like this (turn to next page to see)… Does this look too bumpy for you—or, possibly, not bumpy enough? No problem. Just press Ctrl and Z to undo these changes and then go back to the Lighting Effects menu and tweak some parameters around. I don’t have that luxury right now, since I’m the one writing the tutorial, so…let’s get on to writing the Specular Shader! Section Three: Writing the Shader So now you’ve gone to all the trouble of downloading GIMP (well, maybe) and baking this texture with one of its many filters, right? Well, you should have, and if you didn’t, I command you to, right here and now, march right back to the beginning of Section Two and bake that texture. Honestly, it doesn’t really matter if you use this texture or not—you can use any you want; this was just an example. Well, all your hard work won’t pay off unless you write a shader file! Never written one before? Well, that’s fine—that’s not what this tutorial is about. In fact, I’m going to GIVE YOU THE SHADER and just have you paste it in there! Sound easy? That’s because it is! Now open up Notepad. If you don’t know what THAT is, then you’re pretty sad. Still, I should probably tell you how to open it anyway! Press “Start” (that’s down on the big bar at the bottom of the screen right now, you know) and then go to All Programs, Accessories, and then click on Notepad. It will open up right away—it’s not that big of a program. Copy and paste the entire below block of text into the blank .txt Notepad gives you: models/weapons2/blaster_r/blaster_r { q3map_nolightmap { map models/weapons2/blaster_r/blaster_r rgbGen lightingDiffuse } { map models/weapons2/blaster_r/blaster_r_spec blendFunc GL_SRC_ALPHA GL_ONE rgbGen identity alphaGen lightingSpecular } } If the directory “models/weapons2/blaster_r” doesn’t already exist in the base folder of your JA directory, you’ll have to create it, then save the new Specular Map you just made into “models/weapons2/blaster_r”. The Specular Map needs to be named “blaster_r_specmask.jpg” for this to work, unless you change the Specular Lighting stage to refer to a different filename/directory. If you have no idea what I’m talking about, then just leave your new shader as it is and save it as whatever you want. HOWEVER! You WILL need to save it as a .shader file, which means that in the Save window you will have to select the All Files *.* option and then type the .shader file extension after the filename (blaster_spec.shader , for example). If you do not save it in this manner, the mod WILL NOT WORK. After you’ve done all this, it is safe to compile it all into a new .pk3 using Pakscape and release to the community (if you want)! If you don’t want to release it, just put the .pk3 in your base folder and it will work as a new mod, and whatever model texture you just modified will, if all goes well, shine with specular brilliance next time you look at it. Hmm. Do you know how to make .pk3s? Am I being too cautious? Well, maybe, on both accounts. And, though it pains me to do so and this is NOT a tutorial on .pk3-making, I should probably put an extra section in here, anyway, just in case you DON’T know how to. Grrrrrrr…………………..Well, here it is! Section Four: Pakscape and Compiling the Mod You people make me really angry, you know that? Anyway, here we go. Step 1: Downloading Pakscape If you don’t already have Pakscape, you can get it here: http://jediknight3.f.../Pakscape;31681 Step 2: Create Your .pk3 Press File > New to open up a blank .pk3 template. Here is what it looks like: Step 3: Populate the .pk3 This is where you “fill the real estate” of your new template. There is one guideline you must go by, though. In order for any of your .pk3 content to work, you must make it refer to the original content it replaces. For instance, you want to place your new Specular Map in the right directory so it doesn’t show up as a missing texture in-game. So, you need to know which directory it should go in. See that second “paragraph” (it’s actually called a “pass”—each “pass” is closed off by a block of this: { and this: } so that it can be properly organized) in the shader code I gave you in Section Three—the one that starts off with map models/weapons2/blaster_r/blaster_r_spec? Well, that’s the paragraph that tells the mod where the Specular Map is located and what to do with it. Map, at the very beginning of the “paragraph,” tells what texture to draw there, so if that texture can’t be found, then there’s going to be some “black-and-white box trouble”! We’d better fix it so that doesn’t happen, wouldn’t you say? To do this you need to recreate that exact directory—models/weapons2/blaster_r/—to tell the game where to look for that special texture. Do this by first clicking on that little slash underneath “Untitled1” in the blank Pakscape template and then going up the “Object” menu and clicking New Directory. Name the new directory models. Double-click on models to enter it and then, once inside, create another new directory called weapons2. Finally, inside weapons2 you should create the folder blaster_r and you’re all set to import your Specular Map! So, go up to the Object menu again and click “Import File”. Travel in the new window that pops up to the place where you stored the image and double-click on it to import it. After populating the Specular Map directory and file, you also need the shader to make it all work. So click on that little slash under Untitled1 again, create a new directory there called shaders, and import the file you put my little block of shader text into. There! If you followed every step correctly, you should now end up with a .pk3 that looks basically like this in its directory tree: If it does and you have put everything in the right place, then your mod should WORK—just once you save it in your base folder! Yes, that’s where you put all your OTHER mods, as well—but this time you have made your OWN! Hoorah! Step 4: TEST AND ENJOY Once you have done all this, open up your game, switch your gun to the Blaster Rifle, and see it shine! If it doesn’t, you’ve done something wrong—or you just need to make the Specular Map shine a bit more intense. Congratulations! You’ve just made your own shiny blaster! Good luck on all your future exploits, whether they be in furthering your modding talents or using the talents you already have.
-
 Arena file and missing textures should be fixed now.
 -
Dang it, thought I took care of that. I will remedy it ASAP.
-
593 downloads
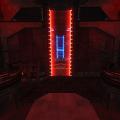
This map is a unique and exciting variation on the Capture the Flag gametype. Just like normal, each team tries to capture the other's flag--but the flags are secured behind forcefields, controlled by "combination locks." You have to hack the enemy's combination lock to disable their forcefield and get their flag. Anyone can set the combination, and anyone can hack it. Check out the short YouTube video below to see how this works. The layout is simple and symmetrical, consisting of two bases and one central combat area. Each base has a weapon loadout area, two emplaced guns to repel invaders, and a console for setting the combination lock. You can leave through your forcefield while it's up, but you can't go back in until it's off. Don't even think about touching the enemy forcefield. Get too close to it, and you'll fry instantly. The central combat area has plenty of cover to hide behind, so you can stay safe while you're shooting rockets through the enemy's disabled forcefield. There are also two walkways high up on the walls on either side, for snipers. Anyone can beam up to them and down from them using the red and blue teleporter beams. I'm really excited about releasing this. As far as I know, no one has ever made a customizable, reusable combination lock system in JKA before. With any luck, it will make for some really intense CTF gameplay! YouTube Demo: NOTE: No botroutes are included. The bots in this game are simply not smart enough to avoid the deadly forcefields (much less operate them), so playing with them would be kind of pointless. -
level Level 9 - Fuel Station Launch
Jedi_Mediator replied to Jedi_Mediator's topic in Dark Forces II Mod
Smaller update this week. I think I have a solid artistic direction figured out for the big multi-level tank room. Feedback is welcome. -
level Level 9 - Fuel Station Launch
Jedi_Mediator replied to Jedi_Mediator's topic in Dark Forces II Mod
Detail has been added to every area up to the completion of the first objective. How do I extract that orange fuel tank texture from the DF2 assets? I'm talking about the tanks you shoot and blow up. They have a flame icon on them, I think. EDIT: I figured it out with some help from Inigro. I now have the fuel tank texture. -
It looks really really faithful to the original! Scale looks quite accurate. My favorite shots are the first two, with lighting shown.
-
level Level 9 - Fuel Station Launch
Jedi_Mediator replied to Jedi_Mediator's topic in Dark Forces II Mod
Ooh, nice! I had been searching "factory" and "power plant," but these work much better! EDIT: Okay, to what extent can I spam pipes, the way they do at these fuel refineries? I'm asking in terms of tris and FPS. (Example below.) https://goo.gl/images/7nMxiW -
level Level 9 - Fuel Station Launch
Jedi_Mediator replied to Jedi_Mediator's topic in Dark Forces II Mod
Detail has been added to the first few areas. As I work on each area, I'm trying to imagine what the actual function of that area might be, if the fuel station were real. It helps with deciding what to add, since lots of the areas in the original level were so empty and apparently purposeless.- 31 replies
-
- 12
-

-
level Level 9 - Fuel Station Launch
Jedi_Mediator replied to Jedi_Mediator's topic in Dark Forces II Mod
I'm starting the process of adding detail, and finding that the base DF2 assets give me a very limited selection of textures to work with. To make certain architectural features look right, I need textures that aren't there. Can I use some from the base JKA assets as well? -
level Level 9 - Fuel Station Launch
Jedi_Mediator replied to Jedi_Mediator's topic in Dark Forces II Mod
Well, there might be a few secret areas I need to go back and add, but other than that, I have officially laid out every area in the map! This will be the foundation I will use to go back and add lots of detail everywhere (which may well take longer than laying the foundation). When I reached the end of the map, I realized/remembered that the player sees the entire length of the Sulon Star before having to jump onto it. Once the player jumps on, the entire ship moves, with the player standing on one of its catwalks. Do we want to make the Sulon Star with modeling? Or should I try to make it with brushes? The shape isn't all that complicated, and we really only need to make one half of it, since the player never sees the other side. -
level Level 9 - Fuel Station Launch
Jedi_Mediator replied to Jedi_Mediator's topic in Dark Forces II Mod
About 99% of the textures in this map are from the mod. The fuel is the only one I have needed to find from an outside source, since I couldn't find the DF2 version anywhere in our assets. Despite that, I will still need to go back and do a lot of texture work at the end, since I haven't worried about texture alignment much, and some of the texture choices in the original game just look bad. -
level Level 9 - Fuel Station Launch
Jedi_Mediator replied to Jedi_Mediator's topic in Dark Forces II Mod
Lots of areas have been added. Using a royalty-free texture I found online as a placeholder for the fuel. Some pretty serious texture distortion can be seen on some of the patch meshes...there is not always a way to fix this in Radiant. This would be another good reason to use models for the pipe interiors, as AshuraDX has offered to do at some later date. -
level Level 13: Lost planet of the Jedi
Jedi_Mediator replied to Randorando's topic in Dark Forces II Mod
While working on the lighting, you might want to test how it looks using the new Rend2 renderer, found in the current version of the DF2 mod. I've noticed that the new renderer has a slightly different visual appearance, besides just adding graphical features. Light seems to not reach as far, for instance, and dark areas look a bit darker. So if you only test in base JKA, you might be surprised to see how different your map looks in the final version of the mod. These differences are just from my experience of using the new renderer, without changing any settings. Different is not bad, but maybe there are tweaks we can do to control these differences, depending on the visual needs of each map? -
level Level 13: Lost planet of the Jedi
Jedi_Mediator replied to Randorando's topic in Dark Forces II Mod
Very inspiring! Are you using the cliff/rock formation models from the "desert" levels of the game? -
level Level 9 - Fuel Station Launch
Jedi_Mediator replied to Jedi_Mediator's topic in Dark Forces II Mod
Yeah, I obviously am not trying very hard with textures yet, since they're just going to change later. More shots are here. Slightly better outdoor lighting, some sourceless WIP lighting indoors, and more new areas. -
level Level 9 - Fuel Station Launch
Jedi_Mediator replied to Jedi_Mediator's topic in Dark Forces II Mod
Ok, I'll give it a try. EDIT: Original post has been fixed. Feel free to give feedback! -
The first WIP screenshots of Level 9. I have the basic brushwork done up to the completion of the first objective, and a little more past that. I couldn't figure out a way to add ambient sky light with the GL2 sun shader, so I just had to give the map an "ambient" value of 200. Is there a better way to do this currently? P.S. I still can't use tags. It says I'm not allowed to. So until that gets figured out, you'll have to keep clicking on the links. EDIT: Problem solved.
-
I disagree, I definitely see some progress! I like the new wood detailing on the platforms at the beginning, and the lighting looks much better than it did before--more consistent colors, and it all has a source. Looking good.
-
Great to see more progress. I can tell that you've started to add more detail. The "canal" setting here reminds me a lot of this level from Half-Life 2: ...especially at the start. Obviously, the HL2 level is more of an Earth-like setting, whereas Barons Hed is on some kind of desert planet. But maybe watching it would give you some architecture/lighting inspiration. One thing I noticed in the shots you posted is that you have some sourceless lights. Meaning that, in the last three shots, the red/blue/green lights seem to be coming from nowhere. In real life, light always comes from somewhere (the sun, ambient daylight, a streetlight, etc.). Try to avoid placing any lights that don't have an obvious source. Also, I recommend using fewer light colors in each area, and when you use multiple colors, try to pick colors that work together. Seeing red, blue, and green light together in one place is a little startling.
-
Hey Inigro! I recently started working on level 6 myself, which also takes place in Barons Hed, right after the level you started. I am glad to turn the assignment over to you, if you are planning to work on both level 5 and level 6. Let me know if you would like to see my incomplete version of level 6. It's just the basic layout of the first area, but maybe you can get some inspiration from it. I'll PM you the .map file if you're interested.
-
Ok. Are you still in contact with him? The YouTube videos he posted of his progress seem to have vanished, so it would be helpful to have the .map file he was working on. If it is not available, we'll have to start from scratch on adapting the Barons Hed architecture. I would be glad to do so if necessary, but it would take a little more time.
-
@@DT85 Is the assignment list up to date? If so, I would like to try my hand at Level 6, "Into the Dark Palace." It's rated as large, so I don't know how long it would take me, but I'm interested in giving it a shot. Let me know what you think. If yes, are there any screenshots available of the work done by @@Trank on the previous Baron's Hed level? Seeing that would help to keep the visual style consistent. I did notice that several years ago Trank also asked to work on Level 6. If he is still around and wants the level instead, I will gladly acknowledge his dibs on it. (Obviously, at the moment, the Sariss level is still up in the air in terms of completion. If it turns out that it still needs work, I will go back and finish it before getting too deep in this next project.)
-
@@DT85 Did my PM come through? If so, take your time, I know you're busy with plenty of other things.
-
I successfully made a functional gl2 sun shader, but when I tested it in-game, the rock walls had a very strong glossy appearance. I'm guessing this is a property of the default shader being used for textures that don't otherwise have their own shaders in a .shader file. The glossiness made it hard to see the contours of the rock walls, so I took these WIP shots in the base game instead. -Added more detail inside ship -Finished terrain -Added detail on hull -Added some twisted metal debris on the ground, to show that it's a crash site I'm starting to run out of ideas at this point. I've added a lot of stuff that wasn't present in the original level, and I can't think of many more worthwhile details I could add. What does everyone else think? Nearly finished? Far from it? I've been working with this map for a while now, so I could use some fresh perspective. Top 2 images: https://jkhub.org/albums/nkCVD7Q P.S. Does anyone know why I can't use img tags?