

AngelModder
-
Posts
645 -
Joined
-
Last visited
Content Type
News Articles
Tutorials
Forums
Downloads
Posts posted by AngelModder
-
-
To be truthful, I don't really remember ever being on Map-Craft. I did a search through my email, and neither "map-craft" or "map craft" brought up any results, which means I either deleted the map-craft registration email (i don't normally delete that stuff though, but maybe) or it went to my Junk mail and was swept by the system. I do believe you though, as I have a tendency to be a dick to people and fuck shit up majorly. I apologize for that, but it's part of my nature. I would've changed the post, had you not quoted it/seen it already.
Anyway, I think the approach you are taking with the ship is wrong. Instead of the ship being a moving entity, the water and everything else ought to be moving, for the reasons I stated above. The argument you stated above isn't really valid, because it doesn't actually make any sense. For example, in the Flintstones and other older cartoons, the background is moving when there is high velocity movement (ie, the Flintstones' vehicle), instead of the actual people moving onscreen. Now granted, we're working with the Titanic here and not The Flintstones, but the same principle could apply here too.
I suppose that would depend on the angle that you take with the ship. If you're going for something like James Cameron's film, this would be difficult and look very bad, especially with the ship splitting in half. But you could also try a different approach here as well, by making a teleporter system that transports the player to different versions of the interior: one for vertical, one for half-way vertical, one for the ship-split occurring and one for "normal". In these sections, the ship would slowly change to match the variations in the different sections. Unfortunately this is going to not be perfectly seamless, which I imagine is what you were going for.
To accomplish this, it'd require some pretty complicated ICARUS scripts, but it's feasible. First, the easy bits: you'd need to change the target/targetname of the main teleporter that leads into the ship's interior, and the destination when leaving. Easy enough, I suppose. But then you would have to worry about the actual people in the interiors, they would need to move too. So, you might make a giant teleporter in those interior sections that remains deactivated until you need to actually swap. There would be a scriptrunner as well which gets run, and calculates the position of the destination (in the next interior section) based on 8 ref_tags which are at the vertices of the triggers. From these ref_tags, get the position of the activator and add it to the origin of the next section's ref_tags, taking into account the angle of the ship.
Now, that's all supposing that you actually do get FPS issues. Like you say above, others get better FPS on your maps, but I'm still a little concerned about the FPS and entity counts (and to a lesser extent, the actual choppiness of collision due to JA's fantabulous collision prediction system) because it's a giant func_static being moved as opposed to a section of BSP that has a background around it. I suppose this is all contingent on the level of detail used in the interior, but I digress.
Ok I appolgize for coming at you like a prick last year, I was having a rough time of it. Any ways, let me explain some thing's. theirs 2 versions so far I'm working on. allow me to break it down.
A: is exterior only (this will be a FFA/CTF map the flags being at either end of the ship tons of guns inbetween, mostly to make it useful) the water would be set to kill as its running a shader to make it appear the ship is moving this is combined witha bow splash effect and shader wakes etc. First thing I had to do with this was to make the water a solid surface (players going beneath the water showed a problem where the blue effect of the water didnt seem to work and a fog looked horrible against the skybox I tried a dozen or so different ideas). Finally I resolved to just make the surface solid and place a trigger kill, this was effective as you would've been left by the ship in real life and died, etc etc, the RP of it.
So the world AROUND the ship (with shaders etc) is what gives her the image of moving. I did this same trick with the night time version/sinking.
The problem I am incountering with (A) is this, the ship angles up towards the bow, and toward the stern, the only level place in the hull was acctually the 75 feet where the main engines sat I wanted to add this bit of realism as without it it just kills the look of the ship. It especially messes with the timing and effect of her sinking. As parts are going under before they should vs the ships angle etc. the trouble comes in at HOW it had to be designed, the floors/cielings of A deck (the main deck were people will be running around is this and the boat deck) is sat as 1 (4unit) thick piece the top textured to be the boat decks decking, and the underside of it the cieling of the A deck promenade. in hind sight this was a mistake for many reasons. I can amend it to a point by making it two separate pieces each 2 units thick. (I could possibly adjust it, but that puts it at 2 X 8 = 16 units and that's WAY to thick realistically that's over a foot thick, the real one was 3 inches at most for that floor/ceiling. A deck is not so much the problem fps wise as is the boat deck etc, theirs lots of vents and other structures and details on this level of the ship. So all in all the hint portal method (due to the thickness of the walls etc not being enough for realism) fails here... It wont even work. Hinting MAY, but I am unsure as to how to apply this. I've went through and set any thing thats not the floors, wall,s or ceilings to detail, if some guidance could be given as to what to do next, it'd be appreciated, hell I'll even hand it over and let you show me what needs to be done, fuck at this point I'll admit and ask for help.
The last and final issue (and this may be soon resolved by me going through the exterior lately and getting rid of about 2000 brushes) is that when ever i ATTEMPT a vis compile I get the "Max_Map_Visibility_Acceded" error I've tried tinkering with many of the world spawn setting's but to no effect, at this point it's even in a VERY small sky box area and it still makes no difference.
B - once im done cleaning up version A will be given it's interior, now by area portal this vis wise wont be a problem, but if I can't eliminate the "Max_Map_Visibility_Acceded" error I feel it will always feel some drag.
C and D would be the same idea's as above but sinking, again as you mentioned I want to keep this seamless as possible. As I've reduced the idea for how MUCH interior will be included down to just the Aft and forward Grand staircase the B and C Deck hallways and the Dinning saloon, it wouldn't be that bad.
The final version will be just for duelers, it's the starn sitting at 23-24 degrees listing to port 12 degrees just before she split, her lights flicking, noises all over the place etc. so you get to duel on her in her final moments, and of course the water would be deadly. but it creates an interesting platform jump duel map.
I hope this has explained the difficult situation I am in...
-
Brush count started today at 10,128 as of this moment it is currently sitting at 9,652 Brushes
Adjusted all web framing to be more accurate from 48 inches down to the proper 36 inches. (this added about a dozen brushes over the original layout, but was necessary for the detail to be true. Vs the loss of brushes today I'm still way ahead.)
Adjusted all outboard frames from 36 inches to the proper 72 inches for the enclosed promenade
Adjust all aft outboard frames from 72 inches to 108 inches (this has caused a line up issue that I'll have to work on resolving).
combined all A deck floor brushes into 50 X 93 Ft (different for some spots) sections (rather then chopped up to form around each housing gutters etc) this eliminated 226 brushes down to 22 brushes (texture's for this are still being designed). The idea is simple let the texture do all the detail of the teak boards gutters and flooring as ONE larger HD texture for each 50 X 93 foot section. This reduces FPS draw as well as brings in new detail.
Combined the forward enclosed promenade brushes back to there original 50 (some odd) foot sections reducing the brush count by another 500 (some odd) brushes down to 10 (5 on each side). This will probably drop down to 3-4 on each side once the new promenade texture's are complete as I'll be doing the expansion joints on the textures.
Adjusted all B deck deck frames to the proper 36 Inches (this added about a dozen brushes over the original layout, but was necessary for the detail to be true. Vs the loss of brushes today I'm still way ahead.)
Built new accurate gear box under the bridge on the roof of A deck and corrected the forward framing it attaches to, this was in total an addition of 16 brushes and 8 patches.
-----------------------------------------------------------------------------------
NOTES BY ANGELMODDER
-----------------------------------------------------------------------------------
The brush count in many other area's will be reduced even further for the exterior, my goal is to drop it down to about 8,500 - no more than 9,000. Another idea came to me today that may be able to reduce this even further possibly as low as 7,500 -8,000.
By eliminating the original procedure for the windows on Boat, A, And B decks and swapping it with the new one I've been using for the Promenade enclosure the brush count and fps could be significantly improved (possibly). The originals call for the walls to be cut, a window texture then fit in at grid 2, and behind it with a grid one spacing sits a grid one nodraw piece with the said windows glow (and most importantly area of view reflection specular). The new process would eliminate the 6 brushes in total process for just one window down to JUST one brush, however, while the windows glow (for night versions) would remain, all versions would suffer the loss of the reflection env (taking away from the realism intended) and it's ability to cast light from the actual window its self. As well any env I apply to the actual metal's surface would apply to the entire thing (the windows wooden frame glass etc) and would break the realism of doing them as separate bits.
The "BETA" version you have all seen never used the shaders I had designed that will not only add a proper metallic env to thing's but also add bloom effect to the surfaces and lighting hits.
To surmise I am torn between aesthetic true detail and functionality. If during the next week or so I manage to find some one willing to help with the vis of this map, I will continue on as originally intended with not only the original realistic window design but other details I had planned (interior etc). It all comes down and hinges on one thing. I NEED HELP... The vis work needed for a map of this type is beyond simple hallway and area-portal etc vis I am use to. The map compiles lighting and meta of-course, but at this point Vis compile says screw you to me. I need an expert...
More details will come over the next weeks. Hopefully some one who knows what to do will read this and understand, I've been working on this idea since 2005, it all come's down to this next two months... Will it be the map it should be, or fail like the Beta did in my eyes.
-
These are not the droids you're looking for Circa >.>
-
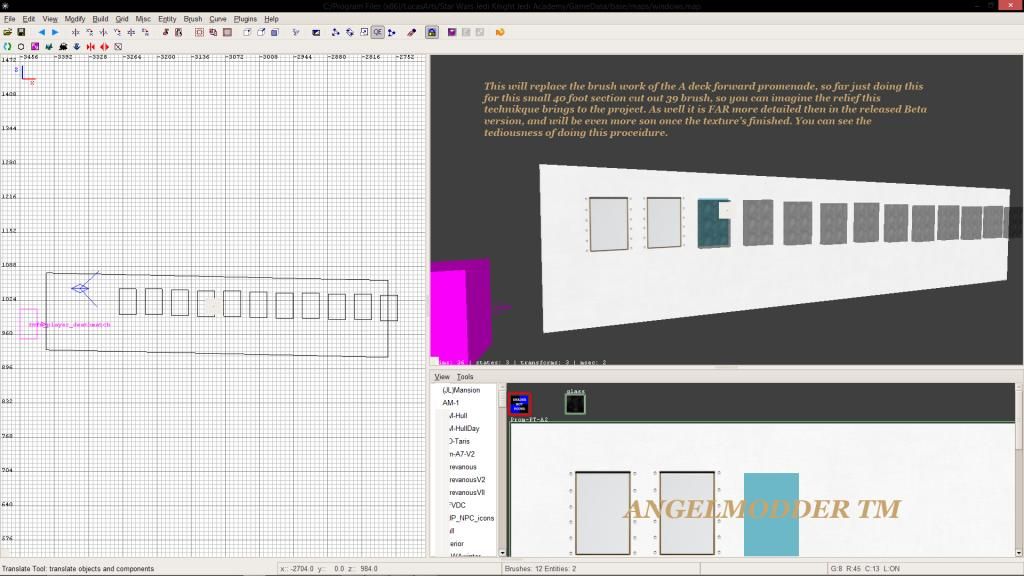
Well it's acctually going quiet well atm, the hull is not the issue as is the time consuming effort being put into the textures. the map sits (exterior only) at around 9980 brushes atm, which is better then when I began cleaning up yesterday as it was around 10230 I believe?! I've managed to work in a LOT of new accuracies. Here's an example of the new promenade deck texture, doing it this way allowed me to make it one brush vs seven, even in area's where stairwells need cut out it still saves me a ton of brush work ergo FPS. I've already seen an increase by 5 points off just cleaning up the first 90 feet of A deck's superstructure. Their's still MANY areas to be cleaned/brush reduced, here is two examples however. This is definitely NOT a new method just a more involved one and new for this project...
Btw if any one has a more effective way of doing this please speak up, so far it's a in and out method that takes about 5 minutes a window, I have the horizontal spacing down however as you can see in the grid etc, the ship is not straight (so the windows are not as well). A simple fix would be to make that piece out of a patch, but I try to avoid over excessive use of patches personally. So the vertical spacing is what take's time to adjust with each window doing it with a brush. For the floors (laughs manically) its a pain
! the example one here was fairly simple, but when the teak boards curve around the deck housing etc it can become very annoying and take a while. -
HAHA Yea its in what i call dry dock form atm (nvm the temp water brush). I often move it into this for a quicker compile etc. And atm she is undergoing a major refit LOL!
-
OK so to clarify yea I exaggerated but mate this was NOT the place to post this if you had an issue. Next time speak to me in person to understand the context of how I meant it. And to be fair I consider having found better ways to do the shit on map-craft and having rewritten more then half of them for my own site makes it a true statement in many ways. In fact theirs very few of us with a collective knowledge these days so try to remember that before you go attempting to damage one of us in such a way. @@Lazarus
Any ways. Moving on!
AngelModder -
Update for the night before I sleep, untop of over 200 or more brushes being fixed etc I've began replacing the old Hull texture with my own work. I've also started on the new decking method and manage to create the proper texture for the privacy screens on A deck. Still a LONG way to go till April, but it's already coming along nicely, a LOT of Photoshop work.
Tempust85 likes this -
One of the most notable thing's that will be different in this one as I've mentioned will be the texture's used. Here is an example of a window texture I just completed. took about an hour in Photoshop to retrace the design etc, but it came out nicely. (I had to trace Park's Stephenson work as to use his actual photo would have caused copyright issues). These will be seen in the area shown in picture two. Im actually about to begin replacing the decking texture's as well as the steel used on the superstructure, this will allow me to condense down using markers to figure out where windows will be rather then cutting the brushes for each window. A cleaver trick I learned ages ago but it's time consuming to apply. But in this case with it currently sitting at around 10k brushes I think theirs room for improvement. All i can say is, get ready in the next couple of days to see some DRASTIC changes, in these shot's you will notice the world around it has been erased, the original while effective was ugly imo I never had the time to go in and polish it up. Another technique I will be adjusting for the final cut.
-
I just want every one to know this project is NOT dead, just been going through some major overhauls. I thought it time to finally share some of the techniques I'll be incoperating into it to help the FPS issues as well as accuracy.
Fixes - 1 : The first and foremost was to condense several brushed areas into larger pieces using singular textures. A good example of this would be the deck/floors of the boat deck and A deck. You will notice as you ran around on the previous version that there was a darker wooden trim next to the deck housing (walls) etc, this originally was done with separate brushes, now it is done with 1 brush per 50X93.5 ft (25 for angling near the engines).
Fixes - 2 : Allot of work is being put into working the vis on this map, I'm no expert so I would ask for help if any will offer who feel they could take on the technical task this presents. what "I've" been doing for the moment is to go through and detail/structural brush every thing from bow to stern.
Fixes - 3 : After the death of my former computer I was forced to DE-compile my previous work to retrieve it. This sadly means we've lost the interior I had designed. However depending on the situation of the VIS I may rebuild some of it. Or at-least the Iconic Grand stair case and dinning room. Luckily since allot of the detailed structure was made of patches not allot of texture re-allighntment has to be done, still quiet a bit though.Fixes - 4 : At the moment I am replacing allot of the old textures with new realistic HD ones. I always felt the old ones just screamed bland. Hopefully in the next day or so I should have a a few photos of this. This includes a new hull texture, which believe me when you see the difference you'll shite your self. LOL
Fixes - 5 : With the release of Titanic Honor and Glory hanging over my head I felt it necessary in the time this will have any lime light to let it provide as much as possible. in the final phase you will be able to select certain objects all over the ship and be told details about the. Originally I was going to do this as "Print" however I've decided it will be done sort of like a toggable hologram. Now I want to say I do not knock the Honor and Glory team nor there work, im acctually VERY excited about it. just disapointed I wasn't ever able to do the same I guess.
Fixes - 6 : Brushes every where are being fixed and cleaned up. This will be a ongoing effort till the very end, I know my brush work, but we're ever learning right? Especially with a complex structure like this were only 80 feet of it are level the rest angles in some way shape or form.
---------------------------------------------------------------The planned release date for the final cut is April 10th 2015.
If any one is insterested in getting involved please hit me up on here with some references to your work/skill. Let's show them one last time what JKA can do! -
Ah ok so it was _remap0# thanks dude!
-
Alright back in the day working with Darth G he taught me the basic _remap command, however he mentioned there where other stages to this for models using multiple textures. In this case it is the models/map_objects/korriban/guard01.md3 that I am trying to remap.
So heres what I did. I bassically just wanted it in a grey stone rather than tan so that was a easy black and white adjustment in photoshop for both textures the model uses, next gave them there own directory in my pk3, no problems. Went in and set it up, testing one stage at a time... First _remap was " *;textures/Dromuund-Kass/statue_guard01 " worked fine, ofcourse the other bits were off that need the second texture. So I added the line (from what I thought I remembered him saying _remap2 with a value of "*;textures/Dromuund-Kass/statue_guard02".Now the second one worked fine as well HOWEVER... 1 went and tweaked up, as if it was now trying to use the second one for all of it...
heres the entity window in gtkAs you can see it is just f'ed up... This probably falls on me not doing the commands right, but in all fairness I never came into a situation where I acctually need to remap based on the acctual textures for the models.
Also if any one knows where I can find Darth G's MP entity definition file could you please PM me a link, or post it here? -
You will ALL have to wait till Christmas!
Any one who gets it early some how will insure it will NEVER comes out for everyone else...
So as I've seen 2 people in game running around with it that I did not give this too... Be warned your ruining this for other people if I find out who leaked it.Omicron likes this -
It's all prepared guys , it just has to be made public
Thank you
-
You want to release slightly before as admins need to approve it first, to make sure there are no viruses, nasty things, etc. Perhaps release it before, but ask for it to be first available on Christmas morning.
Right Ill go ahead and get it out of the way now.
EDIT I just submitted it, lets hope they pay attention and don't release it early!
Omicron likes this -
Its finished actually. I'll release it Christmas morning.
Omicron likes this -
i know dat feel
Nice Vader skin by the way. But I do find the difference in detail between the head (very highly detailed) and the body (more of a watercolor/pastel style in comparison) to be a bit too jarring.
Well I did try as you see in the latest pics to really bring the sute to life. It is a vast improvment over any other version, but still this game can only do so much. Ive been toying around with it and the new spec maps in game really have done wonders to accentuate the materials etc. Following the pro tuts really paid off. When your walking etc you notice vaders lether now has that pale blue shine it always shows in puctures his helmet almost at times seems to reflect some golden lighting.. I stood there for any hour last night just rotating him and watching what happened under different lighting schemes.
To be fair skinning was never really my cup of tea, I never really did more then a few friendly skins here and there. Most my time In Photoshop has been making textures for maps etc.Thats where I learned to blend textures together. when you wanna try defeating dot product and pcx maps with good old school Photoshop skills, you learn quick.
AngelModder
Omicron likes this -
Wow these look amazing guys. Deviance I think the horns could use to be just an inch longer ontop if I may suggest and a bit of curve to them rather then straight up cone like shapes.
Cant wait to see these skinned! -
its alright I figured it out.
Thanks guys. Hes all done, just gotto throw together icons and yea...
-
Ok guys any one knew where I can find like good clear pics of vaders cyrbernetics, and not just his ep 3 arm...
-
It is hotter then two rats fornicating in gym sock!
Lamented likes this -
-
What is Soul Calibur...? You sh**ing me...? It's one of the best fighters of all time.
I dont really play games like that, I checked it out on youtube. XD Seems alright just not my thing. Im a PC only person, To me its BS that games are built on PC's but only come out for X-Box's and PS's... yet 2/3rds of the world own a PC, and 1/4 own a up to date console...
-
I know...
I'll get pics, in a few hours.
You guys crack me up XD!
-
New result was much better! I wish only that I could add some bump mapping
!
After following the tutorial for spec mapping leather, I took there advise and also added a touch of color to it, allot of times when I've sen vader his leather/armor has a very faint touch of blue to them... So I mimicked this in the spec map.
nice DBZ fan movie man
In my opinion the only thing that's holding it back at this point is the shine effect on the helmet
Would what I have be enough or perhaps shinier? Also remember that pic you referred to is in VERy bright lighting.


 ! the example one here was fairly simple, but when the teak boards curve around the deck housing etc it can become very annoying and take a while.


 !
!

R.M.S. Titanic - AngelModder
in WIPs, Teasers & Releases
Posted
In 6 days, you will be receiving the biggest update this project has yet to see...
AngelModder