


Skinning Tutorial #4 - RGB: change colours n stuff
Every skin is better with RGB.
Be sure to check out the basics of shaders tutorial before jumping into this.
What this will cover:
- RGB basics
- Making an RGB texture
- Making an RGB shader
- Using the char_color_ codes
What is RGB?
"RGB" stands for "red, green, and blue"; the three primary colours which make up white light. Mixing various quantities of each will produce any colour in the visible spectrum. In Jedi Academy, skins can have customisable RGB features by using the char_color_red, char_color_green and char_color_blue console commands. The base Jaden models are examples of this. The most common way to achieve this is with a single texture containing transparent areas. These areas are what change colour, once the appropiate shader is made.
Making your RGB texture:
Ruxith made a tutorial for photoshop users here, if you use Gimp then the process will be very similar.
Open up your desired texture in your image editing software. Doesn't matter what, but it MUST support alpha channels (basically not MS paint). Select the area you want to have RGB, make it greyscale and lighten it up if need be:

My selection is scrappy cause I cba making a decent job, make sure you do!
Add a layer mask, and in your selection fill it with black so it should look like this:

Apply layer mask, export your texture as a png.
Undoing the process to a texture:
To undo this process on a texture, add layer mask > Transfer layer's alpha channel > delete the mask and you'll have a 'normal' texture.
Making your RGB shader:
It has two stages to it. The first is to load the texture and apply RGB to this layer. The second is loading the same texture on top (without RGB) and using the transparency shader (see previous tutorial) so the RGB elements from the lower layer are visible. If you remove the first stage, your skin will have gaping holes in game, due to the transparency shader (nothing is being drawn underneath). If you remove the second stage, your whole texture will be changing colour!
The shader will look something like this:
models/players/artsExample/rebel_pilot_torso
{
	{
		map models/players/artsExample/rebel_pilot_torso
		blendFunc GL_ONE GL_ZERO
		rgbGen lightingDiffuseEntity
	}
	{
		map models/players/artsExample/rebel_pilot_torso
		blendFunc GL_SRC_ALPHA GL_ONE_MINUS_SRC_ALPHA
		rgbGen lightingDiffuse
	}
}
What is causing the RGB then? The answer is the rgbGen in the first stage, lightingDiffuseEntity.
lightingDiffuse is the standard for any texture, add Entity to the end and it will now change colour! The second stage is a basic transparency shader to draw the texture on top of the texture with RGB applied. It's the same texture, but its having different things applied to it each time and then drawing it on top.
Here is the RGB shader combined with the final shader from the previous tutorial:
models/players/artsExample/rebel_pilot_torso
{
	{
		map models/players/artsExample/rebel_pilot_torso
		blendFunc GL_ONE GL_ZERO
		rgbGen lightingDiffuseEntity
	}
	{
		map models/players/artsExample/rebel_pilot_torso
		blendFunc GL_SRC_ALPHA GL_ONE_MINUS_SRC_ALPHA
		rgbGen lightingDiffuse
	}
	{
		map models/players/artsExample/rebel_pilot_torso_spec
		blendFunc GL_SRC_ALPHA GL_ONE
		alphaGen lightingSpecular
	}
	{
		map models/players/artsExample/rebel_pilot_torso_glow
		blendFunc GL_ONE GL_ONE
		glow
	}
}
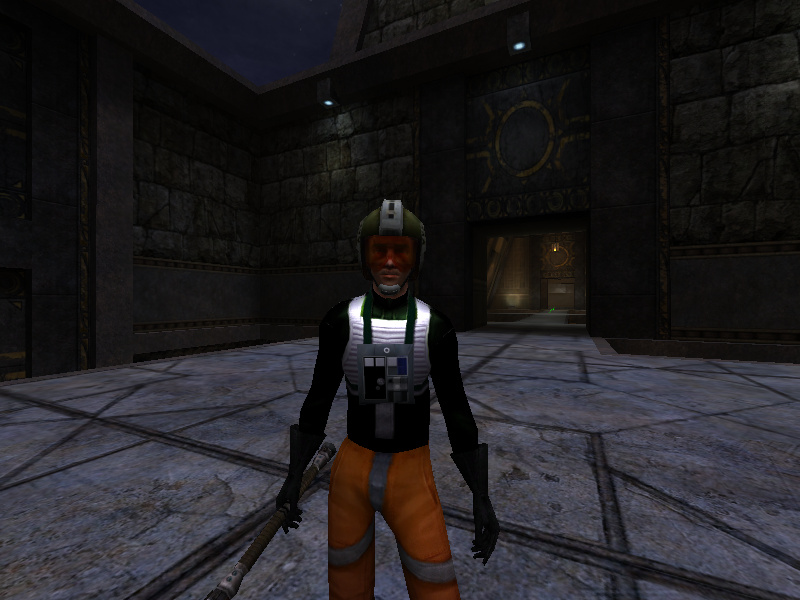
And ingame it looks like this:

... Which brings us onto:
Using char_color_ codes:
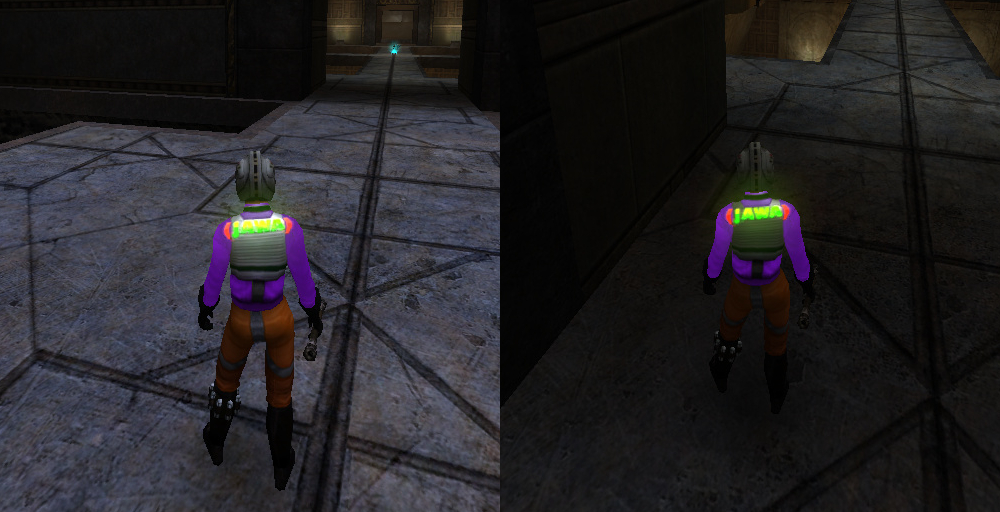
Main thing to remember is you can use any value between 0 and 255 inclusive. 0 = none, 255 = full. You can work out combinations for yourself or look online for "RGB colour mixers". Couple examples of the skin game:


Bonus: Black
To get black, make all your values greater than 255. Intuitively, setting them all to 0 should be black but for whatever reason in JKA, that makes the player white.
Forced RGB
In your shader, you can force a texture to use a specific RGB value. This is useful if you want to have many colour variants but don't want to include additional textures.
Forced RGB
Didn't cover this in the original post but it doesn't really warrent its own thread.
In your shader, you can force a texture to use a specific RGB value. This is useful if you want to have many colour variants but don't want to include additional textures.
How-to:
In the stage where you apply the RGB, change rgbGen lightingDiffuseEntity to rgbGen const ( <R> <G> <B> ). The RGB values are decimals between 0 and 1.
Colour Conversion:
To convert your RGB values (0 - 255) into decimals in the range 0 to 1, divide each by 255. For example, if I wanted to force the colour , made up from RGB values 79 184 115, then I would do:
- 79/255 = 0.30980392156
- 185/255 = 0.72156862745
- 115/255 = 0.45098039215
and in my shader I would have rgbGen const ( 0.30980392156 0.72156862745 0.45098039215 ).
Common conversions you're likely to use:
- 255 = 1
- 128 = 0.5
- 64 = 0.25
- 32 = 0.125
- 0 = 0
Shader changed to force the colour , or 150 20 255:
models/players/artsExample/rebel_pilot_torso
{
	{
		map models/players/artsExample/rebel_pilot_torso
		blendFunc GL_ONE GL_ZERO
		rgbGen const ( 0.58823529411 0.07843137254 1 )
	}
	{
		.
		.
		.
}
However, the forced RGB texture will no longer react to light and remain at full brightness:
Solution:
After the RGB stage and before the "normal" texture stage, insert
	{
		map <path to texture>
		blendFunc GL_DST_COLOR GL_SRC_COLOR
		rgbGen lightingDiffuse
	}
So the full shader now looks like:
models/players/artsExample/rebel_pilot_torso
{
	{
		map models/players/artsExample/rebel_pilot_torso
		blendFunc GL_ONE GL_ZERO
		rgbGen const ( 0.58823529411 0.07843137254 1 )
	}
	{
		map models/players/artsExample/rebel_pilot_torso
		blendFunc GL_DST_COLOR GL_SRC_COLOR
		rgbGen lightingDiffuse
	}
	{
		map models/players/artsExample/rebel_pilot_torso
		blendFunc GL_SRC_ALPHA GL_ONE_MINUS_SRC_ALPHA
		rgbGen lightingDiffuse
	}
	{
		map models/players/artsExample/rebel_pilot_torso_spec
		blendFunc GL_SRC_ALPHA GL_ONE
		alphaGen lightingSpecular
	}
	{
		map models/players/artsExample/rebel_pilot_torso_glow
		blendFunc GL_ONE GL_ONE
		glow
	}
}
In game:

Credits: Ruxith, for his tutorial on finding and creating RGB textures.


Recommended Comments
There are no comments to display.
Create an account or sign in to comment
You need to be a member in order to leave a comment
Create an account
Sign up for a new account in our community. It's easy!
Register a new accountSign in
Already have an account? Sign in here.
Sign In Now