


REQUIREMENTS:
-
Installed GTKRadiant/NetRadiant
-
Basic familiarity with making a simple map
ARRANGEMENTS
Adding NPC's to you map
There are two ways of adding NPCs to your map:
1. You can use the predefined NPC-entities from the context menu in radiant (right mousebutton in 2D view > NPC > NPC-name )
2. You can use the NPC_spawner entity, which gives you the possibility to add your own NPCs to the map. (right mousebutton in 2D view > NPC > NPC_spawner ) If there is no NPC_spawner in your NPC entity list, you are using an old Radiant version or the wrong “sp_entities.def” file. You need GTK radiant version 2.1.12 or above.
If you currently cannot or do not want to upgrade your Radiant (you really should though) or your sp_entities.def file, you can add the following definition to the file:
/*QUAKED NPC_spawner (1 0 0) (-16 -16 -24) (16 16 40) x x x x DROPTOFLOOR CINEMATIC NOTSOLID STARTINSOLID SHY SAFE

DROPTOFLOOR - NPC can be in air, but will spawn on the closest floor surface below it
CINEMATIC - Will spawn with no default AI (BS_CINEMATIC)
NOTSOLID - Starts not solid
STARTINSOLID - Don't try to fix if spawn in solid
SHY - Spawner is shy
SAFE - Won't spawn if an entity is within 64 units

NPC_type - name of NPC (in npcs.cfg) to spawn in

targetname - name this NPC goes by for targetting
target - NPC will fire this when it spawns it's last NPC (should this be when the last NPC it spawned dies?)
target2 - Fired by stasis spawners when they try to spawn while their spawner model is broken
target3 - Fired by spawner if they try to spawn and are blocked and have a wait < 0 (removes them)

If targeted, will only spawn a NPC when triggered
count - how many NPCs to spawn (only if targetted) default = 1
delay - how long to wait to spawn after used
wait - if trying to spawn and blocked, how many seconds to wait before trying again (default = 0.5, < 0 = never try again and fire target2)

NPC_targetname - NPC's targetname AND script_targetname
NPC_target - NPC's target to fire when killed
NPC_target2 - NPC's target to fire when knocked out
NPC_target4 - NPC's target to fire when killed by friendly fire
NPC_type - type of NPC ("Borg" (default), "Xian", etc)
health - starting health (default = 100)

"noBasicSounds" - set to 1 to prevent loading and usage of basic sounds (pain, death, etc)
"noCombatSounds" - set to 1 to prevent loading and usage of combat sounds (anger, victory, etc.)
"noExtraSounds" - set to 1 to prevent loading and usage of "extra" sounds (chasing the enemy - detecting them, flanking them... also jedi combat sounds)

spawnscript - default script to run once spawned (none by default)
usescript - default script to run when used (none by default)
awakescript - default script to run once awoken (none by default)
angerscript - default script to run once angered (none by default)
painscript - default script to run when hit (none by default)
fleescript - default script to run when hit and below 50% health (none by default)
deathscript - default script to run when killed (none by default)
These strings can be used to activate behaviors instead of scripts - these are checked
first and so no scripts should be names with these names:
  default - 0: whatever
idle - 1: Stand around, do abolutely nothing
roam - 2: Roam around, collect stuff
walk - 3: Crouch-Walk toward their goals
run - 4: Run toward their goals
standshoot - 5: Stay in one spot and shoot- duck when neccesary
standguard - 6: Wait around for an enemy
patrol - 7: Follow a path, looking for enemies
huntkill - 8: Track down enemies and kill them
evade - 9: Run from enemies
evadeshoot - 10: Run from enemies, shoot them if they hit you
runshoot - 11: Run to your goal and shoot enemy when possible
defend - 12: Defend an entity or spot?
snipe - 13: Stay hidden, shoot enemy only when have perfect shot and back turned
combat - 14: Attack, evade, use cover, move about, etc.  Full combat AI - id NPC code
medic - 15: Go for lowest health buddy, hide and heal him.
takecover - 16: Find nearest cover from enemies
getammo - 17: Go get some ammo
advancefight - 18: Go somewhere and fight along the way
face - 19: turn until facing desired angles
wait - 20: do nothing
formation - 21: Maintain a formation
crouch - 22: Crouch-walk toward their goals

delay - after spawned or triggered, how many seconds to wait to spawn the NPC
*/
What NPC will be spawned is defined with the KEY “NPC_type” in the entity properties. You can use the predefined NPC names or use your own selfmade NPCs.
NPC Examples
Predefined NPC:
| KEY | NPC_type |
|---|---|
| VALUE | reborn |
Your own NPC:
| KEY | NPC_type |
|---|---|
| VALUE | jedi_yoda |
Adding the first attack wave
When adding NPC attack waves to your map it is very important that the NPCs will not spawn when the map is loaded. You have to add a “targetname” KEY to the NPCs which prevents them form spawning automatically when the map starts. The targetname KEY means this entity must be “triggered” or “used” (by other entity or script) to be spawned/activated.
Since we want waves consisting of more than one enemy we need to count the killed NPCs so we can trigger the next wave once all of them are dead. Counting can be done using a target_counter.
For our testmap we need a simple room like the one created in the tutorial your first map.
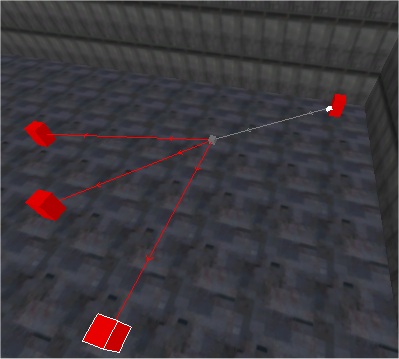
Now we add 3 NPC_spawner. These are our first attackers (first wave).
Select all 3 NPCs and press [N] for the entity properties window. Add the following KEYS:
| KEY | NPC_type |
|---|---|
| VALUE | reborn |
| KEY | targetname |
|---|---|
| VALUE | wave0 |
| KEY | NPC_target |
|---|---|
| VALUE | wave1count |
Description:
-
NPC_type = name of the NPC to be spawned (predefined or your own custom NPC's name)
-
targetname = name for the NPC's in this “attack wave”. You can use this name for activating/spawning the entities by script, trigger, counter, etc.
-
NPC_target = defines which target will be triggered when the NPC is killed. For this tutorial we are using this for incrementing the wave counter (target_counter)
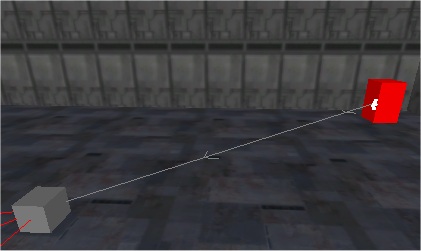
For spawning the first wave of attackers we will use a “target_relay” which is connected to the info_player_start entity. We could just directly connect the info_player_start to the NPCs but this way we get to learn about the target_relay, which can be very useful.
Press right mouse button in the 2D view and choose target > target_relay
Select the entity, press [N] and add following KEYS:
| KEY | targetname |
|---|---|
| VALUE | startwave0 |
| KEY | target |
|---|---|
| VALUE | wave0 |
Now we have to connect our play start with this target_relay.
Press [ESC] key for sure that nothing is selected. Select the “info_player_start”, press [N] and add these KEYS:
| KEY | target |
|---|---|
| VALUE | startwave0 |
This connects our player start entity to the target_relay, which will activate the first attackers wave.
Now we must add the first counter (target_counter) which will count the beaten NPCs.
Add the target_counter to the map, press [N] and add the folowing KEYS:
| KEY | targetname |
|---|---|
| VALUE | wave1count |
| KEY | target |
|---|---|
| VALUE | wave1 |
| KEY | count |
|---|---|
| VALUE | 3 |
Description:
-
targetname = name for the counter. You need this for triggering the counter when the NPC is killed.
-
target = defines which target will be activated once the “count” value is reached.
-
count = Once this value is reached, the counter will fire his dafined “target”. If the value is “3”, this means the counter must be triggered 3 times before firing his target. In our case the counter is triggered after each beaten NPC. once all 3 NPCs are dead, the counter will trigger its target, the next attackers wave.
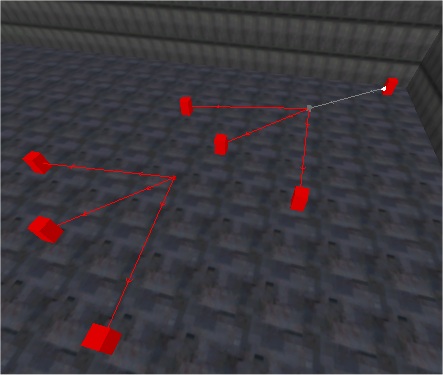
The next attack wave
Now we can add our next attackers wave.
Add 3 more NPC_spawner, select them, press [N] and add the following KEYS:
| KEY | NPC_type |
|---|---|
| VALUE | rebornacrobat |
| KEY | targetname |
|---|---|
| VALUE | wave1 |
| KEY | NPC_target |
|---|---|
| VALUE | wave2count |
Now we need a new counter for our second attackers wave. Add a new target_counter, press [N] and add following KEYS:
| KEY | targetname |
|---|---|
| VALUE | wave2count |
| KEY | target |
|---|---|
| VALUE | wave2 |
| KEY | count |
|---|---|
| VALUE | 3 |
The third attackers wave
Well, we have to repeat the steps for each ave we want to add.
Add 3 more NPC_spawner, select them, press [N] and add the following KEYS:
| KEY | NPC_type |
|---|---|
| VALUE | rebornforceuser |
| KEY | targetname |
|---|---|
| VALUE | wave2 |
| KEY | NPC_target |
|---|---|
| VALUE | wave3count |
Now we need the third counter for our third attackers wave. Add a new “target_counter, press [N] and add following KEYS:
| KEY | targetname |
|---|---|
| VALUE | wave3count |
| KEY | target |
|---|---|
| VALUE | wave3 |
| KEY | count |
|---|---|
| VALUE | 3 |
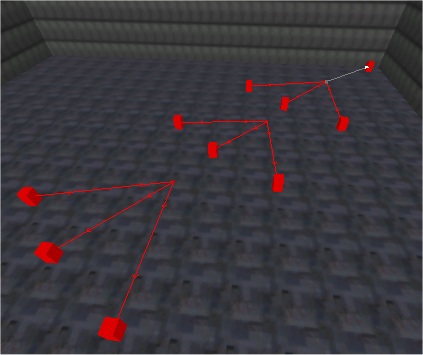
The last attackers wave
Let us add the last 3 NPC's to the map.
Add 3 more NPC_spawner, select them, press [N] and add the following KEYS:
| KEY | NPC_type |
|---|---|
| VALUE | rebornboss |
| KEY | targetname |
|---|---|
| VALUE | wave3 |
We do not need any NPC_target KEY for the NPC'S nor a target_counter entity here, because there will be no more attack waves in this testmap. If you'd like to add more attackers waves, you just have to reapeat all the steps again and again.
Be sure all the “target” > “targetname” relations are created correctly, or your next NPC wave will not work correctly!
Finishing the testmap
Well, we have our attackers waves created.
It's up to you if you want to add more attacker waves to your testmap.
This kind of NPC attacker waves is mostly used in a “Ladder” type of maps or in single player maps where the author has bigger fighting episodes created for the player. (Note that multiple spawning waves of enemies are usually bad leveldesign though.)
Save the test map as “waves.map” in your base/maps folder, compile it and let's test it 
Have fun!
DOWNLOAD THE TUTORIAL MAP
( .map - file included)
JK2 version
JKJA version
The jk2 reborn NPCs don't work properly in Jedi Academy. You need this FIX file.
Unpack the ZIP and put the pk3 file in your Jedi Academy GameData/base folder.


Recommended Comments
There are no comments to display.
Create an account or sign in to comment
You need to be a member in order to leave a comment
Create an account
Sign up for a new account in our community. It's easy!
Register a new accountSign in
Already have an account? Sign in here.
Sign In Now