This tutorial shows you how to install OpenJK or other similar clients like TaystJK, JAEnhanced, etc. Scroll down to your platform to skip to actual steps.
Optional video (a bit outdated, from 2022), follow this guide unless you get stuck, the steps are similar.
Contents
Download OpenJK for Jedi Academy
Since Jedi Academy is over 20 years old now, running it on modern hardware can be a bit of a challenge. On top of that, the default server list no longer works in the game, making it difficult to find servers to play on. To fix those issues, it is best to use a community patch or client to help get the most optimizations and features for the game.
OpenJK is a community-led project to make Jedi Outcast and Jedi Academy code run with minimal bugs and on modern hardware. Many other clients have been made based on OpenJK but take it even further with new features.
Nowadays it is recommended to use clients that add QoL and new features, whereas OpenJK focuses on keeping the game mostly the same. Here is a list of the most used clients for the base game. Those clients should follow the same installation steps as OpenJK and this guide.
Jedi Academy clients:
-
TaystJK - for more QoL features and stability for JKA multiplayer
- TaystJK is based on EternalJK, which is a fork of OpenJK, which aims to adds a ton of quality of life features to Jedi Academy Multiplayer. It is the most recommended way to play the Jedi Academy multiplayer..
-
JAEnhanced - for QoL and enhancement features to JKA singleplayer
- JAEnhanced is based on OpenJK SP but adds a ton of features like first person saber, saber holstering, optional better effects and models, etc. It is the most recommended way to play Jedi Academy singleplayer.
- There are conversion mods as well, like Movie Battles II (MP), Movie Duels (SP), and Galactic Legacy (SP) that add tons of characters, maps, and missions.
Jedi Outcast clients:
-
JK2MV - for more QoL features and stability for JK2 multiplayer
- JK2MV stands for Multi Version which means you can play on any version of JK2 (1.02, 1.03, 1.04) whereas previously you would be limited to just one. It adds a ton of improvements for JK2 multiplayer.
-
OpenJO - just OpenJK but for Jedi Outcast singleplayer
- This is listed with the OpenJK builds.
This tutorial can be used for any of those clients, they are all mostly installed the same way. For this guide I will be using OpenJK since it includes both single player and multiplayer and will get you casually playing either mode the easiest. If you plan on playing multiplayer a lot, TaystJK definitely should be downloaded instead.
I have to assume you already have Jedi Academy (or Outcast) purchased in some way and have access to the game’s files in some way. If not, you can buy it on Steam or GOG.com, or even use the original disc if you have it. These clients will allow you to play without having the disc in the drive. All you need is the asset files.
Windows
Since the majority of people get the game from Steam, I will start with that process. Download the game on Steam as normal. Once installed, go to the library and right click the game, and go to Manage, then Browse local files. That should take you right to the game’s installation folder. Double click the Gamedata folder.
If you are using the GOG.com version, download the offline installer from the Games page, double click the installer and click through the steps. Once finished, click Exit. You’ll find the game folder for the GOG version in the C drive, under GOG Games. Go to the Jedi Academy folder, then Gamedata.
Now you can download OpenJK-windows-x86.zip from the Releases page if you haven't yet. Go to your downloads folder. Extract the zip file or simply double click to open it to reveal the folder within, click into that folder, and select all files. Then simply drag all of those files into your Gamedata folder. You can replace any files it needs to.
You may need to install the Visual C++ Redistributable package from Microsoft in order to run this.
Download and install both the x86 and x64 versions of Visual C++ Redistributable here:
Visual C++ Redistributable x86 [mirror]
Visual C++ Redistributable x64 [mirror]
Now all you have to do is double click on these two launchers (OpenJK.x86.exe) and make sure they open up okay. Try each one and make sure they launch.
If they don’t launch, note the error you get and go to the end of this guide for the Common Error section and how to fix them.
By default your configuration files and screenshots for OpenJK are located in your user Documents folder under My Games/OpenJK. If you’d prefer to keep all of your configurations in one place, follow this guide.
Mac
Installing OpenJK on macOS can be tricky due to the 3 different categories you can find yourself in. If you have a newer Mac with an Apple chip like M1 or M2, there are now native versions you can use. If you have an older Intel-based Mac, the current build of OpenJK on JKHub should also work for you on macOS versions newer than Mojave. For Catalina or older, you will have to use an older build of OpenJK as of this video’s release. This guide will focus on newer Apple chip Macs but the process should be the same for Intel, for the most part.
If you have the game on Steam, you’ll probably see a warning saying it is not compatible with your operating system, but it will let you install it anyway, which is all we need. Install the game, and then right click the game in the library sidebar, and go to Manage, then Browse local files. That should open the folder to show the app for the game. Right click on the app and show package contents. Go to Contents, and your base folder should be there. The base folder is all we need.
Now press Command + N to open a new Finder window. Go up to the menu bar, and click the Go menu. Now hold the Option or Alt key. You should see a Library option appear here. Click that while still holding that key. In Library, go to Application Support. Now you’re going to need to create a new folder here, and name it OpenJK (or OpenJO if installing that). Go back to your other finder window with the base folder. Click and drag the base folder over to the new OpenJK folder in the other window.
Now go download OpenJK-arm64.zip from the Releases page, whatever the latest is. Take note that you are downloading OpenJK for Jedi Academy, and OpenJO for Outcast (singleplayer only). Either download them to that new folder you made, or move them to it from your Downloads folder. The .apps should now be in Application Support/OpenJK.
Since these aren't officially Apple signed apps, they will give an error saying "MOVE TO TRASH" and is blocked by Apple's security. You should be able to whitelist it via Terminal with these commands:
sudo xattr -rd com.apple.quarantine /Users/you/Library/Application\ Support/OpenJK/OpenJK.app
codesign --force --deep --sign - /Users/you/Library/Application\ Support/OpenJK/OpenJK.app
Replace you with your Mac account username, or simply drag and drop the app from Finder into Terminal to insert its path. Do this for both OpenJK and OpenJK SP, or whichever app you are installing.
Now all you need to do is double click on those apps and they should launch. Test both apps to make sure both launch okay. You can also right click each of them and Make an Alias for them and put the shortcuts on your desktop for easy access, or drag them to your dock.
If they don't launch, note the error. Current builds should have SDL2 and Libpng bundled in, but not all apps do. You may need to install them manually via Homebrew, go down to the Common Errors section of this guide to install SDL2 and Libpng, or see other error solutions.
Linux
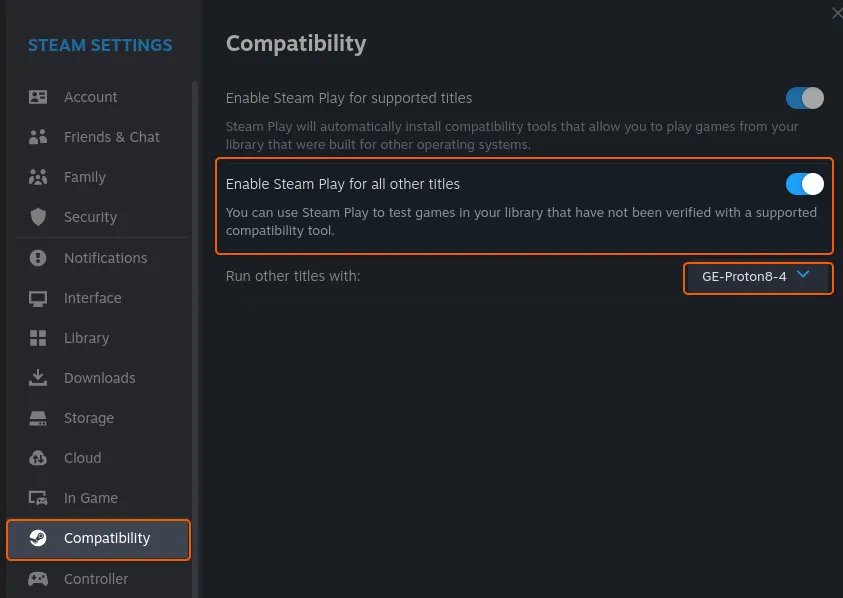
Installing OpenJK on Linux is essentially the same as on Windows now that Proton allows you to install Windows games.
Enable Proton under Steam's Settings, then Compatibility.

Install the game now that it is enabled, and right click in the library or click the cog wheel settings icon, go to Manage, Browse Local Files. Open the GameData folder. This is where you will drop OpenJK or other clients.
Now go download OpenJK or whatever client you're wanting. Either extract it or open with Archive manager, select all files, and drop them into that GameData folder. Now it SHOULD just launch by double clicking the openjk.x86_64 file, however if it just doesn't launch or gives you an error, check out the Common Errors section below. You may need to install SDL2, Libpng, and libopenal1.
Common errors
Failed to load renderer: Install SDL2 & Libpng
If you get an error when launching the game saying it is not compatible with your version of macOS, you'll probably need to install SDL2 via Homebrew.
Open the Terminal app (search or find it in Applications folder) and copy/paste this line:
/bin/bash -c "$(curl -fsSL https://raw.githubusercontent.com/Homebrew/install/HEAD/install.sh)"
If you already had homebrew installed, you can simply update it like so:
brew update
Then you can install SDL2 & Libpng:
brew install sdl2
brew install libpng
If you get a "brew command not found" response (usually on Linux),
eval "$(/home/linuxbrew/.linuxbrew/bin/brew shellenv)"
Then try the brew install commands again.
Once that is done, try launching the game again and it should launch.
Game doesn't launch at all, or says you're missing libopenal
OpenAL can be found in apt-get usually, but that method can vary depending on what Linux distro you are on. For debian based (Ubuntu/PopOS) use this:
sudo apt-get install libopenal1
The error here on linux is usually "error while loading shared libraries: libopenal.so.1: cannot open shared object file: No such file or directory"
Missing default.cfg
A common error people get when installing OpenJK is the "cannot find default.cfg" or "cannot find mpdefault.cfg". This just means that the app can’t find the asset files, which usually means you didn’t put the files in the right folder. Make sure the OpenJK.exe or .app is alongside the base folder and the base folder has the assets in it.
Missing MSVCP140.DLL
Another common error is MSVCP140.DLL was not found. This is fixed by downloading the Visual C++ Redistributable packages.
VM_Create on UI failed
There are a couple errors like the VM_Create error, but it is usually a cause of lack of permissions. On Windows, try launching the game as administrator either by right clicking and choosing the option, or go to Properties, Compatibility, and check the box. If you see this error on Mac, you may need to give the app full disk access. Go to System settings, Privacy & Security, then Full Disk Access, then drag the app over to it.
Menu has grey textures or missing buttons
If you launch the game and the menu has grey and white textures, it's possible you have outdated SDL2, Libpng, have mismatched .DLL files, or you are unintentionally running OpenJO instead of OpenJK on Jedi Academy or vice versa. OpenJO is for Jedi Outcast singleplayer only. OpenJK is for Jedi Academy only. If that's not it, you may have other clients with outdated DLL files. Its recommended you remove all older clients or replace them with the current ones in the latest release.
If you have any other issues or questions, leave a new thread on the forum or head over to the JKCommunity discord and you should get some help pretty quickly.
Edited by Circa
Revamped Linux section, added openal error solution


 1st Place Winner Reepray with Rishi Station 2,
  2nd Place Winner chloe with Oasis Mesa, and
  3rd Place Winner Artemis with TFFA Brutal! Amazing submissions by everyone!


Recommended Comments
Create an account or sign in to comment
You need to be a member in order to leave a comment
Create an account
Sign up for a new account in our community. It's easy!
Register a new accountSign in
Already have an account? Sign in here.
Sign In Now