Jump to content

Jedi Academy turned 20 this year! We celebrated in a ton of different ways: mod contest, server event, podcast, etc. Thank you to all who have been a part of this game for the last two decades. Check out the anniversary content!

Read more

Welcome to JKHub

This community is dedicated to the games Star Wars: Jedi Outcast (2002) and Jedi Academy (2003). We host over 3,000 mods created by passionate fans around the world, and thousands of threads of people showcasing their works in progress and asking for assistance. From mods to art to troubleshooting help, we probably have it. If we don't, request or contribute!

Get started

This game turned 20 years old this year, and it is still one of the greatest Star Wars games of all time. If you're new or returning from a long hiatus, here are the basics of getting started with Star Wars Jedi Knight Jedi Academy in 2023.

Read more

How to make your own bot routes


NAB622

So what are botroutes? To put it simply, botroutes are a path of waypoints that bots will follow. (Pretty babyish way to put it...) These waypoints are numbered so they each have a unique ID. Bots can follow these waypoints going forward through the numbers or backward, unless you specify otherwise (special case covered at the bottom of the page). If you make the paths correctly, this will tell the bots how find their way around the map.

Botrouting is done trough the Jedi Academy/Jedi Outcast game console. Start the game, then open the console by pressing Shift + ~. Start your map by typing:

/devmap [your map name here]

I'm sure you knew that command already, but it's necessary for this. There are a number of commands you will use to make and save your botroutes. The most commonly used ones, and really the only ones you should ever need, are listed below:

/developer 1
/bot_wp_edit 1
/bot_wp_add
/bot_wp_rem
/bot_wp_save


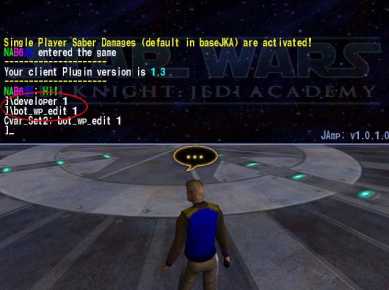
Once your map has loaded, open your game's console again and enter the following three commands:

/developer 1
/bot_wp_edit 1

/devmap [your map name here]

DO NOT FORGET to restart your map! You need to do so to enter bot route editing mode!
The picture below shows the game console window open with the commands that I entered circled in red. Then, I restarted the map by doing the /devmap [map name here] command again.

botrouting_1_sm.jpg

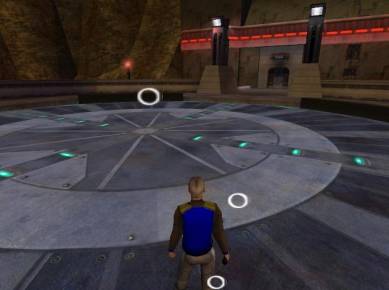
Once your map has reloaded, you are ready to begin making your botroutes! This is quite easy, as I said above. When you add a point, it will be added where your player is standing. When you delete them, it moves in reverse order, deleting the most recent one you made and going back to the first one. With that knowledge in mind, stand somewhere in your map and then type in bot_wp_add. You should see some zeros begin floating up from the ground, like so:.

botrouting_2_sm.jpg

You have just created your first waypoint! Whenever a bot is near this point, it will stay near it and look for another close waypoint, or an object that it wants to pick up. But one waypoint won't do you a whole lot of good! What if the bot spawns in another room and can't see your waypoint? The only way to solve this is to finish creating a path that covers all the major areas of your map. If you have unconnectable rooms or areas, you CAN disconnect your bot route and make a second one inside that building or room...but it doesn't work as well as having one continuous route that goes through the whole map.

So, continue your bot routes! Take it in any direction you like. But remember this: Keep your waypoints fairly close together. If the bot can't see the next waypoint, it will randomly run around looking for it. That is most definitely NOT what you want to have happen. I don't know what the upper limit is on waypoints. I have had more than 1400 in a map at once with no trouble but I DID crash the game by going silly and making half a million of them. So don't be too generous with them, either.

Anyways, keep adding waypoints all around the map. If you get tired of typing the commands out all the time or using the up and down arrows to scroll through your most recent console commands, then you can bind them to keys on your keyboard like so:

/bind f4 bot_wp_add
/bind f6 bot_wp_rem


By using this system, you can stand where you want to add a waypoint to your botroute file, and then push f4 to add it. If you want to remove the last waypoint you placed, press f6 to delete it. Pretty easy, huh?

Please note that I DO NOT recommend doing what I did in the picture below! It is for ILLUSTRATION PURPOSES ONLY!

botrouting_3_sm.jpg

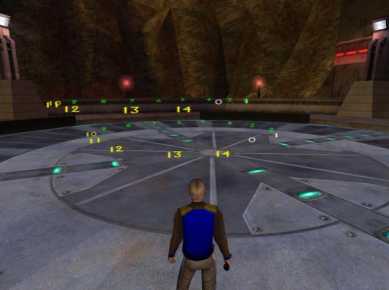
Basically, what I did there is run in a circle and push the button I bound to bot_wp_add repeatedly. This made an incredibly USELESS system of waypoints that will send bots running in circles like people gone mentally mad. While it may be amusing to watch, it's not very fun to fight. But let's just say I wanted to keep this. If I want to save these useless bot routes, then I would open up the console again (Shift + ~) and then type the following command:

/bot_wp_save

If you have a lot of separate areas with the botroutes not connected to each other, your game will lock up for a few moments. DON'T PANIC! Eventually, it will tell you that it reconnected some points or that it can't connect them, as shown below:

botrouting_5_sm.jpg

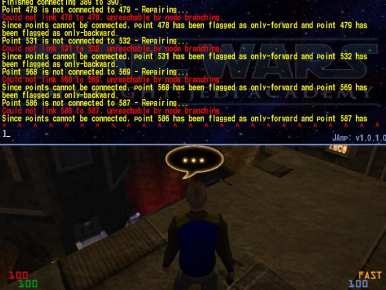
If the game crashes when you save your botroutes, don't worry; it happens sometimes.
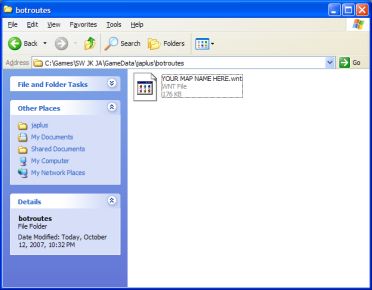
Now, let's retrieve your botroute file. If you have Jedi Academy/Outcast in windowed mode, minimize it, just in case they didn't save right. Then open up your Academy/Outcast game's 'gamedata/base' folder. Inside this folder you should see a new folder called 'botroutes'. Inside this folder should be your botroute file. It should have the same name as your map with a file extension of .wnt on it.

Note: If you have Japlus, Lugormod, Makermod or anything else installed, your botroute file will be inside of a folder with your mod name inside of your gamedata folder. So if I had Japlus installed, it would be in my gamedata/japlus/botroutes folder.

botrouting_4_sm.jpg

That's it. All you need to do now is grab that .wnt file and put it into your map's pk3, inside of a botroutes folder.

Another note: If you have a mod installed and had to take the botroutes from that mod's folder, ignore it! Just put it inside of a 'botroutes' folder inside of the pk3.

Tips for efficient botrouting:

• If you want the bots to walk around more like a real client, use your mouse and walk around your map where you want the bots to go, pushing the button you bound to 'add waypoint' every couple of seconds.

There are a few special things you can do with botroutes, too. My source on the following is:
http://jediknight3.f...aypointTutorial

/bot_wp_addflagged

You can use this with arguments to give bots more interesting behaviors. A more exhaustive list is given from the source I used (link is above).

Basically, you type /bot_wp_addflagged in your console, then put a space and add the letter abbreviation for whatever behavior(s) you want the bot to do at this waypoint. You can mix and match them any way you like.

j - This makes a bot jump while it tries to get to the waypoint with this flag on it.
d - This makes a bot crouch and walk to this waypoint.
x - This forces a bot to move FORWARD in the waypoint index to find the next point.
y - This forces a bot to move BACKWARD in the waypoint index to the previous waypoint.

So if I wanted to add a waypoint that made a bot jump to reach it, I would type the following in my console:

/bot_wp_addflagged j

And if I wanted to force a bot to move forward in the waypoint index and crouch as it moved, I would enter this:

/bot_wp_addflagged dx

That's it! You should be able to start your map and play on it with bots that find their own way around! However, don't forget the MOST important part of making any mods -

TEST YOUR WORK!

Always, ALWAYS, test your work before releasing it on the internet. You don't want to make yourself look bad. :]


User Feedback

Recommended Comments

If I recall correctly, bots will use anything they come into contact with automatically.


If there is a flag to use for that, I am not aware of it and I did not save the source page, so your best bet would be to check with one of the coders and see if they know.

Link to comment

If I recall correctly, bots will use anything they come into contact with automatically.


If there is a flag to use for that, I am not aware of it and I did not save the source page, so your best bet would be to check with one of the coders and see iTh

Thankyou. 

 How to give the command "to wait for the elevator (lift)"? 

Sorry, I don't know English.

Link to comment

Thankyou. 

 How to give the command "to wait for the elevator (lift)"? 

Sorry, I don't know English.


Use "bot_wp_addflagged f"

Link to comment

Jedi Knight2 and Jedi Academy Bot Routes


This is not the most user-friendly system ever created by far, but I'll try to explain it in a semi-simple manner. Before you can use any waypoint-related bot commands you will need to enter into bot waypoint edit mode. To do this you'll need to set bot_wp_edit to 1 and restart the map. The bot_wp_edit cvar is cheat protected however, so you'll likely want to add something like this to your command line when starting the game:


+devmap mymapname +set bot_wp_edit 1


That should take you into edit mode. Once in edit mode a number of bot waypoint management commands and cvars are available. The first two cvars to note are bot_wp_distconnect and bot_wp_visconnect. If distconnect is non-0 (and it is by default), when a route file is saved there will be an automatic check for how close waypoints are to one another. If a waypoint is more than 400 ingame units from the last or next, a node branching system will be used to connect it (inserting points in between as necessary). The visconnect option works in a similar way, except it checks for visibility rather than distance. Both of these options are very convenient if a level is rather simple and allow you to route a level with very little work. However, if a level is more complex and involves numerous lifts and tricky waypoints placement, it's best to disable them because they may fail where unexpected. If either method fails to branch to a waypoint, it will set that waypoint as being a "one way point" (I'll explain what these are later in more detail), which means that the bot will reverse on the trail when it reaches that point and not go forward on it.


When routing a level, you essentially want to just make sure there are waypoints (whether placed manually or by the automated connection routines) everywhere you want bots to go. It's also best to make sure there's always a waypoint close to each spawn point, so a bot has a place to resume the trail on when it respawns. The bots aren't perfect, so if you have an area that's very complex and hard to get through, you may wish to have bots avoid it (unless you don't mind them failing at it now and then). If a bot does manage to get stuck on its trail, it will time out after 2 seconds of no visibility to the next trail point. If it somehow can see the point and cannot get to it, the timeout process will take longer, but will still happen eventually.


As far as how the bots actually follow the points you place, they will follow them in numerical order back and forth by default. When the route file is saved, all nearby points and linked to one another as well. So if, for example, waypoint 5 is close to waypoint 98 and the bot wants to get a powerup which is near waypoint 105, he will branch from waypoint 5 to waypoint 98 in order to get to his destination quicker.


With that in mind, here are the main commands used for waypoint placement:


bot_wp_add - Adds a waypoint at your current ingame location. By default it will add a waypoint after the last in numerical order. However, if you specify an argument with the command it will add the waypoint after a specified waypoint number. So, if you use "bot_wp_add 3", it will insert a waypoint between waypoint 3 and waypoint 4 as waypoint 4 (waypoint 4 will then be bumped up to waypoint 5 an so on).


bot_wp_rem - Removes a waypoint. By default this will remove the last waypoint place. If you specify an argument you can remove a specific waypoint by number. So bot_wp_rem 5 would remove waypoint number 5. (and if there is a waypoint number 6, it then becomes number 5, and so on)


bot_wp_addflagged - Similar to bot_wp_add, but this requires an argument for the special type of waypoint. Valid arguments are:


j - The bot will jump while trying to get to this waypoint.

d - The bot will crouch while trying to get to this waypoint.

c - A camping/sniping point, the bot will often stand here if it has camping properties.

x - Same as 'c', except the bot will crouch while camping.

f - Wait for a func brush underneath this point before moving onto it. This is useful for elevators, moving platforms, and other such items so that the bot will wait until the object is under the point before advancing.

x - This creates a one-way forward point. The bot will travel past this point, but when reversing on the trail, once he reaches it he will turn back and go forward again. This is a good last resort if you want the bot to jump off a tall ledge he can't get back up. However, use these points sparingly, as they make the bot much less efficient in getting places.

y - This creates a one-way backward point. Same principle as the above, except the bot will only pass this point when following a trail in reverse order (5, 4, 3, etc).

n - The bot will not perform visibility checks when moving to this point. Should also be used sparingly, as the bot can easily get stuck when moving to these if something prevents it from getting there.

m - Sort of reversed from 'f'. The bot will only move here if there is NOT a func brush underneath this point.


You can combine these flags however you wish. So if you wanted to add a point that the bot will jump to and only move to when a func brush is under it, you would use "bot_wp_addflagged jf" as the command. This parameter also accepts an additional argument for inserting within trails like bot_wp_add, so if you wanted to insert said point after point 5 in your existing trail, you would use "bot_wp_addflagged jf 5".


bot_wp_switchflags - Switches the flags of an existing waypoint. Uses same flags as bot_wp_addflagged. So if you wanted to turn point 5 into a jump point but let it keep all its other existing properties, you would use "bot_wp_switchflags j 5".


bot_wp_killoneways - This will remove all one-way (x and y) flags from all waypoints on the level. Can be handy sometimes when the distconnect and visconnect cvars flag waypoints as being one-way automatically.


bot_wp_tele - Teleport to a specific waypoint by index. By default it will teleport to the last placed waypoint, but an additional argument will allow you to specify any number (so use "bot_wp_tele 5" to teleport to waypoint number 5, for example).


bot_wp_save - Once you are done placing waypoints, this will write the route file out and do all the calculations necessary at save-time.


Those are all the commands you should need. If you want to edit an existing route file, just load the level up in waypoint edit mode (as described above) and all the waypoint data will be visible and modifiable.


You probably won't end up needing to use many commands other than bot_wp_add, bot_wp_rem, and bot_wp_save. I suggest binding keys to bot_wp_add and bot_wp_rem in order to save time. So then, good luck.This tutorial will get most bot routes in terms of simplicity. I have done a few routes on many maps and the other commands mostly confuse bots, in my experience. That being said, there are some other commands should you wish to try them out.


But yea.. NABs shorter version will do just fine

Link to comment

Why am i not able to access the bot_wp_edit menu?
 

Tried every combination of bot_wp_edit i can think off, nothing has worked so far..

Link to comment

Why am i not able to access the bot_wp_edit menu?


Tried every combination of bot_wp_edit i can think off, nothing has worked so far..


This is how I do it. Start MP and


1. Type in the console by pressing shift + ~ (don't even click on anything menu wise) "set bot_wp_edit 1"

2. Then type "devmap (nameofmap) + set bot_wp_edit 1"

3. This will load your map and if you type "bot_wp_add" numbers should be floating on the screen.


Also don't include the quotation marks when typing. Any issues let me know, and GL.

Link to comment

Okay.. So i think i got why it didn't work.. I assume it does only work on MP maps?

In which case, how can i make it, so NPCs will follow me THROUGHOUT the map, and not just when i am within 15-25 yards/meters?


Like if you spawn NPCs into the "t1_sour" mission, they will find you everywhere in the map

As opposed to spawning NPCs in any custom game?

Link to comment

Okay.. So i think i got why it didn't work.. I assume it does only work on MP maps?


In which case, how can i make it, so NPCs will follow me THROUGHOUT the map, and not just when i am within 15-25 yards/meters?


Like if you spawn NPCs into the "t1_sour" mission, they will find you everywhere in the map

As opposed to spawning NPCs in any custom game?

Botroutes are for bots only and only work in MP. NPCs are not the same as bots. So no, this won't work for NPCs. Your question is related to scripting and should be posted in a new thread in the modding assistance forum.

Link to comment

Botroutes are for bots only and only work in MP. NPCs are not the same as bots. So no, this won't work for NPCs. Your question is related to scripting and should be posted in a new thread in the modding assistance forum.


I believe you are absolutely correct, but to be honest, i don't really want to spend that much time, working out how scripts work, as they are not that important to mapping (except elevators and such)

Link to comment


Create an account or sign in to comment

You need to be a member in order to leave a comment

Create an account

Sign up for a new account in our community. It's easy!

Register a new account

Sign in

Already have an account? Sign in here.

Sign In Now

×
×
  • Create New...