
AshuraDX
-
Posts
2,319 -
Joined
-
Last visited
Content Type
News Articles
Tutorials
Forums
Downloads
Everything posted by AshuraDX
-
@@ChalklYne messed up normals on the left hand EDIT: @@ChalklYne check the bag on his right leg too
-
@@Barricade24 got another 2 hours to work on it today: still only temporary textures new uv layout aswell: Edit: one last update for the next week: changed the geometry for the side pieces, giving them a much smoother appeareance this time with normal maps applied for @@eezstreet
-
nope, I could ask him about that model but I guess he'll just be annoyed
-
@@eezstreet - yes it does rend2
-
@@JAWSFreelao you guys will also get access to these: http://imgur.com/a/vNfxX Which should prove useful while skinning, I'll also prepare something to help keep the reskin quality at the level of my original textures. Basically a skin generator that takes bl&wh decal inputs and the masks them onto my existing textures - the generator will give a high level of control over wear, dirt color and a few other things
-
before I disappear for a week (holiday in northern germany) I'll show you a preview for the game version of the helmet the textures are definitely not final - just a preview and the model has a few gaps atm and for you skinners, I have a preview of what the UV layout will be like: the visor is on a sepperate texture map, as requested by @@Barricade24 so some of the empty space on this helmet texture map will be filled with uvs for random extra parts, like binoculars and what else I'll find I plan to use this distribution of texture maps : torso & hips - 1024² Helmet(s) - 512² Visor(s) - 256² right arm & leg - 1024² left arm & leg - 1024², could use the above if your details are symmetrical Random accesoires - a few 512² or 1024² maps
- 310 replies
-
- 12
-

-
I also just noticed that the hands look tiny - go ahead and use mine, they are posed perfectly for the JKA skeleton - all you have to do is import my basemesh, upscale to 156.25% fromthe world origin and everything should be in place
-
@@ChalklYne you could really round off that body, you're trieing to stay lowpoly, which is good - but you shouldn't stay too low either, because that will reduce the possible quality a lot
-
@@ChalklYne do it like this: take your sketchfab link -> https://sketchfab.com/models/69d90a1c9c0d4b75b433cd1ad53f27e2 then put the highlighted ID number inbetween sketchfab tags [sketchfab]69d90a1c9c0d4b75b433cd1ad53f27e2[/sketchfab]and voila you embedded your model
-
feel free to use it
-
 that's something you could do from this, just by nudging a few vertices around - and this is what this mesh was made for a rough base for people to edit. Taking away the need to worry about topology
 -
updated the sketchfab link, gonna call it a day
-
a few Years ago I said I'd make a enw clone model, guess what - I'm finally at it before you ask: yes I will eventually have all clone versions done, but they will be released step by step in updates to the initial basic phase 2 clone There are plans for a Phase 1 clone aswell
- 310 replies
-
- 12
-
-
Real Life Models, Weapons and Maps
AshuraDX replied to Finalizer's topic in Mod Requests & Suggestions
https://jkhub.org/files/file/215-dark-streets/ https://jkhub.org/files/file/207-neotokyo/ some maps -
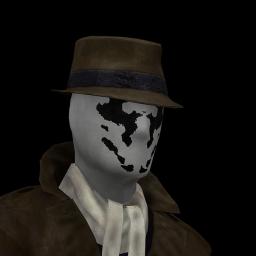
@@Scerendo looking at what you have now I'd say darken the leather base for his jacket but keep the worn areas in this color sme for the shoes, decrease the red and introduce some darker more blueish shades of brown (basing this at the references @ just shared) same for the red parts, darker and more saturated red in the less worn spots you could try multiplieing/overlaying your roughness map to add some slight variation o your diffuse, I have yet to try that myself though EDIT: maybe bake a thickness map to simulate a bit of subsurface scattering in your diffuse map, I think this video covered the process, just blend the effect into your diffuse instead of your emissive channel and keep it subtle https://www.youtube.com/watch?v=dQyQ-taR0Qs if whatever you are baking in has no support for baking a thickness map simply flip the normals of both your high and lowpoly and bake AO, that should do the trick
-
@@Scerendo apply a slight gradient map to the skin areas on your prelight maps, blueish skintone for the darks and a slightly reddish skintone for the lights, makes a huge difference black&white blue&red EDIT: don't forget your curvature map aswell, set it to overlay and slap it below the light layers. Feel free to message me on Steam incase you catch me online
-
updated! https://jkhub.org/files/file/2761-solaire-of-astora/
-
@@JungAk messaged you on skype, let's see if I can help you resolve this
-
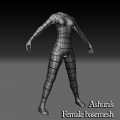
328 downloads
A simple female basemesh I made to build Jedi Academy or Jedi Outcast models around Feel free to use it, but if you do please mention me in your models read me, happy modeling! -
this needs to happen
-
@Scerende when working with PBR you should avoid light information but JKA models won't look good without a bit of prelighting applied I'd recomnmend painting further light information, bring out some parts
-
not necessarily for Zbrush, just a basic low poly mesh to build around, no matter wether in that happens 3ds max or something else Topology was designed with animation in mind EDIT: here's an update to the mesh, updating the model on sketchfab now
-
yet to be released, waiting for some feedback @@Cerez , @@Psyk0Sith
-
Just released something for you guys: https://jkhub.org/files/file/2773-ashura39s-male-basemesh/ can't wait to see what you make of it! a female mesh may follow
-
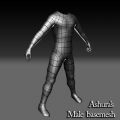
261 downloads
A simple male basemesh I made to build Jedi Academy or Jedi Outcast models around Feel free to use it, but if you do please mention me in your models readMe, happy modeling!