ent
-
Posts
554 -
Joined
-
Last visited
Content Type
News Articles
Tutorials
Forums
Downloads
Everything posted by ent
-
JKChat A.K.A. Jedi Knight mobile application
ent replied to ent's topic in Jedi Knight General Discussions
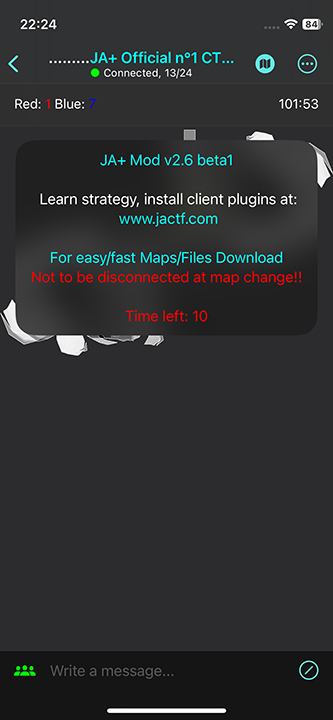
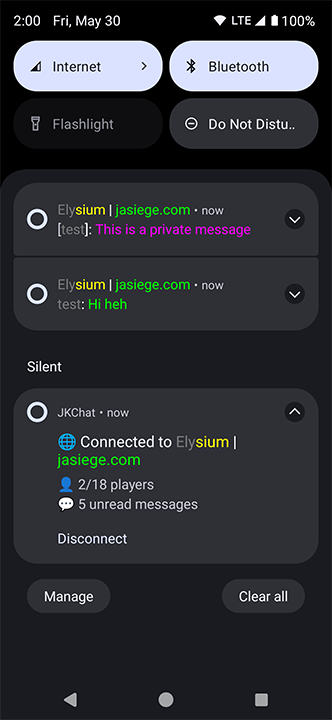
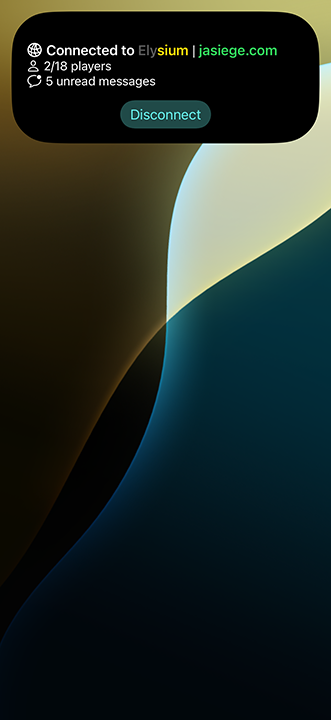
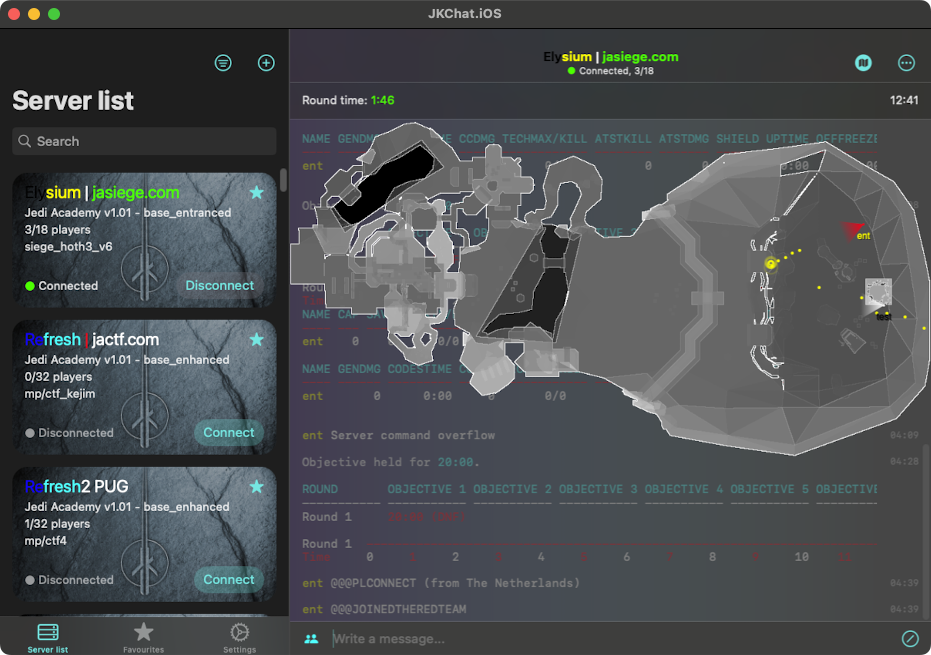
Updated the app. For iOS users: Install TestFlight: https://apps.apple.com/app/testflight/id899247664 Then open that link on your iOS device: https://testflight.apple.com/join/5HSqhVHw For Android users: Install directly from APK: https://www.dropbox.com/s/ptx301a1pas39n9/com.vlbor.jkchat.apk?dl=1 Install from Google Play: https://play.google.com/store/apps/details?id=com.vlbor.jkchat Changed: - added minimaps in chat - added center print message in chat - added merging info messages into one - added scores and game timer in chat - added team colours highlighted in server info - server info updates are synchronized across apps pages and widgets - Android: replaced navigation Animations to match Material Design 3 guidelines - Android: improved notifications to show colourful messages - Android: fixed hanging out Widgets with always displaying the loading indicator - iOS: added Live Activity to show connection status, players and messages count when minimized - iOS: fixed never loading data in Widgets on iOS 18 - iOS: improved gradients animation on screen size changes Oh no, it's a new JKChat update again with a lot of cool features. Minimaps! The feature explains itself. But let me talk more about it. The chatting itself is fine but sometimes it feels like you are missing the game context when the in-game players start playing and chatting less. And minimaps partially solve that issue fortunately. You can see players, their names, shots, impacts, flags and players in vehicles. Unfortunately, many game entities are only visible in a close range, but with minimaps I added some extra predefined commands to help spectating other players. Just hit the [/] button and select /follownext or /followprev to cycle through players you want to follow. An eye emoji 👁 will appear next to the spectated player. Or select /team spectator or /follow to get back to the ghost spectator. The minimap is displayed on top of the chat page and shares place with chat messages. So, to let them not compete with each other only one can be focused: either the minimap or the chat. To toggle the focus just hit the Map icon on top. The app is bundled with generated minimaps for JA SP, JA MP, JO MP, and some JA custom ones. I thought about a way to let users manually upload maps or provide a link to them but for now I decided to put more resources to finishing the minimap feature and make the update. Maybe some other big update will get a feature for providing maps by users but now the proccess is manual and bound to the app updates. For the minimaps generator big thanks to Tom. The only limitation for now is it does not support Q3 maps, so only JK games minimaps are bundled. If you want me to add more minimaps, just tell me which maps you want and I will bundle them with the next update. If you want me to extend minimaps features to display more information I am very open to discuss it! To continue the improvement of the missing game context issue, I also added scores on the top left and game timer on the top right. Another feature is center print messages. They are usually appeared when you just connected to a server to see some introduction text, but sometimes they also get displayed mid game on some events like someone joined the game etc. For iOS users I added Live Activity feature that displays connection status, players and unread messages in either Dynamic Island or as a notification in the Notification Centre. Following the Live Activity feature I improved the Foreground notification on Android that now displays all the same data but in colours just like in game. Notifications on Android also are colourful now. Some servers display much information in the game console like statistics or other game data that is formatted to be table-like. That data is usually sent as separated info messages. And it's better to see all the info together. So now such messages get merged into a single one that you can horizontally scroll and see everything properly formatted. And the last highlight is server info synchronization. If you connected to a server, its info is updated in Favorites, in Server List, in Widgets. If you refresh a Widget then the new server info will also appear in the app pages. Thanks.
-
----------------------------------------------------------------------------------------- System Requirements ----------------------------------------------------------------------------------------- OS Version: Android 4.1 or higher. CPU with clockrate 1000 MHz or more. GPU with OpenGL-ES 1.0 support or higher. RAM: 128 MB or more. Free disk space: 1.2 GB or more (for the game assets). ----------------------------------------------------------------------------------------- Android Permissions ----------------------------------------------------------------------------------------- 1. Privacy: - modify or delete contents of your SD card; - read the contents of your SD card. (to read game files and write such files as configs, logs, demos, serverdata, screenshots etc) 2. Device Access: - full network access; (to be able to connect on servers) - control vibration. (for vibration effect on explosions) ----------------------------------------------------------------------------------------- Installation ----------------------------------------------------------------------------------------- Put jaMME.apk file to your Android device and open it to install the application. Put assets[0-3].pk3 to [game folder]/base folder on your device. [game folder] is your custom folder that you suppose to create. ----------------------------------------------------------------------------------------- Startup ----------------------------------------------------------------------------------------- Select the folder where your base folder with the game assets is ([game folder] that mentioned above). Optionally type startup arguements in format: +command1 value1 +command2 value2 etc. ----------------------------------------------------------------------------------------- General Input Interface ----------------------------------------------------------------------------------------- Use screen as a touchpad to navigate cursor. Two fingers tap opens the console and activates text input. Two fingers long tap will take in-game screenshot. Menu/options/settings key opens the console and activates text input. Back key equals to ESC key. While the console is active and fullscreen swiping vertically will scroll the console. While the console is active and 1/4 screen swiping vertically will scroll last typed commands. Long tap will paste text from clipboard if the text input active. Intefaces for the certain game elements are listed below. ----------------------------------------------------------------------------------------- Input Interface in Main Menu ----------------------------------------------------------------------------------------- Tap equals to MOUSE1 click. ----------------------------------------------------------------------------------------- Input Interface in Game ----------------------------------------------------------------------------------------- Tap will open chat mode and activate text input. 2nd tap will open team chat mode and activate/leave text input. Long tap will show scoreboard. Volume up key switches POV to previous player to follow. Volume down - next one. ----------------------------------------------------------------------------------------- Input Interface in Demos ----------------------------------------------------------------------------------------- Tap pauses or unpauses the demo playback. Long tap will cut the demo with the set cut range (use cut thumbs when paused). Swiping horizontally will rewind or fast forward demo. Volume up key switches POV to the previous player in range. Volume down - next one. While paused seekbar with cut thumbs will be displayed. Moving seekbar thumb will rewind or fast forward demo. Moving cut thumbs will rewind or fast forward demo and set the cut range. ----------------------------------------------------------------------------------------- Out of the Game ----------------------------------------------------------------------------------------- Demo files such as dm_26, dm_25 and mme are associated with the jaMME application. Opening those files will start jaMME and play those demos back. ----------------------------------------------------------------------------------------- Higher FPS config ----------------------------------------------------------------------------------------- Android devices are not that powerful as big computers and the game mays lag, so here is a config to make the game work as smooth as possible: seta cg_simpleItems "1" seta cg_speedTrail "0" seta r_vertexlight "1" seta cg_shadows "0" seta r_lodbias "2" I hope you found this information helpful. Good luck and have a nice day. -- ent
-
This tutorial will be about two different ways to make the depth of field (DOF) effect in videos captured with jaMME. They are constant and variable (scriptable) DOF. ----------------------------------------------------------------------------------------- Constant DOF ----------------------------------------------------------------------------------------- Constant DOF is also divided in two different ways. The first is capturing a DOF mask. To activate this way of DOF you have to set the cvar "/mme_saveDepth 1". The DOF mask output will be in grayscale with dark colours for the nearest objects and light colours for the farthest ones: This output will be captured as a parallel one to your regular one with an additional ".depth" string in its name. So you will have 2 more screenshots/videos. And the regular screenshot: Then you'd need to use additional software to apply a blur effect to your regular image by using the DOF mask. Example for Adobe After Effects: http://q3mme.proboards.com/thread/21/after-effects-tutorial-depth-field To adjust the focus point - the position between the darkest and the lightest parts (aka gray centre), you need to use the cvar "mme_depthFocus". Try values between 0 and 2048. I suggest using 1024. To adjust the length of "flow" between black and white - the range from focus to far and near objects, you need to use the cvar "mme_depthRange". It just adds and subtracts its value to "mme_depthFocus" to count the farthest place (white) and the nearest (black). Try 512 or a higher value. If it's over the value of "mme_depthFocus" then the black part will start behind the camera. Quick setup: 1. Start demo and pause at needed moment 2. Type in the console "/mme_saveDepth 1" 3. Type in the console "/mme_depthFocus 1024" and "/mme_depthRange 512" 4. Type in the console "/capture avi 30 doftest1" 5. Unpause demo 6. Wait until it captures what you wanted and pause again 7. Quit game and find "doftest1.000.avi" and "doftest1.depth.000.avi" 8. Follow those instructions: http://q3mme.proboards.com/thread/21/after-effects-tutorial-depth-field The second way to capture DOF makes a more realistic DOF. Instead of capturing a mask which would require being post-edited, it can create a single output with an already captured DOF. How does it work? The solution is simple: it just captures a bunch of frames with a little camera offset around one focus point each. Then it merges them together similarly to how motion blur merges frames, then saves them in one. The more frames it captures - the more realistic it looks. To set the amount of frames that will be captured for final output, you need to use cvar "mme_dofFrames". WARNING: if it's 0 then it won't work. It looks rather cool with a value of 40 or higher. Max is 256. IMPORTANT: the more value is set - the longer capturing will be. Think like this: if "mme_dofFrames" is 40 then the output will be capturing 40x longer (maybe a bit faster though). To adjust the focus point, use cvar "mme_depthFocus" like in the previous way. Also if you are chasing any object, then DOF focus will be on that object with this way of DOF. To adjust the power of blur - how much camera is focused, use the cvar "mme_dofRadius". The value over 10 is something crazy. Quick setup: 1. Start demo and pause on needed moment 2. Type in the console "/mme_dofFrames 40" and "/mme_dofRadius 5" 3. Type in the console "/capture avi 30 doftest2" 4. Unpause demo 5. Wait until it captures what you wanted and pause again 6. Quit game ----------------------------------------------------------------------------------------- Variable (scriptable) DOF ----------------------------------------------------------------------------------------- Variable DOF is the one which can change its focus point and focused power (radius) by following a scripted instruction. Those instructions are just control points like in the camera or timeline modes. Each keypoint contains information about the focus point and the radius. It works with the same technique as the second way of Constant DOF. Therefore to activate it you need to set the value of the cvar "mme_dofFrames" to more than 0. TIP: DOF does not depend on your current view. Thus for the best result you should probably set the camera keypoints and lock the camera, so you will be editing DOF with an already prepared view. Start your demo, fast-forward to the needed moment and pause. To start working with variable DOF you need to switch editing mode to "Dof". You can be in any Chase or Camera view modes to edit DOF. Now press 4 and it will show "Edit:Dof" in the demo HUD and draw a red grid in the game world. The place where the grid crosses the world is the focus point and the thickness of the lines represents the focused power aka radius. Now you need to adjust DOF settings for the first keypoint. To adjust the focus point hold W and move your mouse. It will move the red grid in the world closer or more far from the previous position. After that hold SPACE and move your mouse again. It will change the grid lines' thickness with the radius value together (before, after). You can see the focus point position and the radius values in the demo HUD. Now press V to add a keypoint with the current values. Hold SHIFT and move your mouse to move in time. Then hold W, move your mouse, hold SPACE, move your mouse to get new values for the current view and add a keypoint by pressing V again. Repeat until you're finished with your cool moment and lock DOF by pressing R. WARNING: if you don't lock, your scripted DOF won't work, and the 2nd constant DOF will work instead. To delete a keypoint sync with it by pressing Q or E and then press B. You can also lock your focus point on any entity. Therefore you will always be focused on that entity, and keypoints will only be able to change the radius. To lock the focus point on an entity you should be in Camera view ("View:Camera" in the demo HUD). Just fly with the camera by holding MOUSE1 and using movement keys like in the regular Camera view. Hold MOUSE1 and MOUSE2 together to highlight lockable entities. Position your view so that entity will be in the center of the screen (highlighting box will be red) and click F. IMPORTANT: Remember to be in DOF editing mode. Now go through keypoints by pressing Q or E to switch to previous or next ones, and adjust them again if needed. So you are done now and it's time to capture. Type in the console "/capture avi 30 doftest3", rewind to the beginning of your editing (you can just hold Q to get to the first keypoint) and unpause to start capturing. You know how it works already. So there will be an output with captured scripted DOF in your "capture" folder. That's all. Quick setup: 1. Start demo and pause at needed moment 2. Type in the console "/mme_dofFrames 40" to activate 3. Press Z or X to switch to Camera view 4. Press 4 to switch to DOF editing mode 5. Hold W, move your mouse 6. Hold SPACE, move your mouse 7. Press V to add a keypoint 8. Move in time and repeat 5, 6 and 7 steps 9. Press R to lock DOF 10. Type in the console "/capture avi 30 doftest3" 11. Unpause demo 12. Wait until it captures what you wanted and pause again 13. Quit game Have fun. ---- ent
-
JKChat A.K.A. Jedi Knight mobile application
ent replied to ent's topic in Jedi Knight General Discussions
A smol update: - added date and time of the last widget refresh Redownload. The links are the same. -
JKChat A.K.A. Jedi Knight mobile application
ent replied to ent's topic in Jedi Knight General Discussions
iOS version with Widgets got approved and available on TestFlight. -
JKChat A.K.A. Jedi Knight mobile application
ent replied to ent's topic in Jedi Knight General Discussions
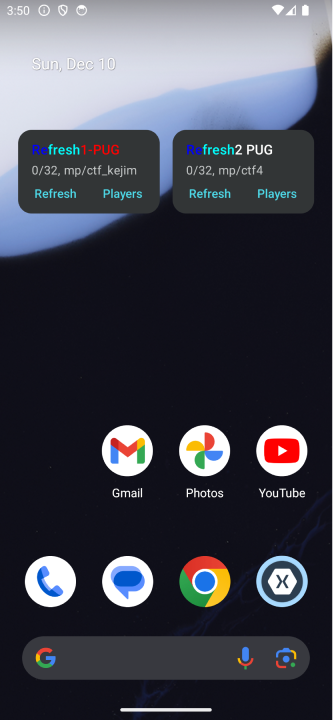
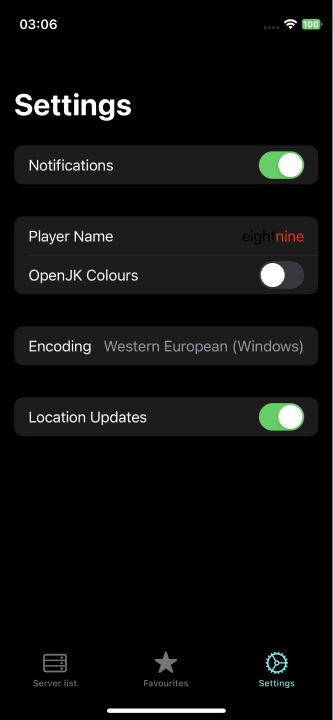
Updated the app. For iOS users: Install TestFlight: https://apps.apple.com/app/testflight/id899247664 Then open that link on your iOS device: https://testflight.apple.com/join/5HSqhVHw For Android users: Install directly from APK: https://www.dropbox.com/s/ptx301a1pas39n9/com.vlbor.jkchat.apk?dl=1 Install from Google Play: https://play.google.com/store/apps/details?id=com.vlbor.jkchat Changed: - added server monitor widgets - added push notifications - added light theme - added applied filter indicator - added OpenJK colours option - made filter lists order by selected - made dialogs with input autofocus - fixed crash after restoration on Android - fixed time font size in Chat on iOS Added Widgets to monitor favourite servers without opening the app or special server monitoring sites. The idea of home screen Widgets visited me pretty much long ago but I was "scared" to add it since I've never worked with Widgets before. But here they are so I faced my "fear". To add Widgets follow official instructions: https://support.apple.com/en-gb/HT207122 for iOS and https://support.google.com/android/answer/9450271?hl=en#zippy=%2Cadd-or-resize-a-widget for Android. To add a server for monitoring into a Widget you first have to add that server in Favourites in the JKChat app. To do so you need to filter out or search the needed server in Server List, tap on Star icon in the server card. Once you added the server you can go to your added Widget to edit it to monitor your special server. Android: tap on the widget and select the server to monitor from the list (Favourites). To refresh the list click Refresh button. To see players list click Players button. iOS: long tap on the widget, tap Edit Widget, tap Choose server, and select the server to monitor from the list (Favourites). To refresh the list click Refresh button. You can use middle and large sized Widgets to monitor players list as well. Tapping on the Widget with a server will navigate you to the app and open Server Info of that server. If you want to connect to the server or just open the app without any navigation you can select corresponding options in Settings. Widgets UI is made by me (comparing to the app UI by my wife) so they are not that pretty. Maybe they will look better in the future. I also properly implemented push notifications. They get triggered when you are connected to a server. Current triggers are: a player connects, you receive a private message, or a chat message contains keywords. All those things are configurable through Settings/Notifications. Tapping on a push notification will navigate you the chat. And the last highlight feature is themes. It is experimental or just proof of concept so don't expect much please. If you follow Apple and Google development guidelines (and I followed) then your Light and Dark themes can work out of the box. So basically I just enabled that was already available. Light theme is not adjusted to game colours so white colours can look invisible. If you encounter any error, then please report me either in the feedback form in TestFlight or in this JKHub post or in JKHub PM or on discord PM: ent#9404. Report the error either by copying it or taking a screenshot and showing me or just telling the steps to reproduce. Thanks.
-
JKChat A.K.A. Jedi Knight mobile application
ent replied to ent's topic in Jedi Knight General Discussions
@Circa Hi. I like options. Currently done like this, maybe it will look a bit different in the next release. Need more requests or bug reports - the app cannot be so well made in the latest release! x)
-
JKChat A.K.A. Jedi Knight mobile application
ent replied to ent's topic in Jedi Knight General Discussions
Updated iOS app: - fixed incorrectly working Favourites - fixed wrong fonts in chat - fixed backgrounds in server info and chat - fixed never saving filters Redownload the app. Links are the same. -
JKChat A.K.A. Jedi Knight mobile application
ent replied to ent's topic in Jedi Knight General Discussions
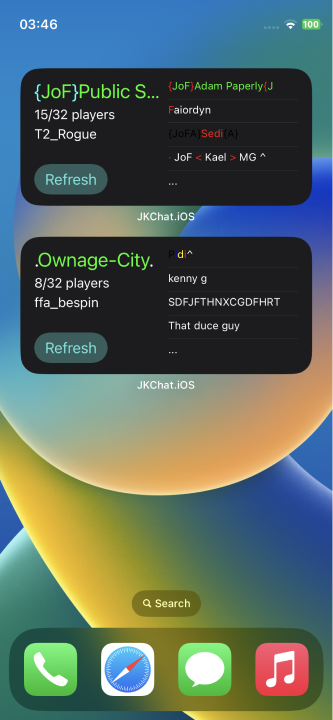
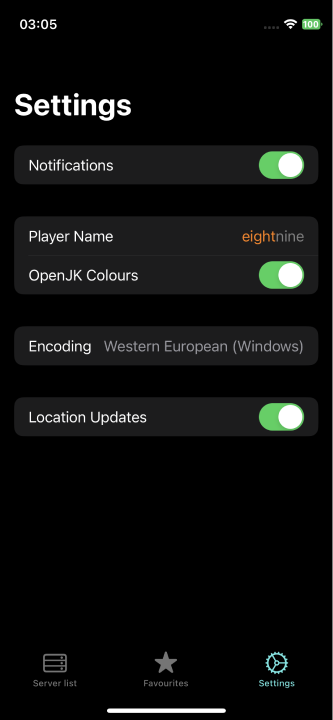
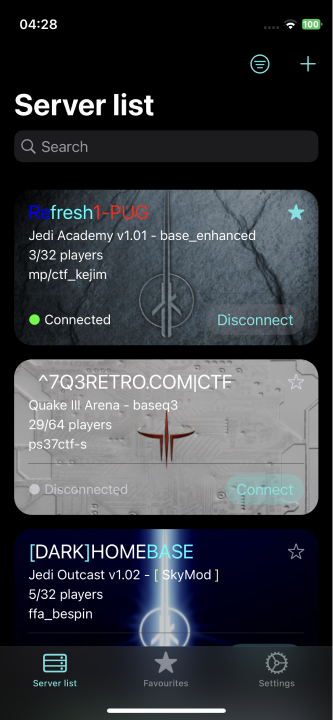
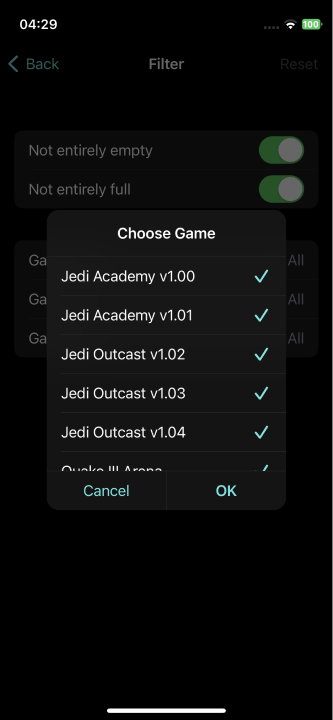
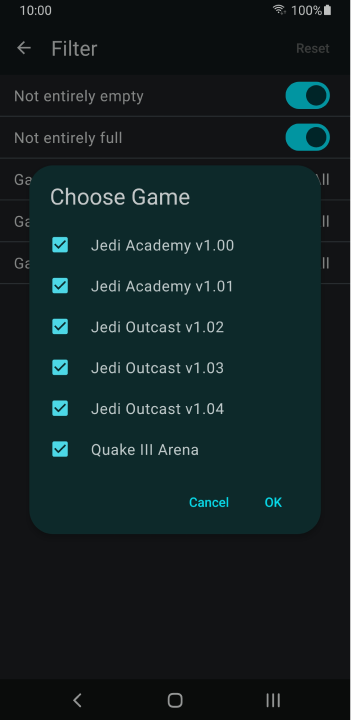
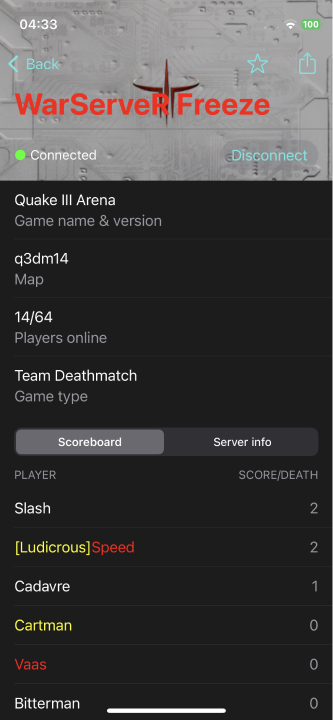
Updated the app. For iOS users: Install TestFlight: https://apps.apple.com/app/testflight/id899247664 Then open that link on your iOS device: https://testflight.apple.com/join/5HSqhVHw For Android users: Install directly from APK: https://www.dropbox.com/s/ptx301a1pas39n9/com.vlbor.jkchat.apk?dl=1 Install from Google Play: https://play.google.com/store/apps/details?id=com.vlbor.jkchat Changed: - changed visual appearance on Android: it now follows Google Material Design 3 (Material You) guidelines - changed visual appearance on iOS: it now follows Apple Design guidelines (HIG) - added filters - added favourites - added detailed server information including scoreboard and server cvars - added commands suggestions None expected but here it is. JKChat in a new shell with a lot of new features. The main feature is probably visual appearance. In the first version we decided to stylize the app with Jedi Academy colours and fonts. But then the app extended games support to Jedi Outcast and Quake III. So we decided to go with neutral appearance. And each platform provides what we needed. So we went wtih Material Design 3 on Android and Apple Design on iOS. Each of of those give us the ability to switch between light and dark themes, customize accent colour and support of accessibility features. Hope you like the new look. Current switching themes is not implemented (but it works!) since some colours has to be adjusted but it will appear in the near future for sure. Another long awaited feature is server list filters. You can choose to exclude empty or full servers, choose games, their mods and game types. And additionally to that you can add servers to favourites to not bother with filters at all or do that once. Also we added server full information page where you can see scoreboard and server cvars, or share the server with others. And for those who likes to use commands in the game we added a "/" (slash) button in chat page with commands suggestions. There are only few commands as proof of concept but feel free to suggest more depending on a mod (like JA+ commands etc). All those features were done in a hurry and not well tested, so please test and leave your feedback so I can fix all the bugs asap. If you encounter any error, then please report me either in the feedback form in TestFlight or in this JKHub post or in JKHub PM or on discord PM: ent#9404. Report the error either by copying it or taking a screenshot and showing me or just telling the steps to reproduce. Thanks.
-
JKChat A.K.A. Jedi Knight mobile application
ent replied to ent's topic in Jedi Knight General Discussions
Updated the app. For iOS users: Install TestFlight: https://apps.apple.com/app/testflight/id899247664 Then open that link on your iOS device: https://testflight.apple.com/join/5HSqhVHw For Android users: Install directly from APK: https://www.dropbox.com/s/ptx301a1pas39n9/com.vlbor.jkchat.apk?dl=1 Install from Google Play: https://play.google.com/store/apps/details?id=com.vlbor.jkchat Changed: - added a possibility to search in server list page - added a possibility to preview nickname in settings page - added a setting to set encoding for Jedi Academy in settings page - some fixes to properly run the iOS app on macOS on Apple Silicon After trying the application, please, leave a feedback of what you'd like see in the future. Yes, you can request any feature you want. It's not necessarily to be only limited to chat, I could implement other game features. Probably everything is possible that doesn't require game assets. Also if you encounter any error, then please report me either in the feedback form in TestFlight or in this JKHub post or in JKHub PM or on discord PM: ent#9404. Report the error either by copying it or taking a screenshot and showing me or just telling the steps to reproduce. -
JKChat A.K.A. Jedi Knight mobile application
ent replied to ent's topic in Jedi Knight General Discussions
The app got released on Apple App Store so it will never expire in 3 month like it does on TestFlight: https://apps.apple.com/app/jkchat/id1545850673 -
JKChat A.K.A. Jedi Knight mobile application
ent replied to ent's topic in Jedi Knight General Discussions
You are close to the idea we got as well: @TriForce -
JKChat A.K.A. Jedi Knight mobile application
ent replied to ent's topic in Jedi Knight General Discussions
Updated the app. For iOS users: Install TestFlight: https://apps.apple.com/app/testflight/id899247664 Then open that link on your iOS device: https://testflight.apple.com/join/5HSqhVHw For Android users: Install directly from APK: https://www.dropbox.com/s/ptx301a1pas39n9/com.vlbor.jkchat.apk?dl=1 Install from Google Play: https://play.google.com/store/apps/details?id=com.vlbor.jkchat Changed: - added a possibility to add a server manually by IP or URL ("+" button on the screenshots) - fixed crashes or undefined behaviour when restoring the app from suspension on Android - fixed appearance on iOS 16 - fixed freezes on launch with bad internet connection After trying the application, please, leave a feedback of what you'd like see in the future. Yes, you can request any feature you want. It's not necessarily to be only limited to chat, I could implement other game features. Probably everything is possible that doesn't require game assets. Also if you encounter any error, then please report me either in the feedback form in TestFlight or in this JKHub post or in JKHub PM or on discord PM: ent#9404. Report the error either by copying it or taking a screenshot and showing me or just telling the steps to reproduce. -
1. Introduction Hello all! Today I'm gonna tell you a bit more about different blur styles and settings that you can use in jaMME. Hopefully it will help you pick the right settings for your material. As you probably know, there are several commands which affect the way mme will blur your frames. Those are: mme_blurframes [0-32] mme_bluroverlap [0-32] mme_blurtype [gaussian,triangle,median] mme_blurframes determines the amount of frames that is taken into the blending. the bigger the number, more smooth the final image is, but also longer processing is required. mme_bluroverlap is similar to blurframes, but it is the number of frames that are kept from previous frame and blended into the new frame. higher number results in smoother image. mme_blurtype governs the algorithm of the smoothing. The tutorial is divided in few sections. Hope you'll enjoy it. 2. Theory In case you are not interested in the beneath the hood part, you may skip to next section, but at least check the "in short" part. This will get slightly mathematical and all. First lets say a bit on different blur shapes. Triangle It is the simplest of blurring methods. It uses the linear average between multiple pixels. It is what is more commonly referred to as mean average. Mathematics: Example 1: (2 + 4 + 3 + 11) / 4 = 5. Example 2: (2 + 4 + 3 + 111) / 4 = 40. Store all pixel data into a 3d matrix, with width [x] and height [y] the size of a single image and "length" [z] of the mme_blurframes. For each [x,y] calculate the linear average of all [z]. That is your new image. Example 1: We have only one gray-scale pixel over 4 frames, with values of 0 (black) - 255 (white). [0,100,5,255] -> [(0+100+5+255)/4] -> [90] As a result we have a dark gray pixel. Example 2: We have only one gray-scale pixel over 5 frames with values of 0 (black) - 255 (white). [0,0,0,0,250] -> [(0+0+0+0+250)/5] -> [50] As above examples show extreme values have a big impact on final image. Gaussian Gaussian blur is based on the "gaussian curve" also known as "bell curve" (due to its shape). That curve is a representation of "probability" that some combination of events happens. Easiest way to picture it is if you take 3 dice with 6 sides, throw them and add the numbers. You will get 10 or 11 as a result on average, and you will get 18, or 3, only extremely rarely. If you would write all that down on a graph, you would get the bell curve. Mathematical part is a bit hard to explain in short, but it gives most impact to average values, and very little to extreme values. Example 1: We have only one gray-scale pixel over 4 frames, with values of 0 (black) - 255 (white). Note that the result is not accurate, it is my own estimate. http://auri.co.uk/files/images/forum/mme/smilies/wink.gif [0,100,5,255] -> [50] As a result we have a very dark gray pixel. Example 2: We have only one gray-scale pixel over 5 frames with values of 0 (black) - 255 (white). [0,0,0,0,250] -> [(0+0+0+0+250)/5] -> [3] As you can see extremes have an impact to final value but it is very low. Median Median blur is a blur based on the median of numbers. It is also a way to determine the average (like linear and gaussian are). In statistics median is the number dividing the higher half of some sample population from the lower half. It has a tendency to completely ignore extremes, and it is always a value that appeared, therefore being an existing value within that population, and not some value that is derived from a calculation (and might not be a part of that population). Example 1: We have only one gray-scale pixel over 5 frames, with values of 0 (black) - 255 (white). [0,100,5,255,75] -> [0,5,75,100,255] -> [75] Example 2: We have only one gray-scale pixel over 5 frames, with values of 0 (black) - 255 (white). [0,0,255,0,255] -> [0,0,0,255,255] -> [0] Note how extreme values are sucked out of a median calculation, having absolutely no effect to final result. In short: Triangle (linear or mean) blur: extreme values affect the final result a lot. Gaussian blur: extreme values have an effect to the final result, but not so much. Median blur: Extreme values are ignored. 3. Action OK all that mambo-jumbo up there wasn't really that helpful. You know what would help you, don't you? Examples in actual movie making? Well here they are! Example 1: Capture settings: mme_blurframes 32, mme_bluroverlap 0, mov_captureFPS 30. Camera is static. http://i1.minus.com/i2dZ4tFwiZrlV.png Triangle http://i5.minus.com/ib1W1HcVJF7p0a.png Gaussian http://i6.minus.com/ibjyws0VhdhUTD.png Median Note the differences. On linear the player is well defined, but notice that edges are a bit sharp, and that even small things, like black edges on textures, effect the rest of the image (due to slow camera movement) and therefore that image is slightly darker. On gaussian the player is slightly less defined on edges, but still visible on entire area of the model. Rest of the image has better light and color data, due to reduction in extreme values. Notice that textures have the most sharpness of all 3 pictures. On median you can notice that the player looks ghostly. If he was moving faster, he would stop being visible! Note that textures look more blurred, but organically so, not like linear blur has them. On linear the textures are much less defined than on gaussian, yet look artificially blurred, unlike median. On gaussian the textures are well defined, yet smooth. On median the textures are heavily blurred, but notice that they are not recalculated, instead they look sort-off like our eye would see them (you notice that there is a texture going on, but you don't see it exact). 4. So what now? OK so you saw examples. What to look after when you go making your own movie? First, examine your material. And also decide what you are after. If you want sharp images, gaussian or triangle is the way to go. Triangle is much faster, at the cost of a bit less precise smoothing. If you want images that look as if the human eye would watch them, use median. Just be careful that nothing moves too fast on your capture, cause nobody will see it. Unless thats what you want, that is. In short it all depends on your time, and how much you consider enough. I've seen clips rendered in mme_blurframes 4 and mme_capturefps 200, than later merged in Vegas to 25 fps, that looked super-smooth (InstaUnlagged demo), and also clips that even on well over 12000 frames just don't look smooth enough (excessiveplus ctf run). Note that the faster the action, the more frames you should be using to keep the quality of blend good. But that usually also results in nothing being visible. Sometimes its better to go for less smoothness, in order to keep content clear. It is a delicate line, and walking it can be hard at times. 5. End Hope you enjoyed the read, and that it helped you. Keep the following in mind: mme_blurframes [0-32] Smaller value will render faster, but loose smoothness as action speed increases. mme_bluroverlap [0-32] Same as blurframes, but can be useful to even more increase the speed of rendering and amount of smoothness in the same time. mme_blurtype [gaussian,triangle,median] Gaussian gives that usual motion blur that you are used to. Good quality and speed. Triangle is fast, but tends to be a bit choppy. Median gives the look as if human eye was watching, so fast action is often not visible. But looks organic if done properly. Thats all folks, till next time. Credits: Foksie; original: link.
-
Hi This feature will make your capturing process a piece of cake. You save very much time and re-capturing stuff will also be awesomely easy. This tutorial: More details about project files Creating project files and a demolist Demolist capturing ----------------------------------------------------------------------------------------- More details about project files ----------------------------------------------------------------------------------------- Need to tell you about project files a bit more. Almost everything you change will be saved in them by default. That means: mme_blurFrames, mme_blurOverlap, mov_captureFPS, mov_captureName (screenies will be named like that) and so many more things. You can go into a project file and look how the settings are stored. It it a kind of html format and you can change everything in notepad. There's that cvar in it called mov_captureCvars. It saves which other cvars shall be saved in the current project file. If you change it, add some things, it will be saved as well. For example you might want to have mme_skykey saved in it for some keyed capturing. ----------------------------------------------------------------------------------------- Creating project files and a demolist ----------------------------------------------------------------------------------------- The aim of a demolist capturing is that you don't have to capture each demo yourself. You can capture everything, may it be first person, chase or normal camera or all 3 of them in one demo. A demolist runs demos and project files you specify. Now you think: Wha, who wants to cap all of his demos? Do I have to cut them before again? - No. You save the capture range in the project files. To do so, load a demo. Then either load a project file you already have or just don't, doesn't matter. Press 3 to switch to Timeline edit mode which contains capture settings. With shift + mouse go to the point in time where you want the capture to start. Then just hit T and it will give out that you marked the current time as capture start. Then go to where you want your capture to stop, hit G. Both points are marked now. They will be stored in the project file you save. Those both have to be set so the demolist knows where to capture. If one of them is not set, it will not capture. The view you're in will be saved in the project file to, so be sure to be in the right one when saving. I suggest capture settings to be done after you did a camera or else. Now when you want to save you can already start setting up a demolist. A demolist must be in the mme folder and can be in either .cfg or .txt format. You can save the current project file under a name and add the demo and the project file to the demolist at the same time. You can type "\save follow firstperson.txt". The second parameter is the name of the demolist file you want to add that to. Just look in your mme folder after to see what changed if you don't get what I mean yet. A demolist looks like this: demo1 prj1 demo2 prj2 demo3 prj3 ...and so on You have to do one project file for every capture you want to do. It is not possible to save two capture settings in one project file. If you want to capture a camera and the follow view, you need two project files. Kay, you set capture start and capture end in every project file and a demolist is created, let's go on to.. ----------------------------------------------------------------------------------------- Demolist capturing ----------------------------------------------------------------------------------------- There are two main ways to capture. Ingame and offscreen capturing. I recommend to do demolist capturing just like I do, I start it with a batch file. My current batch file looks like this: @@Echo off Start jamme.x86.exe +set fs_game "mme" +set mme_renderWidth "0" +set mme_renderHeight "0" +set r_multisample "8" +set r_multisampleNvidia "1" +set r_anisotropy "16" +set r_picmip "0" +demolist "firstperson.txt" Exit You should know many of those commands. I explain the ones you don't know yet: mme has custom settings for anti-aliasing and anisotropic filtering now. If you didn't already set them in your gfx card settings, you can set them seperately here. r_multiSample is anti-aliasing, r_multisampleNvidia enables/disables anti-aliasing (multisampling) for Nvidia cards, they seem to have some problems with it. r_anisotropy is the level of anisotropic filtering you want to have during a capture. Demolist is the command to run a demolist file from the mme folder. You can also run that in the JA menu manually by typing "\demolist firstperson.txt". You can avoid capturing in fullscreen by setting both mme_renderWidth and mme_renderHeight: It's the size that JA will be run at, but you won't see it. When starting the batch with those both set, a small 320x240 JA window will be shown but it stays gray during the cap. The thing you will see is the JA console which prints out server messages and also tells you when the capturing of all demos is done. This is called offscreen capturing. Using it, you can capture all day long while doing other things on your computer. Hint: Right now it's still needed that you have mme_renderWidth, mme_renderHeight AND r_multisample set to more than 0 to have offscreen capturing. I need to talk with Canabis about that. Just so you don't wonder why it doesn't work. ----------------------------------------------------------------------------------------- Quick Setup ----------------------------------------------------------------------------------------- 1. Load a demo 2. Press 4 to enter capture settings editing mode 3. Go to the point in time where you want your capture to start 4. Hit T 5. Go to the point in time where you want your capture to end 6. Hit G 7. Save your project file for that cap with "\save <prjname> <demolistname>" 8. Set the right settings in the batch file 9. Run the batch file 10. Wait until the capture is done, be happy Thanks for listening and good luck. John Credits: John "auri" from q3mme crew; original: link.
-
There was a time before q3mme (therefore before jaMME). Some people created camera paths with their mouse in that time, the dudes who knew something about moviemaking used defrag to create all kinds of cameras. Even today still some movies come out with defrag-cams in them. You can also set original defrag-cams up in jaMME, here is how to do it, it is not even hard. 1. Choose which object to chase 2. Create the camera path ----------------------------------------------------------------------------------------- Description ----------------------------------------------------------------------------------------- Indeed you hear right, chase object. Defrag cameras are usually chase cameras. Now you ask yourself, "Why don't I use the Chase camera then?". Well, there is a big difference between Chase camera mode and Defrag camera mode. I just call them like that, they don't really have names, hehe. So: In the chasecam you lock your camera to an object. The camera will always look at the object but also follow its position! Defrag cameras in contrast to that: The camera will always look at the object, but not follow the object's position. Like this you can easily create some very stylish cameras like you might have seen in so many defrag movies. Here is how you do it... ----------------------------------------------------------------------------------------- Choose an object to chase ----------------------------------------------------------------------------------------- Whether you want a rocket, a grenade, a player, ammo, armor or weapons laying around, go fly to that object in camera view mode and camera edit mode. The defrag-like camera is done in the first editing mode. You may hold both mouse buttons now to see which entities you can lock on. If you chose something sweet, hold mouse1 while looking straight at the entity, then hit the F button. The entity is marked with white borders. Done with this step, not really hard, huh ----------------------------------------------------------------------------------------- Create the camera path ----------------------------------------------------------------------------------------- Similar to the normal chasecam, you notice that you cannot move freely anymore now. You always need to hold mouse1 down to be able to change your position. You can use the keys A S W D to move around, the camera will always look at the "defrag-object". Now just create a camera path like you always did before with the V button and so on (I really hope you read any other tutorial before this, so you know what I talk about, ..you meanie). Later on, lock the camera with R and capture it then. Finished. Note: I wrote this tutorial already before mme 1.5 is out where the function is working very well. It might be a bit nasty in 1.4 to keep the camera locked to the entity, but you might find out. 1.5 is close! Good day, fun with trying this. ----------------------------------------------------------------------------------------- Quick setup ----------------------------------------------------------------------------------------- 1. Load a demo 2. Go to camera view mode by typing "/view camera" or use the X and Z keys 3. Go to camera edit mode by pressing 1 4. Move over to an object you want to chase with the defrag-cam 5. Look straight at it, hold mouse1, hit the F button, you're locked now 6. Move around, make up a camera path 7. Capture it, eat it or whatever, good luck Credits: John "auri" from q3mme crew; original: link.
-
Third tutorial, for the third editing mode, Timeline There are two different types of using time in jaMME: 1. Have a constant timescale all over the demo 2. Have a variable timescale, changing during the demo ----------------------------------------------------------------------------------------- Constant timescale ----------------------------------------------------------------------------------------- For sure you already searched for a command like "timescale" but that one does not work for jaMME. You can edit the whole demo speed with one command called "speed". Often you will record very nice camera runs, but when you playback them, you see that the camera moves much too fast and it rather confuses the watcher. You can for example open the console and type "speed 0.5". The speed of the playback will change, that includes camera runs as well, everything will be in half speed, just as if you applied a timescale. Note: You can only apply 1 value for the speed command, there is no keypointing for it. Use it to get a constantly slower or faster playback of a demo. ----------------------------------------------------------------------------------------- Variable timescale ----------------------------------------------------------------------------------------- The variable timescale feature is used to affect the playback of the action in the demo, but not the camera run. Load a demo and pause it. Press "3" to enter the timeline edit mode. The display will show "Edit: Line". I suggest timeline adjustment to be done before adding a camera path, else the camera run will not fit the action anymore. You can set the view to either Camera or Chase, it does not matter in which view you edit the timeline in. If you hold mouse1 down while in camera view mode and in timeline edit mode, you are still able to move arround. This is how you edit the timeline: You add timeline keypoints and set a timeline speed value for each keypoint. That may remind you of Sony Vegas and its velocity envelope. You use the timeline exactly the same way. The time between two points will fade so it reaches the next keypoint smoothly and will not have certain jumps from normal time to slow motion or so. ----------------------------------------------------------------------------------------- Keypoints for variable timescale ----------------------------------------------------------------------------------------- You need to set the first keypoint to be the basic speed of the demo, I always suggest to make it normal speed. Go to the start of the demo, press V to add a timeline keypoint. Now adjust the timescale value for this keypoint: Press R to lock the timeline. If it is locked, the keypoint information will show up in yellow font. Open the console and type the command for normal speed: "\line speed 1". IMPORTANT: Do not forget to lock the timeline by pressing R. If you don't, you cannot edit keypoints at all! You specified the timescale value for this keypoint. Now you can move forward in time a bit and specify the point where the fading to a slower timescale shall start. You press V again, the timeline will still be locked. Open the console, input the same timescale value again. If you then create a keypoint 1 second ahead with "\line speed 0.5" during playback the timescale will fade from 1 down to half speed in that second and then continue playing in half speed. You can also set the value to 0 for pause, as I obviously did in the tutorial video. If you have 0, the demo time is running, but the ingame time is on pause. So go forward some seconds in the demo time and then put another keypoint with 0 so the ingame time will stay paused for some seconds and then fade to a higher value again. IMPORTANT: The line speed cvar cannot be set to a value below 0, the demo cannot play backwards. I hope you understand the keypointing. If you worked with the velocity envelope in Vegas, you can easily do this. If there are questions, just post in General section. This might be a bit hard to do. ----------------------------------------------------------------------------------------- Quick setup ----------------------------------------------------------------------------------------- 1. Go into your demo, press 3 to be in timeline edit mode 2. Press R to lock the timeline, else you cannot edit keypoints! 3. Go to the start of the demo, press V and type "\line speed 1" 4. Go to 10 seconds, make a keypoint and type "\line speed 1" again 5. Go to 12 seconds, make a keypoint, type "\line speed 0" 6. Go to 15 seconds, make a keypoint, type "\line speed 0" 7. Go to 18 seconds, make a keypoint, type "\line speed 1" 8. Leave the timeline like it is, add camera runs.. This was an example of how you can create a paused section in your demo and here is how it works if you do it like this: The demo will play in normal speed from the start until 10 seconds. From 10 seconds to 12 seconds, the demo speed will fade down to 0. So from 12 seconds the demo will be paused. Until when? Until the second keypoint with "line speed 0", so until 15 seconds no movement at all. Since on 18 seconds there is a keypoint with normal speed again, the demo speed will fade up to 1 in the time between second 15 and second 18. After that it will play in normal speed again. You see, you need 4 keypoints if you want to slow down or speed up the demo for some time. The one in the beginning of the demo does not count. It only defines how fast the demo runs until you put the first keypoint after that. Try learning by doing. It is still a bit hard to edit the timeline. You cannot edit keypoints afterwards, only once yet. If you edited something in a wrong way or you want to change something, better delete the last keypoints instead of trying to change the line speed of a single one in between two others. Good day. John Credits: John "auri" from q3mme crew; original: link.
-
Make sure you read the first tutorial "How to set up a basic Camera" before you read this. I will refer to it. 2 easy processes: 1. Learn how to use the Chasecam mode 2. Lock the Chasecam and create a camera path ----------------------------------------------------------------------------------------- Learn how to use the Chasecam mode ----------------------------------------------------------------------------------------- Choose a demo, put it in the mme/demos folder, start "launch_jaMME.cmd" from the GameData/custom folder, type "\demo <demoname>" and press C when the demo is loaded to pause it. We know how the Camera mode works, now we will learn how to edit a complete Chasecam run. 1. To enter the Chasecam edit mode, press "2". 2. To enter the Chasecam view mode, press X or Z until it says "View set to Chase". 3. Press F to "leave" recorder's pov. Now you see a 3-dimensional white cross in the middle of the screen I hope, it is the marker. ----------------------------------------------------------------------------------------- Lock the Chasecam and create a camera path ----------------------------------------------------------------------------------------- The most important thing in the Chase mode is locking to objects. In contrast to the normal Camera mode the Chasecam always follows objects with its postion. How do you find out which objects you can lock the Chasecam on: Hold mouse1 and mouse2 at the same time, then all available objects will be marked with red borders. You can actually lock on all entities: Players, projectiles (rockets, grenades, blaster shots, other "flying" shots), thrown sabers, weapons, ammo, health, armor and powerups. Lock on a certain object: When you chose an object you want to chase, look at it straight so that the white cross is placed above it. Now hold down mouse1 and then hit F. The object will be surrounded by white borders to show that it is now the chased object. (To release a chased object, press F at anytime while holding mouse1) Your movement is limited now, here is what you can change: The keys W, A, S, D are of no use anymore now. You can change the angle of the Chasecam by holding down mouse1 and then moving the mouse. You change the chase distance (distance between Chasecam and chased object) by holding the Spacebar and moving the mouse left and right. Play around with it a bit so you get used to it. Then start to create a complete Chasecam path. You do it the same way as in the Camera mode: You change the position and angle of the Chasecam, add a keypoint by pressing V, then move forward or back in time by holding down SHIFT and moving the mouse and create more keypoints. When you have finished the path, you want to view the Chasecam run you created. Go to the first keypoint and now press R! If you don't press R, the Chasecam view will not be locked. You will see the view following the player, but angles and distance of the Chasecam will not change. When you are locked to the Chasecam view, press C to unpause the demo and watch what you created. Of course you can edit the Roll of every keypoint as well by holding mouse2 when editing a keypoint and moving the mouse. ----------------------------------------------------------------------------------------- Quick setup ----------------------------------------------------------------------------------------- 1. Load a demo and pause it with C 2. Hit "2" for Chasecam edit mode 3. Hit X or Y until it says "View set to Chase" 4. Move the white marker over an object you want to chase 5. Hold mouse1, then hit F to mark it 6. Hold mouse1 and move the mouse to change the angle 7. Hold the Spacebar and move the mouse to change the disctance 8. Set up keypoints by pressing V 9. Type "\mme_blurFrames 20" 10. Go to the first keypoint by holding down Q 11. Type "\capture tga 30 ChaseTutorial" 14. Unpause the demo with C to capture 15. In windows: all you need is a simple vdub script with framerate set to your final project fps Greetings, John Credits: John "auri" from q3mme crew; original: link.
-
Requirement: one demo Let's imagine your demo is called platypus.dm_26 Put your demo into the folder /mme/demos. Start jaMME with the launch_jaMME.cmd. Go to the demos menu and find platypus, then doubleclick it. The demo loads. When it finished loading, it plays in recorder's pov. Press C to pause the demo - it always helps to get an overview and you do most of the editing in the pause mode. There also are three editing modes: Camera, Chase and Timeline. I will only talk about the Camera mode now. We will go through 3 processes: 1. Create keypoints for a camera path 2. Check the path and do last adjustment 3. Capture the camera run ----------------------------------------------------------------------------------------- Creating Camera Keypoints ----------------------------------------------------------------------------------------- To edit the camera, you have to be in the camera editing mode. You activate it by pressing "1". To see what you are doing you have to be in camera view as well. With the keys X and Z you cycle through the three views until it says "View: Camera". Now I will tell you the basic controls. Hold down mouse1 to be able to move around. You always must have mouse1 (+attack) pressed in order to move in any way. You move with W, S, A, D in all directions, CTRL is move down and the spacebar lifts you up. Surely that is not hard, but you are not bound to player limits, you can spin in every direction, so be careful that you don't end up everything mirrored. Time control. Shift is the time-key. Hold down shift and move your mouse to the left and right to adjust the time. This is how you go forward and back in demos. If you want it to be faster, you can jump in 4-second-steps forward and backward: Hold down shift, then tap A to jump 4 seconds back or tap D to jump 4 seconds forward. You can adjust the time that you jump forward or backward with the cvar mov_seekinterval. Default is set to 4000 miliseconds. Now we will start with the first keypoint. Move to the time in the demo where you want your camera run to start. Then set up a camera angle with a nice view on the player. 1. Press V to create a new camera keypoint. 2. Now you will create more keypoints for the whole run: Hold shift again and go forward in time until the point when you want to have the next keypoint (That surely will be either if the camera stays too far away from the player or the player moves out of view). Hold mouse1 down again, move to the position you want your next keypoint at and press V. Repeat this as often as you want to create your run. Don't do the keypoints too fast after each other. One per 2 seconds often fits. If you do too many, it will look very weird and not smooth anymore. If you don't do enough of them, the camera will follow the player too straight and that might be through walls, so always do keypoints on corners. Now you have a complete run, you will see a red line that shows the way of the camera. The red 3-dimensional crosses are your keypoints. The camera path does not touch all of them. ----------------------------------------------------------------------------------------- Minor Keypoint Adjustment ----------------------------------------------------------------------------------------- When placing the keypoints, the view might be a slightly different from the view from "inside" the camera. To check how your camera run looks from the "inside", press R. Your view will be locked to the camera path. Now it is time to test your path for the first time. With the keys Q and E you can go through all your keypoints. So press Q several times until you reach your first keypoint or hold it down to be even faster. Now press C to unpause the whole demo and watch the camera go along its path until the last keypoint. Then pause the demo again. You might have seen, the camera keypoints are not exactly in the position you want them at. Go back to the first keypoint, still with the view locked to the camera. Now, just hold mouse1 and adjust the position of the keypoint. You do that with every keypoint once now, that is done in like 1 second for each. One more very cool function: Roll. When adjusting a keypoint, hold down mouse2 and move your mouse to the left and the right to set the roll of your camera. Nothing more to say to it, you can edit that for every single one When you have finished adjusting all keypoints, your camera run is finished. Time for... ----------------------------------------------------------------------------------------- Capturing your camera run ----------------------------------------------------------------------------------------- Now when you want to capture, you should know if you want to have any motion blur or not. mme_blurFrames defines motion blur strength. 0 is no motion blur and I think 32 is the max needed. You won't see differences above 32 anymore. There are three kinds of blur included. They are triangle, median and gaussian. They are not easy to describe. Test them yourselves please. You define them by setting the cvar mme_blurType. Default: "\mme_blurType gaussian" If you want motion blur: Open the console, type "\mme_blurFrames <number>", press enter. Values between 12 and 32 give nice motion blur, but for the lower values, it still lets you see frame edges. Now you want to start capturing. Your demo still is paused, you go back to the very first keypoint, the view shall be locked to the camera path now, else nothing will happen. Open the console and define how many frames per second you want. I recorded this clip with 30, motion blur is already included, so I typed: "\capture tga 30 BasicCam". Before you unpause the demo, to get rid of the visible path line and the information in the upper left corner, hit the 4. Another useful feature is soundcapturing, it is included since version 1.5. If you have the cvar "mme_saveWav" set to 1, an uncompressed wavefile will be saved in the same folder as the screenshots. After you unpause the demo capturing will start, the screenshots will be saved in the folder mme\capture\platypus\ and be named BasicCam0000000001.tga and so on. Note: Capturing only happens when the demo is not paused. The capturing of course takes a while, if you should not have known, capturing does not happen in real-time ;D When the path ends and your camera stands still, type "\capture stop" into the console. Your finished capture should be in the quake3\mme\capture\platypus folder. You should bind at least the capture stop command for later recording. If you are unhappy with the camera path, just get the camera view locked and check every keypoint, change its position or roll. If you want to delete a keypoint, press B. If you want to delete all camera points, you can type "\camera clear". Be careful with that, it doesn't ask before doing it. To show a list of all camera commands, only type "\camera" and press enter. You save all your camera points while in the demo with the command "\save CameraTutorial". Then the config file is placed into a folder called project. If you want to load a project into any other demo, put it in the right folder any type "\load <name>". Done. Note: Saved paths work on a per map basis not per demo, so you can re-use paths in other demos with the map if you need. ----------------------------------------------------------------------------------------- Quick Setup ----------------------------------------------------------------------------------------- Quick key commands list also see: mmedemos.cfg (Print this out for easy caming while learning!) C = Pause 1 = Enter camera mode X, Z = Cycle views [Camera, Chase] W,A,S,D while holding mouse1 = Move the camera CTRL = Move down SPACEBAR = Move up SHIFT + move the mouse = Time control V = Create keypoint B = Delete keypoint R = View camera's perspective Q, E = Change to other key points mouse2 + move the mouse = Camera roll 4 = Get rid of all HUDs \mme_blurFrames [0 - 32] .. higher is more blendy \capture tga 30 cam1 [format, fps amount, screenshot filename] \save project1 \load project1 Quick setup for capture (by fei) 1. Load jaMME with the .cmd 2. Exec your high_quality.cfg 3. cl_noprint 1; cg_thirdperson 0 (just in case) 4. \load cam1 (Whatever was the file name that you saved your cam path before) 5. Navigate in your demo to the time when the cams start, then hit "C" to pause 6. Hit "1" to go into Camera edit mode 7. Hit "X" till you get to Camera view mode (Free flight, sorta like defrag) 8. "Q" and "E" to navigate through the keypoints 9. Hit "R" to get into the camera perspective 10. Hit "4" to remove the junk from the screen. 11. \capture tga 30 cam1 12. \mme_blurFrames [0 - 32 is a good range] to set your motion blur amount 13. Hit "C" to unpause and begin capturing 14. In windows: all you need is a simple vdub script with framerate set to your final project fps. Greetings, John Credits: John "auri" and fei; original: link.
-
----------------------------------------------------------------------------------------- Requirements ----------------------------------------------------------------------------------------- System requirements are same as Jedi academy ones. JA+ and JA++ features support: you will need to put JA+ pk3s that contain /models/players/_humanoid/[_humanoid.gla; animation.cfg; animevents.cfg] for JA+ animation and /gfx/effects/sabers/[RGB...; black...] with /shaders/[sabers.shader; sbRGB.shader] for JA+ sabers to your base folder. RGB sabers from clientOverride feature for any game mod: same requirement as above but for sabers only. ----------------------------------------------------------------------------------------- Installation ----------------------------------------------------------------------------------------- Download the latest version here: http://jkhub.org/fil...ile/1712-jamme/. Unzip it to your GameData folder or extract anywhere, then create folder base next to folder mme, put in there (base) assets0.pk3, assets1.pk3, assets2.pk3, assets3.pk3 from base from your original game path. If you did it right, there is a jamme.x86.exe and a launch_jaMME.cmd in your GameData/custom folder and a folder mme. Not so hard to do actually, hehe. If you want you can read through the other attached files: cvars.txt, cmds.txt and readme.txt. Installation complete. ----------------------------------------------------------------------------------------- Running it and loading a demo ----------------------------------------------------------------------------------------- You need a demo for this. Note: keep the demo name shortest possible, there have been problems for some users because their demo name was too long. It's something likefoldername+\+demoname.extension must not be longer than 64 characters. Mme reads demos from the standard demo folder base/demos or mme/demos (including subfolders). So stuff your demo into one of those, you can browse through all subfolders of the mme demos folder in mme itself so you can sort your demos in different folders if you have very many. To start jaMME, doubleclick launch_jaMME.cmd. JA will start with the mme mod loaded. You can now play a demo and see how it works. To do so, click on Demos. You're in the demo browser. Find your demo and doubleclick it. The demo will load and play in recorder's pov. ----------------------------------------------------------------------------------------- Basic controls and settings ----------------------------------------------------------------------------------------- First of all, let's say you only want to record some recorder's pov footage from the demo you loaded. In the other tutorials it's explained how to do cameras and all that funky stuff : ) So, you loaded the demo and it's playing from recorder's pov. Basic key commands you have now: C : pause / resume demo playback Hold Shift + move the mouse : control demo time Hold Shift + D : move 4 seconds forward in time (you can hold this down) Hold Shift + A : move 4 seconds back in time (you can hold this down too) With mov_seekInterval you can define how far forward or back you jump (in seconds) pressing shift + a/d, default value is 4. ----------------------------------------------------------------------------------------- Capturing ----------------------------------------------------------------------------------------- Now capturing time. You do not use the cl_avidemo command, it doesn't even work properly in q3mme because it's not useful. Several capturing options there: Frames per second, motion blur, name and soundcapture. mov_captureFPS defines how many screenshots per second are taken while capturing. Any value possible mov_captureName <name> defines a name for the screenshots for better overview. Screenies: Name0000001.tga mme_blurFrames 0-32 defines how many frames are blended together for motion blur mme_blurOverlap 0-32 defines how many already blurred frames are again blended together or so. Fiddle around with it. mme_saveWav 1/0 enable / disable sound capturing to a wav file while capturing I guess as beginner you don't need to set all of these. saveWav is enabled by default, that's enough, blurOverlap.. don't bother with that yet, it's 0 by default, leave that too. Set some blurFrames, every footage looks better with some blur in my opinion. Values from 12-24 give nice motion blur. You don't have to set mov_captureName and mov_captureFPS yet, you do it when you start recording. Now stop the demo by pressing C, go to the point in the demo where you want to start capturing by holding shift and using the mouse and/or the A and D keys. Open the console, type something like this: /capture <png/tga/jpg/avi> <fps> <name> Example: /capture tga 30 impressive Then bind capture stop to any key (/bind F2 "capture stop"). It does not record yet, it starts when you unpause the demo. Unpause the demo, wait until it's recorded, then press the capture stop key and you're done, the captured screenshots are in a subfolder of mme/capture together with a wave file with the ingame sound in it. Okay that's it right? Hehe, hope I helped you. Good luck and have a nice day. Credits: John "auri" from q3mme crew; original: link.
-
Yo. It's been a while since the last jaMME release. But the time has come. jaMME 1.11 is finally here. Windows: Android: Mac x86_64/arm64: Also thanks to tayst jaMME now has more frequent automatic builds (includes Ubuntu) that you can get jaMME binaries from without waiting for official releases: https://github.com/entdark/jaMME/releases/tag/latest Changelog: New cvars: - mov_smoothCamPos - mov_view6DoFRotation - mov_notify - mov_drawFollow - cg_relativeZoomSensitivity - cg_movementKeys* - cg_drawPlayerNames* - cg_crosshairColor - cg_strafeHelper* - cg_raceTimer* - cg_speedometer* - mme_demoEscapeQuit - cl_notify - con_scale - mme_saveCubemap - mme_combineStereoShots New commands: - find (subcommands) - multispec - script - book - speedometer - strafehelper As always the information about all cvars and commands can be found in cvars.txt and cmds.txt files that are placed in mme folder. Cvars: https://github.com/entdark/jaMME/blob/master/build/mme/cvars.txt Cmds: https://github.com/entdark/jaMME/blob/master/build/mme/cmds.txt 1. Virtual Reality (VR) capture To stay up to date with modern technologies I decided to implement a possibility to capture VR videos. Here are some examples (watch in your VR headset): Long story short: this is achieved by capturing cubemaps in the game and then passing them to ffmpeg (pipe) with v360 filter. To capture a VR video yourself set mme_saveCubemap to 1 and mme_pipeCommand to auto. Long story long: 2. Multispec feature Multispec feature lets you see multiple POVs simultaneously. Using the feature is pretty simple. Hit = (command: multispec add) to add a new multispec window. It will appear in the centre of the screen with a cursor that you can move and edit multispec windows. Put the cursor inside the window and click MOUSE1 or MOUSE2 to cycle through next or previous POV. Camera and Chase POVs are also options. Holding MOUSE1 and moving mouse will move the window. Scrolling mouse wheel will change window scale. Hitting DEL will delete the window. Hitting ESC or ENTER will finish editing. That's all, you got your multispec window. You can add as many windows as you want. More information and examples in the documentation. 3. Scripting console commands Script is a another keypoint-based mode that lets you execute console commands in certain moments in the demo. A few steps to use the feature: 1. Pause the demo. 2. Hit 5 to enter into script editing mode. 3. Hit V to add a keypoint. 4. Hit MOUSE3 to activate the editable demo HUD. 5. Select Run: and type some command, for example: "clientOverride player model reelo". 6. Move in time a bit. Repeat steps 2-4 but 4 with run: "clientOverride player model tusken". 7. Move back to the movement before the first keypoint. 8. Unpause the demo. 9. See how commands get executed in the exact moments they have been set to. Additionally you can edit Init: value in step 5. Init commands are guaranteed to be executed for all keypoints before current time when you rewind. Basically is used as a "reset" command. 4. Bookmarking demo time Sometimes you'd like to edit some moment in the demo but later since now you are editing another part so you can save that moment with bookmarks! Simple to use: hit 6 then hit V and it's added. Hit Q or E to jump between them. 5. Notifications You now get notified about demo event when your game is minimized/unfocused. Notifications could be textual, flashing and console. Basically they look like this: You can be notified about capture start, capture end and find command results. 6. Custom "bokeh" in DOF (credits: Tom Arrow) Now you can set a DOF mask that can basically be treated as custom "camera lenses" that create custom blurring shapes in DOF. Just use any grayscale image with cvar mme_dofMask, for example: mme_dofMask gfx/2d/dlight to use dynamic light circle as a dof mask. 7. Strafe helper Thanks to tayst jaMME got strafe jumping helper from jaPRO. Just use strafeHelper command to see what you can set up. Now go make some new fancy movies!
-
JKChat A.K.A. Jedi Knight mobile application
ent replied to ent's topic in Jedi Knight General Discussions
Updated the Android version with a few bug fixes: - a rare error with "Collection was modified" - inability to reconnect when you got disconnected from the server when the app was minimized - the app gets properly restored from suspension without "blank" chat page or just crashes Redownload. Links are the same. -
JKChat A.K.A. Jedi Knight mobile application
ent replied to ent's topic in Jedi Knight General Discussions
I have unlimited power. -
JKChat A.K.A. Jedi Knight mobile application
ent replied to ent's topic in Jedi Knight General Discussions
Updated the iOS version with shadow colours for text on JKII 1.02 servers. And fixed a rare crash. Redownload. Links are the same. -
JKChat A.K.A. Jedi Knight mobile application
ent replied to ent's topic in Jedi Knight General Discussions
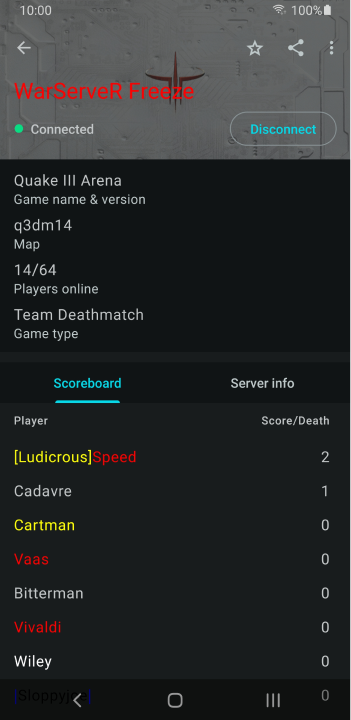
Updated the app. For iOS users: Install TestFlight: https://apps.apple.com/app/testflight/id899247664 Then open that link on your iOS device: https://testflight.apple.com/join/5HSqhVHw For Android users: Install directly from APK: https://www.dropbox.com/s/ptx301a1pas39n9/com.vlbor.jkchat.apk?dl=1 Install from Google Play: https://play.google.com/store/apps/details?id=com.vlbor.jkchat Changed: - added settings menu - added support for wide screens - added more animations and touch effects on Android - added crash analytics - added shadow colours for text on JKII 1.02 servers - fixed a crash on old Android devices (5, 5.1) - added Quake III Arena servers support After trying the application, please, leave a feedback of what you'd like see in the future. Yes, you can request any feature you want. It's not necessarily to be only limited to chat, I could implement other game features. Probably everything is possible that doesn't require game assets. Also if you encounter any error, then please report me either in the feedback form in TestFlight or in this JKHub post or in JKHub PM or on discord PM: ent#9404. Report the error either by copying it or taking a screenshot and showing me or just telling the steps to reproduce.