Brushes
As stated above, brushes are (usually) visible in a map. Almost any shape can be made with one or multiple brushes. The most complex shape you can possibly imagine can probably be created by several brushes, with some inaccuracies here and there. For starters, let's just make the most basic shape in the Quake III arena, a cube.
Open GTKRadiant.
Open any map (This tutorial opens the map "t3_rift_sample.map").
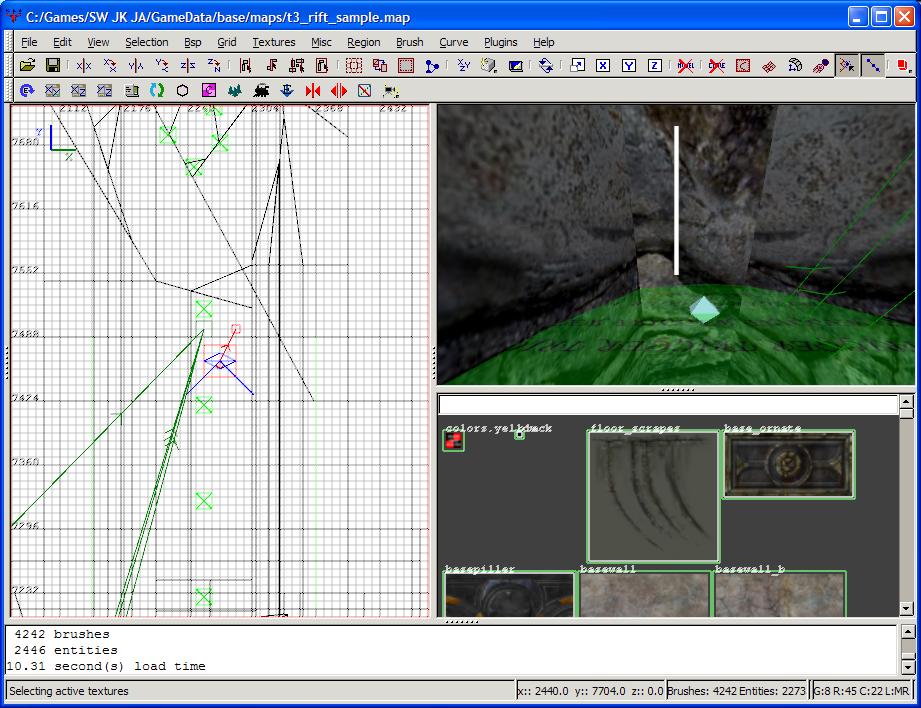
In the picture above, there are eight brushes, one entity, an angle arrow and three entity connection lines visible.
Eight brushes
(Seven rock-textured brushes and one trigger-textured brush)

One entity
(A light entity)

One angle arrow
(Side view)

Three connection lines
(Once you turn to the side, you will see there are actually four of them, but that doesn't matter)

There is also something in every map known as the origin. Please pay careful attention to this term. In case you don't know, an origin is the point where something begins or where it comes from. All maps are laid out on a coordinate system, so there are positive numbers and negative numbers on all 3 axes. There is one point where they all meet, and that point has the coordinates < 0, 0, 0 >. This is known as the origin of the map (it is at the very center, if you haven't guessed). Everything else in the q3 engine has an origin, too, but for brushes, you don't need to worry about them too much. Radiant takes care of them for you. Entities are another story.
Take a look around, and familiarize yourself with what you see. The brushes make up the tunnel the player starts in. The light entity changes the brightness and color of these brushes. The angle arrow is coming from the info_player_start entity, and that will be covered later. Finally, the connection lines are indicating that one interactive object is connected to another interactive object. If anything confuses you, and some of it should, it will be covered. Hang in there!
Let's go over the very first thing in what was mentioned - brushes. They are everywhere. In quake, you will use them more than anything else to make a map. There are a few basic concepts you need to understand about these useful little things, though. If you've ever worked with 3d programs before, you may have used vertices, or vertexes (Pronounced: VER-tis-eez and VER-tex-ez, respectively) to drag things around. If so, you're one step ahead. A brush is made up of several vertexes, with lines, called edges, stretched between them. When you select a brush in GTKRadiant, these edges are outlined in white for you to see.
To illustrate this, here are two brushes with only their vertices and edges showing. The first one is a simple cube:

And here's a more complex brush:

In these pictures, the vertices are the small green dots you see, and the edges are the white lines. Now, if you're new to the 3D realm, you're probably wondering what this has to do with making a visible object. In between the edges, the Quake III graphics engine makes a straight plane called a brush face. These faces are visible toward the outside of the brush only (There is one exception, covered in the next tutorial) and they can have a texture or a shader applied to them to make them look however you want them to.
If you didn't understand any of that, don't worry one bit! You'll get the hang of things once you see how it's done.
Moving Brushes
So, back to the map we loaded up. We have some brushes, entities, an angle arrow and a few connection lines. For now, let's do something with one of the brushes. If you remember from the previous tutorial, to select a brush, you hold down the shift key and left-click on it. Go ahead and select one of them.
• Select the brush shown below.

Notice that on your grid, there is now a dashed line outlining the brush you just selected, and its edges are now visible as white lines in the 3D view.
Note: By default, the brush selection colors are yellow, but if you read the GTKRadiant setup page, as I recommend, it shows you how to change it to red, which is much easier to see.
You can use either the grid or the 3D view to manipulate a brush, but using the 3D view is EXTREMELY inaccurate. Always, ALWAYS, use the grid.
Now to actually do something to this brush.
• Click in the middle of the bush on your grid view and drag it a little to left and up.

Do you see what happened in your 3d view as you dragged it?

If you drag too far, Radiant may shoot your grid away from under your cursor, scrolling your grid outside the maximum bounds of the map and halfway to infinity before you can stop it. If this happens to you, press Ctrl + Z to undo the move that you did, then press Ctrl + Tab three times to get your grid back to your selection, and with the view on the same setting as it was before. Once you have everything back, try again. If you wish to drag something off the side of the grid to scroll the grid and move as you go, make your grid size smaller first so that it doesn't happen again.
It should be pretty obvious what happened. The brush moved a little in the direction that you dragged it. As usual, if it's not exact, don't work yourself up over it. Everybody will get different results depending on what they do.
Something else you should notice is that on Radiant's title bar, there is now an asterisk ( * ) after the map's name:

This asterisk indicates that the map has had some changes made to it and has not been saved since then. While this is a nice little feature, it is not fully reliable. When you are working with entities and change their properties, the title bar will not show the asterisk. You probably don't have any idea what that means, so just take my advice for now and don't trust it. Also, if at any point you think your work needs saved, save it. Always save often - Radiant can crash unexpectedly. This map, however, doesn't need saved. You may want to use the original later, so let's just play around and not save anything.
So, that's pretty basic, huh? You can now select brushes and move them around. If you are confused about anything, please, by all means, go over the process again, or use the chat box on the left (if you have frames enabled) to ask a question about it. Once you feel comfortable, continue on.
Creating Brushes
Now, let's try creating brushes. It may take a bit of time to figure out how to do it and what's going on, so to keep things simple, I'm going to open up a new map to do this, by going to the file menu and choosing new map.

Radiant should tell you that you will lose your changes to the map. Press OK to continue, because you don't need to save what was changed.

Finally, you will notice in your texture window that the textures from t3_rift_sample.map are still loaded. Since you won't be needing them, press the u button to unload them. Your texture window should now be completely empty.
Now, all we're going to do is click in the empty grid view and drag the cursor across the area shown below:

Once you have clicked and dragged from the circle to the tip of the arrow in the last picture, you will see this:

You've just created a brush. The problem is, you can see it on your 2d view just fine, but you can't see it in the 3d view. There's a simple explanation:
When you make a new brush, you are only dragging it on two of three dimensions. There is still a third dimension that must come from somewhere. GTKRadiant automatically uses the size and origin of the previously selected brush, which in our case was the brush we moved in t3_rift_sample.map.
If we hadn't selected any brushes before this point, it would have used the current grid size to make the new brush, and it would have been at the center of the map. If it is at the center, don't worry; just follow along.
Since the brush we selected in t3_rift_sample.map was far, far above the map's origin, and since Radiant is using the previously selected brush for the origin of your third axis, it naturally follows that the brush you created will appear at the same spot on whatever axis you are not dragging it by.
Resizing Brushes
Sorry about the LOOONG wait getting the rest of this tutorial up...I was very busy with TPC V3. I'll finish this up now.
Resizing brushes is a tad tricky at first, but it must become second nature to you. The concept is pretty simple.
With the brush you created in the step above still selected, click and drag from the red circle to the end of the arrow in the picture below:

You should see this as your result:

Notice how the brush dragged in a straight line. This is because of where you clicked. If you click inside the brush, it will move wherever you drag it. But if you click outside the brush, the way it resizes varies depending on where you clicked.
The picture below simplifies what I just said above; it shows you what spots to click for the results you want:
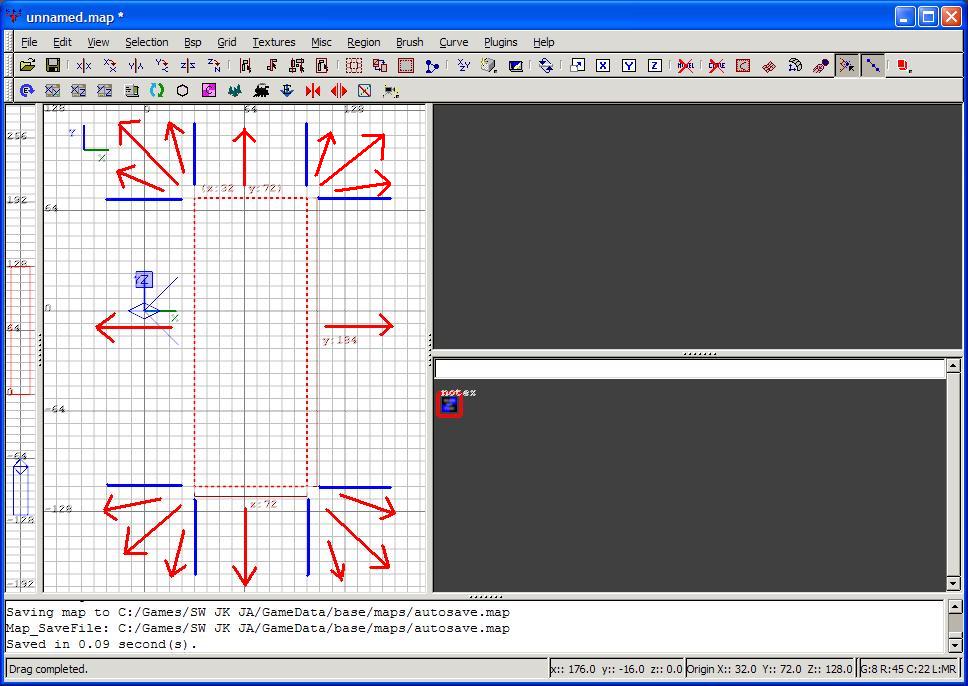
Basically, if you click outside the straight edge of a brush, it will only let you resize it on that direction. But if you click outside the corner of a brush, you have free reign over both edges on that corner.
Experiment with this a little until you get the concept. This also applies to many-sided brushes. Make sure you understand this concept, because things are about to get interesting.
Make your brush 8-sided. (Ctrl + 8 or go to the brush menu and choose 8 sided.) You will see this:

This creates rather interesting dragging - you now have to carefully watch where you click. Here is what the 'drag zones' look like:

That's proabably very scary and confusing. Let me illustrate it. Look at the picture below - click inside the red circle and drag where the arrow shows (You won't make it all the way):

If your grid view moved, press Ctrl + tab three times to get back to the same view on the selected brush.
What happened? You should now see this:

It would appear that one of your brush faces has just disappeared! This is quite useful for making architecture and other tasks. However, there is something important you must remember:
That brush face has NOT disappeared!
It is still there, and GTKRadiant has not lost track of where it is. This can cause random errors like "SV_SetBrushModel: NULL" if you don't take care of it. The only fix is to run a brush cleanup.
To help the example along, deselect the brush (ESC key).
Run a brush clean up (this button):

When you have run the cleanup, you will see a message in the console, and you will also see that the brush has been selected:

The brush was reselected to tell you what brushes were changed, and the message in the console "1 invalid/duplicate planes removed" tells you that it found one invalid or duplicate plane. In our case, it was an invalid plane, and Radiant will no longer remember it.
This tutorial really doesn't say much about brush resizing and all. Sorry about that, but it's best learned on your own. Good luck getting it down. I know you will, given time. It took me a while.
Final Note
As a final note on resizing and moving brushes: make sure you remember you have three different axes you are dealing with. Use your 3d view to know what it looks like and all is well.
Simple Entities
This will be a simple tutorial on entities. I will be writing an advanced entities tutorial and a scripting tutorial, hopefully within a week or two. Hang in there!
So, to start, let's define what an entity is. In Quake III, an entity is anything that creates interractivity between the players and the map. For instance, spawn points are entities. They tell the game where you can spawn into the game when you first join or after you have died. Also, the spectator position and angle is entity controlled. Guns, ammo, force boons, doors...they're all entities.
So, we're going to start with the very basics and do some simple things for now.
Making Entities
If you're going to use entities, you need to know how to make them first. This is really simple. Just find the location on the grid you want to create an entity at, right-click on the grid, and you will see this menu pop up:

Don't be intimidated by the long list. This is where the (limited) power Q3 has is stored. You'll find out as we go along. Everything is categorized by what it does, so it's not very hard to understand. For now, we'll make an 'info_player_deathmatch'.
• Right-click in the grid view
• In the list the pops up, hover your mouse over the info line
• Another list will pop up - click info_player_deathmatch
You should see a pink box/rectangle appear on the grid view, centered where you had right-clicked. If you can see it in the 3d view, you will see a pink rectangle, taller than it is wide. This entity is the exact height of a player. This is because an info_player_deathmatch entity acts as a spawn point in FFA mode. A player will spawn here when they join the game or die. You can have as many of these as you like in a map, and the more the better. JA servers can hold 32 players, and you don't want any spawn frags. Granted, most servers won't have 32 players on it at once, but still, it's a good idea to plan for it.


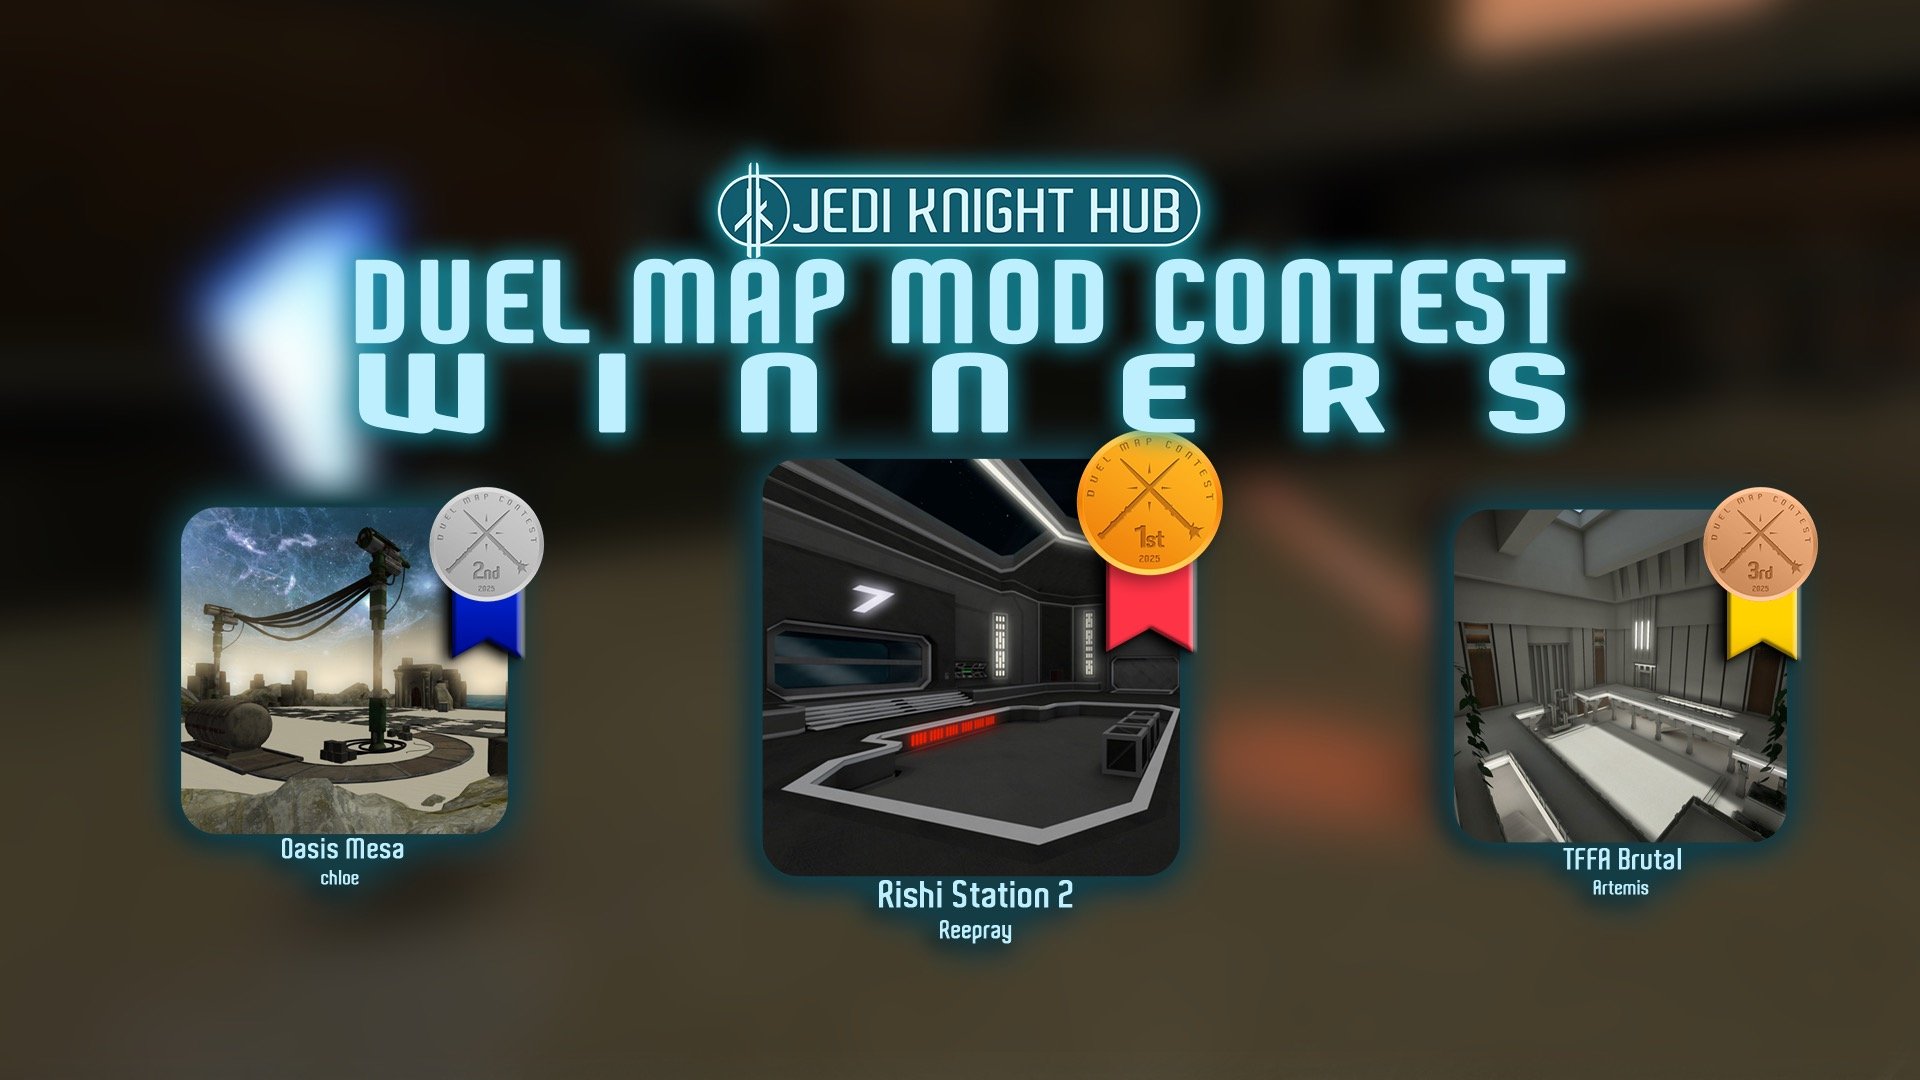
 1st Place Winner Reepray with Rishi Station 2,
  2nd Place Winner chloe with Oasis Mesa, and
  3rd Place Winner Artemis with TFFA Brutal! Amazing submissions by everyone!


Recommended Comments
There are no comments to display.
Create an account or sign in to comment
You need to be a member in order to leave a comment
Create an account
Sign up for a new account in our community. It's easy!
Register a new accountSign in
Already have an account? Sign in here.
Sign In Now