Jump to content

Key

Members
  • Posts

    92
  • Joined

  • Last visited

Posts posted by Key

  1. Learn the very basics of skinning, in a fun / super easy way! Pick up on some cool techniques while you're at it!


    Introduction To Skinning


    Why hello there! If you came here with the intentions of learning how to make your very own skin (for JKA), then you've come to the right place! It's not as complicated as it may seem, so don't fret if you have already scrolled down and seen the plethora of images and stretched faces! It's a fun and addicting process.


    What You'll Need

    Alright, so there are some things you're going to need to get started. Firstly, any program that can accurately edit images. Secondly, a program that can open, read and save PK3 files. Both of which are free!


    Image Editing Software
    Paint.Net [free] Download
    GIMP [free]
    Adobe Photoshop

    PK3 Management
    Pakscape [free] Download

    Others
    PK3 Template Download (Courtesy of Senbou)
    ModView Download
    Your brain
    Can of Coke
    Barbeque Flavored Lay's Potatoe Chips


    Modview will easily allow you to view your progress as you model/skin your mods! Hence the reason it's called MODview.

    I would recommend Paint.Net over GIMP, based on past experiences. Paint.Net is free - I use it for things that are too difficult or lengthy to do in Photoshop. Over all, I use Adobe Photoshop and would recommend you buy it. It can be overwhelming but once you get comfortable using it, it's not hard to do other things. If you're going to only be skinning and nothing more, might as well get Paint.Net

    This tutorial will be done in Photoshop, but I will list the equivalent functions (if they are different) of Paint.Net. I highly dislike GIMP and therefore I will not be giving directions specifically on how to use it.


    Section 1 A: The First Encounter

    Alrighty folks, let's begin! First and foremost, we need to decide what model/skin we're going to use from base JKA. In this tutorial, we're going to use the model named "Galak".Yes yes, we're going to give Ole'Galak an extreme make-over. We all know he needs it after that little confrontation he had with Kyle in JK2.

    Anyways, to access this model with all of its files, we need to open the Pk3 in JKA's base folder, where about fifty percent of all the good important stuff is held. Now you may just happen to be wondering what the heck the "base folder" is. If so, continue reading - otherwise skip to the headliner "Section One B". Oh good, so you were wondering and my words haven't gone to waste! Excellent! Anyways, the base folder is a folder (obviously) which is found in your copy of JKA's directory. The directory is where all of the game files which help make the game run (apart from those found on the CD) are at. To access this magical wonderland, open the place of which you installed the game. In most cases it will be on your local disk ©. Follow the instructions below to continue.


    1. Open "My Computer" or wherever you installed the JKA game.

    2. Open "Program Files" (Unless you installed the game somewhere else on your computer).

    3. Open "Lucas Arts"

    4. Open "Star Wars Jedi knight Jedi Academy"

    5. Open "Game Data"

    6. Finally, open "base"


    Hazaah, you have found the base folder. This is where all of your mods should go (apart from some which are to be extracted in the Game Data folder. For now, don't worry about this!)


    Section 1 B: The Kind-of-Second Encounter

    If I was any sort of musical genius, I would most definitely write a song about the base folder. It truly is a wonderful place, where mods run freely and scripts play hopscotch! Anyways, you've made it to possibly the second most easy part of this tutorial: Opening a PK3!

    As of right now, you should have a window open that displays the contents of the "base" folder. If you do not, please refer to Section One A. If you do, follow the below instructions if you will.


    1. Open PakScape, which you should have already downloaded. If not, click here.

    2. Put PakScape's window off to the side a bit, and go back to the "base" folder's window.

    3. Hunt down the file in the "base" folder named "assets1" which is a PK3 file.

    4. Select the PK3, "assets1", and drag it over to PakScape. Congratulations, you have just opened your first PK3 file.


    Once you have done these things, you can read some more about what this means or you can go on to Section 2 for the next bit of instructions (it's entirely up to you, reading the following will most likely benefit your skinning experience). Well hello, you're still reading! Opening this PK3 file named "assets1" will grant you access to many of the files that are used to make-real the different characters, weapons, and vehicles. In here you'll find all the game textures, effects, physical models, botfiles, menus, and user interfaces. Most of all editing will be done from "assets1". I say MOST of, because sounds are not located in this particular asset PK3, which must be retrieved from another. We'll focus on that as one of the last steps.


    Section 2: Digging To The Depths; Spelunking

    Okay, we're almost to the editing part! These steps are imperative to skinning. Follow the below instructions to learn how to salvage the model/skin parts.


    1. With PakScape open, you should be viewing "assets1" PK3. If not, please refer back to Section 1 B. Here is what it should look like:

    10wmkpt.jpg

    2. Open the folder named "Models"

    3. Open the folder named "Players"

    4. Find the folder named "galak", and as I'm sure you guessed - open it. You can easily find the folders of certain models by clicking randomly on any of the folders, then pressing the key of the first letter in the name of the model. In this case, I clicked one of the folders then pressed G on my keyboard, which brought me to "galak". So open this folder if you already haven't.

    35083sn.jpg

    5. Do NOT close that window. 

    Wooooo! You've opened up and viewed your first JKA skin. Kinda. This stuff right here that you see is literally the meat and bones of what makes Galak, Galak. Continue onto the next step now! Don't close that window!


    Section 3: The Transfer

    Cool, we found our model and his skin. Now we need to duplicate it all so we can much more easily edit it. Follow the below instructions to continue.

    1. Open up a new window and find "My Documents" (then open it).

    2. Make a new folder named "My Skinz" (then open it).

    3. Make another new folder named "Epic Galak" (then open it).

    So the line of folders should look like this:
    My Documents\My Skinz\Epic Galak\ *You're in here!*

    4. Go back to the PakScape window where you have all the original files from the model/skin "galak". Press CTRL+A on your keyboard to select all of the files (or just click/drag your mouse to select).

    5. Press CTRL+C to copy all of these files.

    6. Go back to the new folder you made in the other window, press CTRL+V to duplicate/paste all the files.


    Great, now we have all the files in one easy-to-access spot. For now, you can close PakScape if you wish. We won't be needing it again until later - once we need to go find the sound files and then eventually compress your skin.


    Section 4 A: Get Out Your Skinning Knife

    Whoop, whoop! We're now ready to dive into the mystical world of skinning. Depending on what program you decided to use for image editing, open it now. As a reminder, all the visuals have been done using Adobe Photoshop. Nearly everything that is done in Photoshop can be done in Paint.Net and GIMP, therefore follow the instructions as you would for either program (most of the tools remain the same). However, if no equivalent function is present, I will provide a way around that for Paint.Net only.


    1. Open up your image editing program, mine being Adobe Photoshop.

    2. Go back to the window where you placed all the files for your new skin. If you haven't made a new folder for your skin outside of the base folder yet, please refer to Section 3.

    3. Find the file named "galak_torso" and drag it into your image editing program. This is what it should look like once it is opened.

    sqkrvo.jpg

    4. So what you see now is the entire outside covering that wraps around the actual phsyical model of "galak", referring to the TORSO area. If it doesn't look like the above image, please post here in this thread for extended help or private message me. Anyways, we have to decide what we're going to do next. Continue onwards!

    5. For this tutorial, we're going to do a few things to help y'all get an idea of what can be done to change the appearance of a skin. Firstly, we're going to change the hue of the sleek imperial jacket Galak wears.

    To do this in Photoshop, find the panel on the right hand side that says ADJUSTMENTS, then click the icon that's in the second row, second from the left. It's highlighted in the image below.

    le24i.jpg

    6. Once this is done, feel free to drag that colorful little bar all over the place to find whichever color suits you (well technically Galak) the best. I'm going to choose pink. Note, to get a more vibrant affect, slide the little SATURATION pointer up towards the red (right) side. Not too high though!

    140zukn.jpg

    7. Oh cool, now we've got a krazy-kolor thing going on. What now, you ask? Well, since my current JKA clan is named Knights Reborn, I'm going to support them by slapping on a fat and sassy "KR" stamp on the back. Select the Text tool from the toolbar on the left hand side. Alternatively, in both Paint.Net and PS, you can just press "T" on the keyboard as a shortcut. This is going to open up some options on the top of the window. Here you can adjust font size, font style, and alignment. I usually set the alignment to center just to make things easier. Depending on the font style, you may have to change the size of the text.

    8. Select any color you like before starting. Great, now click the middle portion of the image, it's the very back of the torso on the skin. A blinking cursor will appear with a line under it (in Photoshop). Type "-[KR]-" (or whatever you want to put in) and press the little tiny check mark in the middle/right top portion of the screen (highlighted in the example below).

    dpibdf.jpg

    9. Alrighty, now we have a fanciful jacket, complete with a KR smacker on the back. Feel free to do whatever you please to the jacket, but for the sake of this tutorial we're going to move on to the next step.

    10. Save iiiiitttt!!! In Photoshop, you can't just straight up click save - you have to go to Save As. So click File, then Save As. When the window comes up, it should already be named "galak_torso" so don't mess with that just yet. What you do want to do is click the Format drop-down-box and select JPEG. Once you have selected JPEG, click Save.

    11. Approve the overwriting notifciation, then click OK on the next window that'll pop up after that. It's basically asking how good you want the final JPEG to look. I always set it to level 12 quality, but it honestly doesn't matter all too much where it's at on default.


    Section 4 B: A Botox-a-licious Evening

    Witty comment or joke unavailable.

    1. Go back to the window where all the files are for the galak skin that you created. If you closed it, you should have put it in My Documents if you can recall - so bring that up again. If you haven't made a new folder with all the files in it from the original galak folder, for some reason, then refer to section 3.

    2. Find the image file named "face", then drag and drop it into your image editing program. Whoa! What a fatty! Just kidding, it's actually quite the rare site to see someone's entire head stretched about one flat, 2-dimensional plane. Consider yourself honored. Here's what it should look like when opened:

    73fbyp.jpg

    3. So this is Galak's face, what should we do to it? (Suppressing an evil smile). Well I know what I am going to do. That's right, we're going Joker-style all over his face. Prepare yourself for an epic smile, Mr. Galak. For those of you using Paint.Net, you're out of luck. This can't be done in that program, so just skip step 4. You can always do something else to his beautiful little face, like add another KR stamp to his forehead.

    4. Okay my little shpootleheimers, select the smudge tool from the toolbar on the lefthand side of the window. It looks like a finger pointing down. Change the brush size to about 70 (in the top left hand corner this can be achieved by clicking the little circle and either selecting one of the preset brush sizes or changing it yourself). Now find the corners of Galak's mouth, and slowly/carefully click and drag them upwards and out. Not too far now, refer to the image below. If you're feeling mischevious, you can do his eyebrows as well!

    vq40ur.jpg

    5. Additional clicks/drags will provide you with a better effect. It may not look like the Joker all too much, but why so serious? Anyways, for those of you who skipped step 4, and don't forget as I mentioned from before, you can still do something to his face. Perhaps put a little exclamation point on his cheek or something, be crafty.

    6. Now we're going to save. Click File, Save As, switch the format of the image to JPEG. The name should be "face" if it isn't already. Override the overwrite notification, and select image quality on the final pop-up image after you've hit save.

    *7. As a side step, it'd be favorable to edit the image named "icon_default" which is in the same folder as everything else. It's the little player icon you get when you select a model from the menu. You will most likely want to change it so you can more easily find your skin when you go to select it on said in-game menu. It's rather easy to do, so just follow procedure of saving/opening/editing like you would for the other parts of the skin. Make sure name remains the same. For mine, I will change the hue of the icon a bit.


    Section 5: A Technical Way of Life

    Nice, we've done some pretty cool things so far. We (I) gave Galak a pink jacket, complete with a fashionable green zipper, a big ole' fat and sassy KR stamp on his back, and a face lift. So now we have to do some technical work to make the skin work properly. You may close your image editing software for now, unless you wish to go back and edit other parts of the skin. Just follow the same general procedure for opening and saving each file and you should be gewd.

    1. Open up your folder where you have saved all the duplicated / edited files from the original "galak" folder.

    2. You're going to see 5 non-image files. They are: Model.glm, Model_blue.SKIN, Model_Red.SKIN, Model_Default.SKIN. Open the SKIN file named "Model_Default" using notepad/wordpad or any basic text editor.

    3. Whoa Nelly, that's a lot of stuff. I know. Don't freak out.

    4. Okay, first things first, we have to change the directories of which this file will refer to. A SKIN file helps the game know where to look for the specific model's skin files. So we just made some stuff, right? Well this skin file is how we tell the machine where to look for the edits we just made. Now that you have opened that .SKIN file, it should look like this:

    x51q1u.jpg

    5. Each line represents a part of the model followed by a comma then the skin file location. So you see the first line says "hips,models/players/galak/boots_hips.tga". The part of the model is the hips, and the current file location is "models/players/galak/". The file is "boots_hips.tga". Ignore the ".tga" as JPEG's will still work even though they're labled differently here. So to change the directory, find the part of that line that says "galak" and change it to "epic_galak". We will make this actual directory in Section 6. So the first line should look like this:

    hips,models/players/epic_galak/boots_hips.tga

    If you change the name of the skin's image file, it must be changed in the directory as well. For example, if you named the "face" image file we just edited as "Facelolol", in the directory it HAS TO BE "Facelolol", however, note that caps don't matter.

    6. Here's a higlighted version of the .SKIN file so you can see which parts to edit. Ignore all model parts that refer to the Stormtrooper directory. These parts of the model aren't seen, as they refer to pieces which don't exist. Leave them alone. Change all the folders named "galak" that are highlighted below, to "epic_galak".

    dwz149.jpg

    It should look like this once you're done changing them all:

    2v9unp0.jpg

    7. Double check to make sure there is no folder directory, /galak/, and that they're all in fact /epic_galak/.

    8. Triple check. This stage is very important, as it is the most bothersome. I'd say about 40% of all errors come from a faulty .SKIN file. 10% comes from improper image sizes, which we'll talk about later, and the other 50% most indefinitely comes from SHADERS which we will also talk about later.

    It's extremely important that you have properly renamed all the directories. If you haven't the .SKIN will load other image files as textures onto the skin inappropriately.

    9. Once you have checked over and over, save it. If for some reason you need to do a Save As, make sure you set the format to ALL FILES, then in the actual name of the save put an ".SKIN" at the end.


    Section 6 A: Compiling To Compress

    Phew, alright. We've made it this far. It all goes down hill from here anyways. Compare to what y'all just went through, this is like writing your name on a chalkboard. Strikingly difficult unless you're sitting down watching. Just kidding, because if it was that hard, I would have just lied to you a bunch. It's not that hard. I'm actually relieved we're finally on this part!

    ANYWAYS.

    1. Open up PakScape if you closed it.

    2. Click on the little icon of a blank sheet to create a new file, or just press CTRL+N.

    *2.5. If you downloaded the PK3 Template, you can open this up in PakScape and put all the files in the correct positions instead of having to make a new PK3 entirely. Just make sure you save the PK3 with a different name!

    3. Get a hold of that folder named Epic Galak (in your Skinz folder in My Documents), where you have saved all your edited goodies. Open it up so you have all the files in front of you.

    4. Go back into PakScape and create a new folder. To create new folders, either right click and select object, then new directory or click the icon on the above toolbar that looks like a folder. Name it "models" (open it after creating it)

    2ugo3o2.jpg

    5. Create a folder named "Players" (open it after creating it)

    6. Create a folder named "epic_galak" (open it up, too)

    7. Go back to your little window where are all the images and stuff is for your new creation. Press CTRL+A to highlight all the files in the folder.

    8. Whilst all files are highlighted, click to drag the lot of them over to PakScape. Alternatively, you can copy/paste them into PakScape.

    9. Make sure you put all the files into the directory you just created, that being:

    Models/Players/epic_galak/

    10. Double check the files are put correctly into the series of folders you just made, as stated above. Now, do NOT close PakScape. Continue onto Section 6 B.


    Section 6 B: Sound Sleuthing

    Unfortunately my friend, it is time to go back into the jungle of assets. We need to get the sound files for Mr. Galak, so he can howl in pain and taunt his enemies appropriately.

    1. You won't need to keep your folder open with all your files for the new Galak you're making, so head back to My Computer from there. Note, this doesn't mean close PakScape. Keep PakScape and the new file you just made in there and open. Don't even touch it. Nah-ah-ah, don't look at it either.

    2. From My Compooper, open your local disk © or whever you installed JKA.

    3. Open "Program Files"

    4. Open "Lucas Art"s

    5. Open "Star Wars Jedi Knight Jedi Academy"

    6. Open "Game Data"

    7. Open "base"

    8. Locate the PK3 named "assets0" and drag it into PakScape, careful not to drag it into the new file you just made. You have to open this one up. If it's too hard, you can always open "assets0" from PakScape itself by navigating in the same manner through your computer as shown above.

    9. Yes, I know, another ugly assets file. Why they chose to name it number 0 instead of knocking everything up one, I don't know. Any-who, open up the folder named "Sound".

    10. Open the folder named "chars"

    11. Oddly enough, I don't have a sound folder for Galak. I don't think you do either, so with that said, open up the folder named "Tavion"

    12. Open the folder named "misc". In here are all the important sounds. Oh joy! So what we're going to do is select them all (using any previously mentioned method, like CTRL+A), then copying them using CTRL+C.

    13. Excellent, now after having done nothing but copying those files, go ahead and close assets0. You should be left with the new file you created for your skin.

    14. Create another new folder named "sound" (then open it) Remember now, creating new folders in PakScape you must either right click and select object, then new directory or click the icon on the above toolbar that looks like a folder.

    15. Create another new folder named "chars" (then open it)

    16. Create another new folder named "epic_galak" (then open it)

    17. Create another new folder named "misc" (then open it)

    18. Now press CTRL+V to paste/duplicate all the sound files.

    19. STOP, don't do anything after this. Go on to Section 7.


    Section 7: PK3-pie

    Yes, YES, YEESSS!! Look how far you've come. There's really only 2 things you need to do now. Technically 3, if you're being technical.

    1. Most importantly, SAVE YOUR PK3. TO do this, click File then SAVE AS.

    2. FIRST, you must select format before putting the name in. I don't know why, but mine always saves as a zipped folder instead if I don't. So put the format as PK3 (Quake 3 Pak).

    3. Put in the name for the file as "epic_galak". Click the drop down box next to the small words "Save In" and find the folder "My Skinz" in your "My Documents" folder. Click Save.

    4. Hunt down the skin in its new location, seperate window.

    5. Press CTRL+C to copy it.

    6. Find your base folder, which can be gotten to following these directions...

    7. Go to My Compooper, open your local disk © or whever you installed JKA.

    8. Open "Program Files"

    9. Open "Lucas Art"s

    10. Open "Star Wars Jedi Knight Jedi Academy"

    11. Open "Game Data"

    12. Open "base"

    13. Once in the "base" folder, press CTRL+V to paste/duplicate a copy of your skin.

    14. Open up that can of Coke and bag of chips. Take a break and enjoy life for a moment!


    Section 8: Your Skin, M'Lord

    Let me be the very first to congratulate you on making your first skin ever. Congratulations. You did it. You made a totally whacked out version of Galak. Not only has his manhood been eradicated, but his voice replaced by that of a female psychopath. Seriously, congratulations. It was a long and hardy road thou hath traveled.

    1. Open JKA

    2. Once in-game, press Escape and open the profile menu.

    3. If you changed the icon of the skin, it'll be a lot easier to find. Select it and click Apply.

    4. Enjoy infinite Galak mochery.


    The Finished Project! (Video)


    If you do not understand or are having / had troubles - Please contact me or an SC officer ASAP. We're all very willing to help, and of course, super friendly. Don't be afraid to ask questions either. Support on this matter is appreciated! 


    Brief Lessons


    Lesson 1: Team Colors

    Making your skin team-color-compatible is rather easy. More often than not, the files for other team colors will be trailed by a "_blue" or "_red" which helps signify to the corresponding .SKIN file which image files to use. Yes, there are 2 more .SKIN files which refer to the proper JPEG's/image files in the folder seperately from the "default." If you do make some team colored image files, you'll have to set up new .SKIN files to corrolate with the changed images. They should always be named either "model_blue.SKIN" or "model_red.SKIN" and refer to each respective team color image (inside the .SKIN). It's easiest to open up the "model_default.SKIN" then add either "_red" or "_blue" to the ends of the image files (make sure you put them infront of the ".TGA" at the end of each line) then save it as a new file, being either red/blue with the correct names as shown above. If using that method, make sure you change the format of the file to ALL FILES and add the .SKIN in the file name itself whilst saving.

    Quick example! If you opened up the model_Red.SKIN file, you'll see all the image files and their model parts like you would in the normal model_Default.SKIN. However, instead of just "torso.tga", the image file will probably be "torso_red.tga". So like I said before, if you just open the model_Default.SKIN, you can just go about adding _red/_blue to the ends of the image files then saving the .SKIN with the different name. Please make sure that there actually is a torso_red or head_red (w/e) inside the skin's folder. Otherwise, rename them so they match up.


    Lesson 2: Icons

    It is highly recommended you change the icons for your skins if you're reskinning something. It'll be much easier to find for yourself when you're going to select the skin. The default image size for an icon is "128x128" pixels. The names should always be "icon_default" for default, "icon_red" and "icon_blue" for team colors. The team colored icons don't need to be switched around in the main .SKIN files.


    Lesson 3: Image Sizes

    It's imperative you do not change the sizes of the images to inappropriate proportions. If the file size is 100 pixels by 100 pixels, it will not work if you change it to 140 x 40 pixels. You can upscale the image to help improve quality of the texure on the actual skin. This is a very dirty little secret of mine. Of course don't go over board and do 5000x5000 size textures, no one will download your skins because of the very apparent lag.


    Please note, SHADERs are an entirely different thing when compared to basic skinning. Currently I have not made a tutorial for SHADERs as it can be much more complex. I wasn't kidding when I said half, if not more, of all problems with skins come from SHADERs not satisfying the correct directories or parameters. [/u]

  2. Tired of messing around with boring old normal-people skins? How about trying your hand at Shaders?... heh heh heh.


    Introduction to Shaders


    Why hello there! If you came here with the intentions of learning the functions of Shaders, then you've come to the right place! As far as being positive about this, I'm going to be frank - it's as complicated as it looks. It takes some time getting a grasp on how Shaders work. They're very particular, but when done correctly they are without a doubt the most rewarding part about skins. I'm sure any skinner will agree with me on that one.So if you read my tutorial on skinning, you'll be pleased to know we'll be visiting revisting Mr. Fyarr again today. As if going "joker-style" on his pretty face wasn't enough, he's going to receive some more punishment. Please note, it's imperative that you pay attention and read all instructions / explanations to better your understanding of how Shaders work. Like always, I will give help wherever you need it. Don't be afraid to ask questions.


    What You'll Need

    Note, I'm just going to copy what I said about these programs over from my skinning guide since there's no difference. If you read my skinning guide, you can skip to section 1! Alright, so there are some things you're going to need to get started. Firstly, any program that can accurately edit images. Secondly, a program that can open, read and save PK3 files - just to make things easier. As Jawfin has pointed out, PK3's are basically .Zips with a different name. I prefer to use PakScape just because it helps me see things more clearly. It's up to you!


    Image Editing Software
    Paint.Net [free] Download
    GIMP [free]
    Adobe Photoshop

    PK3 Management
    Pakscape [free] Download


    Shader Knowledge
    http://toolz.nexuizninjaz.com/shader/ (Probably the most valuable tool here - an online manual.)


    Others
    PK3 Template Download (Courtesy of Senbou)
    ModView Download
    Your brain (like always)
    Can of Coke (like always)
    Barbeque Flavored Lay's Potatoe Chips (like always)


    Note, I'm just going to copy what I said about these programs over from my skinning guide since there's no difference. If you read my skinning guide, you can skip to section 1!


    Modview will easily allow you to view your progress as you model/skin your mods! Hence the reason it's called MODview. I would recommend Paint.Net over GIMP, based on past experiences. Paint.Net is free - I use it for things that are too difficult or lengthy to do in Photoshop (these things seem to be much easier to accomplish in Paint.Net when dealing with time). Over all, I use Adobe Photoshop and would recommend you buy it if you're interested enough. It can be overwhelming but once you get comfortable using it, it's not hard to do other things. If you're going to only be skinning and nothing more, might as well get Paint.Net This tutorial will be done in Photoshop, but I will list the equivalent functions (if they are different) of Paint.Net. I highly dislike GIMP and therefore I will not be giving directions specifically on how to use it.


    Section 1 A: Small Recap For New Skinners

    Back again for more, are we? Well if you're new here - you definitely need to learn the basics of skinning before moving on. No exceptions. My introduction to skinning can be found here. Seriously, I won't let you continue unless you know how to do basic skinning. Stop reading. Really, this isn't a joke, you'll be so lost your head will turn inside out and start singing R&B/Soul music. Yeah, makes no sense does it? That's right, that's exactly what this tutorial will be like for you if you just started now. Mhm, no go on.Anyways, welcome back to all the newly made skinners. Let's jump into this head first with, as this section suggests, a small recap. If it helps, which it should, download the PK3 template that Senbou provided, which can be found in the "Others" part of the tool list. What we're going to do though, for this tutorial, is use the exact skin we made in my other tutorial. If you got rid of it, don't fret, you can do it with any other skin and follow the same steps. I just figured it'd be fun to continue torturing Galak.

    Okay, so a skin's/model's PK3 folder spread should look like this inside:


    models -> players -> SKIN NAME -> Skin's texture images, .SKIN, .GLM, and icon.
    sounds -> chars -> SKIN NAME -> misc -> Sound files.
    GFX -> effects -> Shader texture images.
    shaders -> .SHADER file.


    So there's 2 new folders here, the GFX folder and the Shaders folder. The GFX folder contains the folder "effects" which holds all the shader's texture images. The Shaders folder holds the actual .SHADER file.


    1. Go ahead and open PakScape, then load your skin you want to put some fancy-shmancy shaders on. I'm going to use my funky "epic_galak" skin. I suggest you do the same to minimize any confusion, unless of course you never made one.

    2. Create the two new folders, "GFX" and "Shaders" in the same place where "models" and "sounds" are. If you forget how to do this in PakScape, just right click and select New Directory then folder.

    3. Open your GFX folder and make another new folder named "effects", then go back to the main part of the PK3 where all the other folders are.


    Section 1 B: Visualization

    This isn't entirely something we can run into blindfolded, we have to set a goal of what we want to accomplish. Once you become good enough to skin/shader on your own, you can more easily go at it with not entirely sure of where you're going. Anyways, in this tutorial we're going to cover a very basic form of shader and a tad more complex. Both will be explained in full, of course. The first part we're going to do is add a glowing flourish design on Galak. The second part we're going to do is give this lad a pair of shoes the galaxy itself will be jealous of. I must remind you, it's very important you read all directions and explanations. Without further ado, let's continue!


    1. So you should already have PakScape open with the skin you're going to be adding a shader to. If not, do that now. Refer to the directions in section 1 A if you need to. Your first official bit of instructions is to open your original folder where you saved all of your uncompressed work. According to my other tutorial, it should be in a folder in My Documents named "My Skinz". So go there and find your "Epic Galak" skin. For those of you using another skin, make sure you copy all the content from the PK3 into a seperate folder - Adobe Photoshop and *I think* Paint.Net do not read JPG's opened from PakScape. They have to be outside.

    2. Speaking of Paint.Net/Adobe Photoshop, open your image editing software now.

    3. In your other window, where you should have the folder opened for the skin you're editing, open "Models"

    4. Now open "players"

    5. Now open "NAME OF SKIN" which in my case is "epic_galak"

    6. Welcome back to the inner workings of the skin! Find the texture image that refers to the torso of the skin.

    For those of using your Epic Galak skin, it'll be named "Galak_Torso.jpg". Drag it over to your photo editing software to open it. So here's what I've got on my screen:

    2cwx7vr.jpg

    Those of you using another skin, it should look something similar. This is the part of the skin known as the "torso", the .GLM (actual body model) and .SKIN file both refer to this image for the texture which will wrap around that part of the model.We're going to end this section so we can continue with a different, more approriate name.


    Section 2: Get Out The Plasma

    Oh how fun, we're going to do a LOT in one section! So if you missed out a bit on Section 1, which you shouldn't have, since it's important you read everything, we're going to be giving Galak a glowing, white flourish design placed on his back. Note, if you're an experienced skinner or are making a skin of your own, you can skip this section. However, if this is the first time you're learning about skinning/shadering, I highly recommend you continue reading this section.

    1. You should have the torso texture image opened up in your image editing software. What we're going to do first is find some random vector image on the internet to help out. This is the one I'll be using, I've done some editing to it for easier use:

    2cnghz7.png

    2. Save it, or copy it by right clicking on the image, then put it into your image editing software over the skin's texture. It should come on and look like this (somewhat):

    4smfld.jpg

    3. Nice. I'm going to rotate the image so it's upside down and then move it up KR's clan tag logo. Feel free to do whatever you want / put it wherever you want. Keep in mind, if you put it somewhere else - you may have to adjust your player camera in-game to see it in action. Here's my almost-final product:

    13yl7k0.jpg

    4. Now the final step. Since we're going to be using an "add" GL blend function, the rest of the image needs to be black so when it's put onto the skin, only the white will show/glow. Create a new layer under the design and fill it entirely with black. For Photoshop users, press SHIFT+F5 to open the fill menu. Paint.Net users simply use the paintbucket tool - just make sure you're on the correct layer. This is what it should look like:

    2hdtvfq.jpg

    Cool! Now note I'm instilling in you a very basic and useful tool for Shaders. Namely the standard glowing-object technique. Yes, it's an ancient art passed down through generations. Yes, you just learned how to do it. This is a very very very very very significantly useful technique because it's the very bottom line when creating effects that don't include simple color remapping and blending. Long story short, just remember how to create images like this (ones with highlights like this design atop a black background).

    5. Saving time. So click File, then Save As. Pay attention! You're going to want to give the name of this file something unique - something no other skin would ever use. That means, no, you should most definitely NOT name the effect "torsoglow". I'll tell you why, don't get fussy!The effects folder is a "public" folder, meaning even though you're in your own little world with that skin - the game refers to the same gfx/effects directory no matter where it's at. If you had another skin, which also had a "torsoglow" image in it's gfx/effects folder, you'd have some conflict - there's no directory that differentiates the two (like how in models/players you have your next folder named "Epic Galak", which is a seperate directory since it has a specific name). So for those of you following the tutorial skin, let's name the .JPG (make sure it's a .JPG) as "eg_torso_glow". You're going to want to save it in the new folder you made earlier in your skin's open (uncompressed) folder: gfx/effects. It should be the only texture image in there now, unless you've made other ones - which you can if you feel confident enough. But if there's the same effect for the same texture image, then might as well put them all onto the same shader image. If you're confused about what I meant by a "public directory", please refer to the Brief Lessons at the bottom of this tutorial.

    6. Okay, as a review, in your folder you made back in Section 1, you should have saved this newly created shader. It should be in My Documents/My Skinz/Epic Galak/gfx/effects. Or something similar, depending on where you saved your skins.


    Section 3: Get Out the Radioactive Plasma

    Remember those fancy boots I was talking about earlier? Guess what - it's time. Now, instead of a glow function (we'll talk more technical stuff later to help you understand), we're going to do a wavey-wave style of blending. Of course we can make it glow in the dark too - because after all it IS radioactive plasma.


    For this next part, you don't need to open anything. Now, as you may have realized, the image we're going to be applying this shader to is named "boots_hips", meaning it holds the parts for both the boots AND the hips. His little skirty-skirt is going to receive a wavey-wave as well. This is one thing you should constantly be aware of whilst skinning, because not all skins (as we see here) will be as well organized. Most of the JKA/JK3 skins are much more efficiently mapped out than the JK2 skins. Which many of said skins have just been ported from JK2 with miniscule changes if any.

    1. So now we're going to create a different type of shader image. Either create a new document or use the example I have provided - it can be only certain sizes - just keep reading, you'll see. If you are going to use my example, skip to step 3. If you are creating a new one, it can be any size as long as it's divisble by two. Once you find an appropriate size, you should stick with it. For this tutorial, and as I highly recommend, we are going to make the image 256x256 pixels. For other cases, this can be variable - it depends on the effect you're trying to pull off.

    2. Now to be able to make an appealing pattern, you have to be pretty crafty / decent at photoshop/paint.net. Start out by making the image entirely black using the paintbucket tool (or CTRL+F5 -> black, if you're feeling like a pr0 and using PS). Make a new layer and fill it with whatever color you want, I am going to be using green. Erase portions of the image so you get an effect similar to mine - see the example below. There will be another tutorial on how to create much more fancy shader patterns in the future.

    34s0acz.jpg

    3. Save the image as "eg_bh_glow" (as a .JPG) in your gfx/effects folder - if you decided not to create your own, save the above image in the same manner.

    4. Now, as review, these two files should be in your gfx/effects folder:

    "eg_bh_glow"
    "eg_torso_glow"

    Saved in the directory of My Documents/My Skinz/Epic Galak/gfx/effects. Or something similar, depending on where you saved your skins.


    Section 5: He's Code, She's Code, We're All Code

    Now, my little schfizlekwats, we write the shader. This is the most important part of the entire tutorial, you must pay attention. I will be here to hold your hand all the way through - and after if you still need help. Don't be afraid to ask!

    1. Open Notepad and crack your fingers. In order to begin applying effects, we need to identify which part of the skin texture is going to receive a facelift. (Reference to previous skinning tutorial, har har har.) First, we're going to attack the flourish design glow.

    2. Start out the line like this:
     

    models/players/epic_galak/galak_torso
    {

    This tells the shader to look in that specific location for that specific image file so we can, specifically, map a shader to it.

    3. We're going to add to that, so either copy/paste what I have below or continue writing it.
     

    models/players/epic_galak/galak_torso
    {
    {
    map models/players/epic_galak/galak_torso
    rgbGen lightingDiffuse
    }

    Okay STOP. Let's talk about what's going on here. So with the first line, we identify the target of the shader. The second line is a bracket, opening it up to be edited. The third line is another bracket, this part is here because we are going to put multiple effects onto one target - it's necessary as you'll see later. The fourth line uses the command "map" which takes the directed image (which is actually the same as what we're targetting) and blends it with the original image. The fifth line tells the shader what kind of coloring/blending we're using - the command rgbGen is used for editing the light on the image; we're using lightingDiffuse which is the standard lighting for all non-map objects (like our playermodel in this case). The final line signifies the end of that portion of coding, closing the first effect placed onto the skin. Now we'll add the second effect.

    4. Add to your shader as follows:
     

    models/players/epic_galak/galak_torso
    {
    {
    map models/players/epic_galak/galak_torso
    rgbGen lightingDiffuse
    }
    {
    map gfx/effects/eg_torso_glow
    blendFunc GL_ONE GL_ONE
    glow
    rgbGen Identity
    }
    }

    STOP again! Don't forget that right-bracket at the end to clarify it's the closing of that target's shader effects. Let's take another moment to talk about what's happening. We closed off the first portion in step 3, now we made a new one - this one is what adds the shader image we made to the target texture. As you see, the map command allows the ep_torso_glow in gfx/effects to be the texture of our target. Well, if you recall, that image was just black and white. SO, we have "blendFunc GL_ONE GL_ONE" which will remove the black and highlight the other colors. Depending on how far away on the grayscale the color is from black (example - dark green is closer to black than true green) the more will be come translucent / dark. The glow function does exactly what it says - makes the texture have no light requirement to be visible (it's the brightest light source in the game because it's not affected by anything else including darkness.) The rgbGen this time is Identity, which means all the colors (red, green, and blue) are set to full brightness. Don't worry about that too much unless you're shadering for an entire game. Always use rgbGen Identity with glow lighting.

    5. Cool, we have the first portion of the shader done. Now we're going to do those booties. Add the following part to the bottom of your script.
     

    models/players/epic_galak/galak_torso
    {
    {
    map models/players/epic_galak/galak_torso
    rgbGen lightingDiffuse
    }
    {
    map gfx/effects/eg_torso_glow
    blendFunc GL_ONE GL_ONE
    glow
    rgbGen Identity
    }
    }
    
    models/players/epic_galak/boots_hips
    {
    {
    map models/players/epic_galak/boots_hips
    rgbGen lightingDiffuse
    }

    Alright so what I did here was add another target for the shader to hunt down. This time, it's "boots_hips". And like before, we're going to give it an rgbGen of lightingDiffuse. If you can't remember what any of this means, refer to step 2.

    6. At a little faster pace, I'm going to add in the rest of the shader so you may do the same. Once you've copied it, continue on to read what it means.
     

    models/players/epic_galak/galak_torso
    {
    {
    map models/players/epic_galak/galak_torso
    rgbGen lightingDiffuse
    }
    {
    map gfx/effects/eg_torso_glow
    blendFunc GL_ONE GL_ONE
    glow
    rgbGen Identity
    }
    }
    
    models/players/epic_galak/boots_hips
    {
    {
    map models/players/epic_galak/boots_hips
    rgbGen lightingDiffuse
    }
    {
    map gfx/effects/eg_bh_glow
    blendFunc GL_ONE GL_ONE
    glow
    tcGen Environment
    tcMod Scroll 0.2 -0.2
    }
    }

    Most of it should be familiar to you now, apart from the two "tc" functions.

    4. Okay, so, the command tcGen comes with three functions. Base, lightmap and environment. Base is the opposite of environment, as it draws from the original texture's coordinates to generate lighting spots. We want environment, which takes from... well the environment. Like to determine shadows - we need the game to know that there's a lightsource (like a lamp or something) nearby and that the shader must compensate for this rather than just making static shadows/highlights on the body. tcMod also comes with a plethora of fun and exciting things - see the brief lessons below to learn more about them. Right now we're going to go over the function of scroll. Two variables must be put into the scroll to make it dance about his booties. The first number is your x coordinate (left and right), the second is your y coordinate (up and down). So we'll be moving it the left and down at a speed of .2 units per second. If you ever do more than one tcMod, always do scroll last - it may interupt other processes.

    Please note, as an extra precaution, always insert another empty space after the very last line (in the Shader). Sometimes a game will ignore the very last line. If the very last line is a bracket like that above, which is necessary to the Shader, it could mess some things up.


    5. Now we must save it! So click File -> Save As. Now navigate to your skin's "shaders" folder (My Documents/My

    Skinz/Epic Galak/shaders). Change the filetype to "All Files" - this is very important. Now save the file as

    "EG_player.SHADER", with the ".SHADER" on the end. Oh look how good you are at following instructions!


    Section 6: Compress to Impress (The Sequel)

    Oh goodness, you're on the final section! I'm such a brilliant teacher. I'm so proud of you as well, shaders are the fiesty little ferrets of the Skinning Art. Once you have mastered them, they will make you their king!

    Anyways, by now y'all should be pr0's at compressing. As you should all have at least made a .PK3 for the skin you're currently adding a .SHADER file too, I won't be going into depth in this section on how to do it. If you know how to compress already and you're positive of what your abilities - skip to step 7.

    1. Open PakScape.

    2. In another window, find your Epic_Galak.PK3 and drag it into PakScape.

    3. Open your uncompressed Epic Galak folder (in your My Skinz folder) and select all the folders. You can do

    this by either pressing CTRL+A, clicking the first one and then holding CTRL+SHIFT and clicking the last one, or

    individually do step 4 for each folder.

    4. Drag the folders into your opened .PK3 in PakScape. When it asks to overwrite, select "Yes To All" or "Yes",

    depending on which version of PakScape you're using.

    5. Save your PK3.

    6. Copy the PK3 with CTRL+C then navigate ot the JKA's base folder directory and paste the file (CTRL+V).

    7. Open your can of Coke.

    8. Open your bag of Lays Baked Barbeque Potato Chips.

    9. Start JKA.

    10. Select your skin in-game.

    11. Enjoy seizure from skin / eat potato chips / drink Coke.


    *TEST VIDEO COMING SOON!!! Slow internet = horrible uploading speeds *


    If you're having difficulties understand / getting something to work properly - please contact me ASAP. We're all very willing to help here, and of course we're super friendly about it. Don't be afraid to ask questions either. Support on this matter is appreciated!

    You can reach me via this forum if you need help!


    Brief Lessons


    Lesson 1: "Public Directory" Theory

    Unfortunately, this isn't a theory. It's reality!! Anyways, for those of you who were confused by what I meant when I first described it - think of it like this:When a shader refers to the gfx folder, it doesn't matter what PK3 it's in. No matter which it does exist in, the shader may still refer to it. The game will read all the files and find it, provided it's in main holding tank of a PK3/folder or the base.


    Lesson 2: tcMod

    There are a lot of functions that can be used by the tcMod. The one we used is known as scroll. You may find some of the others listed below:

    rotate [degrees per second]
    scale [x] [y]

    These will be the more common ones, the others aren't going to be used unless under very specific conditions.

    Please see the "Shader Knowledge" for a full list of all Shader functions. (Above under TOOLS)


    Lesson 3: Glow Function Extra Notes

    1. Glow's will always make part of the skin stand out no matter the level of lighting in the environment.

    Including pitch black. It'll always be the same level of alpha.
    2. Usually if there's more than one part of the skin you want to have a glow, they can all be on the same

    shader (as long as they're all static - by the way, if this confuses you, don't be afraid to ask. Please!)
    3. You generally want brighter colors so they come out more apparent - it doesn't have to be white. Note that the closer the color is to black, the less vibrant it'll be on the actual skin.

  3. Do you still need help with this?


    Yes, I haven't touched the project since I made this post. The RGB colors shouldn't be a problem, I understand how those work - maybe it's the lighting value. The guide I found said to use "23" ... so I was using 23, then bumped it up to 30 on a test map, then 40 where I stopped because I couldn't see much of any difference. 


    I'll try something ridiculous like 100 just to see, but if you're saying it works that's all I need to hear. Figured I was just doing it wrong. Thx

  4. I have a map that's in the evening during a sunset. It's incredibly dark because it still mostly relies on the skybox's sun which is blocked out by mountains / hills. I googled ways to create ambient light across the whole map and found I can put ambient on the worldspawn with a value and _color to make the ambient have color. I did some testing with different levels of light, and none of them changed anything. Also, the GTKRadiant Editor Manual says this is a "hack" and it's not recommended for usage. 


    Does this method actually work in JKA or is there something preventing it from working? Does it depend on my build settings? Are there alternatives?

  5. Topic title may seem a little misleading but my question is:


    Is there a keyword or something that I can give a shader which'll prevent it from being loaded into GTK Radiant's texture window? I have a very very massive shader file which has several many skyboxes defined within. Every time I load the textures from the shader in GTK Radiant, obviously not only the sky shaders are loaded but all the components of it that I'll never use when mapping are there as well.


    I tried searching for an answer to this in the Q3 shader manual only briefly and didn't find any relative topics. If this doesn't make sense to anybody, I can attempt to explain in a different way.

  6. Unfortunately, as far as I know, any shader lighting applied to a sky shader will be applied to all sky shaders in your map, even if its a different sky shader. They work cumulatively too, so having a sky light on each sky shader just "adds" together, regardless of whether that particular shader is in a given area.


    Alright, thanks for the information. Originally I had no idea that'd happen. I guess my solution would be to strategically use light entities across the map. It was actually something I used to do when I first started mapping (not knowing I could create light-emitting sky shaders) so I'm not a stranger to this method lol...

  7. I'm making a map that uses 3 different sky shaders. Think of them each as different zones with their own separate sky, which are completely sealed off from one another. 


    The problem I'm having is that in each zone, you can visibly see the light cast by the other, secluded, zones. Is it possible to encapsulate the light so that they don't escape outside of their little "boxes"? I'm imagining I have my shaders wrong, but I can't seem to find a good example that'll help me understand what I'm doing wrong.


    If this doesn't make sense - imagine it like there are two rooms ( A & B ) which are completely closed off, miles away from each other in GTK Radiant. They're both surrounded entirely by the void. However, in Room A, it's not only lit by its own sky shader but Room B's as well - even though they're entirely separate.


    Current sky shaders:

    // Hoth Sky
    textures/krrealm/hothsky
    {
     	qer_editorimage textures/skies/sky
    	q3map_sun 0.58 0.58 .71 350 00 90
    	q3map_lightRGB 0.58 0.58 .71
    	q3map_skylight 350 5
    	surfaceparm sky
    	surfaceparm nomarks
    	surfaceparm noimpact
    	surfaceparm nodlight
    	q3map_lightmapFilterRadius 0 8
    	notc
    	q3map_nolightmap
    	skyParms textures/krrealm/hothsky 1024 -
    }
    
    // Desert Sky
    textures/krrealm/desertsky
    {
     	qer_editorimage textures/skies/sky
    	q3map_sun 1.000000 0.588235 .223529 350 -90 30
    	q3map_lightRGB 1.000000 0.588235 .223529
    	q3map_skylight 315 5
    	surfaceparm sky
    	surfaceparm nomarks
    	surfaceparm noimpact
    	surfaceparm nodlight
    	q3map_lightmapFilterRadius 0 8
    	notc
    	q3map_nolightmap
    	skyParms textures/krrealm/desertsky 1024 -
    }
    
    // Space Sky
    textures/krrealm/spacesky
    {
     	qer_editorimage textures/skies/sky
    	q3map_sun 1.000000 1.000000 1.000000 350 90 90
    	q3map_lightRGB 1.000000 1.000000 1.000000
    	q3map_skylight 200 5
    	surfaceparm nomarks
    	surfaceparm sky
    	surfaceparm noimpact
    	surfaceparm nodlight
    	q3map_lightmapFilterRadius 0 8
    	notc
    	q3map_nolightmap
    	skyParms textures/krrealm/spacesky 1024 -
    }
    

    Thanks! 

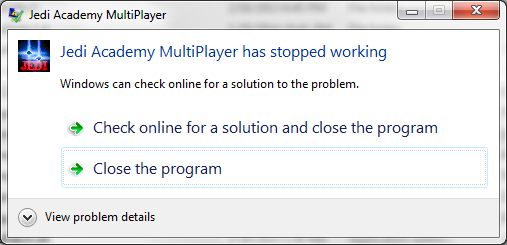
  8. I've already asked ent about this problem, so maybe someone else has an idea or solution...


    Every time I run jaMME, I get this error message:

    dslDXEY.jpg


    When I click "view problem details", I get this: 

    Problem signature:
    Problem Event Name: BEX
    Application Name: jamme.x86.exe
    Application Version: 1.2.0.0
    Application Timestamp: 52c8c6dc
    Fault Module Name: OpenAL32.dll
    Fault Module Version: 0.9.9.5
    Fault Module Timestamp: 3f03686c
    Exception Offset: 000f2001
    Exception Code: c0000005
    Exception Data: 00000008
    OS Version: 6.1.7601.2.1.0.256.1
    Locale ID: 1033
    Additional Information 1: 4c0d
    Additional Information 2: 4c0d4d78887f76d971d5d00f1f20a433
    Additional Information 3: 4c0d
    Additional Information 4: 4c0d4d78887f76d971d5d00f1f20a433

     
    When I click "Close the program", I get this: 
    hehLdix.jpg
     
    Ent suggested I tried running in multiple compatibilities, as I did a google search and it seems like that this error is associated with Windows updates... no luck on that end. Does anyone have any idea or fix for this? 


  9. I'm probably doing something really stupid / noobish here, but my maps won't compile with light from the skybox. I'm using one of the original skies, bespin's skybox, and even if I do a full or final compile - there is no light being generated on the map. The brushes / world remains entirely dark, as if there were 0 light (there IS 0 light). I've tried doing a simple BSP compile then running over it with -light and -vis, still nothing. I've also tried doing different skyboxes, again failing. The skies always appear above head in the map perfectly fine though, as does every other shader. I checked all my compile templates to make sure they're looking in the right directories.


    Also, unlike skyboxes, light will be omitted from my own custom shaders. Which kinda led me to believe there's something wrong with my shaderlist, but I've been able to compile much larger / complex maps and find that the skybox will randomly kick in/out. So there must be some technique or step that's escaping me here... my map is literally just 2 rooms. 


    Could anyone... shed some light? (sorry, couldn't resist)

  10. 3ds Max 2010 can export to .xsi which gets converted to .glm using carcass. Not sure why you had to export it to .obj and use Blender to export it to .glm. :P


    Because I'm a noob... it just happened to be one of the file types I saw could be imported into Blender and exported from 3DS, there's no other reason lol

  11. Just to wrap this up... here's how it was fixed:


    Cleaned up the meshes in Blender by remapping the UVW's and taking care of the seam problem... That's literally all that was wrong after I set my LOD's and parenting/hierarchies correctly. Originally I modeled in 3DS Max 2010, exported the elements in the scene as an OBJ, and finally imported them into Blender... Well Blender didn't like that and got jealous I was using another modeling application, so as I previously mentioned I redid everything in Blender. And when I say I did it, I actually mean a clanmate did it for me and thus deserves all the credit. I'd tag him if he had a JKHub account. 


    Anyways, I'd just be careful about the seam stuff in Blender like mrwonko described... I still don't fully understand it, but I don't think I'll be back for more anytime soon. 

  12. I removed the other LOD's. I looked at the manual and checked all of my additions for the proper hierarchy & requirements. Still won't compile, and at this point, I'm about to just say screw it. Blender is frustrating me, I don't have enough experience with it to pinpoint where I'm going wrong. 


    -- Edit --


    I think it has something to do with the way UV's have been mapped. I started deleting pieces that were causing errors, I found one that complained about a UV having seams. I'm guessing it's just something about the way the meshes have UV's mapped - I certainly don't want to make new elements/meshes in Blender. 3DS Max is much more convenient. So really if I want to get this to work properly, I guess I'm just going to have do everything over within Blender. 

  13. Well that definitely helped, I was able to change a bunch of stuff around and get actual errors (which is a good thing). However something still isn't going right... none of the pieces are showing up, the names I gave them aren't being recognized in the .skin file. 


    This is what I did: 
     

    1. Added armatures to each vertex group
    2. Parented objects. There are like 5 model roots, I don't know why, but I got them all to be on model_root_0
    3. Tried exporting, told me there were faces that weren't triangles. I went back and triangulated every addition I made that needed it.
    4. Tried exporting, told me there were UV seams. Fixed those. 
    5. Tried exporting, gave me a bunch of success messages on the error list - so I'm assuming that's good. 
    6. Added the names of what I thought were the new pieces to the .skin file, check it out in ModView... same result as before, telling me that the surfaces weren't found. 
       

    I'm once again at a loss, I can send the .blend again if needed. I'm obviously doing something wrong, I just have no idea what it is. This'll be the first/last time I ever do playermodeling, lol.

  14. I've successfully imported a GLM into Blender v2.69, using...


     http://jkhub.org/files/file/1413-blender-264-jedi-academy-plugin-suite/


    However, when I go to export - the model is unchanged in-game. Blender isn't throwing any errors at me, nor are any appearing in the game console, so I have no idea what's going on. I've double checked to make sure that all the newly added vertices have been weighted, using a method someone gave me:


    1. Make a group.
    2. Name the group after a bone.
    3. Add vertices to the group that need to be weighted by the bone. 
    4. Apply weighting to all the vertices in the group.


    I added into the .skin file all the new pieces. I'm not maxing out on polies/verts, these are small and simple changes. Now here's the twist, I tried loading the model into modview... For every new piece of the model that I added, it threw an exception that looks like this:


    Model_GLMSurface_SetStatus():

    Surface "name of model piece" not found!


    (Model: "models/players/kb3/model.glm")


    So I think that's a clear flag that something I'm doing is very wrong. I have no clue what I'm missing here. I can upload the .blend file if someone wants to look at it. Does anyone have any idea at all?


    Some possible problems I think may be causing it (although I don't know why): 

    1. I modeled in 3DS Max and exported (only the modifications) as .OBJ's, the imported them into Blender.
    2. UV's might be messed up... they look fine in Blender though. 
    3. The modifications aren't the right type of mesh? I don't even know if that'd make sense. I just started using Blender. 


    Any help is appreciated! 

  15. ....I'm seriously considering it, just want to hear back about @@Key and their luck with a provider using lugormod.....


    We're still using MarkMods... the pricing is pretty good. But as I mentioned before in another topic, we're getting what we're paying for. Customer service isn't that great. There's only 3 available hosts to choose from (from last time I checked), and we're currently going with a Kansas (USA) server. Lag isn't that bad, we noticed every now and then people would lose connection for about 5 seconds. We have complete access to the game files and can very easily manage them with Filezilla - this is probably my the best aspect. From all the hosts we went through (4 in total), MarkMods ended up being our favorite.


    We've successfully been running lugormod for a little under 2 weeks. The fact that we have total control of the game's files really helps with modding and editing. 

×
×
  • Create New...