
pra viilon
-
Posts
11 -
Joined
-
Last visited
Recent Profile Visitors
2,419 profile views


pra viilon's Achievements
-
 pra viilon changed their profile photo
 -
All Console Commands & Cheats
pra viilon commented on Nikomaru14's tutorial in Console Commands & Cvars
Saw this guide on the referecned website (https://jkhub.org/misc/FPS_ping_guide.html). Wanted to add here. For safekeeping. Some commands do overlap with the comments above, some not. Guide copy of Team Image's guide, made by MJZ. FPS Commands /cg_drawfps 1 - Enter this before starting. r_OverBrightBits "0" - This command defines the brightness level of the map. The higher the number, the brighter the map becomes (0 being the lowest possible value). For some reason this command eats up a shit load of frames. I had it set to 16 and when I tried changing it to 0, I gained about 20-30 fps (on an AMD XP 1600+ / GeForce 3 Ti200 combo). So if you need the fps boost, set this to 0. Your game will appear extremely dark at first, but don't worry, you can brighten it up again with r_intensity and r_gamma which are explained next. r_intensity "1.8" - This command increases the brightness of texture colors. With a low r_OverBrightBits, you may have to boost this to around 2 (default is 1). Keep experimenting until you find a brightness level you are comfortable with. r_gamma "2" - This is the master command that adjusts the brightness level of everything in the entire game. All splash screens and menus, along with the actual game play is affected. The default value is 1, but you should usually make this higher, depending on the brightness of your monitor (and to compensate for a low r_OverBrightBits setting). Try 1.4, 1.6, 1.8, 2 etc until you find a good setting. When setting r_OverBrightBits to 0, you'll have to juggle around between r_intensity and r_gamma until you find something you are comfortable with. r_vertexLight "1" - This is the command to enable vertex lightning. It removes many of the special effects and makes the map look somewhat dull. You should experience a decent fps boost with vertex lighting enabled. r_picmip "3" - This is the texture detail command found in Setup / Video. The higher the number, the less detail you will have. 5 is a good value, because it blurs out the textures so you can see your enemies clearer, but if that's too much for you, try 3 or 4. The command defaults to 1 and can go up to 16. If you have simple items enabled (explained next), you'll want to set picmip to 3. Anything higher and some items become blurred beyond recognition. cg_simpleItems "1" - This command makes the items on the map "simple" by changing them into 2d icons from 3d models. Set this to 1 to gain fps. If your r_picmip setting is above 3, some of the items will appear blurry with simpleitems enabled. com_maxfps "120" - This caps your frames (can be seen with cg_drawFPS 1) at 120 fps. A strange physics algorithm in the q3 engine makes it so your characters will have the best possible movement/gravity at a constant 120 fps. Strafe jumps, for example, go the longest and highest when fps is capped at this magic number. The default value is 85. r_displayRefresh "120" - Sets the display refresh rate of your monitor. You'll have to find out what refresh rates your monitor supports for each resolution, and use the highest refresh rate you can. Many monitors use 120 for 640x480 resolution, which works out perfectly with a com_maxfps setting of 120. The default setting is 0. r_subdivisions "80" - The higher number, the less curves there will be in the map, with values ranging from 0-80. If you need fps try 80. If you can spare some, stick with default 4 or 20. r_texturebits "16" r_colorbits "16" r_depthbits "16" - Makes the color depth of the game 16 bits. Change these values to 32 for a smoother picture. If you need the fps, stick with 16. r_lodbias "2" - This is the Geometric detail setting found in Setup/Video. Keep it at 0 if you don't like square models. 1 is default and 2 is the lowest quality (more fps). r_fastsky "1" - When set to 1, This command disables the sky, giving you better fps. r_textureMode "GL_LINEAR_MIPMAP_NEAREST" - Uses Bilinear filtering which will give you better fps. r_mode "3" - Sets your resolution to 640x480, a suggested setting if you need the fps. 4 = 800x600, 5 = 1024x768, 2 = 400x300 etc. cg_shadows "0" - Shadows underneath the models take up FPS and they will look ugly anyway with a picmip of 3-5. com_hunkmegs "128" - This is the command that tells the game how much RAM to reserve. It should generally be about 1/2 or 1/3 of your total ram. The default is 56. cg_drawcrosshair "-6" - This command will select your crosshair, -6 being a red dot. The dot doesn't work on all maps and will appear as a grey box sometimes. To select the crosshairs, you can choose from 1 through 9, or even experiment with some random negative values. cg_crosshairsize "8" - The size of the crosshair. I use 8 with the red dot... default is 24. cg_fov "97" - This is the command for your field of vision. The default setting is 80. Higher values will give you a larger perspective of your surroundings. You can go all the way up to 300 or something in q3, but 97 is the max in jk2/ja for reasons unknown. cg_marks "0" - Disable splash damage/projectile marks on walls (can save fps). This can be set in Setup/More Video. This well known q3 command doesn't seem to work in ja.. god knows why. I set it to 0 yet the marks still show up. cg_gibs "0" - "Gibs" refers to the body parts and blood that splash all over when someone explodes (in q3). Gibing someone takes up fps and clouds up the view. I'm not exactly sure what special effects this command applies to in jk2/ja (since there are no bloody explosions), but the command is present, so set it to 0. cg_noprojectiletrail "1" - Disables rocket smoke trails. Smoke trails eat up valuable fps and can be an annoyance. cg_thirdperson "1" - Setting this to 0 will put your perspective in 1st person. cg_drawGun "0" - Clears the gun drawings on the screen (can only be noticed in 1st person). This setting allows for a small fps boost. Some people like to see the guns, others find them distracting. It's up to you. cg_hudfiles "1" - The default is 0 which will display a graphical mana and health hud. I highly recommend switching this setting to 1 for a simple text hud. It takes up less space on the screen and is easier to read. cg_drawTimer "1" - The timer is displayed in the upper-right corner of the screen. Enable it, you need to be able to see the elapsed time in the game. cg_drawAttacker "0" - Disables the 2d picture of the person who's shooting you from popping up. Some people like to leave this option on 1 but I find it to be distracting. The following commands will disable screen bobbing when you move, which can be a detriment to your aim/be distracting. Set ‘em all to 0 for a smooth ride (can only be noticed in 1st person). g_bobup "0" cg_bobpitch "0" cg_bobroll "0" cg_runroll "0" cg_runpitch "0" cg_forcemodel "1" - This command will change all players' skins in the game to the current model you're using. Along with making it easier on the game's memory, this will give a nice fps boost to a slow computer. model "reelo" - This is the command to change your model. You can choose any model you want by their name. Reelo is the fat ass guy so he may seem easier to see/hit. cg_drawteamoverlay "1" - Tells your teammates' health in the upper-right color of the screen. Use values of 2 or 3 to change its position. cg_autoswitch "0" - I've noticed some people keep auto weapon switch on. They are newbies. sensitivity "8" - This can be adjusted from Setup/Controls/Mouse. Sensitivity really depends on your mouse. The higher it is, the less smooth your mouse will move across the screen. Try any value from 3-15 and see what's comfortable for you. You basically want to get your mouse moving as smooth as possible on screen but still be able to look up and down and spin around with ease. If you want to improve your aim, I suggest getting used to a lower sense. Low as in if you move your mouse from one side of the mouse pad to the other, you shouldn't spin any further than 360 degrees. cl_mouseaccel "0" - 0 (off) being the default setting, mouse accel speeds up the mouse the faster you move it. Accel comes in handy when you have a low mouse sensitivity. Instead of moving your mouse half way across the pad to turn around, you'll be able to just flick it really fast. The mouse will speed up upon the fast input and you'll turn instantly. It may take a while to get used to the feel of accel, but many people swear by it (including me.. I use 0.4). If you want to experiment, try starting with a value of 0.2 and work your way up. cg_aurashell "1" - This defaults to 1 but make sure you don't turn it off (like I did before) or force seeing won't work. Wall hackers pay no attention to this. cg_speedtrail "0" - Setting this handy command to 0 disables the annoying speed trails that appear when force_speed is enabled. Along with a small fps increase, I find it a lot easier to speed with the trails turned off. It almost seems less lagged. cg_repeaterorb "1" - This setting changes the repeater projectile into a shinny sphere. cg_drawRadar "0" - Set this to 0 to clear the useless/distracting radar which is on by default. s_volume "0.1" - Sound effects volume level found in Setup/Sound. Alter from 0 to 1. r_dynamicglow "0" - Setting this to 1 creates a fancy glowing lightsaber effect at the cost of fps. Keep it at 0 to save frames. Thanks for this addition goes to ihp|Clarity. cg_rendertotexturefx "0" - Setting this command to 0 takes off the faggoty "bubble effect" that appears with force push/pull. Some users (cards) have this set to 0 by default for some reason, but if you see the effect and want it gone, here is your fix. The fps boost is small, but the stupid effect gets annoying after a while, especially in push/pull newbie infested servers. s_musicvolume "0" - Music volume level found in Setup/Sound. Set this to 0 for obvious reasons. PING COMMANDS rate "25000" - Optimal setting for a high speed internet connection. Use 3000 if you're on dial up. If your high speed connect sucks, you might want to experiment with values lower than 25000. snaps "40" - Any server admin who knows what he/she is doing will set the sv_fps to 30 for a smoother ride. You'll need to set your snaps to 30 or higher to take full advantage of this. The default snaps/sv_fps settings is 20. If you play with 20 snaps on an optimized server with 30 sv_fps, your ping will be much higher (possibly 20-30ms higher) than it would be if your snaps setting is equal to or greater than 30. Go with 40 just be safe. cl_timenudge "0" - This command compensates for lag and will make your ping feel lower at the expense of choppy enemies. Values are always in the negatives, with 0 (off) being the default. Experiment with this setting depending on your ping/connection. -20 is a good setting for a 60-70 ping, -30 for 100 ping, etc. If the enemies are too choppy for you, keep this at 0. cl_maxpackets "100" - If you have a low ping go with 100. If you're struggling for a decent ping, you might want to try 30 - 50. -
-
All Console Commands & Cheats
pra viilon commented on Nikomaru14's tutorial in Console Commands & Cvars
Nice guide, you might want to add a few more: cg_fpls 1 - switches the view to first person, when vielding lightsaberscg_deferplayers 0 - autorefreshes the players when they change their skins, so that you do not need to hit the scores buttoncg_DrawVehLeadIndicator 1/0 - enables/disables the small aim helper lead indicator drawn when you are flying the fighters. By default its texture is missing, but it is added my many major maps (such as fsf) -
Note: this is multiplayer-only tutorial! I have heard a lot about people saying that NPCs and Vehicles crash servers. Let me enlighten you on the art of NPC and Vehicle use in Jedi Academy's multiplayer. When done correctly nothing bad will happen at all. Professional admins should be able to do this properly. Vehicles are treated as ridable NPCs by Jedi Academy, so from now I will refer to both of these groups as just NPCs. PART I. OVERCOMING NPC SPAWN LIMITATIONS Every BSP map has Entities – they are objects such as weapons, items etc. NPCs are one type of these entities. ALL Entities are: 1. Stored inside a BSP map file and spawned when the map loads on the server. 2. Manually spawned using admin commands. The server can only handle 1022 entities at any time! Any more entities will cause the server to get a fatal error. Entities from BSP map file that are not spawned on the server (info_null's, misc_model(_static)s, pickups that aren't spawned due to settings… etc) do not count towards this limit as they're not spawned and therefore don't take up slots. Now how many NPCs can you spawn on a map? It depends how many entities a map already has inside it and how many NPCs someone already spawned before you. EXAMPLE 1 Let’s say, a map called xnamex.bsp has 1000 entities in it. What does that mean? It means server can handle 22 entities more before it crashes. Now, each UNIQUE NPC takes up one entity slot. That means if you spawn 100 Jawas server will not crash (but it will lag as hell). But you can only spawn 22 unique NPCs in our map xnamex.bsp, any more and server will crash. Now some maps come with many entities, such as JediCouncilGCX, fsf (kotor flight school), tendron v2, asteroidH5. Party because they already have many NPCs preloaded with the map. Spawning NPCs on such maps is not recommended, UNLESS you spawn the SAME NPCs the map already has, since the same NPCs will not take up new entity slot! Here is some clear rules on NPC spawns per map: JediCouncilGCX: 2-3 new NPCs AsteroidH5: 1-2 new NPCS FSF: NO SPAWN of new NPCs allowed <list will be updated> What to do if you already spawned some NPCs, and now you want to spawn others? Restart the map! By reloading the map, server will erase the entities of spawned NPCs, thus allowing you to spawn new NPCs in their place. EXAMPLE 2 We had a cool RP mission on our map xnamex.bsp, spawned some vehicles and NPCs. Now it is over, and we want to spawn some other NPCs. First admin does this: /ammap 0 xnamex Server reloads the map, erasing manually spawned NPC entities from the memory. Now new ones can be spawned. USEFUL TIP: If the server was empty and you came to it and want to spawn NPCs, restart the map before doing it, just to be sure. Who knows, maybe someone spawned some NPCs before you and left, and their entities still remain in server’s memory. Also, if YOU spawned some NPCs, restart server after leaving, just to be sure to clean those entities. PART II. NAMING NPCs NPCs can be named. Each NPC you spawn can either have a unique name, or a group of NPCs can share the same name. Examples: /npc spawn bartender johny /npc spawn stormtrooper squad1 /npc spawn swamptrooper squad2 /npc spawn vehicle atst_vehicle atst1 /npc spawn desann boss1 /npc spawn tavion boss2 Why do you need it? Because you can selectively despawn those NPCs! (In single player you can also use additional commands, which are not available in MP) Example: /npc kill johny – kills that poor bartender from example above. /npc kill squad1 – kills squad one stormtoopers in case we missed some on RP mission /npc kill boss2 – kills Tavion, maybe we want to respawn her. /npc kill atst1 – kills atst we spawned. /npc kill all – kills all NPCs and vehicles on server, including prespawned ones. Why is this useful? During missions too many NPCs can result in server lag. Selectively killing the NPCs you have no use anymore will solve this problem.
-
647 downloads
This is the reskin of Tifa to look like Sakura (or hmm grown up Sakura) this is pretty nice and simple reskin. the most challenging thing was getting rid of the suspenders. i have also added bot and npc support. the sounds remain nearly the same. -
Version v2
4,652 downloads
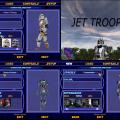
This customisation contains nearly all clones from clone ultima pack, storm- and scout troopers and different battle droids. besides i have created many new skins: like BARC clone, 9 recon corps clone, shadow commander and more (both canon and non-canon) This customization is valuable for rp clans and for anyone who likes Star Wars combat units- clones and droids. u can customize your character within many groups: 1. clone airborne (improved) and clone commander 2. clone bacara 3. bly, deviss, barc clone, commander bow, commander thire, 327th corps 4. phase I clones (visor improved, 8 colors available) 5. clone cody (cody helmet removable!) 6. clone marine (improved) and cold assault trooper 7. neyo, 91 recon corps clones and fleet security 8. ARC clones (visor improved, 6 colors; some elements removable) 9. phase II clones {+jetpack!} (gree, sky, 41st, 212, improved 501st , shock, 38th armored, improved standart, shadow clone and commander, mace windu batallion, jetclone) 10. scout troopers (episode 6 scout, episode 3 scout improved, night scouts) 11. sandtrooper and stormtrooper 12. snowtrooper and snowtrooper commander 13. B1 battle droids (different variants) 14. B2 super battle droid 15. Clone Commandos (6 highly customizable variants) 16. Magna Guards (3 colors) many groups have new skin parts created by me. Existing parts are improved. this customisation works both for single and multiplayer. -
4,178 downloads
This is the skin of Darth Nihilus from KoTOR 2. I did it by reskinning anakin skywalker model by hapslash. i did it because i wasnt happy with the old Nihilus skin (using other model) which has face bug and dont have bot and team support. -
233 downloads
This configuration file is for those server providers and mp game solo players who dont know how to scale models themselves. This file includes all yoda and vandar models i am aware of, younglings, SBDs, new nihilus skin and more as well as all old skins. This is for JA+ servers and it wont work in standart baseJKA multiplayer -
856 downloads
This is the reskin of ARC trooper model to look like captain Rex from the clone wars series All the goodies are present: NPC support, Bot support, Team support and even Soldier customization support (requires Soldier Customization V2) -
326 downloads
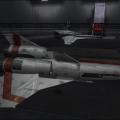
This pack contains several vehicles from Battlestar Galactica show. The original series Viper model (referred as mark I in reimagined series) was created by Mars Marshall and was already at filefront, but it lacked appropriate weapon effects and had buggy shader. Mark II and mark VII Vipers, raptors and cylon raiders from reimagined series were created by Coxxon and converted to JKA format by me. For those who hate spawning in console and want a map with new vehicles, i added one. I edited Kotor flight school final map (FSF), added TFFA and CTF game modes support and added the new BSG vehicles. YOU HAVE TO get original FSF map for this edited version to work. They both will be playable separately: FSF.bsp - original map FSF_BSG.bsp - edited map If you do not want tons of vehicles that come with original FSF map, just install FSF.pk3 from the map archive and install this BSG pack. VEHICLE SPAWN NAMES * Viper-mk1 Viper-mk2 Viper-mk7 * raptor raptor-unarmed * raider-old raider-new * heavy-raider *
