
 1st Place Winner Reepray with Rishi Station 2,
  2nd Place Winner chloe with Oasis Mesa, and
  3rd Place Winner Artemis with TFFA Brutal! Amazing submissions by everyone!


Creating a playermodel by XSI mod tool 7.5
We need this programs and files
1.Autodesk Softimage Mod Tool
2. SDK Academy
3. Jedi Academy skeleton:
https://jkhub.org/files/file/1492-softimage-jedi-academy-character-skeleton/
Now:
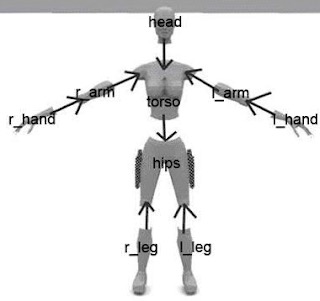
1. You created any character model and divide to this parts
http://i.piccy.info/i7/42ad4f361284a41270386ba47f2134f1/1-5-8299/23985968/Scheme.jpg
Head
Torso
R_arm
R_hand
L_arm
L_hand
Hips
R_leg
L_leg
2. Export to obj.
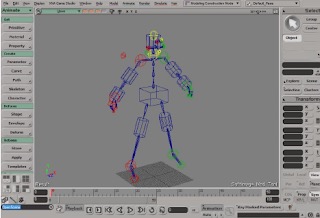
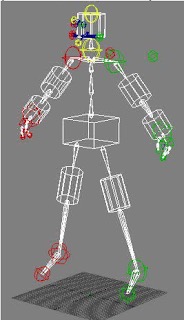
3. Оpen XSI, File / Open, and open skeleton.exp file
4. You see it:
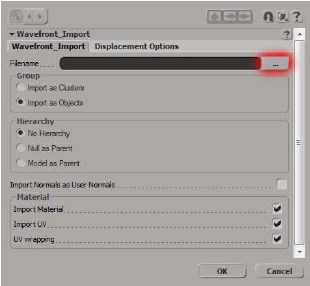
5. Import .obj modelfile
6. Now
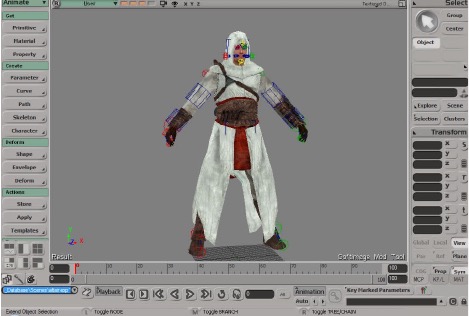
7. Highlight all modelparts by Scene menu
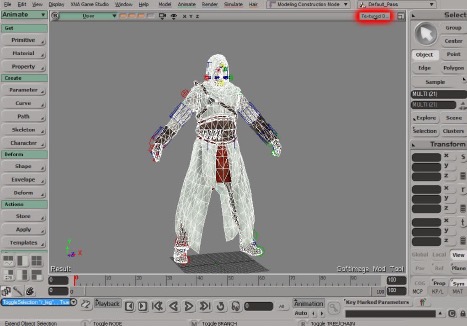
7. Change Textured Decal to Wireframe for easiest highlight.
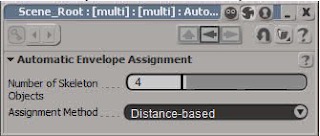
8. Press envelope / set envelope menu, (Change option Model to Animate in left upper corner of windowl) and highlight only blue bones
Our necessary bones on the pic:
Or use Scene menu and highlight bones from Envelope Operators pop.
9. Right click and set this.
10. Press Shift + H(unhide all), then press numpad 8. You see the window.
Go to model_root / mesh_root /stupidtriangle_off, and you see tags.
For object link just drag one object to another.
11. Now:
bolt_l_leg_calf
bolt_l_leg_cap_hips
bolt_l_leg_foot
l_leg_cap_hips_off
-highlight and link to l_leg
bolt_r_leg_calf
bolt_r_leg_cap_hips
bolt_r_leg_foot
r_leg_cap_hips_off
-highlight and link to r_leg
bolt_head_back
bolt_head_cap_torso
bolt_head_eyes
bolt_head_front
bolt_head_left
bolt_head_right
bolt_head_top
head_cap_torso_off
--highlight and link to head
bolt_l_hand
bolt_l_hand_cap_l_arm
l_hand_cap_learn_off
--highlight and link to l_hand
bolt_r_hand
bolt_r_hand_cap_r_arm
r_hand_cap_r_arm_off
--highlight and link to r_hand
bolt_r_arm_cap_r_hand
bolt_r_arm_cap_torso
bolt_r_arm_elbow
r_arm_cap_r_hand_off
r_arm_cap_torso_off
r_hand
--highlight and link to r_arm
bolt_l_arm_cap_hand
bolt_l_arm_cap_torso
bolt_l_arm_elbow
l_arm_cap_l_hand_off
l_arm_cap_torso_off
l_hand
--highlight and link to l_arm
bolt_back
bolt_chestg
bolt_hip_bl
bolt_hip_br
bolt_hip_fl
bolt_hip_fr
bolt_hip_l
bolt_hip_r
bolt_lchest_l
bolt_lchest_r
bolt_shldr_l
bolt_shldr_r
bolt_torso_cap_head
bolt_torso_cap_hips
bolt_torso_cap_l_arm
bolt_torso_cap_r_arm
bolt_uchest_l
bolt_uchest_r
torso_cap_head_off
torso_cap_hips_off
torso_cap_l_arm_off
torso_cap_r_arm_off
head
l_arm
r_arm
--highlight and link to torso
bolt_hips_cap_l_leg
bolt_hips_cap_r_leg
bolt_hips_cap_torso
bolt_hips_l_knee
bolt_hips_r_knee
hips_cap_l_leg_off
hips_cap_r_leg_off
hips_cap_torso_off
torso
l_leg
r_leg
--highlight and link to hips
hips
--highlight and link to stupidtriangle_off
stupidtriangle_off
--highlight and link to mesh_root
mesh_root
--highlight and link to model_root
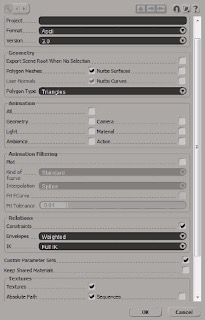
Then export your scene to XSI and name exported file root.xsi
Below settings.
13. Now we write car file. Called it model.car.
This file contents:
$aseanimgrabinit
$aseanimgrab_gla models/players/_humanoid/_humanoid.gla
$aseanimgrabfinalize
$aseanimconvertmdx_noask models/players/yourmodel/root –makeskin -losedupverts
You must install SDK Otcast before it. Paste _humanoid folder with GLA and CFG files from assets0.pk3 to SDK /base/models/players folder
Then create base/models/players/yourmodel/ folder
And paste to this folder model.car and root.xsi
14. Open model.car file by carcass.exe and receive GLM file. Then write model_default.skin file, pack to pk3, copy to base and viola
Below videotutorial in english


Recommended Comments
There are no comments to display.
Create an account or sign in to comment
You need to be a member in order to leave a comment
Create an account
Sign up for a new account in our community. It's easy!
Register a new accountSign in
Already have an account? Sign in here.
Sign In Now