
 1st Place Winner Reepray with Rishi Station 2,
  2nd Place Winner chloe with Oasis Mesa, and
  3rd Place Winner Artemis with TFFA Brutal! Amazing submissions by everyone!


- Title: Horizon Blending
- Subject: How to create a seamless horizon blend between your 3D terrain and a 2D Skybox.
- Written by: Szico VII
- Tutorial written for: JK3
- Similar concept work like in: N/A
- Difficulty level: 10/10
- Expected time to complete for first attempt: 2-4 hours
- Prerequisites: Understanding of trisoup and quadsoup terrain creation, Understanding of Alpha-Fading, Proficiency in Radiant 1.4.0 and in shader creation and useage, an image editing program that can blend 2 textures together, understanding of func_groups and how to use them.
Introduction:Creating the Skybox
This tutorial will instruct you on how to create a seamless blend between your 3D terrain and playable map and the horizon of your skybox, which I call "Horizon Blending". It will involve editing of the skybox image files, so you will need an image editing program capable of blending two textures together. I this tutorial I use Photoshop CS3, however you are free to use any program which performs a similar function.
There is a fair amount of assumed knowledge you will need to follow this tutorial, most importantly the basics behind quadsouped and trisouped terrain, and you must be able to create your own .SHADER files and be able to get them working in Radiant. This tutorial also assumes strong knowledge of the editor and its various shortcut keys, although these will sometimes be listed for your convenience.
Additionally, this method makes use of the alpha-fade system, so background knowledge on this system will help when customising different terrain blends. However, shaders and information will be provided in this tutorial which you can simply copy and paste, so it is not necessary to grasp the full concept provided you follow the instructions carefully.
Below is a list of tutorials you may find useful to read prior to attempting a terrain/skybox blend.
Hand-Shaped Terrain
Updating your Compiler
Terrain Blending
IMPORTANT! You must have Q3map2 version 2.5.16 installed for the alpha-fade system to work. Download it here (should be installed with GTKRadiant too) and use the above tutorial to install it if necessary.
Opaque Horizon Blending (no Water)
EXAMPLE FILES! - You should download the example files and extract them all to your base folder whilst reading through this tutorial, as they will help you to understand how things work! The large file size is due to the high-res textures.
Download example/source files
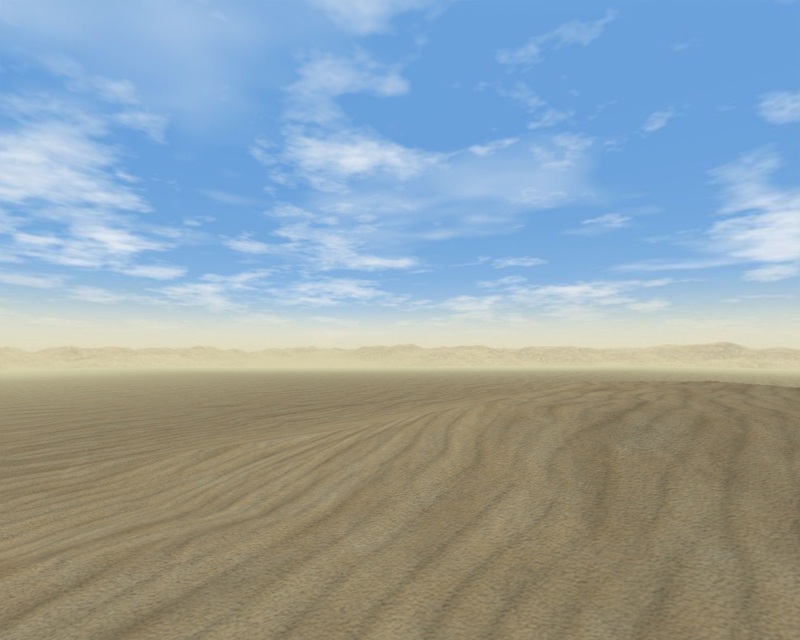
The first thing You will need to create is the terrain in which your players can move around in. This is basically your normal level, so build whatever you want. However, it is important that you decide on a texture which you want to use to blend into your horizon. In this tutorial, I shall be making a desert themed map, so the edges of my playable area will be using a sand texture. Ideally this texture should be large and scalable, as it will be stretching a long way into the distance and the less repetitive it looks, the better. There are a few design tips I have however, that will make your skybox blend look better.
If possible, have your playable area raised (i.e on a small hill) this is because it means the player is ABOVE the horizon line in relation to the skybox, and this allows you to keep more of your skybox visible (more on this later) If you are trying to create an ocean effect that a player can swim in, don't raise it too much as this will cause problems.
Try and make your map in a mainly circular shape - i.e, If you stuck a giant circular brush underneath it, it would fit onto it with no sections jutting out.
Make sure that when you have finished creating your level, the edges of the terrain of it are squared off and the same texture is all around the border. You should also place clip brushes to prevent players running out into the horizon!
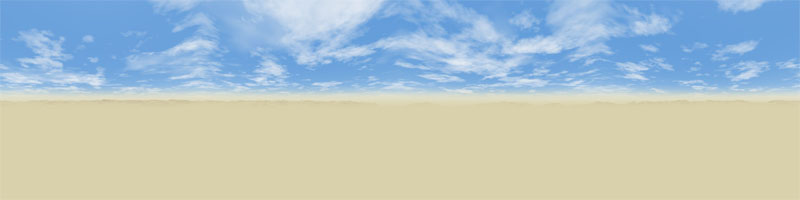
Here is the sand texture I have chosen to use for my terrain blend:
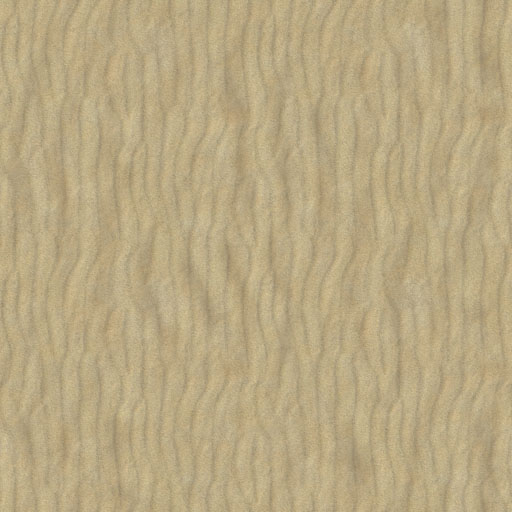
NB: You do not need to download this texture as it is included in the example files!
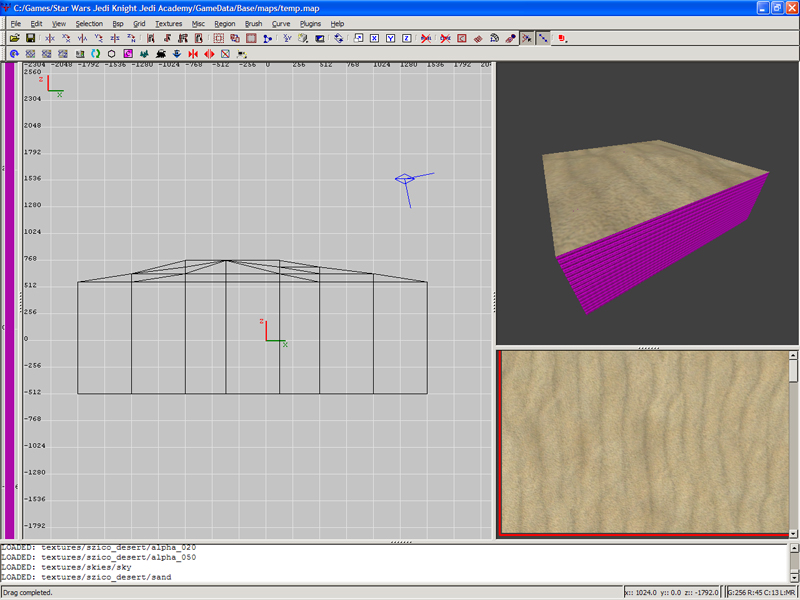
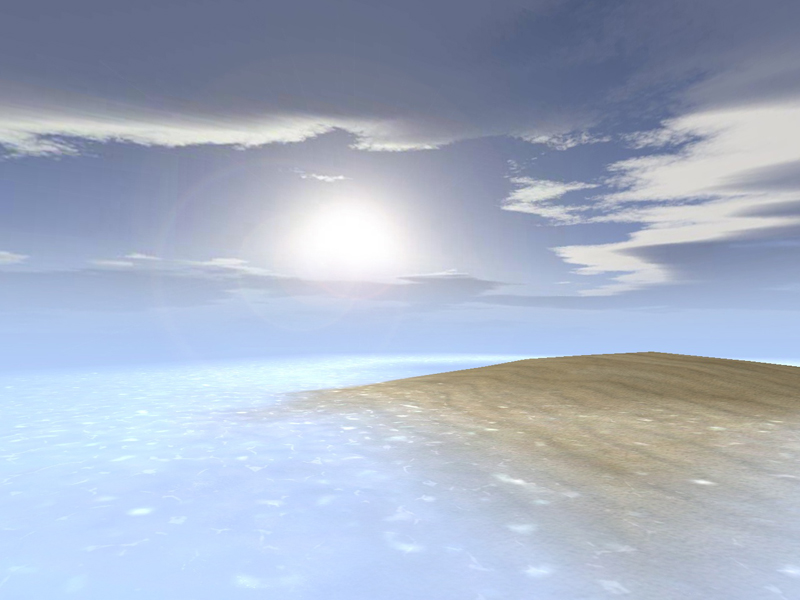
And here, is my basic terrain. (squared off at the edges) It doesn't have any detail in it, as this is only for demonstration purposes, but you can build whatever you want in this area as you would in a normal map. Feel free to make the terrain undulate (but keep the outside edges all the same height and using the same chosen texture) or do other alpha blends within this section
Now we can begin working on our skybox horizon blending itself. The first thing You will need to do is find an appropriate skybox, but bear in mind you will be losing any detail below the halfway line in them, so choose appropriately. Sometimes skyboxes that might not seem to be good choices for a seamless blend turn out to be quite good. I've chosen to use a base JA skybox, DESERT. You will need to place all your skybox images in a custom texture folder. For the purposes of this tutorial, I have chosen the folder textures/szico_desert. One of my skybox images can be seen below.

"textures/szico_desert/desert_ft.jpg"
You will also need to setup a sky shader for your new skybox. I have pasted one you can use below.
textures/szico_desert/sky
{
qer_editorimage textures/skies/sky.jpg
q3map_sun 1 1 1 350 180 45
surfaceparm sky
surfaceparm noimpact
surfaceparm nomarks
notc
q3map_nolightmap
skyParms textures/szico_desert/desert 512 -
}
NB: This sky shader has "Sky Lighting" which means a global sun will illuminate the level. You can choose to remove this if you wish, by deleting the line: "q3map_sun 1 1 1 350 180 45"
Open up your image editing program of choice!
Before we continue, I should explain the main principle behind this skybox blending.
Theory
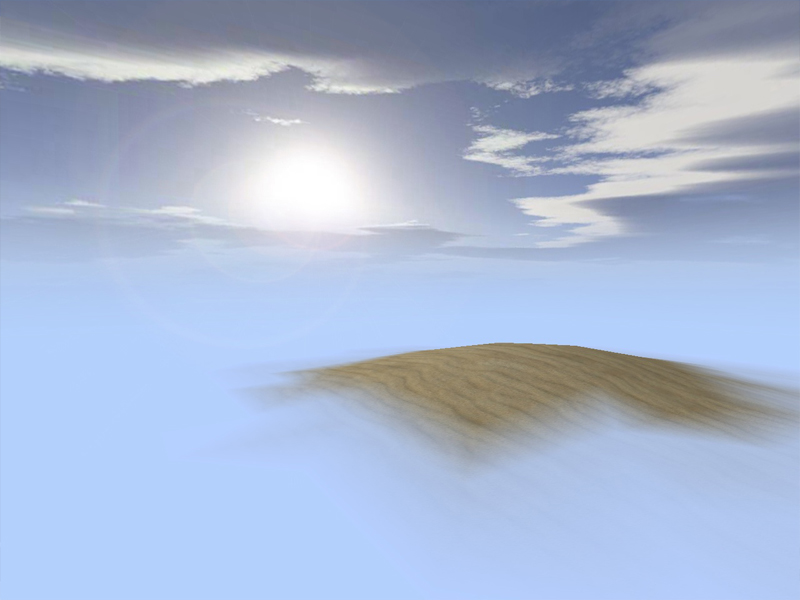
The main idea behind blending 3D terrain into a skybox is quite simple. In order for both the skybox and your terrain to both appear to have blended together, they must both be the same colour and shade where they "meet." (In reality, they never meet as the skybox is drawn at an infinite distance from the player, but to the player"s eyes ingame, this is how it will appear.) This blend occurs at the horizon line on your skybox, that is, exactly halfway up your side-facing skybox textures, provided the player is on a flat plane. So here is what happens:
You blend your side-facing skybox images (skybox_rt, skybox_bk, skybox_lf, skybox_ft) to a solid colour of your choice halfway down. The colour you choose should be close to the shade of the skybox pixels directly above where the blend occurs, and a similar shade to your texture that you picked earlier on (in this case, a yellowy sand texture) Your bottom skybox image should be converted into a single colour that matches the one you picked for the sideways images. Do not edit your UP skybox image.
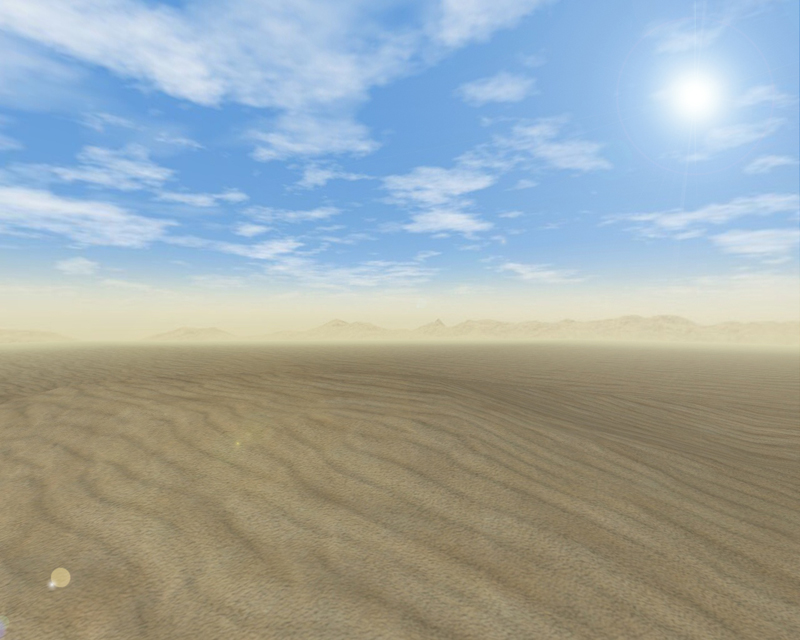
You then create a flat section terrain which stretches out into the distance in your map, and gradually blend this texture to the same shade of colour that you used in your skybox, using alpha-fade brushes. This gives the impression of a seamless blend, as shown below.
An important thing to note is that the lower down a player can move within the playable area of the map, the "horizon" line moves further up the side of your skybox texture. You will have to experiment to find the best place to blend your skybox images.
So, the next section of the tutorial will quickly explain how to create your skybox images using Photoshop.
NB: - The next few steps show how to blend your side images using Photoshop - If you use a different program you will need to find an equivalent tutorial for this section.
PHOTOSHOP ONLY
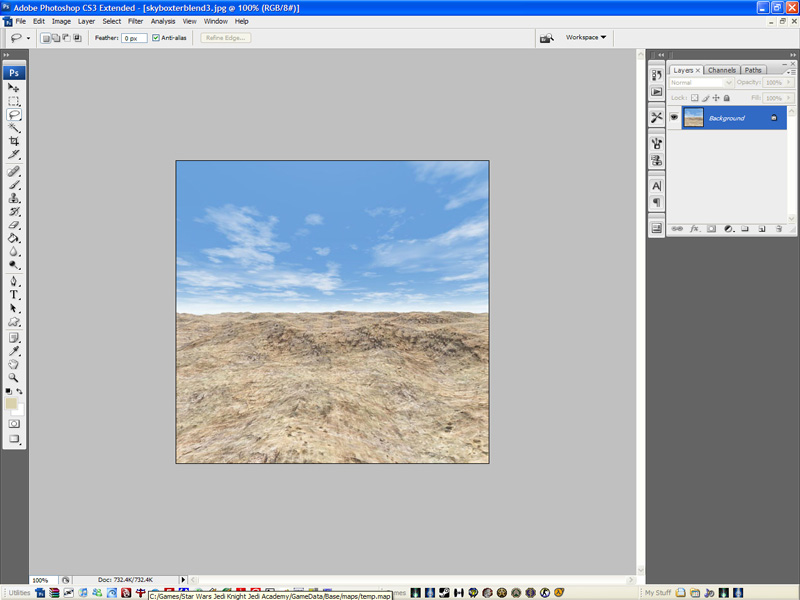
Step #1 - Open up your skybox_dn.jpg image. Recolour it to a completely flat shade (Remember, the shade should be approximately equal to the colour of your terrain texture) Some of JKA"s default skyboxes already have the bottom skybox image as a flat shade, so you do not need to edit these. An example is shown below, using the Korriban skybox.

SAVE THIS IMAGE!
Step #2 - Create a smaller 64x64pixel texture and colour it completely the same shade again. (This is the image we will later use to blend our terrain texture with.) SAVE IT as textures/szico_desert/yellowblend.jpg (Feel free to change the name when creating your own skybox blend that doesn"t use yellow as its colour)
Step #3 - Open your 4 side-facing skybox images (skybox_rt, skybox_bk, skybox_lf, skybox_ft.) You can start with any one of these 4.
Step #4 - Create a new layer (Layer --> New --> Layer...)
Step #5 - Use the fill tool to make this layer the same colour as the DN skybox image.

Step #6 - Create a new Layer Mask (Layer --> Layer Mask --> Reveal All...) A white box should appear next to your layer thumbnail in your layers window.
Step #7 - Select the Gradient Tool, and make sure that you are using the white/black flat gradient, as shown below:
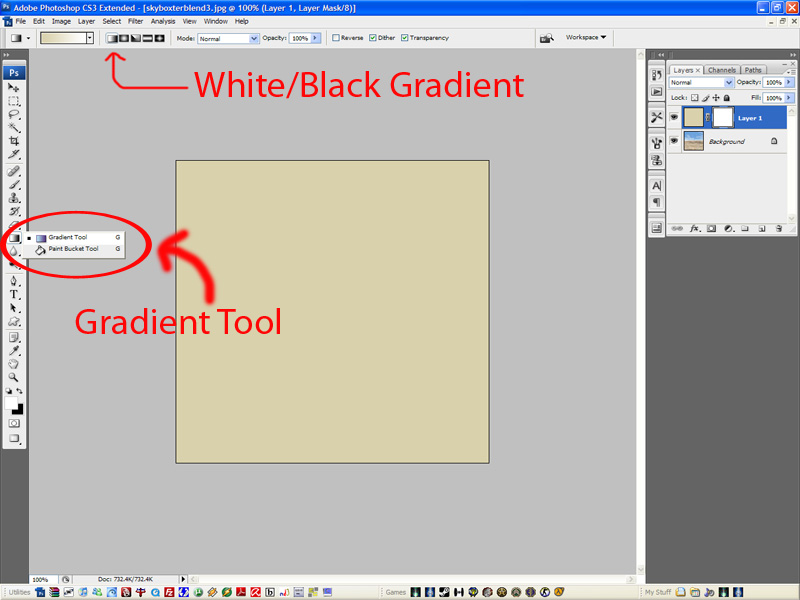
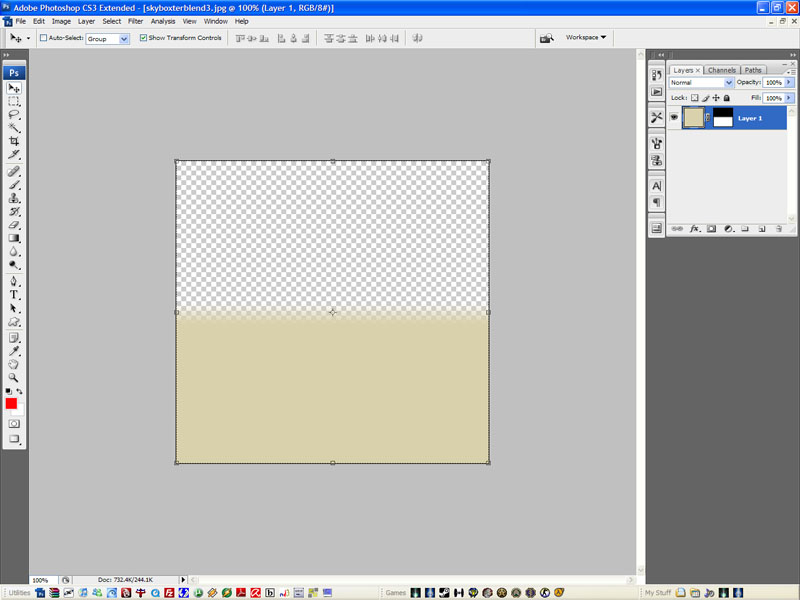
Step #8 - Press and Hold SHIFT, whilst clicking and dragging your mouse upward. The further you drag your mouse upwards, the more gradual the blend. You can try again by repeating this action if you make your blend in the wrong place. Ideally your blend should start just about the halfway point, and extend slightly above it, although this might change depending on your specific map horizon level. This will create an effect as shown below:

SAVE THIS IMAGE over your original image.
Step #8 - Now we need to paste this new layer mask into the other 3 side-facing skybox images. In your layers window, RIGHT-CLICK on the layer that is named "Background," and press DELETE. This should leave you with your yellow blending only.
Step #9 - Copy everything left over. First hit Ctrl+A to select everything in your image, and then go Edit --> Copy Merged. This will add your yellow/transparent blend to your clipboard.
Step #10 - Paste this layer over your remaining 3 side-facing skybox images, so all of them blend to a solid yellow colour at the same level, as shown below. SAVE ALL OF THEM OVER THE ORIGINAL IMAGES!
You have now finished all the editing of your skybox textures! The next section will deal with blending your terrain into this skybox.
Blending your terrain: Opaque Horizon Blend
First up, here is a basic explanation of what an alpha fade is, and how it works.
An Alpha-fade brush is simply a brush you make in Radiant which is covered with an alpha-fade shader. Alpha fade shaders are used by a mapper to blend textures together in varying degrees. In this tutorial, we will only be blending 2 textures together, similar to the way easygen blends textures together, but using a different method.
For this tutorial, our PRIMARY texture is my sand texture (textures/szico_desert/sand.jpg), and my SECONDARY texture is my yellow texture (textures/szico_desert/yellowblend.jpg) Wherever an alpha 100% brush covers a brush vertex with a special blending shader applied, it will tell the shader to show the Primary texture at 100% opacity. Wherever an alpha 0% brush is applied, it will tell the shader to show the primary texture at 0% opacity, and thus the secondary texture will be fully visible.
Values of 50% and other inbetween show the primary texture at various opacities, thus creating a blended effect.
Shaders:
You will need to edit all these shaders into your own shader file for your own maps - however, all the tutorial images/shaders can be found in the included example files.
PHONG SHADER: - This is the shader that should be applied to all the edge brushes of your playable area. It is a phong shader, which means it smooths shadowing over trisouped and quadsouped terrain, preventing hard edges or splodge shadowing/lighting from occuring. This shader is NOT affected by alpha fade brushes.
textures/szico_desert/sand
{
qer_editorimage textures/szico_desert/sand
q3map_material Sand
q3map_shadeangle 90
q3map_nonplanar
{
map $lightmap
rgbGen identity
}
{
map textures/szico_desert/sand
detail
blendFunc filter
}
}
SAND/YELLOW BLENDING SHADER: - This is the shader which is applied to all the flat brushes outside your playing area, and these are the brushes where the blending takes place. This shader is affected by any alpha fade brushes which touch the vertices of the brush it is applied to. It also has an editorimage so you can tell the difference between the normal phong sand shader and the blending shader in radiant.
textures/szico_desert/sandyellow_blend
{
qer_editorimage textures/szico_desert/sandyellow_blend
q3map_material Sand
q3map_shadeangle 90
{
map $lightmap
rgbGen identity
}
{
map textures/szico_desert/sand
blendFunc GL_DST_COLOR GL_ZERO
}
{
map textures/szico_desert/yellowblend
blendFunc blend
alphaGen oneMinusVertex
}
}
ALPHA FADE SHADERS: - These are the shaders that give the alphamod brushes their paramaters and cause them to affect your blending shaders. They are editor only and are used only during the compile process, and do not appear ingame.
textures/szico_desert/alpha_000
{
q3map_alphaMod volume
q3map_alphaMod set 0
q3map_nolightmap
surfaceparm nodraw
surfaceparm nonsolid
surfaceparm trans
qer_trans 0.75
}
textures/szico_desert/alpha_010
{
q3map_alphaMod volume
q3map_alphaMod set 0.1
q3map_nolightmap
surfaceparm nodraw
surfaceparm nonsolid
surfaceparm trans
qer_trans 0.75
}
textures/szico_desert/alpha_020
{
q3map_alphaMod volume
q3map_alphaMod set 0.2
q3map_nolightmap
surfaceparm nodraw
surfaceparm nonsolid
surfaceparm trans
qer_trans 0.75
}
textures/szico_desert/alpha_030
{
q3map_alphaMod volume
q3map_alphaMod set 0.3
q3map_nolightmap
surfaceparm nodraw
surfaceparm nonsolid
surfaceparm trans
qer_trans 0.75
}
textures/szico_desert/alpha_050
{
q3map_alphaMod volume
q3map_alphaMod set 0.5
q3map_nolightmap
surfaceparm nodraw
surfaceparm nonsolid
surfaceparm trans
qer_trans 0.75
}
textures/szico_desert/alpha_075
{
q3map_alphaMod volume
q3map_alphaMod set 0.75
q3map_nolightmap
surfaceparm nodraw
surfaceparm nonsolid
surfaceparm trans
qer_trans 0.75
}
textures/szico_desert/alpha_100
{
q3map_alphaMod volume
q3map_alphaMod set 1.0
q3map_nolightmap
surfaceparm nodraw
surfaceparm nonsolid
surfaceparm trans
qer_trans 0.75
}
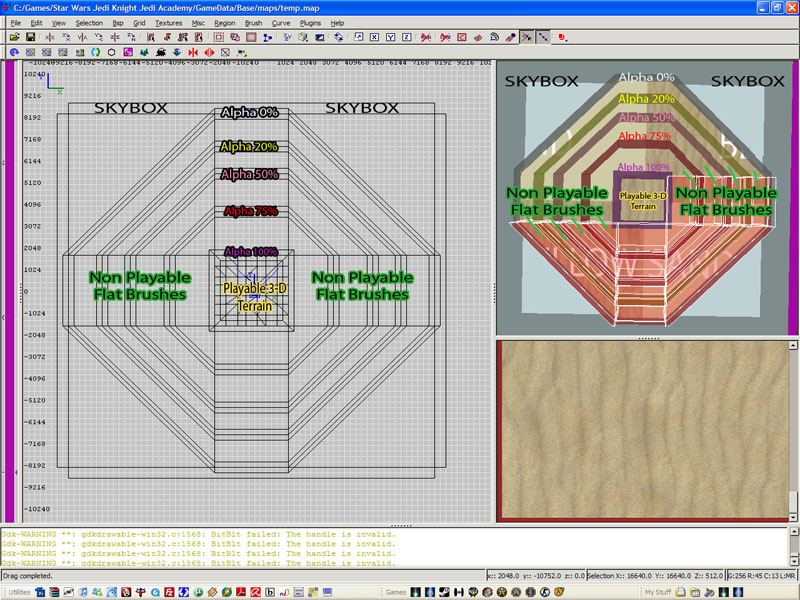
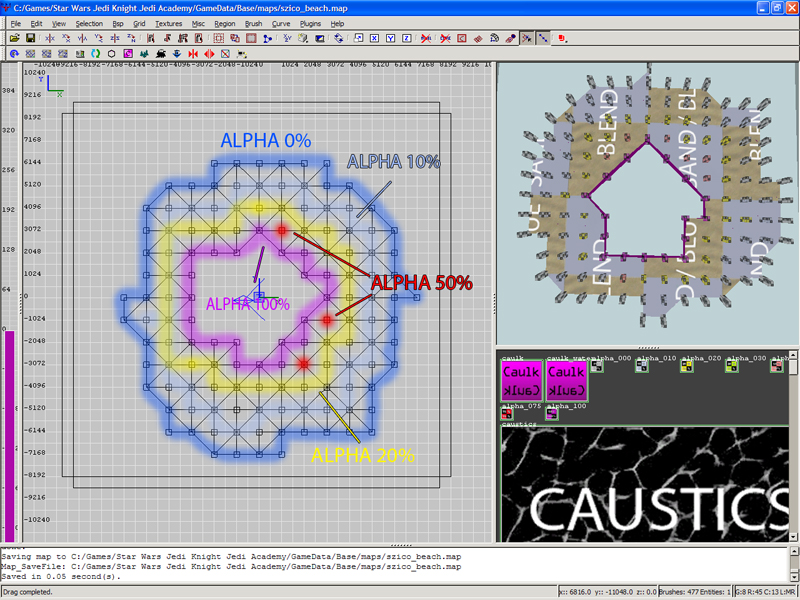
The basic layout for our overall terrain will be as shown below. It is important to note that all your skybox terrain blending brushes (Green in the image below) should be FLAT.
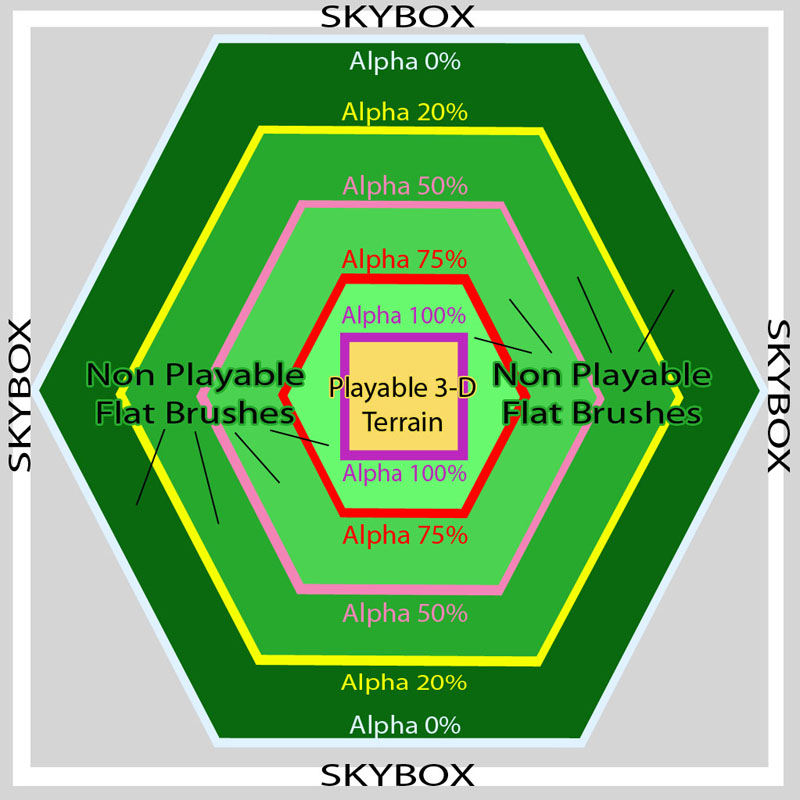
Key:
GREEN - Flat brushes covered with the SAND/YELLOW BLENDING shader. Each different shade of green is a different set of brushes.
ALPHA XX% - Brushes which overlap the edges of the flat GREEN brushes either side and use the alpha fade shaders.
SKYBOX - Your skybox shader applied to a large box which extends around your terrain.
PLAYABLE 3D - The area where your map itself is located, bordered by the PHONG SHADER.
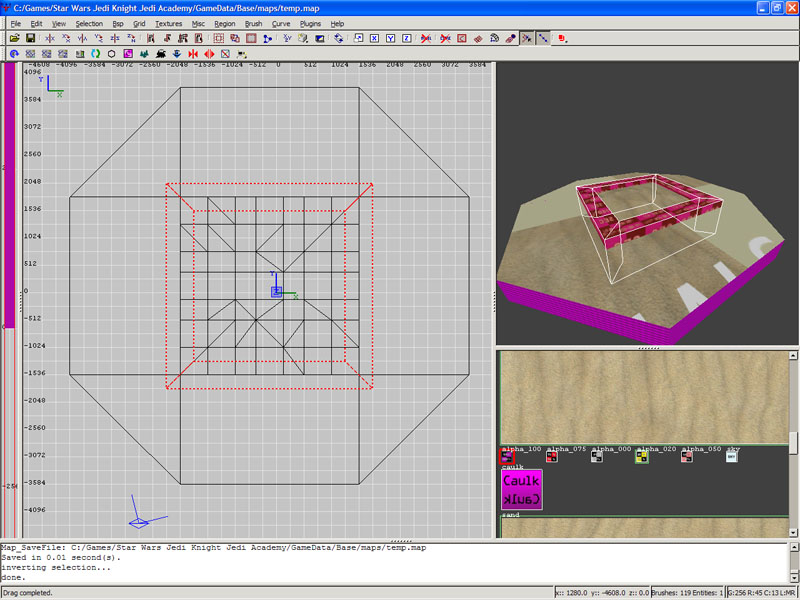
Here is the same setup shown in Radiant. The playable area of your map which you made earlier is in the center.
Here's how you go about creating this shape, starting from your basic playable area (remember it should be a square shape and the edges should use the phong shader described above)
Remember the basic terrain we made earlier?
Well, it's time to add to this. We will start with our first "layer" of terrain blending brushes and form them into a hexagonal shape around our central box.
Create a hexagonal shape around your central area using 6 brushes as shown below. Texture them all with the SAND/YELLOW BLENDING shader. You will notice the brushes in my central area all use the PHONG shader, but in your map this is not necessary - only the brushes nearest the outside of this area need the phong shader. If you wanted grass in the middle, you could then blend the phong shader to grass, but that's something for you to try in your own time. If you're fine with sand all the way, then leave it as I have.

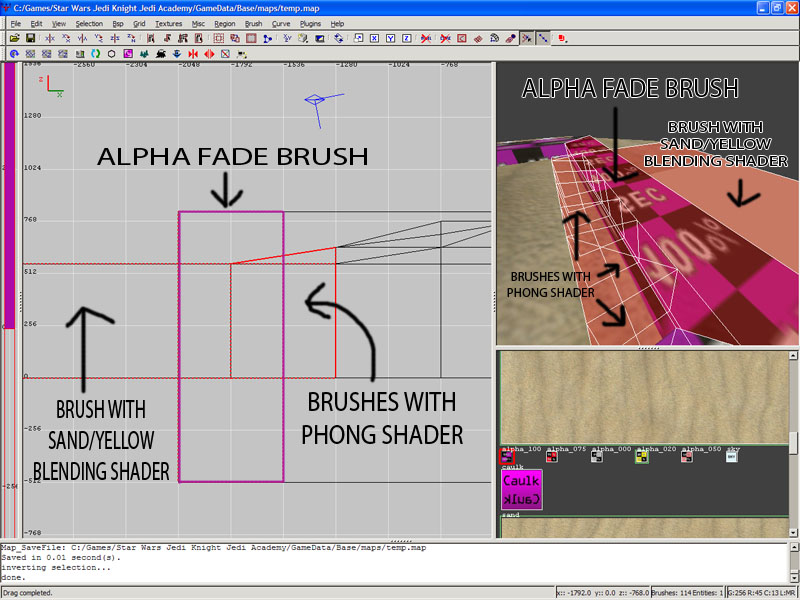
Now it's time to add the alpha-fade brushes. Place 4 alpha fade brushes (mitred) along the seams between your 6 new terrain blending brushes, and any brushes making up the edges of your playable area, as shown below. The Alpha Fade 100% brushes used will tell the game to show 100% of the primary texture (The sand) where the terrain blending brushes meet the normal phong shader. As the primary texture and the phong shader are the same, they should match up. The alpha fade brushes should extend above and below the terrain brushes, AND they should extend a short way into the brush on either side, to make sure they are over the brush vertexes.
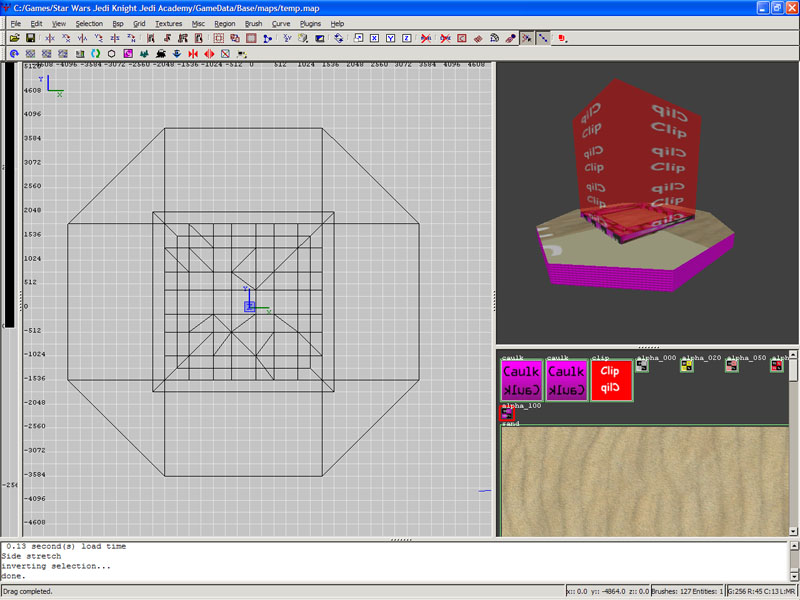
I have also added CLIP brushes to prevent players from leaving the main map and venturing into our skybox/terrain blending section.
Now we need to make the next layer of brushes. In case you don't understand why we are making it in layers, it is because alpha fade brushes only work when they are placed over brush vertices, and so if we just made one big brush, it wouldn't have any effect, except for at the edges. However, this time we will be using an alpha fade 70% brush on the seams - this means our secondary texture (the yellow texture) will start to show up. It wont show up in radiant but after you have compiled you will see it.
NB: I have hidden the clip brushes for ease of viewing

You now just need to add the remaining layers until you get to the final layer and can use the 0% Alpha Fade brush. You can use the above images as reference if you wish.
NOTES:
You are free to make these layers wider or shorter, or use more of them with more specific alpha fade brushes. I have only used 100,75,50,20 and 0%, but you can use any value between 1-100% by editing the alpha fade shaders to suit your needs.
Increasing the width of the layer results in a more smooth transition, for long terrains stretching out into the distance. Smaller widths tend to fall off faster, but do save space in your map, so aim to make them as thin as possible whilst still maintaining a good looking blend.
For maps where you can move to very high points, say towers and the like, you will probably need wider brushes to made the blend look good.
When you are finished, your map should resemble my sample map. Don't forget to add your skybox box if you haven't already!
Compile and check it out ingame!!
A water skyline: Non-Opaque Horizon Blends
This next section builds on the last by showing you how to create non-opaque terrain blends - that is, using water as well as fading terrain to create your horizon. It will also show you how to add a surf to circular islands using alpha fading, and how to add caustics to shallow water, again using alpha fading.
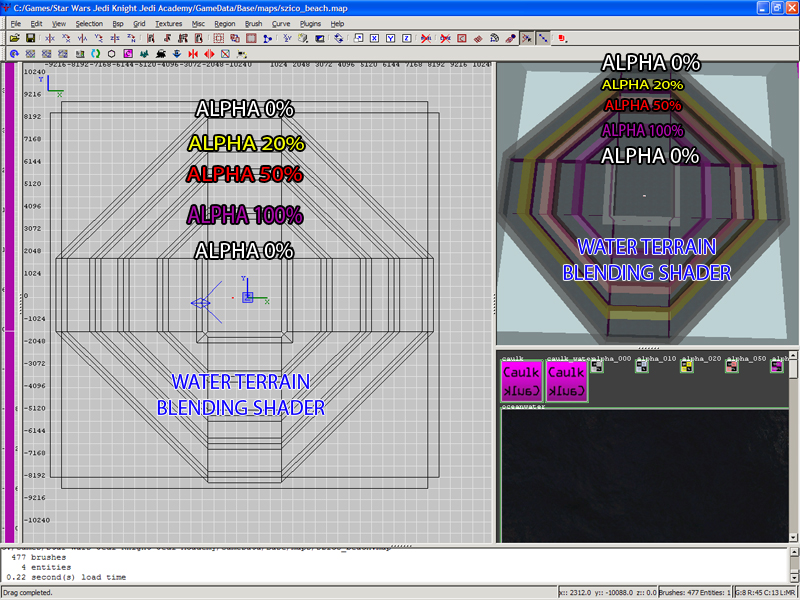
The first thing to note about blending water is that the terrain setup is slightly but significantly different from when you make an opaque terrain blend. With the opqaue blend shown in the above section, you only need two sections of terrain: The central playable area, and a flat plane for your blending terrain which stretches into the distance.
However, with a non-opaque water blend, you have to remember that you will be able to see through the water, so there needs to be another layer of terrain beneath it. Additionally, your underwater sand layer is not going to be completely flat, as shores generally tend to slope off into the water, and would look silly if they just went down and then was straight. The second point is that your water layer will need to blend to transparency, rather than a solid colour texture, which will require a different shader! The image below shows the differences between the two types of horizon blending. And finally, your water will start (on the shore) as transparent, then quickly fade to 100% water shader, and then gradually back to transparent. This it to prevent a hard line occuring where the water meets the shore.
At the end of this section will be an optional paragraph or two about adding underwater caustics and a surf should you wish.
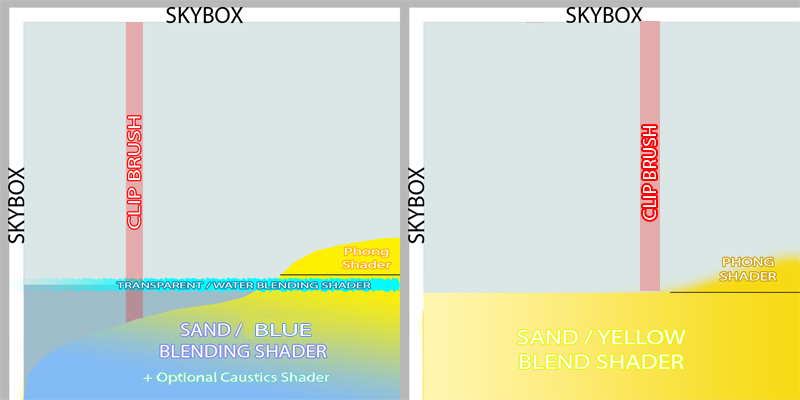
On the left: Non-Opaque blending, and On the Right, Opaque blending.
Shaders:
You will need to edit all these shaders into your own shader file for your own maps - however, all the tutorial images/shaders can be found in the included example files.
PHONG SHADER: - This is the shader that should be applied to any brushes exclusively above your water level, i.e, only brushes that have no section of them underneath the water line! It is a phong shader, which means it smooths shadowing over trisouped and quadsouped terrain, preventing hard edges or splodge shadowing/lighting from occuring. This shader is NOT affected by alpha fade brushes.
textures/szico_beach/sand
{
qer_editorimage textures/szico_beach/sand
q3map_material Sand
q3map_shadeangle 90
q3map_nonplanar
{
map $lightmap
rgbGen identity
}
{
map textures/szico_beach/sand
detail
blendFunc filter
}
]
SAND/BLUE BLENDING SHADER: - This is the shader which is applied to all the underwater terrain brushes (including those that are partly underwater and partly above water), and these are one set of brushes where blending takes place. This shader is affected by any alpha fade brushes which touch the vertices of the brush it is applied to. It also has an editorimage so you can tell the difference between the normal phong sand shader and the blending shader in radiant. It will be applied to a trisoup/quadsoup.
textures/szico_beach/sandblue_blend
{
qer_editorimage textures/szico_beach/sandblue_blend
q3map_material Sand
q3map_shadeangle 90
q3map_nonplanar
{
map $lightmap
rgbGen identity
}
{
map textures/szico_beach/sand
blendFunc filter
detail
rgbGen identity
}
{
map textures/szico_beach/blueblend
blendFunc blend
rgbGen identityLighting
alphaGen oneMinusVertex
}
}
OCEAN BLENDING SHADER: - This is the shader which is applied to flat ocean brushes (i.e, your water level.) and these are one set of brushes where blending takes place. This shader is affected by any alpha fade brushes which touch the vertices of the brush it is applied to. It does not have a lightmap so you will need to adjust the brightness/contrast/colours of the textures manually if you want to use it for a night-time water. It contains multiple layers, all of which will fade to transparency when the right alpha fade brushes are applied to it, and the extra layers will simulate various refractions off the water, as envmaps don't work with this kind of blending (or, I haven't got them to work properly yet.
textures/szico_beach/oceanwater
{
qer_editorimage textures/szico_beach/water
q3map_nolightmap
qer_trans 0.65
q3map_material Water
surfaceparm nonsolid
surfaceparm trans
surfaceparm water
cull none
sort additive
{
map textures/szico_beach/water
blendFunc GL_SRC_ALPHA GL_ONE
rgbGen identity
alphaGen vertex
tcMod scroll 0.01 0.025
}
{
map textures/szico_beach/oceanwater
blendFunc GL_SRC_ALPHA GL_ONE
rgbGen identity
alphaGen vertex
tcMod scale 0.25 0.25
tcMod scroll -0.0075 -0.03
rgbGen identity
}
{
map textures/szico_beach/oceanglow
blendFunc GL_SRC_ALPHA GL_ONE
rgbGen identity
alphaGen vertex
tcMod scroll -0.0075 -0.03
rgbGen wave sin 1 0.05 0 0.5
tcMod scale 0.5 0.5
rgbGen identity
glow
}
{
map textures/szico_beach/oceanglow2
blendFunc GL_SRC_ALPHA GL_ONE
rgbGen identity
alphaGen vertex
tcMod scale 0.35 0.35
rgbGen wave sin 1 0.05 0 0.5
tcMod scroll -0.05 0.008
tcMod rotate 4
rgbGen identity
glow
}
{
map textures/szico_beach/oceanglow3
blendFunc GL_SRC_ALPHA GL_ONE
rgbGen identity
alphaGen vertex
tcMod scale 0.15 0.15
tcMod scroll -0.005 0.01
rgbGen wave sin 1 0.05 0 0.5
rgbGen identity
glow
}
}
Setting up your Terrain
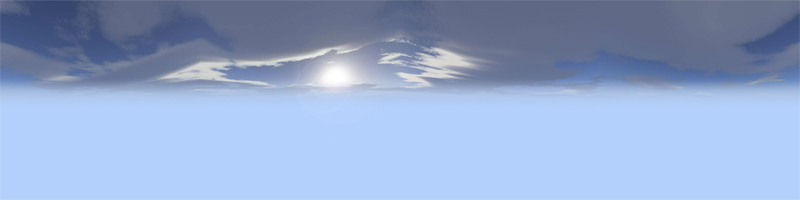
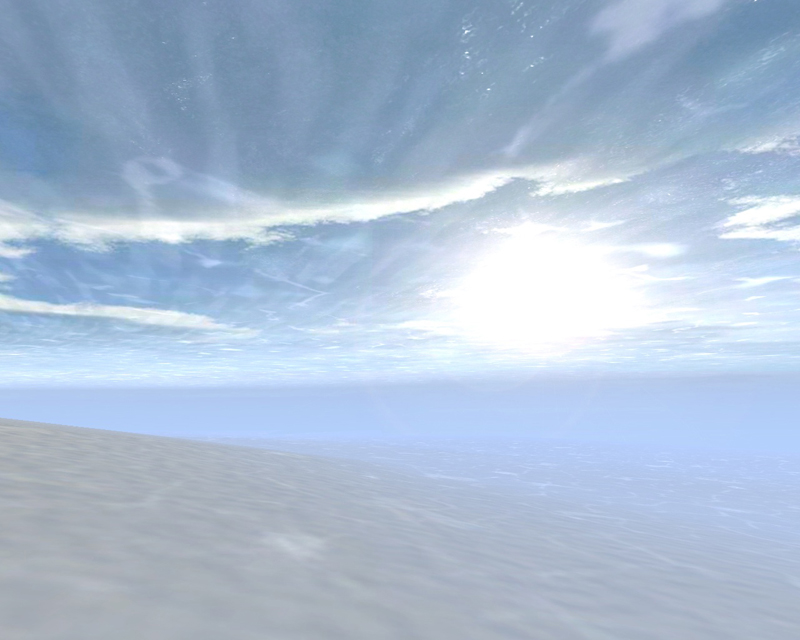
Firstly you will need to repeat the steps shown previously to create your skybox. As this is now a water-themed skybox, blue is a more appropriate colour to blend to, instead of yellow, so blend to a blue colour instead (and save a 64x64 pixel texture using the same block colour).
My skybox is shown below.
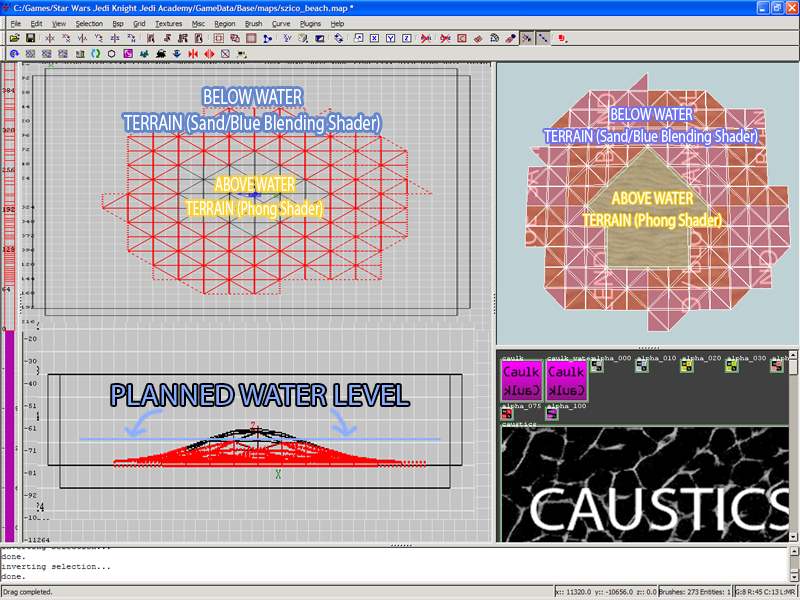
Next up, you'll need to create your playable terrain. For my example map, the player is on a beach, and so can actually enter the water. For this reason, my underwater terrain is entirely trisouped. Remember, any brushes exclusively above water should be your phong shader, at least around the edges, but within that you can build your normal map and anything you want. Any brushes which touch beneath your planned water line in any way should be covered with your sand/blue terrain blending shader, as shown below. Remember your central area must (obviously) be higher in the middle and gradually slope outwards, although the exact incline and shape is entirely up to you.
The next part is adding your alpha fade brushes to this terrain to cause it to gradually blend to the same blue colour that you have used for your skybox.
Because we are using our terrain blending shader on a trisoup this time, we will need a LOT more alpha fade brushes, as you will need an alpha fade brush for each vertex of your trisoup. It is is a little difficult to explain, so you should look at the source files as you read through, but you need to move in a circular motion around the far outside of your trisoup, placing Alpha 0% 'poles' on every set of brush vertexes. Once you have finished the outside layer of vertexes, you should do the next layer using Alpha 20/30% brushes. Depensing on the size of your terrain, you can control how gradually the blend occurs by using a greater variety of alpha fade brushes. For my map, I used 0,10,20,50 and 100%. The basic layout is shown below.
Select all your brushes with your Sand / Blue Terrain Blending shader AND the alpha fade brushes you have added (but not your phong shader brushes) and FUNC GROUP THEM!
You can hold Alt+Ctrl and click one of these brushes to quickly select the entire group if you wish in the future.
This is what you have done so far looks ingame. The blend might seem very sharp and not very smooth at the moments, but when we add the water brush above it it won't be noticeable. Obviously, bigger islands will need a large area of underwater terrain and a more gradual blend.
FUNC_GROUPS
The type of blending used within this section of the tutorial relies on the use of func_groups within radiant. Func_groups are used to group brushes together within the editor, both for convenience, and in this case, to determine which alpha fade brushes affect which sections of terrain Alpha fade brushes will only affect terrain blend shaders on other brushes within the same func_group. This is particularly necessary in this section because there will be overlapping areas of terrain, but which need to be affected by different alpha fade transparencies. Each different set of brushes with a blending shader will be part of a different func group.
To make a set of brushes into a func group, simply select all the brushes you want to include in the group, go Right Click --> func --> func_group
To select all the brushes within a func group, hold Alt+Ctrl and click any brush that is part of the group you wish to select.
Adding the water:
The setup for your water brushes are remarkable similar to the setup used in the first section of this tutorial for an opaque terrain blend. The water brushes must be flat as before, and will still be in a hexagonal shape with alpha fade brushes applied to the vertex seams. There are however, 3 crucial differences here.
NOTE #1 - Aside from the top facing face of your brushes, all the other sides should be caulk_water.
NOTE #2 - You must FUNC GROUP all your alpha brushes and water brushes together to make sure the alpha fade brushes used here don't affect the underwater terrain you just made and mess the blending up.
NOTE #3 - You should use alpha 0% shaders for moth the outermost brushes and the innermost brushes, to both blend the water to transparency at the edges of the map, and right on the shoreline to prevent a hard edge from occuring where it means the sand terrain. The 2nd innermost layer should go straight to a 100% alpha brush, and then gradually fade out towards the outermost layer. An example is shown below.
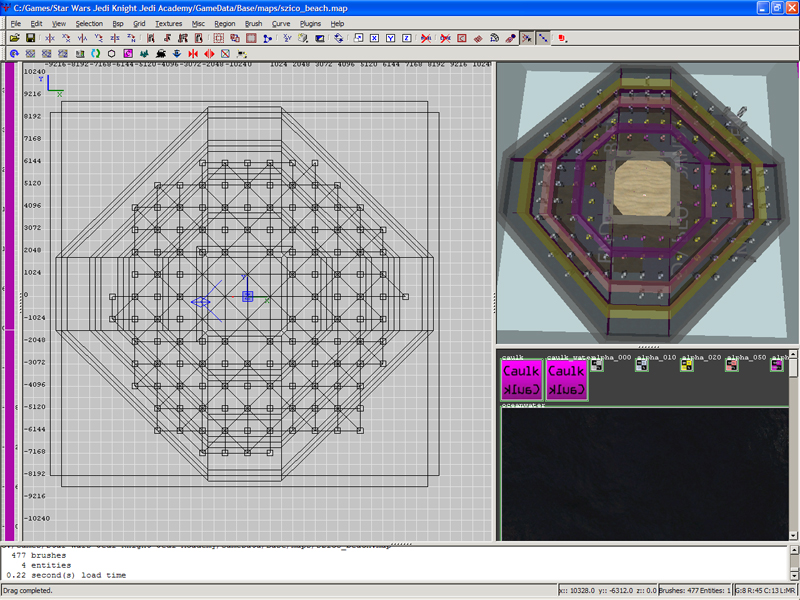
The water brushes, with the rest of the terrain hidden:
The map with both the water terrain func_group AND the sand terrain func_group visible.
And the map ingame:

And that's it for creating your water! If you want to learn how to add underwater caustics and a surf, carry on reading!
Light Refractions Underwater: Underwater Caustics
Adding underwater caustics is quite simple. You will need a shader similar to the one shown here:
CAUSTICS SHADER: - This is a DECAL shader. This means that it if placed on a brush that occupies the same plane as another brush, this shader will always be shown on top. We can use this to good effect by duplicating the orginal sand/blue terrain blending brushes and simply applying this shader to them. Although identical shaped brushes will now be in place, the brushes with the caustics shader will be prioritised ingame.
textures/szico_beach/caustics
{
qer_editorimage textures/szico_beach/caustics_editor
q3map_material Sand
q3map_shadeangle 90
q3map_nonplanar
q3map_nolightmap
surfaceparm trans
surfaceparm nonsolid
surfaceparm nonopaque
qer_trans 0.5
polygonOffset
{
map textures/szico_beach/caustics
tcmod Scale 4 4
blendFunc GL_SRC_ALPHA GL_ONE
alphaGen oneMinusVertex
rgbGen wave sin 1 0.05 0 0.5
tcMod scroll -0.0075 0.005
}
{
map textures/szico_beach/caustics2
tcmod Scale 4 4
blendFunc GL_SRC_ALPHA GL_ONE
alphaGen oneMinusVertex
rgbGen wave sin 1 0.15 0 0.8
tcMod scroll -0.0175 0.025
}
{
map textures/szico_beach/caustics3
tcmod Scale 4 4
alphaGen oneMinusVertex
blendFunc GL_SRC_ALPHA GL_ONE
tcMod scroll 0.15 0.15
rgbGen wave sin 1 0.15 0 0.8
glow
}
}
Hide your water terrain brushes with the alpha fade brushes, and select your brushes covered with the Sand / Blue Terrain Blending Shader. Copy and Paste the entire set of brushes, and change the shader to your caustics shader. Re-func group these brushes to make them a seperate func group from the original set of brushes!You will now need to change the centre-most layer of alpha-fade brushes from 100% alpha to 0% alpha, as we need the caustics to blend to transparency as they touch the shoreline, then become more opaque as you go beneath the water, then fade to transparency again as you move away from the centre of the map. You may need to change some of the other alpha fade brushes to get a clear set of caustics visible ingame
MAKE SURE YOUR CAUSTICS BRUSHES AND THEIR ALPHA-FADE BRUSHES ARE ALL FUNC_GROUPED AND IN A DIFFERENT FUNC_GROUP FROM YOUR ORIGINAL TERRAIN!
In Radiant, you will see Z-fighting, as shown below,
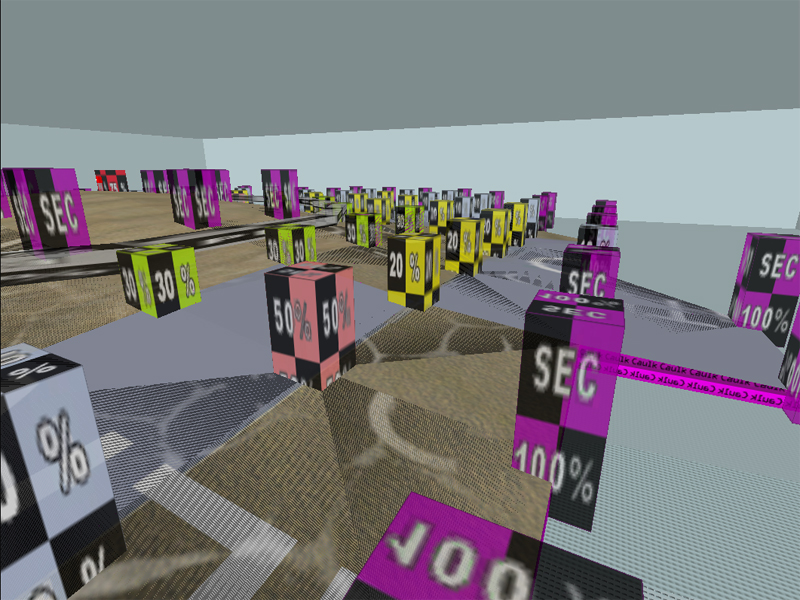
But ingame, it should look like this! - Alpha fading used to create underwater caustics!


Recommended Comments
There are no comments to display.
Create an account or sign in to comment
You need to be a member in order to leave a comment
Create an account
Sign up for a new account in our community. It's easy!
Register a new accountSign in
Already have an account? Sign in here.
Sign In Now