
 1st Place Winner Reepray with Rishi Station 2,
  2nd Place Winner chloe with Oasis Mesa, and
  3rd Place Winner Artemis with TFFA Brutal! Amazing submissions by everyone!


Originally written by lassev - Source
- Title: Rotating Doors with Areaportalling
- Subject: How to create realistic rotating doors which use areaportals.
- Written by: Lassev
- Tutorial written for: Jedi Academy/BehavED
- Similar concept work like in: N/A
- Difficulty level: 4/10
- Expected time to complete for first attempt: 30 mins
- Prerequisites: Entity linking, Scripting, Basic Brush Manipulation, BehavED installed
Introduction
Rotating doors, like the ordinary swinging doors that we use all the time in the real world, are not directly supported by the Jedi Academy game engine in the form of func_doors. However, they are easy to build using another entity called func_static and some simple scripting. Now that scripting is also supported in MP, the demand for swinging doors is higher than ever before.
The title calls this tutorial "Rotating Doors With Areaportaling." Areaportaling is an easy and good way to keep the FPS up in your map, so you should do that every time you use a door between two rooms otherwise sealed from each other (no windows or other holes between them).
However, if your rooms are leaking into each other or you don't want to use areaportaling for some other reason, you can skip the parts required for areaportaling (I will mention those parts separately).
Technical Note: This tutorial requires very basic Radiant mapping skills. It also requires that you know what an ICARUS script is and how to use BehavEd to make some simple scripts. If you don't know how to use ICARUS, or you haven't yet configured BehavEd, you need to do and learn that first.
Check Kengo's cutscene scripting tutorials for some ideas. They are, however, meant for JK2 Jedi Outcast, but despite the fact that the paths need some adjustment to Jedi Academy folders, they should be pretty correct...
Building the Door in Radiant
Let's launch Radiant and start the tutorial. First you need some basic architecture to be able to test the swinging door. For this specific purpose you obviously need two rooms to be connected with each other. Either use some preexisting map of yours or build one from scratch according to the specifications that I will give below.
All right! If you start from scratch, build one room big enough to run around in game. Texture it, then select the walls, floor and ceiling, and clone it all. Place the new room next to the original, leaving something like 48-64 units between the rooms (or as much as you want). Next we will make a small corridor between the rooms. Notice that I used thicker brushes for the walls facing the other room. This has a special meaning in avoiding nasty errors later when we will make the actual func_static door entities.
2D from above:
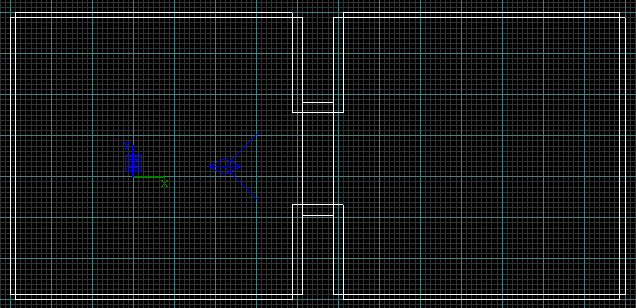
Fig 1. The room layout.
The doorway between the rooms. I have thrown in some random brush blocks to make the rooms just a little bit more interesting:
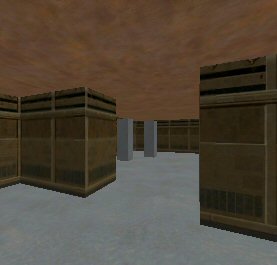
Fig 2. The doorway.
OK. Let's now draw the door itself. In this tutorial, I will make double doors, instead of a single swinging door. This is just to illustrate that double doors are just as simple to make as the single type. However, if you prefer a single swinger, it's easy enough just to skip making the counterpart, and stretch your door to cover the whole doorway. Also, you will see easily enough how to adapt the script for just one door.
Since I''m a fan of door frames, I will start my doorway by making them. I'll start it by drawing a big brush, 16 units thick, to span the whole mouth of the corridor, like in Fig 3.1 below (16 is also the thickness of the thicker than normal wall here). Then I clipped the frames and textured them, like in Fig 3.2. The portion that will form the actual doors is also reduced to thickness of 8 units, and placed in the middle of the frames, as you can see. Even if we are making double doors, don''t yet clip the door portion, if you are going to use one of the existing Raven double door textures (or one of your own equivalents). Texture it first, by fitting the texture 1x1. After that, you can easily just clip it in two in the middle, and you will have perfectly textured double doors! Just check Fig 3.3. Don''t forget to texture also the surface of the doors facing each other, and the surface facing the door frames. You don''t want to leave caulk there, because then they would be transparent, when the doors are open in game!
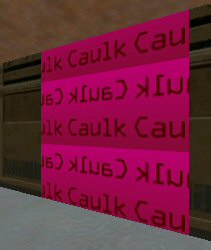
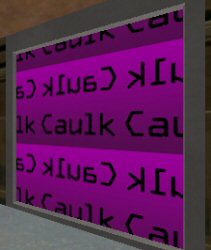
Fig 3.1 Fig 3.2 Fig 3.3
Next you will need to place Origin brushes for both doors. The Origin brushes will be integral parts of the func_statics, but they won't show in game. However, they will define the actual point around which the doors will rotate. So they are indeed very essential for the swinging doors to work. In practice the Origin brushes are nothing but brushes covered with the Origin shader (texture).
You will find the Origin shader in System. It has (in addition to the text "ORIGIN") an ugly orange color, so you should have no trouble finding it...
Having the Origin shader selected, make a 16x16 piece, and place it exactly like you see in Fig 4. This means at about the half the height of the door, so that the middle of the Origin brush is 4 units (one grid button 3 square) over the hinge end of the door. This means the door will turn nicely in game, and won't invade the door frame. So, on the Y axis, the origin is three quarters inside the door, one quarter inside the frame. After you are done with the first Origin, do the exact same thing with the other half of the double doors.
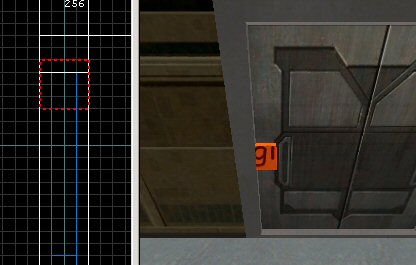
Fig 4.
The Origin brush is selected to make it easier for you to spot it. Notice that it's not entirely inside the door, but also partially inside the frame. Actually, the size of the Origin brush does not matter at all, just its exact center coordinates.
Finally we are ready to actually turn the doors into entities! Now, you need to select the origin brush, then the door half. You need to make two func_statics for double doors; the halves are totally separate entities; they will just be controlled at once. So, after you have selected the left origin and left door, right click, select func/func_static. Do the same trick for the right door.
Now, select the left portion (the upper one in XY 2D) and press "N" to bring up entity properties. You will need to enter two keys over there (see Fig 5):
key: script_targetname
value: rotadoor1
key: soundset
value: stone_door
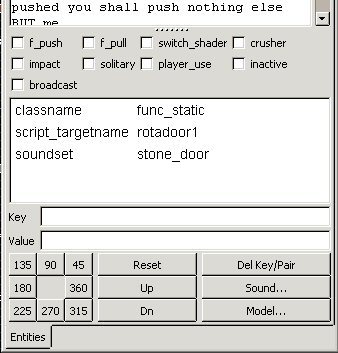
Fig 5. Entity properties for the left (upper in XY 2D) door.
Script_targetname will define the name you will use in the affect command in the script controlling the doors. If you want to use some other name for your doors, feel free to do it! Soundset of course just gives some audible character to the doors. Name the other door likewise, only use "rotadoor2" as the script_targetname. You can also check the crusher flag of the door if you want it to cause damage to the player, if blocked. This is something you must decide based on your specific needs. The swinging doors should work properly, whether you make them crusher or not.
Now we have only a couple of compulsory things to do, before we will leave Radiant for a while to write the script. We will also do some extra work to make the areaportal work, but if you don't want to do that, I will point out what you can skip. However, you will need to do the next things no matter what for the doors to work.
Go to System textures again and fetch the Trigger texture. Draw a big brush that spans from one side of the door all the way through it to the other side, just like you can see in Fig 6. Turn it into trigger_multiple. Give it the following key:
key: wait
value: 10
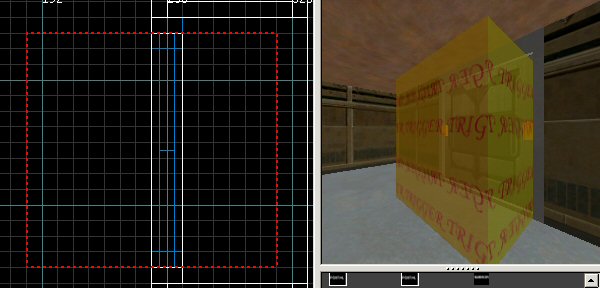
Fig 6. The trigger_multiple to control the opening of the doors.
This makes sure that the double doors won't be triggered to open a second time before they have had time to open, wait a little, and then close again. The actual script will determine how fast the doors open, how long they stay open, and how fast they again close. The combined time of those events will be made to be little less than 10 seconds.
If you haven't saved your map before this, it's time to do it. Select some sensible name, but if you want to follow the tutorial without changing a single bit, you will have to name it "rotamap". However, it's easy enough to use what name you ever want. You will just need to create a folder named after you map under scripts.
Next place a target_scriptrunner next to the trigger_multiple. Target the trigger to the scriptrunner. Then select just the scriptrunner, and bring up the entity properties. You will need to add the following keys and values:
key: count
value: -1
key: usescript
value: rotamap/dooropener
"Count -1" means that the script can be run as many times as needed (indefinitely). "Usescript rotamap/dooropener" is the key and value pointing to the script file we haven't yet made. If you named your map something other than rotamap, then just replace the map name with your own.
Now we are finished with the compulsory things to be done in Radiant. If you are not interested in Areaportaling, just skip the things I will explain next, and jump to the scripting part. However, if you want to build a clean map, you can follow through the next steps.
Areaportaling The Swinging Door
Areaportaling a normal func_door couldn't be easier: You just place an areaportal brush there. Unfortunately it's not so simple with a rotating door. To work, an areaportal needs the origin of the entity to move. This is the triggering event that will adjust the areaportal. That is, the movement of the entity tells the game engine that it needs to remove the areaportal so that the player can see through the doorway. However, a rotating door won't move its origin at all; it will just rotate around it. How can we then use an areaportal at all with a swinging door? We will do it by tricking the game into thinking there is actually a door opening and closing just normally. And so there will be - but it will be an invisible, silent and a very fast bogus door. However, it's enough to make the game adjust areaportaling.
All right, without further ado we will proceed to place an areaportal inside the double doors. You need only one areaportal, even if you have two doors, like in double doors. So, go to System textures and look for a "Skip" texture (it''s tiny and blue, just before the texture where Kyle is slipping, if you don''t seem to find it). Hit now "shift+ctrl+T" to filter away the big trigger so that you will be able to better work with the door. Select and then deselect once either of the doors - that will give you the right height for the areaportal. Then draw with the skip texture such a brush as you can see in Fig 7 below. Notice that the other side of the brush is in line with the walls and door frames of the room. This is necessary. The other side, however, is exactly in the center of the double doors. Otherwise the areaportal spans the whole doorway (excluding the frames made of structural brushes).
After you are finished with drawing the brush, you will need to move it temporarily away from the right place. Drag it away from inside the door so that you can see the side that will be inside the door. Now, select just that surface, and texture it with the yellow Areaportal shader (also in System). See Fig 8 how it should look like, before you place it back to its proper place halfway inside the door (Fig 7).
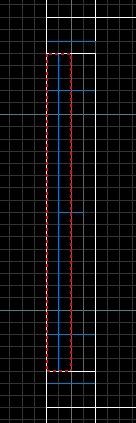
Fig 7. The placement of the Areaportal brush so that it will be in line with the walls of the room, and halfway inside the door entity. The areaportal texture (see Fig  is located to the right side, in the middle of the door.
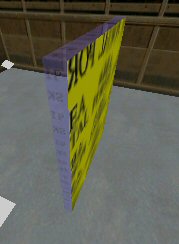
Fig 8. The Skip/Areaportal textured Areaportal brush in a temporary location.
Alright, we are about halfway through areaportaling now. Let's move forward. We must create the secondary, invisible door that will control the areaportaling. The secondary door will be made toggleable, and it''s controlled in the script controlling the door rotation. Without this secondary door the opening swinging doors will produce a very ugly HOM (House Of Mirrors).
Drawing the bogus door is easy: Just clone your existing areaportal brush, click caulk to make it all caulked, and then resize as shown in Fig 9.

Fig 9. The thickness of the bogus door is half that of the actual swinging doors.
Turn the new brush into a func_door and give it the following entity properties:
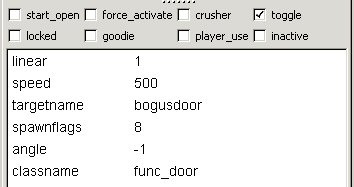
Fig 10. Entity properties for the toggle mode bogus door.
Finally! Now the map is ready even with the troublesome Areaportal adjusting! If you are making an SP map, place the info_playerstart in some sensible place, but put it far away from the door so that it won''t be inside the trigger! Otherwise if you are making an MP map, place there the appropriate starting positions.
Writing The Door Control Script
You need to launch BehavEd to create the script controlling the doors. I'm not going to tell here how to script but what to script. As noted in the Technical Notes, you need to know something about scripting to survive the next part. All right, that being said, let's move forward.
It's usually good to keep the Radiant and the map still at hand, because you might forget some targetnames. Type some notes in the rem(comment) if you want, then proceed to add your first command.
Affect ("rotadoor1", /*AFFECT_TYPE*/ FLUSH )
{
This will direct the following commands to the upper door. The doors will function basically mirror like when compared to each other. They will also be affected separately, but in effect everything will happen at once in game. That is, the doors will open simultaneously.
OK, let's go forward. I will give you in Fig 11 all the opening script commands needed for "rotadoor1" and "rotadoor2", and explain what everything does in the script.
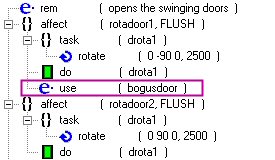
Fig 11. The opening portion of the script.
I have encircled with purple the command you need ONLY if you are going forward with the areaportaling. If you chose not to areaportal, don't insert the line encircled with purple, just insert the other rows. OK, use("bogusdoor") tells the game that it needs to open the fast, silent and invisible bogus door inside the actual swinging doors. This will make the game open the areaportal, allowing the player to see through the doorway.
As you can see, the use command lies only once in the opening portion of the script. This is necessary, because the bogus door is a totally separate entity from the swinging doors, and using it twice would make it close immediately again, and we cannot do that yet. The command could as well reside inside the rotadoor2 affect group.
The rotate (0 -90 0 , 2500) command means that the brush entity (the door) is going to be rotated ninety degrees toward the room on the left. Here you need to only think about the angle buttons in Radiant entity properties. -90 degrees is essentially the same as 270 degrees. Check my little picture below for some insight into rotating objects with the rotate command:

Fig 12. Rotating entities with the rotate command. Imagine the squares as flags swinging around the axes.
The most important thing to keep in mind while rotating is that the rotation is not relative to the current position (facing) of the brush. The rotate command will rather give every time a new absolute angle value for the object, much like the angle buttons in Radiant entity properties. For our doors we use the middle value that controls the rotating around the Z-axis, the axis rising from the XY plane, and thus the most natural axis for any door hinges. The starting position for an entity, as long as you haven''t hit the angle buttons, is 0 degrees, that is, straight to the right on the XY plane! So, even if our upper door points down, it's still facing zero degrees, when we start the game. Thus we need to turn it -90 degrees to open it toward the left room.
Adjust the opening script to the lower door as well. You need to change the rotate command to 90 degrees instead of -90 degrees (take the minus away), and also take away the bogus door control command, which you must not have twice in the opening part of the script.
After you are finished with the other door, minimize the trees, and insert a wait(7000) after the two affects. The wait means that the door will stay fully open for 4.5 seconds, after it has spent 2.5 seconds opening. Let's think for a moment the times. As you remember, you entered 10 seconds for the trigger Wait key. Now, if you consider the script, it takes 2.5 seconds for the doors to open and close. However, the time for them to stay open is reduced to 4.5 seconds. This mean the doors will stay closed for half a second, before they can be opened again (because the trigger won't launch again until the 10 seconds wait has passed). The half a second idle time is implemented to ensure proper areaportaling behavior.
Your script (when the affects are minimized) should look like this:
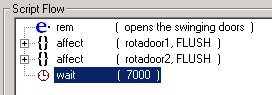
Fig 13. Both door affects and the wait.
After this, you need to make the doors close after the staying open time is finished. For this purpose, copy the existing two affects, and paste them after the wait. Then proceed to edit them. I'll now post the whole script in Fig 14. You should by now know exactly what''s going on, so I will only explain it afterwards very shortly.
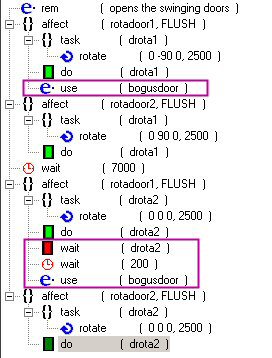
Fig 14. The whole script for opening and closing the double doors and adjusting Areaportals!
As you can see, the parts needed only for Areaportal adjustment are once again encircled with purple. Other parts are needed always. The latter affects will rotate the doors to the starting positions, thus all the rotate values have only zeroes; they are the absolute values for starting positions, of course. In the script we wait for the rotadoor1 to close, then we wait for an additional period of 200 ms just to be sure, and only then close the bogus door. The areaportal is returned.
Of the trigger's 10 seconds wait time, 300 ms is left for the areaportaling to update, before reopening of the doors is possible.
Now you only need to save your script. You must give it the name you used with the "usescript" key in the target_scriptrunner. After saving, just hit the Compile button. Now you are finished! Just ship the script with your level, in "scripts/mymapname" directory (in our case "scripts/rotamap").
Close BehavEd, compile your map and launch it in JA. You will see that once you go near the door, inside the trigger, the script will launch and the door will open! After a while, it will close. If you implemented the Areaportal, you can check whether it works by using the console command:
r_showtris 1
Closing Remarks
It wasn't hard at all, was it? Have nice time implementing this methods in your own maps. And remember that you can rotate objects which ever way you want. So, you can have trapdoors in the roof, or floor, wherever you want. You can even divide the door into four parts and open it like a flower.
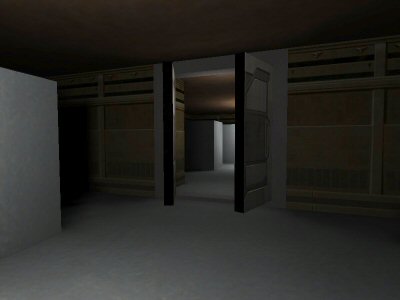

These images show you the door while it is closing. Areaportaling has worked properly, as you can see while looking at the picture on the right. You cannot see anything from the other room while having r_showtris 1 turned on.


Recommended Comments
There are no comments to display.
Create an account or sign in to comment
You need to be a member in order to leave a comment
Create an account
Sign up for a new account in our community. It's easy!
Register a new accountSign in
Already have an account? Sign in here.
Sign In Now