
 1st Place Winner Reepray with Rishi Station 2,
  2nd Place Winner chloe with Oasis Mesa, and
  3rd Place Winner Artemis with TFFA Brutal! Amazing submissions by everyone!


Background
For some, a real pain in the rear end. Some people think the func_plat will suffice when they are mapping, but for others, not so much. This is because the func_plat always returns to its starting position after it has ran its course. In my opinion, the func_plat is the easy solution, but inadequate of what we truly want. A real elevator works like this: you call, and it stays at your position until you say otherwise. I heard about techniques using the toggle function within a func_door and having that dictate your elevator. Also that has its downfall, because a door you can’t properly set to its height, so you had to drag it out and start from top, leaving an ugly brush to show.
Today we are going to do it scriptwise, and its not as hard as you think. Let’s set up radiant first how we want it.
Setup in GTK Radiant.
Lets first preperate room. Where do you want the elevator and how is it going to run. It It a diagonal one or a vertical one, even horizontal is possible. Everything you think is not possible, is possible with scripting. In common, it may take more time and steps to create it, but if you understand the basics, it’s really easy.
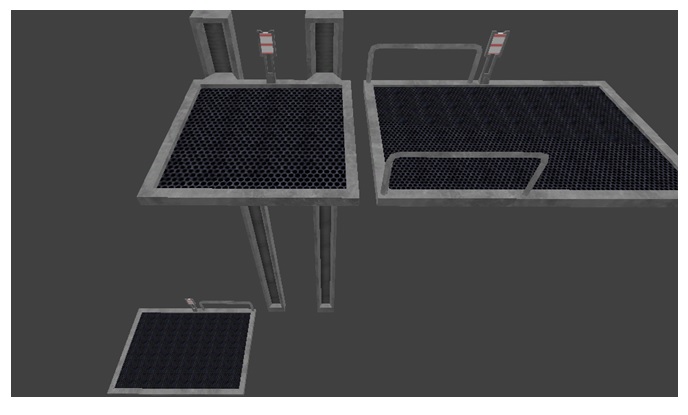
So I am going to do a regular vertical elevator. I create my platform and create for show a rail where it is on. On the top position, I placed a platform I can step on and off, with the same below. In between I created the elevator itself, which is nothing more than a visual representation at this point. It consists out of 2 brushes connecting to the rails, and the platform itself. For the sake of appearance, I added a nice feature which will be the button to control the elevator
So now we have the visual stuff out of the way, let’s start on the entities.
The very first thing you need to do now is create a brush in the middle of your platform (don’t matter about the size, but I made it in the 16 by 16 by 16(which is 2 blocks in the grid of 8). Why? This is going to be the center point for your reference in the script. Cover the brush with the origin texture out of the system map. It’s an orange texture with origin on it. You can’t miss it.
That out of the way, lets transform the platform into a usable entity. We will transform the moving part in a func_static. This allows the script to move the platform towards we point it too later. Select everything you want to move, right click in the 2d screen and go to the func menu. Select the func_static. Your brushes should now turn blue lined in the 2d view.
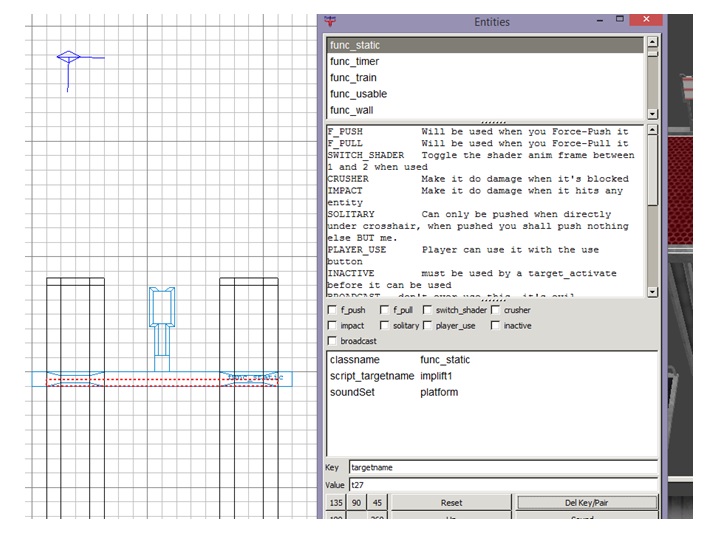
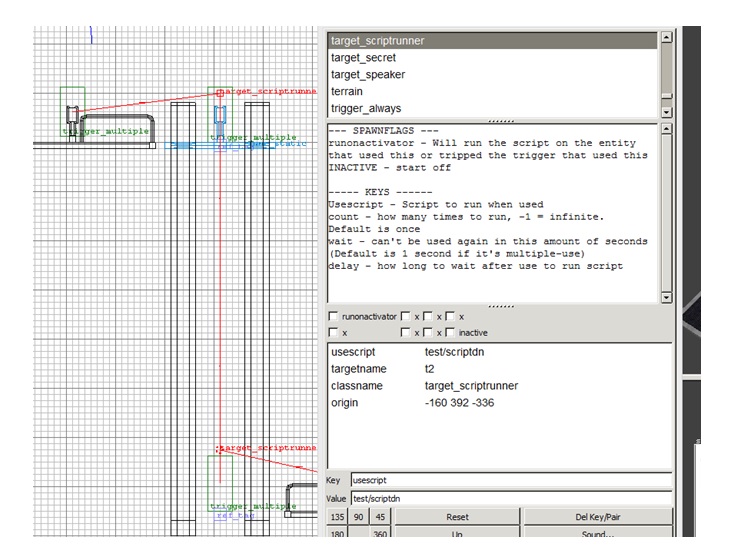
So I transformed the platform (with all the parts I want to move, including the origin brush) to a func_static. I opened the entity panel, (press N for those who do not know it) and give your func_static a script_targetname as key. As value, pick what you want. In my case, I called it the implift1. This value we need later in Behaved.
Additionally you can use a soundSet for the elevator. This will be played when the platform is moving. I picked platform, but there are tons of soundSets. There is a file called sound in one of the assets. It contains all the soundSets there are in the game, thus making it easier to chose from. Scroll about 2/3 down, cause a lot are ambient sounds for the environment.
Next part is the path it should run over. This is where we use ref_tags for. These ref_tags are used for a lot of things in scripting, such as camera usage, but also for reference points for moving objects, in this case, your future elevator. We are going to create 2 of them. One for the top, one for the bottom. Since my elevator as starting at the top, the placement of the ref_tag should be at the same spot as the origin brush we created earlier on. The other one should be on the bottom position of where the elevator should stop.
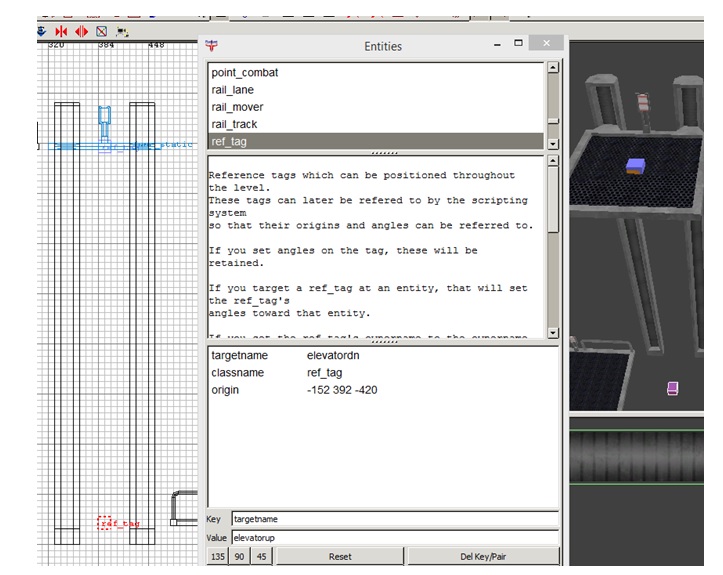
The only thing we need to add to the ref tag is it’s targetname. In my case, the upper one is called elevatorup, and the bottom one is elevatordn as you can see in the image.
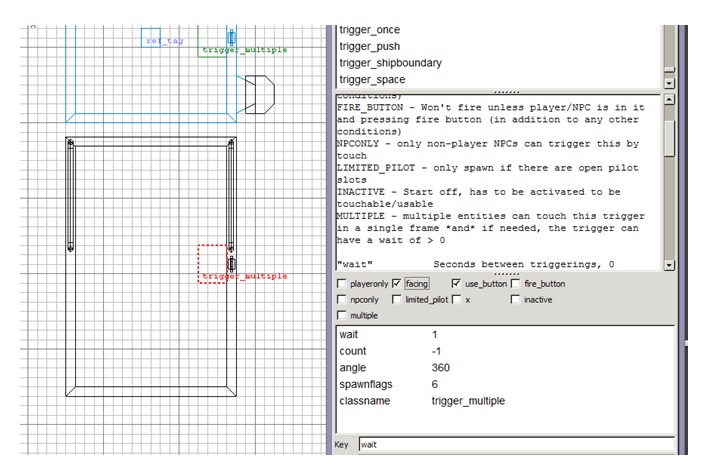
So now, we simply need something to activate the elevator. Logically I would end up with a trigger, so create 4 of them (we have technically 4 positions to call the elevator from). That means up 2 and down 2. Create a brush and cover it in the trigger texture from the system textures.
If you use a static button to move your elevator, don’t mind this explanation but if you use something like I did, I ll elaborate. The elevator goes down, thus it needs to be controlled down as well, since your console is sliding with you it means you need a trigger as well at the bottom part to control the elevator to send it back up. That’s why you need 4 triggers and not 3 as you would count the consoles.
Convert the brushes into trigger_multiple and tick the use button box, and the facing. Give it a count of -1 (for infinite uses) a wait of 1 second (so it won’t fire so quickly) and an angle. The angle gives the direction in which you have to face to activate the button.
Almost done now. We now only need to tell the triggers to move the object. Now this is where the “magic” happens. We need a 2 target_scriptrunner. One to make the elevator move up, and the other one to move it down. To separate them, I always place one up to point it to the up position, and one down, to point it to the down position. This way I don’t get confused.
Create 2 and give them both a usescript key and give it a value of where the script is gonna be and what is called. In my case, I quickly named it test/elevatordn for the lower one, and test/elevatorup for the upper one. (test is the subfolder within the scripts folder). Now you need to connect the respectable triggers to their target_scriptrunners. You do that by first selecting the trigger, then the target_scriptrunner it should run and hit control-k. The following image doesn’t show it clear, but for me the setup is linked to each other.
This is all that should happen in radiant.
The actual scripting
The rest happens somewhere else, namely in the script. In this case, we need to start scripting. If you never scripted before in your life. No worries, cause BeHaved is easy to learn. If you want to learn more about Behaved first, I suggest you look at other tutorials too, and/or follow me.
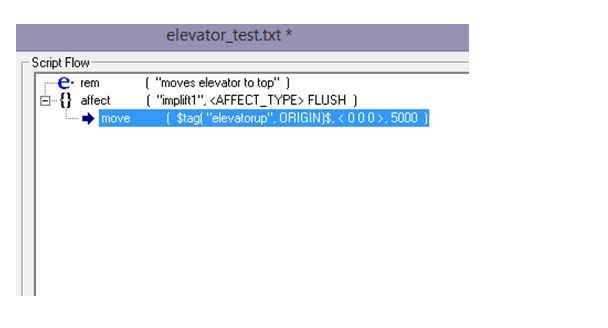
So launch Behaved (find it in the tools section of your gamedata folder) and double click on the rem message (it says comment) on top of your screen (in the big right field). I always tell there what the script does, so I filled in “moves elevator to top”. You can leave it blank if you want to.
So this is Behaved, isn’t that scary. Behaved is a drag and drop program that lets you easily create scripts. It has all kinds of functions, as you see, but today we only use 2 of them. The first one is the affect one, you see on the left side. Double click on it and it should move to the right field. Its now in the script.
Explaining is simple for the affect. It does what it says. In this block you can specify what you want to affect. So double click on it in you workfield and it should open. Standard, it says default what to affect, but since we don’t have a func_static called default, we need to change that. I called my func_static earlier implift1, so I change default to implift1 and hit okay.
Right now you see also affect has an instance. It means you can place something in the affect. Simply said, we have an affect on the implift1 and we want to move it right? Guess what: Behaved has the move option. So lets go pick … oh wait… it has 2 move options. One with <vec,vec,float> and one with <expr,expr>.
We need the vector, vector, float one. So double click on that, and its being placed inside the affect (if not, drag it from your workspace inside the affect) and double click on it. Now this is the hardest part of this whole tutorial. Sometimes you miss a step here and this is what screws you up. The first vector is actually where we need to move to. However, we don’t use a vector for this. Remember I told you earlier to place a origin brush? Now we need that one. So hit the expr button next to the left vector and suddenly you screen is expanded
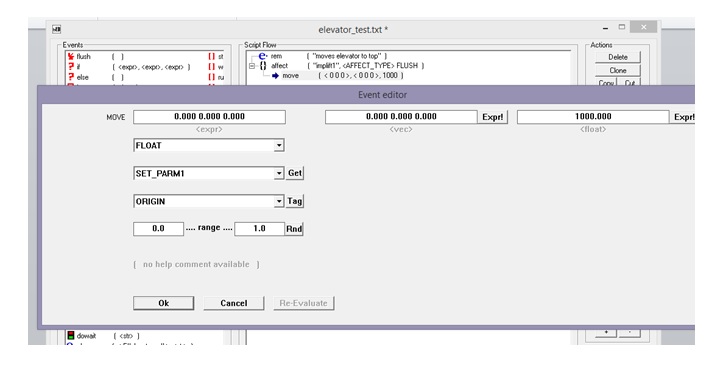
You see as 3rd option actually the origin. Hey, we used that! So hit the tag button next to it, and your first box becomes different. It will say “tag( "targetname", ORIGIN)”. Technically for us it says: “Bring the origin of our affect to the targetname.” Since we have an origin brush (which is the origin of the elevator) we are on the right track. Now we need to fill in that targetname. And that’s where we have the ref_tags for. Those are the reference points for the script. So we tell the script that the targetname is “elevatorup” (remember, we are working on the script to go up).
You can ignore now the middle box, but we need to fill in the float. The float is right now the amount of miliseconds it will take to reach that destination. Right now it will move from begin point to end point in 1 second. That is very fast, so I changed it to 5 seconds, which is 5000 miliseconds. Hit ok, and that’s it.
Don’t forget to check if your quotationmarks are still there around the targetname (elevatorup). If not, it will give an error.
This was it. Hit save and save it to the folder and name you specified in your target_scriptrunner. Hit compile and you are done…. Wait, we only can go up now.
Lets do the exact same thing but then to go down. But why invent the wheel again. Hit Saveas, save it as the other script we defined to go down for in the other target_scriptrunner and just change one thing. Do you know which one?
That’s right. We need to change the targetname in the move section. Change it to the targetname you gave to the ref_tag that is in the lower position (for me that is elevatordn). Save it and compile it. Done and done.
Change your comment on the top if you set it too.
Compile your map and enjoy.
Extra: if you put this in a multiplayer map, it would be smart to add a delay of 6 seconds at least to the target_scriptrunner. This will make sure people don’t start messing with buttons while you are using the elevator and renders the scriptrunner inactive for 6 seconds after use.


Recommended Comments
There are no comments to display.
Create an account or sign in to comment
You need to be a member in order to leave a comment
Create an account
Sign up for a new account in our community. It's easy!
Register a new accountSign in
Already have an account? Sign in here.
Sign In Now