
 1st Place Winner Reepray with Rishi Station 2,
  2nd Place Winner chloe with Oasis Mesa, and
  3rd Place Winner Artemis with TFFA Brutal! Amazing submissions by everyone!


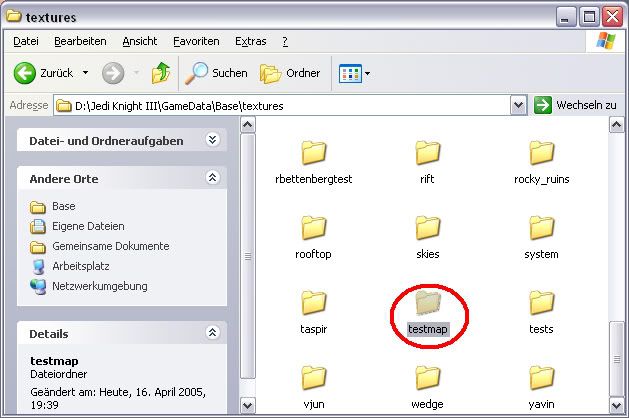
Textures
First of all we create a new folder in our …Base/textures – folder. Give it the name of your map (here: "testmap"):
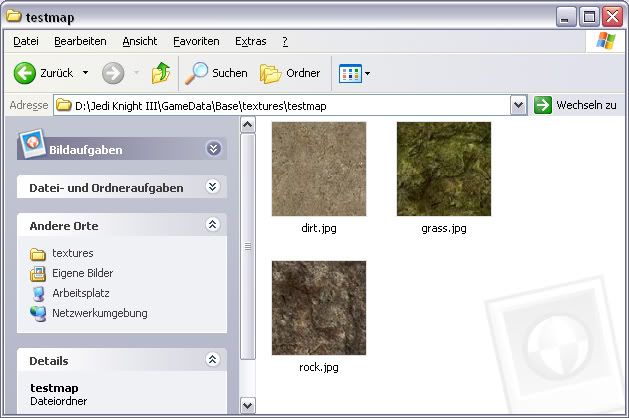
Now we put the textures for the terrain into this folder (here: "rock", "grass" and "dirt"):
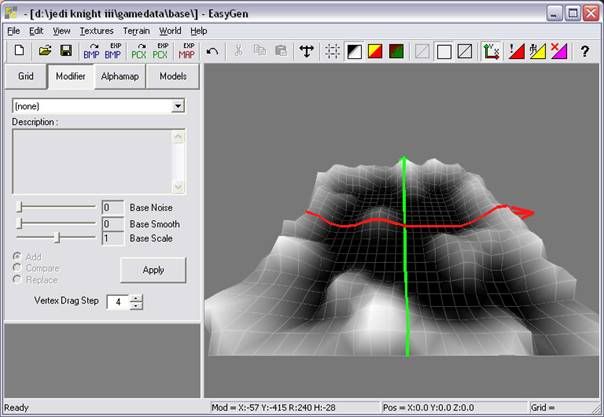
EasyGen
Then we start EasyGen and create a terrain with the Modifier like usual: (Optionally we could also import a 8-Bit heightmap )
Hint: the little red box in the middle of the terrain represents the player, and has the same size as a player.
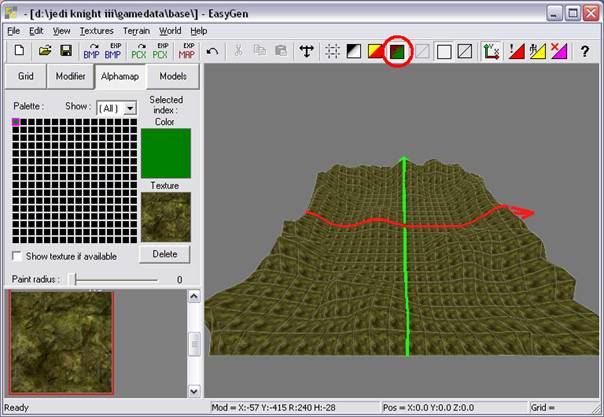
Now we click the tab next to "Modifier" » "Alphamap", and then in one of the black boxes. This will open a window in which you can select a color. We choose green as the first color, because this will be our "grass". Then we open the "Textures" menu in the menu bar and choose "Add folder …".
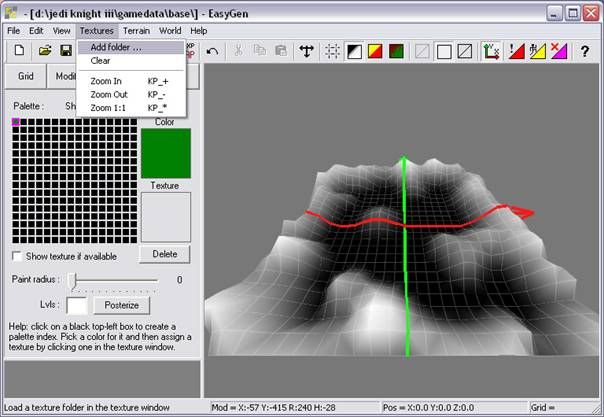
This way we can load the textures we have just put into the folder. So we choose the folder "testmap" which we created earlier:

Our 3 textures are now shown in the panel on the left so let’s click the "grass" – texture, it should now appear under the greenbox. Now just click the "Rendering: Texture" – symbol and we should see the terrain covered with the "grass" – Texture.
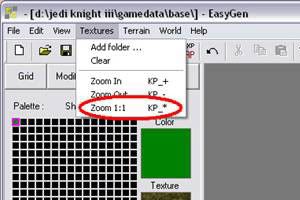
Hint: to get rid of the tiling, click "Zoom 1:1" in the textures menu.
Now that we have the base texture, we can start to worry about the other textures. To add another texture, do it the same way as we did with the first one, so click another black box and choose another color than the one used in „grass“. Then click the texture below. Here I used brown for "rock" and yellow for "dirt".
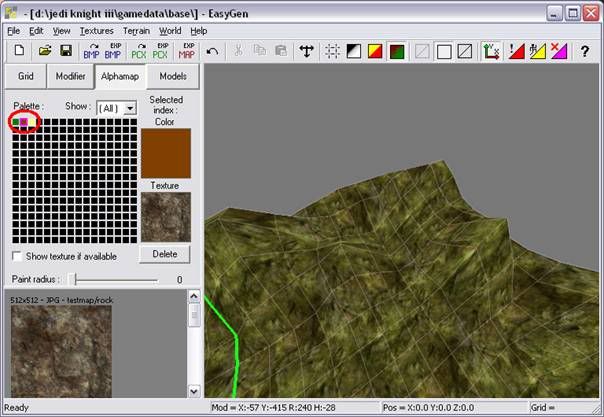
To apply the second texture to the terrain, we can just select one of the colored boxes. Then hold down "shift+ctrl" and move your mouse over the terrain, click the left mouse button every time you want to apply the texture (or hold it down).
Important: this method of blending terrain only supports 2-Way Blending, if more than 2 textures come together in one point, black triangles will appear, so try to avoid this!!!
Hint: if those black triangles appear anyway, don’t panic, just use the base texture over the area and start over.
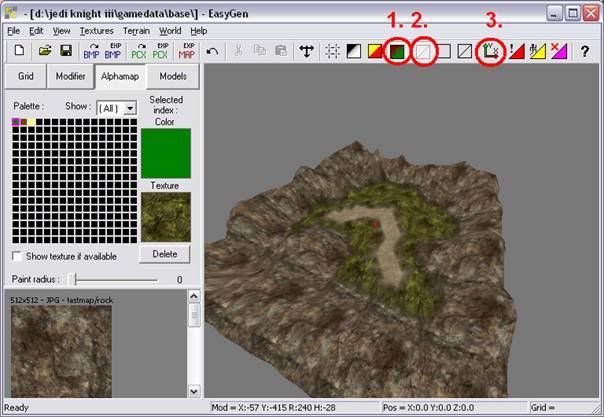
- Once again the "Rendering: Texture" view (on the left the alphamap view and the heightmap).
- Turns off the grid (on the right the view for Rectangles and Polygons).
- Turns off those ugly axes .
Export
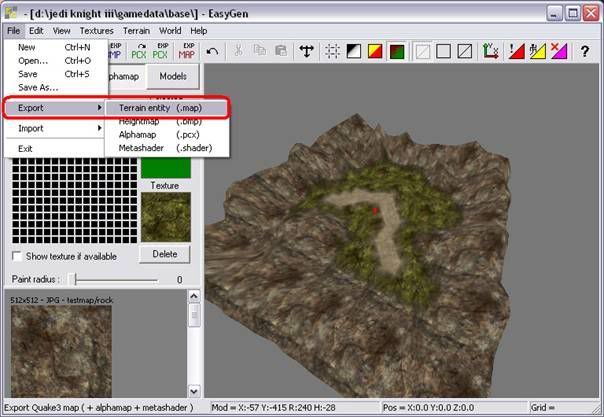
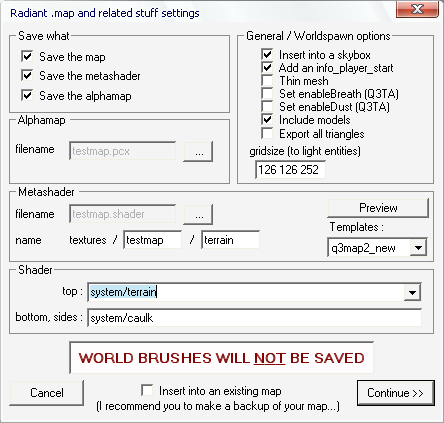
When we are satisfied with the terrain and the textures, we can export it all. To do so we open the file menu in the menu bar, go to export and choose the entry "Terrain entity (.map)" in the appearing submenu:
This will open a window in which we have to change some settings:
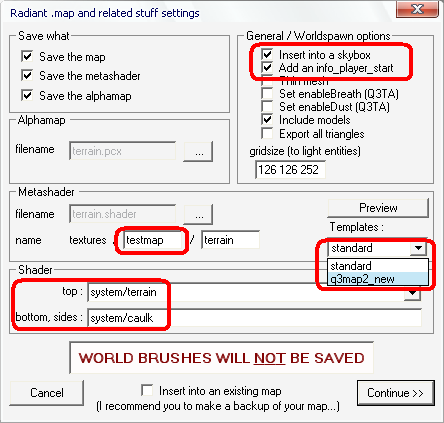
- We check the "Insert into a Skybox" and "Add an info_player_start" checkboxes.
- Choose "q3map2_new" in the "Templates" menu (Metashader section) - Hint: scroll down, download testmap.zip and install the templates!!!
- We put the name of our map into the name field (Metashader section).
- In "top:" and "bottom, sides:" we change "common" to "system" ("common" is for Q3)
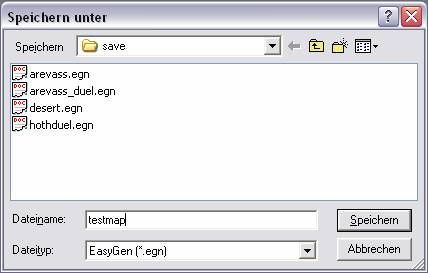
Then we click the "…" in the Alphamap section (next o the gray field), a window will open, in this window we browse to our base folder and enter the name of our map:
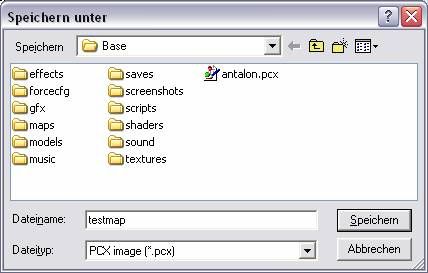
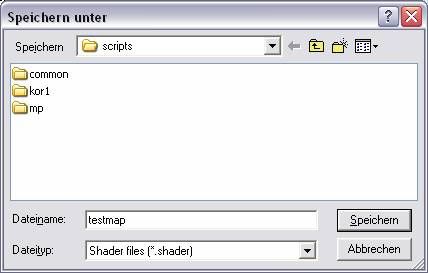
By clicking "Save" the mapname ("testmap") will be entered into the field hat was empty. Then we do he same thing with the field below, here the base-subdirectory "scripts" must be selected:
After this our "Export" – window should look like this:
When everything is alright click "Continue >>". A window will open and we find ourselves in the "maps" – folder (if not, we browse there!) and save our terrain as .map with the name "testmap" (like usual). Confirm with "Save" and voila, done. Now we save our terrain incase we want to change anything later (textures or surface). To do this just go to "File" » "Save As…" the file will be saved in the EasyGen subfolder "save":
Radiant
Close EasyGen, open Radiant and load the map, this might take a while.
Hint: anyone who panics can calm down, the green "terrain" - texture is completely normal.
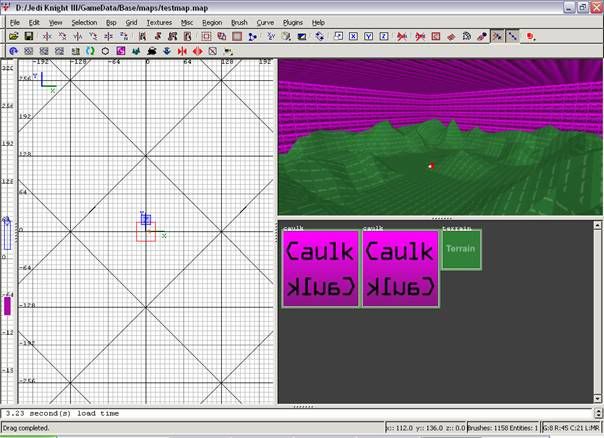
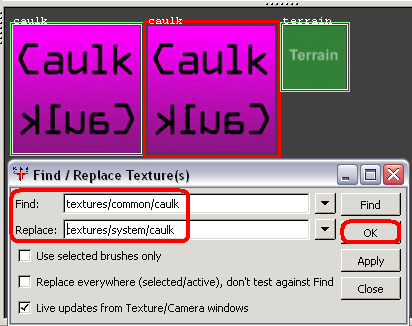
We see that EasyGen put the terrain into a skybox, there is also an info_player_start entity. Sadly, EasyGen used the "common/caulk" – texture anyway; but that's no problem – we can just replace it with the "system/caulk" – texture. To do this, just find the menu "Textures" in the menu bar and click "Find/Replace…".
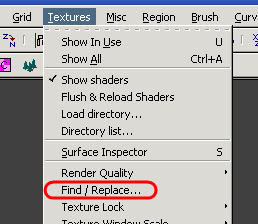
This will open a window, here click the first white field and then the "common/caulk" – texture. Then click the second field and click the "system/caulk" – texture, confirm with "OK":
Now we have to give the skybox a sky. You can choose a shader with a sun, put a bunch of lights in the map or just add an ambient value to the worldspawn. There’s one more thing we have to do, so select a brush in the skybox and press "N". Then delete some lines in the following window:
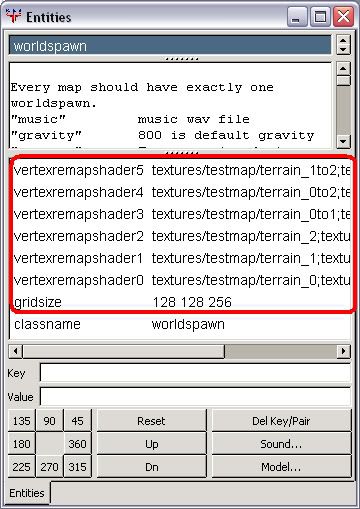
Always click one line and then the "Del Key/Pair" (on the right). And then we’re finished with the map, yay! (Of course you can put in heaps of other things like plants, houses, water, etc).
Make a PK3
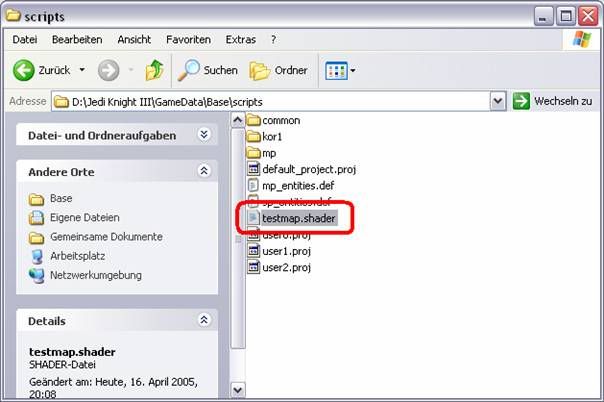
We save our map and close Radiant. Then we go to our …Base/scripts – folder and move "testmap.shader" into the …Base/shaders – folder.
(from scripts to shaders)
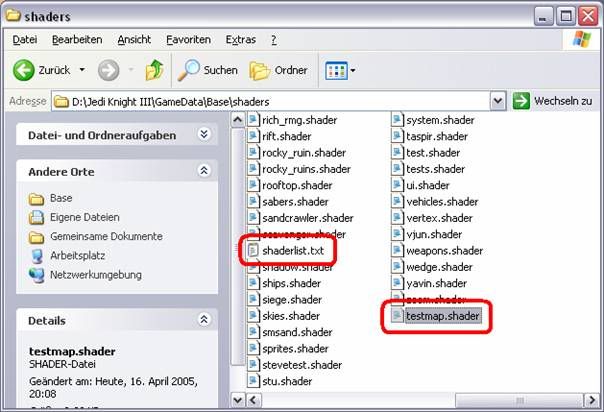
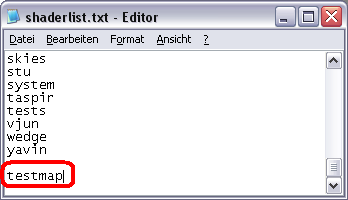
There is also a file called "shaderlist.txt" that we open now. At the bottom we add "testmap" this entry is very important. Radiant and q3map2 need this to recognize the shader during a compile.
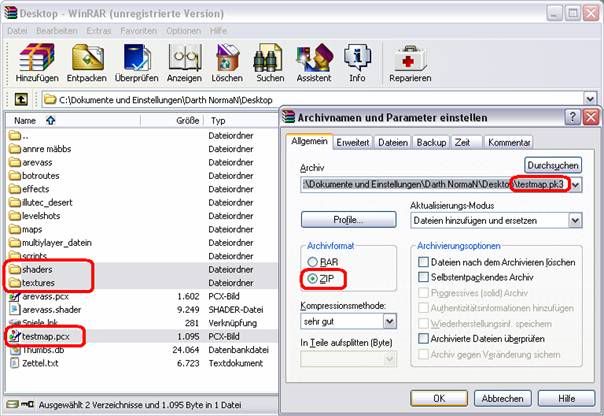
Now we create two folders on our desktop: We call the first one "textures" and the second one "shaders". Then we cut (CTRL+X) the "testmap" folder out of our …Base/textures – folder and paste it (CTRL+V) into out new "textures" – folder on our desktop. Then we do the same with the shader: Cut the "testmap.shader" out of …Base/shaders and into the new "shaders" – folder on the desktop. Now we only need "testmap.pcx" from the …Base - folder. This file is also cut out and pasted onto the desktop. Now we need a program which can create .zip files (here: WinRAR).

In the program we browse to the deskop and select "testmap.pcx" and the two folders "textures" and "shaders". Then we click "Add". In the new window we type the path to the desktop and the name of the file (here "testmap.pk3").
Important: in other programs you should use "testmap.zip" and later rename to "testmap.pk3".
Hint: a .pk3 is the same as a .zip, just with another extension.
Press "OK" and close the program after the packing process is complete.
Now move the new file called "testmap.pk3" into the base folder!
Compile
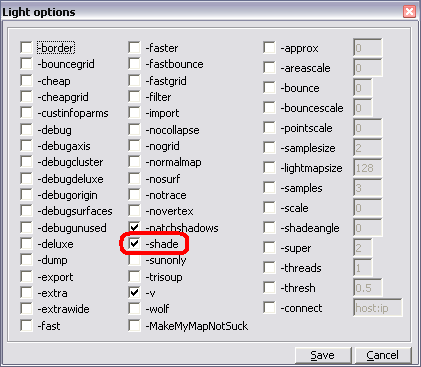
Close everything and open Q3Map2Build. In the "Light options " we have to check the "-shade" checkbox, to enable the "Phong – Shading – Technique" (this makes the terrain look more round and better lighted).
Click "Save" and you’re done! Now we compile the map. To do it, click on he map in the list, then click "Build".
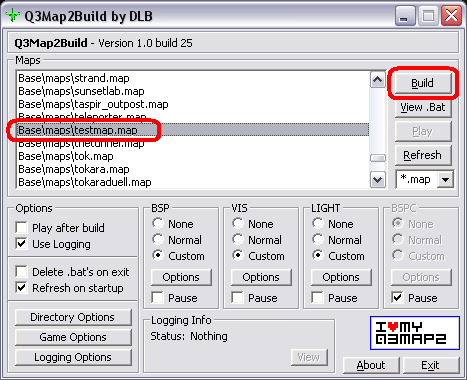
Important: don’t close Q3map2Build!!
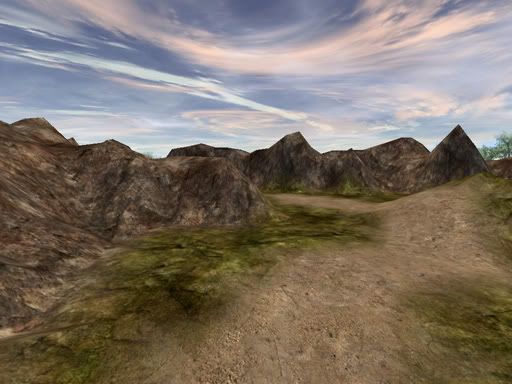
When the compile is done we can just click "Play" to play the map.

And this is how it should look in game:
That wasn’t so hard, was it?
Example Files
Hint: following files can be downloaded:
testmap.map
testmap.bsp
testmap.eng
testmap.pk3 (shaders, textures, alphamap)
"q3map2_new" - templates for EasyGen
testmap.zip (695 kB)


Recommended Comments
There are no comments to display.
Create an account or sign in to comment
You need to be a member in order to leave a comment
Create an account
Sign up for a new account in our community. It's easy!
Register a new accountSign in
Already have an account? Sign in here.
Sign In Now