

ksgWXfan
-
Posts
28 -
Joined
-
Last visited
Content Type
News Articles
Tutorials
Forums
Downloads
Posts posted by ksgWXfan
-
-
Just curious, which weapon are you looking to replace with your new model?
* Do you have mrwonko's Import/Export Tools Blender plugin? https://jkhub.org/files/file/3521-blender-279-jedi-academy-plugin-suite/
* Get MD3View and ModView
On 12/7/2020 at 4:28 AM, mrwonko said:It might be easiest to import an existing weapon (using MD3View) as a base for a new one.
*** I HIGHLY recommend this! It helps you size correctly and such.
The following are some tips I've ran into as a frequent mrwonko's blender tools user:
EXPORTING FROM MD3View
* in MD3View, when exporting, and if using with Jedi Academy, USE the "Export as GLM (Ghoul2) *without* 90-degree skewing for JA" option
I learned the hard way.
IMPORTING INTO BLENDER
* Remember with MD3View, you're EXPORTING the MD3 as a GLM so that you can import the GLM representation of the MD3 into Blender. And once you're done building in Blender, you can then export as an MD3.
* When importing that GLM representation of the MD3 into Blender, clear the skin box (it says 'default') because md3's don't need it, and it will throw an error otherwise.BUILDING
* Stay true to the hierarchal setup: scene_root (an empty) -> model_root_0 (an empty) -> your_model_goes_here_0
* you can have multiple meshes as part of your model; it being best to parent them to model_root_0
* all mesh origins should be centered at the world origin (0,0,0); any rotation, scaling, translating should be done only in Edit mode; if anything like that is done outside of edit mode, you'll have to manually move the origin back to the center (includes ensuring the 3D cursor is set at the center: SHFT+S -> cursor to center; then in object mode with the mesh selected, SHFT+CTRL+ALT+C -> Origin to 3D Cursor)
* If the scale is changed outside of edit mode, Apply the scale/rotation of the mesh (CTRL+A).
* Tags should be empties. The naming convention should be tag_<name>. So if you have the flash or fubar tag, they should be called tag_flash and tag_fubar, respectively.
* When a GLM representation is imported, the tags are imported as well, but they are meshes, named like their glm counterparts (*flash; *fubar) Think of them as placeholders. The empties should be placed at the same location as the right-angle of the mesh placeholder. (in edit mode of the placeholder, select the right-angle vertex, SHFT+S -> Cursor to Selected; then exit edit mode; add a new empty. it should be added at the new location of the 3D Cursor). Remember to rename the new empties properly.
* Shaders: each mesh part of your model needs a custom property called md3shader. Then the value of that property should direct the game to the location of the texture defining the mesh (i.e. models/weapons2/thermal/xyz_texture.tga). Select the mesh, then the custom properties can be added via the Object tab in properties (right-bottom panel); it's at the very bottom.EXPORTING
* More than likely, your MD3 won't have animations. I have no idea how to handle it if it does. BUT, if it doesn't, as I suspect it doesn't, on the timeline, ensure the start frame is 1 and the end frame is 1.
* You then need to select each part of the new MD3 you want exported. Remember to select the tags as well. This is advantageous because you can have other meshes to assist you in building your model, but if they're not selected, they won't bother with the exported MD3.
* Go to file -> export -> JA MD3
* if you had imported a GLM representation as reference, you probably hadn't changed the scale from the default of 0.1. If you chose to do that, just remember when you export the new MD3, scale it by 10.0 to set the MD3 back to the proper size, or it will appear very small in-game.OCD2 likes this -
Thanks for the tips. One of the problems I had was the ghoul2 properties. for my jersey objects I had copied them from existing objects, and thus they had the same name. But I got that cleared up. I have the model working now...just going to be doing some tweaks and working within the pk3.
ooeJack likes this -
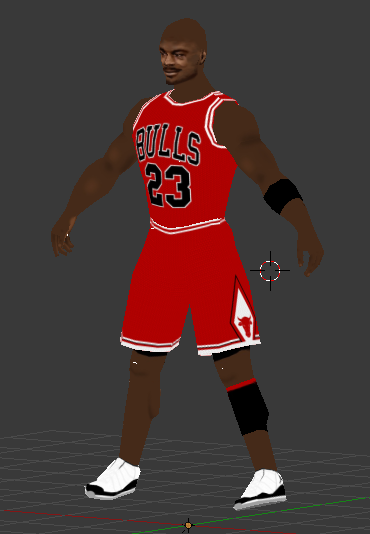
So, I've been fiddling with Blender for a few weeks now, working on a Michael Jordan (and happens to be my first) model/skin; making it for JK3. I used a GrayFox (JK2) model and Frankensteined a MaceWinduNK (JK3) head... I finally got to where I was happy with the way it looked (still not completely done with skinning). Blender exports the model as it is right now. But then the trouble (and unknown) begins.

Some more info: From what I can tell, the hierarchy looks correct; The armband, legband, shorts, and jersey top are additions I added (they are their own individual objects(?); Everything was rooted to the skeleton; Everything was properly parented.
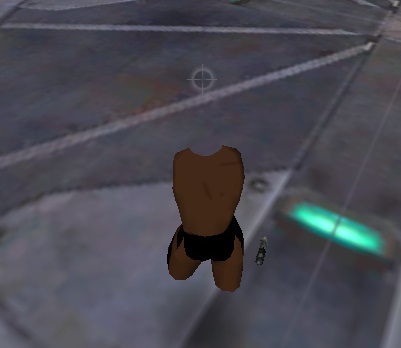
So like I said, it lets me export the GLM file. I then created a 'model_default.skin' file, made an npc file, pk3'd it (inc. textures), and tested it. Upon loading the model, it shows this:
Then if I try to import the model.glm file that I successfully exported, it gives me this error:
and the import looks like this, with virtually everything unparented and the UV maps/textures messed up:
I'm not 100% sure where something is going wrong. On other JK2 models I import, then export, I can import the exported versions just fine.
Sidenote (that may be of worth to those with experience): With part of my troubleshooting, I decided to delete the additional objects I had made to see if it would export okay but it gives a LOD error: torso_0 … suggesting that I split the UV mesh somewhere (but I have no idea if it is the torso, or a child of the torso that needs more edge splits, and know of no quick way to tell where a seam is merged, and thus needs to split...especially if it is an imported object foreign to Blender). But this error is not thrown when I export it with the jersey. It's odd.
So there's a lot of info. If anyone can make sense of any of it, I'd appreciate it. I'd hate to throw this away given how much time I've invested in it the past few weeks. -
Dude...I believe my brain was so burnt out, I overthought it. Thanks so much. Instead of mirroring, I simply overlayed the UV islands, selected them, then the "remove doubles UV" option, and I eventually got the result I wanted. Thank you!
Artemis likes this -
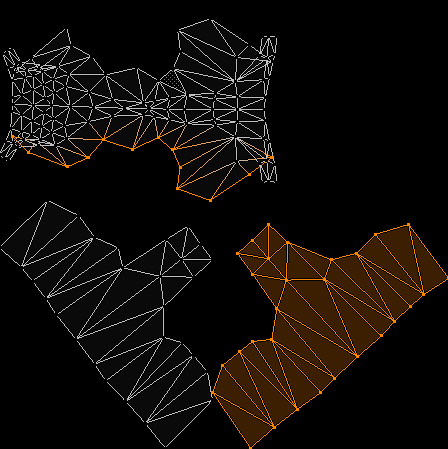
I'm fairly new to Blender (and 3D modelling for that matter), so I'm not familiar with all of the proper terminology, so bear with me... So I traced the seams that I wanted, followed by unwrapping. The result is fine...but I'd rather modify a few things on the UV map(?)
The bottom two pieces are the same, just on different sides of the model.
- Ultimately, I'd like to get the bottom pieces overlayed one another so that when I do the texture, I only have to do it once. How would I go about doing this?
- I believe I can figure out a way to translate some UV coordinates, but a problem is when I select the seamed area, it also selects the edge of the first(top) piece. How can I isolate one of the bottom selections to play around with translation?Any help would be appreciated; thanks from a 1337 noob.


Missing NPC weapons
in Modding Assistance
Posted
The hand tags (*l_hand_0 tag, *r_hand_0) are found parented to the l_hand_0 and r_hand_0, respectively.
Try copying them / pasting them from an existing model. The reason this is recommended is because they already have proper associated vertex groups for the correct bone associations on the skeleton.
* When you do this, it will likely look huge and it will import a copy of the skeleton from the other model as well. Don't panic! simply delete the skeleton.
* First parent the tags to the existing l_hand and r_hand. (Select tag ->Object Properties -> Parent -> l_hand/r_hand)
* If the scale is right, the tag should essentially sit in the player's hand. If it is offset, it means you likely have to scale it. Make sure you're in Object Mode. Scale it (if I was a betting man, I'd say scale it by 0.1. This would shrink it.) Now, importantly, you must Apply the scale via CTRL+A -> Apply Scale
* NOT quite done yet! Ensure the tag is selected, and goto the Modifiers tab. It should be a red box indicating the deleted skeleton. Simply choose the correct skeleton. Try to export it then.
Repeat the above for any of the tags you seem to be missing (there's like 3 or 4 total in the lower half of the arm; use another model for reference)