

DarthNormaN
-
Posts
24 -
Joined
-
Last visited
Content Type
Profiles
News Articles
Tutorials
Forums
Downloads
Posts posted by DarthNormaN
-
-
Textures
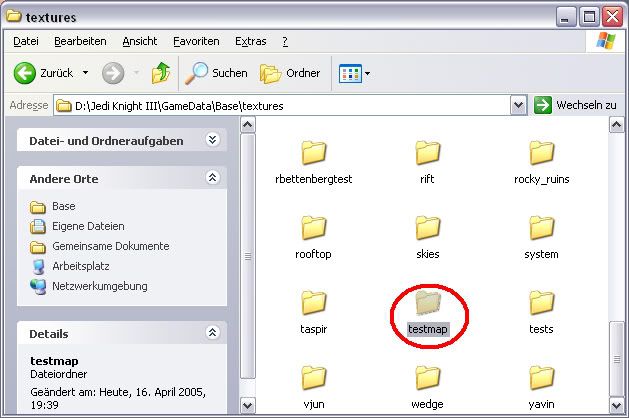
First of all we create a new folder in our …Base/textures – folder. Give it the name of your map (here: "testmap"):

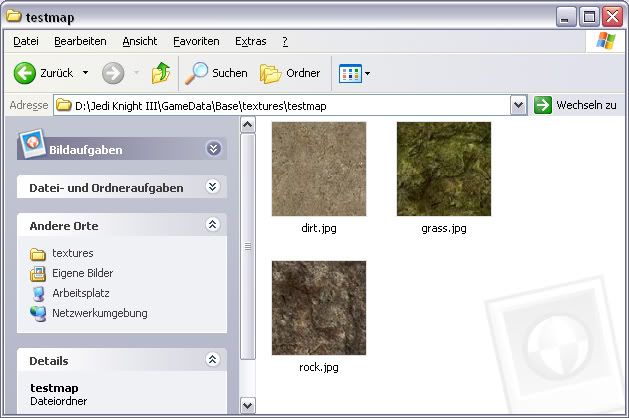
Now we put the textures for the terrain into this folder (here: "rock", "grass" and "dirt"):
EasyGen
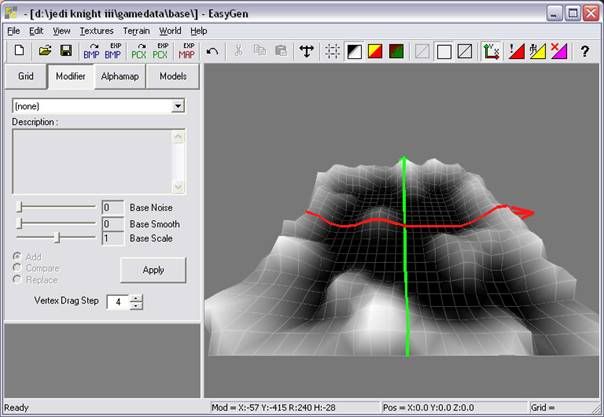
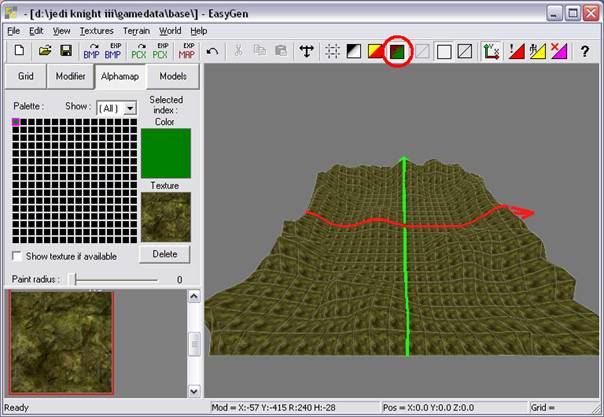
Then we start EasyGen and create a terrain with the Modifier like usual: (Optionally we could also import a 8-Bit heightmap )
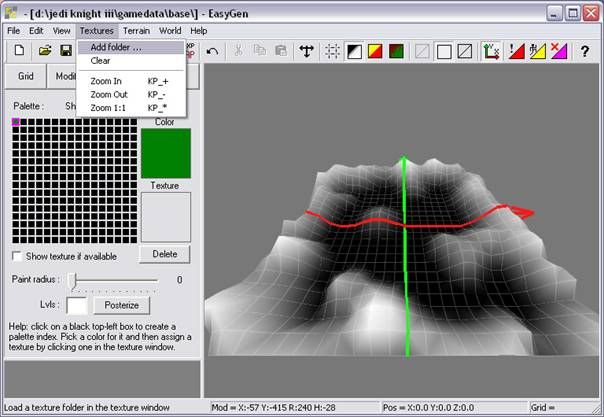
Hint: the little red box in the middle of the terrain represents the player, and has the same size as a player.Now we click the tab next to "Modifier" » "Alphamap", and then in one of the black boxes. This will open a window in which you can select a color. We choose green as the first color, because this will be our "grass". Then we open the "Textures" menu in the menu bar and choose "Add folder …".
This way we can load the textures we have just put into the folder. So we choose the folder "testmap" which we created earlier:
Our 3 textures are now shown in the panel on the left so let’s click the "grass" – texture, it should now appear under the greenbox. Now just click the "Rendering: Texture" – symbol and we should see the terrain covered with the "grass" – Texture.
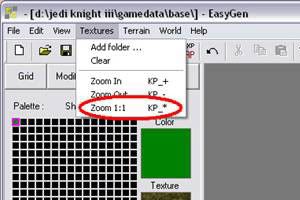
Hint: to get rid of the tiling, click "Zoom 1:1" in the textures menu.
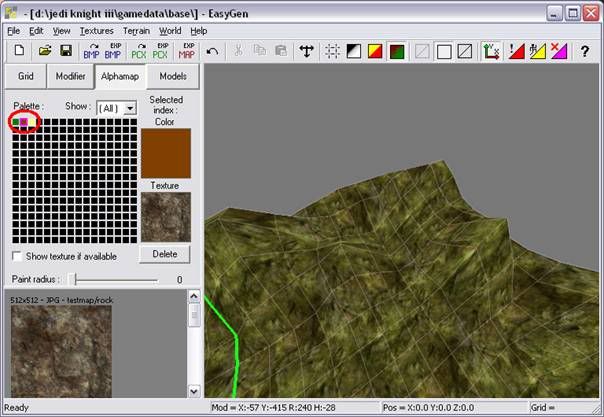
Now that we have the base texture, we can start to worry about the other textures. To add another texture, do it the same way as we did with the first one, so click another black box and choose another color than the one used in „grass“. Then click the texture below. Here I used brown for "rock" and yellow for "dirt".
To apply the second texture to the terrain, we can just select one of the colored boxes. Then hold down "shift+ctrl" and move your mouse over the terrain, click the left mouse button every time you want to apply the texture (or hold it down).
Important: this method of blending terrain only supports 2-Way Blending, if more than 2 textures come together in one point, black triangles will appear, so try to avoid this!!!
Hint: if those black triangles appear anyway, don’t panic, just use the base texture over the area and start over.
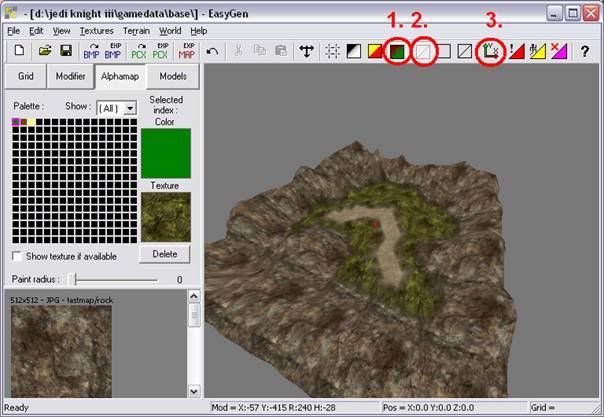
1. Once again the "Rendering: Texture" view (on the left the alphamap view and the heightmap).
2. Turns off the grid (on the right the view for Rectangles and Polygons).
3. Turns off those ugly axes .Export
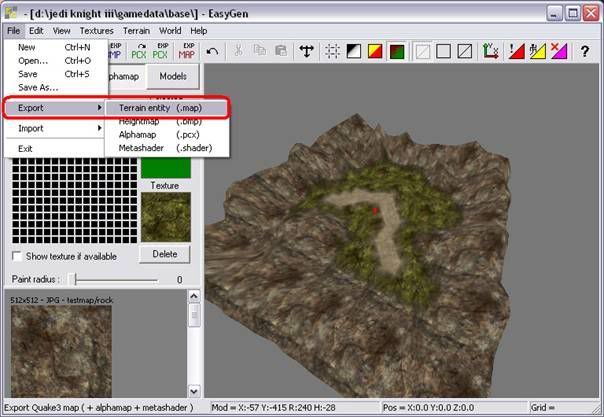
When we are satisfied with the terrain and the textures, we can export it all. To do so we open the file menu in the menu bar, go to export and choose the entry "Terrain entity (.map)" in the appearing submenu:
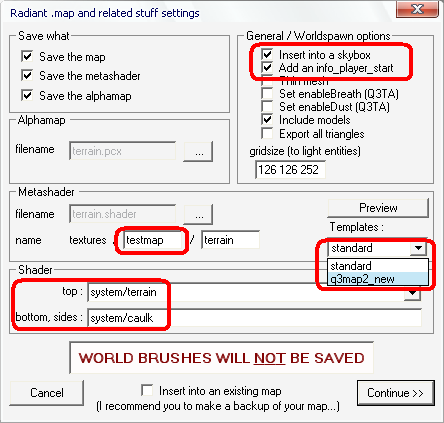
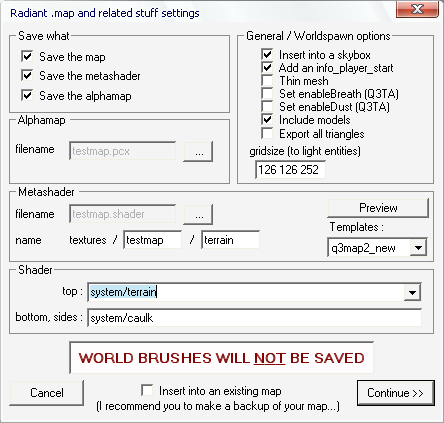
This will open a window in which we have to change some settings:
1. We check the "Insert into a Skybox" and "Add an info_player_start" checkboxes.
2. Choose "q3map2_new" in the "Templates" menu (Metashader section).Hint: scroll down, download testmap.zip and install the templates!!!
3. We put the name of our map into the name field (Metashader section).
4. In "top:" and "bottom, sides:" we change "common" to "system" ("common" is for Q3)
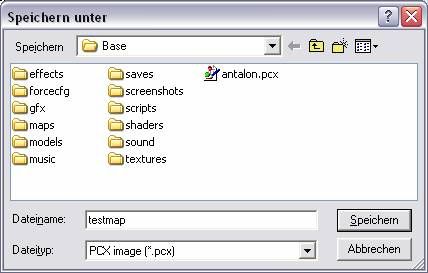
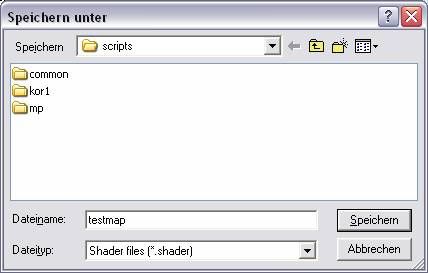
Then we click the "…" in the Alphamap section (next o the gray field), a window will open, in this window we browse to our base folder and enter the name of our map:By clicking "Save" the mapname ("testmap") will be entered into the field hat was empty. Then we do he same thing with the field below, here the base-subdirectory "scripts" must be selected:
After this our "Export" – window should look like this:
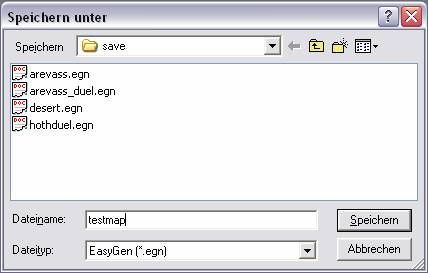
When everything is alright click "Continue >>". A window will open and we find ourselves in the "maps" – folder (if not, we browse there!) and save our terrain as .map with the name "testmap" (like usual). Confirm with "Save" and voila, done. Now we save our terrain incase we want to change anything later (textures or surface). To do this just go to "File" » "Save As…" the file will be saved in the EasyGen subfolder "save":
Radiant
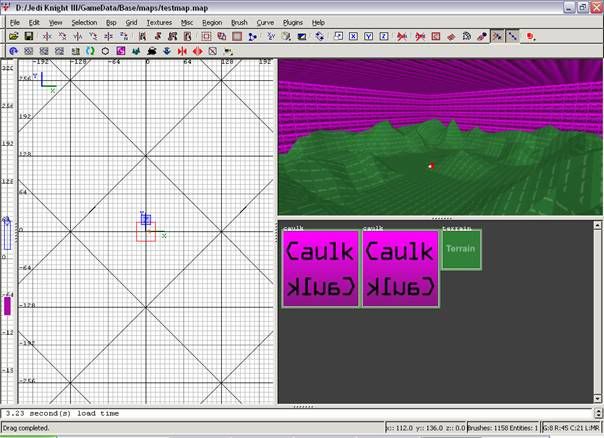
Close EasyGen, open Radiant and load the map, this might take a while.
Hint: anyone who panics can calm down, the green "terrain" - texture is completely normal.
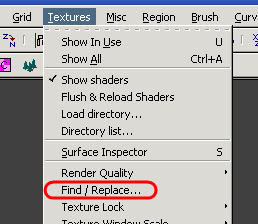
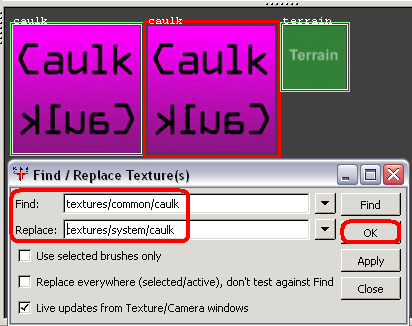
We see that EasyGen put the terrain into a skybox, there is also an info_player_start entity. Sadly, EasyGen used the "common/caulk" – texture anyway; but that's no problem – we can just replace it with the "system/caulk" – texture. To do this, just find the menu "Textures" in the menu bar and click "Find/Replace…".
This will open a window, here click the first white field and then the "common/caulk" – texture. Then click the second field and click the "system/caulk" – texture, confirm with "OK":
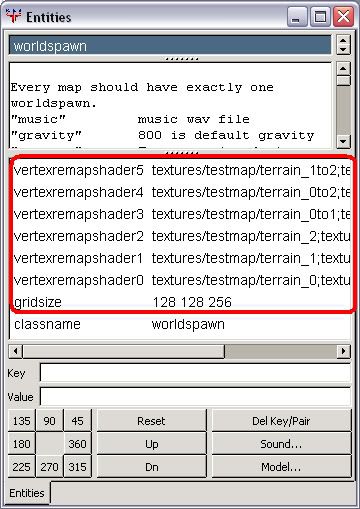
Now we have to give the skybox a sky. You can choose a shader with a sun, put a bunch of lights in the map or just add an ambient value to the worldspawn. There’s one more thing we have to do, so select a brush in the skybox and press "N". Then delete some lines in the following window:
Always click one line and then the "Del Key/Pair" (on the right). And then we’re finished with the map, yay! (Of course you can put in heaps of other things like plants, houses, water, etc).
Make a PK3
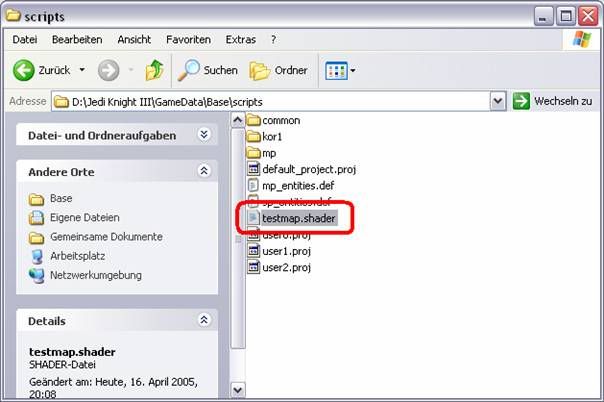
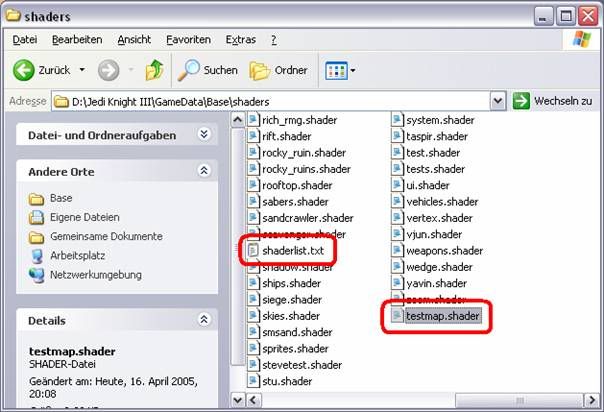
We save our map and close Radiant. Then we go to our …Base/scripts – folder and move "testmap.shader" into the …Base/shaders – folder.
(from scripts to shaders)
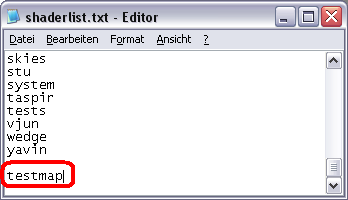
There is also a file called "shaderlist.txt" that we open now. At the bottom we add "testmap" this entry is very important. Radiant and q3map2 need this to recognize the shader during a compile.
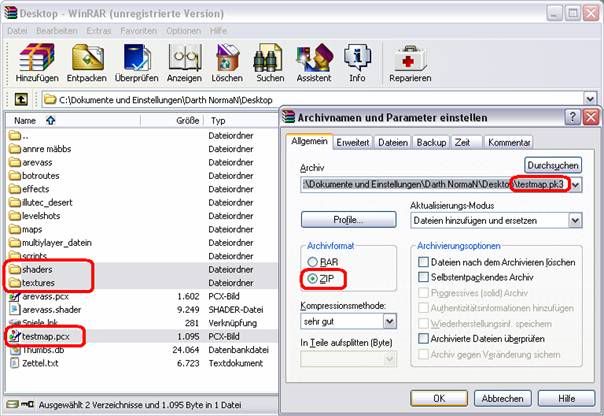
Now we create two folders on our desktop: We call the first one "textures" and the second one "shaders". Then we cut (CTRL+X) the "testmap" folder out of our …Base/textures – folder and paste it (CTRL+V) into out new "textures" – folder on our desktop. Then we do the same with the shader: Cut the "testmap.shader" out of …Base/shaders and into the new "shaders" – folder on the desktop. Now we only need "testmap.pcx" from the …Base - folder. This file is also cut out and pasted onto the desktop. Now we need a program which can create .zip files (here: WinRAR).
In the program we browse to the deskop and select "testmap.pcx" and the two folders "textures" and "shaders". Then we click "Add". In the new window we type the path to the desktop and the name of the file (here "testmap.pk3").
Important: in other programs you should use "testmap.zip" and later rename to "testmap.pk3".
Hint: a .pk3 is the same as a .zip, just with another extension.
Press "OK" and close the program after the packing process is complete.
Now move the new file called "testmap.pk3" into the base folder!
Compile
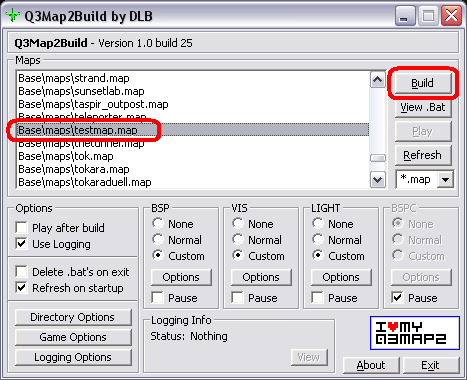
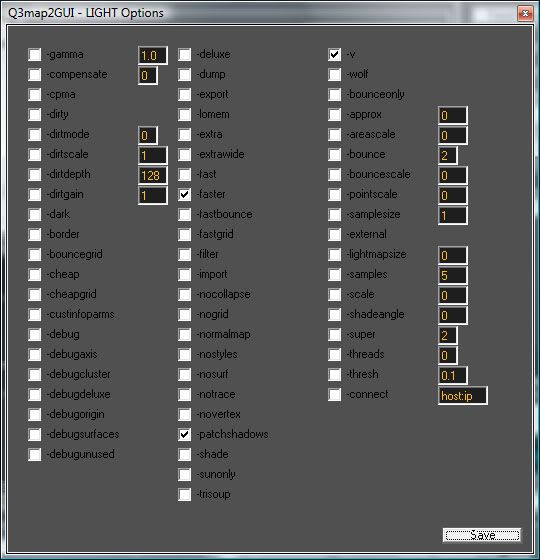
Close everything and open Q3Map2Build. In the "Light options " we have to check the "-shade" checkbox, to enable the "Phong – Shading – Technique" (this makes the terrain look more round and better lighted).
Click "Save" and you’re done! Now we compile the map. To do it, click on he map in the list, then click "Build".
Important: don’t close Q3map2Build!!
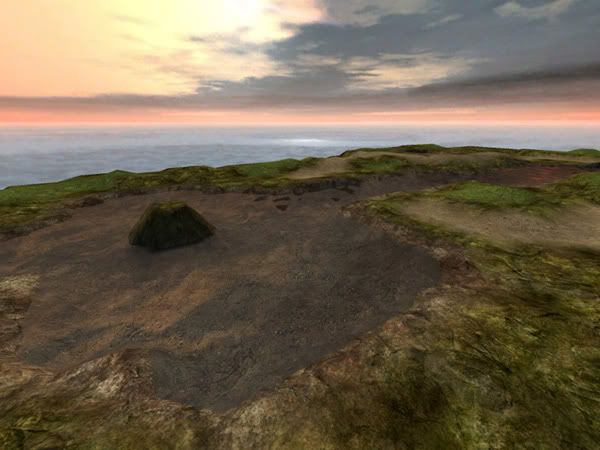
When the compile is done we can just click "Play" to play the map.
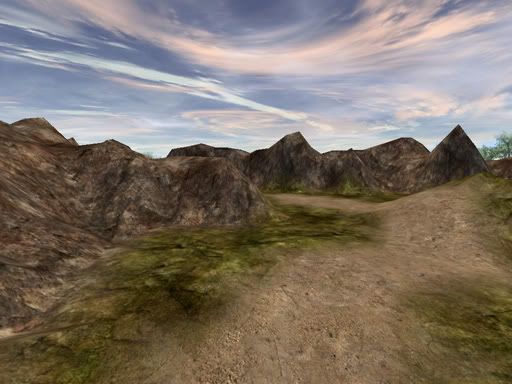
And this is how it should look in game:
That wasn’t so hard, was it?
Example FilesHint: following files can be downloaded:
testmap.map
testmap.bsp
testmap.eng
testmap.pk3 (shaders, textures, alphamap)
"q3map2_new" - templates for EasyGen
testmap.zip (695 kB) -
The Textures
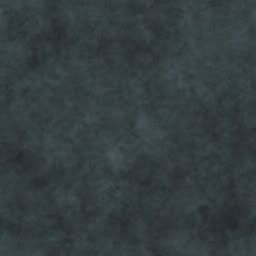
First, we take care of the textures we will need. The texture "water" is a normal .jpg (RGB-mode saved in 'Baseline-Standard').
mymap/water.jpg (scaled 50%)
"env_water" is our environment texture and also a .jpg (RGB-mode saved in 'Baseline-Standard'). To get it we have have to build a testmap. That testmap should consist of the skybox (with lighting), a skyportal (if needed) including your basic/background terrain and an info_playerstart. After compile you start the map (devmap [mapname]) and type following two commands into the console:
cg_draw2d 0
cg_drawgun 0
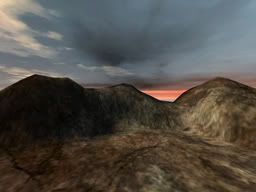
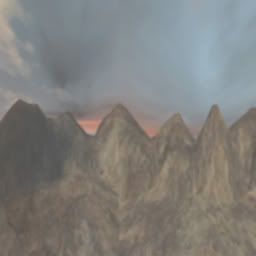
After that you change into first-person view and take 2 screenshots of the map. Just go in the middle of your map and take a shot after every 90° while turning around.
Hint: if possible, avoid very bright spots on those screenshots.
shot1 (scaled 25%) shot2 (scaled 25%)
Now merge both pics together by using a graphics program such as Photoshop. Then scale it till it has a texture format (1024x1024 pixel should be more than enough). Now use the Motion Blur Filter to make it unsharp. Last but not least bright it up around 75% and save it as .jpg (RGB-mode saved in 'Baseline-Standard').
mymap/env_water.jpg (scaled 25%)The Shader
textures/mymap/water // name of the texture (in Radiant)
{
qer_editorimage textures/mymap/water // picture of the shader in Radiant
sort banner // depth sorting of shaders
qer_trans 0.8 // transparency in Radiant
surfaceparm nonsolid // surface is non solid
surfaceparm nonopaque // surface is transparent
surfaceparm trans // surface is transparent 2
surfaceparm water // water characteristics
q3map_material Water // water characteristics 2
tessSize 128 // divides Brushes into 128x128 Brushes
deformvertexes normal 0.1 1.85 // undulation
deformvertexes wave 128 sin 0 1 0.3 2 // undulation 2
{
map textures/mymap/water // basic texture
blendFunc GL_ONE GL_SRC_ALPHA // transparency
rgbGen const ( 0.5 0.5 0.5 ) // weakens colors 50%
alphaFunc GE128 // filters black
alphaGen const 1.0 // alpha-channel attitudes
tcmod scroll 0 -0.25 // texture scrolling (optional)
}
{
map textures/mymap/env_water // environment texture (reflectivity)
tcGen environment // makes this an environment stage
rgbGen const ( 0.5 0.4 0.4 ) // (red stronger than green & blue)
blendFunc GL_ONE GL_ONE // transparency
}
{
map textures/mymap/env_water // environment texture (reflectivity)
tcGen environment // makes this an environment stage
blendFunc GL_DST_COLOR GL_ZERO // transparency
}
{
map $lightmap // lightmap stage
blendFunc GL_DST_COLOR GL_ZERO // transparency
}
}
Pack shader and texturen into a .pk3 and move it into your base folder.
Important: don't forget the shaderlist.txt (...base/shaders) entry!
Ingame
To use the new water, create a brush and give it the "system/caulk_water" texture. Now select the visible sites of the brush (ctrl+shift+alt+left mous button in 3d window) and give those the new "mymap/water" texture.
Now it's time to compile. -
The Texture
First you create an image (Paint does the job here) with the size of a texture (here: 256x512), by drawing straight lines (hold down Shift) in colors of a rainbow. (You can see the order by looking closely at real pictures of rainbows)
Important: Center the lines and make sure they have he same distance to each other!
Then you open the image in a "better" image manipulation program. I used Photoshop and the blur filter "Motion Blur": twice at 0 degrees (with 50 pixel disort) and twice at 90 degrees (again 50 pixel disort).
Save it all as a Baseline - Standard ".jpg" and the texture is ready.
The Shader
Now you just have to equip the texture with a shader.
textures/meinemap/regenbogen // Name of the texture (in Radiant)
{
q3map_nolightmap // No shadows on the texture
surfaceparm nolightmap // No shadows on the texture
surfaceparm nonsolid // Makes it non-solid
surfaceparm nonopaque // Transparency
surfaceparm nomarks // No weapon marks
surfaceparm trans // Transparency
cull twosided // Patch is visible from both sides
{
map textures/mymap/rainbow // Path of the texture
blendFunc GL_ONE GL_SRC_ALPHA // Transparency
rgbGen const ( 0.5 0.5 0.5 ) // Less saturated colors
alphaFunc GE128 // Filters out black
alphaGen const 1.0 // Alpha channel property
}
}Texture and shader are now packaged into a .pk3 and moved to …GameData/Base/.
Important: Don’t forget the entry in the shaderlist.txt (…Base/shaders)!
Ingame
To put the rainbow into a map, just make a big patch and apply the rainbow texture (press Shift+S and click on "Fit" to strech the texture). Now just disort (press V, then manipulate) and move it to the right place.
Now, that we have the rainbow in the map, lets compile (see: Q3map2GUI tutorial).
Comparison:
-
Introduction
Ok there we go, this is the first official tutorial about Darth Arth's compiler frontend Q3Map2GUI.
So what is the idea behind this little program, you ask? Well, you may know Q3Map2Build or Q3Map2toolz which are very similar programs. And maybe you don't even know that such programs exist and use Radiant (boooh) to compile your maps, anyway Q3Map2GUI takes all the good features and merge them together, resulting in a small but effective frontend for Q3Map2.
You can download the latest version here.
Hint: Since it is a free program there are some known issues in the current version: The error "Map Leaked" isn't recognized as such and the error/warning windows won't be reset when you start a new Compile.
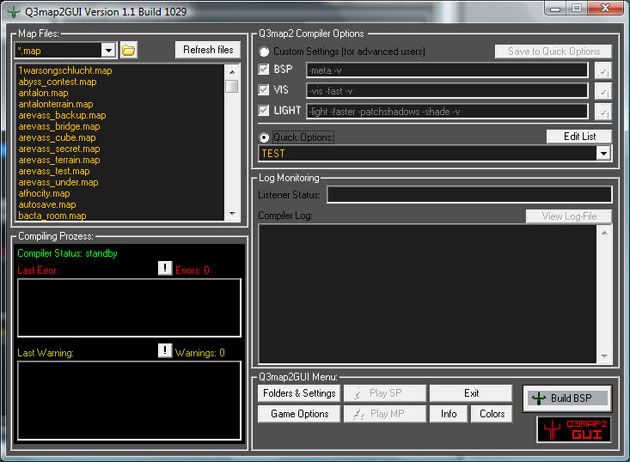
The Program
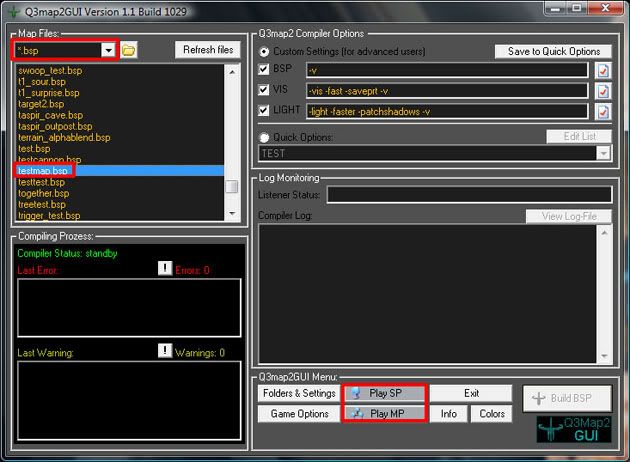
After starting Q3Map2GUI you will see something like this:
Don't be shocked about all those buttons, trust me, it is really not as hard as you may think. Since this program don't know anything about your folder structure or your favourite compile switches, you have to set it up properly first.
Let's begin with the most important thing: Folders & Settings.
Compiler Settings
Q3Map2.exe location: Type the path or browse to your Q3Map2.exe,
that's the Compiler, download the latest version here.
Checkboxes: Those checkboxes are depending on your taste.
Game Settings
Game: Choose the game you want to map for here.
Use devmap: I prefer playing in devmode while testing a map but that's up to you.
Single-Player.exe: Browse to your game's single player.exe (important!).
Multi-Player.exe: Browse to your game's multi player.exe (optional but recommended).
Logging Settings
use logging: I highly recommend using loggin! (7525 is the standard Port)
Log-File Folder: Browse to a folder where all logs will be saved.
Log-File Viewer: Choose Internal Viewer or notepad(++)/wordpad/whatever.
When you are done, click on save.
You can also export your latest settings to backup them or import a saved setting file (import/export buttons).
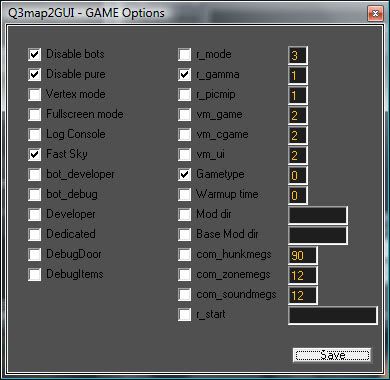
Next on the list is Game Options:
Here you can choose game switches for your server, when you start your map from Q3Map2GUI. I prefer the settings you can see in the image above.
Compile .map
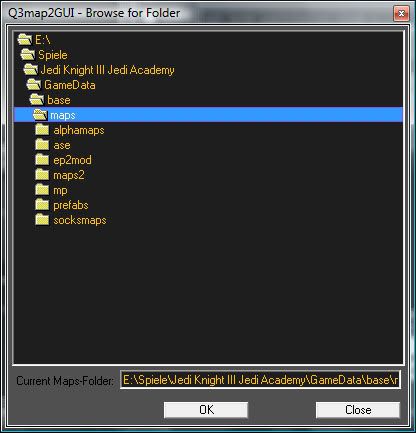
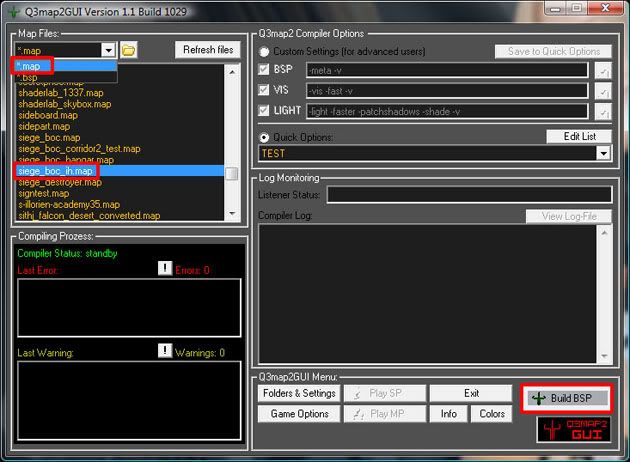
Now to the interesting part - the compile. In the left upper corner of Q3Map2GUI you see the map files list. If there are no maps listed you either set up the wrong path to your single player.exe or you maps folder is just empty. Anyway if you have subfolders in your base/maps folder you can go there by using the browse button:
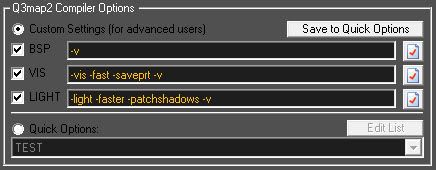
To compile your map, you have to tell the Compiler (q3map2.exe) which switches it should use. Therefor you have two ways in Q3Map2GUI to do so:
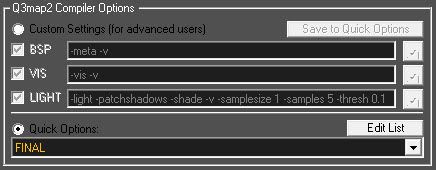
#1 Custom Settings:
You can write down your switches for each stage by hand or you click on the buttons at the right and choose the ones you want for your map, Q3Map2GUI will add them automatically to the list. You can save those switches now by giving them a name and adding them to the Quick Options List. Here an overview of all switches for each stage:
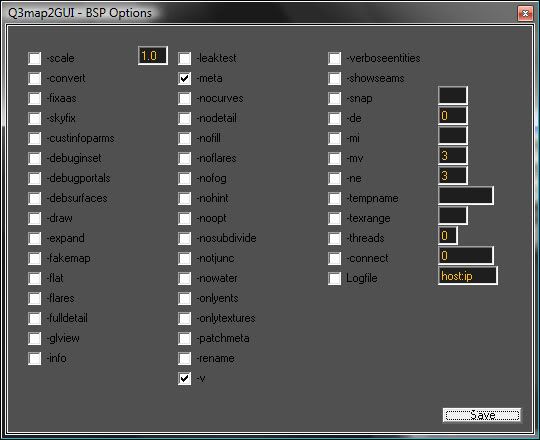
BSP Options:
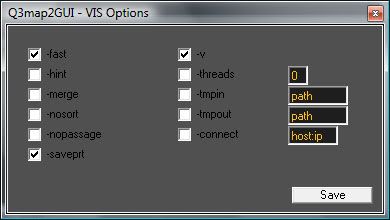
VIS Options:
LIGHT Options:
#2 Quick Options:
Quick Options is something you know from Radiant. Pre-saved switches combined to make Compile faster. If you click on "Edit List" a new window will open:
Down there you find the complete list of your Quick Options. (Mine is smaller than yours because i deleted the presaved ones. ) Anyway, when you click on one of them a detailed list of the switches gets displayed on the upper half of the window (looks similar to Custom Settings). There you can add or remove switches and save or delete whole Quick Options. Okay, now that everything is set up, you can compile. Choose the map from the map list, choose the right Custom Setting or Quick Option and press "Build BSP":
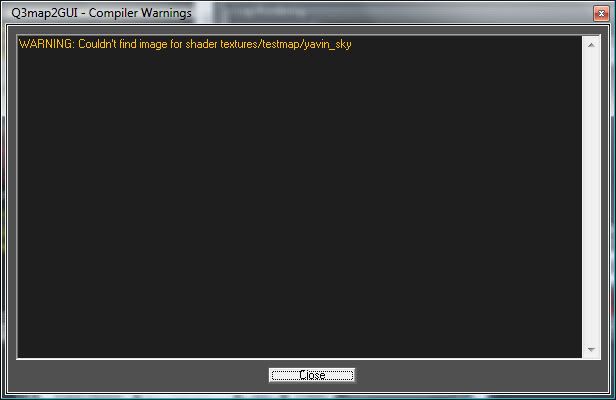
If you get any warnings or errors during compile Q3Map2GUI will create a list of them on the left. You can look at the list by clicking on the exclamation mark.
Warnings:
Errors:
Of course it is always better to have a bug-free compile.
Play .bsp
If that is the case, you can start your map by choosing ".bsp" in the map list view, choosing the right bsp and clicking on "Play SP" or "Play MP".
External Links
Q3Map2: Download
Q3Map2GUI: Download
Switches: Q3Map2 - Wikibook
-
Hey,
I am not really into mapping anymore but I'd love to see a Force Awakens map.. the insides of the Starkiller Base would work as a map. There a blue prints of it on the internet (overall layout of the set, size comparisons etc.).
I started some brushwork on it (no textures/shaders yet) when I got the BluRay.. could be a nice start. We could use standard textures from the game.
Tell me what you think.
Futuza, CansecoDev and Archangel35757 like this


Prepare Radiant & Hotkeys
in Mapping
Posted
Preferences
After you have Installed and started GtkRadiant, you can customize the Preferences (press "P") to suit your needs.
Game settings:
Here you choose the game you want to map for.
2D Display/Rendering:
Here you should leave the factory settings.
3D View:
This is concerning the 3D window. It's better to push the regulators to the very left.
Texture Settings:
Leave the standard settings
Layout:
Here you can customize the layout of the windows; You should experiment with this setting to see what you like best, I prefer this layout:
Mouse:
Here you should make sure that "3 button" is selected; but only if you have a 3-button mouse.
Editing:
Just leave the standard settings.
Startup/Autosave:
"Load last map on open": command Radiant to automatically open the last used map on startup.
"Autosave"-function: Here you can set how often you want the map o get autosaved to autosave.map, 5min is usually a good setting.
Paths:
You can just leave this empty.
Misc:
You should leave the factory settings.
BSP Monitoring:
Not important, because Q3map2 is used for compile
User Interface
1) The menu and toolbars, with which you can do all important stuff.
2) The 3D window, here your map will be displayed in 3D and Color.
3) The Texture window which shows all textures that are currently loaded, to load textures go to: Menu Bar » Textures » *Texture Directory*.
4) The 2D window, your map can be shown in three ways: from above, from the side or from the front You can switch between therse views by pressing this button in the toolbar:
5) This window displays the height of your brushes; the brushe can be selected and moved up/down (is rarely used » can be hidden).
6) This is a console where the program prints everything its doing including compile logs and actions like moving brushes. This can be limited to 1 row.
7) The statusbar which shows the position (X Y Z coordinates) of the cursor and the number of non-selected brushes and entities.
Hotkeys
Hotkeys in gereral are used to make Work easier, and whats alot more important, to make it faster. Its not necesarry to know all the hotkeys, because normally all these functions can also be Activated by buttons or menus. There are a lot of hotkeys in GtkRadiant, first, here are the most important ones. (These also apply to many other windows programs):
Hotkeys in gereral are used to make Work easier, and whats alot more important, to make it faster. Its not necesarry to know all the hotkeys, because normally all these functions can also be Activated by buttons or menus. There are a lot of hotkeys in GtkRadiant, first, here are the most important ones. (These also apply to many other windows programs):
LMB=left mouse button; MMB=middle ~; RMB=right ~
ctrl +
N - new map
O - open map
S - save
A - select all
X - cut out
C - copy
V - paste
Y - undo
Radiant Hotkeys
, and . - Move the camera to the left or to the right.
A and Y - Tilts the camera up and down.
C and D - Moves the camera up and down.
E - Selects all sides of the brush so these can be dragged around, this is useful for building angled things.
H - This hides all selected brushes (shift + H to show them again).
I - Inverts the selection.
J - Switches between the four kinds of brush-selection:
1. red overlay + white borders (default and best!)
2. only red overlay (good for editing handmade terrain)
3. no kind of marks
4. only white borders
K - Opens the color chooser (for lights).
L - Opens the entity overview window where all entity types used are shown.
M - Shows how many entities/brushes there are in the map and how often each is used.
N - Opens the entity editor.
P - Opens the preferences window.
Q - Shows the size of the selected brush in all 2D Views
R - Activates the “Free Rotate” function which lets you rotate the brush in any direction (not to recommend due texture disort).
S - Opens the surface inspector wich which you can change texture atributes.
V - This lets you go into Vertex editing mode. Often used with patches.
You will get a wireframe of the selected curve (Patch, Cylinder, Endcap,
etc). You can then move the dots to shape the curve.
These buttons will help you to rotate bigger selections:
BACKSPACE - This will delete the selection.
SPACE - Duplicates the current selection, all properies are kept!
1 - 9 - Changes the gridsize in the 2D windows 1=smallest, 9=biggest, 0=no grid
Shortcuts
shift + LMB
Selects/deselects bbjects (only recommended the 3D window).
shift + S
Opens the patch properties window, this works similar to the Surface inspector, but is used for patches.
shift + P
This turns a normal brush into a patch.
shift + U
This activates the cut-out function (CSG Subtract).
shift + B
Opens the surface inspector ( = press "S").
shift + R
This makes that the texture is unstickied from the surface, the texture will now stop moving with the surface.
shift + T
Undos the above.
shift + C
This puts Endcaps on the selected curve.
ctrl + LMB
Disorts the selected brush (unimortant).
ctrl + K
Connects different entities to eachother (used to make spotlights, connect tiggers to the thing they trigger, etc.).
ctrl + I
Inverts the texture on the current curve so that the other side is textured.
ctrl + T
Thicken function, just try this out, it will thicken the selected patch.
ctrl + 3-9
Defines the number of corners in a brush. (Don’t overuse this, use patches instead!)
ctrl + shift + LMB
Selects only one face of the brush.
ctrl+shift+alt+LMB
Allows you to select many faces at once.
3D Window
To move around freely in the 3D window, just rightclick in the window, a white crosshair will appear (see picture).
Now just move the mouse to look around. If you also use the arrow-keys or the scroll wheel, you can look at the map from every angle, and look for errors in the editor. But you can also use the 3D window to do other things:
MMB
If you have one brush selected, non-selected brush with the MMB the selected brush will get the same texture as the non-selected (very useful and also a lot faster than messing around with the textures window).
alt + LMB
Moves the texture on the brush.
ctrl + LMB
Disorts the selected brush.
LMB
Moves the selected brush around in the map (unaccurate! – not to recommend).