
 1st Place Winner Reepray with Rishi Station 2,
  2nd Place Winner chloe with Oasis Mesa, and
  3rd Place Winner Artemis with TFFA Brutal! Amazing submissions by everyone!


Prerequisites:
- Why you may want this
- What you need
- Required .skin files
- Icons
- Colours
Why you may want this:
If your skin has many variations, you may consider adding species menu support. It allows you to mix and match all the different parts you've made to allow a greater variety, without cluttering the character menu. Couple great examples utilising this are Spanki's Sith Customisation and MUG's Base Customisation. I added it to Duster-Man's skin so he can choose from 117649 (49³) variations.
What you need:
Your skin must have multiple textures for the various parts you want to be customisable (e.g. two head variants). You'll also need to make icons for each part, but more on that later.
Required .skin files:
A normal skin is uses one .skin file to render in game. Skins in the species menu use three: One for the head, torso and legs. To make the head .skin file, open your model_default.skin and find all the lines which point to the head part of model, including the caps. Copy them into a new text document and save it as head_a1.skin. Here is how it would look for the reborn model:
torso_cap_head_off,models/players/stormtrooper/caps.tga
torso_cap_hips_off,models/players/stormtrooper/caps.tga
torso_cap_l_arm_off,models/players/stormtrooper/caps.tga
torso_cap_r_arm_off,models/players/stormtrooper/caps.tga
head,models/players/reborn/forc_hood.tga
head_cap_torso_off,models/players/stormtrooper/caps.tga
head_eyes_mouth,models/players/imperial/mouth_eyes.tga
head_face,models/players/reborn/forc_face.tga
torso_cowelbase,models/players/reborn/forc_hood.tga
Same again for the torso and leg parts, call them torso_a1.skin and lower_a1.skin respectively.
Now that the head, torso and legs have their own .skin files, you can use these as a template for your remaining variations. Be sure to use a different number/letter for each new .skin file. (E.g. head_a1, head_a2, head_b1, etc). To keep things organised, I recommend matching the naming of head/torso/leg variations to the .skin name. For example, having all the default textures as _a1, blue as _b1, red as _c1, etc. Any sub variations can be denoted by changing the number.
Icons:
Once your .skin files are made, you need to make icons for the menu. Not much needs to be said here, other than the naming convention has to match with the .skin file. head_a1.skin goes with icon_head_a1.jpg, torso_b3.skin goes with icon_torso_b3.jpg, etc.
Colours:
The menu requires at least one colour variation (even if your skin doesn't have customisable RGB). To do this, make a new .txt document called playerchoice.txt. Add the following into it:
*white
{
	setcvar ui_char_color_red 255
	setcvar ui_char_color_green 255
	setcvar ui_char_color_blue 255
}
Add more tint options:
If your skin has customisable RGB then you can add more variations to your playerchoice.txt.
*white
{
	setcvar ui_char_color_red 255
	setcvar ui_char_color_green 255
	setcvar ui_char_color_blue 255
}

gfx/menus/players/skin_example/tintchoice_turquoise
{
	setcvar ui_char_color_red 0
	setcvar ui_char_color_green 255
	setcvar ui_char_color_blue 54
}
The line before the { braces } can either be a *white or point directly to an image.
If you want to add RGB elements to your skin, I have a tutorial on this too.
Menu name:
Once you have done that, you can pak up your pk3, put it ingame. If everything has been done properly, you should see your skin in the species menu with all the customisable parts:
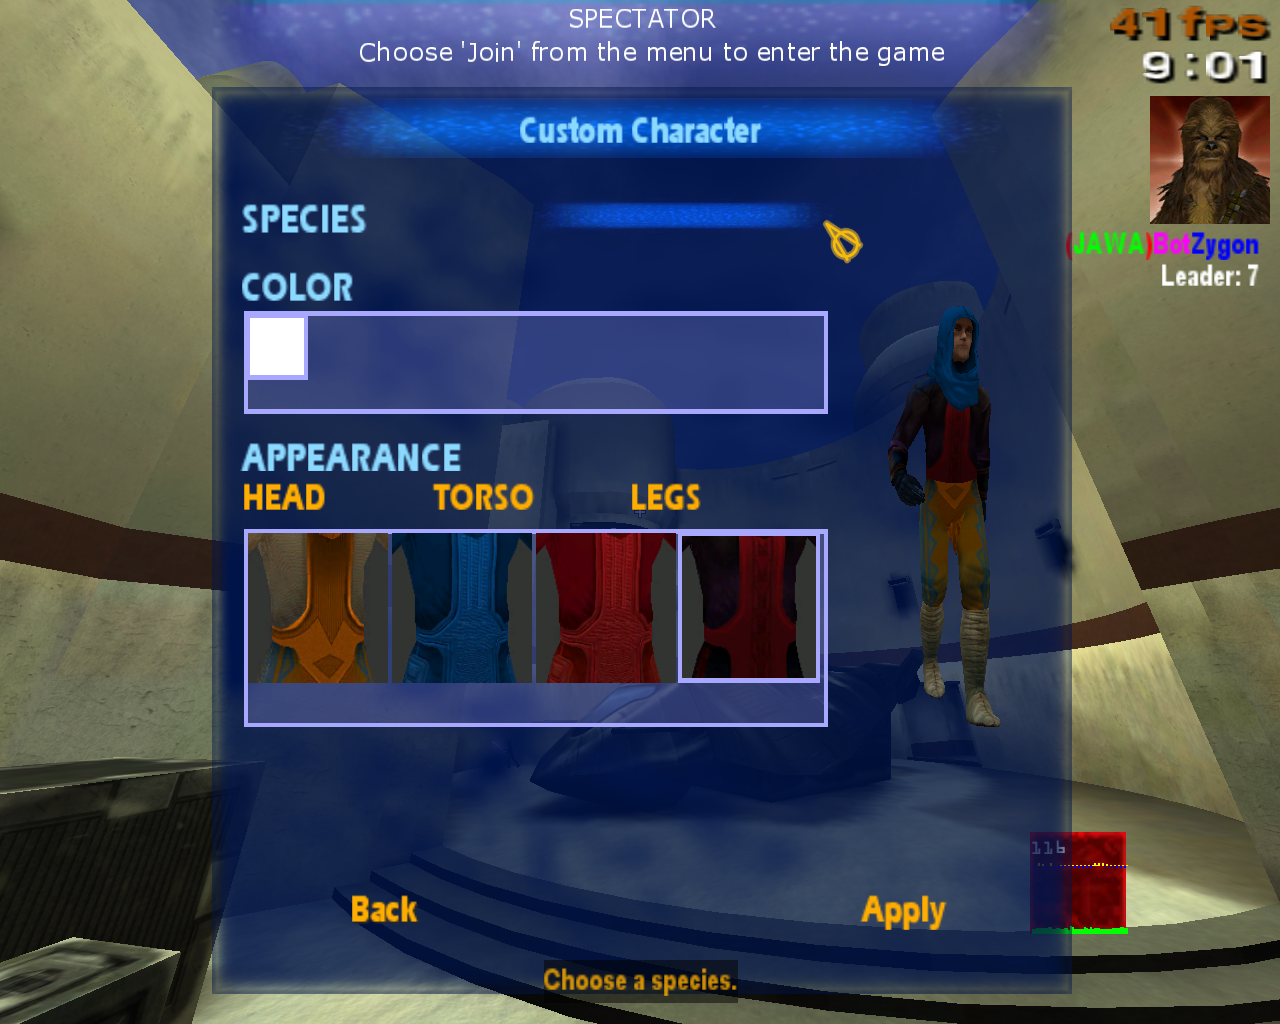
You will notice it has no name in the menu. To fix this, extract strings/English/MENUS.str from assets0. If you're playing the game in a different language, then use your relevant folder instead.
You should see some developer comments at the top followed by:
VERSION             "1"
CONFIG              "W:\bin\stringed.cfg"
FILENOTES           ""
Insert the following three lines after the above and before REFERENCE JEDI_HF:
REFERENCE           MODEL_NAME
NOTES               "For character menu"
LANG_ENGLISH        "Skin name"
Change MODEL_NAME to the name of your skin's folder in models/players (e.g. reborn, imperial_worker, etc). Change "Skin Name" to what you you want the name to appear as in the menu. Keep the quotations. Add your modified MENUS.str file to your pk3 (following the same folder structure in assets0), and that's you done!


Recommended Comments
There are no comments to display.
Create an account or sign in to comment
You need to be a member in order to leave a comment
Create an account
Sign up for a new account in our community. It's easy!
Register a new accountSign in
Already have an account? Sign in here.
Sign In Now