
 1st Place Winner Reepray with Rishi Station 2,
  2nd Place Winner chloe with Oasis Mesa, and
  3rd Place Winner Artemis with TFFA Brutal! Amazing submissions by everyone!


Section 1: Introduction
Welcome to the scripting series. The goal of these tutorials is to give the reader an introduction to scripting using BehavEd. For this reason, I assume that you are already experienced and know your way around GTKRadiant or your map editor of choice. First off, let’s begin by defining what scripting is. A Script in Jedi Academy contains code to perform different commands within the current map. These commands can include things like moving entities in the world, triggering entities, moving NPC’s, and controlling the camera.
In Jedi Academy, scripts are made by chaining together series of Events. Events are commands that will be performed by the game. Events include things like setting a variable, setting up the camera for cutscenes, moving objects in the game world, and many other things.
BehavEd
Jedi Academy uses a program called BehavEd to write its scripts. BehavEd is included in Raven’s Jedi Academy SDK. When you open BehavEd you’re presented with the following window:
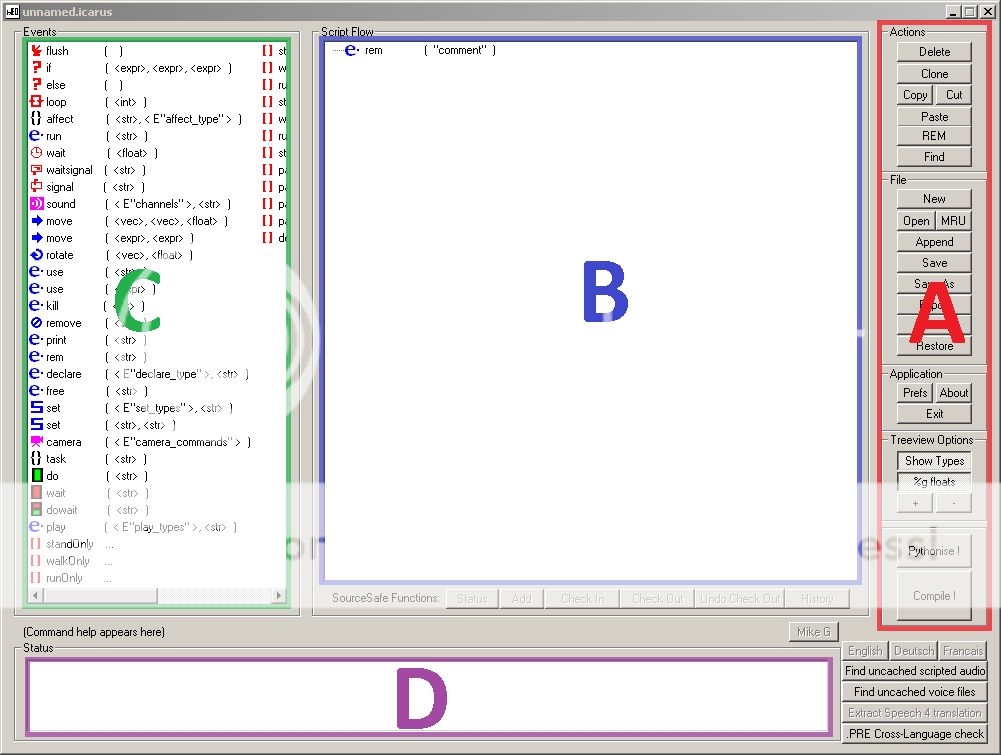
( A ) Toolbar
The toolbar contains a number of actions for you to use while creating your scripts. Starting from the top we have the Actions category:
- Delete: Deletes the a currently selected event
- Clone: Places a copy of the current event below itself
- Copy: Copies the selected event to the Clipboard
- Cut: Removes the selected event and copies it to the Clipboard
- Paste: Inserts an item after the current event from the Clipboard
- REM: Comments an event
- Find: opens a dialog to find matching events in the script.
The File category contains commands about opening and saving the script. In this menu we have:
- New: Creates a new script
- Open: Opens a script for editing
- MRU: Choose to open a script from a list of your Most Recently Used scripts
- Append: Adds the content of the selected script to the end of this one
- Save: Saves a script under the current file
- Save As: Saves a script under a name you input
- Export: Dumps the script to a file and opens it in your default .txt editor
- Backup: Saves a copy to <Script Name>.bak
- Restore: Reloads from the backup at <Script Name>.bak
The next category is the Application category. This category contains three buttons:
- Prefs: Opens the Preferences Window, where you can modify BehavEd’s settings
- About: Opens a window showing information about BehavEd and who created it
- Exit: Exits BehavEd
The Treeview Options contains items for controlling the view in the Script Flow area (  .
.
- Show Types: Shows verbose type information. When enabled, shows helpers to indicate what type is used or expected in an event.
- %g floats: Shows verbose Floating Point Numbers. Sets the editor whether or not to show all decimal-places at once.
- +/-: Expands/Collapses event groups in the editor.
The next category (though unnamed in the window) is the Compile menu. These buttons compile the script.
- Pythonise !: Will attempt to write a .python file for your script. Ignore This Button
- Compile !: Compiles the Script so it can be used in game.
( B ) Script Flow
This is the editing area for your script. It contains all the events currently in your script. From here you can select, edit, copy, cut, paste and etc. your scripted events.
( C ) Events
This is the list of events available for you to use in your scripts. Double clicking an event here will place it in your script. You can also drag and drop items from here.
( D ) Status
This shows a console style output from the program. This shows you the status of commands you’ve asked BehavEd to perform.
Conclusion
Now that you've had an introduction to the BehavEd window you can start writing your scripts. Next, we'll write our first script.
Section 2: Your First Script
Resources
The following .zip contains the .map file we will use for this section of the tutorial.
scripting_tutorial_1.zip
Preparation
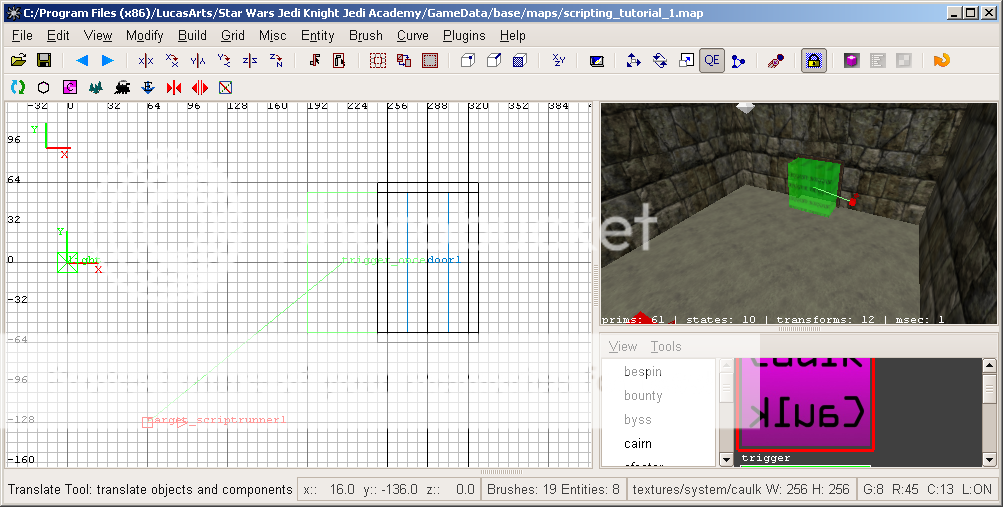
Open the .map file in Radiant. You will see we have two rooms, a spawn point, and a door. There is a trigger_once sitting in front of the door. The script we will make here will print a message, and open the door after three seconds.
Begin by placing a target_scriptrunner in the map. This is the entity that will launch our script when it is triggered. Connect (ctrl-k) the trigger_once in front of the door to it.
Edit (N) the target_scriptrunner and add the following key and value:
Key: usescript
Value: scripting_tutorial/tutorial1
This means that when triggered, the target_scriptrunner will launch the script located in: scripts/scripting_tutorial/tutorial_1
In the map, you may notice the door entity with the following key and value.
Key: targetname
Value: door1
This targetname allows our door entity to be referenced from in the script. You may have also noticed that there is an NPC_Desann sitting in the other room. Let's play around a little with him too.
Edit the NPC_Desann. Check the spawnflag for Cinematic. This will make it so Desann will not attack. Also, give him the following key and value.
Key: npc_targetname
Value: desann
This acts like the script_targetname, and allows the NPC to be referenced in the script. You can now save and compile the map. Running it now will do nothing though because we have to make the script file.
The Script
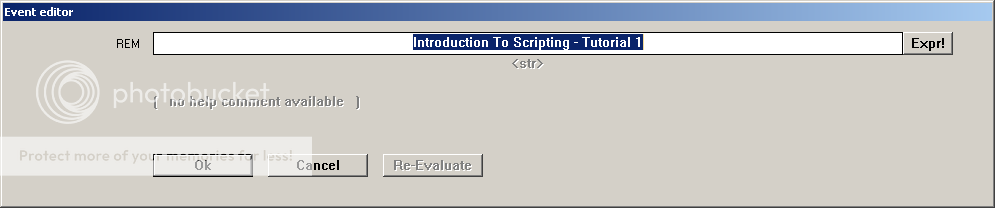
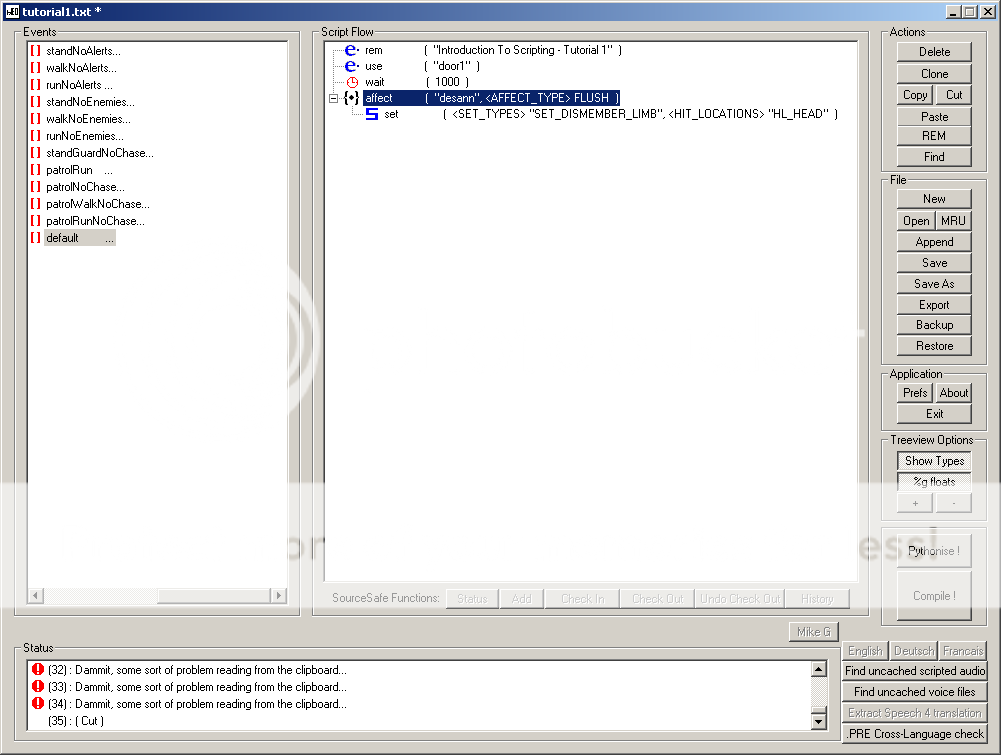
Open up BehavEd. Firstly, you might notice the item saying rem("comment") up at the top of your editing window. This item, rem(), represents comments in your script. These will not affect any in game actions, but can be used to aid in readability. So let's change our rem() to say something about our script. To do this, double click the item. The Event Editor Window will pop up with the item properties. Change the text here and click OK. I went for, "Introduction To Scripting - Tutorial 1", but you can go with whatever you choose.
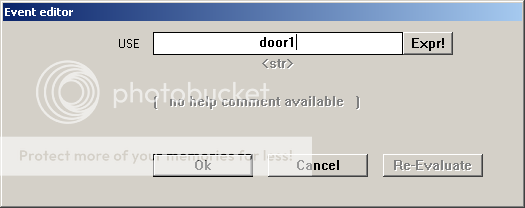
Next, we can begin by opening the door. To do this, simply add (double click or drag into the editor) the use( <str> ) event from the events list. When you do that, you'll notice that the command is currently set for "DEFAULT". Our door was named "door1" so let's change this now. Double click the item to open the event editor window and change the default to door1.
So now our script will trigger the door, causing it to open. Now let us experiment with the NPC sitting on the other side. Let's first add a wait event, so we have a second after the door opens to see Desann. This event tells the script to wait for the specified milliseconds before continueing onward. Now, add the affect event to the script. Modify it and change the first field to desann. You can leave the FLUSH command for now. We will discuss it further later on. You may have noticed that this is a collapsable item. The affect specifies which entity the events within it will modify.
Now, let's add a set( < E"set_types">, < str > ) event into the affect block. This lets you set values for many different parameters in the game. These values include things like animations, position, behaviours, and much more. Edit your set event, and let's change the first part to set_dismember_limb. If you're having trouble finding it look towards the end of the list. Click the re-evaluate button. You'll notice the field on the right has now changed. Here, we can specify the limb we want to dismember. First, let's pop his head off. Set the field on the right to hl_head. Click OK and you should now have a headless Desann.
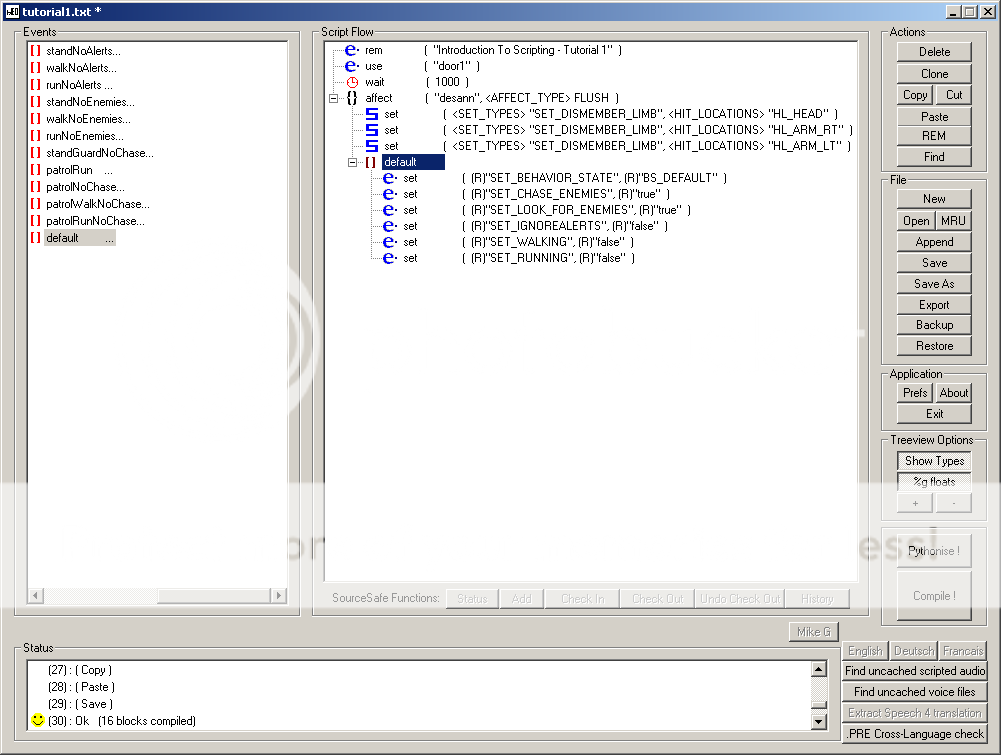
With the set event still highlighted in the editor, click space twice to clone this set command two times. Modify them to lop off each of his arms (hl_arm_rt & hl_arm_lt). Finally, from the events list, add the default event to stop Desann from ignoring the player. If you expand this item in the editor, you'll see that it is actually a collection of several commands. This is called a macro.
Now, save your script in the "base\scripts\scripting_tutorial" directory with the file name "tutorial1", which is what we set in the target_scriptrunner if you recall. Click Compile ! and load up the map in single player (devmap scripting_tutorial_1).
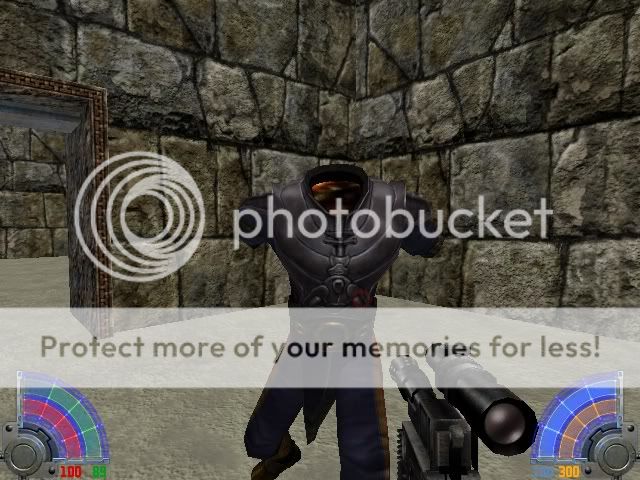
Run up to the door, watch it open, wait a second and enjoy as desann's head and arms pop off. Congratulations on your first script and enjoy fighting Monty Python's Black Knight!
Section 3: Manipulating the World
Resources
The following .zip contains the .map file we will use for this section of the tutorial.
scripting_tutorial_2.zip
Preparation
Open the .map file in Radiant. You will see you spawn in the same room, and the next room over is split into two areas, with a sort of track linking them. You’ll also notice two gates—one above and one below the track. These gates have been made into func_static entities for you. The goal of this section is to make the gates move around the track in a continuous loop so as to challenge the player trying to reach the other side; potentially pushing him/her into the lava.
Let us begin by placing our target_scriptrunner entity, like we did last time. Edit it (n) and give it the following key/value:
Key: usescript
Value: scripting_tutorial/tutorial2
Just like last time this means that when triggered, the target_scriptrunner will launch the script located in: scripts/scripting_tutorial/tutorial_2. However, if we’re making this obstacle course, we want it to run as soon as the map begins. To do this, place a trigger_always entity in your map, and link it (ctrl+k) to the target_scriptrunner.
Now that we have our script being called, let us begin setting up our entities so that they can be referenced from the script. Start by selecting the func_static entity sitting atop the track. A func_static entity is a brush-model which just sits in one position. It also adds some behaviors such as the possibility of being push/pull activated, but we will be using that functionality here.
You may also notice the presence of the origin brush in this entity—this being the brush textured with “system/origin”, which sits at the bottom of the func_static. This brush acts as the “origin” or center of transformations in this entity. This means that any movement or rotation that happens to this brush will move in respect to this location.
Now that we know what the entity is, let’s edit it for our script. Give this func_static the following key/value:
Key: script_targetname
Value: gate1
Now edit the func_static sitting below the track (it is sitting largely in the lava), and give it the following key/value:
Key: script_targetname
Value: gate2
So now that we’ve taken care of those, let’s set up the points that these gates need to move around. If you look within the track, you’ll see that there are two ref_tag entities—one at each end. A ref_tag entity acts as a reference-point that can be accessed from the script. You can use them to reference a position in space or for angles.
Begin by editing the ref_tag towards the gate on top of the track, and give it the following key/value:
Key: targetname
Value: back
Edit the other ref_tag with the key/value of:
Key: targetname
Value: front
You might be wondering why we had to use the key “script_targetname” for the func_static entities but only “targetname” for the ref_tag entities. This is because we will be referring to the func_static entities in an affect event from within the script, like the one we used to refer to the npc_desann in the previous tutorial. However, we gave Desann an npc_targetname field because he is an npc.
Now that we’ve set up all the references, we should be ready to write our script file. So, compile your map and get ready for scripting.
The Script
Open up BehavEd. Begin by changing the rem comment present in the first line to something more useful, such as “Introduction to Scripting – Tutorial 2”.
We will want our script to cycle endlessly. To achieve this, use the loop( < int > ) event. This event will loop (run repeatedly) for the number of times specified within the parenthesis. You’ll notice by default this value is -1. This means that it will loop infinitely. We will leave this be, since it is the desired effect.
Now, let us begin moving the first gate. To do this, we must first specify what we want to move. Place an affect event within the loop you made. Open the event editor window and change the first field to gate_1, as we specified in Radiant.
Now that we’ve specified what we want to affect, let us begin moving the entity. Place a move( < vec >, < vec >, < float > ) event into your affect event. Open the event editor window. You’ll notice there are three fields which we can modify here. The first field represents the translation vector we want to use, the second field represents the rotation vector we want to use, and the third field represents the time in milliseconds that this movement takes. The translation vector is organized as (x, y, z).
Begin by clicking the Expr! button next to the first field. You’ll notice the field now changes type from vector to expression, though the field still expects the expression to resolve into a vector. You’ll also have seen that some new items appeared below the field now as well. These are our expression builders. With ORIGIN chosen from the drop-down menu, click the Tag button.
You’ll notice the text now changed to tag( “targetname”, ORIGIN). This means that it will look up the origin of the entity with the tag (rather targetname) specified within the quotation marks. Therefore, let us change ours from “targetname” to “back”. This means that gate1 will move towards location defined by the targetname back (our ref_tag). Let us also change the time (the third field) from 1000 to 1500 (1 second to 1.5 seconds). Click OK.
Because our script will not wait for this movement to finish before continuing by default, we need to specify that we want to wait manually. Add a wait( < float > ) event after the move event, and give it a value of 1500 (1.5s) as well.
Now that our gate has reached one end of the track, it should rotate down towards the underside. Therefore, let us place a rotate( < vec >, < float > ) event. This event rotates the affected entity to the rotation vector specified in the first field over the time in milliseconds specified by the second field. The rotation vector is organized as: (pitch, yaw, roll).
Let us change our rotation vector to: 0 0 180, and our time to 250. Just like before, this event will not wait to finish before moving on to the next one. Therefore, add another wait( < float > ) event and give it a value of 250 to match our rotation.
Now we’re ready to move to the front of the conveyor again. Place another move(< vec >, < vec >, < float > ) event. This time set the tag/targetname to “front”. This time, we will also modify the rotation vector. Set it to: 0 0 180, so that it matches the previous rotate event. If we had left this at 0 0 0 the gate would rotate back to its original rotation. Set a time of 1500 ms again. Once more, add a wait( 1500 ).
The only thing that’s left is to rotate this gate so it is back to its original rotation. Add a rotate( < vec >, < float > ) event. Set the rotation vector to: 0 0 360, and give it a time of 250. Add the corresponding wait( 250 ). The reason why we rotate to 360 instead of going back to 0 is because we want the gate to continue rotating in the same direction (+180 degrees).
This however will lead to a problem. When our loop repeats, it will try rotating to 180 degrees from 360 degrees, which would be a negative rotation (-180 degrees). Therefore, we need to reset the angles quickly and quietly. To do this, add the set( < E"set_types">, < str > ) event. Change the first field to SET_ANGLES, click Re-Evaluate, and leave the second field as 0 0 0. Click okay. You now have one gate which will cycle around endlessly.
Add a new affect event to the loop (not to the affect( gate1 )) and set it to operate on gate2. Repeat all the movement commands and waits in this new affect block. However, this time, make it move first to the front, and then towards the back.
Because all these affect commands will happen at the same time: the loop will run constantly since it is not waiting for anything to finish before continuing to the next iteration of the loop. As is, this will crash your game. Therefore, at the end of one of the affect events (after the set event), add a signal( < str> ) event. Change the value here to complete. Now, at the end of your loop (after your last affect block), add a waitsignal( < str > ) event. Change the value here to match the one in the signal, complete. The signalwait event will wait for a signal with the specified value before continuing. The signal event will send off a signal with the specified value, which will allow any signalwait events with the same value to continue (stop waiting).
Save your script as "base\scripts\scripting_tutorial\tutorial2” and compile it. You’re now ready to launch your level (devmap scripting_tutorial_2). Have fun playing with your treadmill of doom!


Recommended Comments
There are no comments to display.
Create an account or sign in to comment
You need to be a member in order to leave a comment
Create an account
Sign up for a new account in our community. It's easy!
Register a new accountSign in
Already have an account? Sign in here.
Sign In Now