
Curves 201: Lesson 1
Domed Ceilings
This tutorial assumes you have mastered all the concepts covered in General Concepts 101-102.
While brushes should be the core by which your level is based, curves are another factor that can make a map much more visually appealing. Of course, the Q3A engine cannot technically render a curve, as everything it does is triangle-based - instead, it draws a huge number of triangles whenever the player stands close to one. Thus, curves should be used sparingly, so as to keep framerate down, but a few here and there aren't usually too bad. You can see an example of intricate curve work on my first map, duel_kamino.
To start our work on curves, let's first create a domed ceiling. Create an empty room as you would any other room. For this tutorial, we will start with a reasonably large one, 768x768x512. This time, however, leave the ceiling as caulk.
The reason for this is that we are going to create a domed ceiling, and the ceiling as it is now will not be seen. Of course, to the engine during the VIS process, the curve isn't even there - so we still need to make a complete room (with caulk) in order for VIS to be calculated properly.
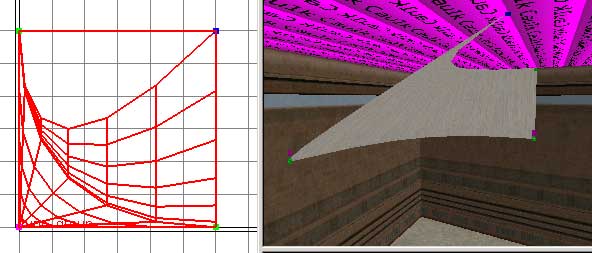
Next, draw a nearly flat brush about 1/4 of the way down from the ceiling and 1/2 the height and width of the room. In other words, it should be 384x384x16 and look something like this:
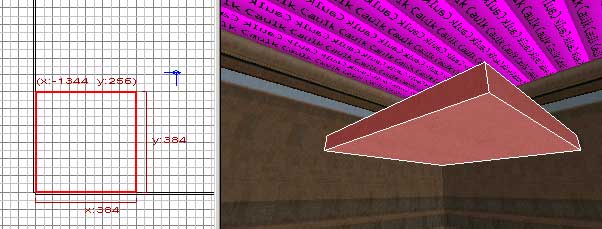
Now, convert that into a bevel. Rotate it so that it curves into the room, and invert its matrix (CTRL+I) if you need to in order to make the texture appear on the inside curve. Thus, you should have something like this:
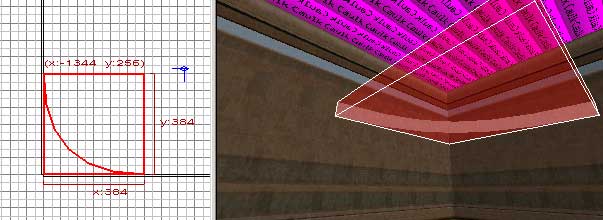
Flip to the side or front view, turn on the Vertex Tool (V Key) and highlight (Left Click Drag) all of the vertices on the top row. Drag them all up to the top of the room:
Now, before we shape the bevel to a dome shape, we need to add its Inverted Cap. This will match up the curve with the brushes that make up the room itself. With the curve selected, go to the Curve menu, the Cap submenu, and then select Inverted Bevel. When the menu pops up, select Inverted Bevel and hit OK.
When you do this, the curve will create two caps, one on either side of it. It will also add all three to a func_group. A func_group is only significant in Radiant - it will have no effect on your compile and won't end up in your compiled map. func_groups are useful when you want to copy/select large numbers of brushes or curves and move them around in relation to each other.
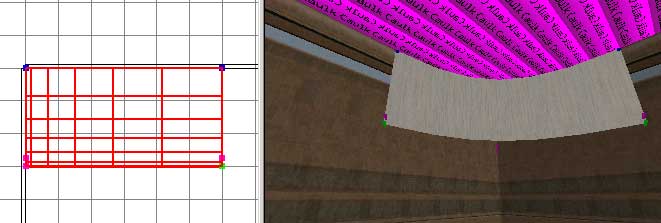
You can Shift-Click each individual part of the func_group to select/deselect it. Since we want to delete the top cap, you need to Shift-Click the curve and the lower cap to deselect them. Then press BACKSPACE to delete it. You may or may not need to invert the matrix of the cap by itself - you can select it in the same manner. You should be left with something like this:
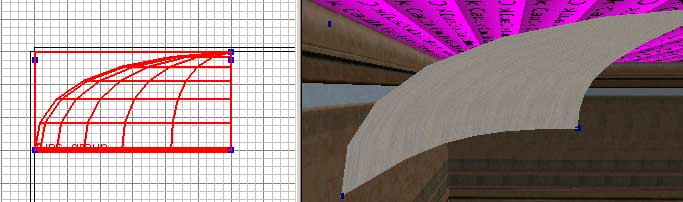
Now, in the XY Top View, Control-Click one of the vertices in the top row of your bevel in the 3D View to select it. Then drag it in the 2D View to the corner of the bounding box. This may sound a bit confusing, but you can see the correct result of this action here:
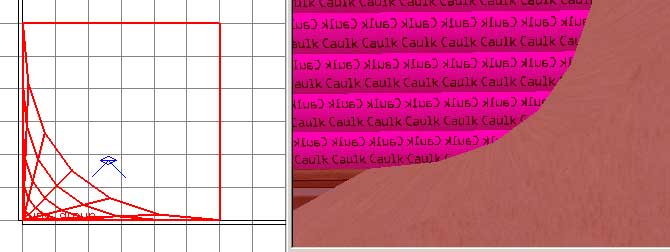
See how the dome is starting to take shape? Repeat this for the other two vertices on the top row. Now, in the side view, drag the second row of vertices up a little bit to make a smoother shape. You should have something like this:

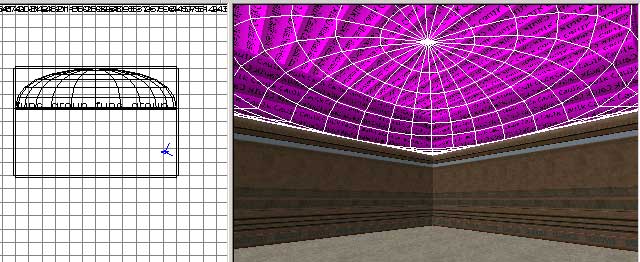
Duplicate the curve and cap for the four corners of the room and you will have a domed ceiling! But we're not done! Use the clip tool to cut your side walls so that you can caulk above the "curve line" - the line where your ceiling intersects the patches. Thus, you should end up with something like this:

(Remember
that you can view your curves as wireframes with the Curve Wireframe
Button ![]() )
)
That's all there is to it! Add some lights, an info_player_start, and compile to see your new dome.