
Brushes 201: Lesson 1
Liquids
This tutorial assumes you have mastered all the concepts covered in General Concepts 101-102.
Liquids are a relatively simple thing to add to a map, but there are a few qualifications and tricks to use when implementing them. First of all, every liquid is simply a shader. The water shader we will be using for this lesson will be bespin/water2.
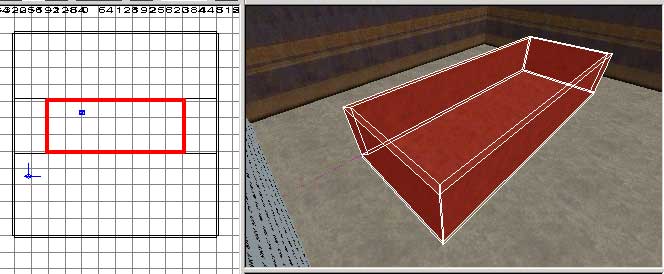
First of all, of course, create a new room. For this tutorial, will will be using a room 768x768x512. Then create a large tub like the one you see here. Make sure your brushes are entirely caulk when you place them! THEN only texture the faces that you can see! Note that the bottom of the tub in my example is actually a piece of the floor cut away with the Clip Tool and Shift-Enter.
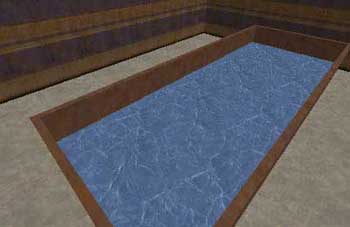
Next, put a big system/caulk_nonsolid (hereafter referred to as just "caulk" in this tutorial) brush in the center and texture the top and bottom of it with bespin/water2. That means after making the correctly sized brush, you'll need to pull the brush up into the air where you can see it and texture the bottom. That's all there is to it! Water! Add a spawn point, a couple of lights, and take a swim!
Of course, it can get a bit more complicated. What if you wanted a water-filled tunnel? The trick is this - the engine will make water in any area which is textured on its top and bottom with a water shader. Thus, you want to place caulk on the surfaces between (lateral) water brushes. If you don't, this can cause some weird effects with some of the animated water shaders.
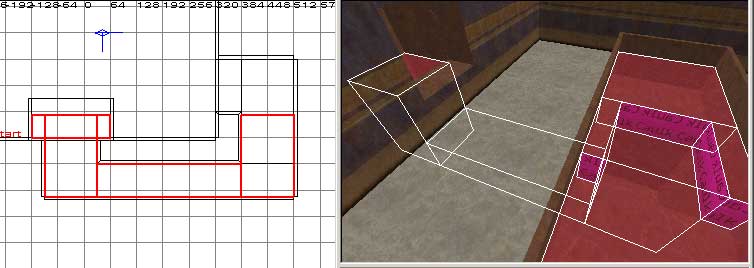
Using the Clip Tool, build a tunnel starting in the bottom of the tub that loops around to the side of your room that looks something like this:

I know it looks intimidating, but believe me, it's not that difficult. All I used was make brushes and trim/resize them with the Clip Tool and the Edge Tool. This specific one took me about 6 minutes to put together. After you have your tunnel built, try to do a compile (with FullVis). If you create leaks (and you probably will if this is the first complex structure you've made with brushes), they will appear as red lines in the 2D view. Follow the red lines and determine where the line changes from being "inside" your map to "outside" your map. Then get rid of that hole by resizing the brushes around it. Keep editing your tunnel's brushes until you have no leaks.
Next, add the water brushes. Remember, you only want to put water shaders on the absolute top of the water and absolute bottom of the water in any one place. The easiest way to do that in this situation is to cut up the water brush you already have so that there is a tunnel-sized brush in the center above the tunnel itself. Normally you would need to remember to caulk between the brushes, but in the case of liquids, you need to apply system/nodraw in the center. This is due to the fact that caulk will cast an underwater shadow if you use caulk. After you clip up the top water, it should look like this:

Extend your tunnel-shaped water brush down into the tunnel and then place water throughout the rest (remembering to caulk in between!). Your water brushes all together should look like this:
Add some lights underwater (everyone hates a dark tunnel) and you will have your tunnel of water!