Crazy Assassin
-
Posts
7 -
Joined
-
Last visited
Crazy Assassin's Achievements
-
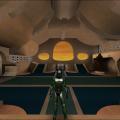
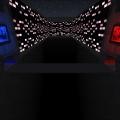
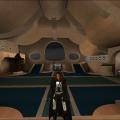
This tutorial is meant to teach you how to use the RGB system in your skin. This also shows you how to add tint presets to the SP species menu. Tools you'll need Notepad Image editing software, such as GIMP //Oh, hey there! //This tutorial is in the process of being rewritten, so what you see here is actually a work in progress, //about 95% complete. In this tutorial, I will attempt to show you how to enable custom tinting through shaders, as found on the single-player skins. Before we begin, we're going to need a skin to actually use this on. For this tutorial, we'll use the Shadowtrooper, and make his chest crystal use custom tinting. The texture we're modifying. The new 'base' texture. The crystal. Note how it is desaturated (grayscale). This is crucial. RGB tinting is handled shader-side, in the rgbGen modifier. There are two possible modes that follow rgbGen: Entity, and lightingDiffuseEntity. 'rgbGen lightingDiffuseEntity' results in tinting with normal lighting, while 'rgbGen Entity' forces the stage to full-bright. The 'default' shader. (Pre-tint support) models/players/shadowtrooper/accessories { { map models/players/shadowtrooper/accessories_rgb1 rgbGen lightingDiffuse } { map models/players/shadowtrooper/accessories_rgb2 blendFunc GL_ONE GL_ONE rgbGen lightingDiffuse } } Our new shader, with a dull crystal. models/players/shadowtrooper/accessories { { map models/players/shadowtrooper/accessories_rgb1 rgbGen lightingDiffuse } { map models/players/shadowtrooper/accessories_rgb2 blendFunc GL_ONE GL_ONE rgbGen lightingDiffuseEntity } } Glowing crystal. models/players/shadowtrooper/accessories { { map models/players/shadowtrooper/accessories_rgb1 rgbGen lightingDiffuse } { map models/players/shadowtrooper/accessories_rgb2 blendFunc GL_ONE GL_ONE rgbGen Entity glow } } Great, we just made a colorful crystal. But that's not all we can do. You know how in the SP species selection menu, there's a row of solid-color icons above Frankenstein's body-part bins? Notice how most custom SP skins only have one? Well, I'm gonna show you how to make those. If you've worked with SP skins before, you should be familiar with 'playerchoice.txt'. If not, go read an SP skin tutorial, there's too much for me to cover here. This is what you will find inside for most custom SP skins: *white { setcvar ui_char_color_red 255 setcvar ui_char_color_green 255 setcvar ui_char_color_blue 255 } At a glance this may seem cryptic, but it's not. The '*white' header is actually a shader path. Moreover, this entire block can be copied and pasted with different headers to create multiple color options. For instance: models/players/shadowtrooper/uired { setcvar ui_char_color_red 255 setcvar ui_char_color_green 0 setcvar ui_char_color_blue 0 } This could be added to the file, and suddenly you could pick white or red for your skin in the SP species selection menu. Be warned though: The SP menu can only fit up to 9 colors at once. But of course, this alone isn't enough. Like I said, the header is a shader path. We need an actual shader to match. We have two options here: The space-saver method, and the super-fancy-schmancy method. The super fancy method is a shader complete with an image, while the space saver method is just a shader, using textures included in the game already. Space-Saver method: models/players/shadowtrooper/uired { { map $whiteimage rgbGen const ( 1.000000 0.000000 0.000000 ) } } Done! That was easy, wasn't it? Nice and simple, and no texture to pack up with the rest of the mod. Since the fancy method involves its own image, your shader complexity depends on how complex the image is. If it's a simple, flat, still image, then you'll have a simple and short shader. If you've got something complex lined up that involves a more animated piece, you're going to have a slightly more complex shader. Whatever you do, remember it's going to be squeezed into a 32x32 pixel area.
-
This tutorial is meant to teach you how to use the RGB system in your skin. This also shows you how to add tint presets to the SP species menu. Tools you'll need NotepadImage editing software, such as GIMP//Oh, hey there! //This tutorial is in the process of being rewritten, so what you see here is actually a work in progress, //about 95% complete. In this tutorial, I will attempt to show you how to enable custom tinting through shaders, as found on the single-player skins. Before we begin, we're going to need a skin to actually use this on. For this tutorial, we'll use the Shadowtrooper, and make his chest crystal use custom tinting. The texture we're modifying. The new 'base' texture. The crystal. Note how it is desaturated (grayscale). This is crucial. RGB tinting is handled shader-side, in the rgbGen modifier. There are two possible modes that follow rgbGen: Entity, and lightingDiffuseEntity. 'rgbGen lightingDiffuseEntity' results in tinting with normal lighting, while 'rgbGen Entity' forces the stage to full-bright. The 'default' shader. (Pre-tint support) models/players/shadowtrooper/accessories { { map models/players/shadowtrooper/accessories_rgb1 rgbGen lightingDiffuse } { map models/players/shadowtrooper/accessories_rgb2 blendFunc GL_ONE GL_ONE rgbGen lightingDiffuse } }Our new shader, with a dull crystal. models/players/shadowtrooper/accessories { { map models/players/shadowtrooper/accessories_rgb1 rgbGen lightingDiffuse } { map models/players/shadowtrooper/accessories_rgb2 blendFunc GL_ONE GL_ONE rgbGen lightingDiffuseEntity } }Glowing crystal. models/players/shadowtrooper/accessories { { map models/players/shadowtrooper/accessories_rgb1 rgbGen lightingDiffuse } { map models/players/shadowtrooper/accessories_rgb2 blendFunc GL_ONE GL_ONE rgbGen Entity glow } }Great, we just made a colorful crystal. But that's not all we can do. You know how in the SP species selection menu, there's a row of solid-color icons above Frankenstein's body-part bins? Notice how most custom SP skins only have one? Well, I'm gonna show you how to make those. If you've worked with SP skins before, you should be familiar with 'playerchoice.txt'. If not, go read an SP skin tutorial, there's too much for me to cover here. This is what you will find inside for most custom SP skins: *white { setcvar ui_char_color_red 255 setcvar ui_char_color_green 255 setcvar ui_char_color_blue 255 }At a glance this may seem cryptic, but it's not. The '*white' header is actually a shader path. Moreover, this entire block can be copied and pasted with different headers to create multiple color options. For instance: models/players/shadowtrooper/uired { setcvar ui_char_color_red 255 setcvar ui_char_color_green 0 setcvar ui_char_color_blue 0 }This could be added to the file, and suddenly you could pick white or red for your skin in the SP species selection menu. Be warned though: The SP menu can only fit up to 9 colors at once. But of course, this alone isn't enough. Like I said, the header is a shader path. We need an actual shader to match. We have two options here: The space-saver method, and the super-fancy-schmancy method. The super fancy method is a shader complete with an image, while the space saver method is just a shader, using textures included in the game already. Space-Saver method: models/players/shadowtrooper/uired { { map $whiteimage rgbGen const ( 1.000000 0.000000 0.000000 ) } }Done! That was easy, wasn't it? Nice and simple, and no texture to pack up with the rest of the mod. Since the fancy method involves its own image, your shader complexity depends on how complex the image is. If it's a simple, flat, still image, then you'll have a simple and short shader. If you've got something complex lined up that involves a more animated piece, you're going to have a slightly more complex shader. Whatever you do, remember it's going to be squeezed into a 32x32 pixel area.
-
Still not listed as author for my own stuff. Sadface.
-
Crazy Assassin joined the community
-
Version v2
227 downloads
Author Crazy Assassin This is basically a recolored reborn with some shine and a special electric shader. Nothing much, but hey, at least I did something. FEATURES: green patches on armor for default new team skins, same pattern as default JKO shadowtrooper sounds Single Player support shiny, electrified armor new orange, purple, teal, and yellow armor entire skin in seperate model, with the OPTION to make it an overwrite via another pk3 -

482 downloads
Author Crazy Assassin This mod's purpose is to make the saber lengths for staffs in JKA more realistic. Anyone who has done saber modding should know that the default length for a staff blade is 32, while single sabers get a whopping 40. This mod will simply make all base staffs have a saber length of 40 as well. That's really all it does. Simple, but it does what's advertised. -
Version Beta 1
129 downloads
Author Crazy Assassin This is a Capture the Flag map, featuring two forts, one bridge between them, and a bottemless pit under the bridge. There are two secret passages in each fortress. -

86 downloads
Author Crazy Assassin This mod replaced the three loading screens with space-themed ones. Each one is slightly different. -
Version v3
251 downloads
Author Crazy Assassin This is my personal skin, with some extras, obviously. It is an armored jedi with electricity running through his armor. Model names are: These NPCs use special sabers designed JUST for them, and are supposed to be harder than any baseJKA NPC.