
General Concepts 101: Lesson 6
Basic Lighting
Now that you understand entities, we will go into detail about a specific type of entity that is vital to a good map - a light entity.
Lighting is the second core concept to map making. In fact, the style that you light your maps with defines your mapmaking style. Some people like occasional, sparse lighting (making very dark atmospheres) while some people prefer light-hearted maps with ample lighting. The key to establishing your lighting style will be by learning three concepts: radial light entities, spotlight light entities, and light-emitting shaders. Light-emitting shaders will come later. For now, we will concentrate on light entities.
First of all you have the standard radial light. This is the light that you already have in your map! Easy, huh? Select your light entity and look at its properties (reminder: Shift-Click the light entity and press the N Key).
This is where you can modify your light! First of all, add the key light and the value 600. You will notice that the circular lines surrounding your light got much bigger! The center dotted line that you see is the range of the full intensity of the light. The light will then fall off in intensity up to the outer line. To increase the full intensity of the light, add the key scale and the value 2. You will notice that the dotted circle in the center increases in size! You can also use fractional values (0.1, 0.5, etc) for less intense lights.
Now click on Radiant and press the N key again to close the Entity window.
With a light entity selected, press the K Key to bring up a light entity's color properties. Select any color you like and press OK. Now open up the light's Entity window again. Notice that a new key (_color) has appeared in the list. The three numbers are the color you selected in "normalized RGB form." If you are already familiar with RGB, you'll know that any color can be made by combining red, blue, and green values. On a computer, these values are on a 255 point scale. In the JK2 engine, these numbers are "normalized" to 1. This means that the values from 0-255 are converted to a scale of 1 by dividing them by 255.
For example, if you wanted a cool light blue color with traditional RGB values of (0, 102, 255) you would divide each of these numbers by 255 to come up with the normalized color (0/255 = 0.0, 102/255 = 0.4, 255/255 = 1.0). Thus you would set _color to 0.0 0.4 1.0. You can come up with any displayable color for your light in this manner... although it is much easier just to press the K Key.
Now, delete your light! I know it's hard after all that work, but this level would be much better off with spotlights!
To create a spotlight:
1) Add an info_null entity for the light to point at.
2) Add a new Light entity to be your spotlight's source
3) Deselect (ESC) everything
4) Shift-Click the Light and then Shift-Click the info_null entity
5) Press Ctrl-K to target the Light at the info_null
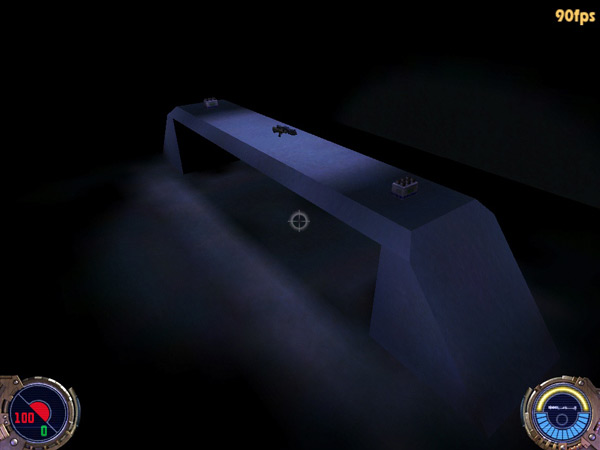
I know it sounds complicated, but trust me, after you make a few, it will seem like second nature. To show you the kind of cool effects you can make, I added five spotlights in the following pattern - four pointed at the base of the walkway, and one pointed straight down. Follow the above 4-step pattern for each to produce the following:
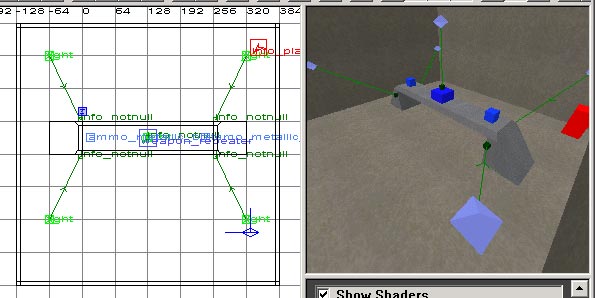
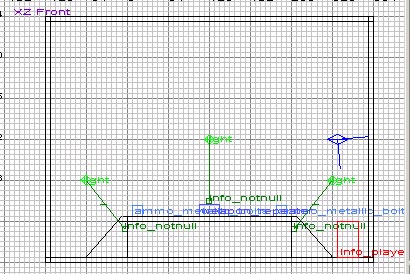
Also, all lights were colored with the key _color and value "0.549020 0.607843 1.000000"
Now compile! You should end up with something like...
You can also add the key radius to your spotlight. The value of this key determines how many base grid units the spotlight will light in all directions. By default, the light will have a radius of 64 units - meaning a 128 unit wide circle of light will appear around the info_null.
Now, doesn't that look so much better than before? Find your niche - bright light, soft light, or low light - and design your maps accordingly. I promise it's worth the effort.