
General Concepts 101: Lesson 3
Getting Around JK2 Radiant
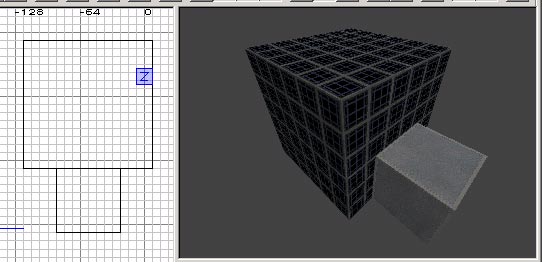
Fire Radiant up! You should see something like this...
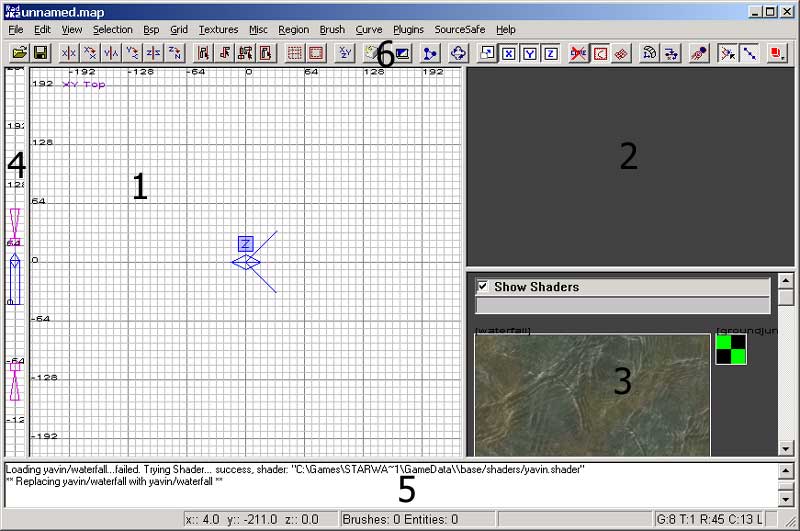
Trust me, it's not as confusing as it looks. We'll go at it in pieces. Before we start, as a side note, if a little window pops up that says "Entity" just make sure Radiant is selected (the colored bar is at the top of Radiant itself - not the Entity window) and press "n". That'll fix it. (:
Section 1 - 2D View:
The key to understanding this grid is the ability to think in three
dimensions that you can't see. At any one time, this panel shows ONE
plane - either straight down (viewing the X and Y axes), from the front
(viewing the X and Z axes), or from the side (viewing the Y and Z axes).
You can switch between these by pressing the Change Views Button
![]() . Generally speaking,
when you're building your level, you will want to build in the XY Top
view and then adjust things for the other views later.
. Generally speaking,
when you're building your level, you will want to build in the XY Top
view and then adjust things for the other views later.
Let's experiment! Left-click drag a box while viewing the XY Top view. You now have drawn what's called a brush. A brush is basically a block that you can put textures on the side of. This is the main building unit of a JK2 map. You should have something like this:
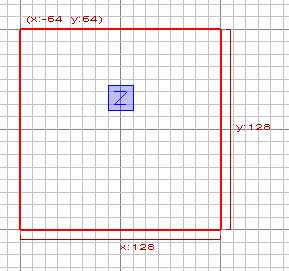
Ah, but what are those numbers? Those numbers are called base grid units. To display the size of any selected brush, press and hold the q key.
I hear you ask, "But I don't see 128 little lines there!" This because Radiant does not always display ever grid unit. Instead, it will only draw a line every few grid units, based on your grid setting which determines visible grid units. You can see your current grid setting at the bottom right hand corner of Radiant, as G: #. The # is your grid setting. To change the grid setting, press any number between 1 and 7. The grid setting (and that number next to the G:) will change based on the powers of 2 (1 = 1 grid unit, 2 = 2 grid units, 3 = 4 grid units, 4 = 8 grid units, etc.) You should also notice lines appear and disappear in the 2D View.
So what difference does this make? Press 4 and try to left-click-drag the brush around the screen. You'll notice it snaps to each grid unit that you can see. Now press 7 and try the same thing. Notice that the brush snaps to the grid units as shown by the grid you have currently selected.
Now press 1. You may notice the grid lines disappear! Where did they go?? Well the fact of the matter is, they are too small for your computer to draw them without overlapping each other. That means you need to zoom in! To zoom in in the 2D View, press the Delete key. To zoom out, press the Insert key.
Press the Change Views Button
![]() and try resizing your brush
in the XZ Front view. Keep moving the brush around and resizing
it until you're comfortable with how these two features work.
and try resizing your brush
in the XZ Front view. Keep moving the brush around and resizing
it until you're comfortable with how these two features work.
Now press the Escape (ESC) key. Suddenly, the brush has turned black! What happened?? Well, the Escape (ESC) key deselects all currently selected brushes. All currently selected brushes are red, while deselected brushes are black. So what do you do to highlight it again? Press and hold shift while clicking a brush to select it. You can use this technique to select multiple brushes at the same time. Lo and behold, you know how to move brushes around! You can move your viewpoint on the 2D grid by Right-Click Dragging the grid. Use this to center the 2D view on your brush.
To move a brush, Left-Click Drag with the cursor inside the selected brush. To resize a brush, Left-Click Drag with the cursor outside the dimension of the selected brush that you want to change. Using all three Views, resize your brush to 128x128x128.
Section 2 - 3D View:
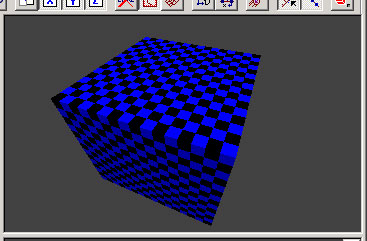
Alright, so admittedly, a box on a grid isn't all too exciting.
This is where the 3D View comes in. You probably noticed the
big random blue thing in the 2D View. Well, that big blue thing
is actually the camera, which refers to the point of view that the
3D View displays from. Confusing? You bet!
Camera controls are one of the most important concepts in Radiant, so keep going over this section (and moving the camera around) until you understand it. Press the left and right arrow keys to turn around in the 3D View. If you don't see the brush you created earlier (should be a big checkerboard block), press the A key to tilt the camera up and press the Z key to tilt the camera down. Now that you see your brush, you have a point of reference! If you press A and Z so much that you're not sure which way is up, press the END key to level the camera. Press the up and down arrow keys to move on the X and Y axis around your map in relation to the camera. Then press the C key to move the camera DOWN the Z axis or press the D key to move UP the Z axis. If you need to move sideways, press the , and . keys to "strafe" left and right in relation to the camera's viewpoint.
I know it's confusing, but this is extremely important. Experiment with the camera controls until you can move the camera in a complete lateral circle around your brush (Camera strafe left or right while using the arrow keys to keep your view centered) and then a complete vertical circle around your brush (Camera up or down while using the arrow keys to keep your view centered).
To recap:
-
Left Arrow Key - Rotate the Camera View Left on the Z-axis
-
Right Arrow Key - Rotate the Camera View Right on the Z-axis
-
Up Arrow Key - Move the Camera Itself Forward in the 3D View
-
Down Arrow Key - Move the Camera Itself Backwards in the 3D View
-
D Key - Move the Camera Itself up on the Z-axis
-
C Key - Move the Camera Itself down on the Z-axis
-
A Key - Move the Camera View up in the 3D View
-
Z Key - Move the Camera View down in the 3D View
-
END Key - Center the Camera View to be level with the XY Plane
If you are having trouble figuring out which axis is which, go retake high school geometry. (:
Please note that you can select your brush in the 3D View the same way as in the 2D View. Just shift-click your brush to select it. If there are multiple brushes on top of each other, press and hold Shift+Alt and then keep clicking until the brush you want is selected. Shift-Click will only select the brush closest to you in the 3D or 2D Views.
Play around with the 3D View and Camera Controls for as long as you need. Camera controls are what allow you to see what you level tentatively looks like, so they are extremely important! Spend time spinning the camera around your brush until you feel comfortable with it.
As a final note, if the 3D View ever stops responding to Camera Controls (for example, if you switch back and forth between applications), just Left Click on the 3D View itself so that it accepts your commands.
Section 3 - Texture Browser:
The texture browser is your friend. This is where all the textures
in a given texture set will be listed for you to apply to your brushes.
At the top of the screen open up the Textures Menu.
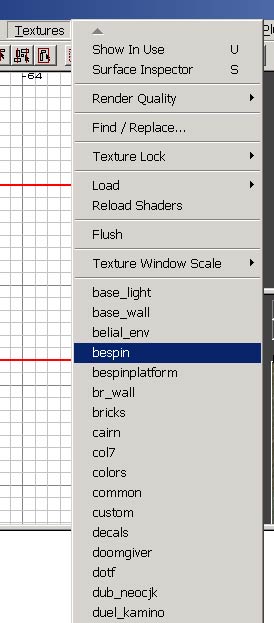
As you can see here, I have many texture sets that aren't included with Jedi Knight II. This is because Radiant will read the textures/ directory from any .pk3 you have in your GameData/base/ folder. If you download a map, its textures will appear here.
Click on Bespin to load the Bespin texture set. These are all of the textures that Raven used in the SP (Single Player) Bespin levels and the MP (Multi Player) level ffa_bespin. You are free to reference any texture that was included with the game in your own levels. If you decide you want to use textures from a custom level, make sure you e-mail the level's authors and ask permission first.
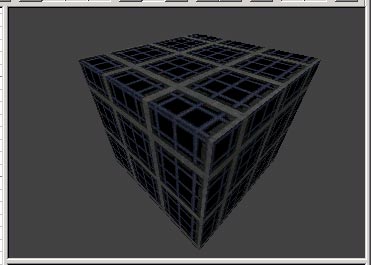
After the texture set loads (you will see it loading in the Status Bar (Section 5) at the bottom of the screen), you will notice that a WHOLE lot of textures have appeared in your Texture Browser. Since they all appear so big, go back up into the Texture Menu and select Texture Window Scale. This is where you set the visual size of the textures as they appear in the Texture Browser. I personally set this to 25% except when viewing extremely small textures. Select the brush you've been looking at and then click the "u_grate" texture (it's toward the end) from your texture window. Ta-da! Your box now looks like more of a box. (:
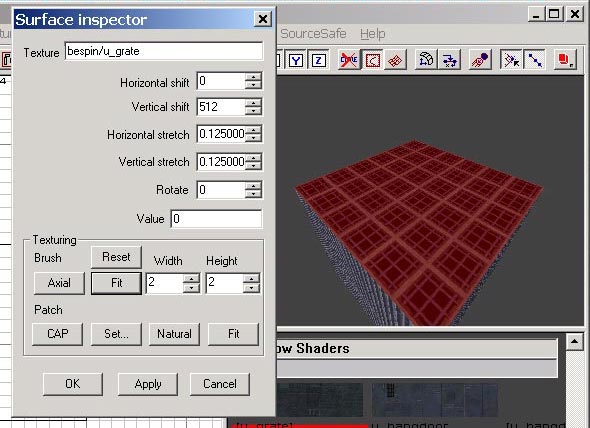
But what about those repeating textures? What if we want one texture stretched across the entire face of the brush? Well easy! Press and hold Control and Shift - then click to select one face of a brush. With one face of a brush selected, you now have access to what's called the Surface Inspector. Press the S key to bring up the Surface Inspector. Under "Texturing" click "Fit" to stretch the texture to fit the surface of the brush. Oh no! We want double that many textures! Well have no fear, just increase the Width field to 2, the Height field to 2, and then click Fit again. Voila!
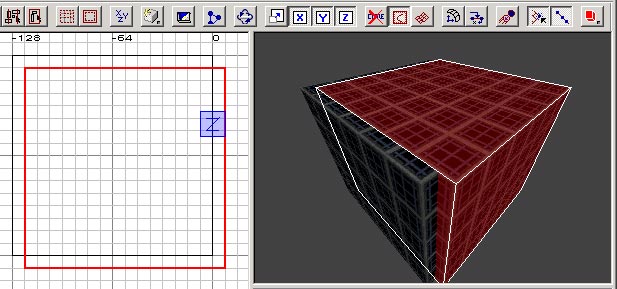
Press OK to save the changes to that face of the brush. But oh no (again)! The other faces of the brush aren't textured correctly! Also easy to remedy... remember how I told you to get good at Camera Controls? This is where it comes in handy. Select one of the incorrectly textured side faces of your brush. Press and hold Control and Shift while Center Clicking (3rd Mouse Button) the texture pattern you want to match. Radiant will copy the texture pattern information from the top face (the texture you edited by hand with the Surface Inspector) and paste it on the new surface. Rotate the camera around your box while repeating this process for the remaining faces of the brush until it is uniform on every side.
See why it's handy to have a firm understanding of Camera Controls?
If you don't have a 3-button Mouse (or if textures aren't being matched properly when you try it this way - it happens sometimes), then you can select each face of a textured brush and press Shift-F to stretch the texture to fit the brush face based on the value set in the Surface Inspector. Note that because of that, if the last texture you fit was 2x2, if you press Shift-F, that will fit your new texture 2x2 as well.
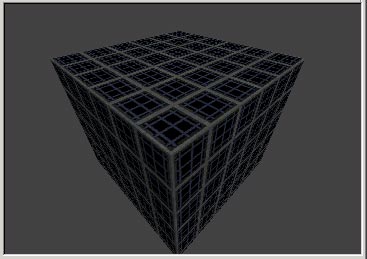
You should now have something like this:
Section 4 - Z-Axis View
This handy little side bar gives you fine control over an object's Z-axis position. It isn't entirely necessary to use the Z-Axis View, but it will allow you to set objects where you want them much faster once you understand it. With your brush selected, you should see a red outline in the Z-Axis View. First off, Right-Click Drag to move around the Z-Axis View. Left-Click Drag to move an object on its Z-Axis in the Z-Axis View. Try it now - move your brush up and down a few grid units while watching it move in the 3D View. If your brush is too big or too small, press and holt Control while pressing the Insert or Delete key to zoom in and out of the Z-Axis View. Not too complicated, right? (:
Section 5 - The Status Bar
The Status Bar is where you will get all sorts of messages, from the list of Textures loading to errors at compile time. Look at any message the Status Bar gives you, as most of them are important!
Section 6 - The Tool Bar
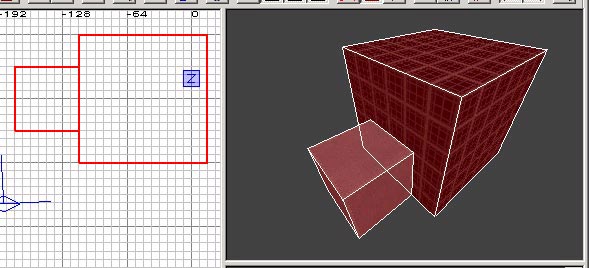
This is your toolset. Most of these things will be covered in later tutorials, but we will go ahead and look at the Flip/Rotation Tools. First of all, you need to duplicate your current box. Do this in the XY Top View with a grid setting of 8 units (press the 4 key). Press the Space Bar to make an exact duplicate of all currently selected brushes/patches exactly 1 visible grid unit down and to the right of your original brushes. You should have something like this:
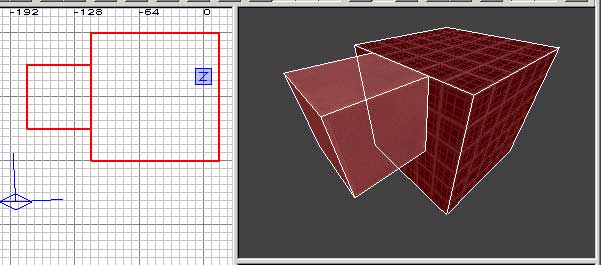
Now it's time to do something on your own! Resize your brush to make it look like a smaller box to the side of the original box. Also, texture the entire brush with "floor2." In other words, make it look like this:
Fit the floor2 texture across each face of the cube 1x1 that it looks like the picture above. If you have problems using the Mouse3-Click technique for matching faces, remember you can press Shift-F as a shortcut. Make sure you set texture fitting to 1x1 in the Surface Inspector ("s") first though!
Now select both brushes by Shift-Clicking
each. Press the Z-Rotate Button
![]() .
.
Congrats! You just rotating both brushes 90 degrees
on the Z-Axis. Now press the Z-Flip Button
![]() .
.
Congrats again! You just FLIPPED the selected brush so that their far points on the Z-Axis reversed.
Z-Rotate will be the most common tool you use to rotate brushes. Experiment with all the Flip/Rotation Tools now until you have a good grasp of what they do.
Now that we're done with these brushes, you need to get rid of them. Select a brush and press the BACKSPACE Key to delete it.
Now go BACK over this entire lesson until you completely understand every concept explained here. These are the single most important concepts to learn in Radiant. You should now know how to and easily be able to:
-
Move Around the 2D View
-
Move the Camera Around the 3D View
-
Draw, Delete, Resize, Rotate, and Flip a Brush
-
Set and Fit Textures on the Faces of a Brush
PHEW! That was a long lesson, now wasn't it? Don't worry, this is the longest and most complicated of the lessons, and now you're done with it! With a firm grasp of these four base concepts, the rest of Radiant will come much more easily.